- Table of Contents
-
- H3C MSR1000[2600][3600] Routers Configuration Examples All-in-One-R9141-6W100
- 00-Preface
- 01-Local 802.1X Authentication Configuration Examples
- 02-RADIUS-Based 802.1X Authentication Configuration Examples
- 03-AAA Configuration Examples
- 04-ACL Configuration Examples
- 05-MPLS over ADVPN Configuration Examples
- 06-ARP Attack Protection Configuration Examples
- 07-BFD Configuration Examples
- 08-Basic BGP Configuration Examples
- 09-BGP Route Attribute-Based Route Selection Configuration Examples
- 10-EAA Monitor Policy Configuration Examples
- 11-GRE with OSPF Configuration Examples
- 12-HoVPN Configuration Examples
- 13-IGMP Snooping Configuration Examples
- 14-IGMP Configuration Examples
- 15-IPsec Configuration Examples
- 16-IPsec Digital Certificate Authentication Configuration Examples
- 17-IPv6 IS-IS Configuration Examples
- 18-IPv6 over IPv4 GRE Tunnel Configuration Examples
- 19-IPv6 over IPv4 Manual Tunnel with OSPFv3 Configuration Examples
- 20-IS-IS Configuration Examples
- 21-Combined ISATAP Tunnel and 6to4 Tunnel Configuration Examples
- 22-L2TP over IPsec Configuration Examples
- 23-Multi-Instance L2TP Configuration Examples
- 24-L2TP Multidomain Access Configuration Examples
- 25-MPLS L3VPN Configuration Examples
- 26-MPLS OAM Configuration Examples
- 27-MPLS TE Configuration Examples
- 28-Basic MPLS Configuration Examples
- 29-NAT DNS Mapping Configuration Examples
- 30-NetStream Configuration Examples
- 31-NQA Configuration Examples
- 32-NTP Configuration Examples
- 33-OSPFv3 Configuration Examples
- 34-OSPF Configuration Examples
- 35-OSPF Multi-Process Configuration Examples
- 36-OSPF Multi-Instance Configuration Examples
- 37-Portal Configuration Examples
- 38-PPP Configuration Examples
- 39-RBAC Configuration Examples
- 40-RMON Configuration Examples
- 41-IPv4 NetStream Sampling Configuration Examples
- 42-SNMP Configuration Examples
- 43-SRv6 Configuration Examples
- 44-SSH Configuration Examples
- 45-Tcl Commands Configuration Examples
- 46-VLAN Configuration Examples
- 47-VRRP Configuration Examples
- 48-VXLAN over IPsec Configuration Examples
- 49-WLAN AC Configuration Examples
- 50-Small and Medium-Sized Store Configuration Examples
- 51-Cloudnet VPN Configuration Examples
- 52-Ethernet Link Aggregation Configuration Examples
- 53-Ethernet OAM Configuration Examples
- 54-Outbound Bidirectional NAT Configuration Examples
- 55-NAT Hairpin in C-S Mode Configuration Examples
- 56-Load Sharing NAT Server Configuration Examples
- 57-BIDIR-PIM Configuration Examples
- 58-Control Plane-Based QoS Policy Configuration Examples
- 59-Scheduling a Task Configuration Examples
- 60-Client-Initiated L2TP Tunnel Configuration Examples
- 61-LAC-Auto-Initiated L2TP Tunnel Configuration Examples
- 62-Authorized ARP Configuration Examples
- 63-GTS Configuration Examples
- 64-Traffic Policing Configuration Examples
- 65-Traffic Accounting Configuration Examples
- 66-Mobile Communication Modem Management Configuration Examples
- 67-Port Isolation Configuration Examples
- 68-PBR Configuration Examples
- 69-TFTP Client Software Upgrade Configuration Examples
- 70-FTP Client Software Upgrade Configuration Examples
- 71-FTP Server Software Upgrade Configuration Examples
- 72-Routing Policy Configuration Examples
- 73-Software Upgrade from the BootWare Menu Configuration Examples
- 74-Mirroring Configuration Examples
- Related Documents
-
| Title | Size | Download |
|---|---|---|
| 44-SSH Configuration Examples | 697.30 KB |
|
|
|
H3C Routers |
|
SSH Configuration Examples |
|
|
|
|
Copyright © 2024 New H3C Technologies Co., Ltd. All rights reserved.
No part of this manual may be reproduced or transmitted in any form or by any means without prior written consent of New H3C Technologies Co., Ltd.
Except for the trademarks of New H3C Technologies Co., Ltd., any trademarks that may be mentioned in this document are the property of their respective owners.
The information in this document is subject to change without notice.
Contents
Example: Configuring the device as an Stelnet server using password authentication
Example: Configuring the device as an Stelnet server using publickey authentication
Configuring the host as an Stelnet client
Configuring the device as the FTP server
Uploading the public key file from the FTP client
Configuring the device as the Stelnet server
Example: Configuring the device as an Stelnet client for password authentication
Configuring the Stelnet server
Configuring the Stelnet client
Example: Configuring SFTP with password-publickey authentication
Configuring Device B as the FTP server
Uploading the public key file from the FTP client
Configuring Device B as the SFTP server
Example: Configuring SCP file transfer with remote password authentication
Introduction
The following information provides examples for using SSH to implement secure remote access or file management on MSR router series.
Prerequisites
The following information applies to Comware 9-based MSR router series. Procedures and information in the examples might be slightly different depending on the software or hardware version of the routers.
The configuration examples were created and verified in a lab environment, and all the devices were started with the factory default configuration. When you are working on a live network, make sure you understand the potential impact of every command on your network.
The following information is provided based on the assumption that you have basic knowledge of SSH.
Example: Configuring the device as an Stelnet server using password authentication
Network configuration
As shown in Figure 1, establish an Stelnet connection between the host and the device, so you can remotely log in to the device to manage the campus network. The specific requirements are as follows:
· The device uses local password authentication.
· The login username and password are client001 and 123456TESTplat&!, respectively.

Analysis
To meet the network requirements, you must perform the following tasks:
· To ensure correct SSH version negotiation and algorithm negotiation, and to ensure that the server can pass the client's authentication, generate DSA and RSA key pairs on the server.
· To perform local authentication, create a local user and configure a password for the local user on the Stelnet server.
· Because the Stelnet client accesses the device through VTY user lines, the authentication mode for Stelnet user lines must be AAA (scheme).
· To enable an SSH user to use all commands after login, set the user role of the local user to network-admin. By default, the user role of a local user is network-operator.
Software versions used
This configuration example was created and verified on R9141P16 of the MSR2630E-X1 device.
Procedures
# Generate an RSA key pair.
<Device> system-view
[Device] public-key local create rsa
The range of public key size is (512 ~ 2048).
If the key modulus is greater than 512, it will take a few minutes.
Press CTRL+C to abort.
Input the modulus length [default = 1024]:
Generating Keys...
........................++++++
...................++++++
..++++++++
............++++++++
Create the key pair successfully.
# Generate a DSA key pair.
[Device] public-key local create dsa
The range of public key size is (512 ~ 2048).
If the key modulus is greater than 512, it will take a few minutes.
Press CTRL+C to abort.
Input the modulus length [default = 1024]:
Generating Keys...
.++++++++++++++++++++++++++++++++++++++++++++++++++*
........+......+.....+......................................+
...+.................+..........+...+.
Create the key pair successfully.
# Enable the SSH server function.
[Device] ssh server enable
# Assign an IP address to GigabitEthernet 0/0/1. The Stelnet client uses this IP address to connect to the Stelnet server.
[Device] interface GigabitEthernet 0/0/1
[Device-GigabitEthernet0/0/1] ip address 192.168.1.40 255.255.255.0
[Device-GigabitEthernet0/0/1] quit
# Set the authentication mode to AAA (scheme) for the user lines.
[Device] line vty 0 63
[Device-line-vty0-63] authentication-mode scheme
[Device-line-vty0-63] quit
# Create a local user client001.
[Device] local-user client001 class manage
New local user added.
# Set the password to 123456TESTplat&! in plain text for local user client001.
[Device-luser-manage-client001] password simple 123456TESTplat&!
# Authorize local user client001 to use the SSH service.
[Device-luser-manage-client001] service-type ssh
# Assign user role network-admin to local user client001.
[Device-luser-manage-client001] authorization-attribute user-role network-admin
[Device-luser-manage-client001] quit
Verifying the configuration
There are different types of Stelnet client software, such as PuTTY and OpenSSH. This example uses an Stelnet client that runs Putty version 0.60.
To verify that you can log in to the Stelnet server from the Stelnet client:
Table 1 Launch PuTTY.exe.
Table 2 From the navigation tree, click Session.
The interface shown in Table 3Figure 2 appears.
Table 3 Configure the following parameters:
¡ Enter 192.168.1.40 in the Host Name (or IP address) field.
¡ Enter 22 in the Port field.
¡ Select SSH for Connection type.
Figure 2 SSH client configuration interface

Table 4 Click Open. The PuTTY Security Alert dialog box appears.
Figure 3 PuTTY Security Alert dialog box

Table 5 Click Yes.
Table 6 Enter username client001 and password 123456TESTplat&! to log in to the Stelnet server.
login as: client001
[email protected]'s password:
******************************************************************************
* Copyright (c) 2004-2023 Hangzhou H3C Tech. Co., Ltd. All rights reserved. *
* Without the owner's prior written consent, *
* no decompiling or reverse-engineering shall be allowed. *
******************************************************************************
<Device>
Configuration files
#
interface GigabitEthernet0/0/1
port link-mode route
ip address 192.168.1.40 255.255.255.0
#
line vty 0 63
authentication-mode scheme
#
ssh server enable
#
local-user client001 class manage
password hash $h$6$CqMnWdX6LIW/hz2Z$4+0Pumk+A98VlGVgqN3n/mEi7hJka9fEZpRZIpSNi9bcBEXhpvIqaYTvIVBf7ZUNGnovFsqW7nYxjoToRDvYBg==
service-type ssh
authorization-attribute user-role network-admin
authorization-attribute user-role network-operator
#
Example: Configuring the device as an Stelnet server using publickey authentication
Network configuration
As shown in Figure 4, establish an Stelnet connection between the host and the device, so you can log in to the device to manage the campus network. To enhance the security and authentication strength of the device, configure the network to meet the following requirements:
· The device uses publickey authentication and RSA public key algorithm.
· Set the login username to client001. Configure the user to use all commands after successful login.
· Import the client's host public key to the server to ensure correct format and content of the public key.

Analysis
To meet the network requirements, you must perform the following tasks:
· Because the client's host public key is required in the server configuration, you must generate the key pairs on the client before configuring the SFTP server.
· For successful publickey authentication, perform the following tasks:
a. Configure the client's RSA host public key on the server.
b. Specify the paired RSA host private key for the SSH user on the client. To assign correct working directory and user role to the SSH user, you must create a local user on the Stelnet server. The local user must have the same username as the SSH user.
· Because the Stelnet client accesses the device through VTY user lines, the authentication mode for Stelnet user lines must be AAA (scheme).
· To enable an SSH user to use all commands after login, set the user role of the local user to network-admin. By default, the user role of a local user is network-operator.
Software versions used
This configuration example was created and verified on R9141P16 of the MSR2630E-X1 device.
Restrictions and guidelines
To support Stelnet clients that use different types of key pairs, generate DSA and RSA key pairs on the Stelnet server.
Procedures
Configuring the host as an Stelnet client
There are different types of Stelnet client software, such as PuTTY and OpenSSH. This example uses an Stelnet client that runs Putty version 0.60.
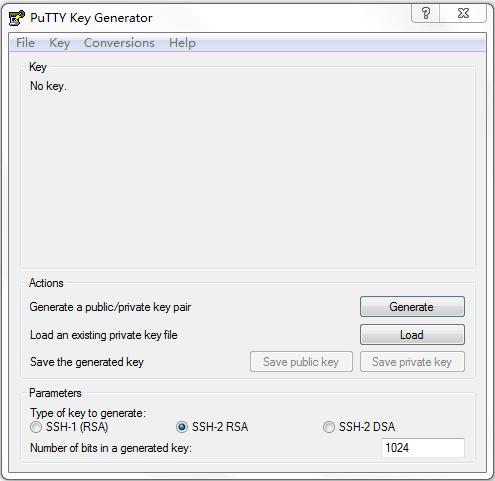
# Run PuTTYGen.exe, select SSH-2 RSA, and then click Generate.
Figure 5 Generating a key pair on the client
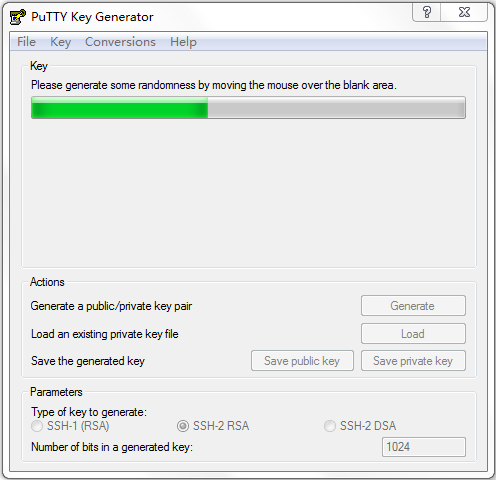
# Continuously move the mouse and do not place the mouse over the green process bar shown in Figure 6. Otherwise, the process bar stops moving and the key pair generating process stops.
# After the key pair is generated, click Save public key.
# On the file saving window that appears, select the saving directory (disk D in this example), enter a file name (key.pub in this example), and then click Save.
Figure 7 Saving a key pair on the client
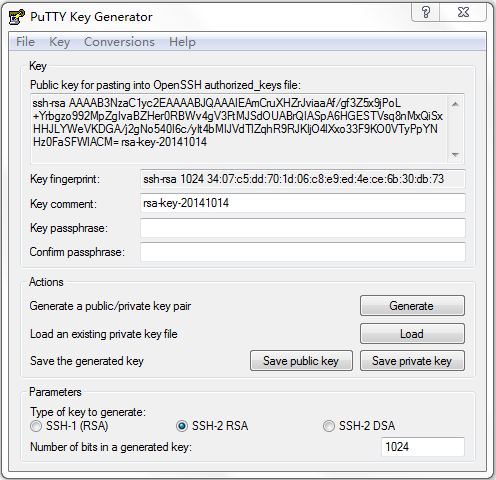
# On the page shown in Figure 7, click Save private key.
# Click Yes on the confirmation dialog box that appears.
# Select the saving directory (disk D in this example), enter a file name (private.ppk in this example), and then click Save.
Configuring the device as the FTP server
# Assign an IP address to interface GigabitEthernet 0/0/1.
<Device> system-view
[Device] interface GigabitEthernet 0/0/1
[Device-GigabitEthernet0/0/1] ip address 192.168.1.40 255.255.255.0
[Device-GigabitEthernet0/0/1] quit
# Create a local user ftp.
[Device] local-user ftp class manage
New local user added.
# Set the password to 123456TESTplat&! in plain text for local user ftp.
[Device-luser-manage-ftp] password simple 123456TESTplat&!
# Assign user role network-admin to local user ftp.
[Device-luser-manage-ftp] authorization-attribute user-role network-admin
# Assign working directory flash:/ to local user ftp.
[Device-luser-manage-ftp] authorization-attribute work-directory flash:/
# Authorize local user ftp to use the FTP service.
[Device-luser-manage-ftp] service-type ftp
[Device-luser-manage-ftp] quit
# Enable the FTP server function.
[Device] ftp server enable
[Device] quit
Uploading the public key file from the FTP client
# Log in to the FTP server from the host and upload the public key file key.pub to the server.
<DeviceA>ftp 192.168.1.40
Press CTRL+C to abort.
Connected to 192.168.1.40 (192.168.1.40).
220 FTP service ready.
User (192.168.1.56:(none)): ftp
331 Password required for ftp.
Password:
230 User logged in.
Remote system type is UNIX.
Using binary mode to transfer files.
ftp> put flash:/key.pub
227 Entering Passive Mode (192,168,1,40,41,116)
150 Accepted data connection
226 File successfully transferred
301 bytes sent in 0.000 seconds (1.05 Mbytes/s)
ftp> quit
221-Goodbye. You uploaded 1 and downloaded 0 kbytes.
221 Logout.
Configuring the device as the Stelnet server
# Generate an RSA key pair.
[Device] public-key local create rsa
The range of public key size is (512 ~ 2048).
If the key modulus is greater than 512, it will take a few minutes.
Press CTRL+C to abort.
Input the modulus length [default = 1024]:
Generating Keys...
........................++++++
...................++++++
..++++++++
............++++++++
Create the key pair successfully.
# Generate a DSA key pair.
[Device] public-key local create dsa
The range of public key size is (512 ~ 2048).
If the key modulus is greater than 512, it will take a few minutes.
Press CTRL+C to abort.
Input the modulus length [default = 1024]:
Generating Keys...
.++++++++++++++++++++++++++++++++++++++++++++++++++*
........+......+.....+......................................+
...+.................+..........+...+
Create the key pair successfully.
# Enable the SSH server function.
[Device] ssh server enable
# Set the authentication mode to AAA (scheme) for the user lines.
[Device] line vty 0 63
[Device-line-vty0-63] authentication-mode scheme
[Device-line-vty0-63] quit
# Import the client's public key from file key.pub, and name the public key devicekey.
[Device] public-key peer devicekey import sshkey key.pub
# Create an SSH user client001. Specify the authentication type as publickey for the user, and assign public key devicekey to the user.
[Device] ssh user client001 service-type stelnet authentication-type publickey assign publickey devicekey
# Create a local user named client001.
[Device] local-user client001 class manage
New local user added.
# Authorize local user client001 to use the SSH service.
[Device-luser-manage-client001] service-type ssh
# Assign user role network-admin to local user client001.
[Device-luser-manage-client001] authorization-attribute user-role network-admin
[Device-luser-manage-client001] quit
Verifying the configuration
To verify that you can log in to the Stelnet server from the Stelnet client:
Table 1 Launch PuTTY.exe.
Table 2 From the navigation tree, click Session.
The interface shown in Table 3Figure 8 appears.
Table 3 Configure the following parameters:
¡ Enter 192.168.1.40 in the Host Name (or IP address) field.
¡ Enter 22 in the Port field.
¡ Select SSH for Connection type.
Figure 8 Specifying basic connection parameters
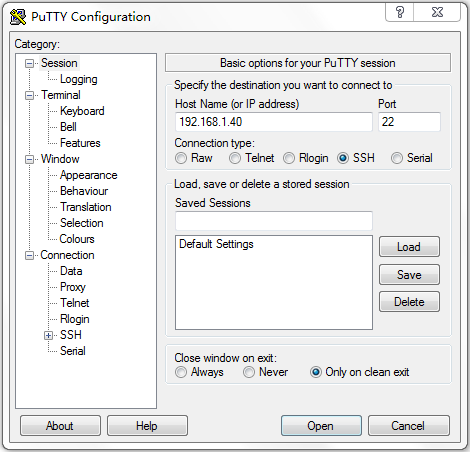
Table 4 From the navigation tree, select Connection > SSH.
The window shown in Table 4Figure 9 appears. In the Protocol options area, specify the preferred SSH version as 2.
Figure 9 Specifying the SSH version
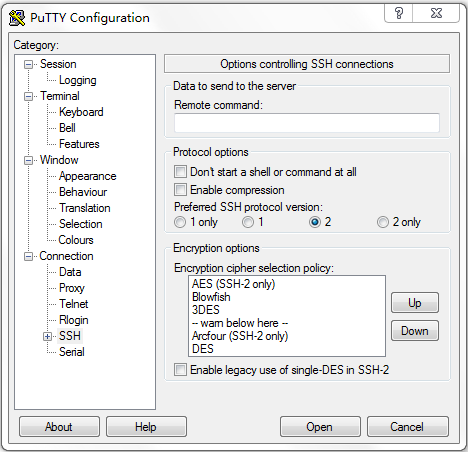
Table 5 From the navigation tree, select Connection > SSH > Auth.
The window shown in Table 6Figure 10 appears.
Table 6 Click Browse….
A file selection window appears. Select private key file private.ppk, and then click OK.
Figure 10 Specifying the private key file
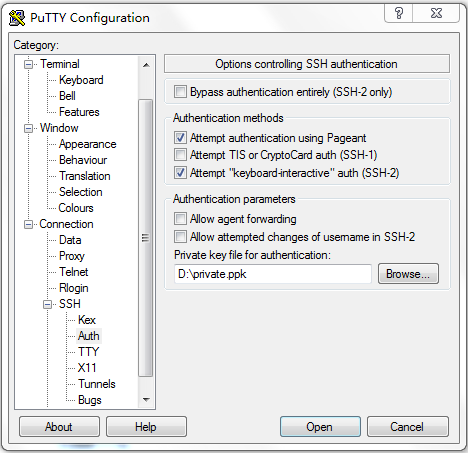
Table 7 Click Open. The PuTTY Security Alert dialog box appears.
Figure 11 PuTTY Security Alert dialog box
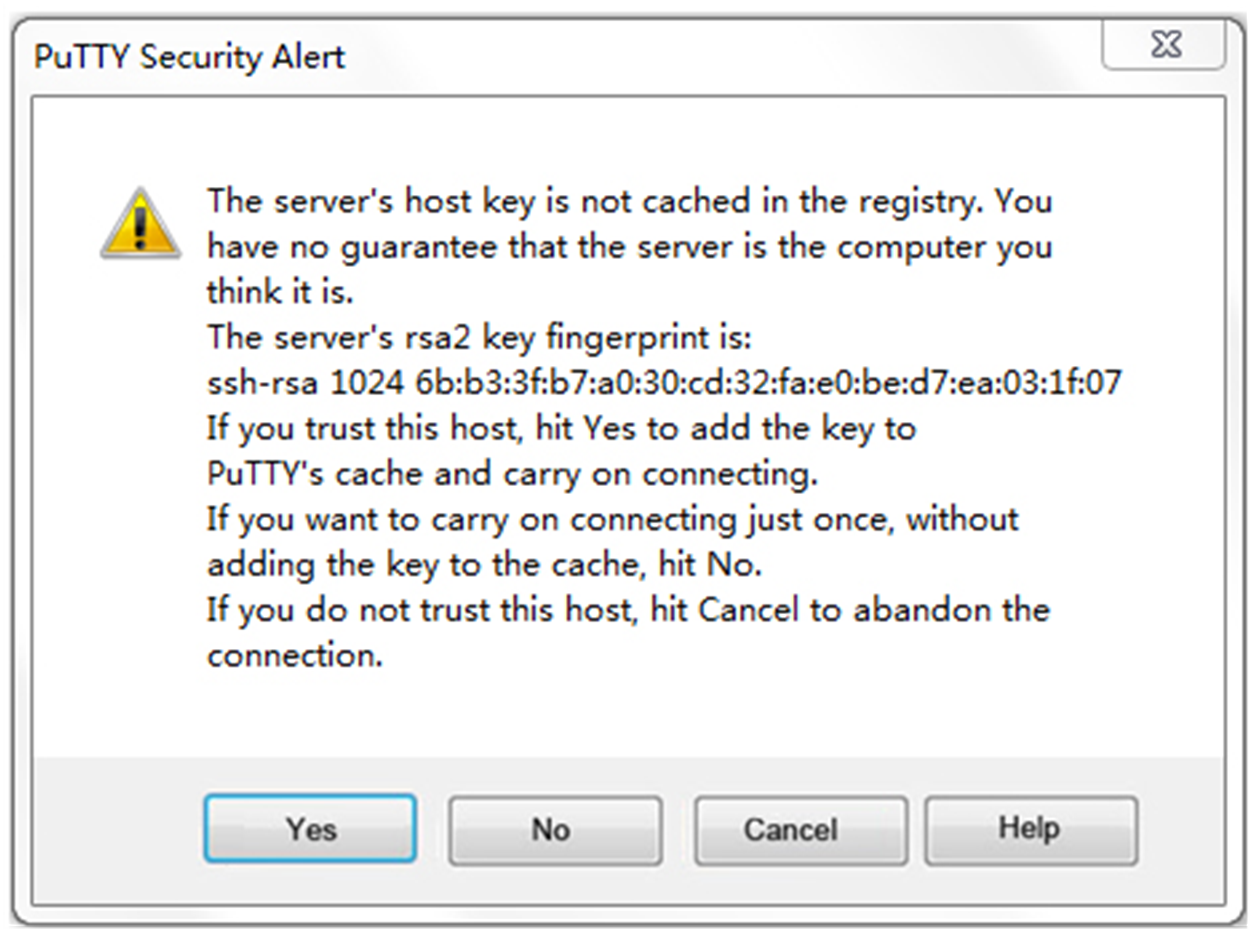
Table 8 Click Yes.
Table 9 Enter username client001 to log in to the Stelnet server.
login as: client001
Authenticating with public key ”rsa-key-20140726”
******************************************************************************
* Copyright (c) 2004-2023 Hangzhou H3C Tech. Co., Ltd. All rights reserved. *
* Without the owner's prior written consent, *
* no decompiling or reverse-engineering shall be allowed. *
******************************************************************************
<Device>
Configuration files
#
interface GigabitEthernet0/0/1
port link-mode route
ip address 192.168.1.40 255.255.255.0
#
line vty 0 63
authentication-mode scheme
#
ssh server enable
ssh user client001 service-type stelnet authentication-type publickey assign publickey devicekey
#
local-user client001 class manage
service-type ssh
authorization-attribute user-role network-operator
authorization-attribute user-role network-admin
#
public-key peer Devicekey
public-key-code begin
30819D300D06092A864886F70D010101050003818B0030818702818100A2DBC1FD76A837BEF5D322598442D6753B2E8F7ADD6D6209C80843B206B309078AFE2416CB4FAD496A6627243EAD766D57AEA70B901B4B4566D9A651B133BAE34E9B9F04E542D64D0E9814D7E3CBCDBCAF28FF21EE4EADAE6DF52001944A40414DFF280FF043B14838288BE7F9438DC71ABBC2C28BF78F34ADF3D1C912579A19020125
public-key-code end
peer-public-key end
#
local-user ftp class manage
password hash $h$6$YJP7kt/UyktDpfZ4$1OXECE52tKrwMA5qwOXr1wNwAqXOR1C8D9hHnvG9cEFLPx4+a1PebBJBs8pnVl0PPEvBrHaQD9Ff0GaaYU5kdQ==
authorization-attribute work-directory flash:/
authorization-attribute user-role network-admin
authorization-attribute user-role network-operator
service-type ftp
#
ftp server enable
#
Example: Configuring the device as an Stelnet client for password authentication
Network configuration
As shown in Figure 12, establish an Stelnet connection between Device A and Device B, so you can log in to Device B. The specific requirements are as follows:
· Device B uses local password authentication.
· The login username and password are client001 and 123456TESTplat&!, respectively. Configure the user to use all commands after successful login.
· To ensure communication security, configure Device A to use the host public key of Device B to authenticate Device B.


Analysis
To meet the network requirements, you must perform the following tasks:
· To ensure correct SSH version negotiation and algorithm negotiation, and to ensure that the server can pass the client's authentication, generate DSA and RSA key pairs on the server.
· Because the Stelnet client accesses the device through VTY user lines, the authentication mode for Stelnet user lines must be AAA (scheme).
· To perform local authentication, create a local user and configure a password for the local user on the Stelnet server.
· To enable an SSH user to use all commands after login, set the user role of the local user to network-admin. By default, the user role of a local user is network-operator.
· Because the Stelnet client uses the host public key of the server to authenticate the server, you must configure the host public key of the server on the client.
Software versions used
This configuration example was created and verified on R9141P16 of the MSR2630E-X1 device.
Procedures
Configuring the Stelnet server
# Generate an RSA key pair.
<DeviceB> system-view
[DeviceB] public-key local create rsa
The range of public key size is (512 ~ 2048).
If the key modulus is greater than 512, it will take a few minutes.
Press CTRL+C to abort.
Input the modulus length [default = 1024]:
Generating Keys...
........................++++++
...................++++++
..++++++++
............++++++++
Create the key pair successfully.
# Generate a DSA key pair.
[DeviceB] public-key local create dsa
The range of public key size is (512 ~ 2048).
If the key modulus is greater than 512, it will take a few minutes.
Press CTRL+C to abort.
Input the modulus length [default = 1024]:
Generating Keys...
.++++++++++++++++++++++++++++++++++++++++++++++++++*
........+......+.....+......................................+
...+.................+..........+...+
Create the key pair successfully.
# Enable the SSH server function.
[DeviceB] ssh server enable
# Assign an IP address to GigabitEthernet 0/0/1. The Stelnet client uses this IP address to connect to the Stelnet server.
[DeviceB] interface GigabitEthernet 0/0/1
[DeviceB-GigabitEthernet0/0/1] ip address 192.168.1.40 255.255.255.0
[DeviceB-GigabitEthernet0/0/1] quit
# Set the authentication mode to AAA (scheme) for the user lines.
[DeviceB] line vty 0 63
[DeviceB-line-vty0-63] authentication-mode scheme
[DeviceB-line-vty0-63] quit
# Create a local user client001.
[DeviceB]local-user client001 class manage
New local user added.
# Set the password to 123456TESTplat&! in plain text for local user client001.
[DeviceB-luser-manage-client001] password simple 123456TESTplat&!
# Authorize local user client001 to use the SSH service.
[DeviceB-luser-manage-client001]service-type ssh
# Assign user role network-admin to local user client001.
[DeviceB-luser-manage-client001] authorization-attribute user-role network-admin
[DeviceB-luser-manage-client001]quit
# Display the DSA key pair of the server.
[DeviceB] display public-key local dsa public
=====================================================
Key name: dsakey(default)
Key type: DSA
Key length: 1024
Time when key pair created: 11:02:10 2014/08/07
Key code:
308201B73082012C06072A8648CE3804013082011F02818100D757262C4584C44C211F18BD
96E5F061C4F0A423F7FE6B6B85B34CEF72CE14A0D3A5222FE08CECE65BE6C265854889DC1E
DBD13EC8B274DA9F75BA26CCB987723602787E922BA84421F22C3C89CB9B06FD60FE01941D
DD77FE6B12893DA76EEBC1D128D97F0678D7722B5341C8506F358214B16A2FAC4B36895038
7811C7DA33021500C773218C737EC8EE993B4F2DED30F48EDACE915F0281810082269009E1
4EC474BAF2932E69D3B1F18517AD9594184CCDFCEAE96EC4D5EF93133E84B47093C52B20CD
35D02492B3959EC6499625BC4FA5082E22C5B374E16DD00132CE71B020217091AC717B6123
91C76C1FB2E88317C1BD8171D41ECB83E210C03CC9B32E810561C21621C73D6DAAC028F4B1
585DA7F42519718CC9B09EEF03818400028180077F06B3E343CAE9988F4BE3F76FACBAB565
AB73D4BA295C52BA92428B1F2DA1E6DD652413DD3AFE0C5A4FCF365100CBE34CECA55A2C30
A2A9FF7E899628557E39CE8FC615F53193A7E200B4B1CB21E3F1091D595716D229DDED6872
061F9B4B08301ADC81F7EC1501FFB863C0009536596CCB508596C3325892DC6D8C5C35B5
Configuring the Stelnet client
# Assign an IP address to GigabitEthernet 0/0/1. The Stelnet client uses this IP address to connect to the Stelnet server.
[DeviceA] interface GigabitEthernet 0/0/1
[DeviceA-GigabitEthernet0/0/1] ip address 192.168.1.56 255.255.255.0
[DeviceA-GigabitEthernet0/0/1] quit
# Specify the name of the server's host public key as key1 and enter public key view.
[DeviceA] public-key peer key1
Enter public key view. Return to system view with "peer-public-key end" command.
# Configure the host public key of the Stelnet server by entering the public key displayed by the display public-key local dsa public command. By default, the client authenticates the server by using the DSA host public key of the server.
[DeviceA-pkey-public-key-key1]308201B73082012C06072A8648CE3804013082011F02818100D757262C4584C44C211F18BD96E5F061C4F0A423F7FE6B6B85B34CEF72CE14A0D3A5222FE08CECE65BE6C265854889DC1EDBD13EC8B274DA9F75BA26CCB987723602787E922BA84421F22C3C89CB9B06FD60FE01941DDD77FE6B12893DA76EEBC1D128D97F0678D7722B5341C8506F358214B16A2FAC4B368950387811C7DA33021500C773218C737EC8EE993B4F2DED30F48EDACE915F0281810082269009E14EC474BAF2932E69D3B1F18517AD9594184CCDFCEAE96EC4D5EF93133E84B47093C52B20CD35D02492B3959EC6499625BC4FA5082E22C5B374E16DD00132CE71B020217091AC717B612391C76C1FB2E88317C1BD8171D41ECB83E210C03CC9B32E810561C21621C73D6DAAC028F4B1585DA7F42519718CC9B09EEF03818400028180077F06B3E343CAE9988F4BE3F76FACBAB565AB73D4BA295C52BA92428B1F2DA1E6DD652413DD3AFE0C5A4FCF365100CBE34CECA55A2C30A2A9FF7E899628557E39CE8FC615F53193A7E200B4B1CB21E3F1091D595716D229DDED6872061F9B4B08301ADC81F7EC1501FFB863C0009536596CCB508596C3325892DC6D8C5C35B5
# Exit public key view.
[DeviceA-pkey-public-key-key1] peer-public-key end
[DeviceA] return
Verifying the configuration
# Establish an SSH connection to the server at 192.168.1.40. Specify the host public key of the server as key1. After you enter the username and password, you can log in to the Stelnet server successfully.
<DeviceA> ssh2 192.168.1.40 publickey key1
login as: client001
[email protected]'s password:
******************************************************************************
* Copyright (c) 2004-2021 Hangzhou H3C Tech. Co., Ltd. All rights reserved. *
* Without the owner's prior written consent, *
* no decompiling or reverse-engineering shall be allowed. *
******************************************************************************
<DeviceB>
Configuration files
· Device A:
#
interface GigabitEthernet0/0/1
port link-mode route
ip address 192.168.1.56 255.255.255.0
#
public-key peer key1
public-key-code begin
308201B73082012C06072A8648CE3804013082011F02818100D757262C4584C44C211F18BD
96E5F061C4F0A423F7FE6B6B85B34CEF72CE14A0D3A5222FE08CECE65BE6C265854889DC1E
DBD13EC8B274DA9F75BA26CCB987723602787E922BA84421F22C3C89CB9B06FD60FE01941D
DD77FE6B12893DA76EEBC1D128D97F0678D7722B5341C8506F358214B16A2FAC4B36895038
7811C7DA33021500C773218C737EC8EE993B4F2DED30F48EDACE915F0281810082269009E1
4EC474BAF2932E69D3B1F18517AD9594184CCDFCEAE96EC4D5EF93133E84B47093C52B20CD
35D02492B3959EC6499625BC4FA5082E22C5B374E16DD00132CE71B020217091AC717B6123
91C76C1FB2E88317C1BD8171D41ECB83E210C03CC9B32E810561C21621C73D6DAAC028F4B1
585DA7F42519718CC9B09EEF03818400028180077F06B3E343CAE9988F4BE3F76FACBAB565
AB73D4BA295C52BA92428B1F2DA1E6DD652413DD3AFE0C5A4FCF365100CBE34CECA55A2C30
A2A9FF7E899628557E39CE8FC615F53193A7E200B4B1CB21E3F1091D595716D229DDED6872
061F9B4B08301ADC81F7EC1501FFB863C0009536596CCB508596C3325892DC6D8C5C35B5
public-key-code end
peer-public-key end
#
· Device B:
#
interface GigabitEthernet0/0/1
port link-mode route
ip address 192.168.1.40 255.255.255.0
#
line vty 0 63
authentication-mode scheme
#
ssh server enable
#
local-user client001 class manage
password hash $h$6$TZDvtSF8dZvNpjxr$+gcQprRZcPhaeRidjakWFoNIyri0wefdYEHscj/3UDiVB03x8wEQFEH+cofRI0aykMKtORUpTfElxjUGwXGVrw==
authorization-attribute user-role network-operator
authorization-attribute user-role network-admin
service-type ssh
#
Example: Configuring SFTP with password-publickey authentication
Network configuration
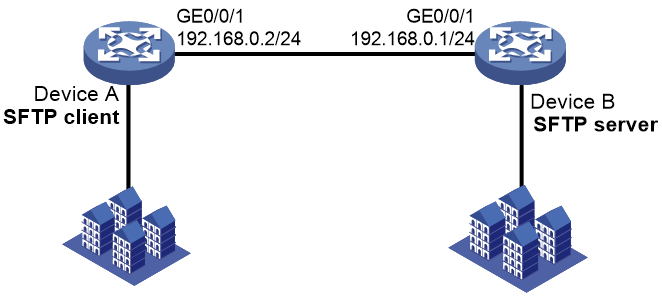
As shown in Figure 13, establish an SFTP connection between Device A and Device B, so you can log in to Device B to perform file and directory operations. The specific requirements are as follows:
· To ensure high security and authentication strength, configure Device B to use password-publickey authentication and RSA public key algorithm.
· The login username and password are client001 and 123456TESTplat&!, respectively. Configure the user to use all commands after successful login.
· Import the client's host public key to the server to ensure correct format and content of the public key.
Analysis
To meet the network requirements, you must perform the following tasks:
· To perform local authentication, create a local user and configure a password for the local user on the SFTP server.
· For successful publickey authentication, perform the following tasks:
¡ Configure the client's RSA host public key on the server.
¡ Specify the paired RSA host private key for the SSH user on the client. To specify the RSA host private key on the client, use the identity-key rsa keyword in the sftp command.
· To assign correct working directory and user role to the SSH user, you must create a local user on the SFTP server. The local user must have the same username as the SSH user.
· Because the client's host public key is required in the server configuration, you must generate the key pairs on the client before configuring the SFTP server.
· To enable an SSH user to use all commands after login, set the user role of the local user to network-admin. By default, the user role of so you a local user is network-operator.
Software versions used
This configuration example was created and verified on R9141P16 of the MSR2630E-X1 device.
Restrictions and guidelines
To support SFTP clients that use different types of key pairs, generate DSA and RSA key pairs on the SFTP server.
Procedures
Configure the SFTP client
# Assign an IP address to GigabitEthernet 0/0/1. The SFTP client uses this IP address to connect to the SFTP server.
<DeviceA> system-view
[DeviceA] interface GigabitEthernet 0/0/1
[DeviceA-GigabitEthernet0/0/1] ip address 192.168.0.2 255.255.255.0
[DeviceA-GigabitEthernet0/0/1] quit
# Generate an RSA key pair.
[DeviceA] public-key local create rsa
The range of public key size is (512 ~ 2048).
If the key modulus is greater than 512, it will take a few minutes.
Press CTRL+C to abort.
Input the modulus length [default = 1024]:
Generating Keys...
........................++++++
...................++++++
..++++++++
............++++++++
Create the key pair successfully.
# Export the host public key to the file key.pub.
[DeviceA] public-key local export rsa ssh2 key.pub
[DeviceA] quit
Configuring Device B as the FTP server
# Assign an IP address to interface GigabitEthernet 0/0/1.
<DeviceB> system-view
[DeviceB] interface GigabitEthernet 0/0/1
[DeviceB-GigabitEthernet0/0/1] ip address 192.168.0.1 255.255.255.0
[DeviceB-GigabitEthernet0/0/1] quit
# Create a local user ftp.
[DeviceB] local-user ftp class manage
New local user added.
# Set the password to 123456TESTplat&! in plain text for local user ftp.
[DeviceB-luser-manage-ftp] password simple 123456TESTplat&!
# Assign user role network-admin to local user ftp.
[DeviceB-luser-manage-ftp] authorization-attribute user-role network-admin
# Assign working directory flash:/ to local user ftp.
[DeviceB-luser-manage-ftp] authorization-attribute work-directory flash:/
# Authorize local user ftp to use the FTP service.
[DeviceB-luser-manage-ftp] service-type ftp
[DeviceB-luser-manage-ftp] quit
# Enable the FTP server function.
[DeviceB] ftp server enable
[DeviceB] quit
Uploading the public key file from the FTP client
# Log in to the FTP server from Device A and upload the public key file key.pub to the server.
<DeviceA>ftp 192.168.0.1
Press CTRL+C to abort.
Connected to 192.168.0.1 (192.168.0.1).
220 FTP service ready.
User (192.168.0.2:(none)): ftp
331 Password required for ftp.
Password:
230 User logged in.
Remote system type is UNIX.
Using binary mode to transfer files.
ftp> put flash:/key.pub
227 Entering Passive Mode (192,168,0,1,41,116)
150 Accepted data connection
226 File successfully transferred
301 bytes sent in 0.000 seconds (1.05 Mbytes/s)
ftp> quit
221-Goodbye. You uploaded 1 and downloaded 0 kbytes.
221 Logout.
Configuring Device B as the SFTP server
# Generate an RSA key pair.
<DeviceB> system-view
[DeviceB] public-key local create rsa
The range of public key size is (512 ~ 2048).
If the key modulus is greater than 512, it will take a few minutes.
Press CTRL+C to abort.
Input the modulus length [default = 1024]:
Generating Keys...
........................++++++
...................++++++
..++++++++
............++++++++
Create the key pair successfully.
# Generate a DSA key pair.
[DeviceB] public-key local create dsa
The range of public key size is (512 ~ 2048).
If the key modulus is greater than 512, it will take a few minutes.
Press CTRL+C to abort.
Input the modulus length [default = 1024]:
Generating Keys...
.++++++++++++++++++++++++++++++++++++++++++++++++++*
........+......+.....+......................................+
...+.................+..........+...+
Create the key pair successfully.
# Enable the SFTP server function.
[DeviceB] sftp server enable
# Import the client's public key from file key.pub, and name the public key devicekey.
[DeviceB] public-key peer devicekey import sshkey key.pub
# Create an SSH user client001. Specify the authentication type as password-publickey for the user, and assign the public key devicekey to the user.
[DeviceB] ssh user client001 service-type sftp authentication-type password-publickey assign publickey devicekey
# Create a local user client001.
[DeviceB] local-user client001 class manage
New local user added.
# Set the password to 123456TESTplat&! in plain text for the local user client001.
[DeviceB-luser-manage-client001] password simple 123456TESTplat&!
# Authorize the local user client001 to use the SSH service.
[DeviceB-luser-manage-client001] service-type ssh
# Assign the user role network-admin and working directory flash:/ to the local user client001.
[DeviceB-luser-manage-client001] authorization-attribute user-role network-admin work-directory flash:/
[DeviceB-luser-manage-client001] quit
Verifying the configuration
# Verify that you can log in to the SFTP server from the SFTP client.
<DeviceA >sftp 192.168.0.1 identity-key rsa
Username: client001
Press CTRL+C to abort.
Connecting to 192.168.0.1 port 22.
The server is not authenticated. Continue? [Y/N]:y
Do you want to save the server public key? [Y/N]:n
[email protected]'s password:
# After you enter the password, you are placed in SFTP client view.
sftp>
# Verify that you can perform file and directory operations after logging in to the SFTP server:
# Display files under the current directory of the server, delete the file z, and verify the result.
sftp> dir -l
-rwxrwxrwx 1 1 1 1759 Aug 23 06:52 config.cfg
-rw-rw---- 1 1 1 301 Aug 7 16:52 key.pub
-rwxrwxrwx 1 1 1 0 Sep 01 06:22 new
-rwxrwxrwx 1 1 1 225 Sep 01 06:55 pub
-rwxrwxrwx 1 1 1 225 Aug 24 08:01 pubkey2
-rwxrwxrwx 1 1 1 0 Sep 01 08:00 z
sftp> delete z
Removing /z
sftp> dir -l
-rwxrwxrwx 1 1 1 1759 Aug 23 06:52 config.cfg
-rw-rw---- 1 1 1 301 Aug 7 16:52 key.pub
-rwxrwxrwx 1 1 1 0 Sep 01 06:22 new
-rwxrwxrwx 1 1 1 225 Sep 01 06:55 pub
-rwxrwxrwx 1 1 1 225 Aug 24 08:01 pubkey2
# Add directory new1 and verify the result.
sftp> mkdir new1
sftp> dir -l
-rwxrwxrwx 1 1 1 1759 Aug 23 06:52 config.cfg
-rw-rw---- 1 1 1 301 Aug 7 16:52 key.pub
-rwxrwxrwx 1 1 1 0 Sep 01 06:22 new
drwxrwxrwx 1 1 1 0 Sep 02 06:30 new1
-rwxrwxrwx 1 1 1 225 Sep 01 06:55 pub
-rwxrwxrwx 1 1 1 225 Aug 24 08:01 pubkey2
# Rename directory new1 to new2 and verify the result.
sftp> rename new1 new2
sftp> dir -l
-rwxrwxrwx 1 1 1 1759 Aug 23 06:52 config.cfg
-rw-rw---- 1 1 1 301 Aug 7 16:52 key.pub
-rwxrwxrwx 1 1 1 0 Sep 01 06:22 new
drwxrwxrwx 1 1 1 0 Sep 02 06:33 new2
-rwxrwxrwx 1 1 1 225 Sep 01 06:55 pub
-rwxrwxrwx 1 1 1 225 Aug 24 08:01 pubkey2
# Download file pubkey2 and rename it to public.
sftp> get pubkey2 public
Fetching /pubkey2 to public
/public 100% 301 0.3KB/s 00:00
# Upload local file public to the server, and verify the result.
sftp> put public
Uploading public to /public
public 100% 301 0.3KB/s 00:00
sftp> dir -l
-rwxrwxrwx 1 1 1 1759 Aug 23 06:52 config.cfg
-rw-rw---- 1 1 1 301 Aug 7 16:52 key.pub
-rwxrwxrwx 1 1 1 0 Sep 01 06:22 new
drwxrwxrwx 1 1 1 0 Sep 02 06:33 new2
-rwxrwxrwx 1 1 1 225 Sep 01 06:55 pub
-rwxrwxrwx 1 1 1 225 Aug 24 08:01 pubkey2
-rwxrwxrwx 1 1 1 301 Jul 30 16:21 public
sftp>
# Exit SFTP client view.
sftp> quit
<DeviceA>
Configuration files
· Device A:
#
interface GigabitEthernet0/0/1
port link-mode route
ip address 192.168.0.2 255.255.255.0
#
· Device B:
#
interface GigabitEthernet0/0/1
port link-mode route
ip address 192.168.0.1 255.255.255.0
#
sftp server enable
ssh user client001 service-type sftp authentication-type password-publickey assign publickey devicekey
#
local-user client001 class manage
service-type ssh
password hash $h$6$TZDvtSF8dZvNpjxr$+gcQprRZcPhaeRidjakWFoNIyri0wefdYEHscj/3UDiVB03x8wEQFEH+cofRI0aykMKtORUpTfElxjUGwXGVrw==
authorization-attribute work-directory flash:/
authorization-attribute user-role network-operator
authorization-attribute user-role network-admin
#
ftp server enable
#
local-user ftp class manage
password hash $h$6$YJP7kt/UyktDpfZ4$1OXECE52tKrwMA5qwOXr1wNwAqXOR1C8D9hHnvG9cEFLPx4+a1PebBJBs8pnVl0PPEvBrHaQD9Ff0GaaYU5kdQ==
service-type ftp
authorization-attribute work-directory flash:/
authorization-attribute user-role network-admin
authorization-attribute user-role network-operator
#
public-key peer devicekey
public-key-code begin
30819F300D06092A864886F70D010101050003818D00308189
1BD316C0DBB9009503E78F31947B651F9950E9A6E9E256E1E
public-key-code end
peer-public-key end
#
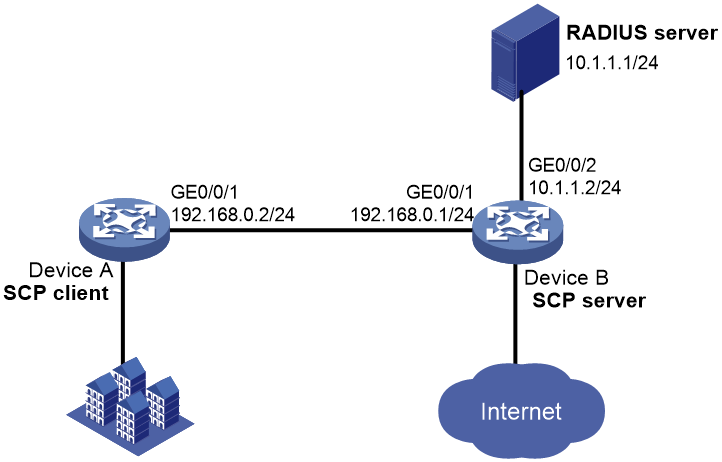
Example: Configuring SCP file transfer with remote password authentication
Network configuration
As shown in Figure 14, configure the devices and the RADIUS server to meet the following requirements:
· Use the RADIUS server for SSH user authentication and authorization. The user name and password are hello@bbb and 123456TESTplat&!, respectively. Assign the default user role network-admin to the SSH user, so the user can use all commands after login.
· Include the domain name in the username sent to the RADIUS server.
Analysis
To meet the network requirements, you must perform the following tasks:
· To ensure correct SSH version negotiation and algorithm negotiation, and to ensure that the server can pass the client's authentication, generate DSA and RSA key pairs on the server.
· To perform remote password authentication, configure the username and password on the RADIUS server.
· To ensure communication security between the RADIUS client (Device B) and the RADIUS server, configure the same shared key on Device B and the RADIUS server.
· To enable an SSH user to use all commands after login, set the user role to network-admin for the user on the RADIUS server.
· To use the RADIUS server for authentication and authorization, perform the following tasks on Device B:
¡ Configure a RADIUS scheme to specify the authentication and authorization server.
¡ Create an ISP domain, and specify the ISP domain to use the RADIUS scheme for authentication, authorization, and accounting.
Software versions used
This configuration example was created and verified on R9141P16 of the MSR2630E-X1 device.
Procedures
Configuring the RADIUS server
In this example, the RADIUS server runs on IMC PLAT 7.0 (E0102) and IMC EIA 7.0 (E0201).
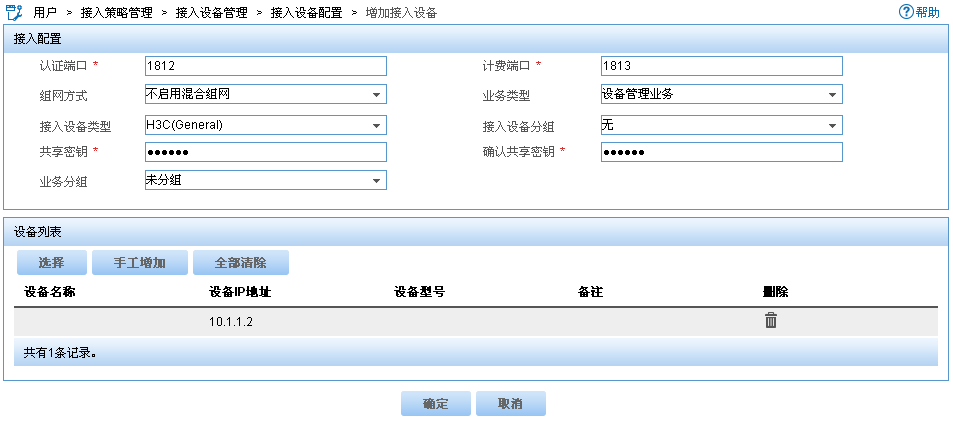
Adding an access device
Table 1 Log in to IMC and click the User tab.
Table 2 From the navigation pane, select User Access Policy > Access Device Management > Access Device.
Table 3 Click Add.
¡ Set the ports for authentication and accounting to 1812 and 1813, respectively.
¡ Select the service type Device Management Service.
¡ Select H3C(General) from the Access Device Type list.
¡ Set the shared key to expert for secure RADIUS communication.
¡ In the Device List area, click Select or Add Manually to add Device B at 10.1.1.2 as an access device.
¡ Use the default settings for other parameters.
¡ Click OK.
Figure 15 Adding Device B as an access device
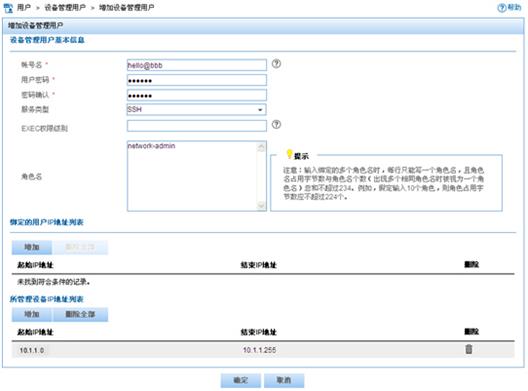
Adding an account for device management
Table 1 Click the User tab.
Table 2 From the navigation pane, select Access User > Device User.
Table 3 Click Add.
¡ Enter the account name hello@bbb and the password 123456TESTplat&!.
¡ Select the service type SSH.
¡ Enter the user role network-admin in the Role Name field.
¡ Specify 10.1.1.0 to 10.1.1.255 as the IP address range of the devices to be managed.
¡ Click OK.
Figure 16 Adding a device management account
Configuring Device B
[DeviceB] public-key local create rsa
The range of public key size is (512 ~ 2048).
If the key modulus is greater than 512, it will take a few minutes.
Press CTRL+C to abort.
Input the modulus length [default = 1024]:
Generating Keys...
........................++++++
...................++++++
..++++++++
............++++++++
Create the key pair successfully.
[DeviceB] public-key local create dsa
The range of public key size is (512 ~ 2048).
If the key modulus is greater than 512, it will take a few minutes.
Press CTRL+C to abort.
Input the modulus length [default = 1024]:
Generating Keys...
.++++++++++++++++++++++++++++++++++++++++++++++++++*
........+......+.....+......................................+
...+.................+..........+...+.
Create the key pair successfully.
# Assign an IP address to GigabitEthernet 0/0/1. The SCP client uses this IP address to connect to the SCP server.
[DeviceB] interface GigabitEthernet 0/0/1
[DeviceB-GigabitEthernet0/0/1] ip address 192.168.0.1 255.255.255.0
[DeviceB-GigabitEthernet0/0/1] quit
# Assign an IP address to interface GigabitEthernet 0/0/2.
[DeviceB] interface GigabitEthernet 0/0/2
[DeviceB-GigabitEthernet0/0/2] ip address 10.1.1.2 255.255.255.0
[DeviceB-GigabitEthernet0/0/2] quit
# Enable the SSH server function.
[DeviceB] radius scheme rad
# Specify the primary authentication server 10.1.1.1 and UDP port 1812 for the RADIUS scheme rad.
[DeviceB-radius-rad] primary authentication 10.1.1.1 1812
# Specify the primary authentication server 10.1.1.1 and UDP port 1813 for the RADIUS scheme rad.
[DeviceB-radius-rad] primary accounting 10.1.1.1 1813
# Specify the shared key as expert for secure authentication and accounting communication.
[DeviceB-radius-rad] key authentication simple expert
[DeviceB-radius-rad] key accounting simple expert
# Include domain names in the usernames sent to the RADIUS server.
[DeviceB-radius-rad] user-name-format with-domain
[DeviceB-radius-rad] quit
# Create an ISP domain bbb.
[DeviceB] domain bbb
# Configure ISP domain bbb to use RADIUS scheme rad for authentication, authorization, and accounting of all login users.
[DeviceB-isp-bbb] authentication login radius-scheme rad
[DeviceB-isp-bbb] authorization login radius-scheme rad
[DeviceB-isp-bbb] accounting login radius-scheme rad
[DeviceB-isp-bbb] quit
Configuring Device A
# Assign an IP address to interface GigabitEthernet 0/0/1.
<DeviceA> system-view
[DeviceA] interface GigabitEthernet 0/0/1
[DeviceA-GigabitEthernet0/0/1] ip address 192.168.0.2 255.255.255.0
[DeviceA-GigabitEthernet0/0/1] quit
[DeviceA] quit
Verifying the configuration
<DeviceA> scp 192.168.0.1 get remote.bin local.bin
Username: hello@bbb
Press CTRL+C to abort.
Connecting to 192.168.0.1 port 22.
The Server is not authenticated. Continue? [Y/N]:y
Do you want to save the server public key? [Y/N]:n
hello@[email protected]'s password:
remote.bin 100% 8275KB 318.3KB/s 00:26.
Configuration files
· Device A:
#
interface GigabitEthernet0/0/1
port link-mode route
ip address 192.168.0.2 255.255.255.0
#
· Device B:
#
interface GigabitEthernet0/0/1
port link-mode route
ip address 192.168.0.1 255.255.255.0
#
interface GigabitEthernet0/0/2
port link-mode route
ip address 10.1.1.2 255.255.255.0
#
ssh server enable
#
radius scheme rad
primary authentication 10.1.1.1
primary accounting 10.1.1.1
key authentication cipher $c$3$63G7LzIQElGq4aFGTiYQafU+loQxS/cbLg==
key accounting cipher $c$3$tUIVlyGISJ5X/yiTFWrmh8nyjBIF+1LFzQ==
#
domain bbb
authentication login radius-scheme rad
authorization login radius-scheme rad
accounting login radius-scheme rad
#
Related documentation
· Security Configuration Guide in H3C MSR1000[2600][3600] Routers Configuration Guides (V9)
· Security Command Reference in H3C MSR1000[2600][3600] Routers Command References (V9)