- Table of Contents
-
- 03-CLI configuration examples (AC+fit AP)
- 01-HTTPS Login Configuration Examples
- 02-SSH Configuration Examples
- 03-License Management Configuration Examples
- 04-IPv6 URL Redirection Configuration Examples
- 05-AP Association with the AC at Layer 2 Configuration Examples
- 06-AP Association with the AC at Layer 2 (IPv6) Configuration Examples
- 07-Auto AP Configuration Examples
- 08-AP Association with the AC at Layer 3 Configuration Examples
- 09-AP Association with the AC at Layer 3 (IPv6) Configuration Examples
- 10-WEP Encryption Configuration Examples
- 11-PSK Encryption Configuration Examples
- 12-WPA3-SAE PSK Encryption Configuration Examples
- 13-WLAN Access (IPv6) Configuration Examples
- 14-Policy-Based Forwarding with Dual Gateways Configuration Examples
- 15-Scheduled Configuration Deployment by AP Group Configuration Examples
- 16-Inter-AC Roaming with Static Client VLAN Allocation Configuration Examples
- 17-Service Template and Radio Binding Configuration Examples
- 18-Scheduled WLAN Access Services Configuration Examples
- 19-Local Portal Authentication Configuration Examples
- 20-HTTPS-Based Local Portal Authentication Configuration Examples
- 21-Remote Portal Authentication Configuration Examples
- 22-Local Portal Authentication through LDAP Server Configuration Examples
- 23-Local Portal Authentication and SSID-based Authentication Page Pushing Configuration Examples
- 24-Local Portal MAC-Trigger Authentication Configuration Examples
- 25-Portal MAC-Trigger Authentication Configuration Examples
- 26-Local Forwarding Mode and Local Portal MAC-Trigger Authentication Configuration Examples
- 27-Local Portal Authentication (IPv6) Configuration Examples
- 28-Local Portal Authentication through LDAP Server (IPv6) Configuration Examples
- 29-Remote Portal Authentication (IPv6) Configuration Examples
- 30-Portal MAC-Trigger Authentication (IPv6) Configuration Example
- 31-Remote Portal Authentication with User Profile Authorization Configuration Examples
- 32-Portal Fail-Permit Configuration Examples
- 33-Local MAC Authentication Configuration Examples
- 34-MAC Authentication and PSK Authentication Configuration Examples
- 35-Remote MAC and Portal Authentication and Transparent Authentication Configuration Examples
- 36-Remote AP and Remote Portal MAC-Trigger Authentication Configuration Examples
- 37-MAC Authentication with Guest VLAN Assignment Configuration Examples
- 38-MAC Authentication with Guest VLAN Assignment (IPv6) Configuration Examples
- 39-Local MAC-Then-802.1X Authentication Configuration Examples
- 40-Local 802.1X Authentication Configuration Examples
- 41-Local RADIUS-Based 802.1X Authentication in EAP Relay Mode Configuration Examples
- 42-Remote 802.1X Authentication Configuration Examples
- 43-Remote 802.1X Authentication (IPv6) Configuration Examples
- 44-Remote 802.1X Authentication in WPA3-Enterprise Mode Configuration Examples
- 45-802.1X Authentication with ACL Assignment Through IMC Server Configuration Examples
- 46-802.1X Authentication with User Profile Assignment Through IMC Server Configuration Examples
- 47-EAD Authentication Configuration Examples
- 48-EAD Authentication (IPv6) Configuration Examples
- 49-Local Forwarding Mode and Local Portal Authentication Configuration Examples
- 50-Local Forwarding Mode Direct Portal Authentication Configuration Examples
- 51-Local Forwarding Mode Direct Portal Authentication (IPv6) Configuration Examples
- 52-Local Forwarding Configuration Examples
- 53-Remote AP Configuration Examples
- 54-WIPS Configuration Examples
- 55-WIPS Countermeasures Against All SSIDs Configuration Examples
- 56-IP Source Guard (IPv4) Configuration Examples
- 57-IP Source Guard (IPv6) Configuration Examples
- 58-IRF Setup with Members Directly Connected Configuration Examples
- 59-IRF Setup with Members Not Directly Connected Configuration Examples
- 60-IRF Setup with Members in One Chassis Configuration Examples
- 61-IRF Setup with Members in Different Chassis Configuration Examples
- 62-Dual-Link Backup Configuration Examples
- 63-Remote 802.1X Auth on AC Hierarchy Network with Dual-Link Central AC Backup Configuration Examples
- 64-Remote Portal Auth on AC Hierarchy Network with Dual-Link Central AC Backup Configuration Examples
- 65-OAuth-Based Portal MAC-Trigger Auth on Local-Forwarding Dual-Link Backup Configuration Examples
- 66-Dual-Link Backup OAuth-Based Portal Auth in Local Forwarding Configuration Examples
- 67-Dual-Link Backup Remote Portal MAC-Trigger Auth in Local Forwarding Configuration Examples
- 68-Dual-Link Backup Remote Portal and Transparent MAC Auth in Local Forwarding Configuration Examples
- 69-Dual-Link Backup Remote Portal Auth in Local Forwarding Configuration Examples
- 70-Dual-Link Backup Remote Portal and MAC Auth in Centralized Forward Configuration Examples
- 71-Dual-Link Backup Remote Portal Auth in Centralized Forwarding Configuration Examples
- 72-Dual-Link Backup Lightweight Portal Auth in Centralized Forwarding Configuration Examples
- 73-Dual-Link Backup OAuth-Based Portal Auth in Centralized Forwarding Configuration Examples
- 74-Dual-Link Backup Remote Portal MAC-Trigger Auth in Centralized Forwarding Configuration Examples
- 75-Remote 802.1X Auth on a Dual-Link AC Backup Network Configuration Examples
- 76-Remote MAC Auth on a Dual-Link AC Backup Network Configuration Examples
- 77-Remote 802.1X Authentication on an AC Hierarchy Network Configuration Examples
- 78-Remote 802.1X Authentication Configuration Examples
- 79-WLAN Probe Configuration Examples
- 80-Multicast Optimization Configuration Examples
- 81-Client Rate Limiting Configuration Examples
- 82-Inter-AC Roaming Configuration Examples
- 83-Inter-AC Roaming (IPv6) Configuration Examples
- 84-WLAN Load Balancing Configuration Examples
- 85-Static Blacklist Configuration Examples
- 86-Client Quantity Control Configuration Examples
- 87-AP License Synchronization Configuration Examples
- 88-iBeacon Management Configuration Examples
- 89-Mesh Link Establishment Between a Fit AP and a Fat AP Configuration Examples
- 90-Mesh Link Establishment Between Fit APs Configuration Examples
- 91-Auto-DFS and Auto-TPC Configuration Examples
- 92-AP Image Downloading Configuration Examples
- 93-Dual-Uplink Interfaces Configuration Guide
- 94-Internal-to-External Access Through NAT Configuration Examples
- 95-Layer 2 Static Aggregation Configuration Examples
- 96-Layer 2 Multicast Configuration Examples
- 97-Static VLAN Allocation Configuration Examples
- 98-URL Redirection Configuration Examples
- Related Documents
-
| Title | Size | Download |
|---|---|---|
| 02-SSH Configuration Examples | 481.91 KB |
|
|
|
H3C Access Controllers |
|
Comware 7 SSH Configuration Examples |
|
|
Copyright © 2022 New H3C Technologies Co., Ltd. All rights reserved.
No part of this manual may be reproduced or transmitted in any form or by any means without prior written consent of New H3C Technologies Co., Ltd.
Except for the trademarks of New H3C Technologies Co., Ltd., any trademarks that may be mentioned in this document are the property of their respective owners.
The information in this document is subject to change without notice.
Example: Configuring the AC as an Stelnet server (password authentication)
Example: Configuring the AC as an Stelnet server (publickey authentication)
Example: Configuring the AC as an Stelnet client (password authentication)
Example: Configuring the AC as an Stelnet client (publickey authentication)
Example: Configuring the AC as an SFTP server (password authentication)
Example: Configuring the AC as an SFTP client (publickey authentication)
Example: Configuring SCP with password authentication
Example: Configuring NETCONF over SSH with password authentication
Introduction
The following information provides SSH configuration examples.
Prerequisites
This document applies to Comware 7-based access controllers and access points. Procedures and information in the examples might be slightly different depending on the software or hardware version of the access controllers and access points.
The configuration examples in this document were created and verified in a lab environment, and all the devices were started with the factory default configuration. When you are working on a live network, make sure you understand the potential impact of every command on your network.
This document assumes that you have basic knowledge of WLAN and SSH.
Example: Configuring the AC as an Stelnet server (password authentication)
Network configuration
As shown in Figure 1:
· The route between the wireless client and the AC is reachable.
· The AC acts as the Stelnet server and uses password authentication to authenticate the Stelnet client. The username and password of the Stelnet client are saved on the AC.
· The wireless client acts as the Stelnet client, using Stelnet client software (SSH2). After the user on the wireless client logs in to the AC through Stelnet, the user can configure and manage the AC as a network administrator.

Procedures
# Generate RSA key pairs.
<AC> system-view
[Switch] public-key local create rsa
The range of public key size is (512 ~ 2048).
If the key modulus is greater than 512, it will take a few minutes.
Press CTRL+C to abort.
Input the modulus length [default = 1024]:
Generating Keys...
........................++++++
...................++++++
..++++++++
............++++++++
Create the key pair successfully.
# Generate a DSA key pair.
[AC] public-key local create dsa
The range of public key size is (512 ~ 2048).
If the key modulus is greater than 512, it will take a few minutes.
Press CTRL+C to abort.
Input the modulus length [default = 1024]:
Generating Keys...
.++++++++++++++++++++++++++++++++++++++++++++++++++*
........+......+.....+......................................+
...+.................+..........+...+.
Create the key pair successfully.
# Generate an ECDSA key pair.
[AC] public-key local create ecdsa secp256r1
Generating Keys...
.
Create the key pair successfully.
# Enable the Stelnet server.
[AC] ssh server enable
# Assign an IP address to VLAN-interface 2. The Stelnet client uses this address as the destination for SSH connection.
[AC] interface vlan-interface 2
[AC-Vlan-interface2] ip address 192.168.1.40 255.255.255.0
[AC-Vlan-interface2] quit
# Set the authentication mode to AAA for user lines.
[AC] line vty 0 63
[AC-line-vty0-63] authentication-mode scheme
[AC-line-vty0-63] quit
# Create a local device management user named client001.
[AC] local-user client001 class manage
# Set the password to aabbcc in plain text for local user client001.
[AC-luser-manage-client001] password simple aabbcc
# Authorize local user client001 to use the SSH service.
[AC-luser-manage-client001] service-type ssh
# Assign the network-admin user role to local user client001.
[AC-luser-manage-client001] authorization-attribute user-role network-admin
[AC-luser-manage-client001] quit
# Create an SSH user named client001. Specify the service type as stelnet and the authentication method as password for the user.
[AC] ssh user client001 service-type stelnet authentication-type password
Verifying the configuration
There are different types of Stelnet client software, such as PuTTY and OpenSSH. This example uses an Stelnet client that runs PuTTY version 0.58 to verify the configuration.
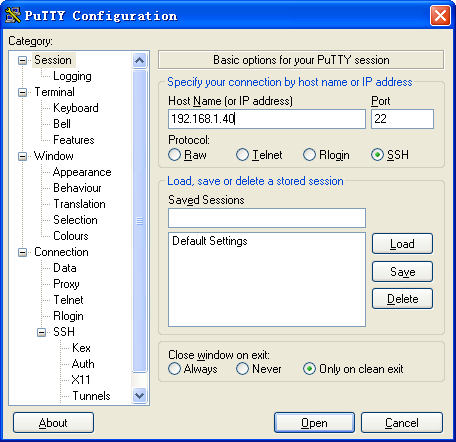
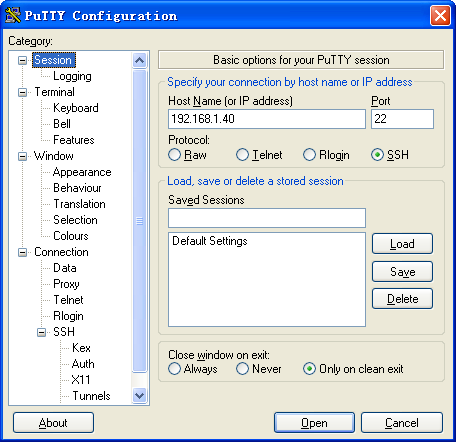
To verify that you can log in to the Stelnet server from the Stelnet client:
1. Launch PuTTY.exe to enter the page shown in Figure 2.
2. In the Host Name (or IP address) field, enter IP address 192.168.1.40 of the Stelnet server.
3. Click Open.
Figure 2 Connecting to the Stelnet server
4. Enter username client001 and password aabbcc to log in to the Stelnet server.
Example: Configuring the AC as an Stelnet server (publickey authentication)
Network configuration
As shown in Figure 3:
· The route between the wireless client and the AC is reachable.
· The AC acts as the Stelnet server, and it uses publickey authentication and the RSA public key algorithm.
· The wireless client acts as the Stelnet client, using Stelnet client software (SSH2). After the user on the wireless client logs in to the AC through Stelnet, the user can configure and manage the AC as a network administrator.

Analysis
Because the client's host public key is required in the server configuration, you must generate RSA key pairs on the client before configuring the Stelnet server.
Procedures
There are different types of Stelnet client software, such as PuTTY and OpenSSH. This example uses an Stelnet client that runs PuTTY version 0.58.
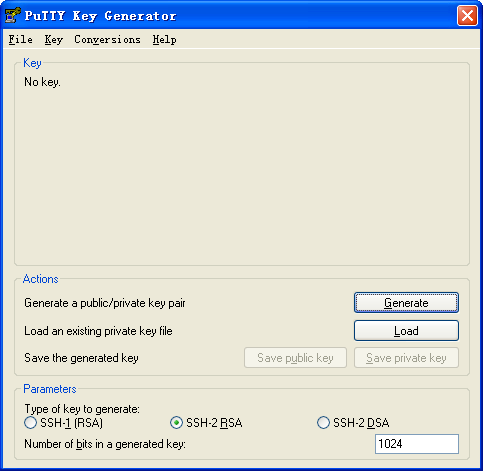
1. Generate RSA key pairs on the Stelnet client:
a. Run PuTTYGen.exe on the client, select SSH-2 RSA, and then click Generate.
Figure 4 Generating a key pair on the client
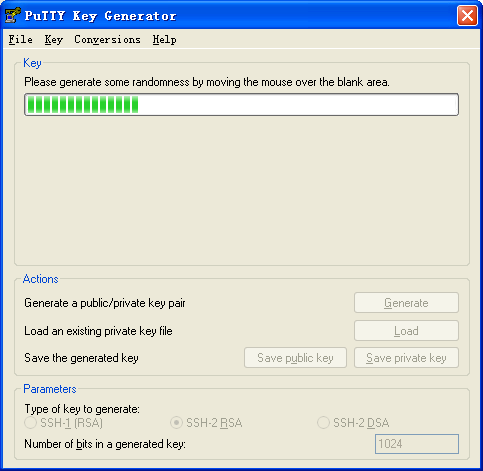
b. Continue moving the mouse during the key generating process, but do not place the mouse over the green progress bar shown in Figure 5. Otherwise, the progress bar stops moving and the key pair generating progress stops.
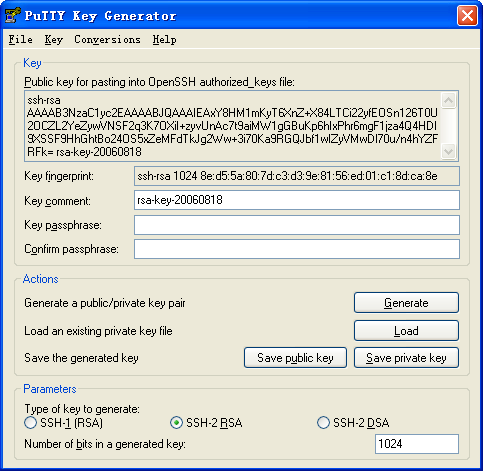
c. After the key pair is generated, click Save public key to save the public key, as shown in Figure 6.
A file saving page opens.
Figure 6 Saving a key pair on the client
d. Enter a file name (key.pub in this example), and then click Save.
e. On the page as shown in Figure 6, click Save private key to save the private key.
A confirmation dialog box opens, as shown in Figure 7.
Figure 7 Private key saving dialog box

f. Click Yes.
A file saving page opens.
g. Enter a file name (private.ppk in this example), and then click Save.
h. Transmit the public key file to the server through FTP or TFTP. (Details not shown.)
2. Configure the Stelnet server:
# Generate RSA key pairs.
<AC> system-view
[AC] public-key local create rsa
The range of public key size is (512 ~ 2048).
If the key modulus is greater than 512, it will take a few minutes.
Press CTRL+C to abort.
Input the modulus length [default = 1024]:
Generating Keys...
........................++++++
...................++++++
..++++++++
............++++++++
Create the key pair successfully.
# Generate a DSA key pair.
[AC] public-key local create dsa
The range of public key size is (512 ~ 2048).
If the key modulus is greater than 512, it will take a few minutes.
Press CTRL+C to abort.
Input the modulus length [default = 1024]:
Generating Keys...
.++++++++++++++++++++++++++++++++++++++++++++++++++*
........+......+.....+......................................+
...+.................+..........+...+
Create the key pair successfully.
# Generate an ECDSA key pair.
[AC] public-key local create ecdsa secp256r1
Generating Keys...
.
Create the key pair successfully.
# Enable the Stelnet server.
[AC] ssh server enable
# Assign an IP address to VLAN-interface 2. The Stelnet client uses this IP address as the destination for SSH connection.
[AC] interface vlan-interface 2
[AC-Vlan-interface2] ip address 192.168.1.40 255.255.255.0
[AC-Vlan-interface2] quit
# Set the authentication mode to AAA for user lines.
[AC] line vty 0 63
[AC-line-vty0-63] authentication-mode scheme
[AC-line-vty0-63] quit
# Import the client's public key from the public key file key.pub and name it ackey.
[AC] public-key peer ackey import sshkey key.pub
# Create an SSH user named client002. Specify the authentication method as publickey for the user, and assign the public key ackey to the user.
[AC] ssh user client002 service-type stelnet authentication-type publickey assign publickey ackey
# Create a local device management user named client002.
[AC] local-user client002 class manage
# Authorize local user client002 to use the SSH service.
[AC-luser-manage-client002] service-type ssh
# Assign the network-admin user role to local user client002.
[AC-luser-manage-client002] authorization-attribute user-role network-admin
[AC-luser-manage-client002] quit
Verifying the configuration
To verify that you can log in to the Stelnet server from the Stelnet client:
1. Launch PuTTY.exe on the Stelnet client to enter the page shown in Figure 8.
2. In the Host Name (or IP address) field, enter IP address 192.168.1.40 of the Stelnet server.
Figure 8 Specifying the host name (or IP address)
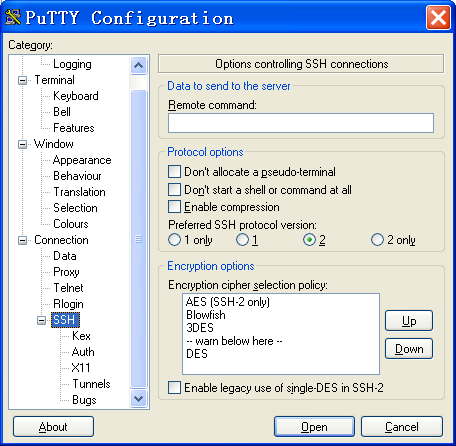
3. From the navigation tree, select Connection > SSH.
The page shown in Figure 9 opens.
4. Set Preferred SSH protocol version to 2.
Figure 9 Specifying the preferred SSH version
5. From the navigation tree, select Connection > SSH > Auth.
The page shown in Figure 10 opens.
6. Click Browse… to open the file selection page, and then select the private key file (private.ppk in this example).
7. Click Open.
Figure 10 Specifying the private key file
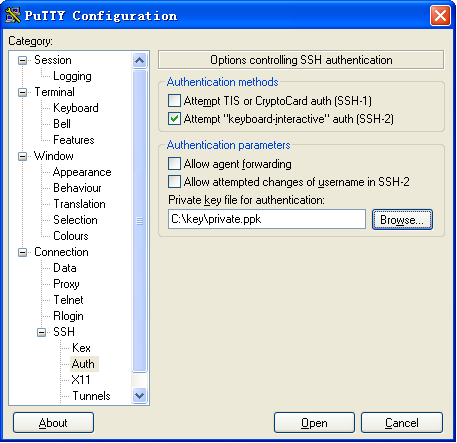
8. Enter username client002 to log in to the Stelnet server.
Example: Configuring the AC as an Stelnet client (password authentication)
Network configuration
As shown in Figure 11:
· The switch acts as the Stelnet server and uses password authentication to authenticate the Stelnet client. The username and password of the client are saved on the switch.
· The AC acts as the Stelnet client. After the user on the AC logs in to the switch through Stelnet, the user can configure and manage the switch as a network administrator.

Procedures
1. Configure the Stelnet server:
# Generate RSA key pairs.
<Switch> system-view
[Switch] public-key local create rsa
The range of public key size is (512 ~ 2048).
If the key modulus is greater than 512, it will take a few minutes.
Press CTRL+C to abort.
Input the modulus length [default = 1024]:
Generating Keys...
........................++++++
...................++++++
..++++++++
............++++++++
Create the key pair successfully.
# Generate a DSA key pair.
[Switch] public-key local create dsa
The range of public key size is (512 ~ 2048).
If the key modulus is greater than 512, it will take a few minutes.
Press CTRL+C to abort.
Input the modulus length [default = 1024]:
Generating Keys...
.++++++++++++++++++++++++++++++++++++++++++++++++++*
........+......+.....+......................................+
...+.................+..........+...+
Create the key pair successfully.
# Generate an ECDSA key pair.
[Switch] public-key local create ecdsa secp256r1
Generating Keys...
.
Create the key pair successfully.
# Enable the Stelnet server.
[Switch] ssh server enable
# Assign an IP address to VLAN-interface 2. The Stelnet client uses this address as the destination address of the SSH connection.
[Switch] interface vlan-interface 2
[Switch-Vlan-interface2] ip address 192.168.1.40 255.255.255.0
[Switch-Vlan-interface2] quit
# Set the authentication mode to AAA for user lines.
[Switch] line vty 0 63
[Switch-line-vty0-63] authentication-mode scheme
[Switch-line-vty0-63] quit
# Create a local device management user named client001.
[Switch] local-user client001 class manage
# Set the password to aabbcc in plain text for local user client001.
[Switch-luser-manage-client001] password simple aabbcc
# Authorize local user client001 to use the SSH service.
[Switch-luser-manage-client001] service-type ssh
# Assign the network-admin user role to local user client001.
[Switch-luser-manage-client001] authorization-attribute user-role network-admin
[Switch-luser-manage-client001] quit
# Create an SSH user named client001. Specify the service type as stelnet and the authentication method as password for the user.
[Switch] ssh user client001 service-type stelnet authentication-type password
2. Assign an IP address to VLAN-interface 2 on the AC:
<AC> system-view
[AC] interface vlan-interface 2
[AC-Vlan-interface2] ip address 192.168.1.56 255.255.255.0
[AC-Vlan-interface2] quit
[AC] quit
Verifying the configuration
On the AC, use one of the following methods to establish a connection to the Stelnet server and verify the configuration:
· Establish a connection to the Stelnet server, enter username client001, and then enter y to access the server and download the server's host public key.
<AC> ssh2 192.168.1.40
Username: client001
Press CTRL+C to abort.
Connecting to 192.168.1.40 port 22.
The server is not authenticated. Continue? [Y/N]:y
Do you want to save the server public key? [Y/N]:y
[email protected]'s password:
Enter a character ~ and a dot to abort.
******************************************************************************
* Copyright (c) 2004-2020 New H3C Technologies Co., Ltd. All rights reserved.*
* Without the owner's prior written consent, *
* no decompiling or reverse-engineering shall be allowed. *
******************************************************************************
<Switch>
After you enter password aabbcc, you can log in to the switch successfully. At the next connection attempt, the client authenticates the server by using the server's host public key that is locally saved on the client.
· Configure the server's host public key on the client, and then connect to the Stelnet server:
# Use the display public-key local dsa public command on the server to display the server's host public key. (Details not shown.)
# Enter public key view of the client and copy the server's host public key to the client.
[AC] public-key peer key1
Enter public key view. Return to system view with "peer-public-key end" command.
[AC-pkey-public-key-key1]308201B73082012C06072A8648CE3804013082011F0281810
0D757262C4584C44C211F18BD96E5F0
[AC-pkey-public-key-key1]61C4F0A423F7FE6B6B85B34CEF72CE14A0D3A5222FE08CECE
65BE6C265854889DC1EDBD13EC8B274
[AC-pkey-public-key-key1]DA9F75BA26CCB987723602787E922BA84421F22C3C89CB9B0
6FD60FE01941DDD77FE6B12893DA76E
[AC-pkey-public-key-key1]EBC1D128D97F0678D7722B5341C8506F358214B16A2FAC4B3
68950387811C7DA33021500C773218C
[AC-pkey-public-key-key1]737EC8EE993B4F2DED30F48EDACE915F0281810082269009E
14EC474BAF2932E69D3B1F18517AD95
[AC-pkey-public-key-key1]94184CCDFCEAE96EC4D5EF93133E84B47093C52B20CD35D02
492B3959EC6499625BC4FA5082E22C5
[AC-pkey-public-key-key1]B374E16DD00132CE71B020217091AC717B612391C76C1FB2E
88317C1BD8171D41ECB83E210C03CC9
[AC-pkey-public-key-key1]B32E810561C21621C73D6DAAC028F4B1585DA7F42519718CC
9B09EEF0381840002818000AF995917
[AC-pkey-public-key-key1]E1E570A3F6B1C2411948B3B4FFA256699B3BF871221CC9C5D
F257523777D033BEE77FC378145F2AD
[AC-pkey-public-key-key1]D716D7DB9FCABB4ADBF6FB4FDB0CA25C761B308EF53009F71
01F7C62621216D5A572C379A32AC290
[AC-pkey-public-key-key1]E55B394A217DA38B65B77F0185C8DB8095522D1EF044B465E
8716261214A5A3B493E866991113B2D
[AC-pkey-public-key-key1]485348
[AC-pkey-public-key-key1] peer-public-key end
[AC] quit
# Establish an SSH connection to the server, and specify the host public key of the server as key1.
<AC> ssh2 192.168.1.40 public-key key1
Username: client001
Press CTRL+C to abort.
Connecting to 192.168.1.40 port 22.
[email protected]'s password:
Enter a character ~ and a dot to abort.
******************************************************************************
* Copyright (c) 2004-2020 New H3C Technologies Co., Ltd. All rights reserved.*
* Without the owner's prior written consent, *
* no decompiling or reverse-engineering shall be allowed. *
******************************************************************************
<Switch>
After you enter username client001 and password aabbcc, you can log in to the switch successfully.
Example: Configuring the AC as an Stelnet client (publickey authentication)
Network configuration
As shown in Figure 12:
· The switch acts as the Stelnet server, and it uses publickey authentication and the DSA public key algorithm.
· The AC acts as the Stelnet client. After the user on the AC logs in to the switch through Stelnet, the user can configure and manage the switch as a network administrator.

Analysis
Because the client's host public key is required in the server configuration, you must generate a DSA key pair on the client before configuring the Stelnet server.
Procedures
1. Configure the Stelnet client:
# Assign an IP address to VLAN-interface 2.
<AC> system-view
[AC] interface vlan-interface 2
[AC-Vlan-interface2] ip address 192.168.1.56 255.255.255.0
[AC-Vlan-interface2] quit
# Generate a DSA key pair.
[AC] public-key local create dsa
The range of public key size is (512 ~ 2048).
If the key modulus is greater than 512, it will take a few minutes.
Press CTRL+C to abort.
Input the modulus length [default = 1024]:
Generating Keys...
.++++++++++++++++++++++++++++++++++++++++++++++++++*
........+......+.....+......................................+
...+.................+..........+...+
Create the key pair successfully.
# Export the DSA host public key to a public key file named key.pub.
[AC] public-key local export dsa ssh2 key.pub
[AC] quit
# Transmit the public key file key.pub to the server through FTP or TFTP. (Details not shown.)
2. Configure the Stelnet server:
# Generate RSA key pairs.
<Switch> system-view
[Switch] public-key local create rsa
The range of public key size is (512 ~ 2048)
If the key modulus is greater than 512, it will take a few minutes.
Press CTRL+C to abort.
Input the modulus length [default = 1024]:
Generating Keys...
........................++++++
...................++++++
..++++++++
............++++++++
Create the key pair successfully.
# Generate a DSA key pair.
[Switch] public-key local create dsa
The range of public key size is (512 ~ 2048).
If the key modulus is greater than 512, it will take a few minutes.
Press CTRL+C to abort.
Input the modulus length [default = 1024]:
Generating Keys...
.++++++++++++++++++++++++++++++++++++++++++++++++++*
........+......+.....+......................................+
...+.................+..........+...+
Create the key pair successfully.
# Generate an ECDSA key pair.
[Switch] public-key local create ecdsa secp256r1
Generating Keys...
.
Create the key pair successfully.
# Enable the Stelnet server.
[Switch] ssh server enable
# Assign an IP address to VLAN-interface 2. The Stelnet client uses this address as the destination address for SSH connection.
[Switch] interface vlan-interface 2
[Switch-Vlan-interface2] ip address 192.168.1.40 255.255.255.0
[Switch-Vlan-interface2] quit
# Set the authentication mode to AAA for user lines.
[Switch] line vty 0 63
[Switch-line-vty0-63] authentication-mode scheme
[Switch-line-vty0-63] quit
# Import the peer public key from the public key file key.pub, and name it ackey.
[Switch] public-key peer ackey import sshkey key.pub
# Create an SSH user named client002. Specify the authentication method as publickey for the user and assign the public key ackey to the user.
[Switch] ssh user client002 service-type stelnet authentication-type publickey assign publickey ackey
# Create a local device management user named client002.
[Switch] local-user client002 class manage
# Authorize local user client002 to use the SSH service.
[Switch-luser-manage-client002] service-type ssh
# Assign the network-admin user role to local user client002.
[Switch-luser-manage-client002] authorization-attribute user-role network-admin
[Switch-luser-manage-client002] quit
Verifying the configuration
# Verify that you can log in to the Stelnet server from the Stelnet client.
<AC> ssh2 192.168.1.40
Username: client002
Press CTRL+C to abort.
Connecting to 192.168.1.40 port 22.
The server is not authenticated. Continue? [Y/N]:y
Do you want to save the server public key? [Y/N]:n
Enter a character ~ and a dot to abort.
******************************************************************************
* Copyright (c) 2004-2020 New H3C Technologies Co., Ltd. All rights reserved.*
* Without the owner's prior written consent, *
* no decompiling or reverse-engineering shall be allowed. *
******************************************************************************
<Switch>
After you enter username client002 and then enter y to continue accessing the server, you can log in to the server successfully.
Example: Configuring the AC as an SFTP server (password authentication)
Network configuration
As shown in Figure 13:
· The route between the wireless client and the AC is reachable.
· The AC acts as the SFTP server and uses password authentication to authenticate the SFTP client. The username and password of the client are saved on the AC.
· The wireless client acts as the SFTP client. After the user on the client logs in to the AC through SFTP, the user can perform file management and transfer operations on the AC as a network administrator.

Procedures
# Generate RSA key pairs.
<AC> system-view
[AC] public-key local create rsa
The range of public key size is (512 ~ 2048).
If the key modulus is greater than 512, it will take a few minutes.
Press CTRL+C to abort.
Input the modulus length [default = 1024]:
Generating Keys...
........................++++++
...................++++++
..++++++++
............++++++++
Create the key pair successfully.
# Generate a DSA key pair.
[AC] public-key local create dsa
The range of public key size is (512 ~ 2048).
If the key modulus is greater than 512, it will take a few minutes.
Press CTRL+C to abort.
Input the modulus length [default = 1024]:
Generating Keys...
.++++++++++++++++++++++++++++++++++++++++++++++++++*
........+......+.....+......................................+
...+.................+..........+...+
Create the key pair successfully.
# Generate an ECDSA key pair.
[AC] public-key local create ecdsa secp256r1
Generating Keys...
.
Create the key pair successfully.
# Enable the SFTP server.
[AC] sftp server enable
# Assign an IP address to VLAN-interface 2. The SFTP client uses this address as the destination for SSH connection.
[AC] interface vlan-interface 2
[AC-Vlan-interface2] ip address 192.168.1.45 255.255.255.0
[AC-Vlan-interface2] quit
# Create a local device management user named client002.
[AC] local-user client002 class manage
# Set the password to aabbcc in plain text for local user client002.
[AC-luser-manage-client002] password simple aabbcc
# Authorize local user client002 to use the SSH service.
[AC-luser-manage-client002] service-type ssh
# Assign the network-admin user role and working directory cfa0:/ to local user client002.
[AC-luser-manage-client002] authorization-attribute user-role network-admin work-directory cfa0:/
[AC-luser-manage-client002] quit
# Create an SSH user named client002. Specify the authentication method as password and service type as sftp for the user.
[AC] ssh user client002 service-type sftp authentication-type password
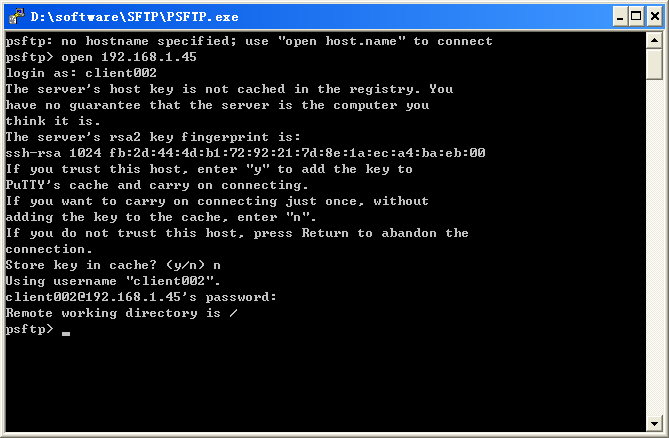
Verifying the configuration
The device supports different types of SFTP client software. This example uses an SFTP client that runs PSFTP of PuTTy version 0.58 to connect to the SFTP server and verify the configuration.
|
|
NOTE: PSFTP supports only password authentication. |
To verify that you can log in to the SFTP server from the SFTP client:
1. Run psftp.exe to launch the client interface shown in Figure 14, and enter the following command:
open 192.168.1.45
2. Enter username client002 and password aabbcc to log in to the SFTP server.
Figure 14 SFTP client interface
Example: Configuring the AC as an SFTP client (publickey authentication)
Network configuration
As shown in Figure 15:
· AC 2 acts as the SFTP server, and it uses publickey authentication and the RSA public key algorithm.
· AC 1 acts as the SFTP client. After the user on AC 1 logs in to AC 2 through SFTP, the user can perform file management and transfer operations on AC 2 as a network administrator.

Analysis
Because the client's host public key is required in the server configuration, you must generate RSA key pairs on the client before configuring the SFTP server.
Procedures
1. Configure the SFTP client:
# Assign an IP address to VLAN-interface 2.
<AC1> system-view
[AC1] interface vlan-interface 2
[AC1-Vlan-interface2] ip address 192.168.0.2 255.255.255.0
[AC1-Vlan-interface2] quit
# Generate RSA key pairs.
[AC1] public-key local create rsa
The range of public key size is (512 ~ 2048).
If the key modulus is greater than 512, it will take a few minutes.
Press CTRL+C to abort.
Input the modulus length [default = 1024]:
Generating Keys...
........................++++++
...................++++++
..++++++++
............++++++++
Create the key pair successfully.
# Export the host public key to a public key file named pubkey.
[AC1] public-key local export rsa ssh2 pubkey
[AC1] quit
# Transmit the public key file pubkey to the server through FTP or TFTP. (Details not shown.)
2. Configure the SFTP server:
# Generate RSA key pairs.
<AC2> system-view
[AC2] public-key local create rsa
The range of public key size is (512 ~ 2048).
If the key modulus is greater than 512, it will take a few minutes.
Press CTRL+C to abort.
Input the modulus length [default = 1024]:
Generating Keys...
........................++++++
...................++++++
..++++++++
............++++++++
Create the key pair successfully.
# Generate a DSA key pair.
[AC2] public-key local create dsa
The range of public key size is (512 ~ 2048).
If the key modulus is greater than 512, it will take a few minutes.
Press CTRL+C to abort.
Input the modulus length [default = 1024]:
Generating Keys...
.++++++++++++++++++++++++++++++++++++++++++++++++++*
........+......+.....+......................................+
...+.................+..........+...+
Create the key pair successfully.
# Generate an ECDSA key pair.
[AC2] public-key local create ecdsa secp256r1
Generating Keys...
.
Create the key pair successfully.
# Enable the SFTP server.
[AC2] sftp server enable
# Assign an IP address to VLAN-interface 2. The SFTP client uses this address as the destination for SSH connection.
[AC2] interface vlan-interface 2
[AC2-Vlan-interface2] ip address 192.168.0.1 255.255.255.0
[AC2-Vlan-interface2] quit
# Import the peer public key from the public key file pubkey, and name it ackey.
[AC2] public-key peer ackey import sshkey pubkey
# Create an SSH user named client001. Specify the service type as sftp and the authentication method as publickey for the user. Assign the public key ackey to the user.
[AC2] ssh user client001 service-type sftp authentication-type publickey assign publickey ackey
# Create a local device management user named client001.
[AC2] local-user client001 class manage
# Authorize local user client001 to use the SSH service.
[AC2-luser-manage-client001] service-type ssh
# Assign the network-admin user role and working directory cfa0:/ to local user client001.
[AC2-luser-manage-client001] authorization-attribute user-role network-admin work-directory cfa0:/
[AC2-luser-manage-client001] quit
Verifying the configuration
# Verify that you can log in to the SFTP server from the SFTP client.
<AC1> sftp 192.168.0.1 identity-key rsa
Username: client001
Press CTRL+C to abort.
Connecting to 192.168.0.1 port 22.
The server is not authenticated. Continue? [Y/N]:y
Do you want to save the server public key? [Y/N]:n
sftp>
# Display files under the current directory of the server, delete file z, and verify the result.
sftp> dir -l
-rwxrwxrwx 1 noone nogroup 1759 Aug 23 06:52 config.cfg
-rwxrwxrwx 1 noone nogroup 225 Aug 24 08:01 pubkey2
-rwxrwxrwx 1 noone nogroup 283 Aug 24 07:39 pubkey
drwxrwxrwx 1 noone nogroup 0 Sep 01 06:22 new
-rwxrwxrwx 1 noone nogroup 225 Sep 01 06:55 pub
-rwxrwxrwx 1 noone nogroup 0 Sep 01 08:00 z
sftp> delete z
Removing /z
sftp> dir -l
-rwxrwxrwx 1 noone nogroup 1759 Aug 23 06:52 config.cfg
-rwxrwxrwx 1 noone nogroup 225 Aug 24 08:01 pubkey2
-rwxrwxrwx 1 noone nogroup 283 Aug 24 07:39 pubkey
drwxrwxrwx 1 noone nogroup 0 Sep 01 06:22 new
-rwxrwxrwx 1 noone nogroup 225 Sep 01 06:55 pub
# Add a new directory named new1, and verify the result.
sftp> mkdir new1
sftp> dir -l
-rwxrwxrwx 1 noone nogroup 1759 Aug 23 06:52 config.cfg
-rwxrwxrwx 1 noone nogroup 225 Aug 24 08:01 pubkey2
-rwxrwxrwx 1 noone nogroup 283 Aug 24 07:39 pubkey
drwxrwxrwx 1 noone nogroup 0 Sep 01 06:22 new
-rwxrwxrwx 1 noone nogroup 225 Sep 01 06:55 pub
drwxrwxrwx 1 noone nogroup 0 Sep 02 06:30 new1
# Change the name of directory new1 to new2, and verify the result.
sftp> rename new1 new2
sftp> dir -l
-rwxrwxrwx 1 noone nogroup 1759 Aug 23 06:52 config.cfg
-rwxrwxrwx 1 noone nogroup 225 Aug 24 08:01 pubkey2
-rwxrwxrwx 1 noone nogroup 283 Aug 24 07:39 pubkey
drwxrwxrwx 1 noone nogroup 0 Sep 01 06:22 new
-rwxrwxrwx 1 noone nogroup 225 Sep 01 06:55 pub
drwxrwxrwx 1 noone nogroup 0 Sep 02 06:33 new2
# Download file pubkey2 from the server, and save it as a local file named public.
sftp> get pubkey2 public
Fetching / pubkey2 to public
/pubkey2 100% 225 1.4KB/s 00:00
# Upload local file pu to the server, save it as puk, and verify the result.
sftp> put pu puk
Uploading pu to / puk
sftp> dir -l
-rwxrwxrwx 1 noone nogroup 1759 Aug 23 06:52 config.cfg
-rwxrwxrwx 1 noone nogroup 225 Aug 24 08:01 pubkey2
-rwxrwxrwx 1 noone nogroup 283 Aug 24 07:39 pubkey
drwxrwxrwx 1 noone nogroup 0 Sep 01 06:22 new
drwxrwxrwx 1 noone nogroup 0 Sep 02 06:33 new2
-rwxrwxrwx 1 noone nogroup 283 Sep 02 06:35 pub
-rwxrwxrwx 1 noone nogroup 283 Sep 02 06:36 puk
sftp>
# Exit SFTP client view.
sftp> quit
<AC1>
Example: Configuring SCP with password authentication
Network configuration
As shown in Figure 16:
· AC 2 acts as the SCP server and uses password authentication to authenticate the SCP client. The client 's username and password are saved on AC 2.
· AC 1 acts as the SCP client. After the user on AC 1 logs in to AC 2 through SCP, the user can transfer files between AC 1 and AC 2 as a network administrator.

Procedures
1. Configure the SCP server:
# Generate RSA key pairs.
<AC2> system-view
[AC2] public-key local create rsa
The range of public key size is (512 ~ 2048).
If the key modulus is greater than 512, it will take a few minutes.
Press CTRL+C to abort.
Input the modulus length [default = 1024]:
Generating Keys...
........................++++++
...................++++++
..++++++++
............++++++++
Create the key pair successfully.
# Generate a DSA key pair.
[AC2] public-key local create dsa
The range of public key size is (512 ~ 2048).
If the key modulus is greater than 512, it will take a few minutes.
Press CTRL+C to abort.
Input the modulus length [default = 1024]:
Generating Keys...
.++++++++++++++++++++++++++++++++++++++++++++++++++*
........+......+.....+......................................+
...+.................+..........+...+.
Create the key pair successfully.
# Generate an ECDSA key pair.
[AC2] public-key local create ecdsa secp256r1
Generating Keys...
.
Create the key pair successfully.
# Enable the SCP server.
[AC2] scp server enable
# Assign an IP address to VLAN-interface 2. The client uses this address as the destination for SCP connection.
[AC2] interface vlan-interface 2
[AC2-Vlan-interface2] ip address 192.168.0.1 255.255.255.0
[AC2-Vlan-interface2] quit
# Create a local device management user named client001.
[AC2] local-user client001 class manage
# Set the password to aabbcc in plain text for local user client001.
[AC2-luser-manage-client001] password simple aabbcc
# Authorize local user client001 to use the SSH service.
[AC2-luser-manage-client001] service-type ssh
# Assign the network-admin user role to local user client001.
[AC2-luser-manage-client001] authorization-attribute user-role network-admin
[AC2-luser-manage-client001] quit
# Create an SSH user named client001. Specify the service type as scp and the authentication method as password for the user.
[AC2] ssh user client001 service-type scp authentication-type password
2. Assign an IP address to VLAN-interface 2 on AC 1.
<AC1> system-view
[AC1] interface vlan-interface 2
[AC1-Vlan-interface2] ip address 192.168.0.2 255.255.255.0
[AC1-Vlan-interface2] quit
[AC1] quit
Verifying the configuration
# Verify that you can log in to the SCP server, download file remote.bin from the server, and save it locally with the name local.bin.
<AC1> scp 192.168.0.1 get remote.bin local.bin
Username: client001
Press CTRL+C to abort.
Connecting to 192.168.0.1 port 22.
The server is not authenticated. Continue? [Y/N]:y
Do you want to save the server public key? [Y/N]:n
[email protected]’s password:
remote.bin 100% 2875 2.8KB/s 00:00
Example: Configuring NETCONF over SSH with password authentication
Network configuration
As shown in Figure 17:
· The route between the wireless client and the AC is reachable.
· The AC acts as the NETCONF-over-SSH server and uses password authentication to authenticate the client. The client's username and password are saved on the AC.
· The wireless client acts as the NETCONF-over-SSH client, using SSH2 client software. After the user on the wireless client logs in to the AC through NETCONF over SSH, the user can perform NETCONF operations on the AC as a network administrator.

Procedures
# Generate RSA key pairs.
<AC> system-view
[AC] public-key local create rsa
The range of public key size is (512 ~ 2048).
If the key modulus is greater than 512, it will take a few minutes.
Press CTRL+C to abort.
Input the modulus length [default = 1024]:
Generating Keys...
........................++++++
...................++++++
..++++++++
............++++++++
Create the key pair successfully.
# Generate a DSA key pair.
[AC] public-key local create dsa
The range of public key size is (512 ~ 2048).
If the key modulus is greater than 512, it will take a few minutes.
Press CTRL+C to abort.
Input the modulus length [default = 1024]:
Generating Keys...
.++++++++++++++++++++++++++++++++++++++++++++++++++*
........+......+.....+......................................+
...+.................+..........+...+.
Create the key pair successfully.
# Generate an ECDSA key pair.
[AC] public-key local create ecdsa secp256r1
Generating Keys...
.
Create the key pair successfully.
# Enable NETCONF over SSH.
[AC] netconf ssh server enable
# Assign an IP address to VLAN-interface 2. The client uses this address as the destination for NETCONF-over-SSH connection.
[AC] interface vlan-interface 2
[AC-Vlan-interface2] ip address 192.168.100.49 255.255.255.0
[AC-Vlan-interface2] quit
# Set the authentication mode to AAA for user lines.
[AC] line vty 0 63
[AC-line-vty0-63] authentication-mode scheme
[AC-line-vty0-63] quit
# Create a local device management user named client001.
[AC] local-user client001 class manage
# Set the password to aabbcc in plain text for local user client001.
[AC-luser-manage-client001] password simple aabbcc
# Authorize local user client001 to use the SSH service.
[AC-luser-manage-client001] service-type ssh
# Assign the network-admin user role to local user client001.
[AC-luser-manage-client001] authorization-attribute user-role network-admin
[AC-luser-manage-client001] quit
# Create an SSH user named client001. Specify the service type as NETCONF and the authentication method as password for the user.
[AC] ssh user client001 service-type netconf authentication-type password
Verifying the configuration
1. Launch a client that supports NETCONF over SSH.
This example uses NetConf Browser 2015 (version 3.1).
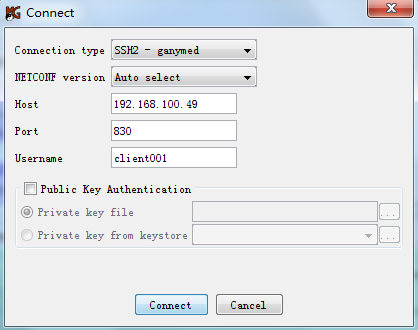
2. Select File > Connect… from the menu.
The Connect page opens, as shown in Figure 18.
3. Configure connection parameters as follows:
a. Select a connection type from the Connection type list.
This example uses SSH2-ganymed.
b. Select Auto select from the NETCONF version list.
c. Enter 192.168.100.49 in the Host field.
d. Enter 830 in the Port field.
e. Enter client001 in the Username field.
f. Use the default setting for the Public Key Authentication area.
4. Click Connect.
Figure 18 Connecting to the device
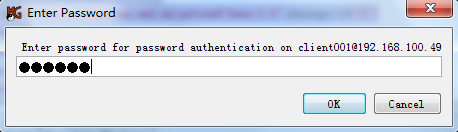
5. Enter password aabbcc, and then click OK, as shown in Figure 19.
Figure 19 Entering the password
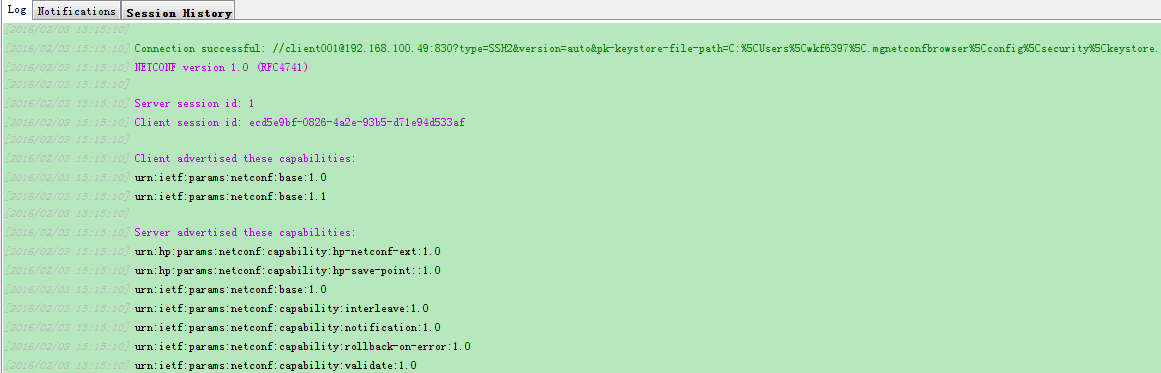
The NETCONF configuration interface opens when the client successfully establishes an NETCONF-over-SSH connection to the device. The Log tab of the interface displays the connection information, as shown in Figure 20.
Figure 20 Logging in to the device
6. Verify that you have obtained the permissions of the network-admin user role:
In the Command XML area of the NETCONF configuration interface, enter <get-sessions/>, and then click Send.
The following message is displayed in the Output XML area.
<?xml version="1.0" encoding="utf-8"?>
<rpc-reply xmlns="urn:ietf:params:xml:ns:netconf:base:1.0" message-id="2">
<get-sessions>
<Session>
<SessionID>1</SessionID>
<Line>vty1</Line>
<UserName>client001</UserName>
<Since>2011-01-01T08:36:27</Since>
<LockHeld>false</LockHeld>
</Session>
</get-sessions>
</rpc-reply>
Related documentation
· Security Command Reference in H3C Access Controllers Command References
· Security Configuration Guide in H3C Access Controllers Configuration Guides
· WLAN Access Command Reference in H3C Access Controllers Command References
· WLAN Access Configuration Guide in H3C Access Controllers Configuration Guides
