- Table of Contents
-
- H3C S7500 Series Operation Manual(Release 3100 Series)-(V1.04)
- 00-1Cover
- 00-2Overview
- 01-CLI Configuration
- 02-Login Configuration
- 03-Configuration File Management Configuration
- 04-VLAN Configuration
- 05-Extended VLAN Application Configuration
- 06-IP Address-IP Performance-IPX Configuration
- 07-GVRP Configuration
- 08-QinQ Configuration
- 09-Port Basic Configuration
- 10-Link Aggregation Configuration
- 11-Port Isolation Configuration
- 12-Port Binding Configuration
- 13-DLDP Configuration
- 14-MAC Address Table Configuration
- 15-MSTP Configuration
- 16-Routing Protocol Configuration
- 17-Multicast Configuration
- 18-802.1x Configuration
- 19-AAA-RADIUS-HWTACACS-EAD Configuration
- 20-Traffic Accounting Configuration
- 21-VRRP-HA Configuration
- 22-ARP Configuration
- 23-DHCP Configuration
- 24-ACL Configuration
- 25-QoS Configuration
- 26-Mirroring Configuration
- 27-Cluster Configuration
- 28-PoE Configuration
- 29-UDP-Helper Configuration
- 30-SNMP-RMON Configuration
- 31-NTP Configuration
- 32-SSH Terminal Service Configuration
- 33-File System Management Configuration
- 34-FTP and TFTP Configuration
- 35-Information Center Configuration
- 36-DNS Configuration
- 37-System Maintenance and Debugging Configuration
- 38-HWPing Configuration
- 39-RRPP Configuration
- 40-NAT-Netstream-Policy Routing Configuration
- 41-Telnet Protection Configuration
- 42-Hardware-Dependent Software Configuration
- Related Documents
-
| Title | Size | Download |
|---|---|---|
| 32-SSH Terminal Service Configuration | 190 KB |
Chapter 1 SSH Terminal Service Configuration
1.1.2 Configuring an SSH Server
1.1.3 Configuring an SSH Client
1.1.4 Displaying SSH Configuration
1.1.5 SSH Server Configuration Example
1.1.6 SSH Client Configuration Example
1.2.2 SFTP Server Configuration
1.2.3 SFTP Client Configuration
1.2.4 SFTP Configuration Example
Chapter 1 SSH Terminal Service Configuration
1.1 SSH Terminal Services
This section covers these topics:
l Displaying SSH Configuration
l SSH Server Configuration Example
l SSH Client Configuration Example
1.1.1 Introduction to SSH
Secure shell (SSH) can provide information security and powerful authentication to prevent such assaults as IP address spoofing, plain-text password interception when users log on to the Switch remotely in an insecure network environment.
As an SSH server, a switch can connect to multiple SSH clients; as an SSH client, a switch can establish SSH connections with switches or UNIX hosts that support SSH server.
Currently, the S7500 series switches support SSH2.0 (compatible with SSH1.5).
The communication process between the server and client includes the following five stages:
1) Version negotiation stage. The following operations are completed at this stage:
l The client sends TCP connection requests to the server.
l When a TCP connection is established, both ends begin to negotiate the SSH version.
l If they can work together in harmony, they enter the key algorithm negotiation stage. Otherwise the server removes the TCP connection.
2) Key and algorithm negotiation stage. The following operations are completed at this stage:
l The server and the client send key algorithm negotiation packets to each other, which include the supported server-side public key algorithm list, encryption algorithm list, MAC algorithm list, and compression algorithm list.
l Based on the received algorithm negotiation packets, the server and the client figure out the algorithms to be used.
l The server and the client use the DH key exchange algorithm and parameters such as the host key pair to generate the session key and session ID.
Through the above steps, the server and the client get the same session key, which is to be used to encrypt and decrypt data exchanged between the server and the client later. The server and the client use session ID in the authentication stage.
3) Authentication stage
The client sends to the server an authentication request, which includes the username and authentication method, and the server starts to authenticate the client.
SSH provides two authentication methods: password authentication and RSA authentication.
For password authentication:
l The client encrypts the username and password, encapsulates them into a password authentication request, and sends the request to the server.
l Upon receiving the request, the server decrypts the username and password, compares them against those it maintains, and then informs the client of the authentication result.
For RSA authentication:
l The client sends to the server an RSA authentication request containing its RSA public key modulus.
l The server validates the modulus. If the modulus is invalid, the authentication fails; otherwise, the server generates a 32-byte random number, converts it to a multiple precision (MP) integer (MSB first), encrypts it using the RSA public key from the client, and then sends a challenge to the client.
l Upon receiving the challenge, the client decrypts it with its private key and gets an MP integer, creates an MD5 value using the MP integer and the session ID, and then encrypts and sends the MD5 value to the server.
l After receiving the encrypted MD5 value, the server decrypts it to obtain the MD5 value and compares it with that locally calculated. If they match, the authentication succeeds.
4) Session request stage. The client sends session request messages to the server which processes the request messages.
5) Interactive session stage. Both ends exchange data till the session ends.
1.1.2 Configuring an SSH Server
The following table describes SSH server configuration tasks.
Table 1-1 Configure SSH2.0 server
|
To do… |
Use the command… |
|
|
Configure supported protocols |
protocol inbound |
|
|
Generate a local RSA key pair |
rsa local-key-pair create |
|
|
Destroy a local RSA key pair |
rsa local-key-pair destroy |
|
|
Create an SSH user |
ssh user username |
|
|
Specify a default authentication type for SSH users |
ssh authentication-type default |
|
|
Configure authentication type for SSH users |
ssh user username authentication-type |
|
|
Set SSH authentication timeout time |
ssh server timeout |
|
|
Set SSH authentication retry times |
ssh server authentication-retries |
|
|
Set the update interval for the server key |
ssh server rekey-interval |
|
|
Specify the server to be compatible with the SSH1.x-supported client. |
ssh server compatible-ssh1x enable |
|
|
Allocate public keys for SSH users |
ssh user username assign rsa-key keyname |
I. Configuring supported protocols
Table 1-2 Configure supported protocols
|
To do... |
Use the command... |
Remarks |
|
Enter system view |
system-view |
— |
|
Enter one or multiple user interface views |
user-interface [ type-keyword ] number [ ending-number ] |
Required |
|
Set the login authentication method |
authentication-mode scheme [ command-authorization ] |
Required |
|
Configure the protocols supported in the user interface view(s) |
protocol inbound { all |ssh | telnet } |
Optional By default, the system supports both Telnet and SSH. |
![]() Caution:
Caution:
l When SSH protocol is supported in the current user interface, to ensure a successful login, you must use the authentication-mode scheme command to configure the AAA authentication for login to the user interface.
l The protocol inbound ssh configuration fails if you configured the authentication-mode password command or the authentication-mode none command. When you configure SSH protocol successfully for the user interface, then you cannot configure the authentication-mode password command or the authentication-mode none command any more.
II. Generating or destroying RSA key pairs
This configuration task is used to generate or destroy the RSA key pairs on the server end. Generating RSA key pairs on the server end is a prerequisite for SSH login. After you execute this command, the system will prompt you to specify the key length in bits. The length range is from 512 bits to 2048 bits, and defaults to 1024 bits. If there already exist key pairs, the system will prompt you whether to replace the old ones.
& Note:
Server RSA key pairs (H3C_Server) is not used in SSH2.0; therefore, when the rsa local-key-pair create command is executed, the system only prompts you the host RSA key pair (H3C_Host) is generated, and does not inform you the information about the server RSA key pair even if the server RSA key pair is generated in the background for the purpose of SSH1.x compatibility. You can use the display rsa local-key-pair public command to display the generated key pairs.
Table 1-3 Generate or destroy RSA key pairs
|
To do... |
Use the command... |
Remarks |
|
Enter system view |
system-view |
— |
|
Generate a local RSA key pair |
rsa local-key-pair create |
Required |
|
Destroy a local RSA key pair |
rsa local-key-pair destroy |
Optional |
& Note:
Configuration of the rsa local-key-pair create can survive a reboot. You only need to configure it once.
III. Creating an SSH user
Table 1-4 Create an SSH user
|
To do... |
Use the command... |
Remarks |
|
Enter system view |
system-view |
— |
|
Create an SSH user |
ssh user username |
Required |
IV. Configuring authentication type
An authentication type must be specified for new SSH users. Otherwise, they cannot access the switch.
Table 1-5 Configure authentication type
|
To do... |
Use the command... |
Remarks |
|
Enter system view |
system-view |
— |
|
Specify a default authentication type for SSH users |
ssh authentication-type default { password | rsa | password-publickey | all } |
Optional; By default, the password authentication type is specified. |
|
Configure authentication type for SSH users |
ssh user username authentication-type { password | rsa | password-publickey | all } |
Optional; By default, the system does not specify available authentication types for SSH users, that is, they can not access the switch |
Note that:
l Use the ssh authentication-type default command to configure the default authentication type for all users.
l Use the ssh user username authentication-type command to specify the authentication type for a user.
l When the two commands are configured simultaneously, and the authentication types configured for the user (specified by username) are different from each other, comply with the configuration of the ssh user username authentication-type command.
![]() Caution:
Caution:
l If the RSA authentication type is specified, then the RSA public key of the client user must be configured on the switch.
l For the password-publickey authentication type: SSH1 client users can access the switch as long as they pass one of the two authentications. SSH2 client users can access the switch only when they pass both the authentications.
l For the password authentication, the username argument should be consistent with the effective user name defined in AAA; for the RSA authentication, the username argument is the local SSH user name, so that there is no need to configure a local user in AAA.
V. Configuring SSH attributes for the server
Configuring SSH authentication timeout time, retry times, server key update interval and SSH compatible mode for the server can effectively assure security of SSH connections by avoiding illegal actions such as malicious password guessing.
Table 1-6 Configure SSH attributes for the server
|
To do... |
Use the command... |
Remarks |
|
Enter system view |
system-view |
— |
|
Set SSH authentication timeout time |
ssh server timeout seconds |
Optional The authentication timeout time defaults to 60 seconds. |
|
Set SSH authentication retry times |
ssh server authentication-retries times |
Optional The authentication retry times defaults to 3. |
|
Set server key update interval |
ssh server rekey-interval hours |
Optional By default, the system does not update server keys. |
|
Set the SSH server to be compatible with SSH1.x clients |
ssh server compatible-ssh1x enable |
Optional By default, the SSH server is compatible with SSH1.x clients. |
VI. Configuring client public keys
You can configure RSA public keys for client users on the switch and specify RSA private keys, which correspond to the public keys, on the client. The client public keys are generated randomly by the SSH2.0 client software.
This operation is not necessary for password authentication type.
Table 1-7 Configure client public keys
|
To do... |
Use the command... |
Remarks |
|
Enter system view |
system-view |
— |
|
Enter public key view |
rsa peer-public-key key-name |
Required |
|
Enter public key code view |
public-key-code begin |
You can key in a blank space between characters, since the system can remove the blank space automatically. You can also press the <Enter> key and then key in characters continuously. But the public key should be composed of hexadecimal characters. |
|
Return to public key view from public key code view |
public-key-code end |
The system saves public key data when exiting from public key code view |
|
Return to system view from public key view |
peer-public-key end |
— |
|
Allocate public keys to SSH users |
ssh user username assign rsa-key keyname |
Required The keyname argument is the name of an existing public key. If the user already has a public key, the new public key overrides the old one. |
1.1.3 Configuring an SSH Client
Follow these steps to configure an SSH client:
|
To do... |
Use the command... |
Remarks |
|
Enter system view |
system-view |
— |
|
Create the connection between an SSH client and an SSH server |
ssh2 { host-ip | host-name } [ port-num ] [ prefer_kex { dh_group1 | dh_exchange_group } | prefer_ctos_cipher { des | aes128 } | prefer_stoc_cipher { des | aes128 } | prefer_ctos_hmac { sha1 | sha1_96 | md5 | md5_96 } | prefer_stoc_hmac { sha1 | sha1_96 | md5 | md5_96 } ] * |
Required You can use this command to enable the connection between an SSH client and an SSH server, define the preferential key exchange algorithm, the preferential encryption algorithm and the preferential HMAC algorithm between the server and client. |
|
Allocate a public key to the server |
ssh client server-ip assign rsa-key keyname |
Required You can specify on the client the public key for the server to be connected to guarantee the client can be connected to a reliable server. |
|
Configure the client to run the first-time authentication for the server |
ssh client first-time enable |
Optional By default, the client runs the first-time authentication. |
& Note:
With the first-time authentication, if the SSH client does not have the public key of the server which the SSH client accesses for the first time, the client continues to access the server and save the public key of the server locally. Then at the next access, the client can authenticate the server through the public key saved locally.
1.1.4 Displaying SSH Configuration
Use the display commands in any view to view the running status of SSH and verify the configuration.
Table 1-8 Display SSH configuration
|
To do... |
Use the command... |
Remarks |
|
Display the public keys of the host key pair and the server key pair on the server |
display rsa local-key-pair public |
The display commands can be executed in any view. |
|
Display the public key of the specified RSA key pair on the client |
display rsa peer-public-key [ brief | name keyname ] |
|
|
Display SSH status and session information |
display ssh server { status | session } |
|
|
Display SSH user information |
display ssh user-information [ username ] |
|
|
Display the mappings between host public keys and SSH servers saved on a client |
display ssh server-info |
1.1.5 SSH Server Configuration Example
I. Network requirements
As shown in Figure 1-1, the PC (SSH Client) runs the client software supporting SSH2.0, establishes a local connection with the switch (SSH Server) and ensures the security of data exchange.
II. Network diagram

Figure 1-1 Network diagram for SSH server configuration
III. Configuration procedure
1) Generate a local RSA key pair.
<H3C>system-view
[H3C] rsa local-key-pair create
& Note:
If the local RSA key pair has been generated in previous operations, skip this step here.
2) Set authentication type.
Settings for the two authentication types are described respectively in the following section:
l Password authentication
# Set AAA authentication on the user interfaces.
[H3C] user-interface vty 0 4
[H3C-ui-vty0-4] authentication-mode scheme
# Set the user interfaces to support SSH.
[H3C-ui-vty0-4] protocol inbound ssh
# Configure the login protocol for the client001 user as SSH, specify commands of level 3, authentication type as password and the authentication password as abc.
[H3C] local-user client001
[H3C-luser-client001] password simple abc
[H3C-luser-client001] service-type ssh level 3
[H3C-luser-client001] quit
[H3C] ssh user client001 authentication-type password
& Note:
Select the default SSH authentication timeout time and authentication retry times. After these settings, run the SSH2.0-supporting client software on other terminals connected to the switch. These terminals can log in to the switch using user name client001 and password abc.
l RSA public key authentication
# Set AAA authentication on the user interfaces.
[H3C] user-interface vty 0 4
[H3C-ui-vty0-4] authentication-mode scheme
# Set the user interfaces to support SSH.
[H3C-ui-vty0-4] protocol inbound ssh
# Set the command level for the login users to 3.
[H3C-ui-vty0-4] user privilege level 3
[H3C-ui-vty0-4] quit
# Configure the login protocol for the client002 user as SSH and authentication type as RSA public key.
[H3C] ssh user client002 authentication-type rsa
# Generate randomly RSA key pairs on the SSH2.0 client and send the corresponding public keys to the server.
# Configure client public keys on the server, with their name as H3C002.
[H3C] rsa peer-public-key H3C002
[H3C-rsa-public-key] public-key-code begin
[H3C-rsa-key-code] 308186028180739A291ABDA704F5D93DC8FDF84C427463
[H3C-rsa-key-code] 1991C164B0DF178C55FA833591C7D47D5381D09CE82913
[H3C-rsa-key-code] D7EDF9C08511D83CA4ED2B30B809808EB0D1F52D045DE4
[H3C-rsa-key-code] 0861B74A0E135523CCD74CAC61F8E58C452B2F3F2DA0DC
[H3C-rsa-key-code] C48E3306367FE187BDD944018B3B69F3CBB0A573202C16
[H3C-rsa-key-code] BB2FC1ACF3EC8F828D55A36F1CDDC4BB45504F020125
[H3C-rsa-key-code] public-key-code end
[H3C-rsa-public-key] peer-public-key end
[H3C] ssh user client002 assign rsa-key H3C002
# Start the SSH client software on the host which stores the RSA private keys and perform corresponding configurations to establish an SSH connection.
1.1.6 SSH Client Configuration Example
I. Network requirements
As shown in Figure 1-2:
l Switch A serves as an SSH client with user name being client003.
l Switch B serves as an SSH server, with its IP address being 10.165.87.136.
l The SSH client authenticates the SSH server to ensure that the server end is legal.
II. Network diagram
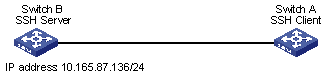
Figure 1-2 Network diagram for SSH client configuration
III. Configuration procedure
The following configurations are performed on Switch B.
& Note:
The SSH client does not authenticate the SSH server for the first time access. It is necessary to configure on the SSH client the RAS host public key of the SSH server.
1) Configure the client not to perform first-time authentication to the SSH server.
<H3C> system-view
[H3C] undo ssh client first-time
2) Configure server public keys on the client.
[H3C] rsa peer-public-key public
[H3C-rsa-public-key] public-key-code begin
[H3C-rsa-key-code] 308186028180739A291ABDA704F5D93DC8FDF84C427463
[H3C-rsa-key-code] 1991C164B0DF178C55FA833591C7D47D5381D09CE82913
[H3C-rsa-key-code] D7EDF9C08511D83CA4ED2B30B809808EB0D1F52D045DE4
[H3C-rsa-key-code] 0861B74A0E135523CCD74CAC61F8E58C452B2F3F2DA0DC
[H3C-rsa-key-code] C48E3306367FE187BDD944018B3B69F3CBB0A573202C16
[H3C-rsa-key-code] BB2FC1ACF3EC8F828D55A36F1CDDC4BB45504F020125
[H3C-rsa-key-code] public-key-code end
[H3C-rsa-public-key] peer-public-key end
[H3C] ssh client 10.165.87.136 assign rsa-key public
3) Start SSH client
Settings for the two authentication types are described respectively in the following section:
l Adopt the password authentication and start the client using the default encryption algorithm.
[H3C] ssh2 10.165.87.136
username: client003
Trying 10.165.87.136 ...
Press CTRL+K to abort
Connected to 10.165.87.136 ...
Enter password:
**************************************************************************
* Copyright(c) 2004-2007 Hangzhou H3C Tech. Co., Ltd. All rights reserved.*
* Without the owner's prior written consent, *
* no decompiling or reverse-engineering shall be allowed. *
**************************************************************************
<H3C>
l Adopt the RSA public key authentication and start the client using the defined encryption algorithm.
[H3C] ssh2 10.165.87.136 perfer_kex dh_group1 perfer_ctos_cipher des perfer_ctos_hmac md5 perfer_stoc_hmac md5
username: client003
Trying 10.165.87.136...
Press CTRL+K to abort
Connected to 10.165.87.136...
**************************************************************************
* Copyright(c) 2004-2007 Hangzhou H3C Tech. Co., Ltd. All rights reserved.*
* Without the owner's prior written consent, *
* no decompiling or reverse-engineering shall be allowed. *
**************************************************************************
<H3C>
1.2 SFTP Service
1.2.1 SFTP Overview
Secure FTP (SFTP) is a new feature introduced in SSH2.0.
SFTP is established on SSH connections to secure remote users’ login to the switch, file management, and file transfer (such as upgrade the system), thus providing much securer data transfer. An SFTP client enables you to securely log onto another remote device to transfer files.
1.2.2 SFTP Server Configuration
The following sections describe SFTP server configuration tasks:
l Configuring service type for an SSH user
I. Configuring service type for an SSH user
Table 1-9 Configure service type for an SSH user
|
To do... |
Use the command... |
Remarks |
|
Enter system view |
system-view |
— |
|
Configure service type for an SSH user |
ssh user username service-type { stelnet | sftp | all } |
Required By default, the available service type is stelnet. |
& Note:
For SFTP login users, it is necessary to set their service type to sftp or all.
II. Enabling the SFTP server
Table 1-10 Enable the SFTP server
|
To do... |
Use the command... |
Remarks |
|
Enter system view |
system-view |
— |
|
sftp server enable |
Required By default, the SFTP server is not enabled. |
1.2.3 SFTP Client Configuration
The following sections describe SFTP client configuration tasks:
Table 1-11 Configure SFTP client
|
To do... |
Command Key word |
View |
Remarks |
|
|
Enable the SFTP client |
sftp |
System view |
Required |
|
|
Disable the SFTP client |
bye |
SFTP client view |
Optional |
|
|
exit |
||||
|
quit |
||||
|
SFTP directory -related operations |
Change the current directory |
cd |
SFTP client view |
Optional |
|
Return to the upper-level directory |
cdup |
|||
|
Display the current directory |
pwd |
|||
|
Display the list of the files in a directory |
dir |
|||
|
ls |
||||
|
Create a new directory |
mkdir |
|||
|
Delete a directory |
rmdir |
|||
|
SFTP file-related operations |
Rename a file on the SFTP server |
rename |
SFTP client view |
Optional |
|
Download a file from the remote SFTP server |
get |
|||
|
Upload a local file to the remote SFTP server |
put |
|||
|
Display the list of the files in a directory |
dir |
|||
|
ls |
||||
|
Delete a file from the SFTP server |
delete |
|||
|
remove |
||||
|
Get help information about SFTP client commands |
help |
SFTP client view |
Optional |
|
I. Enabling the SFTP client
You can enable the SFTP client, establish a connection to the remote SFTP server and enter STP client view.
Table 1-12 Enable the SFTP client
|
To do... |
Use the command... |
Remarks |
|
Enter system view |
system-view |
— |
|
Enable the SFTP client |
sftp { host-ip | host-name } [ port-num ] [ prefer_kex { dh_group1 | dh_exchange_group } | prefer_ctos_cipher { des | aes128 } | prefer_stoc_cipher { des | aes128 } | prefer_ctos_hmac { sha1 | sha1_96 | md5 | md5_96 } | prefer_stoc_hmac { sha1 | sha1_96 | md5 | md5_96 } ] * |
Required |
II. Disabling the SFTP client
Table 1-13 Disable the SFTP client
|
To do... |
Use the command... |
Remarks |
|
Enter system view |
system-view |
— |
|
Enter SFTP client view |
sftp { host-ip | host-name } |
— |
|
Disable the SFTP client |
bye |
The three commands have the same function. |
|
exit |
||
|
quit |
III. Operating with SFTP directories
SFTP directory-related operations include: changing or displaying the current directory, creating or deleting a directory, and displaying files or information of a specific directory.
Table 1-14 Operate with SFTP directories
|
To do... |
Use the command... |
Remarks |
|
Enter system view |
system-view |
Optional |
|
Enter SFTP client view |
sftp { host-ip | host-name } |
|
|
Change the current directory |
cd [ remote-path ] |
|
|
Return to the upper-level directory |
cdup |
|
|
Display the current directory |
pwd |
|
|
Display the list of the files in a directory |
dir [ -a | -l ] [ remote-path ] |
Optional The dir and ls commands have the same function. |
|
ls [ -a | -l ] [ remote-path ] |
||
|
Create a directory on the SFTP server |
mkdir remote-path |
Optional |
|
Delete a directory from the SFTP server |
rmdir remote-path&<1-10> |
IV. Operating with SFTP files
SFTP file-related operations include: changing file name, downloading files, uploading files, displaying the list of the files, and deleting files.
Table 1-15 Operate with SFTP files
|
To do... |
Use the command... |
Remarks |
|
Enter system view |
system-view |
Optional |
|
Enter SFTP client view |
sftp { host-ip | host-name } |
|
|
Change the name of a file on the remote SFTP server |
rename old-name new-name |
|
|
Download a file from the remote SFTP server |
get remote-file [ local-file ] |
|
|
Upload a file to the remote SFTP server |
put local-file [ remote-file ] |
|
|
Display the list of files in a directory |
dir [ -a | -l ] [ remote-path ] |
Optional The dir and ls commands have the same function. |
|
ls [ -a | -l ] [ remote-path ] |
||
|
Delete a file from the SFTP server |
delete remote-file&<1-10> |
Optional The delete and remove commands have the same function. |
|
remove remote-file&<1-10> |
V. Displaying help information
You can display help information about a command, such as syntax and parameters.
Table 1-16 Display help information about SFTP client commands
|
To do... |
Use the command... |
Remarks |
|
Enter system view |
system-view |
— |
|
Enter SFTP client view |
sftp { host-ip | host-name } |
— |
|
Display help information about SFTP client commands |
help [ all | command-name ] |
Optional |
1.2.4 SFTP Configuration Example
I. Network requirements
As shown in Figure 1-3:
l An SSH connection is present between Switch A and Switch B.
l Switch B serves as an SFTP server, with IP address being 10.111.27.91.
l Switch A serves as an SFTP client.
l An SSH user named abc with password being hello is created.
II. Network diagram
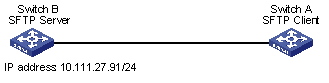
Figure 1-3 Network diagram for SFTP configuration
III. Configuration procedure
1) Configure Switch B (SFTP server)
# Enable the SFTP server.
[H3C] sftp server enable
# Specify SFTP service for SSH user abc.
[H3C] ssh user abc service-type sftp
2) Configure Switch A (SFTP client)
# Establish a connection to the remote SFTP server and enter SFTP client view.
[H3C] sftp 10.111.27.91
# Display the current directory on the SFTP server, delete file z and verify the operation.
sftp-client> dir
-rwxrwxrwx 1 noone nogroup 1759 Aug 23 06:52 config.cfg
-rwxrwxrwx 1 noone nogroup 225 Aug 24 08:01 pubkey2
-rwxrwxrwx 1 noone nogroup 283 Aug 24 07:39 pubkey1
drwxrwxrwx 1 noone nogroup 0 Sep 01 06:22 new
-rwxrwxrwx 1 noone nogroup 225 Sep 01 06:55 pub
-rwxrwxrwx 1 noone nogroup 0 Sep 01 08:00 z
sftp-client> delete z
The following File will be deleted:
flash:/z
Are you sure to delete it?(Y/N):y
This operation may take a long time. Please wait...
File successfully Removed
sftp-client> dir
-rwxrwxrwx 1 noone nogroup 1759 Aug 23 06:52 config.cfg
-rwxrwxrwx 1 noone nogroup 225 Aug 24 08:01 pubkey2
-rwxrwxrwx 1 noone nogroup 283 Aug 24 07:39 pubkey1
drwxrwxrwx 1 noone nogroup 0 Sep 01 06:22 new
-rwxrwxrwx 1 noone nogroup 225 Sep 01 06:55 pub
# Create directory new1 and verify the operation.
sftp-client> mkdir new1
New directory created
sftp-client> dir
-rwxrwxrwx 1 noone nogroup 1759 Aug 23 06:52 config.cfg
-rwxrwxrwx 1 noone nogroup 225 Aug 24 08:01 pubkey2
-rwxrwxrwx 1 noone nogroup 283 Aug 24 07:39 pubkey1
drwxrwxrwx 1 noone nogroup 0 Sep 01 06:22 new
-rwxrwxrwx 1 noone nogroup 225 Sep 01 06:55 pub
drwxrwxrwx 1 noone nogroup 0 Sep 02 06:30 new1
# Change the name of directory new1 to new2 and verify the operation.
sftp-client> rename new1 new2
File successfully renamed
sftp-client> dir
-rwxrwxrwx 1 noone nogroup 1759 Aug 23 06:52 config.cfg
-rwxrwxrwx 1 noone nogroup 225 Aug 24 08:01 pubkey2
-rwxrwxrwx 1 noone nogroup 283 Aug 24 07:39 pubkey1
drwxrwxrwx 1 noone nogroup 0 Sep 01 06:22 new
-rwxrwxrwx 1 noone nogroup 225 Sep 01 06:55 pub
drwxrwxrwx 1 noone nogroup 0 Sep 02 06:33 new2
# Download the file named pubkey2 and rename it to public.
sftp-client> get pubkey2 public
Remote file:flash:/pubkey2 ---> Local file: public..
Downloading file successfully ended
# Upload the file named pu to the SFTP server and rename it to puk. Verify the operations.
sftp-client> put pu puk
Local file: pu ---> Remote file: flash:/puk
Uploading file successfully ended
sftp-client> dir
-rwxrwxrwx 1 noone nogroup 1759 Aug 23 06:52 config.cfg
-rwxrwxrwx 1 noone nogroup 225 Aug 24 08:01 pubkey2
-rwxrwxrwx 1 noone nogroup 283 Aug 24 07:39 pubkey1
drwxrwxrwx 1 noone nogroup 0 Sep 01 06:22 new
drwxrwxrwx 1 noone nogroup 0 Sep 02 06:33 new2
-rwxrwxrwx 1 noone nogroup 283 Sep 02 06:35 pub
-rwxrwxrwx 1 noone nogroup 283 Sep 02 06:36 puk
sftp-client>
# Exit from SFTP.
sftp-client> quit
Bye
[H3C]