- Table of Contents
-
- H3C S7500 Series Operation Manual(Release 3100 Series)-(V1.04)
- 00-1Cover
- 00-2Overview
- 01-CLI Configuration
- 02-Login Configuration
- 03-Configuration File Management Configuration
- 04-VLAN Configuration
- 05-Extended VLAN Application Configuration
- 06-IP Address-IP Performance-IPX Configuration
- 07-GVRP Configuration
- 08-QinQ Configuration
- 09-Port Basic Configuration
- 10-Link Aggregation Configuration
- 11-Port Isolation Configuration
- 12-Port Binding Configuration
- 13-DLDP Configuration
- 14-MAC Address Table Configuration
- 15-MSTP Configuration
- 16-Routing Protocol Configuration
- 17-Multicast Configuration
- 18-802.1x Configuration
- 19-AAA-RADIUS-HWTACACS-EAD Configuration
- 20-Traffic Accounting Configuration
- 21-VRRP-HA Configuration
- 22-ARP Configuration
- 23-DHCP Configuration
- 24-ACL Configuration
- 25-QoS Configuration
- 26-Mirroring Configuration
- 27-Cluster Configuration
- 28-PoE Configuration
- 29-UDP-Helper Configuration
- 30-SNMP-RMON Configuration
- 31-NTP Configuration
- 32-SSH Terminal Service Configuration
- 33-File System Management Configuration
- 34-FTP and TFTP Configuration
- 35-Information Center Configuration
- 36-DNS Configuration
- 37-System Maintenance and Debugging Configuration
- 38-HWPing Configuration
- 39-RRPP Configuration
- 40-NAT-Netstream-Policy Routing Configuration
- 41-Telnet Protection Configuration
- 42-Hardware-Dependent Software Configuration
- Related Documents
-
| Title | Size | Download |
|---|---|---|
| 04-VLAN Configuration | 448 KB |
1.2.1 Link Types of Ethernet Ports
1.2.2 Adding an Ethernet Port to Specified VLANs
1.2.3 Configuring the Default VLAN ID for a Port
1.3.1 Introduction to Protocol-Based VLAN
1.3.2 Encapsulation Format of Ethernet Data
1.3.3 Procedure for the Switch to Judge Packet Protocol
1.3.5 Implementation of Protocol-Based VLAN
2.1.1 Basic VLAN Configuration
2.1.2 Configuring VLAN Broadcast Storm Suppression
2.1.3 Basic VLAN Interface Configuration
2.1.4 Displaying VLAN Configuration
2.2 Configuring a Port-Based VLAN
2.2.1 Configuring an Access-Port-Based VLAN
2.2.2 Configuring a Trunk-Port-Based VLAN
2.2.3 Configuring a Hybrid-Port-Based VLAN
2.2.4 Protocol-based VLAN Configuration Example
2.3 Configuring a Protocol-Based VLAN.
2.3.1 Creating Protocol Template for Protocol-Based VLAN
2.3.2 Associating a Port with the Protocol-Based VLAN
2.3.3 Associating a Card with the Protocol-Based VLAN
2.3.4 Displaying Protocol-Based VLAN Configuration
2.3.5 Protocol-Based VLAN Configuration Example
Chapter 1 VLAN Overview
This chapter covers the following topics:
1.1 VLAN Overview
1.1.1 Introduction to VLAN
The traditional Ethernet is a flat network, where all hosts are in the same broadcast domain and connected with each other through hubs or switches. A hub is a physical layer device without the switching function, so it forwards the received packet to all ports. A switch is a link layer device which can forward the packet according to the MAC address of the packet. However, when the switch receives a broadcast packet or an unknown unicast packet whose MAC address is not included in the MAC address table of the switch, it will forward the packet to all the ports except the inbound port of the packet.
In the above scenarios, a host in the network receives a lot of packets whose destination is not the host itself, wasting plenty of bandwidth resources and causing potential serious security problems as well.
The traditional way of isolating broadcast domains is to use routers. However, routers are expensive and provide few ports, so they cannot subnet the network particularly.
The Virtual Local Area Network (VLAN) technology is developed for switches to control broadcast in LANs.
By creating VLANs in a physical LAN, you can divide the LAN into multiple logical LANs, each of which has a broadcast domain of its own. Hosts in the same VLAN communicate with each other as if they are in a LAN. However, hosts in different VLANs cannot communicate with each other directly. Figure 1-1 illustrates a VLAN implementation.
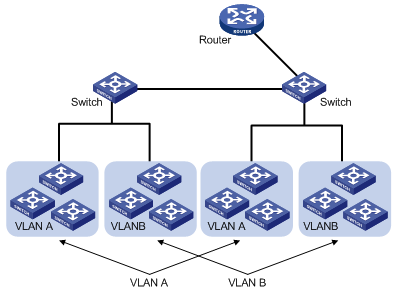
Figure 1-1 A VLAN implementation
A VLAN can span across multiple switches, or even routers. This enables hosts in a VLAN to be dispersed in a looser way. That is, hosts in a VLAN can belong to different physical network segment.
Compared with the traditional Ethernet, VLAN enjoys the following advantages.
1) Broadcasts are confined to VLANs. This decreases bandwidth utilization and improves network performance.
2) Network security is improved. VLANs cannot communicate with each other directly. That is, a host in a VLAN cannot access resources in another VLAN directly, unless routers or Layer 3 switches are used.
3) Network configuration workload for the host is reduced. VLAN can be used to group specific hosts. When the physical position of a host changes within the range of the VLAN, you need not change its network configuration.
1.1.2 VLAN Principles
VLAN tags in the packets are necessary for the switch to identify packets of different VLANs. The switch works at Layer 2 (Layer 3 switches are not discussed in this chapter) and it can identify the data link layer encapsulation of the packet only, so you can add the VLAN tag field into only the data link layer encapsulation if necessary.
In 1999, IEEE issues the IEEE 802.1Q protocol to standardize VLAN implementation, defining the structure of VLAN-tagged packets.
In traditional Ethernet data frames, the type field of the upper layer protocol is encapsulated after the destination MAC address and source MAC address, as shown in Figure 1-2
![]()
Figure 1-2 Encapsulation format of traditional Ethernet frames
In Figure 1-2 DA refers to the destination MAC address, SA refers to the source MAC address, and Type refers to the protocol type of the packet. IEEE 802.1Q protocol defines that a 4-byte VLAN tag is encapsulated after the destination MAC address and source MAC address to show the information about VLAN.

As shown in Figure 1-3, a VLAN tag contains four fields, including TPID, priority, CFI, and VLAN ID.
l TPID is a 16-bit field, indicating that this data frame is VLAN-tagged. By default, it is 0x8100 in H3C series Ethernet switches.
l Priority is a 3-bit field, referring to 802.1p priority. Refer to “QoS” part for details.
l CFI is a 1-bit field, indicating whether the MAC address is encapsulated in the standard format in different transmission media. This field is not described in detail in this chapter.
l VLAN ID is a 12-bit field, indicating the ID of the VLAN to which this packet belongs. It is in the range of 0 to 4,095. Generally, 0 and 4,095 is not used, so the VLAN ID is in the range of 1 to 4,094.
VLAN ID identifies the VLAN to which a packet belongs. When the switch receives an un-VLAN-tagged packet, it will encapsulate a VLAN tag with the default VLAN ID of the inbound port for the packet, and the packet will be assigned to the default VLAN of the inbound port for transmission. For the details about setting the default VLAN of a port, refer to the “Port Basic Configuration” part of the H3C S7500 Series Ethernet Switches – Operation Manual.
1.2 Port-Based VLAN
Port-based VLAN technology introduces the simplest way to classify VLANs. You can isolate the hosts and divide them into different virtual workgroups through assigning the ports on the device connecting to hosts to different VLANs.
This way is easy to implement and manage and it is applicable to hosts with relatively fixed positions.
1.2.1 Link Types of Ethernet Ports
An Ethernet port on an S7500 switch can operate in one of the three link types:
l Access: An Access port can belong to only one VLAN, and is generally used to connect user PCs.
l Trunk: A Trunk port can belong to more than one VLAN. It can receive/send packets from/to multiple VLANs, and is generally used to connect another switch.
l Hybrid: A Hybrid port can belong to more than one VLAN. It can receive/send packets from/to multiple VLANs, and can be used to connect either a switch or user PCs.
& Note:
A Hybrid port allows the packets of multiple VLANs to be sent without tags, but a Trunk port only allows the packets of the default VLAN to be sent without tags.
You can configure all the three types of ports on the same device. However, note that you cannot directly switch a port between Trunk and Hybrid and you must set the port as Access before the switching. For example, to change a Trunk port to Hybrid, you must first set it as Access and then Hybrid.
1.2.2 Adding an Ethernet Port to Specified VLANs
You can add the specified Ethernet port to a specified VLAN. After that, the Ethernet port can forward the packets of the specified VLAN, so that the VLAN on this switch can intercommunicate with the same VLAN on the peer switch.
An Access port can only be added to one VLAN, while Hybrid and Trunk ports can be added to multiple VLANs.
& Note:
The Access ports or Hybrid ports must be added to an existing VLAN.
1.2.3 Configuring the Default VLAN ID for a Port
An Access port can belong to only one VLAN. Therefore, the VLAN an Access port belongs to is also the default VLAN of the Access port. A Hybrid/Trunk port can belong to several VLANs, and so a default VLAN ID for the port is required.
![]() Caution:
Caution:
You are recommended to set the default VLAN ID of the local Hybrid or Trunk ports to the same value as that of the Hybrid or Trunk ports on the peer switch. Otherwise, packet forwarding may fail on the ports.
After a port is added to a VLAN and configured with a default VLAN, the port receives and sends packets in a way related to its link type. For detailed description, refer to the following tables:
Table 1-1 Packet processing of an Access port
|
Processing of an incoming packet |
Processing of an outgoing packet |
|
|
If the packet does not carry a VLAN tag |
If the packet carries a VLAN tag |
|
|
Receive the packet and add the default VLAN tag to the packet. |
l If the VLAN ID is just the default VLAN ID, receive the packet. l If the VLAN ID is not the default VLAN ID, discard the packet. |
Deprive the tag from the packet and send the packet. |
Table 1-2 Packet processing of a Trunk port
|
Processing of an incoming packet |
Processing of an outgoing packet |
|
|
If the packet does not carry a VLAN tag |
If the packet carries a VLAN tag |
|
|
l If the port is already added to its default VLAN, add the default VLAN tag to the packet and then forward the packet. l If the port is not added to its default VLAN, discard the packet. |
l If the VLAN ID is one of the VLAN IDs allowed to pass through the port, receive the packet. l If the VLAN ID is not one of the VLAN IDs allowed to pass through the port, discard the packet. |
l If the VLAN ID is just the default VLAN ID, deprive the tag and send the packet. l If the VLAN ID is not the default VLAN ID, keep the original tag unchanged and send the packet. |
Table 1-3 Packet processing of a Hybrid port
|
Processing of an incoming packet |
Processing of an outgoing packet |
|
|
If the packet does not carry a VLAN tag |
If the packet carries a VLAN tag |
|
|
l If the port is already added to its default VLAN, add the default VLAN tag to the packet and then forward the packet. l If the port is not added to its default VLAN, discard the packet. |
l If the VLAN ID is one of the VLAN IDs allowed to pass through the port, receive the packet. l If the VLAN ID is not one of the VLAN IDs allowed to pass through the port, discard the packet. |
Send the packet if the VLAN ID is allowed to pass through the port. Use the port hybrid vlan command to configure whether the port keeps or strips the tags when sending packets of a VLAN (including the default VLAN). |
1.3 Protocol-Based VLAN
1.3.1 Introduction to Protocol-Based VLAN
Protocol-based VLAN is also known as protocol VLAN, which is another way to classify VLANs besides port-based VLAN. Through the protocol-based VLANs, the switch can analyze the received un-VLAN-tagged packets on the port and match the packets with the user-defined protocol template automatically according to different encapsulation formats and the values of specific fields. If a packet is matched, the switch will add a corresponding VLAN tag to it automatically. Thus, the data of the specific protocol is assigned automatically to the corresponding VLAN for transmission.
This feature is used for binding the ToS provided in the network to VLAN to facilitate management and maintenance.
1.3.2 Encapsulation Format of Ethernet Data
This section introduces the common encapsulation formats of Ethernet data for you to understand well the procedure for the switch to identify the packet protocols.
I. Ethernet II and 802.2/802.3 encapsulation
In the link layer, there are two main packet encapsulation types: Ethernet II and 802.2/802.3, whose encapsulation formats are described in the following figures.
Ethernet II packet:
![]()
Figure 1-4 Ethernet II encapsulation format
802.2/802.3 packet:
![]()
Figure 1-5 802.2/802.3 encapsulation format
In the two figures, DA and SA refer to the destination MAC address and source MAC address of the packet respectively. The number in the brackets indicates the field length in bits.
The maximum length of an Ethernet packet is 1500 bytes, that is, 5DC in hexadecimal, so the length field in 802.2/802.3 encapsulation is in the range of 0x0000 to 0x05DC.
Whereas, the type field in Ethernet II encapsulation is in the range of 0x0600 to 0xFFFF.
The switch identifies whether a packet is an Ethernet II packet or an 802.2/802.3 packet according to the ranges of the two fields.
II. Encapsulation formats of 802.2/802.3 packets
802.2/802.3 packets are encapsulated in the following three formats:
l 802.3 raw encapsulation: only the length field is encapsulated after the source and destination address field, followed by the upper layer data. The type field is not included.
![]()
Figure 1-6 802.3 raw encapsulation format
Only IPX protocol supports 802.3 raw encapsulation format currently. This format is identified by the two bytes whose value is 0xFFFF after the length field.
l 802.2 Logical Link Control (LLC) encapsulation: the length field, the Destination Service Access Point (DSAP) field, the Source Service Access Point (SSAP) field and the control field are encapsulated after the source and destination address field.
![]()
Figure 1-7 802.2 LLC encapsulation format
The DSAP field and the SSAP field in the LLC part are used to identify the upper layer protocol. For example, the two fields are both 0xE0, meaning that the upper layer protocol is IPX protocol.
l 802.2 Sub-Network Access Protocol (SNAP) encapsulation: the length field, the DSAP filed, the SSAP field, the control field, the OUI field and the PID field are encapsulated according to 802.2/802.3 standard packets.
![]()
Figure 1-8 802.2 SNAP encapsulation format
In 802.2 SNAP encapsulation format, the values of the DSAP field and the SSAP field are always AA, and the value of the control field is always 3.
The switch differentiates between 802.2 LLC encapsulation and 802.2 SNAP encapsulation according to the values of the DSAP field and the SSAP field.
& Note:
When the OUI is 00-00-00 in 802.2 SNAP encapsulation, the PID field has the same meaning as the type field in Ethernet II encapsulation, which both refer to globally unique protocol number. Such encapsulation is also known as SNAP RFC 1042 encapsulation, which is standard SNAP encapsulation. The SNAP encapsulation mentioned in this chapter refers to SNAP RFC 1042 encapsulation.
1.3.3 Procedure for the Switch to Judge Packet Protocol
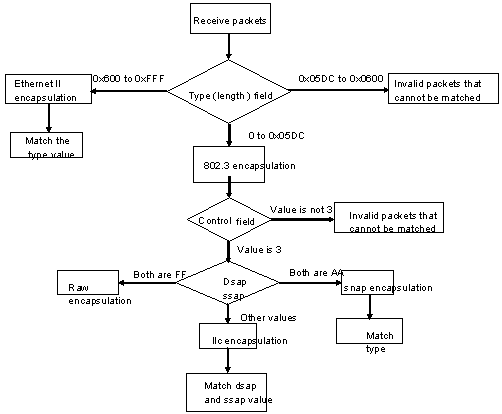
Figure 1-9 Procedure for the switch to judge packet protocol
1.3.4 Encapsulation Formats
Table 1-4 Encapsulation formats
|
Encap
Protocol |
Ethernet II |
802.3 raw |
802.2 LLC |
802.2 SNAP |
Type value |
|
IP |
Supported |
Not supported |
Not supported |
Supported |
0x0800 |
|
IPX |
Supported |
Supported |
Supported |
Supported |
0x8137 |
|
AppleTalk |
Supported |
Not supported |
Not supported |
Supported |
0x809B |
1.3.5 Implementation of Protocol-Based VLAN
S7500 series Ethernet switches assign a packet to the specific VLAN by matching the packet with the protocol template.
The protocol template is the standard to determine the protocol to which a packet belongs. Protocol templates include standard templates and user-defined templates:
l The standard template adopts the RFC-defined packet encapsulation formats and values of some specific fields as the matching criteria.
l The user-defined template adopts the user-defined encapsulation formats and values of some specific fields as the matching criteria.
After configuring the protocol template, you must add a port to the protocol-based VLAN and associate this port with the protocol template. This port will add VLAN tags to packets based on protocol types of the packets. The port in the protocol-based VLAN needs to be connected to a client. However, a common client cannot process VLAN-tagged packets. In order that the client can process the packets out of this port, you must configure the port in the protocol-based VLAN as a Hybrid port and configure the port to remove VLAN tags when forwarding packets of all VLANs.
& Note:
For the operation of removing VLAN tags when the Hybrid port sends packets, refer to the section “Port Basic Configuration” in this manual.
Chapter 2 VLAN Configuration
When configuring VLAN, go to these sections for information you are interested in:
l Configuring a Port-Based VLAN
l Configuring a Protocol-Based VLAN
2.1 VLAN Configuration
2.1.1 Basic VLAN Configuration
Follow these steps to perform basic VLAN configuration:
|
To do… |
Use the command… |
Remarks |
|
Enter system view |
system-view |
— |
|
Create a VLAN and enter VLAN view |
vlan vlan-id |
Required The vlan-id argument ranges from 1 to 4,094. |
|
Assign a name for the current VLAN |
name string |
Optional By default, the name of a VLAN is its VLAN ID. |
|
Specify the description string of the current VLAN |
description string |
Optional By default, the description string of a VLAN is its VLAN ID. |
2.1.2 Configuring VLAN Broadcast Storm Suppression
You can use the following command to set the maximum volume of allowed broadcast traffic through a VLAN. When the actual broadcast traffic exceeds the specified value, the system will discard the extra packets so that the bandwidth occupied by broadcast traffic can be kept within a specific ratio. In this way, the system can suppress broadcast storm, avoid network congestion and ensure normal network operation.
Follow these steps to configure VLAN broadcast storm suppression:
|
To do… |
Use the command… |
Remarks |
|
Enter system view |
system-view |
— |
|
Enter VLAN view |
vlan vlan-id |
— |
|
Set VLAN broadcast storm suppression |
broadcast-suppression { ratio | pps pps } |
Required |
A VLAN only supports one broadcast storm suppression mode at one time. If you configure broadcast storm suppression modes multiple times for a VLAN, the latest configuration will overwrite the previous configuration.
The cards of S7500 series switches support different broadcast storm suppression modes, as listed in Table 2-1.
Table 2-1 Broadcast storm suppression modes and card types
|
Broadcast storm suppression mode |
Type A cards |
Non-type-A cards |
|
VLAN pps suppression |
Supported |
Not supported |
|
VLAN bandwidth ratio suppression |
Supported |
Not supported |
& Note:
Type A cards include LS81FT48A, LS81FM24A, LS81FS24A, LS81GB8UA, LS81GT8UA, iSalience I, Salience I and Salience II.
2.1.3 Basic VLAN Interface Configuration
I. Configuration prerequisites
Create a VLAN before configuring a VLAN interface.
II. Configuration procedure
Follow these steps to perform basic VLAN interface configuration:
|
To do… |
Use the command… |
Remarks |
|
Enter system view |
system-view |
— |
|
Create a VLAN interface and enter VLAN interface view |
interface Vlan-interface vlan-id |
Required The vlan-id argument ranges from 1 to 4,094. |
|
Specify the description string for the current VLAN interface |
description text |
Optional By default, the description string of a VLAN interface is the name of this VLAN interface |
|
Disable the VLAN interface |
shutdown |
Optional |
|
Enable the VLAN Interface |
undo shutdown |
Optional |
Note that the operation of enabling/disabling a VLAN interface does not influence the enabling/disabling status of the Ethernet ports belonging to this VLAN.
By default, a VLAN interface is enabled. In this scenario, the VLAN interface’s status is determined by the status of its ports, that is, if all ports of the VLAN are down, the VLAN interface is down (disabled); if one or more ports of the VLAN are up, the VLAN interface is up (enabled).
If a VLAN interface is disabled, its status is not determined by the status of its ports.
2.1.4 Displaying VLAN Configuration
|
To do… |
Use the command… |
Remarks |
|
Display the VLAN interface information |
display interface Vlan-interface [ vlan-id ] |
Available in any view. |
|
Display the VLAN information |
display vlan [ vlan-id [ to vlan-id ] | all | static | dynamic ] |
2.2 Configuring a Port-Based VLAN
2.2.1 Configuring an Access-Port-Based VLAN
There are two ways to configure Access-port-based VLAN: one way is to configure in VLAN view, the other way is to configure in Ethernet port view.
Follow these steps to configure the Access-port-based VLAN in VLAN view:
|
To do… |
Use the command… |
Remarks |
|
Enter system view |
system-view |
— |
|
Enter VLAN view |
vlan vlan-id |
Required If the specified VLAN does not exist, this command be created first creates the VLAN before entering its view. |
|
Add an Access port to the current VLAN |
port interface-list |
Required By default, system will add all ports to VLAN 1. |
Follow these steps to configure the Access-port-based VLAN in Ethernet port view:
|
To do… |
Use the command… |
Remarks |
|
Enter system view |
system-view |
— |
|
Enter Ethernet port view |
interface interface-type interface-number |
— |
|
Configure the port link type as Access |
port link-type access |
Optional The link type of a port is Access by default. |
|
Add the current Access port to a specified VLAN |
port access vlan vlan-id |
Optional By default, all Access ports belong to VLAN 1. |
& Note:
To add an Access port to a VLAN, make sure the VLAN already exists.
2.2.2 Configuring a Trunk-Port-Based VLAN
A Trunk port may belong to multiple VLANs, and you can only perform this configuration in Ethernet port view.
Follow these steps to configure the Trunk-port-based VLAN:
|
To do… |
Use the command… |
Remarks |
|
Enter system view |
system-view |
— |
|
Enter Ethernet port view |
interface interface-type interface-number |
— |
|
Configure the port link type as Trunk |
port link-type trunk |
Required |
|
Allow the specified VLANs to pass through the current Trunk port |
port trunk permit vlan { vlan-id-list | all } |
Required By default, all Trunk ports only allow packets of VLAN 1 to pass. |
|
Configure the default VLAN for the Trunk port |
port trunk pvid vlan vlan-id |
Optional VLAN 1 is the default by default. |
& Note:
l To convert a Trunk port into a Hybrid port (or vice versa), you need to use the Access port as a medium. For example, the Trunk port has to be configured as an Access port first and then a Hybrid port.
l The default VLAN IDs of the Trunk ports on the local and peer devices must be the same. Otherwise, packets cannot be transmitted properly.
2.2.3 Configuring a Hybrid-Port-Based VLAN
A Hybrid port may belong to multiple VLANs, and this configuration can only be performed in Ethernet port view.
Follow these steps to configure the Hybrid-port-based VLAN:
|
To do… |
Use the command… |
Remarks |
|
Enter system view |
system-view |
— |
|
Enter Ethernet port view |
interface interface-type interface-number |
— |
|
Configure the port link type as Hybrid |
port link-type hybrid |
Required |
|
Allow the specified VLANs to pass through the current Hybrid port |
port hybrid vlan vlan-id-list { tagged | untagged } |
Required By default, all Hybrid ports only allow packets of VLAN 1 to pass. |
|
Configure the default VLAN of the Hybrid port |
port hybrid pvid vlan vlan-id |
Optional VLAN 1 is the default by default |
& Note:
l To configure a Trunk port into a Hybrid port (or vice versa), you need to use the Access port as a medium. For example, the Trunk port has to be configured as an Access port first and then a Hybrid port.
l Ensure that the VLANs already exist before configuring them to pass through a Hybrid port.
l The default VLAN IDs of the Hybrid ports on the local and the peer devices must be the same. Otherwise, packets cannot be transmitted properly.
2.2.4 Protocol-based VLAN Configuration Example
I. Configuration requirements
l Create VLAN 2 and VLAN 3 and specify the description string of VLAN 2 as home;
l Add Ethernet 2/0/1 and Ethernet 2/0/2 to VLAN 2 and add Ethernet 2/0/3 and Ethernet 2/0/4 to VLAN 3.
II. Network diagram
![]()
Figure 2-1 Network diagram for VLAN configuration
III. Configuration procedure
# Create VLAN 2 and enter its view.
<H3C> system-view
[H3C] vlan 2
# Specify the description string of VLAN 2 as home.
[H3C-vlan2] description home
# Add Ethernet 2/0/1 and Ethernet 2/0/2 to VLAN 2.
[H3C-vlan2] port Ethernet2/0/1 Ethernet2/0/2
# Create VLAN 3 and enter its view.
[H3C-vlan2] vlan 3
# Add Ethernet 2/0/3 and Ethernet 2/0/4 to VLAN 3.
[H3C-vlan3] port Ethernet2/0/3 Ethernet2/0/4
2.3 Configuring a Protocol-Based VLAN
2.3.1 Creating Protocol Template for Protocol-Based VLAN
I. Configuration prerequisites
Create a VLAN before configuring a protocol-based VLAN.
II. Configuration procedure
Follow these steps to create protocol types of a VLAN:
|
To do… |
Use the command… |
Remarks |
|
Enter system view |
system-view |
— |
|
Enter VLAN view |
vlan vlan-id |
Required |
|
Create the protocol template for the VLAN |
protocol-vlan [ protocol-index ] { at | ip [ ip-address [ net-mask ] ] | ipx { ethernetii | llc | raw | snap } | mode { ethernetii [ etype etype-id ] | llc [ dsap dsap-id [ ssap ssap-id ] | ssap ssap-id ] | snap [ etype etype-id ] } } |
Required |
When you are creating protocol templates for protocol-based VLANs, the at, ip and ipx keywords are used to create standard templates, and the mode keyword is used to create user-defined templates.
![]() Caution:
Caution:
In a VLAN, it is not allowed to configure two templates with the same protocol type and encapsulation format. The encapsulation defined by the user-defined template is the same as that defined by a standard template if the parameters of the user-defined template adopt some special values. In this scenario, the user-defined template and the standard template cannot be configured in the same VLAN.
Pay attention to the following notices about the template configuration:
l It is not allowed to configure both ipx llc standard template and LLC user-defined template in the same VLAN.
l It is not allowed to configure both ipx raw standard template and LLC user-defined template whose dsap and ssap are both ff in the same VLAN.
l It is not allowed to configure both ipx ethernetii standard template and EthernetII user-defined template whose etype is 8137 in the same VLAN.
l It is not allowed to configure both ipx snap standard template and SNAP user-defined template whose etype is 8137 in the same VLAN.
l When the values of the dsap-id and ssap-id arguments are AA, the packet encapsulation type is not llc but snap. To avoid template conflict, the system disables the value AA for the dsap-id and ssap-id arguments when you configure LLC user-defined template.
In addition, pay attention to the following notices about IP template:
l If a packet can match both IPv4-based VLAN and the VLAN based on other protocol, IPv4-based VLAN takes higher priority.
l ip [ ip-address [ net-mask ] ] defines IPv4-based VLAN. If you want to define the VLANs based on IP or other encapsulation formats, use mode { ethernetii [ etype etype-id ] } and snap [ etype etype-id ], in which, etype-id is 0x0800.
2.3.2 Associating a Port with the Protocol-Based VLAN
I. Configuration prerequisites
l The protocol template for the protocol-based VLAN is created
l The port is configured as a Hybrid port, and the port is configured to remove VLAN tags when it forwards the packets of the protocol-based VLANs.
II. Configuration procedure
Follow these steps to associate a port with the protocol-based VLAN:
|
To do… |
Use the command… |
Remarks |
|
Enter system view |
system-view |
— |
|
Enter port view |
interface interface-type interface-number |
Required |
|
Associate a port with the protocol-based VLAN |
port hybrid protocol-vlan vlan vlan-id { protocol-index [ to protocol-end ] | all } |
Required |
![]() Caution:
Caution:
l For the operation of adding a port to the VLAN in the untag way, refer to the Port Basic Configuration part of this manual.
l For the same VLAN, it is not allowed to configure the same protocol type and encapsulation format. Between different VLANs, the same protocol type and encapsulation format can be configured, but cannot be distributed to the same port. Even the user-defined template and standard template with the same encapsulation format cannot be distributed to the same port.
l If protocol has been distributed to a VLAN, the VLAN cannot be removed.
l If a protocol of a VLAN has been distributed to a port, the port cannot be removed from the VLAN.
l If a protocol of a VLAN has been distributed to a port, the protocol cannot be removed from the VLAN.
2.3.3 Associating a Card with the Protocol-Based VLAN
Follow these steps to create protocol-based VLAN on specific card:
|
To do… |
Use the command… |
Remarks |
|
Enter system view |
system-view |
— |
|
Create protocol-based VLAN on specific card |
protocol-vlan vlan vlan-id { protocol-index [ to protocol-end ] | all } { slot slot-number | mainboard } |
Required |
![]() Caution:
Caution:
l It is necessary to add those ports that require protocol on the card to the protocol-based VLAN.
l Currently, only non-type-A cards, including LPUs and SRPUs, support this command.
l If a protocol-based VLAN has been associated with a card, the VLAN cannot be removed.
l If a protocol in a VLAN has been associated with a card, the protocol cannot be removed from the VLAN.
Table 2-2 shows the supported protocol-based VLAN creation commands on different cards.
Table 2-2 Protocol-based VLAN creation commands on different cards
|
Command description |
Type-A card |
Non-type-A card |
|
Create protocol-based VLAN on specific card in system view. |
Not supported |
Supported (only for all IP protocols and subnet IP protocols. |
|
Create protocol-based VLAN on specific port in Ethernet port view. |
Supported |
Supported (exclude all IP protocols and subnet IP protocols. |
& Note:
Type A cards include LS81FT48A, LS81FM24A, LS81FS24A, LS81GB8UA, LS81GT8UA, iSalience I, Salience I and Salience II.
2.3.4 Displaying Protocol-Based VLAN Configuration
|
To do… |
Use the command… |
Remarks |
|
Display the information about the protocol-based VLAN |
display vlan [ vlan-id [ to vlan-id ] | all | static | dynamic ] |
Available in any view |
|
Display the protocol information and protocol indexes configured on the specified VLAN(s) |
display protocol-vlan vlan { vlan-id [ to vlan-id ] | all } |
|
|
Display the protocol information and protocol indexes configured on the specified port(s) |
display protocol-vlan interface { interface-type interface-number [ to interface-type interface-number ] | all } |
|
|
Display protocol-based VLAN information on specified card(s) |
display protocol-vlan slot { slot-number [ to slot-number ] | all } |
2.3.5 Protocol-Based VLAN Configuration Example
I. Standard-template-protocol-based VLAN configuration example
1) Network requirements
l Create VLAN 5 and configure it to be a protocol-based VLAN, with the protocol-index being 1 and the protocol being IP.
l Associate Ethernet 2/0/5 port with the protocol-based VLAN to enable IP packets received by this port to be tagged with the tag of VLAN 5 and be transmitted in VLAN 5.
2) Configuration procedure
# Create VLAN 5 and enter its view.
<H3C> system-view
[H3C] vlan 5
[H3C-vlan5]
# Configure the protocol-index to be 1, and the associated protocol to be IP.
[H3C-vlan5] protocol-vlan 1 ip
# Enter Ethernet 2/0/5 port view.
[H3C-vlan5] interface Ethernet 2/0/5
# Configure the port to be a Hybrid port.
[H3C-Ethernet2/0/5] port link-type hybrid
# Add the port to VLAN 5 and add VLAN 5 to the untagged VLAN list of the port.
[H3C-Ethernet2/0/5] port hybrid vlan 5 untagged
# Associate the port with protocol-index 1.
[H3C-Ethernet2/0/5] port hybrid protocol-vlan vlan 5 1
II. User-defined-template-based protocol VLAN configuration example
1) Network requirement
l Create VLAN 7 and configure it as a protocol-based VLAN.
l Create two indexes in VLAN 7. Index 1 is used to match the packets with DSAP and SSAP value being 01 and ac respectively in 802.3 LLC encapsulation; Index 2 is used to match the packets with the type value being 0xabcd in 802.3 SNAP encapsulation.
l Associate Ethernet 2/0/7 port with the two indexes of the protocol-based VLAN 7 to enable IP packets matching one of the indexes received by this port to be tagged with the tag of VLAN 7.
2) Configuration procedure
# Create VLAN 7 and enter its view.
<H3C> system-view
[H3C] vlan 7
[H3C-vlan7]
# Configure index 1 of VLAN 7 according to the network requirement.
[H3C-vlan7] protocol-vlan 1 mode llc dsap 01 ssap ac
# Configure index 2 of VLAN 7 according to the network requirement.
[H3C-vlan7] protocol-vlan 2 mode snap etype abcd
# Enter port view of the Ethernet 2/0/7.
[H3C-vlan7] interface Ethernet 2/0/7
# Configure the port as a hybird port.
[H3C-Ethernet2/0/7] port link-type hybrid
# Add the port to VLAN 7, and add VLAN 7 to the list of untagged VLANs permitted to pass through the port.
[H3C-Ethernet2/0/7] port hybrid vlan 7 untagged
# Associate the port with the two indexes of VLAN 7.
[H3C-Ethernet2/0/7] port hybrid protocol-vlan vlan 7 1 to 2