- Table of Contents
-
- H3C Campus Fixed-Port Switches CLI-Based Quick Start Configuration Guide -6W102
- 01-H3C Devices CLI Reference
- 02-Login Management Quick Start Configuration Guide
- 03-Configuration File Management Quick Start Configruation Guide
- 04-Software Upgrade Quick Start Configuration Guide
- 05-Device Management Quick Start Configuration Guide
- 06-NTP Quick Start Configuration Guide
- 07-RBAC Quick Start Configuration Guide
- 08-IRF Quick Start Configuration Guide
- 09-Ethernet Interface Quick Start Configuration Guide
- 10-VLAN Quick Start Configuration Guide
- 11-Port Isolation Quick Start Configuration Guide
- 12-Loop Detection Quick Start Configuration Guide
- 13-QinQ Quick Start Configuration Guide
- 14-MAC Address Table Quick Start Configuration Guide
- 15-Ethernet Link Aggregation Quick Start Configuration Guide
- 16-Spanning Tree Quick Start Configuration Guide
- 17-DHCP Quick Start Configuration Guide
- 18-OSPF Quick Start Configuration Guide
- 19-Static Routing Quick Start Configuration Guide
- 20-Basic RIP Quick Start Configuration Guide
- 21-PBR Quick Start Configuration Guide
- 22-IGMP Snooping Quick Start Configuration Guide
- 23-Packet Filtering Quick Start Configuration Guide
- 24-QoS Quick Start Configuration Guide
- 25-IP Source Guard Quick Start Configuration Guide
- 26-SSH Quick Start Configuration Guide
- 27-Port Security Quick Start Configuration Guide
- 28-VRRP Quick Start Configuration Guide
- 29-PoE Quick Start Configuration Guide
- 30-Mirroring Quick Start Configuration Guide
- 31-Information Center Quick Start Configuration Guide
- 32-SNMP Quick Start Configuration Guide
- 33-Static Route-Based Public and Private Network Intercommunication Configuration Guide
- 34-LAN Networks Quick Start Configuration Guide
- 35-802.1X Quick Start Configuration Guide
- 36-AAA Quick Start Configuration Guide
- Related Documents
-
| Title | Size | Download |
|---|---|---|
| 36-AAA Quick Start Configuration Guide | 170.67 KB |
AAA Quick Start Configuration Guide
Copyright © 2025 New H3C Technologies Co., Ltd. All rights reserved.
No part of this manual may be reproduced or transmitted in any form or by any means without prior written consent of New H3C Technologies Co., Ltd.
Except for the trademarks of New H3C Technologies Co., Ltd., any trademarks that may be mentioned in this document are the property of their respective owners.
The information in this document is subject to change without notice.
Configuring HWTACACS authentication and authorization for Telnet users
Introduction
This example describes how to configure HWTACACS authentication and authorization for Telnet users.
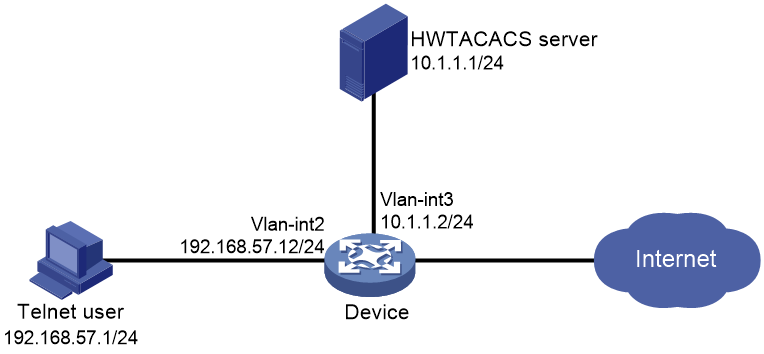
Network configuration
As shown in Figure 1, configure remote HWTACACS authentication and authorization on the NAS device to enable secure Telnet user login.
· Use the HWTACACS server to authorize and authenticate Telnet users logging into the device. The login username is user@bbb and the password is 123456TESTplat&!.
· The authenticated users are permitted to use the display commands of all system features and resources.
Procedure
Configuring HWTACACS
|
|
NOTE: This section uses HWTACACS server ACS 4.0 to illustrate basic configuration of HWTACACS. |
Adding a device management user
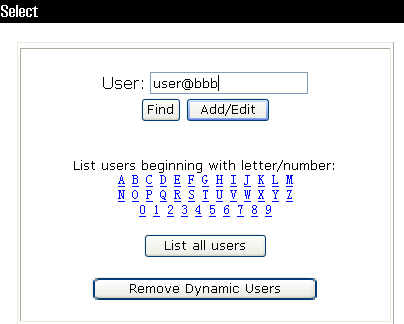
# Log in to the HWTACACS management platform. Click User-Setup in the left navigation pane.
· Enter username user@bbb.
· Click Add/Edit.
Figure 2 User creation interface
Configuring a device management user
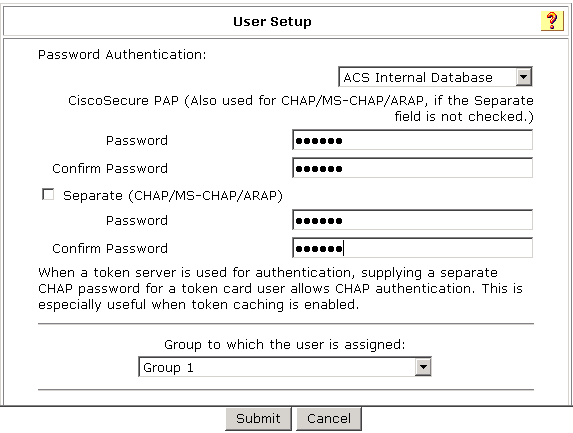
# Edit a user.
· Set the user password to 123456TESTplat&!.
· Select group Group 1 for the user.
· Click Submit.
Figure 3 User password configuration
Configuring the network
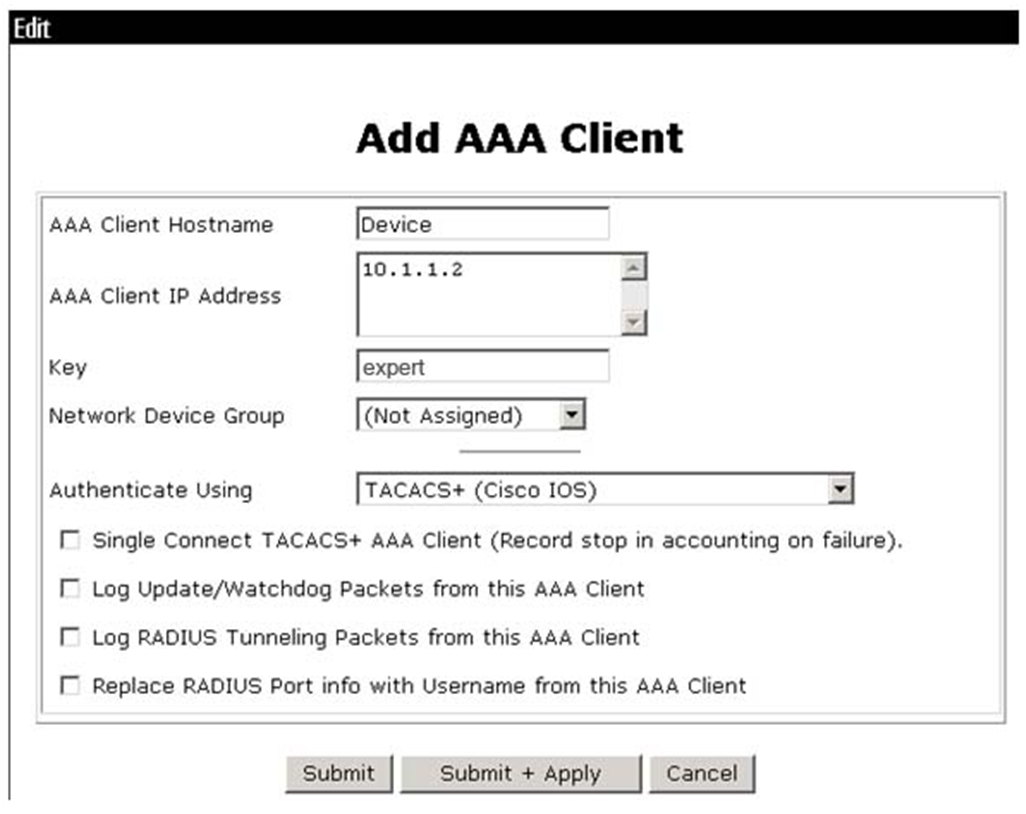
# From the left navigation pane, click Network Configuration. Specify a name in the AAA Client Hostname field. In this example, the name is Device.
· Specify the IP address of device interface that connects the device to the HWTACACS server as 10.1.1.2 in the AAA Client IP Address field.
· Enter the shared key expert in the Key field. Make sure the shared key is the same as the key configured for authentication, authorization, and accounting in the HWTACACS scheme on the device.
· Select TACACS+ (Cisco IOS) from the Authenticate Using field.
· Click Submit+Apply.
Figure 4 Network configuration interface
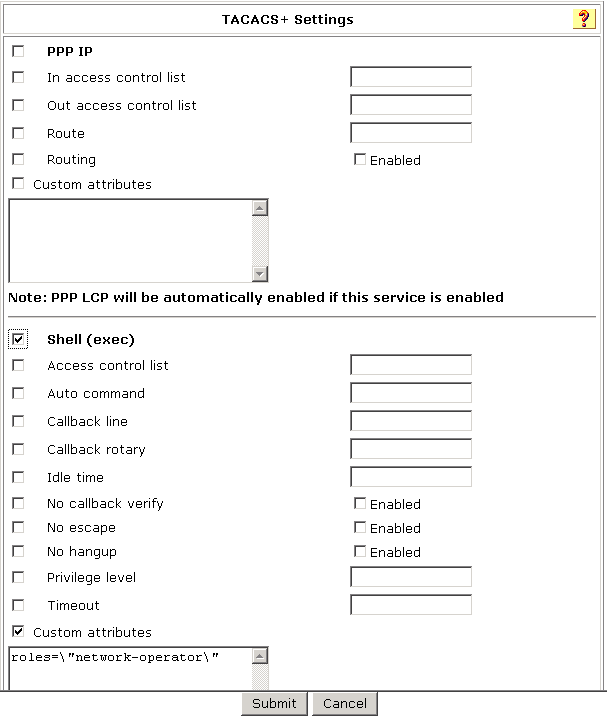
Setting up the group
# From the left navigation pane, click Group Setup. Select Group 1 (the same group selected for the device management user) and then click Edit Settings.
· Select Shell (exec).
· Select Custom attributes and enter roles="network-operator" in the text box.
· Click Submit.
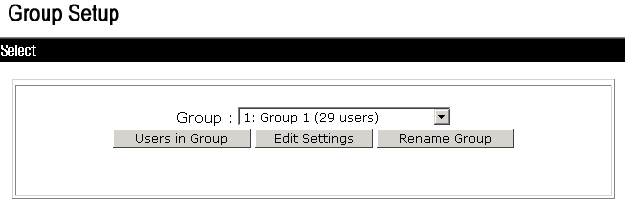
Figure 6 Group configuration interface
Configuring the device
# Create VLAN 2 and add GigabitEthernet 1/0/2 to VLAN 2.
[Device] vlan 2
[Device-vlan2] port gigabitethernet 1/0/2
[Device-vlan2] quit
# Specify an IP address for VLAN-interface 2.
[Device] interface vlan-interface 2
[Device-Vlan-interface2] ip address 192.168.57.12 255.255.255.0
[Device-Vlan-interface2] quit
# Create VLAN 3. Assign GigabitEthernet 1/0/1 to VLAN 3.
[Device] vlan 3
[Device-vlan3] port gigabitethernet 1/0/1
[Device-vlan3] quit
# Configure the IP address for VLAN-interface 3.
[Device] interface vlan-interface 3
[Device-Vlan-interface3] ip address 10.1.1.2 255.255.255.0
[Device-Vlan-interface3] quit
# Enable Telnet server on the device.
[Device] telnet server enable
# Configure the Telnet user login interface to use the scheme method.
[Device] line vty 0 63
[Device-line-vty0-63] authentication-mode scheme
[Device-line-vty0-63] quit
# Create HWTACACS scheme hwtac.
[Device] hwtacacs scheme hwtac
# Set the IP address of the primary authentication, authorization, and accounting server to 10.1.1.1, and the port number to 49. The TCP port for HWTACACS authentication, authorization, and account is 49.
[Device-hwtacacs-hwtac] primary authentication 10.1.1.1 49
[Device-hwtacacs-hwtac] primary authorization 10.1.1.1 49
[Device-hwtacacs-hwtac] primary accounting 10.1.1.1 49
# Set the plaintext shared key for packet exchanging with the authorization, authorization, and accounting servers to expert.
[Device-hwtacacs-hwtac] key authentication simple expert
[Device-hwtacacs-hwtac] key authorization simple expert
[Device-hwtacacs-hwtac] key accounting simple expert
[Device-hwtacacs-hwtac] quit
# Create an ISP domain and configure login users to use the HWTACAS authentication, authorization, and accounting AAA methods.
[Device] domain bbb
[Device-isp-bbb] authentication login hwtacacs-scheme hwtac
[Device-isp-bbb] authorization login hwtacacs-scheme hwtac
[Device-isp-bbb] accounting login hwtacacs-scheme hwtac
[Device-isp-bbb] quit
Verifying the configuration
Verify that Telnet users can pass authentication with username user@bbb and password 123456TESTplat&!, and obtain user role network-operator after authentication. Verify that the users can execute display commands for all functions and resources of the system.
Configuration files
|
|
NOTE: The configuration files of some switches might display the port link-mode bridge command. |
#
telnet server enable
#
vlan 2 to 3
#
interface Vlan-interface2
ip address 192.168.57.12 255.255.255.0
#
interface Vlan-interface3
ip address 10.1.1.2 255.255.255.0
#
interface GigabitEthernet1/0/2
port link-mode bridge
port access vlan 2
#
interface GigabitEthernet1/0/1
port link-mode bridge
port access vlan 3
#
line vty 0 63
authentication-mode scheme
user-role network-operator
#
hwtacacs scheme hwtac
primary authentication 10.1.1.1
primary authorization 10.1.1.1
primary accounting 10.1.1.1
key authentication cipher $c$3$X3oR/wjLFjDqIyjdAmvjwAhiuqewGABglQ==
key authorization cipher $c$3$5pmuq0RJ9UWMWDkRNNERX6HFM0aRv5txFg==
key accounting cipher $c$3$FSdSiBY1u+ZNkAYYlPw9YkGxJA4iR8MDjw==
#
domain bbb
authentication login hwtacacs-scheme hwtac
authorization login hwtacacs-scheme hwtac
accounting login hwtacacs-scheme hwtac
#
Related documentation
· AAA configuration in the security configuration guide for the device.
· AAA commands in the security command reference for the device.