- Table of Contents
-
- H3C Campus Fixed-Port Switches CLI-Based Quick Start Configuration Guide -6W102
- 01-H3C Devices CLI Reference
- 02-Login Management Quick Start Configuration Guide
- 03-Configuration File Management Quick Start Configruation Guide
- 04-Software Upgrade Quick Start Configuration Guide
- 05-Device Management Quick Start Configuration Guide
- 06-NTP Quick Start Configuration Guide
- 07-RBAC Quick Start Configuration Guide
- 08-IRF Quick Start Configuration Guide
- 09-Ethernet Interface Quick Start Configuration Guide
- 10-VLAN Quick Start Configuration Guide
- 11-Port Isolation Quick Start Configuration Guide
- 12-Loop Detection Quick Start Configuration Guide
- 13-QinQ Quick Start Configuration Guide
- 14-MAC Address Table Quick Start Configuration Guide
- 15-Ethernet Link Aggregation Quick Start Configuration Guide
- 16-Spanning Tree Quick Start Configuration Guide
- 17-DHCP Quick Start Configuration Guide
- 18-OSPF Quick Start Configuration Guide
- 19-Static Routing Quick Start Configuration Guide
- 20-Basic RIP Quick Start Configuration Guide
- 21-PBR Quick Start Configuration Guide
- 22-IGMP Snooping Quick Start Configuration Guide
- 23-Packet Filtering Quick Start Configuration Guide
- 24-QoS Quick Start Configuration Guide
- 25-IP Source Guard Quick Start Configuration Guide
- 26-SSH Quick Start Configuration Guide
- 27-Port Security Quick Start Configuration Guide
- 28-VRRP Quick Start Configuration Guide
- 29-PoE Quick Start Configuration Guide
- 30-Mirroring Quick Start Configuration Guide
- 31-Information Center Quick Start Configuration Guide
- 32-SNMP Quick Start Configuration Guide
- 33-Static Route-Based Public and Private Network Intercommunication Configuration Guide
- 34-LAN Networks Quick Start Configuration Guide
- 35-802.1X Quick Start Configuration Guide
- 36-AAA Quick Start Configuration Guide
- Related Documents
-
| Title | Size | Download |
|---|---|---|
| 04-Software Upgrade Quick Start Configuration Guide | 441.48 KB |
Software Upgrade Quick Start Configuration Guide
Copyright © 2025 New H3C Technologies Co., Ltd. All rights reserved.
No part of this manual may be reproduced or transmitted in any form or by any means without prior written consent of New H3C Technologies Co., Ltd.
Except for the trademarks of New H3C Technologies Co., Ltd., any trademarks that may be mentioned in this document are the property of their respective owners.
The information in this document is subject to change without notice.
Contents
Configuring IP addresses for interfaces
Configuring an IP address for the PC
Viewing the current version information
Viewing the free storage space
Upgrade software through the BootRom menu and Xmodem
Viewing the current version information
Modifying the terminal baud rate
Upgrade software through the BootRom menu and TFTP/FTP
Logging in to the device through the console port
Obtaining the software image files
Downloading management software
Viewing the current version information
Downloading and upgrading BootRom from the BootRom menu
Upgrading software at the CLI
Introduction
The following information uses an example to describe the basic procedure for upgrading software at the CLI.
Network configuration
As shown in Figure 1, the PC and the device are connected through a configuration cable.
Configure the PC as a file server and enable the TFTP server on it. Configure the device as a TFTP client, download the upgrade file to the device through TFTP, and upgrade the device software.

Restrictions and guidelines
Use the release notes for the upgrade software version to evaluate the upgrade impact on your network and verify the compatibility of the upgrade software with the current software version.
An upgrade requires the device to reboot. Please upgrade software during off-peak hours.
Prerequisites
Obtaining the software image files
You can obtain the upgrade file by using either of the following methods:
· Log in to http://www.h3c.com/en, and download the upgrade file.
· Contact H3C Support to obtain the upgrade file.
Configuring the file server
The device can function as an FTP, TFTP, or SFTP client. In this example, the device functions as a TFTP client.
# Enable the FTP server on the PC (3CDaemon, in this example), set the upload/download path, and enable the TFTP service.
Figure 2 Setting the upload/download path
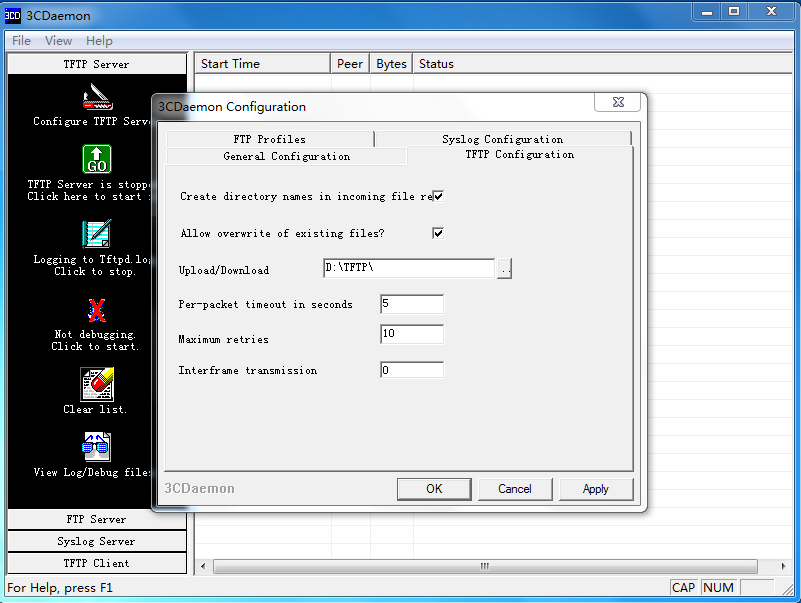
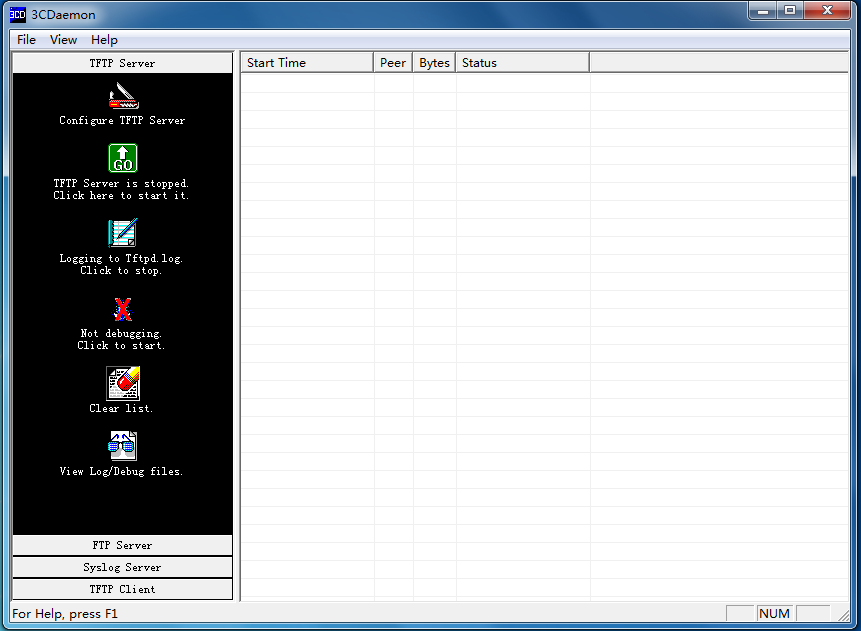
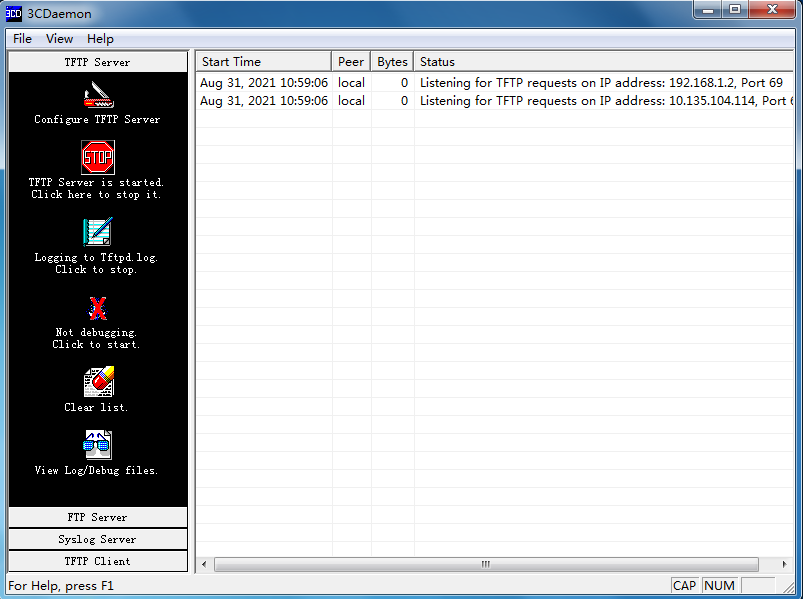
Figure 3 Enabling the TFTP service
Procedure
Configuring IP addresses for interfaces
# Create VLAN 99.
<Switch> system-view
[Switch] vlan 99
[Switch-vlan99] quit
# Create VLAN interface 99.
[Switch] interface vlan-interface 99
# Assign IP address 192.168.1.1/24 to VLAN interface 99.
[Switch-Vlan-interface99] ip address 192.168.1.1 24
[Switch-Vlan-interface99] quit
# Enter the view of the interface that connects to the PC, GigabitEthernet 1/0/1 in this example.
[Switch] interface gigabitethernet 1/0/1
# Configure GigabitEthernet 1/0/1 to operate in Layer 2 mode.
[Switch-GigabitEthernet1/0/1] port link-mode bridge
# Assign GigabitEthernet 1/0/1 to VLAN 99.
[Switch-GigabitEthernet1/0/1] port access vlan99
[Switch-GigabitEthernet1/0/1] quit
Configuring an IP address for the PC
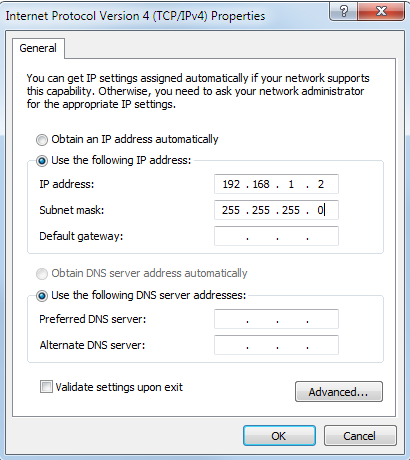
# Assign IP address 192.168.1.2/24 to the PC.
Figure 4 Assigning IP address 192.168.1.2/24 to the PC
# Open the Run window by using the Win + R short keys, enter cmd in the Open field, and ping the device in the Command window.
C:\ Documents and Setting\Administrator> ping 192.168.1.1
Pinging 192.168.0.1 with 32 bytes of data:
Reply from 192.168.1.1: bytes=32 time=31ms TTL=253
Reply from 192.168.1.1: bytes=32 time=30ms TTL=253
Reply from 192.168.1.1: bytes=32 time=30ms TTL=253
Reply from 192.168.1.1: bytes=32 time=30ms TTL=253
Ping statistics for 192.168.1.1:
Packets: Sent = 4, Received = 4, Lost = 0 (0% loss),
Approximate round trip times in milli-seconds:
Minimum = 30ms, Maximum = 31ms, Average = 30ms
# Ping the TFTP server from the device.
<Switch> ping 192.168.1.2
Ping 192.168.1.2 (192.168.1.2): 56 data bytes, press CTRL_C to break
56 bytes from 192.168.1.2: icmp_seq=0 ttl=64 time=10.701 ms
56 bytes from 192.168.1.2 icmp_seq=1 ttl=64 time=2.678 ms
56 bytes from 192.168.1.2: icmp_seq=2 ttl=64 time=2.282 ms
56 bytes from 192.168.1.2: icmp_seq=3 ttl=64 time=1.617 ms
56 bytes from 192.168.1.2: icmp_seq=4 ttl=64 time=1.701 ms
--- Ping statistics for 192.168.1.2 ---
5 packet(s) transmitted, 5 packet(s) received, 0.0% packet loss
round-trip min/avg/max/std-dev = 1.617/3.796/10.701/3.474 ms
# Save the configuration.
<Switch> save
The current configuration will be written to the device. Are you sure? [Y/N]:y
Please input the file name(*.cfg)[flash:/startup.cfg]
(To leave the existing filename unchanged, press the enter key):
flash:/startup.cfg exists, overwrite? [Y/N]:y
Validating file. Please wait...
Saved the current configuration to mainboard device successfully.
Viewing the current version information
# View the current version information. You can check whether the upgrade succeeds by comparing the version information before and after the upgrade.
<Switch> display version
H3C Comware Software, Version 7.1.070, Release xxxx
Copyright (c) 2004-2021 New H3C Technologies Co., Ltd. All rights reserved.
H3C Switch uptime is 0 weeks, 0 days, 0 hours, 19 minutes
Last reboot reason : User reboot
…
Viewing the free storage space
# Execute the dir command to verify that the device has sufficient space for the new system software image. Typically, the storage space should be twice the size of the upgrade file.
<Switch> dir
Directory of flash:
0 drw- 707584 Jan 29 2013 05:41:21 123.bin
1 drw- 12639 Jan 29 2013 05:41:21 patch.bin
2 drw- 48866304 Jan 02 2013 08:30:11 r6126p20.ipe
3 -rw- 591 Jan 01 2013 03:31:14 serverkey
4 -rw- 6304 Feb 02 2013 06:58:55 startup.cfg
5 -rw- 159335 Feb 02 2013 06:58:55 startup.mdb
6 -rw- 0 Jan 02 2013 06:19:27 topology.dba
7 drw- - Jan 02 2013 05:32:24 versionInfo
…
251904 KB total (25052 KB free)
# If the free storage space is not sufficient, delete unused files.
<Switch> delete /unreserved patch.bin
The file cannot be restored. Delete flash:/patch.bin? [Y/N]:y
Deleting the file permanently will take a long time. Please wait...
Deleting file flash:/123.bin...Done.
|
|
NOTE: · The .ipe file will be decompressed into multiple .bin files. Make sure the storage space is sufficient for storing the decompressed files. Typically, the storage space should be twice the size of the upgrade files. · To delete a file permanently, use the delete /unreserved command. If you use the delete command, the file is moved to the recycle bin and still occupies the storage space. To release the storage space, you must execute the reset recycle-bin command in the file's original directory. |
Upgrading software
# Place the upgrade image file switch.ipe in the upload/download path on the TFTP server.
# Download the upgrade image file to the device through TFTP.
<Switch> tftp 192.168.1.2 get switch.ipe
% Total % Received % Xferd Average Speed Time Time Time Current
Dload Upload Total Spent Left Speed
100 58.7M 100 58.7M 0 0 1193k 0 0:00:50 0:00:50 --:--:-- 1127k
# Specify the switch.ipe file as the main startup file for the device.
<Switch> boot-loader file flash:/switch.ipe all main
# After the file is decompressed, the system prompts you to delete the file. If the file will be used for rollback, enter N.
<Switch> Do you want to delete flash:/switch.ipe now? [Y/N]:N
# Reboot the device.
<Switch> reboot
Verify the configuration
# Execute the display version command to verify that the software has been upgraded.
<Switch> display version
H3C Comware Software, Version 7.1.070, Release xxxx
Copyright (c) 2004-2021 New H3C Technologies Co., Ltd. All rights reserved.
H3C Switch uptime is 0 weeks, 0 days, 0 hours, 19 minutes
Last reboot reason : User reboot
...
# Display the current software images and startup software images.
<Switch> display boot-loader
Software images on slot 1:
Current software images:
flash:/boot.bin
flash:/system.bin
Main startup software images:
flash:/boot.bin
flash:/system.bin
Backup startup software images:
None
Configuration files
#
interface vlan-interface 99
ip address 192.168.1.1 24
#
interface gigabitethernet 1/0/1
port link-mode bridge
port access vlan 99
#
Related documentation
· Software upgrade configuration in the fundamentals configuration guide for the device.
· Software upgrade commands in the fundamentals command reference for the device
Upgrade software through the BootRom menu and Xmodem
Introduction
The following information uses an example to describe the basic procedure for upgrading software through the BootRom menu and Xmodem.
Network configuration
As shown in Figure 2, the PC and the device are connected through a configuration cable.
Download the upgrade file to the device through Xmodem, and upgrade the device software.
Figure 2 Network diagram

Restrictions and guidelines
Use the release notes for the upgrade software version to evaluate the upgrade impact on your network and verify the compatibility of the upgrade software with the current software version.
An upgrade requires the device to reboot. Please upgrade software during off-peak hours.
Xmodem is slow to transfer files. As a best practice, use a network cable to transfer files (see "Upgrading software at the CLI").
Prerequisites
Obtaining the software image files
You can obtain the upgrade file by using either of the following methods:
· Log in to http://www.h3c.com/en, and download the upgrade file.
· Contact H3C Support to obtain the upgrade file.
Downloading management software
Download management software. This example uses HyperTerminal.
Procedure
Viewing the current version information
# View the current version information. You can check whether the upgrade succeeds by comparing the version information before and after the upgrade.
<Switch> display version
H3C Comware Software, Version 7.1.070, Release xxxx
Copyright (c) 2004-2021 New H3C Technologies Co., Ltd. All rights reserved.
H3C Switch uptime is 0 weeks, 0 days, 0 hours, 19 minutes
Last reboot reason : User reboot
...
Accessing the BootRom menu
# Press Ctrl+B after the "Press Ctrl+B to enter extended boot menu..." message appears upon device startup.
EXTENDED BOOT MENU
1. Download image to flash
2. Select image to boot
3. Display all files in flash
4. Delete file from flash
5. Restore to factory default configuration
6. Enter BootRom upgrade menu
7. Skip current system configuration
8. Set switch startup mode
0. Reboot
Ctrl+Z: Access EXTENDED ASSISTANT MENU
Ctrl+F: Format file system
Ctrl+P: Change authentication for console login
Ctrl+R: Download image to SDRAM and run
Ctrl+C: Display Copyright
# Enter 1 to download the image file to the flash memory.
Enter your choice(0-8): 1
1. Set TFTP protocol parameters
2. Set FTP protocol parameters
3. Set XMODEM protocol parameters
0. Return to boot menu
# Enter 3 to set the Xmodem download baud rate.
Enter your choice(0-3): 3
Please select your download baudrate:
1.* 9600
2. 19200
3. 38400
4. 57600
5. 115200
0. Return to boot menu
# Select an appropriate download rate, for example, enter 5 to select 115200 bps.
Enter your choice(0-5): 5
Download baudrate is 115200 bps
Please change the terminal's baudrate to 115200 bps and select XMODEM protocol
Press enter key when ready
Modifying the terminal baud rate
Set the serial port on the terminal to use the same baud rate as the console port.
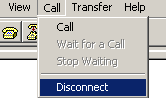
1. Select Call > Disconnect in the HyperTerminal window to disconnect the terminal from the switch.
Figure 3 Disconnecting the terminal from the switch
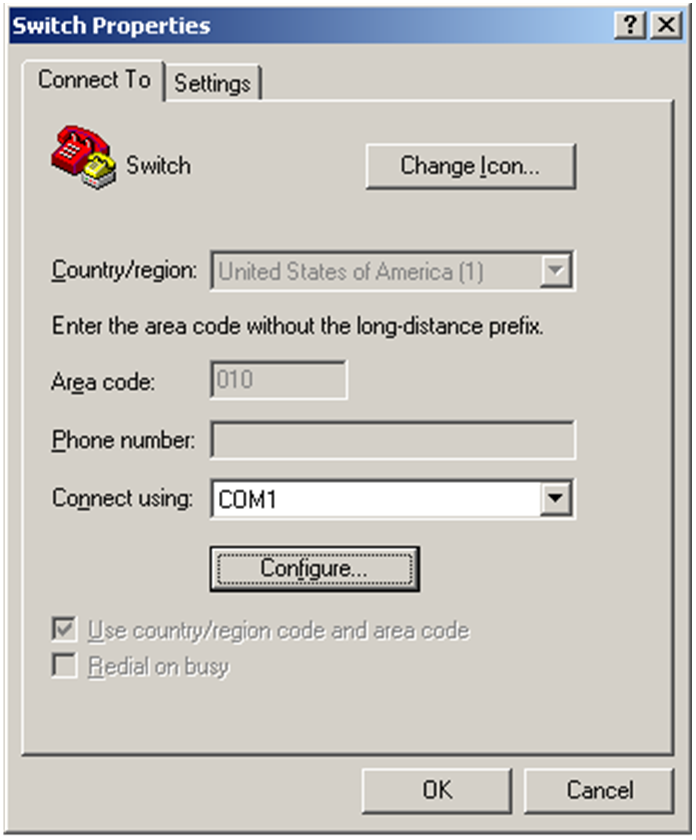
2. Select File > Properties, and in the Properties dialog box, click Configure.
Figure 4 Properties dialog box
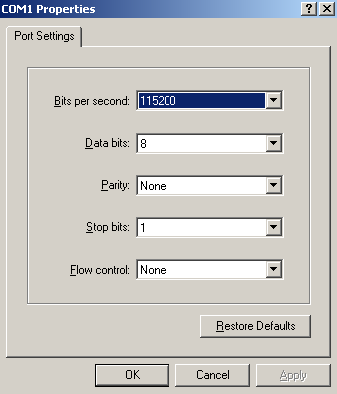
3. Select 115200 from the Bits per second list, and click OK.
Figure 5 Modifying the baud rate
4. Select Call > Call to re-establish the connection.
Figure 6 Re-establishing the connection

Upgrading software
1. Press Enter. The following message appears:
Are you sure to download file to flash? Yes or No (Y/N):Y
2. Enter Y to start downloading the file. (To return to the BootWare menu, enter N.)
Now please start transfer file with XMODEM protocol
If you want to exit, Press <Ctrl+X>
Loading ...CCCCCCCCCCCCCCCCCCCCCCCCC
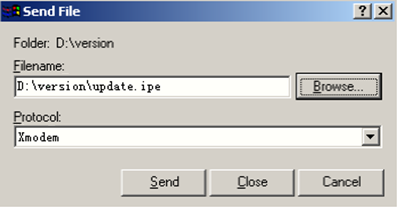
3. Select Transfer > Send File in the HyperTerminal window.
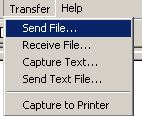
4. In the dialog box that appears, click Browse… to select the image file, and select Xmodem from the Protocol list.
Figure 8 File transmission dialog box
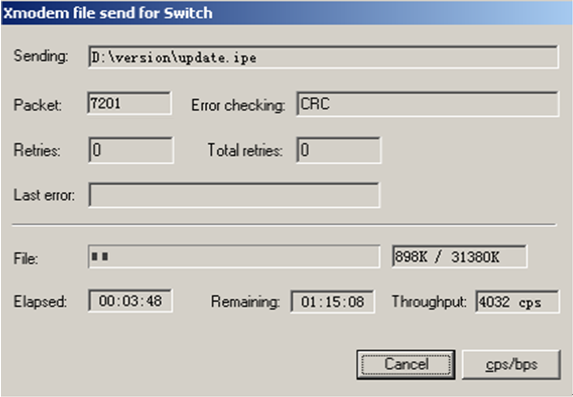
5. Click Send. The following dialog box appears:
Figure 9 File transfer progress
6. Enter the M (main), B (backup), or N (none) attribute for the image file. In this example, assign the main attribute to the images.
Please input the file attribute (Main/Backup/None) m
The boot.bin image is self-decompressing...
Load File name : boot.bin // Set the name of the boot image file
Free space: 470519808 bytes
Writing flash...................................................................
.............
Done!
The system-update.bin image is self-decompressing...
Load File name : system.bin // Set the name of the system image file
Free space: 461522944 bytes
Writing flash...................................................................
.............
Done!
Your baudrate should be set to 9600 bps again!
Press enter key when ready
|
|
NOTE: If an image with the same attribute as the image you are loading is already in the flash memory, the attribute of the old image changes to none after the new image becomes valid. |
7. Restore the baud rate of the HyperTerminal to 9600 bps (see "Modifying the terminal baud rate"). If the baud rate is 9600 bps, skip this step.
8. Press Enter to access the BootWare menu.
EXTENDED BOOT MENU
EXTENDED BOOT MENU
1. Download image to flash
2. Select image to boot
3. Display all files in flash
4. Delete file from flash
5. Restore to factory default configuration
6. Enter BootRom upgrade menu
7. Skip current system configuration
8. Set switch startup mode
9. Set default boot storage medium
0. Reboot
Ctrl+F: Format file system
Ctrl+P: Change authentication for console login
Ctrl+R: Download image to SDRAM and run
Ctrl+C: Display Copyright
Enter your choice(0-9): 0
9. Enter 0 to reboot the system with the new software images.
Verify the configuration
# Execute the display version command to verify that the software has been upgraded.
<Switch> display version
H3C Comware Software, Version 7.1.070, Release xxxx
Copyright (c) 2004-2021 New H3C Technologies Co., Ltd. All rights reserved.
H3C Switch uptime is 0 weeks, 0 days, 0 hours, 19 minutes
Last reboot reason : User reboot
...
# Display the current software images and startup software images.
<Switch> display boot-loader
Software images on slot 1:
Current software images:
flash:/boot.bin
flash:/system.bin
Main startup software images:
flash:/boot.bin
flash:/system.bin
Backup startup software images:
None
Configuration files
#
interface vlan-interface 99
ip address 192.168.1.1 24
#
interface gigabitethernet 1/0/1
port link-mode bridge
port access vlan 99
#
Related documentation
· Software upgrade configuration in the fundamentals configuration guide for the device.
· Software upgrade commands in the fundamentals command reference for the device.
Upgrade software through the BootRom menu and TFTP/FTP
Introduction
The following information uses an example to describe the basic procedure for upgrading software through the BootRom menu and TFTP/FTP.
Network configuration
As shown in Figure 10, the host and the device are connected through a configuration cable. Use the PC as the file server, with the FTP server feature enabled. Use the device as the FTP client. Download the upgrade package to the device through FTP to upgrade the software.

Restrictions and guidelines
Use the release notes for the upgrade software version to evaluate the upgrade impact on your network and verify the compatibility of the upgrade software with the current software version.
An upgrade requires the device to reboot. Please upgrade software during off-peak hours.
Prerequisites
Logging in to the device through the console port
To set up a local configuration environment through the console port, you must use a terminal emulation program to establish a connection with the router.
Configure the parameters as follows:
· Baud rate—9600.
· Data bits—8.
· Stop bits—1.
· Parity—None.
· Flow control—None.
Power on the device. The terminal displays self-test information. After the self-test is completed, press Enter. The command prompt will appear (such as <Sysname>).
****************************************************************************
* Copyright (c) 2004-2024 New H3C Technologies Co.,Ltd.All rights reserved.*
* Without the owner's prior written consent, *
* no decompiling or reverse-engineering shall be allowed. *
****************************************************************************
Line aux0 is available.
Press ENTER to get started.
<Sysname>%Mar 30 09:52:58:243 2022 H3C SHELL/5/SHELL_LOGIN:TTY logged in from aux0.
<Sysname>
Obtaining the software image files
You can obtain the upgrade file by using either of the following methods:
· Log in to http://www.h3c.com/en, and download the upgrade file.
· Contact H3C Support to obtain the upgrade file.
Downloading management software
Download management software. This example uses FTP Server.
Procedure
Viewing the current version information
# Execute the display version command to view the current version information. You can check whether the upgrade succeeds by comparing the version information before and after the upgrade.
<Switch> display version
H3C Comware Software, Version 7.1.070, Release xxxx
Copyright (c) 2004-2024 New H3C Technologies Co., Ltd. All rights reserved.
H3C Switch uptime is 0 weeks, 0 days, 0 hours, 19 minutes
Last reboot reason : User reboot
...
Downloading and upgrading BootRom from the BootRom menu
|
|
IMPORTANT: · The BootRom menu might vary by software version. · This example describes how to download the software through FTP. You can download the software through TFTP in the similar way. · The upgrade procedure might vary by device. |
1. Run FTP Server on the PC (IP address: 192.168.0.23), configure the username, password, and file save directory, and then save the upgrade file to the working directory of FTP Server.
2. Run the terminal emulation program on the PC, start the device, and then enter <Ctrl+B> to open the BootRom extended menu.
EXTENDED BOOT MENU
1. Download image to flash
2. Select image to boot
3. Display all files in flash
4. Delete file from flash
5. Restore to factory default configuration
6. Enter BootRom upgrade menu
7. Skip current system configuration
8. Set switch startup mode
9. Set The Operating Device
0. Reboot
Ctrl+Z: Access EXTENDED ASSISTANT MENU
Ctrl+F: Format file system
Ctrl+P: Change authentication for console login
Ctrl+R: Download image to SDRAM and run
Ctrl+C: Display Copyright
Enter your choice(0-9):
3. Download and upgrade BootRom.
EXTENDED BOOT MENU
1. Download image to flash
2. Select image to boot
3. Display all files in flash
4. Delete file from flash
5. Restore to factory default configuration
6. Enter BootRom upgrade menu
7. Skip current system configuration
8. Set switch startup mode
9. Set The Operating Device
0. Reboot
Ctrl+Z: Access EXTENDED ASSISTANT MENU
Ctrl+F: Format file system
Ctrl+P: Change authentication for console login
Ctrl+R: Download image to SDRAM and run
Ctrl+C: Display Copyright
# Enter <1> to load the application to the flash memory.
1. Set TFTP protocol parameters
2. Set FTP protocol parameters
3. Set XMODEM protocol parameters
0. Return to boot menu
Enter your choice(0-3):
# Enter <2> to configure FTP protocol parameters.
|
|
NOTE: You can enter the new parameters directly. If you do not specify any parameters and directly press Enter, the original parameters will be retained without any modifications. |
Load File Name :test.ipe
:test.ipe
Server IP Address :192.168.0.23
Local IP Address :192.168.0.105
Subnet Mask :255.255.255.0
Gateway IP Address :0.0.0.0
FTP User Name :xxx
FTP User Password :***
Table 1 Ethernet port parameters
|
Field |
Description |
|
Load File Name |
Name of the file to be downloaded. |
|
Server IP Address |
IP address of the FTP/TFTP server or PC. |
|
Local IP Address |
Device IP address. |
|
Subnet Mask |
Subnet mask. |
|
Gateway IP Address |
Set a gateway IP address if the device is on a different network than the server. |
|
FTP User Name |
FTP username. |
|
FTP User Password |
FTP password. |
# After configuring the FTP protocol parameters, enter <Y> to download the application to the flash memory.
Are you sure to download file to flash? Yes or No (Y/N):
# Enter <Main> to configure the application as the primary next startup configuration file.
Please input the file attribute (Main/Backup/None)
|
Option |
Description |
|
Main |
Load the primary program file to the current storage medium. The newly loaded program file will automatically be designated as type M, and the M-type attribute in the original program file will be removed. |
|
Backup |
Load the backup program file to the current storage medium. The newly loaded program file will automatically be designated as type B, and the B-type attribute in the original program file will be removed. |
|
None |
Load the file to the current storage medium. |
Rebooting the device
After BootRom upgrades, enter < 0> in the BootRom menu to reboot the device.
Verifying the configuration
# After the device reboots, execute the display version command to display software version information.
<Switch> display version
H3C Comware Software, Version 7.1.070, Release xxxx
Copyright (c) 2004-2024 New H3C Technologies Co., Ltd. All rights reserved.
H3C Switch uptime is 0 weeks, 0 days, 0 hours, 19 minutes
Last reboot reason : User reboot
...
# Execute the display boot-loader command to display current software images and startup software images.
<Switch> display boot-loader
Software images on slot 1:
Current software images:
flash:/boot.bin
flash:/system.bin
Main startup software images:
flash:/boot.bin
flash:/system.bin
Backup startup software images:
None
Related documentation
· Software upgrade configuration in the fundamentals configuration guide for the device.
· Software upgrade commands in the fundamentals command reference for the device.