- Table of Contents
-
- H3C Campus Fixed-Port Switches CLI-Based Quick Start Configuration Guide -6W102
- 01-H3C Devices CLI Reference
- 02-Login Management Quick Start Configuration Guide
- 03-Configuration File Management Quick Start Configruation Guide
- 04-Software Upgrade Quick Start Configuration Guide
- 05-Device Management Quick Start Configuration Guide
- 06-NTP Quick Start Configuration Guide
- 07-RBAC Quick Start Configuration Guide
- 08-IRF Quick Start Configuration Guide
- 09-Ethernet Interface Quick Start Configuration Guide
- 10-VLAN Quick Start Configuration Guide
- 11-Port Isolation Quick Start Configuration Guide
- 12-Loop Detection Quick Start Configuration Guide
- 13-QinQ Quick Start Configuration Guide
- 14-MAC Address Table Quick Start Configuration Guide
- 15-Ethernet Link Aggregation Quick Start Configuration Guide
- 16-Spanning Tree Quick Start Configuration Guide
- 17-DHCP Quick Start Configuration Guide
- 18-OSPF Quick Start Configuration Guide
- 19-Static Routing Quick Start Configuration Guide
- 20-Basic RIP Quick Start Configuration Guide
- 21-PBR Quick Start Configuration Guide
- 22-IGMP Snooping Quick Start Configuration Guide
- 23-Packet Filtering Quick Start Configuration Guide
- 24-QoS Quick Start Configuration Guide
- 25-IP Source Guard Quick Start Configuration Guide
- 26-SSH Quick Start Configuration Guide
- 27-Port Security Quick Start Configuration Guide
- 28-VRRP Quick Start Configuration Guide
- 29-PoE Quick Start Configuration Guide
- 30-Mirroring Quick Start Configuration Guide
- 31-Information Center Quick Start Configuration Guide
- 32-SNMP Quick Start Configuration Guide
- 33-Static Route-Based Public and Private Network Intercommunication Configuration Guide
- 34-LAN Networks Quick Start Configuration Guide
- 35-802.1X Quick Start Configuration Guide
- 36-AAA Quick Start Configuration Guide
- Related Documents
-
| Title | Size | Download |
|---|---|---|
| 35-802.1X Quick Start Configuration Guide | 299.03 KB |
802.1X Quick Start Configuration Guide
Copyright © 2025 New H3C Technologies Co., Ltd. All rights reserved.
No part of this manual may be reproduced or transmitted in any form or by any means without prior written consent of New H3C Technologies Co., Ltd.
Except for the trademarks of New H3C Technologies Co., Ltd., any trademarks that may be mentioned in this document are the property of their respective owners.
The information in this document is subject to change without notice.
Configuring 802.1X local authentication
Introduction
This example describes how to configure 802.1X local authentication.
Network configuration
As shown in Figure 1, the user accesses the network through interface GigabitEthernet 1/0/1 of the device. Configure port-based access control to enable the device to perform 802.1X local authentication on users accessing from interface GigabitEthernet 1/0/1.

Restrictions and guidelines
For authorized users to access the network successfully, do not enable global 802.1X authentication until you complete all other configuration.
The 802.1X configuration takes effect on an interface only after you enable 802.1X both on the interface and globally.
Procedure
Configuring the device
1. Configure a local user.
# Add a local access user with username dot1x and enter the user view.
<Device> system-view
[Device] local-user dot1x class network
New local user added.
# Configure a plaintext password 123456TESTplat&! for user dot1x.
[Device-luser-network-dot1x] password simple 123456TESTplat&!
# Specify the lan-access service type for the local user.
[Device-luser-network-dot1x] service-type lan-access
[Device-luser-network-dot1x] quit
2. Configure an IP address for the VLAN interface to act as the gateway of the host.
[Device] interface vlan-interface 1
[Device-Vlan-interface1] ip address 192.168.56.101 255.255.255.0
[Device-Vlan-interface1] quit
3. Configure 802.1X authentication.
# Enable 802.1X authentication on interface GigabitEthernet1/0/1.
[Device] interface gigabitethernet1/0/1
[Device-GigabitEthernet1/0/1] dot1x
# Configure port-based access control.
[Device-GigabitEthernet1/0/1] dot1x port-method portbased
[Device-GigabitEthernet1/0/1] quit
# Enable 802.1X authentication globally.
[Device] dot1x
Configuring the 802.1X client
|
|
NOTE: · This example uses iNode PC 7.3 (E0518). · For 802.1X clients using Windows XP to establish connections, configure network attributes as follows: ¡ Select the Enable IEEE 802.1x authentication for this network option on the authentication tab. ¡ Select the MD5-Challenge EAP authentication type. · Make sure the client IP address of a user is promptly updated to communication with resources in the authorized VLANs after the user passes authentication. |
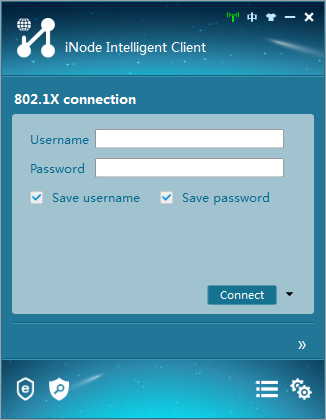
1. Start the client.
Figure 2 iNode client interface
2. Click Create.
Figure 3 Creating an 802.1X connection

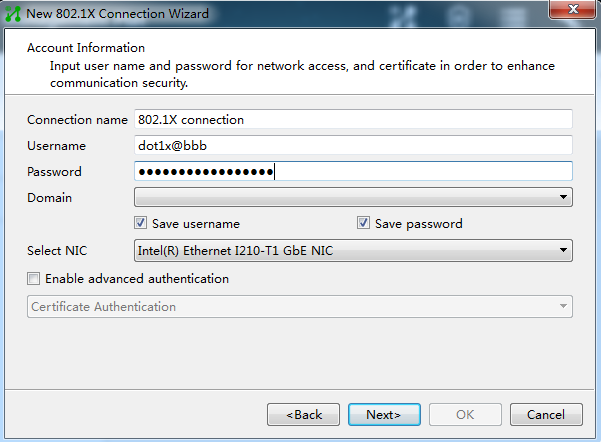
3. Configure the username and password.
Figure 4 Configuring 802.1X username and password
4. Configure the connection attributes.
Figure 5 Configuring the 802.1X connection attributes
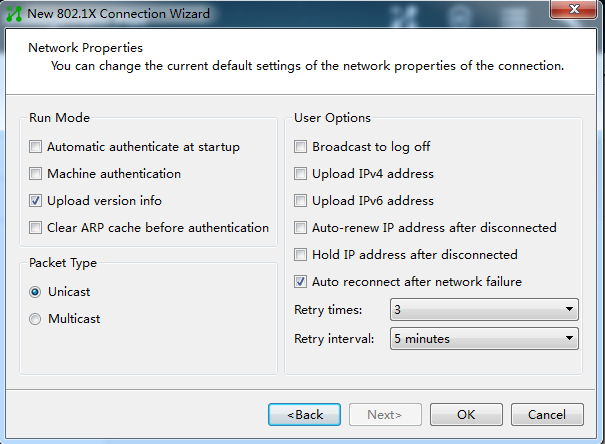
|
|
NOTE: In local authentication scenarios, version numbers uploaded by a client cannot be identified. Therefore, do not select the uploading client version number option. |
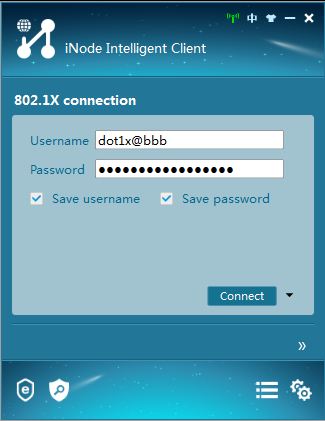
5. After the connection is created successfully, click Connect on the iNode client interface to initiate an 802.1X connection.
Figure 6 Initiating an 802.1X connection
Verifying the configuration
# Execute the display dot1x interface command to view the 802.1X configuration of interface GigabitEthernet 1/0/1.
[Device] display dot1x interface gigabitethernet 1/0/1
Global 802.1X parameters:
802.1X authentication : Enabled
CHAP authentication : Enabled
Max-tx period : 30 s
Handshake period : 15 s
Offline detect period : 300 s
Quiet timer : Disabled
Quiet period : 60 s
Supp timeout : 30 s
Server timeout : 100 s
Reauth period : 3600 s
Max auth requests : 2
User aging period for Auth-Fail VLAN : 1000 s
User aging period for Auth-Fail VSI : 1000 s
User aging period for critical VLAN : 1000 s
User aging period for critical VSI : 1000 s
User aging period for guest VLAN : 1000 s
User aging period for guest VSI : 1000 s
EAD assistant function : Disabled
EAD timeout : 30 min
Domain delimiter : @
Online 802.1X wired users : 0
GigabitEthernet1/0/1 is link-up
802.1X authentication : Enabled
Handshake : Enabled
Handshake reply : Disabled
Handshake security : Disabled
Unicast trigger : Disabled
Periodic reauth : Disabled
Port role : Authenticator
Authorization mode : Auto
Port access control : Port-based
Multicast trigger : Enabled
Mandatory auth domain : Not configured
Guest VLAN : Not configured
Auth-Fail VLAN : Not configured
Critical VLAN : Not configured
Critical voice VLAN : Disabled
Add Guest VLAN delay : Disabled
Re-auth server-unreachable : Logoff
Max online users : 4294967295
User IP freezing : Disabled
Reauth period : 0 s
Send Packets Without Tag : Disabled
Max Attempts Fail Number : 0
Guest VSI : Not configured
Auth-Fail VSI : Not configured
Critical VSI : Not configured
Add Guest VSI delay : Disabled
User aging : Enabled
Server-recovery online-user-sync : Disabled
Auth-Fail EAPOL : Disabled
Critical EAPOL : Disabled
Discard duplicate EAPOL-Start : No
EAPOL packets: Tx 0, Rx 0
Sent EAP Request/Identity packets : 0
EAP Request/Challenge packets: 0
EAP Success packets: 0
EAP Failure packets: 0
Received EAPOL Start packets : 0
EAPOL LogOff packets: 0
EAP Response/Identity packets : 0
EAP Response/Challenge packets: 0
Error packets: 0
Online 802.1X users: 0
# After you come online on the iNode client successfully, you can execute the display dot1x connection command to view the connection information about online users.
Configuration files
#
interface Vlan-interface1
ip address 192.168.56.101 255.255.255.0
#
local-user localuser class network
password cipher $c$3$YPkufRcxFR3KdpUCHFiNkns/YFPmbJkG/pQxBg==
service-type lan-access
authorization-attribute user-role network-operator
#
interface GigabitEthernet1/0/1
dot1x
dot1x port-method portbased
#
dot1x
#
Related documentation
· 802.1X configuration in the security configuration guide for the device.
· 802.1X commands in the security command reference for the device.