- Table of Contents
-
- H3C Campus Fixed-Port Switches CLI-Based Quick Start Configuration Guide -6W102
- 01-H3C Devices CLI Reference
- 02-Login Management Quick Start Configuration Guide
- 03-Configuration File Management Quick Start Configruation Guide
- 04-Software Upgrade Quick Start Configuration Guide
- 05-Device Management Quick Start Configuration Guide
- 06-NTP Quick Start Configuration Guide
- 07-RBAC Quick Start Configuration Guide
- 08-IRF Quick Start Configuration Guide
- 09-Ethernet Interface Quick Start Configuration Guide
- 10-VLAN Quick Start Configuration Guide
- 11-Port Isolation Quick Start Configuration Guide
- 12-Loop Detection Quick Start Configuration Guide
- 13-QinQ Quick Start Configuration Guide
- 14-MAC Address Table Quick Start Configuration Guide
- 15-Ethernet Link Aggregation Quick Start Configuration Guide
- 16-Spanning Tree Quick Start Configuration Guide
- 17-DHCP Quick Start Configuration Guide
- 18-OSPF Quick Start Configuration Guide
- 19-Static Routing Quick Start Configuration Guide
- 20-Basic RIP Quick Start Configuration Guide
- 21-PBR Quick Start Configuration Guide
- 22-IGMP Snooping Quick Start Configuration Guide
- 23-Packet Filtering Quick Start Configuration Guide
- 24-QoS Quick Start Configuration Guide
- 25-IP Source Guard Quick Start Configuration Guide
- 26-SSH Quick Start Configuration Guide
- 27-Port Security Quick Start Configuration Guide
- 28-VRRP Quick Start Configuration Guide
- 29-PoE Quick Start Configuration Guide
- 30-Mirroring Quick Start Configuration Guide
- 31-Information Center Quick Start Configuration Guide
- 32-SNMP Quick Start Configuration Guide
- 33-Static Route-Based Public and Private Network Intercommunication Configuration Guide
- 34-LAN Networks Quick Start Configuration Guide
- 35-802.1X Quick Start Configuration Guide
- 36-AAA Quick Start Configuration Guide
- Related Documents
-
| Title | Size | Download |
|---|---|---|
| 14-MAC Address Table Quick Start Configuration Guide | 114.30 KB |
MAC Address Table Quick Start Configuration Guide
Copyright © 2025 New H3C Technologies Co., Ltd. All rights reserved.
No part of this manual may be reproduced or transmitted in any form or by any means without prior written consent of New H3C Technologies Co., Ltd.
Except for the trademarks of New H3C Technologies Co., Ltd., any trademarks that may be mentioned in this document are the property of their respective owners.
The information in this document is subject to change without notice.
Contents
Configuring static MAC address entries
Setting the MAC learning limit for a VLAN
Setting the MAC learning limit on interfaces
Configuring static MAC address entries
Introduction
The following information uses an example to describe the basic procedure for configuring static MAC address entries.
Network configuration
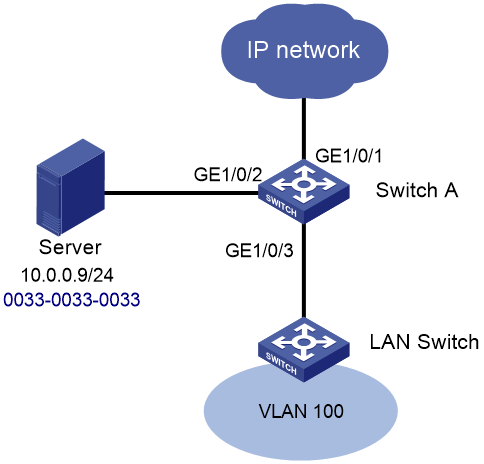
As shown in Figure 1, for secure communication between users in VLAN 100 and the server or extranet through Switch A, perform the following tasks:
· Assign GigabitEthernet 1/0/2 and GigabitEthernet 1/0/3 to VLAN 100.
· Add a static MAC address entry on Switch A to bind the server MAC address to GigabitEthernet 1/0/2.
Procedure
# Create VLAN 100.
<Switch A> system-view
[Switch A] vlan 100
[Switch A-vlan100] quit
# Assign GigabitEthernet 1/0/2 to VLAN 100.
[Switch A] interface gigabitethernet 1/0/2
[Switch A-GigabitEthernet1/0/2] port access vlan 100
[Switch A-GigabitEthernet1/0/2] quit
# Configure GigabitEthernet 1/0/3 (port facing the LAN switch) as a trunk port, and assign the port to VLAN 100.
[Switch A] interface gigabitethernet 1/0/3
[Switch A-GigabitEthernet1/0/3] port link-type trunk
[Switch A-GigabitEthernet1/0/3] port trunk permit vlan 100
[Switch A-GigabitEthernet1/0/3] quit
# Add a static entry for MAC address 0033-0033-0033 on GigabitEthernet 1/0/2 that belongs to VLAN 100.
[Switch A] mac-address static 0033-0033-0033 interface gigabitethernet 1/0/2 vlan 100
Verifying the configuration
# Use ping operations to verify that any 10.0.0.0/24 host in VLAN 100 can communicate with the server.
<Switch A> ping 10.0.0.9
Ping 10.0.0.9 (10.0.0.9): 56 data bytes, press CTRL+C to break
56 bytes from 10.0.0.9: icmp_seq=0 ttl=254 time=2.137 ms
56 bytes from 10.0.0.9: icmp_seq=1 ttl=254 time=2.051 ms
56 bytes from 10.0.0.9: icmp_seq=2 ttl=254 time=1.996 ms
56 bytes from 10.0.0.9: icmp_seq=3 ttl=254 time=1.963 ms
56 bytes from 10.0.0.9: icmp_seq=4 ttl=254 time=1.991 ms
--- Ping statistics for 10.0.0.9 ---
5 packet(s) transmitted, 5 packet(s) received, 0.0% packet loss
round-trip min/avg/max/std-dev = 1.963/2.028/2.137/0.062 ms
# Verify that the static MAC address entry has been added.
[Switch A] display mac-address
MAC Address VLAN ID State Port/NickName Aging
0033-0033-0033 100 Static GE1/0/2 N
Configuration files
#
vlan 100
#
interface GigabitEthernet1/0/2
port access vlan 100
mac-address static 0033-0033-0033 vlan 100
#
interface GigabitEthernet1/0/3
port link-type trunk
port trunk permit vlan 1 100
#
Related documentation
· MAC address table configuration in the Layer 2—LAN switching configuration guide for the device.
· MAC address table commands in the Layer 2—LAN switching command reference for the device.
Setting the MAC learning limit for a VLAN
Introduction
The following information uses an example to describe the basic procedure for setting the MAC learning limit for a VLAN.
Network configuration
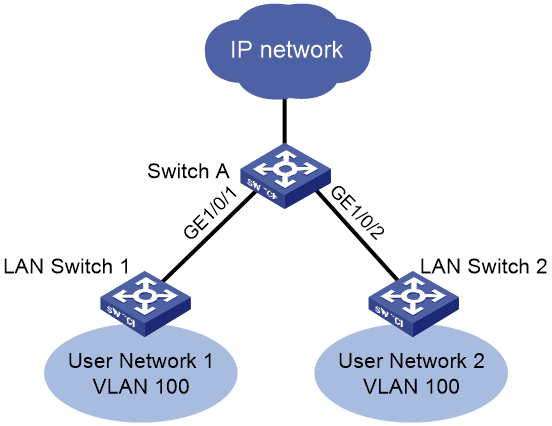
As shown in Figure 2, User Network 1 and User Network 2 both use VLAN 100 to communicate with the external network via Switch A. A large MAC address table will degrade forwarding performance. To ensure the forwarding performance of Switch A, configure VLAN 100 on Switch A to learn a maximum of 1024 MAC address entries.
Procedure
To Configure Switch A:
# Create VLAN 100.
<Switch A> system-view
[Switch A] vlan 100
[Switch A-vlan100] quit
# Configure GigabitEthernet 1/0/1 as a trunk port, and assign the port to VLAN 100.
[Switch A] interface gigabitethernet 1/0/1
[Switch A-GigabitEthernet1/0/1] port link-type trunk
[Switch A-GigabitEthernet1/0/1] port trunk permit vlan 100
[Switch A-GigabitEthernet1/0/1] quit
# Configure GigabitEthernet 1/0/2 as a trunk port, and assign the port to VLAN 100.
[Switch A] interface gigabitethernet 1/0/2
[Switch A-GigabitEthernet1/0/2] port link-type trunk
[Switch A-GigabitEthernet1/0/2] port trunk permit vlan 100
[Switch A-GigabitEthernet1/0/2] quit
# Configure VLAN 100 to learn a maximum of 1024 MAC address entries.
[Switch A] vlan 100
[Switch A-vlan100] mac-address max-mac-count 1024
[Switch A-vlan100] quit
Verifying the configuration
# Execute the display this command in VLAN 100 view to see if the configuration takes effect.
[Switch A] vlan 100
[Switch A-vlan100] display this
#
mac-address max-mac-count 1024
#
Return
Configuration files
#
vlan 100
mac-address max-mac-count 1024
#
interface GigabitEthernet1/0/1
port link-mode bridge
port link-type trunk
port trunk permit vlan 1 100
#
interface GigabitEthernet1/0/2
port link-mode bridge
port link-type trunk
port trunk permit vlan 1 100
#
Related documentation
· MAC address table configuration in the Layer 2—LAN switching configuration guide for the device.
· MAC address table commands in the Layer 2—LAN switching command reference for the device.
Setting the MAC learning limit on interfaces
Introduction
The following information uses an example to describe the basic procedure for setting the MAC learning limit on interfaces.
Network configuration
As shown in Figure 3, Switch A is the edge device of the operator's network, LAN Switch 3 is the company's access switch, and LAN Switch 1 and LAN Switch 2 are the access switches for two departments within the company. Department network 1 uses VLAN 100 and Department network 2 uses VLAN 200. The company network is connected to Switch A via LAN Switch 3 to access the external network.
A large MAC address table will degrade forwarding performance. To ensure the forwarding performance of Switch A, configure VLAN 100 on Switch A to learn a maximum of 1024 MAC address entries.

Procedure
To Configure Switch A:
# Create VLAN 100 and VLAN 200.
<Switch A> system-view
[Switch A] vlan 100 200
# Configure GigabitEthernet 1/0/1 as a trunk port, and assign the port to VLAN 100 and VLAN 200.
[Switch A] interface gigabitethernet 1/0/1
[Switch A-GigabitEthernet1/0/1] port link-type trunk
[Switch A-GigabitEthernet1/0/1] port trunk permit vlan 100 200
[Switch A-GigabitEthernet1/0/1] quit
# Configure VLAN 100 to learn a maximum of 1024 MAC address entries.
[Switch A] interface gigabitethernet 1/0/1
[Switch A-GigabitEthernet1/0/1]mac-address max-mac-count 1024
[Switch A-GigabitEthernet1/0/1] quit
Verifying the configuration
# Execute the display this command in VLAN 100 view to see if the configuration takes effect.
[Switch A] interface gigabitethernet 1/0/1
[Switch A-GigabitEthernet1/0/1] display this
#
interface GigabitEthernet1/0/1
port link-mode bridge
port link-type trunk
port trunk permit vlan 1 100 200
mac-address max-mac-count 1024
#
return
Configuration files
#
vlan 100
#
vlan 200
#
interface GigabitEthernet1/0/1
port link-mode bridge
port link-type trunk
port trunk permit vlan 1 100 200
mac-address max-mac-count 1024
#
Related documentation
· MAC address table configuration in the Layer 2—LAN switching configuration guide for the device.
· MAC address table commands in the Layer 2—LAN switching command reference for the device.