- Table of Contents
-
- 02-WLAN
- 00-Preface
- 01-AP management configuration
- 02-Radio management configuration
- 03-WLAN access configuration
- 04-WLAN security configuration
- 05-WLAN authentication configuration
- 06-WIPS configuration
- 07-WLAN QoS configuration
- 08-WLAN roaming configuration
- 09-WLAN load balancing configuration
- 10-WLAN radio resource measurement configuration
- 11-Channel scanning configuration
- 12-Band navigation configuration
- 13-WLAN high availability configuration
- 14-802.11r configuration
- 15-Wireless location configuration
- 16-Hotspot 2.0 configuration
- 17-WLAN RRM configuration
- 18-WT configuration
- 19-IoT AP configuration
- 20-CM tunnel configuration
- 21-Cloud connection configuration
- 22-WLAN IP snooping configuration
- 23-WLAN fast forwarding configuration
- Related Documents
-
| Title | Size | Download |
|---|---|---|
| 06-WIPS configuration | 304.87 KB |
Broadcast disassociation/deauthentication attack detection
Detection on clients with the 40 MHz bandwidth mode disabled
AP impersonation attack detection
Association/reassociation DoS attack detection
User-defined attack detection based on signatures
Enabling WIPS in AP group radio view
Configuring wireless attack detection
Configuring flood attack detection
Configuring malformed packet detection
Configuring device entry attack detection
Configuring detection on other attacks
Applying an attack detection policy
Configuring user-defined attack detection based on signatures
Configuring the alarm-ignored device list
Configuring device classification
Configuring a classification policy
Applying a classification policy
Configuring a countermeasure policy
Applying a countermeasure policy
Configuring common parameters for client probing
Configuring client probing in radio view
Configuring client probing in AP group radio view
Detecting clients with NAT configured
Detecting clients with NAT configured in AP view
Detecting clients with NAT configured in AP group view
Displaying and maintaining WIPS
Device classification and countermeasures configuration example
Malformed packet and flood attack detection examples
Signature-based user-defined attack detection configuration example
Configuring WIPS
Overview
Wireless Intrusion Prevention System (WIPS) helps you monitor your WLAN, detect attacks and rogue devices, and take countermeasures. WIPS provides a complete solution for WLAN security.
WIPS contains the network management module, the AC, and sensors (APs enabled with WIPS). They provide the following functions:
· The sensors monitor the WLAN, collect channel information, and report the information to the AC for further analysis.
· The AC determines attacks and rogue devices, takes countermeasures, and triggers alarms.
· The network management module allows you to configure WIPS in the Web interface. It provides configuration management, report generation, and alarm management functions.
Attack detection
WIPS detects attacks by listening to 802.11 frames and triggers alarms to notify the administrator.
Flood attack detection
An AP might be facing a flood attack if it receives a large number of same-type frames within a short period of time. To prevent the AP from being overwhelmed, WIPS periodically examines incoming packet statistics, and alarms when it detects a suspicious flood attack. WIPS can detect the following flood attacks:
· Authentication request flood attack—Floods the association table of an AP by imitating many clients sending authentication requests to the AP.
· Probe request/association request/reassociation request flood attack—Floods the association table of an AP by imitating many clients sending probe requests/association requests/reassociation requests to the AP.
· EAPOL-start flood attack—Exhausts the AP's resources by imitating many clients sending EAPOL-start frames defined in IEEE 802.1X to the AP.
· Broadcast/unicast deauthentication flood attack—Spoofs deauthentication frames from the AP to the associated clients to disassociate the clients from the AP. This attack can rapidly terminate wireless services to multiple clients.
· Broadcast/unicast disassociation flood attack—Spoofs disassociation frames from the AP to the associated clients to disassociate the clients from the AP. This attack can rapidly terminate wireless services to multiple clients.
· RTS/CTS flood attack—Floods RTS/CTS frames to reserve the RF medium and force other wireless devices sharing the RF medium to hold back their transmissions. This attack takes advantage of vulnerabilities of the virtual carrier mechanism.
· Block Ack flood attack—Floods Block Ack frames to the AP to interrupt the operation of the Block Ack mechanism.
· Null data flood attack—Spoofs null data frames with power management bit 1 that are sent from a client to the AP. The AP determines that the client is in power save mode and buffers frames for the client. When the aging time of the buffered frames expires, the AP discards the frames. This interrupts the client's communication with the AP.
· Beacon flood attack—Floods beacon frames imitating a large number of fake APs to interrupt client association.
· EAPOL-logoff flood attack—The IEEE 802.1X standard defines the authentication protocol using Extensible Authentication Protocol over LANs (EAPOL). A client needs to send an EAPOL-logoff frame to terminate the session with an AP. The EAPOL-logoff frames are not authenticated, and an attacker can spoof EAPOL-logoff frames to disassociate a client.
· EAP-success/failure flood attack—In a WLAN using 802.1X authentication, an AP sends an EAP-success or EAP-failure frame to a client to inform authentication success or failure. An attacker can spoof the MAC address of an AP to send EAP-success or EAP-failure frames to a client to disrupt the authentication process.
Malformed packet detection
WIPS determines that a frame is malformed if the frame matches the criteria shown in Table 1, and then it triggers alarms and logs. WIPS can detect 16 kinds of malformed packets.
Table 1 Malformed frame match criteria
|
Detection type |
Applicable frames |
Match criteria |
|
Invalid IE length detection |
All management frames |
The IE length does not conform to the 802.11 protocol. The remaining length of the IE is not zero after the packet is resolved. |
|
Duplicate IE detection |
All management frames |
Duplicate IE. This type of detection is not applicable to vendor-defined IEs. |
|
Redundant IE detection |
All management frames |
The IE is not a necessary IE to the frame and is not a reserved IE. |
|
Invalid packet length detection |
All management frames |
The remaining length of the IE is not zero after the packet payload is resolved. |
|
Abnormal IBSS and ESS setting detection |
· Beacon frames · Probe response frames |
Both IBSS and ESS are set to 1. |
|
Malformed authentication request frame detection |
Authentication request frames |
· The authentication algorithm number does not conform to the 802.11 protocol and is larger than 3. · The authentication transaction sequence number is 1 and the status code is not 0. · The authentication transaction sequence number is larger than 4. |
|
Malformed association request frame detection |
Association request frames |
The frame length is 0. |
|
Malformed HT IE detection |
· Beacon frames · Probe responses · Association responses · Reassociation requests |
· The SM power save value for the HT capabilities IE is 2. · The secondary channel offset value for the HT operation IE is 2. |
|
Oversized duration detection |
· Unicast management frames · Unicast data frames · RTS, CTS, and ACK frames |
The packet duration value is larger than the specified threshold. |
|
Malformed probe response frame detection |
Probe response frames |
The frame is not a mesh frame and its SSID length is 0. |
|
Invalid deauthentication code detection |
Deauthentication frames |
The reason code is 0 or is in the range of 67 to 65535. |
|
Invalid disassociation code detection |
Disassociation frames |
The reason code is 0 or is in the range of 67 to 65535. |
|
Oversized SSID detection |
· Beacon frames · Probe requests · Probe responses · Association request frames |
The SSID length is larger than 32. |
|
FATA-Jack detection |
Authentication frames |
The value of the authentication algorithm number is 2. |
|
Invalid source address detection |
All management frames |
· The TO DS is 1, indicating that the frame is sent to the AP by a client. · The source MAC address of the frame is a multicast or broadcast address. |
|
Oversized EAPOL key detection |
EAPOL-Key frames |
The TO DS is 1 and the length of the key is larger than 0. |
Spoofing attack detection
In a spoofing attack, the attacker sends frames on behalf of another device to threaten the network. WIPS supports detecting the following spoofing attacks:
· Frame spoofing—A fake AP spoofs an authorized AP to send beacon or probe response frames to induce clients to associate with it.
· AP MAC address spoofing—A client spoofs an authorized AP to send deauthentication or disassociation frames to other clients. This can cause the clients to go offline and affect the correct operation of the WLAN.
· Client MAC address spoofing—A fake AP spoofs an authorized client to associate with an authorized AP.
Frame spoofing attack detection
WIPS calculates the startup time of an AP by using the frame receiving time and timestamp. If the calculated startup time of the AP is not the same as the startup time recorded in WIPS, WIPS determines that this is a spoofing attack.
AP MAC address spoofing attack detection
WIPS examines the MAC address of the sender. If the MAC address of the sender already exists in the AP MAC address table, WIPS determines that this is a spoofing attack.
Client MAC address spoofing attack detection
WIPS examines the MAC address of the sender. If the MAC address of the sender already exists in the client MAC address table, WIPS determines that this is a spoofing attack.
Weak IV detection
When the RC4 encryption algorithm, used by the WEP security protocol, uses an insecure IV, the WEP key is more likely to be cracked. An IV is a weak IV if its first byte is smaller than 16 (decimal) and its second byte is FF. WIPS prevents this kind of attack by detecting the IV in each WEP packet.
Omerta attack detection
Omerta is a DoS attack tool based on the 802.11 protocol. It sends disassociation frames with the reason code 0x01 to disassociate clients. Reason code 0x01 indicates an unknown disassociation reason. WIPS detects Omerta attacks by detecting the reason code of each disassociation frame.
Broadcast disassociation/deauthentication attack detection
An attacker spoofs a legitimate AP to send a broadcast disassociation or deauthentication frame to log off all clients associated with the AP.
Detection on clients with the 40 MHz bandwidth mode disabled
802.11n devices support both the 20 MHz and 40 MHz bandwidth modes. If the 40 MHz bandwidth mode is disabled on a client, other clients associated with the same AP as the client must also use the 20 MHz bandwidth. This affects network throughput and efficiency.
WIPS detects such clients by detecting probe request frames sent by the clients.
Power save attack detection
An attacker spoofs the MAC address of a client to send power save on frames to an AP. The AP caches the frames for the client. The attacked client cannot receive data frames because the AP determines that the client is still in power save mode. When the aging time of the cached frames expires, the AP discards the frames. WIPS detects power save attacks by determining the ratio of power save on frames to power save off frames.
Prohibited channel detection
After you configure a permitted channel list and enable prohibited channel detection, WIPS determines that channels that are not in the permitted channel list are prohibited channels.
Soft AP detection
A soft AP refers to a client that acts as an AP and provides wireless services. An attacker can access the internal network through a soft AP and then initiate further attacks. WIPS detects soft APs by detecting the interval at which a device switches its roles between client and AP. WIPS does not perform soft AP detection on unassociated clients.
Windows bridge detection
When a wireless client connected to a wired network establishes a Windows bridge through the wired NIC, the client can bridge an external AP with the internal network. This might bring security problems to the internal network. WIPS detects Windows bridges by analyzing data frames sent by associated clients.
Unencrypted device detection
An authorized AP or client that is transmitting unencrypted frames might bring security problems to the network. WIPS detects unencrypted devices by analyzing the frames sent the by authorized APs or clients.
Hotspot attack detection
An attacker sets up a rogue AP with the same SSID as a hotspot to lure the clients to associate with it. After the clients associate with the malicious AP, the attacker initiates further attacks to obtain client information.
You can configure a hotspot file to enable WIPS to detect hotspot attacks.
AP impersonation attack detection
In an AP impersonation attack, a malicious AP that has the same BSSID and ESSID as a legitimate AP lures the clients to associate with it. Then this impersonating AP initiates hotspot attacks or fools the detection system.
WIPS detects AP impersonation attacks by detecting the interval at which an AP sends beacon frames.
HT-greenfield AP detection
An AP operating in HT-greenfield mode might cause collisions, errors, and retransmissions because it cannot communicate with 802.11a/b/g devices. WIPS detects HT-greenfield APs by analyzing the beacon frames or probe response frames sent by APs.
Honeypot AP detection
In a honeypot AP attack, the attacker sets up a malicious AP to lure clients to associate with it. The SSID of the malicious AP is similar to the SSID of a legitimate AP. After a client associates with a honeypot AP, the honeypot AP initiates further attacks such as port scanning or fake authentication to obtain client information.
WIPS detects honeypot APs by detecting SSIDs of external APs. If the similarity between the SSID of an external AP and the SSID of a legitimate AP reaches the specified threshold, WIPS generates an alarm.
MITM attack detection
In an MITM attack, the attacker sets up a rogue AP and lures a client to associate with it. Then the rogue AP spoofs the MAC address of the client to associate with the authorized AP. When the client and the authorized AP communicate, the rogue AP captures packets from both the client and the authorized AP. The rogue AP might modify the frames and obtain the frame information. WIPS detects MITM attacks by detecting clients that are disassociated from an authorized AP and associated with a honeypot AP.
Wireless bridge detection
An attacker might intrude on the internal networks through a wireless bridge. When detecting a wireless bridge, WIPS generates an alarm. If the wireless bridge is in a mesh network, WIPS records the mesh link.
Association/reassociation DoS attack detection
An association/reassociation DoS attack floods the association table of an AP by imitating many clients sending association requests to the AP. When the number of entries in the table reaches the upper limit, the AP cannot process requests from legitimate clients.
AP flood attack detection
WIPS detects the number of APs in the WLAN and triggers an alarm for an AP flood attack when the number of APs exceeds the specified threshold.
Device entry attack detection
Attackers can send invalid packets to WIPS to increase processing costs. WIPS periodically examines the learned device entries to determine whether to rate limit device entry learning. If the number of AP or client entries learned within the specified interval exceeds the threshold, WIPS triggers an alarm and stops learning new entries.
User-defined attack detection based on signatures
WIPS provides user-defined attack detection based on signatures. A signature contains a packet identification method and actions to take on the matching packets. The sensor matches the detected packets against the signature, and takes actions defined in the signature if a packet matches the signature.
A signature can contain a maximum of six subsignatures, which can be defined based on the frame type, MAC address, serial ID, SSID length, SSID, and frame pattern. A packet matches a signature only when it matches all the subsignatures in the signature.
Device classification
AP classification
As shown in Table 2, WIPS classifies detected APs according to the predefined classification rules.
|
Category |
Description |
Classification rule |
|
Authorized AP |
An AP that is permitted in the WLAN. |
· Has been connected to the AC and not in the prohibited device list. · Configured as an authorized AP. · In the permitted device list. · Classified as an authorized AP by a user-defined AP classification rule. |
|
Rogue AP |
An AP that cannot be used in the WLAN. |
· In the prohibited device list. · Not in the OUI configuration file. · Configured as a rogue AP. · Classified as a rogue AP by a user-defined AP classification rule. If the wired port on an AP has been connected to the network and the AP is not connected to the AC, the AP might be a rogue AP. |
|
Misconfigured AP |
An AP that can be used in the WLAN but has incorrect configuration. |
· Configured as a misconfigured AP. · Classified as a misconfigured AP by a user-defined AP classification rule. |
|
External AP |
An AP that is in an adjacent WLAN. |
· Configured as an external AP. · Classified as an external AP by a user-defined AP classification rule. |
|
Ad hoc |
An AP operating in Ad hoc mode. WIPS detects Ad hoc APs by listening to beacon frames. |
N/A |
|
Mesh AP |
An AP in a WLAN mesh network. |
WIPS identifies mesh APs through beacon frames. |
|
Potential-authorized AP |
An AP that is possibly authorized. |
An AP is a potential-authorized AP if it meets all the following conditions: · Not in the permitted device list. · Not in the prohibited device list. · Not in the trusted SSID list. · Not in the trusted OUI list. · Has been connected to the AC. · Not manually classified. · Does not match any user-defined AP classification rules. |
|
Potential-rogue AP |
An AP that is possibly a rogue AP. |
Has incorrect wireless configuration and is not in any one of the following lists: · Permitted device list. · Prohibited device list. · Trusted OUI list. If the wired port on an AP has been connected to the network, the AP is a rogue AP. |
|
Potential-external AP |
An AP that is possibly an external AP. |
· Has incorrect wireless service configuration. · The wired port has not been connected to the network. · Not in any of the following lists: ¡ Permitted device list. ¡ Prohibited device list. ¡ Trusted OUI list. |
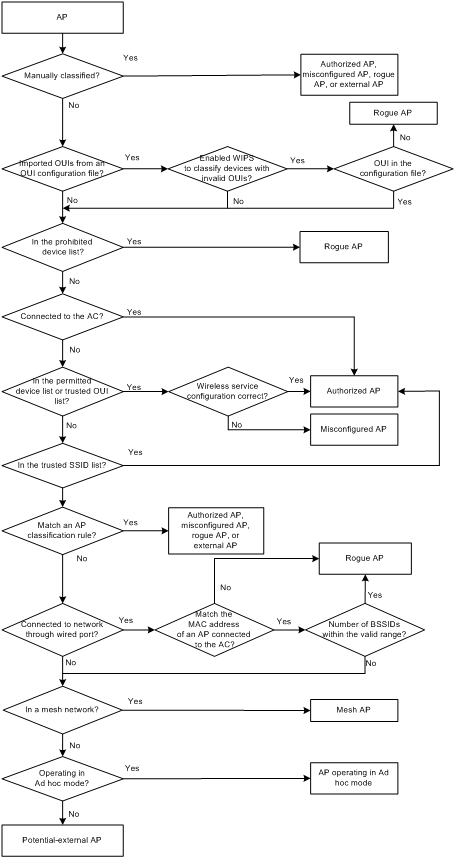
WIPS classifies detected APs by following the procedure shown in Figure 1.
Figure 1 AP classification flow
Client classification
As shown in Table 3, WIPS classifies detected clients according to the predefined classification rules.
|
Category |
Description |
Classification rule |
|
Authorized client |
A client that is permitted in the WLAN. |
· In the prohibited device list and associated with an authorized AP. · Has passed authentication and is associated with an authorized AP. |
|
Unauthorized client |
A client that cannot be used in the WLAN. |
· In the prohibited device list. · Associated with a rogue AP. · Not in the OUI configuration file. |
|
Misassociated client |
A client that is associated with an unauthorized AP. |
In the permitted device list but associated with an unauthorized AP. A misassociated client might bring security threats to the network. |
|
Uncategorized client |
A client whose category cannot be determined. |
N/A |
WIPS classifies detected clients by following the procedure shown in Figure 2.
Figure 2 Client classification flow

Countermeasures
Rogue devices are susceptible to attacks and might bring security problems to the WLAN. WIPS enables you to take countermeasures against rogue devices.
WIPS configuration task list
|
Tasks at a glance |
|
(Required.) Enabling WIPS |
|
(Optional.) Configuring wireless attack detection: · Configuring flood attack detection · Configuring malformed packet detection · Configuring device entry attack detection · Configuring detection on other attacks · Applying an attack detection policy · Configuring user-defined attack detection based on signatures |
|
(Optional.) Configuring device classification: |
|
(Optional.) Configuring countermeasures: |
|
(Optional.) Configuring client probing |
|
(Optional.) Detecting clients with NAT configured |
Enabling WIPS
You can divide a wireless network into multiple virtual security domains (VSDs) and apply different policies to these VSDs.
Before enabling WIPS for a radio of an AP, you must add the AP to a VSD.
Enabling WIPS in radio view
|
Step |
Command |
Remarks |
|
1. Enter system view. |
system-view |
N/A |
|
2. Enter AP view. |
wlan ap ap-name [ model model-name ] |
You must specify the model name when you create an AP. |
|
3. Add the AP to a VSD. |
wips virtual-security-domain vsd-name |
By default, an AP uses the configuration in AP group view. |
|
4. Enter radio view. |
radio radio-id |
N/A |
|
5. Enable WIPS. |
wips enable |
By default, an AP uses the configuration in AP group view. |
Enabling WIPS in AP group radio view
|
Step |
Command |
Remarks |
|
1. Enter system view. |
system-view |
N/A |
|
2. Enter AP group view. |
wlan ap-group group-name |
N/A |
|
3. Add the AP group to a VSD. |
wips virtual-security-domain vsd-name |
By default, an AP group is not in any VSD. |
|
4. Enter AP model view. |
ap-model ap-model |
N/A |
|
5. Enter radio view. |
radio radio-id |
N/A |
|
6. Enable WIPS. |
wips enable |
By default, WIPS is disabled. |
Configuring wireless attack detection
To configure wireless attack detection, you must first create an attack detection policy and enable detection of the specified attacks.
Configuring flood attack detection
|
Step |
Command |
Remarks |
|
7. Enter system view. |
system-view |
N/A |
|
8. Enter WIPS view. |
wips |
N/A |
|
9. Create an attack detection policy and enter its view. |
detect policy policy-name |
By default, no attack detection policy exists. |
|
10. Configure association request flood attack detection. |
flood association-request [ interval interval-value | quiet quiet-value | threshold threshold-value ] * |
By default, association request flood attack detection is disabled. |
|
11. Configure authentication request flood attack detection. |
flood authentication [ interval interval-value | quiet quiet-value | threshold threshold-value ] * |
By default, authentication request flood attack detection is disabled. |
|
12. Configure beacon flood attack detection. |
flood beacon [ interval interval-value | quiet quiet-value | threshold threshold-value ] * |
By default, beacon flood attack detection is disabled. |
|
13. Configure Block Ack flood attack detection. |
flood block-ack [ interval interval-value | quiet quiet-value | threshold threshold-value ] * |
By default, Block Ack flood attack detection is disabled. |
|
14. Configure RTS flood attack detection. |
flood rts [ interval interval-value | quiet quiet-value | threshold threshold-value ] * |
By default, RTS flood attack detection is disabled. |
|
15. Configure CTS flood attack detection. |
flood cts [ interval interval-value | quiet quiet-value | threshold threshold-value ] * |
By default, CTS flood attack detection is disabled. |
|
16. Configure deauthentication flood attack detection. |
flood deauthentication [ interval interval-value | quiet quiet-value | threshold threshold-value ] * |
By default, deauthentication flood attack detection is disabled. |
|
17. Configure disassociation flood attack detection. |
flood disassociation [ interval interval-value | quiet quiet-value | threshold threshold-value ] * |
By default, disassociation flood attack detection is disabled. |
|
18. Configure EAPOL-start flood attack detection. |
flood eapol-start [ interval interval-value | quiet quiet-value | threshold threshold-value ] * |
By default, EAPOL-start flood attack detection is disabled. |
|
19. Configure null data flood attack detection. |
flood null data [ interval interval-value | quiet quiet-value | threshold threshold-value ] * |
By default, null data flood attack detection is disabled. |
|
20. Configure probe request flood attack detection. |
flood probe-request [ interval interval-value | quiet quiet-value | threshold threshold-value ] * |
By default, probe request flood attack detection is disabled. |
|
21. Configure reassociation request flood attack detection. |
flood reassociation-request [ interval interval-value | quiet quiet-value | threshold threshold-value ] * |
By default, reassociation request flood attack detection is disabled. |
|
22. Configure EAPOL-logoff flood attack detection. |
flood eapol-logoff [ interval interval-value | quiet quiet-value | threshold threshold-value ]* |
By default, EAPOL-logoff flood attack detection is disabled. |
|
23. Configure EAP-failure flood attack detection. |
flood eap-failure [ interval interval-value | quiet quiet-value | threshold threshold-value ] * |
By default, EAP-failure flood attack detection is disabled. |
|
24. Configure EAP-success flood attack detection. |
flood eap-success [ interval interval-value | quiet quiet-value | threshold threshold-value ] * |
By default, EAP-success flood attack detection is disabled. |
Configuring malformed packet detection
|
Step |
Command |
Remarks |
|
1. Enter system view. |
system-view |
N/A |
|
2. Enter WIPS view. |
wips |
N/A |
|
3. Create an attack detection policy and enter its view. |
detect policy policy-name |
By default, no attack detection policy exists. |
|
4. Configure duplicated IE detection. |
malformed duplicated-ie [ quiet quiet-value ] |
By default, duplicated IE detection is disabled. |
|
5. Configure FATA-Jack detection. |
malformed fata-jack [ quiet quiet-value ] |
By default, FATA-Jack detection is disabled. |
|
6. Configure abnormal IBSS or ESS setting detection. |
malformed illegal-ibss-ess [ quiet quiet-value ] |
By default, abnormal IBSS or ESS setting detection is disabled. |
|
7. Configure invalid source address detection. |
malformed invalid-address-combination [ quiet quiet-value ] |
By default, invalid source address detection is disabled. |
|
8. Configure malformed association request frame detection. |
malformed invalid-assoc-req [ quiet quiet-value ] |
By default, malformed association request frame detection is disabled. |
|
9. Configure malformed authentication request frame detection. |
malformed invalid-auth [ quiet quiet-value ] |
By default, malformed authentication request frame detection is disabled. |
|
10. Configure invalid deauthentication code detection. |
malformed invalid-deauth-code [ quiet quiet-value ] |
By default, invalid deauthentication code detection is disabled. |
|
11. Configure invalid disassociation code detection. |
malformed invalid-disassoc-code [ quiet quiet-value ] |
By default, invalid disassociation code detection is disabled. |
|
12. Configure invalid IE length detection. |
malformed invalid-ie-length [ quiet quiet-value ] |
By default, invalid IE length detection is disabled. |
|
13. Configure malformed HT IE detection. |
malformed invalid-ht-ie [ quiet quiet-value ] |
By default, malformed HT IE detection is disabled. |
|
14. Configure invalid packet length detection. |
malformed invalid-pkt-length [ quiet quiet-value ] |
By default, invalid packet length detection is disabled. |
|
15. Configure oversized duration detection. |
malformed large-duration [ quiet quiet-value | threshold value ] |
By default, oversized duration detection is disabled. |
|
16. Configure malformed probe response frame detection. |
malformed null-probe-resp [ quiet quiet-value ] |
By default, malformed probe response frame detection is disabled. |
|
17. Configure oversized EAPOL key detection. |
malformed overflow-eapol-key [ quiet quiet-value ] |
By default, oversized EAPOL key detection is disabled. |
|
18. Configure oversized SSID detection. |
malformed overflow-ssid [ quiet quiet-value ] |
By default, oversized SSID detection is disabled. |
|
19. Configure redundant IE detection. |
malformed redundant-ie [ quiet quiet-value ] |
By default, redundant IE detection is disabled. |
Configuring device entry attack detection
|
Step |
Command |
Remarks |
|
1. Enter system view. |
system-view |
N/A |
|
1. Enter WIPS view. |
wips |
N/A |
|
2. Create an attack detection policy and enter its view. |
detect policy policy-name |
By default, no attack detection policy exists. |
|
3. Rate limit client entry learning. |
client-rate-limit [ interval interval-value | quiet quiet-value | threshold threshold-value ] * |
By default, the statistics collection interval is 60 seconds, the quiet time is 1200 seconds, and the client entry threshold is 512 for learned client entries. |
|
4. Set a client entry timer. |
client-timer inactive inactive-value aging aging-value |
By default, the inactive time is 300 seconds, and the aging time is 600 seconds. When a client neither receives nor sends packets within the inactive time, WIPS sets the client to inactive state. When a client neither receives nor sends frames within the aging time, WIPS deletes the entry. |
|
5. Rate limit AP entry learning. |
ap-rate-limit [ interval interval-value | quiet quiet-value | threshold threshold-value ] * |
By default, the statistics collection interval is 60 seconds, the quiet time is 1200 seconds, and the AP entry threshold is 64 for learned AP entries. |
|
6. Set an AP entry timer. |
ap-timer [ inactive inactive-value aging aging-value ] |
By default, the inactive time for APs is 300 seconds, and the aging time is 600 seconds. When an AP neither receives nor sends packets within the inactive time, WIPS sets the AP to inactive state. When an AP neither receives nor sends frames within the aging time, WIPS deletes the entry. |
Configuring detection on other attacks
|
Step |
Command |
Remarks |
|
|
1. Enter system view. |
system-view |
N/A |
|
|
2. Enter WIPS view. |
wips |
N/A |
|
|
3. Create an attack detection policy and enter its view. |
detect policy policy-name |
By default, no attack detection policy exists. |
|
|
4. Configure client MAC address spoofing attack detection. |
client-spoofing [ quiet quiet-value ] |
By default, client MAC address spoofing attack detection is disabled. |
|
|
5. Configure AP MAC address spoofing attack detection. |
ap-spoofing [ quiet quiet-value ] |
By default, AP MAC address spoofing attack detection is disabled. |
|
|
6. Configure weak IV detection. |
weak-iv [ quiet quiet-value ] |
By default, weak IV detection is disabled. |
|
|
7. Configure Omerta attack detection. |
omerta [ quiet quiet-value ] |
By default, Omerta attack detection is disabled. |
|
|
8. Configure broadcast disassociation attack detection. |
disassociation-broadcast [ interval interval-value | quiet quiet-value | threshold threshold-value ] * |
By default, broadcast disassociation attack detection is disabled. |
|
|
9. Configure broadcast deauthentication attack detection. |
deauthentication-broadcast [ interval interval-value | quiet quiet-value | threshold threshold-value ] * |
By default, broadcast deauthentication attack detection is disabled. |
|
|
10. Configure detection on clients with the 40 MHz bandwidth mode disabled. |
ht-40mhz-intolerance [ quiet quiet-value ] |
By default, detection on clients with the 40 MHz bandwidth mode disabled is disabled. |
|
|
11. Configure power saving attack detection. |
power-save [ interval interval-value | minoffpacket packet-value | onoffpercent percent-value | quiet quiet-value ] * |
By default, power saving attack detection is disabled. |
|
|
12. Configure the permitted channel list. |
permit-channel channel-id-list |
By default, no channel is added to the permitted channel list. |
|
|
13. Configure prohibited channel detection. |
prohibited-channel [ quiet quiet-value ] |
By default, prohibited channel detection is disabled. |
|
|
14. Configure Windows bridge detection. |
windows-bridge [ quiet quiet-value ] |
By default, Windows bridge detection is disabled. |
|
|
15. Configure unencrypted authorized AP detection. |
unencrypted-authorized-ap [ quiet quiet-value ] |
By default, unencrypted authorized AP detection is disabled. |
|
|
16. Configure unencrypted authorized client detection. |
unencrypted-trust-client [ quiet quiet-value ] |
By default, unencrypted authorized client detection is disabled. |
|
|
17. Configure soft AP detection. |
soft-ap [ convert-time time-value ] |
By default, soft AP detection is disabled. |
|
|
18. Configure AP impersonation attack detection. |
ap-impersonation [ quiet quiet-value ] |
By default, AP impersonation attack detection is disabled. |
|
|
19. Configure HT-greenfield AP detection. |
ht-greenfield [ quiet quiet-value ] |
By default, HT-greenfield AP detection is disabled. |
|
|
20. Configure association/reassociation DoS attack detection. |
association-table-overflow [ quiet quiet-value ] |
By default, association/reassociation DoS attack detection is disabled. |
|
|
21. Configure wireless bridge detection. |
wireless-bridge [ quiet quiet-value ] |
By default, wireless bridge detection is disabled. |
|
|
22. Configure AP flood attack detection. |
ap-flood [ apnum apnum-value | exceed exceed-value | quiet quiet-value ] * |
By default, AP flood attack detection is disabled. |
|
|
23. Configure honeypot AP detection. |
honeypot-ap [ similarity similarity-value | quiet quiet-value ] * |
By default, honeypot AP detection is disabled. |
|
|
24. Configure MITM attack detection. |
man-in-the-middle [ quiet quiet-value ] |
By default, MITM attack detection is disabled. |
|
|
25. Configure channel change detection. |
ap-channel-change [ quiet quiet-value ] |
By default, channel change detection is disabled. |
|
|
26. Return to WIPS view. |
quit |
N/A |
|
|
27. Import hotspot information from a configuration file. |
import hotspot file-name |
By default, no hotspot information is imported. |
|
|
28. Create an attack detection policy and enter its view. |
detect policy policy-name |
By default, no attack detection policy exists. |
|
|
29. Configure hotspot attack detection. |
hotspot-attack [ quiet quiet-value ] |
By default, hotspot attack detection is disabled. |
|
Applying an attack detection policy
|
Step |
Command |
Remarks |
|
1. Enter system view. |
system-view |
N/A |
|
2. Enter WIPS view. |
wips |
N/A |
|
3. Create a VSD and enter its view. |
virtual-security-domain vsd-name |
By default, no VSD exists. |
|
4. Apply an attack detection policy to the VSD. |
apply detect policy policy-name |
By default, no attack detection policy is applied to the VSD. An attack detection policy applied to a VSD takes effect on all radios in the VSD. |
Configuring user-defined attack detection based on signatures
Configuring a signature
WIPS matches detected packets against the configured signatures in ascending order of ID until a match is found.
You can configure one or multiple subsignatures for a signature. A packet matches a signature only when it matches all the subsignatures of the signature.
To configure a signature:
|
Step |
Command |
Remarks |
|
1. Enter system view. |
system-view |
N/A |
|
2. Enter WIPS view. |
wips |
N/A |
|
3. Create a signature and enter its view. |
signature rule rule-id |
By default, no signature is created. |
|
4. Configure a subsignature to match the frame type of a frame. |
frame-type { control | data | management [ frame-subtype { association-request | association-response | authentication | beacon | deauthentication | disassociation | probe-request } ] } |
By default, no subsignature is configured to match the frame type of a frame. |
|
5. Configure a subsignature to match the MAC address of a frame. |
mac-address { bssid | destination | source } mac-address |
By default, no subsignature is configured to match the MAC address of a frame. |
|
6. Configure a subsignature to match the sequence number of a frame. |
seq-number seq-value1 [ to seq-value2 ] |
By default, no subsignature is configured to match the sequence number of a frame. |
|
7. Configure a subsignature to match the SSID length of a frame. |
ssid-length length-value1 [ to length-value2 ] |
By default, no subsignature is configured to match the SSID length of a frame. |
|
8. Configure a subsignature to match the SSID of a frame. |
ssid [ case-sensitive ] [ not ] { equal | include } string |
By default, no subsignature is configured to match the SSID of a frame. |
|
9. Configure a subsignature to match the specified bits of a frame. |
pattern pattern-number offset offset-value mask hex-value value1 [ to value2 ] [ from-payload ] |
By default, no subsignature is configured to match the specified bits of a frame. |
Applying a signature
To apply a signature, bind the signature to a signature policy.
To apply a signature:
|
Step |
Command |
Remarks |
|
1. Enter system view. |
system-view |
N/A |
|
2. Enter WIPS view. |
wips |
N/A |
|
3. Create a signature policy and enter its view. |
signature policy policy-name |
By default, no signature policy is created. |
|
4. Bind the specified signature to the signature policy. |
apply signature rule rule-id |
By default, no signature is bound to a signature policy. |
|
5. Enable WIPS to detect packets that match the signature. |
detect signature [ interval interval-value | quiet quiet-value | threshold threshold-value ] * |
By default, WIPS detects packets that match a signature. The statistics collection interval is 60 seconds, the quiet interval is 600 seconds, and the alarm threshold is 50. |
Applying a signature policy
|
Step |
Command |
Remarks |
|
1. Enter system view. |
system-view |
N/A |
|
2. Enter WIPS view. |
wips |
N/A |
|
3. Create a VSD and enter its view. |
virtual-security-domain vsd-name |
By default, no VSD is created. |
|
4. Apply the specified signature policy to the VSD. |
apply signature policy policy-name |
By default, no signature policy is applied to a VSD. |
Configuring the alarm-ignored device list
For wireless devices in an alarm-ignored device list, WIPS only monitors them but does not trigger any alarms.
To configure the alarm-ignored device list:
|
Step |
Command |
Remarks |
|
1. Enter system view. |
system-view |
N/A |
|
2. Enter WIPS view. |
wips |
N/A |
|
3. Add the MAC address of a device to the alarm-ignored device list. |
ignorelist mac-address mac-address |
By default, no MAC address is added to the alarm-ignored device list. |
Configuring device classification
To configure wireless device classification, you must first create a classification policy and configure the classification of the specified devices.
Configuring a classification policy
You can enable WIPS to classify devices by using either of the following methods:
· Automatic classification—WIPS automatically classifies devices by adding the MAC addresses, OUIs, or SSIDs of the devices to the specified lists. WIPS also allows you to classify APs by using user-defined AP classification rules.
· Manual classification—You manually specify a category for a device. Manual classification is applicable only to APs.
If you configure both automatic classification and manual classification, manual classification takes effect.
Configuring automatic device classification
|
Step |
Command |
Remarks |
|
1. Enter system view. |
system-view |
N/A |
|
2. Enter WIPS view. |
wips |
N/A |
|
3. Import OUIs from an OUI configuration file. |
import oui file-name |
By default, no OUI is imported. |
|
4. Create a classification policy and enter its view. |
classification policy policy-name |
By default, no classification policy exists. |
|
5. Configure WIPS to classify devices with invalid OUIs as rogue devices. |
invalid-oui-classify illegal |
By default, WIPS does not classify devices with invalid OUIs as rogue devices. |
|
6. Add a MAC address to the permitted device list. |
trust mac-address mac-address |
By default, no MAC address exists in the permitted device list. |
|
7. Add an OUI to the trusted OUI list. |
trust oui oui |
By default, no OUI exists in the trusted OUI list. This command is applicable only to AP classification. |
|
8. Add an SSID to the trusted SSID list. |
trust ssid ssid-name |
By default, no SSID exists in the trusted SSID list. |
|
9. Add a MAC address to the static prohibited device list. |
block mac-address mac-address |
By default, no MAC address exists in to the static prohibited device list. |
|
10. Bind the specified AP classification rule to the classification policy. |
apply ap-classification rule rule-id { authorized-ap | { { external-ap | misconfigured-ap | rogue-ap } [ severity-level level ] } } |
By default, no AP classification rule is bound to a classification policy. |
Configuring an AP classification rule
|
Step |
Command |
Remarks |
|
1. Enter system view. |
system-view |
N/A |
|
2. Enter WIPS view. |
wips |
N/A |
|
3. Create an AP classification rule and enter its view. |
ap-classification rule rule-id |
By default, no AP classification rule is created. |
|
4. Configure the AP classification rule to match the RSSI of an AP. |
rssi value1 [ to value2 ] |
By default, an AP classification rule does not match the RSSI of an AP. |
|
5. Configure the AP classification rule to match the SSID of the wireless service for an AP. |
ssid [ case-sensitive ] [ not ] { equal | include } ssid-string |
By default, an AP classification rule does not match the SSID of the wireless service for an AP. |
|
6. Configure the AP classification rule to match the running time of an AP. |
up-duration value1 [ to value2 ] |
By default, an AP classification rule does not match the running time of an AP. |
|
7. Configure the AP classification rule to match the number of associated clients for an AP. |
client-online value1 [ to value2 ] |
By default, an AP classification rule does not match the number of associated clients for an AP. |
|
8. Configure the AP classification rule to match the number of sensors that detect an AP. |
discovered-ap value1 [ to value2 ] |
By default, an AP classification rule does not match the number of sensors that detect an AP. |
|
9. Configure the AP classification rule to match the security mode used by an AP. |
security { equal | include } { clear | wep | wpa | wpa2 } |
By default, an AP classification rule does not match the security mode used by an AP. |
|
10. Configure the AP classification rule to match the authentication mode used by an AP. |
authentication { equal | include } { 802.1x | none | other | psk } |
By default, an AP classification rule does not match the authentication mode used by an AP. |
|
11. Configure the AP classification rule to match the OUI information of an AP. |
oui oui-info |
By default, an AP classification rule does not match the OUI information of an AP. |
Configuring manual AP classification
|
Step |
Command |
Remarks |
|
1. Enter system view. |
system-view |
N/A |
|
2. Enter WIPS view. |
wips |
N/A |
|
3. Create a classification policy and enter its view. |
classification policy policy-name |
By default, no classification policy is created. |
|
4. Specify a category for the specified AP. |
manual-classify mac-address mac-address { authorized-ap | external-ap | misconfigured-ap | rogue-ap } |
By default, no category is specified for an AP. |
Applying a classification policy
|
Step |
Command |
Remarks |
|
1. Enter system view. |
system-view |
N/A |
|
2. Enter WIPS view. |
wips |
N/A |
|
3. Enter VSD view. |
virtual-security-domain vsd-name |
By default, no VSD exists. |
|
4. Apply a classification policy to the VSD. |
apply classification policy policy-name |
By default, no classification policy is applied on the VSD. A classification policy applied to a VSD takes effect on all radios in the VSD. |
Configuring countermeasures
To take countermeasures against rogue devices, you must first create a countermeasure policy and enable WIPS to take countermeasures against the specified devices.
Configuring a countermeasure policy
|
Step |
Command |
Remarks |
|
1. Enter system view. |
system-view |
N/A |
|
2. Enter WIPS view. |
wips |
N/A |
|
3. Create a countermeasure policy and enter its view. |
countermeasure policy policy-name |
By default, no countermeasure policy exists. |
|
4. Enable WIPS to take countermeasures against external APs. |
countermeasure external-ap |
By default, WIPS does not take countermeasures against external APs. |
|
5. Enable WIPS to take countermeasures against misconfigured APs. |
countermeasure misconfigured-ap |
By default, WIPS does not take countermeasures against misconfigured APs. |
|
6. Enable WIPS to take countermeasures against misassociated clients. |
countermeasure misassociation-client |
By default, WIPS does not take countermeasures against misassociated clients. |
|
7. Enable WIPS to take countermeasures against potential-external APs. |
countermeasure potential-external-ap |
By default, WIPS does not take countermeasures against potential-external APs. |
|
8. Enable WIPS to take countermeasures against potential-authorized APs. |
countermeasure potential-authorized-ap |
By default, WIPS does not take countermeasures against potential-authorized APs. |
|
9. Enable WIPS to take countermeasures against potential-rogue APs. |
countermeasure potential-rogue-ap |
By default, WIPS does not take countermeasures against potential-rogue APs. |
|
10. Enable WIPS to take countermeasures against rogue APs. |
countermeasure rogue-ap |
By default, WIPS does not take countermeasures against rogue APs. |
|
11. Enable WIPS to take countermeasures against unauthorized clients. |
countermeasure unauthorized-client |
By default, WIPS does not take countermeasures against unauthorized clients. |
|
12. Enable WIPS to take countermeasures against uncategorized APs. |
countermeasure uncategorized-ap |
By default, WIPS does not take countermeasures against uncategorized APs. |
|
13. Enable WIPS to take countermeasures against uncategorized clients. |
countermeasure uncategorized-client |
By default, WIPS does not take countermeasures against uncategorized clients. |
|
14. Enable WIPS to take countermeasures against the specified device. |
countermeasure mac-address mac-address |
By default, WIPS does not take countermeasures against devices. |
|
15. Enable WIPS to take countermeasures against Ad hoc devices. |
countermeasure adhoc |
By default, WIPS does not take countermeasures against Ad hoc devices. |
|
16. Enable WIPS to take countermeasures against devices that launch broadcast deauthentication attacks. |
countermeasure attack deauthentication-broadcast |
By default, WIPS does not take countermeasures against devices that launch broadcast deauthentication attacks. |
|
17. Enable WIPS to take countermeasures against devices that launch broadcast disassociation attacks. |
countermeasure attack disassociation-broadcast |
By default, WIPS does not take countermeasures against devices that launch broadcast disassociation attacks. |
|
18. Enable WIPS to take countermeasures against honeypot APs. |
countermeasure attack honeypot-ap |
By default, WIPS does not take countermeasures against honeypot APs. |
|
19. Enable WIPS to take countermeasures against devices that launch hotspot attacks. |
countermeasure attack hotspot-attack |
By default, WIPS does not take countermeasures against devices that launch hotspot attacks. |
|
20. Enable WIPS to take countermeasures against devices with the 40 MHz bandwidth mode disabled. |
countermeasure attack ht-40-mhz-intolerance |
By default, WIPS does not take countermeasures against devices with the 40 MHz bandwidth mode disabled. |
|
21. Enable WIPS to take countermeasures against devices that send malformed packets. |
countermeasure attack malformed-packet |
By default, WIPS does not take countermeasures against devices that send malformed packets. |
|
22. Enable WIPS to take countermeasures against devices that launch MITM attacks. |
countermeasure attack man-in-the-middle |
By default, WIPS does not take countermeasures against devices that launch MITM attacks. |
|
23. Enable WIPS to take countermeasures against devices that launch Omerta attacks. |
countermeasure attack omerta |
By default, WIPS does not take countermeasures against devices that launch Omerta attacks. |
|
24. Enable WIPS to take countermeasures against devices that launch power save attacks. |
countermeasure attack power-save |
By default, WIPS does not take countermeasures against devices that launch power save attacks. |
|
25. Enable WIPS to take countermeasures against soft APs. |
countermeasure attack soft-ap |
By default, WIPS does not take countermeasures against soft APs. |
|
26. Enable WIPS to take countermeasures against unencrypted authorized clients. |
countermeasure attack unencrypted-trust-client |
By default, WIPS does not take countermeasures against unencrypted authorized clients. |
|
27. Enable WIPS to take countermeasures against devices that use weak IVs. |
countermeasure attack weak-iv |
By default, WIPS does not take countermeasures against devices that use weak IVs. |
|
28. Enable WIPS to take countermeasures against devices that launch Windows bridge attacks. |
countermeasure attack windows-bridge |
By default, WIPS does not take countermeasures against devices that launch Windows bridge attacks. |
|
29. Enable WIPS to take countermeasures against all attackers. |
countermeasure attack all |
By default, WIPS does not take countermeasures against all attackers. |
|
30. Enable all sensors that detect an attacker to take countermeasures against the attacker. |
select sensor all |
By default, only the sensor that most recently detects an attacker takes countermeasures against the attacker. |
Applying a countermeasure policy
|
Step |
Command |
Remarks |
|
1. Enter system view. |
system-view |
N/A |
|
2. Enter WIPS view. |
wips |
N/A |
|
3. Create a VSD and enter its view. |
virtual-security-domain vsd-name |
By default, no VSD exists. |
|
4. Apply a countermeasure policy to the VSD. |
apply countermeasure policy policy-name |
By default, no countermeasure policy is applied on the VSD. A countermeasure policy applied to a VSD takes effect on all radios in the VSD. |
Configuring client probing
Perform this task to configure an AP to scan channels to collect client information and maintain client entries and send the collected client information to the specified server.
Configuring common parameters for client probing
|
Step |
Command |
Remarks |
|
|
1. Enter system view. |
system-view |
N/A |
|
|
2. Specify an HTTPS server for client probing. |
client-proximity-sensor server string [ window-time window-time-value | partner partner-value ] * |
By default, no HTTPS server is specified. |
|
|
3. Specify a UDP server for client probing. |
client-proximity-sensor udp-server ip-address port port-number [ interval interval | preshared-key [ cipher | simple ] key-string ] * |
By default, no UDP server is specified. |
|
|
4. Set the AP entry timers. |
client-proximity-sensor ap-timer inactive inactive-value aging aging-value |
By default, the inactive time and aging time for AP entries are 300 seconds and 600 seconds, respectively. |
|
|
5. Set the client entry timers. |
client-proximity-sensor client-timer inactive inactive-value aging aging-value |
By default, the inactive time and aging time for client entries are 300 seconds and 600 seconds, respectively. |
|
|
6. Configure a MAC address list to filter client MAC addresses. |
client-proximity-sensor filter-list list |
By default, no MAC address list is configured for client probing to filter client MAC addresses. |
|
|
7. Set the RSSI threshold for APs or clients. |
client-proximity-sensor rssi-threshold { ap ap-rssi-value | client client-rssi-value } |
By default, no RSSI threshold is set. |
|
|
8. Enable APs to send information about Apple terminals that use a random MAC address to the server. |
client-proximity-sensor random-mac-report enable |
By default, APs do not send information about Apple terminals that use a random MAC address to the server. |
|
|
9. Enable APs to report detected AP information to the server. |
client-proximity-sensor report-ap enable |
By default, APs do not report detected AP information to the server. |
|
|
10. Enable fast wireless device information reporting. |
client-proximity-sensor rt-report enable |
By default, fast wireless device information reporting is disabled. |
|
|
11. Enable APs to send information about detected devices to the AC. |
client-proximity-sensor report-ac enable |
By default, APs do not send information about detected devices to the AC. |
|
|
12. Set the interval for APs to send device information to the AC. |
client-proximity-sensor report-ac-interval |
By default, the interval for APs to send device information to the AC is 3000 milliseconds. |
|
|
13. Set the RSSI variation threshold. |
client-proximity-sensor rssi-change-threshold |
By default, the RSSI variation threshold is 100. |
|
|
14. Create an AP and enter AP view. |
wlan ap ap-name [ model model-name ] |
You must specify the name and model when you create an AP. |
|
|
client-proximity-sensor coordinates longitude longitude-value latitude latitude-value |
By default, the longitude and latitude are not set for an AP. |
|
|
|
16. Specify a UDP server to which APs send device information. |
client-proximity-sensor ap-udp-server ip-address port port-number [ interval interval | preshared-key { cipher | simple } string ] * |
By default, no UDP server is specified. |
|
Configuring client probing in radio view
|
Step |
Command |
Remarks |
|
1. Enter system view. |
system-view |
N/A |
|
2. Create an AP and enter AP view. |
wlan ap ap-name [ model model-name] |
You must specify the name and model when you create an AP. |
|
3. Enter radio view. |
radio radio-id |
N/A |
|
4. Configure client probing. |
client-proximity-sensor { disable | enable } |
By default, an AP uses the configuration in AP group view. |
Configuring client probing in AP group radio view
|
Step |
Command |
Remarks |
|
1. Enter system view. |
system-view |
N/A |
|
2. Enter AP group view. |
wlan ap-group group-name |
N/A |
|
3. Enter AP model view. |
ap-model ap-model |
N/A |
|
4. Enter radio view. |
radio radio-id |
N/A |
|
5. Configure client probing. |
client-proximity-sensor { disable | enable } |
By default, client probing is disabled. |
Detecting clients with NAT configured
Perform this task to enable an AP to detect clients with NAT configured to prevent network sharing among clients.
Detecting clients with NAT configured in AP view
|
Step |
Command |
Remarks |
|
1. Enter system view. |
system-view |
N/A |
|
2. Create an AP and enter AP view. |
wlan ap ap-name [ model model-name ] |
You must specify the name and model when you create an AP. |
|
3. Enable the AP to detect clients with NAT configured. |
wlan nat-detect enable |
By default, an AP uses the configuration in AP group view. |
Detecting clients with NAT configured in AP group view
|
Step |
Command |
Remarks |
|
1. Enter system view. |
system-view |
N/A |
|
2. Create an AP group and enter AP group view. |
wlan ap-group group-name |
By default, a system-defined AP group exists. This AP group is named default-group and cannot be deleted. |
|
3. Enable APs in the AP group to detect clients with NAT configured. |
wlan nat-detect enable |
By default, APs do not detect clients with NAT configured. |
Displaying and maintaining WIPS
Execute display commands in any view and reset commands in user view.
|
Command |
|
|
Display information about all sensors. |
display wips sensor |
|
Display attack detection information collected by sensors. |
display wips statistics [ receive | virtual-security-domain vsd-name ] |
|
Display information about wireless devices detected in a VSD. |
display wips virtual-security-domain vsd-name device [ ap [ adhoc | authorized | external | misconfigured | potential-authorized | potential-external | potential-rogue | rogue ] | client [ [ dissociative-client ] [ authorized | misassociation | unauthorized | uncategorized ] ] | mac-address mac-address ] [ verbose ] |
|
Display information about countermeasures that WIPS has taken against rogue devices. |
display wips virtual-security-domain vsd-name countermeasure record |
|
Display information about detected wireless devices. |
display client-proximity-sensor device [ ap | client | mac-address mac-address ] [ verbose ] |
|
Display information about all sensors. |
display client-proximity-sensor sensor |
|
Display detection statistics that the AC receives from sensors. |
display client-proximity-sensor statistics receive |
|
Display information about detected NAT-configured clients. |
display wlan nat-detect [ mac-address mac-address ] |
|
Clear information received from all sensors. |
reset wips statistics |
|
Clear learned AP or client entries for a VSD. |
reset wips virtual-security-domain vsd-name { ap { all | mac-address mac-address} | client { all | mac-address mac-address } | all } |
|
Clear information about countermeasures that WIPS has taken against rogue devices. |
reset wips virtual-security-domain vsd-name countermeasure record |
|
Clear information about detected wireless devices. |
reset client-proximity-sensor device { ap | client | mac-address mac-address | all } |
|
Clear detection statistics received from sensors. |
reset client-proximity-sensor statistics |
|
Clear information about detected NAT-configured clients. |
reset wlan nat-detect |
WIPS configuration examples
Device classification and countermeasures configuration example
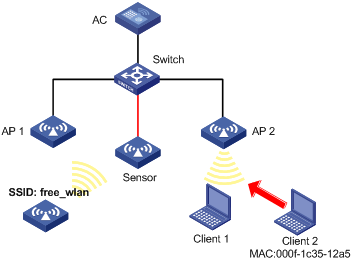
Network requirements
As shown in Figure 3, the sensor connects to the AC through the switch. AP 1 and AP 2 provide wireless services to clients through the SSID abc. Perform the following tasks:
· Enable WIPS for the sensor.
· Configure wireless device classification to add the MAC address 000f-1c35-12a5 to the static prohibited device list and the SSID abc is added to the trusted SSID list.
· Configure countermeasures to enable WIPS to take countermeasures against potential-external APs and unauthorized clients.
Configuration procedure
# Configure wireless services on the AC. (Details not shown.)
For more information about wireless service configuration, see "Configuring WLAN access."
# Create a VSD named vsd1.
<AC> system-view
[AC] wips
[AC-wips] virtual-security-domain vsd1
[AP-wips-vsd-vsd1] quit
[AC-wips] quit
# Create an AP named Sensor and enable WIPS for the AP.
[AC] wlan ap Sensor model WA4320i-ACN
[AC-wlan-ap-Sensor] serial-id 210235A1GQB139000435
[AC-wlan-ap-Sensor] radio 1
[AC-wlan-ap-Sensor-radio-1] radio enable
[AC-wlan-ap-Sensor-radio-1] wips enable
[AC-wlan-ap-Sensor-radio-1] quit
#Add the AP Sensor to the VSD vsd1.
[AC-wlan-ap-Sensor] wips virtual-security-domain vsd1
[AC-wlan-ap-Sensor] quit
# Create a classification policy named class1, add the MAC address of Client 2 to the prohibited device list, and add SSID abc to the trusted SSID list.
[AC] wips
[AC-wips] classification policy class1
[AC-wips-cls-class1] block mac-address 000f-1c35-12a5
[AC-wips-cls-class1] trust ssid abc
[AC-wips-cls-class1] quit
# Apply the classification policy class1 to the VSD vsd1.
[AC-wips] virtual-security-domain vsd1
[AC-wips-vsd-vsd1] apply classification policy class1
[AC-wips-vsd-vsd1] quit
# Create a countermeasure policy named protect, and enable WIPS to take countermeasures against unauthorized clients and potential-external APs.
[AC-wips] countermeasure policy protect
[AC-wips-cms-protect] countermeasure unauthorized-client
[AC-wips-cms-protect] countermeasure potential-external-ap
[AC-wips-cms-protect] quit
# Apply the countermeasure policy protect to the VSD vsd1.
[AC-wips] virtual-security-domain vsd1
[AC-wips-vsd-vsd1] apply countermeasure policy protect
[AC-wips-vsd-vsd1] quit
[AC-wips] quit
Verifying the configuration
# Display wireless device classification information for the VSD vsd1.
[AC] display wips virtual-security-domain vsd1 device
Total 3 detected devices in virtual-security-domain vsd1
Class: Auth - authorization; Ext - extern; Mis - mistake;
Unauth - unauthorized; Uncate - uncategorized;
(A) - associate; (C) - config; (P) - potential
MAC address Type Class Duration Sensors Channel Status
00e0-fc00-5829 AP Auth 00h 10m 24s 1 149 Active
000f-e228-2528 AP Auth 00h 10m 04s 1 149 Active
000f-e223-1616 AP Ext(P) 00h 10m 46s 1 149 Active
000f-1c35-12a5 Client Unauth 00h 10m 02s 1 149 Active
000f-e201-0102 Client Auth 00h 10m 02s 1 149 Active
The output shows that the AP with the MAC address 000f-e223-1616 is classified as a potential-external AP and the client with the MAC address 000f-1c35-12a5 is classified as an unauthorized client.
# Display information about countermeasures that WIPS has taken against the devices.
[AC] display wips virtual-security-domain vsd1 countermeasure record
Total 2 times countermeasure, current 2 countermeasure record in virtual-security-domain vsd1
Reason: Attack; Ass - associated; Black - blacklist;
Class - classification; Manu - manual;
MAC address Type Reason Countermeasure AP Radio ID Time
000f-e223-1616 AP Class Sensor 1 2014-06-03/10:30:36
000f-1c35-12a5 Client Class Sensor 1 2014-06-03/09:13:26
The output shows that WIPS has taken countermeasures against the unauthorized client with the MAC address 000f-1c35-12a5 and the potential-external AP with the MAC address 000f-e223-1616.
Malformed packet and flood attack detection examples
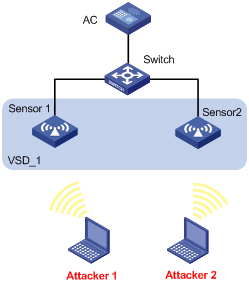
Network requirements
As shown in Figure 4, configure the two APs that connect to the AC through the switch as sensors. Add Sensor 1 and Sensor 2 to the VSD VSD_1. Configure malformed packet detection and flood attack detection to enable WIPS to trigger an alarm when it detects beacon flood attacks or malformed packets with duplicated IE.
Configuration procedure
# Configure wireless services on the AC. (Details not shown.)
For more information about wireless service configuration, see "Configuring WLAN access."
# Create an AP named sensor1 and enable WIPS for the AP.
<AC> system-view
[AC] wlan ap sensor1 model WA4320i-ACN
[AC-wlan-ap-sensor1] serial-id 210235A1GQB139000435
[AC-wlan-ap-sensor1] radio 1
[AC-wlan-ap-sensor1-radio-1] radio enable
[AC-wlan-ap-sensor1-radio-1] wips enable
[AC-wlan-ap-sensor1-radio-1] return
# Create an AP named sensor2 and enable WIPS for the AP.
<AC> system-view
[AC] wlan ap sensor2 model WA4320i-ACN
[AC-wlan-ap-sensor2] serial-id 210235A1GQB139000436
[AC-wlan-ap-sensor2] radio 1
[AC-wlan-ap-sensor2-radio-1] radio enable
[AC-wlan-ap-sensor2-radio-1] wips enable
[AC-wlan-ap-sensor2-radio-1] quit
[AC-wlan-ap-sensor2] quit
# Create a VSD named VSD_1.
[AC] wips
[AC-wips] virtual-security-domain VSD_1
[AP-wips-vsd-VSD_1] quit
# Create an attack detection policy named dtc1.
[AC-wips] detect policy dtc1
# Enable detection on malformed packets with duplicated IE, and set the quiet time to 50 seconds.
[AC-wips-dtc-dtc1] malformed duplicated-ie quiet 50
# Enable beacon flood attack detection, and set the statistics interval, threshold, and quiet time to 100 seconds, 200, and 50 seconds, respectively.
[AC-wips-dtc-dtc1] flood beacon interval 100 quiet 50 threshold 200
[AC-wips-dtc-dtc1] quit
# Apply the attack detection policy dtc1 to the VSD VSD_1.
[AC-wips] virtual-security-domain VSD_1
[AC-wips-vsd-VSD_1] apply detect policy dtc1
[AC-wips-vsd-VSD_1] quit
[AC-wips] quit
# Add the AP sensor1 to the VSD VSD_1.
[AC] wlan ap sensor1
[AC-wlan-ap-sensor1] wips virtual-security-domain VSD_1
[AC-wlan-ap-sensor1] quit
# Add the AP sensor2 to the VSD VSD_1.
[AC] wlan ap sensor2
[AC-wlan-ap-sensor2] wips virtual-security-domain VSD_1
[AC-wlan-ap-sensor2] return
Verifying the configuration
# Display packet statistics when WIPS does not detect any attacks in the WLAN. The output shows that no malformed packet or flood attack message exists.
<AC> display wips statistics receive
Information from sensor 1
Information about attack statistics:
Detected association-request flood messages: 0
Detected authentication flood messages: 0
Detected beacon flood messages: 0
Detected block-ack flood messages: 0
Detected cts flood messages: 0
Detected deauthentication flood messages: 0
Detected disassociation flood messages: 0
Detected eapol-start flood messages: 0
Detected null-data flood messages: 0
Detected probe-request flood messages: 0
Detected reassociation-request flood messages: 0
Detected rts flood messages: 0
Detected duplicated-ie messages: 0
Detected fata-jack messages: 0
Detected illegal-ibss-ess messages: 0
Detected invalid-address-combination messages: 0
Detected invalid-assoc-req messages: 0
Detected invalid-auth messages: 0
Detected invalid-deauth-code messages: 0
Detected invalid-disassoc-code messages: 0
Detected invalid-ht-ie messages: 0
Detected invalid-ie-length messages: 0
Detected invalid-pkt-length messages: 0
Detected large-duration messages: 0
Detected null-probe-resp messages: 0
Detected overflow-eapol-key messages: 0
Detected overflow-ssid messages: 0
Detected redundant-ie messages: 0
Detected AP spoof AP messages: 0
Detected AP spoof client messages: 0
Detected AP spoof ad-hoc messages: 0
Detected ad-hoc spoof AP messages: 0
Detected client spoof AP messages: 0
Detected weak IV messages: 0
Detected excess AP messages: 0
Detected excess client messages: 0
Detected sig rule messages: 0
Information from sensor 2
Information about attack statistics:
Detected association-request flood messages: 0
Detected authentication flood messages: 0
Detected beacon flood messages: 0
Detected block-ack flood messages: 0
Detected cts flood messages: 0
Detected deauthentication flood messages: 0
Detected disassociation flood messages: 0
Detected eapol-start flood messages: 0
Detected null-data flood messages: 0
Detected probe-request flood messages: 0
Detected reassociation-request flood messages: 0
Detected rts flood messages: 0
Detected duplicated-ie messages: 0
Detected fata-jack messages: 0
Detected illegal-ibss-ess messages: 0
Detected invalid-address-combination messages: 0
Detected invalid-assoc-req messages: 0
Detected invalid-auth messages: 0
Detected invalid-deauth-code messages: 0
Detected invalid-disassoc-code messages: 0
Detected invalid-ht-ie messages: 0
Detected invalid-ie-length messages: 0
Detected invalid-pkt-length messages: 0
Detected large-duration messages: 0
Detected null-probe-resp messages: 0
Detected overflow-eapol-key messages: 0
Detected overflow-ssid messages: 0
Detected redundant-ie messages: 0
Detected AP spoof AP messages: 0
Detected AP spoof client messages: 0
Detected AP spoof ad-hoc messages: 0
Detected ad-hoc spoof AP messages: 0
Detected client spoof AP messages: 0
Detected weak IV messages: 0
Detected excess AP messages: 0
Detected excess client messages: 0
Detected sig rule messages: 0
# Display packet statistics when WIPS detects beacon flood attacks and malformed packets with duplicated IE. The output shows that the number of detected messages is 28 for malformed packets with duplicated IE and the number of detected messages is 18 for beacon flood attacks.
<AC> display wips statistics receive
Information from sensor 1
Information about attack statistics:
Detected association-request flood messages: 0
Detected authentication flood messages: 0
Detected beacon flood messages: 18
Detected block-ack flood messages: 0
Detected cts flood messages: 0
Detected deauthentication flood messages: 0
Detected disassociation flood messages: 0
Detected eapol-start flood messages: 0
Detected null-data flood messages: 0
Detected probe-request flood messages: 0
Detected reassociation-request flood messages: 0
Detected rts flood messages: 0
Detected duplicated-ie messages: 0
Detected fata-jack messages: 0
Detected illegal-ibss-ess messages: 0
Detected invalid-address-combination messages: 0
Detected invalid-assoc-req messages: 0
Detected invalid-auth messages: 0
Detected invalid-deauth-code messages: 0
Detected invalid-disassoc-code messages: 0
Detected invalid-ht-ie messages: 0
Detected invalid-ie-length messages: 0
Detected invalid-pkt-length messages: 0
Detected large-duration messages: 0
Detected null-probe-resp messages: 0
Detected overflow-eapol-key messages: 0
Detected overflow-ssid messages: 0
Detected redundant-ie messages: 0
Detected AP spoof AP messages: 0
Detected AP spoof client messages: 0
Detected AP spoof ad-hoc messages: 0
Detected ad-hoc spoof AP messages: 0
Detected client spoof AP messages: 0
Detected weak IV messages: 0
Detected excess AP messages: 0
Detected excess client messages: 0
Detected sig rule messages: 0
Information from sensor 2
Information about attack statistics:
Detected association-request flood messages: 0
Detected authentication flood messages: 0
Detected beacon flood messages: 0
Detected block-ack flood messages: 0
Detected cts flood messages: 0
Detected deauthentication flood messages: 0
Detected disassociation flood messages: 0
Detected eapol-start flood messages: 0
Detected null-data flood messages: 0
Detected probe-request flood messages: 0
Detected reassociation-request flood messages: 0
Detected rts flood messages: 0
Detected duplicated-ie messages: 28
Detected fata-jack messages: 0
Detected illegal-ibss-ess messages: 0
Detected invalid-address-combination messages: 0
Detected invalid-assoc-req messages: 0
Detected invalid-auth messages: 0
Detected invalid-deauth-code messages: 0
Detected invalid-disassoc-code messages: 0
Detected invalid-ht-ie messages: 0
Detected invalid-ie-length messages: 0
Detected invalid-pkt-length messages: 0
Detected large-duration messages: 0
Detected null-probe-resp messages: 0
Detected overflow-eapol-key messages: 0
Detected overflow-ssid messages: 0
Detected redundant-ie messages: 0
Detected AP spoof AP messages: 0
Detected AP spoof client messages: 0
Detected AP spoof ad-hoc messages: 0
Detected ad-hoc spoof AP messages: 0
Detected client spoof AP messages: 0
Detected weak IV messages: 0
Detected excess AP messages: 0
Detected excess client messages: 0
Detected sig rule messages: 0
Signature-based user-defined attack detection configuration example
Network requirements
As shown in Figure 5, AP 1 and AP 2 provide wireless services for clients through the SSID abc. Enable WIPS for the sensor, and configure a signature to enable WIPS to trigger an alarm when it detects beacon frames whose SSIDs are not abc.
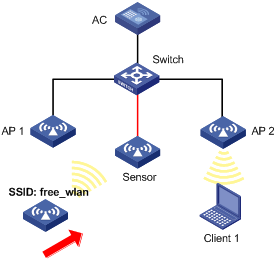
Configuration procedure
# Configure wireless services on the AC. (Details not shown.)
For more information about wireless service configuration, see "Configuring WLAN access."
# Create an AP named sensor1 and enable WIPS for the AP.
<AC> system-view
[AC] wlan ap sensor1 model WA4320i-ACN
[AC-wlan-ap-sensor1] serial-id 210235A1GQB139000435
[AC-wlan-ap-sensor1] radio 1
[AC-wlan-ap-sensor1-radio-1] radio enable
[AC-wlan-ap-sensor1-radio-1] wips enable
[AC-wlan-ap-sensor1-radio-1] quit
[AC-wlan-ap-sensor1 ] quit
# Create a VSD named vsd1.
[AC] wips
[AC-wips] virtual-security-domain vsd1
[AC-wips] quit
# Add the AP sensor1 to the VSD vsd1.
[AC] wlan ap sensor1
[AC-wlan-ap-sensor1] wips virtual-security-domain vsd1
[AC-wlan-ap-sensor1] quit
# Create signature 1, and configure a subsignature to match beacon frames and a subsignature to match frames whose SSIDs are not abc.
[AC] wips
[AC-wips] signature rule 1
[AC-wips-sig-rule-1] frame-type management frame-subtype beacon
[AC-wips-sig-rule-1] ssid not equal abc
[AC-wips-sig-rule-1] quit
# Create a signature policy named sig1, and bind signature 1 to the signature policy sig1.
[AC-wips] signature policy sig1
[AC-wips-sig-sig1] apply signature rule 1
# Enable WIPS to detect packets that match the signature, and set the statistics collection interval, quiet time, and alarm threshold to 5 seconds, 60 seconds, and 60, respectively.
[AC-wips-sig-sig1] detect signature interval 5 quiet 60 threshold 60
[AC-wips-sig-sig1] quit
# Apply the signature policy sig1 to the VSD vsd1.
[AC] wips
[AC-wips] virtual-security-domain vsd1
[AP-wips-vsd-vsd1] apply signature policy sig1
[AP-wips-vsd-vsd1] quit
Verifying the configuration
# Verify that the AC receives an alarm from the sensor when the sensor detects the wireless service with the SSID free_wlan.
WIPS/5/WIPS_SIGNATURE: -VSD=vsd1-RuleID=1; Signature rule matched.
# Display attack detection information collected from sensors. The output shows that the number of detected messages is 26 for packets that match the signature.
[AC] display wips statistics receive
Information from sensor
Information about attack statistics:
Detected association-request flood messages: 0
Detected authentication flood messages: 0
Detected beacon flood messages: 0
Detected block-ack flood messages: 0
Detected cts flood messages: 0
Detected deauthentication flood messages: 0
Detected disassociation flood messages: 0
Detected eapol-start flood messages: 0
Detected null-data flood messages: 0
Detected probe-request flood messages: 0
Detected reassociation-request flood messages: 0
Detected rts flood messages: 0
Detected duplicated-ie messages: 0
Detected fata-jack messages: 0
Detected illegal-ibss-ess messages: 0
Detected invalid-address-combination messages: 0
Detected invalid-assoc-req messages: 0
Detected invalid-auth messages: 0
Detected invalid-deauth-code messages: 0
Detected invalid-disassoc-code messages: 0
Detected invalid-ht-ie messages: 0
Detected invalid-ie-length messages: 0
Detected invalid-pkt-length messages: 0
Detected large-duration messages: 0
Detected null-probe-resp messages: 0
Detected overflow-eapol-key messages: 0
Detected overflow-ssid messages: 0
Detected redundant-ie messages: 0
Detected AP spoof AP messages: 0
Detected AP spoof client messages: 0
Detected AP spoof ad-hoc messages: 0
Detected ad-hoc spoof AP messages: 0
Detected client spoof AP messages: 0
Detected weak IV messages: 0
Detected excess AP messages: 0
Detected excess client messages: 0
Detected sig rule messages: 26