- Table of Contents
-
- 02-WLAN
- 00-Preface
- 01-AP management configuration
- 02-Radio management configuration
- 03-WLAN access configuration
- 04-WLAN security configuration
- 05-WLAN authentication configuration
- 06-WIPS configuration
- 07-WLAN QoS configuration
- 08-WLAN roaming configuration
- 09-WLAN load balancing configuration
- 10-WLAN radio resource measurement configuration
- 11-Channel scanning configuration
- 12-Band navigation configuration
- 13-WLAN high availability configuration
- 14-802.11r configuration
- 15-Wireless location configuration
- 16-Hotspot 2.0 configuration
- 17-WLAN RRM configuration
- 18-WT configuration
- 19-IoT AP configuration
- 20-CM tunnel configuration
- 21-Cloud connection configuration
- 22-WLAN IP snooping configuration
- 23-WLAN fast forwarding configuration
- Related Documents
-
| Title | Size | Download |
|---|---|---|
| 20-CM tunnel configuration | 73.28 KB |
Configuring CM tunnels
Overview
A cloud management tunnel (CM tunnel) is a management tunnel established between a local device and the H3C Oasis server. It enables you to manage the local device from the H3C Oasis server without accessing the network where the device resides.
CM tunnel establishment
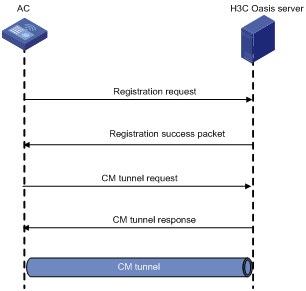
This section uses an AC and the H3C Oasis server as an example. The CM tunnel is established as follows:
1. The AC sends a registration request to the H3C Oasis server.
2. The H3C Oasis server sends a registration success packet to the AC.
The H3C Oasis server sends a registration success packet to the AC only if the serial number of the AC has been added to the H3C Oasis server.
|
|
NOTE: If the serial number of the AC has not been added to the H3C Oasis server, the H3C Oasis server sends a registration failure packet to the AC. After receiving the registration failure packet, the AC starts the re-establishment timer and requests to re-establish the CM tunnel when the timer expires. |
3. The AC sends a CM tunnel request to the H3C Oasis server.
4. The H3C Oasis server sends a CM tunnel response to the AC.
5. The AC uses the CM tunnel interface to establish a CM tunnel with the H3C Oasis server.
Figure 1 CM tunnel establishment
Configuring a CM tunnel
For a successful CM tunnel establishment, add the serial number of the device to be managed to the H3C Oasis server.
To configure a CM tunnel:
|
Step |
Command |
Remarks |
|
1. Enter system view. |
system-view |
N/A |
|
2. Configure the domain name of the H3C Oasis server. |
cmtunnel server domain domain-name |
By default, the domain name of the H3C Oasis server is not configured. |
Displaying and maintaining CM tunnels
Execute display commands in any view.
|
Task |
Command |
|
Display CM tunnel state information. |
display cmtunnel state |
CM tunnel configuration example
Network requirements
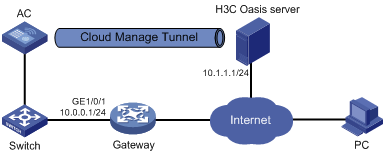
As shown in Figure 2, configure the AC to establish a CM tunnel with the H3C Oasis server.
Configuration procedure
1. Configure IP addresses for interfaces as shown in Figure 2, and configure a routing protocol to make sure the devices can reach each other. (Details not shown.)
2. Log in to the H3C Oasis server to add the serial number of the AC to the server. (Details not shown.)
3. Configure the domain name of the H3C Oasis server as lvzhou.h3c.com.
<AC> system-view
[AC] cmtunnel server domain-name lvzhou.h3c.com
|
|
NOTE: The DNS service is provided by the ISP DNS server. |
Verifying the configuration
# Verify that the AC and the H3C Oasis server have established a CM tunnel.
[AC] display cmtunnel state
Server address : 10.1.1.1
Server name : lvzhou.h3c.com
Local port : 80
Connection state : Established
Device state : Request_success