- Table of Contents
-
- 02-WLAN
- 00-Preface
- 01-AP management configuration
- 02-Radio management configuration
- 03-WLAN access configuration
- 04-WLAN security configuration
- 05-WLAN authentication configuration
- 06-WIPS configuration
- 07-WLAN QoS configuration
- 08-WLAN roaming configuration
- 09-WLAN load balancing configuration
- 10-WLAN radio resource measurement configuration
- 11-Channel scanning configuration
- 12-Band navigation configuration
- 13-WLAN high availability configuration
- 14-802.11r configuration
- 15-Wireless location configuration
- 16-Hotspot 2.0 configuration
- 17-WLAN RRM configuration
- 18-WT configuration
- 19-IoT AP configuration
- 20-CM tunnel configuration
- 21-Cloud connection configuration
- 22-WLAN IP snooping configuration
- 23-WLAN fast forwarding configuration
- Related Documents
-
| Title | Size | Download |
|---|---|---|
| 11-Channel scanning configuration | 125.34 KB |
Setting the maximum service period
Setting the service idle timeout
Configuring the channel scanning blacklist or whitelist
Channel scanning configuration examples
Configuring channel scanning
Overview
Channel scanning enables APs to scan channels and capture wireless packets. The AC analyzes the captured wireless packets to obtain wireless service information, including interferences, error bit rate, and wireless signal strength. Channel scanning provides data for WLAN RRM and WIPS, and enhances wireless service quality.
Basic concepts
· Scanning period—In this period, an AP only scans a channel and does not provide wireless services.
· Service period—In this period, an AP works in either of the following ways:
¡ The AP only provides wireless services and does not scan channels.
¡ The AP scans its working channel and provides wireless services simultaneously for a time period that is the same as the scanning period. After that, the AP only provides wireless services.
Work mechanism
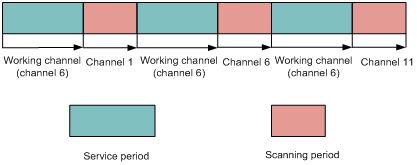
An AP scans each channel on the channel scanning list in turn regardless of whether the AP provides wireless services, and each channel is scanned for a scanning period. If the AP does not provide wireless services, it starts scanning periods consecutively. If the AP provides wireless services, it starts service periods and scanning periods alternatively.
For example, Figure 1 shows the channel scanning mechanism for an AP when the AP works on channel 6 and the channel scanning list contains channels 1, 6, and 11.
Figure 1 Channel scanning mechanism
Configuring channel scanning
Setting the scanning period
Make sure the scanning period is not greater than the maximum service period.
Setting the scanning period in radio view
|
Step |
Command |
Remarks |
|
1. Enter system view. |
system-view |
N/A |
|
2. Enter AP view. |
wlan ap ap-name [ model model-name ] |
N/A |
|
3. Enter radio view. |
radio radio-id |
N/A |
|
4. Set the scanning period. |
scan scan-time scan-time |
By default, a radio uses the configuration in AP group radio view. |
Setting the scanning period in AP group radio view
|
Step |
Command |
Remarks |
|
1. Enter system view. |
system-view |
N/A |
|
2. Enter AP group view. |
wlan ap-group group-name |
N/A |
|
3. Enter AP model view. |
ap-model ap-model |
N/A |
|
4. Enter radio view. |
radio radio-id |
N/A |
|
5. Set the scanning period. |
scan scan-time scan-time |
By default, the scanning period is 100 milliseconds. |
Setting the maximum service period
To ensure both scanning and service quality, you can set the maximum service period. When the maximum service period is reached, the AP starts a scanning period regardless of whether it has traffic to forward. To ensure wireless service quality, you can configure the AP to not limit the service period. The AP does not start a scanning period unless the service idle timeout expires.
Setting the maximum service period in radio view
|
Step |
Command |
Remarks |
|
1. Enter system view. |
system-view |
N/A |
|
2. Enter AP view. |
wlan ap ap-name [ model model-name ] |
N/A |
|
3. Enter radio view. |
radio radio-id |
N/A |
|
4. Set the maximum service period. |
scan max-service-time { max-service-time | no-limit } |
By default, a radio uses the configuration in AP group radio view. |
Setting the maximum service period in AP group radio view
|
Step |
Command |
Remarks |
|
1. Enter system view. |
system-view |
N/A |
|
2. Enter AP group view. |
wlan ap-group group-name |
N/A |
|
3. Enter AP model view. |
ap-model ap-model |
N/A |
|
4. Enter radio view. |
radio radio-id |
N/A |
|
5. Set the maximum service period. |
scan max-service-time { max-service-time | no-limit } |
By default, the maximum service period is 5000 milliseconds. |
Setting the service idle timeout
During a service period, an AP does not begin a new scanning period until the current service period exceeds the scanning period even if the specified service idle timeout expires.
Setting the service idle timeout in radio view
|
Step |
Command |
Remarks |
|
1. Enter system view. |
system-view |
N/A |
|
1. Enter AP view. |
wlan ap ap-name [ model model-name ] |
N/A |
|
2. Enter radio view. |
radio radio-id |
N/A |
|
3. Set the service idle timeout. |
scan idle-time idle-time |
By default, a radio uses the configuration in AP group radio view. The service idle timeout cannot be greater than the maximum service period. |
Setting the service idle timeout timer in AP group radio view
|
Step |
Command |
Remarks |
|
1. Enter system view. |
system-view |
N/A |
|
2. Enter AP group view. |
wlan ap-group group-name |
N/A |
|
3. Enter AP model view. |
ap-model ap-model |
N/A |
|
4. Enter radio view. |
radio radio-id |
N/A |
|
5. Set the service idle timeout timer. |
scan idle-time idle-time |
By default, the service idle timeout timer is 100 milliseconds. |
Configuring the channel scanning blacklist or whitelist
Perform this task for an AP to not scan channels in the blacklist or to scan only channels in the whitelist. You cannot configure both the channel scanning blacklist and whitelist for the same AP.
Configuring the channel scanning blacklist or whitelist in radio view
|
Step |
Command |
Remarks |
|
1. Enter system view. |
system-view |
N/A |
|
2. Enter AP view. |
wlan ap ap-name [ model model-name ] |
N/A |
|
3. Enter radio view. |
radio radio-id |
N/A |
|
4. Add the specified channels to the channel scanning blacklist. |
scan channel blacklist channel-list |
By default, a radio uses the configuration in AP group radio view. |
|
5. Add the specified channels to the channel scanning whitelist. |
scan channel whitelist channel-list |
By default, a radio uses the configuration in AP group radio view. |
Configuring the channel scanning blacklist or whitelist in AP group radio view
|
Step |
Command |
Remarks |
|
1. Enter system view. |
system-view |
N/A |
|
2. Enter AP group view. |
wlan ap-group group-name |
N/A |
|
3. Enter AP model view. |
ap-model ap-model |
N/A |
|
4. Enter radio view. |
radio radio-id |
N/A |
|
5. Add the specified channels to the channel scanning blacklist. |
scan channel blacklist channel-list |
By default, no channel scanning blacklist exists. |
|
6. Add the specified channels to the channel scanning whitelist. |
scan channel whitelist channel-list |
By default, no channel scanning whitelist exists. |
Scanning all channels
|
|
IMPORTANT: This feature is applicable only to dual-band radios. |
Perform this task to enable an AP to alternatively scan 2.4 GHz channels and 5 GHz channels at the specified interval.
Scanning all channels in radio view
|
Step |
Command |
Remarks |
|
1. Enter system view. |
system-view |
N/A |
|
2. Enter AP view. |
wlan ap ap-name [ model model-name ] |
N/A |
|
3. Enter radio view. |
radio radio-id |
N/A |
|
4. Enable the radio to scan all channels. |
scan mode all [ interval interval-value ] |
By default, a radio uses the configuration in AP group radio view. |
Scanning all channels in AP group radio view
|
Step |
Command |
Remarks |
|
1. Enter system view. |
system-view |
N/A |
|
2. Enter AP group view. |
wlan ap-group group-name |
N/A |
|
3. Enter AP model view. |
ap-model ap-model |
N/A |
|
4. Enter radio view. |
radio radio-id |
N/A |
|
5. Enable the radio to scan all channels. |
scan mode all [ interval interval-value ] |
By default, a radio does not scan all channels. |
Channel scanning configuration examples
Relative forwarding preferred configuration example
Network requirements
As shown in Figure 2, configure channel scanning and set the maximum service period for AP 1 to ensure both channel scanning and wireless service quality.
Configuration procedure
# Create a manual AP and specify the model and serial ID.
<AC> system-view
[AC] wlan ap ap1 model WA4320i-ACN
[AC-wlan-ap-ap1] serial-id 219801A0CNC138011454
# Enter radio view of radio 1.
[AC-wlan-ap-ap1] radio 1
# Set the scanning period to 200 milliseconds.
[AC-wlan-ap-ap1-radio-1] scan scan-time 200
# Set the maximum service period to 5000 milliseconds.
[AC-wlan-ap-ap1-radio-1] scan max-service-time 5000
# Set the service idle timeout to 100 milliseconds.
[AC-wlan-ap-ap1-radio-1] scan idle-time 100
Absolute forwarding preferred configuration example
Network requirements
As shown in Figure 3, configure channel scanning and do not limit the service period for AP 1 to ensure wireless service quality.
Configuration procedure
# Create a manual AP and specify the model and serial ID.
<AC> system-view
[AC] wlan ap ap1 model WA4320i-ACN
[AC-wlan-ap-ap1] serial-id 219801A0CNC138011454
# Enter radio view of radio 1.
[AC-wlan-ap-ap1] radio 1
# Set the scanning period to 100 milliseconds.
[AC-wlan-ap-ap1-radio-1] scan scan-time 100
# Configure the radio to not limit the service period.
[AC-wlan-ap-ap1-radio-1] scan max-service-time no-limit
# Set the service idle timeout to 100 milliseconds.
[AC-wlan-ap-ap1-radio-1] scan idle-time 100