- Table of Contents
-
- 08-Configuration Examples
- 01-Web Login Configuration Examples
- 02-Internet Access Through a Static IP Address Configuration Examples
- 03-Internet access through PPPoE configuration examples
- 04-Signature Library Upgrade Configuration Examples
- 04-Software Upgrade Examples(only for F50X0-D and F5000-AK5X5 firewalls)
- 05-Software Upgrade Examples
- 06-Static routing configuration examples
- 07-OSPF configuration examples
- 08-BGP configuration examples
- 09-RIP configuration examples
- 10-DHCP configuration examples
- 11-DNS configuration examples
- 12-Object Group Configuration Examples
- 13-Public key management configuration examples
- 14-Security Policy Configuration Examples
- 15-Attack defense configuration examples
- 16-Connection Limit Configuration Examples
- 17-IPS Configuration Examples
- 18-URL Filtering Configuration Examples
- 19-Anti-Virus Configuration Examples
- 20-Data Filtering Configuration Examples
- 21-File Filtering Configuration Examples
- 22-APR-Based Security Policy Configuration Examples
- 23-Bandwidth Management Configuration Examples
- 24-NAT configuration examples
- 25-NAT hairpin configuration examples
- 26-IPsec configuration examples
- 27-SSL VPN configuration examples
- 28-Server Load Balancing Configuration Examples
- 29-Outbound Link Load Balancing Configuration Examples
- 30-Inbound Link Load Balancing Configuration Examples
- 31-Transparent DNS Proxy Configuration Examples
- 32-Context Configuration Examples
- 32-Context Configuration Examples(only for F50X0-D and F5000-AK5X5 firewalls)
- 33-IRF configuration examples
- 34-High Availability Group Configuration Examples
- 35-NAT Flow Logging Configuration Examples
- 36-User identification configuration examples
- 37-Server Connection Detection Configuration Examples
- 38-IP Reputation Configuration Examples
- 39-NPTv6 Configuration Examples
- 40-SSL Decryption Configuration Examples
- 41-MAC Address Learning Through a Layer 3 Device Configuration Examples
- 42-WAF Configuration Examples
- 43-NetShare Control Configuration Examples
- 44-4G Configuration Examples
- 45-WLAN Configuration Examples
- Related Documents
-
| Title | Size | Download |
|---|---|---|
| 22-APR-Based Security Policy Configuration Examples | 457.79 KB |
APR-based security policy configuration examples
The following information provides APR-based security policy configuration examples.
A security policy defines a set of rules for forwarding control and Deep Packet Inspection (DPI). It matches packets against the rules and takes the action stated in the rules on the matched packets.
This document is not restricted to specific software or hardware versions. Procedures and information in the examples might be slightly different depending on the software or hardware version of the device.
The configuration examples were created and verified in a lab environment, and all the devices were started with the factory default configuration. When you are working on a live network, make sure you understand the potential impact of every command on your network.
The following information is provided based on the assumption that you have basic knowledge of the APR and security policy features.
Restrictions and guidelines
Packet filtering, if configured, is performed only on packets that do not match any security policy rule. As a best practice, make sure security policies have stricter filtering criteria than packet filtering, so the unmatched packets can still be filtered by packet filtering.
For security purposes, configure APR-based, strict security policies.
Example: Configuring APR-based, strict security policies
Network configuration
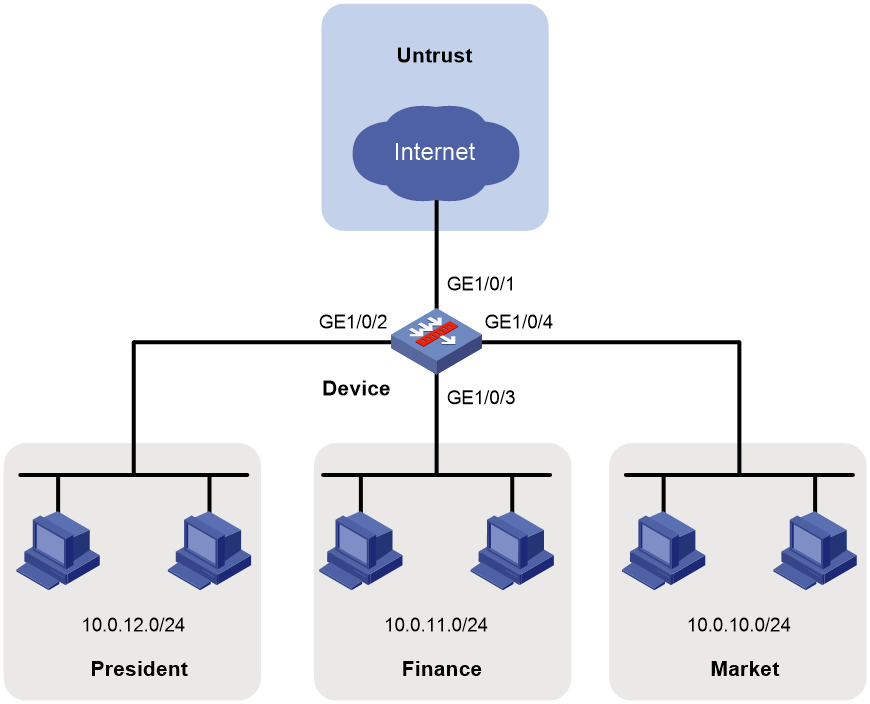
As shown in Figure 1, configure security policies to achieve the following goals:
· The president office can access all network resources at any time.
· The financial office can access only its own resources.
· The marketing office can access some resources on the Internet from 8:00 to 18:00 on workdays.
¡ Cannot access gaming, streaming media, P2P, or network community resources, but can access YouKu.
¡ Can only access WeChat and cannot access any other IM applications.
¡ Can access MSN, DingTalk, and security forum resources.
¡ Can access any resources except the listed resources that cannot be accessed.
· The financial office cannot be accessed by anyone, and the financial office and the marketing office cannot access each other.

Software versions used
This configuration example was created and verified on F9345 of the F1060 device.
Restrictions and guidelines
When you configure a security policy, follow these restrictions and guidelines:
· Update the APR signature library to the latest version.
· For the applications in a security policy to be identified, you must allow the dependent protocols of the applications to pass through.
Analysis
· Configure security policy president_permit to allow the employees in the president office to freely access any network resources.
· Configure security policy finance_permit to allow the employees in the financial office to communicate with one another.
· Configure security policy market_permit1 to allow the employees in the marketing office to use WeChat, MSN, DingTalk, YouKu, and security forum resources. By default, a security policy does not allow use of IM applications.
· Configure security policy market_deny1 to deny network community and streaming media applications for the marketing office from 8:00 to 18:00 on workdays. This security policy prevents employees in the marketing office from playing games, watching video, and accessing network community sites from 8:00 to 18:00 on workdays. To permit WeChat, MSN, DingTalk, YouKu, and security forum applications, you must configure security policy market_permit1 before market_deny1.
· Configure security policy market_permit2 to allow the employees in the marketing office to use some OA, email, and protocol applications that are not easy to identify. To deny such an application, remove it from the application group or configure another security policy to deny it.
· Configure security policy market_permit3 to allow common protocols for APR to identify applications correctly. Common protocols include TCP, UDP, DNS, HTTP, HTTPS, SMTP, IMAP, and POP3. The security policy market_permit2 might permit these protocols. As a best practice for APR to identify applications correctly when security policy market_permit2 changes, configure security policy market_permit3 to allow these protocols.
· Configure the security policies in the following order:
a. president_permit
b. finance_permit
c. market_permit1
d. market_deny1
e. market_permit2
f. market_permit3
Procedure
1. Assign IP addresses to interfaces.
# On the top navigation bar, click Network.
# From the navigation pane, select Interface Configuration > Interfaces.
# Click the Edit icon for GE 1/0/1.
# In the dialog box that opens, configure the interface:
a. On the IPv4 Address tab, enter the IP address and mask of the interface. In this example, enter 2.2.2.1/24.
b. Click OK.
# Configure the IP addresses of GE 1/0/2, GE 1/0/3, and GE 1/0/4 as 10.0.12.1/24, 10.0.11.1/24, and 10.0.10.1/24, respectively, in the same way you configure GE 1/0/1.
2. Configure security zones.
# On the top navigation bar, click Network.
# From the navigation pane, click Security Zones.
# Click the Edit icon for security zone Untrust.
# In the dialog box that opens, add GE 1/0/1 to the security zone.
# Create a security zone named president, and add GE 1/0/2 to the security zone.
# Create a security zone named finance, and add GE 1/0/3 to the security zone.
# Create a security zone named market, and add GE 1/0/4 to the security zone.
3. Configure a time range.
# On the top navigation bar, click Objects.
# From the navigation pane, select Object Groups > Time Ranges.
# Click Create.
# In the dialog box that opens, configure the time range:
a. Enter a time range name. In this example, enter work.
b. Create a periodic time range from 8:00 to 18:00 on workdays, and click OK.
c. Click OK.
4. Configure application groups.
# On the top navigation bar, click Objects.
# From the navigation pane, select APPSecurity > APP Recognition > Application Groups.
# Click Create.
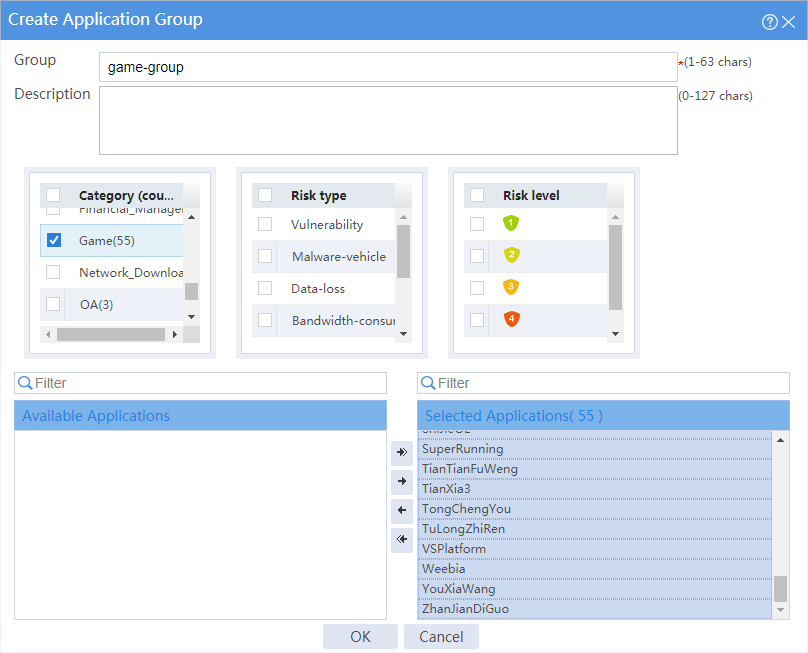
# In the dialog box that opens, configure an application group named game-group:
¡ Enter group name game-group.
¡ Add all applications in the Game category to the Selected Applications pane.
¡ Click OK.
Figure 2 Creating an application group
# Create an application group named p2p-group, and add all applications in the P2P category to the application group.
# Create an application group named streaming-media-group, and add all applications in the Streaming_Media category to the application group.
# Create an application group named network-community-group, and add all applications in the Network-Community category to the application group.
# Create an application group named permit-others, and add some applications in the E-Mail, OA, and Protocol categories that are not easy to identify to the application group.
# Create an application group named protocol-permit, and add common protocols (such as TCP, UDP, DNS, HTTP, HTTPS, SMTP, IMAP, and POP3) to the application group.
5. Configure a security policy named president_permit.
# On the top navigation bar, click Policies.
# From the navigation pane, select Security Policies > Security Policies.
# Click Create.
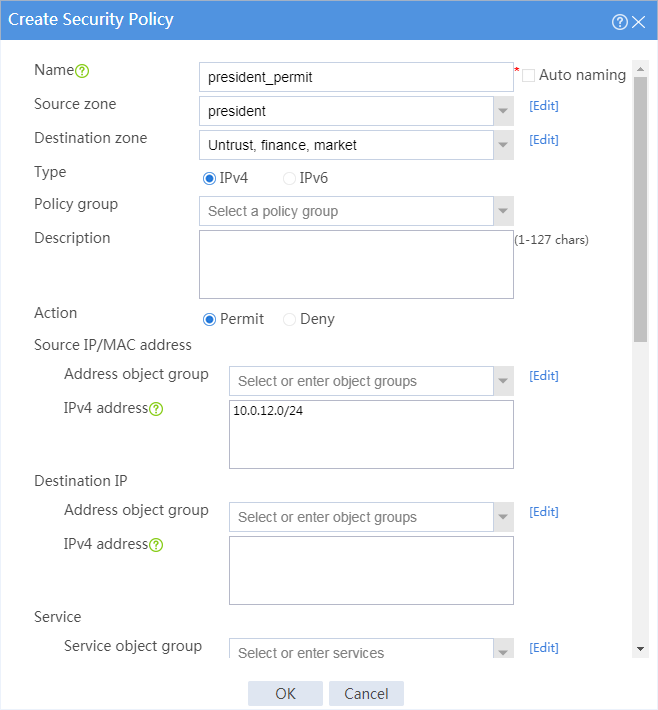
# In the dialog box that appears, configure the security policy:
¡ Enter policy name president_permit.
¡ Select source zone president.
¡ Select destination zones Untrust, finance, and market.
¡ Select policy type IPv4.
¡ Select action Permit.
¡ Select source IP address president.
# Click OK.
Figure 3 Creating security policy president_permit
6. Configure a security policy named finance_permit.
# On the top navigation bar, click Policies.
# From the navigation pane, select Security Policies > Security Policies.
# Click Create.
# In the dialog box that appears, configure the security policy:
¡ Enter policy name finance_permit.
¡ Select source zone finance.
¡ Select destination zone finance.
¡ Select policy type IPv4.
¡ Select action Permit.
# Click OK.
Figure 4 Creating security policy finance_permit

7. Configure a security policy named market_permit1.
# On the top navigation bar, click Policies.
# From the navigation pane, select Security Policies > Security Policies.
# Click Create.
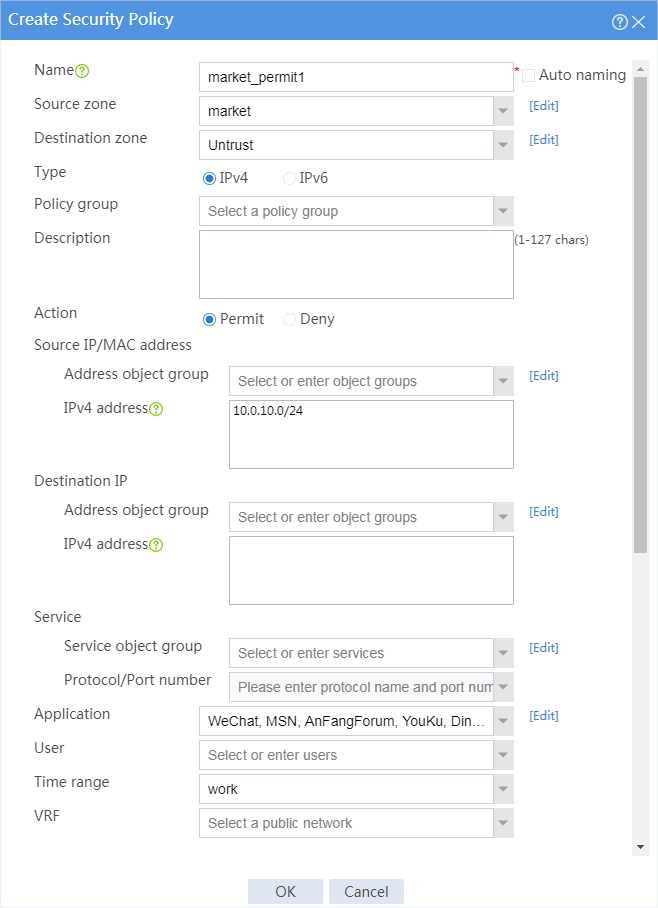
# In the dialog box that appears, configure the security policy:
¡ Enter policy name market_permit1.
¡ Select source zone market.
¡ Select destination zone Untrust.
¡ Select policy type IPv4.
¡ Select action Permit.
¡ Select source IP address market.
¡ Select applications WeChat, MSN, AnFang Forum (security forum), and YouKu.
¡ Select time range work.
# Click OK.
Figure 5 Creating security policy market_permit1
8. Configure a security policy named market_deny1.
# On the top navigation bar, click Policies.
# From the navigation pane, select Security Policies > Security Policies.
# Click Create.
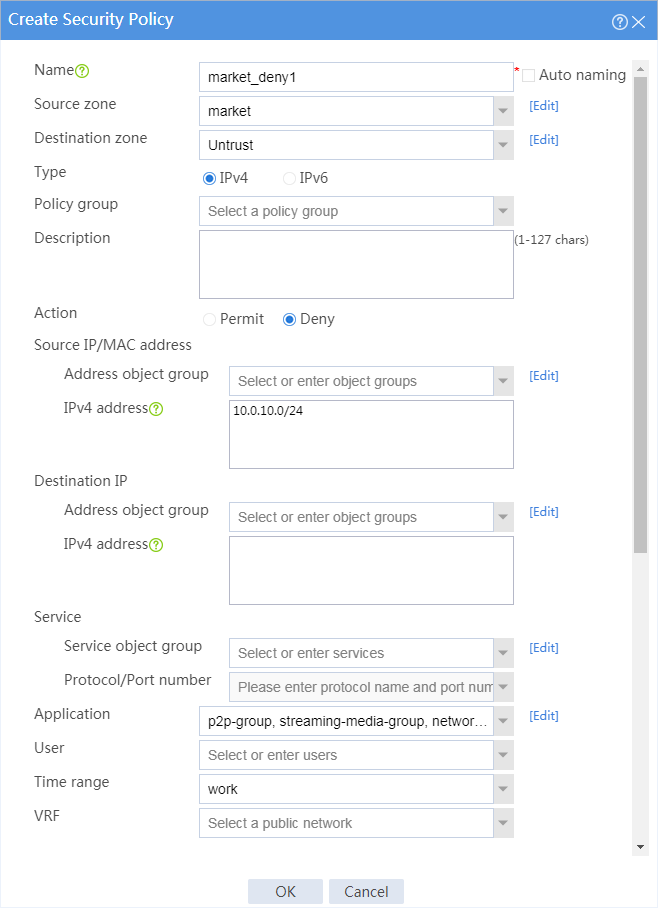
# In the dialog box that appears, configure the security policy:
¡ Enter policy name market_deny1.
¡ Select source zone market.
¡ Select destination zone Untrust.
¡ Select policy type IPv4.
¡ Select action Permit.
¡ Select source IP address market.
¡ Select application groups p2p-group, streaming-media-group, network-community-group, and game-group.
¡ Select time range work.
# Click OK.
Figure 6 Creating security policy market_deny1
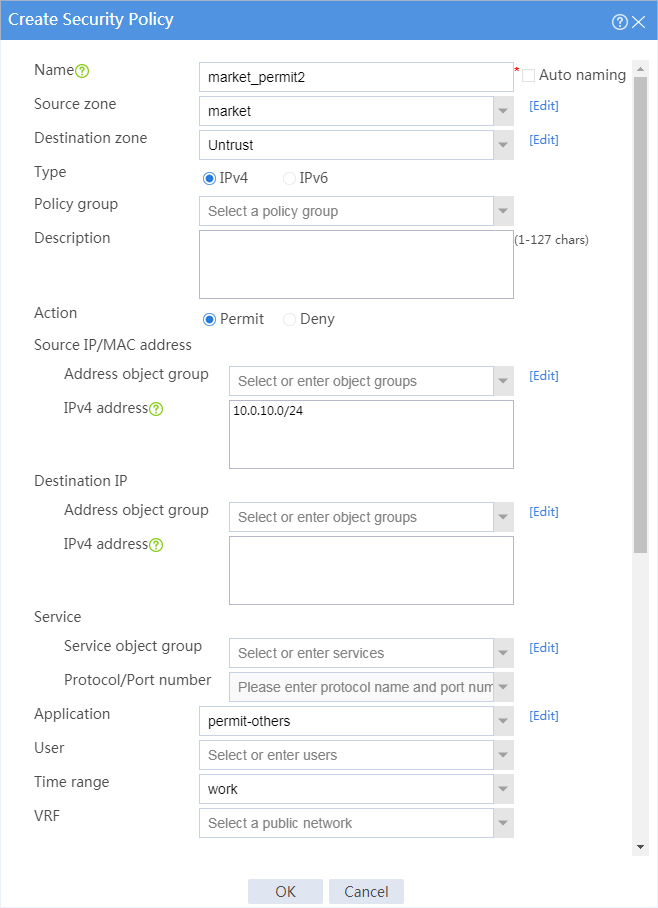
9. Configure a security policy named market_permit2.
# On the top navigation bar, click Policies.
# From the navigation pane, select Security Policies > Security Policies.
# Click Create.
# In the dialog box that appears, configure the security policy:
¡ Enter policy name market_permit2.
¡ Select source zone market.
¡ Select destination zone Untrust.
¡ Select policy type IPv4.
¡ Select action Permit.
¡ Select source IP address market.
¡ Select application group permit-others.
¡ Select time range work.
# Click OK.
Figure 7 Creating security policy market_permit2
10. Configure a security policy named market_permit3.
# On the top navigation bar, click Policies.
# From the navigation pane, select Security Policies > Security Policies.
# Click Create.
# In the dialog box that appears, configure the security policy:
¡ Enter policy name market_permit3.
¡ Select source zone market.
¡ Select destination zone Untrust.
¡ Select policy type IPv4.
¡ Select action Permit.
¡ Select source IP address market.
¡ Select application group protocol-permit.
# Click OK.
Figure 8 Creating security policy market_permit3

Verifying the configuration
# Verify that the employees in the president office can freely access any network resources.
# Verify that the employees in the financial office can communicate with one another.
# Verify that the marketing office can access some resources on the Internet from 8:00 to 18:00 on workdays.
· Cannot access gaming, streaming media, P2P, or network community resources, but can access YouKu.
· Can only access WeChat and cannot access any other IM applications.
· Can access MSN, DingTalk, and security forum resources.
· Can access any resources except the listed resources that cannot be accessed.
# Verify that the financial office cannot be accessed by anyone, and the financial office and the marketing office cannot access each other.
# Verify that security polices can be hit correctly by selecting Monitor > Security Logs > Security Policy Logs. The following are examples of security policy hitting:
Figure 9 Denying Xunleikankan
![]()
Figure 10 Permitting YouKu
![]()
Figure 11 Permitting WeChat

Figure 12 Denying QQ

Example: Configuring APR-based, loose security policies
Network configuration
As shown in Figure 13, configure security policies to achieve the following goals:
· The president office can access all network resources at any time.
· The financial office can access only its own resources.
· The marketing office can access all network resources except video and game applications from 8:00 to 18:00 on workdays and can play games and watch video during non-working hours.
Software versions used
This configuration example was created and verified on F9345 of the F1060 device.
Restrictions and guidelines
When you configure a security policy, follow these restrictions and guidelines:
· Update the APR signature library to the latest version.
· For the applications in a security policy to be identified, you must allow the dependent protocols of the applications to pass through.
Analysis
· Configure security policy finance_permit to allow the employees in the financial office to communicate with one another.
· Configure security policy market_deny1 to deny game and streaming video applications for the marketing office from 8:00 to 18:00 on workdays. This security policy prevents employees in the marketing office from playing games and watching video from 8:00 to 18:00 on workdays.
· Configure security policy president_market_permit to allow packets from the president office and the marketing office to pass through. This security policy can meet the following requirements:
¡ The president office can access all network resources at any time.
¡ The marketing office can access all network resources except video and game applications from 8:00 to 18:00 on workdays and can play games and watch video during non-working hours.
· Configure the security policies in the following order:
a. finance_permit
b. market_deny1
c. president_market_permit
Procedure
1. Assign IP addresses to interfaces.
# On the top navigation bar, click Network.
# From the navigation pane, select Interface Configuration > Interfaces.
# Click the Edit icon for GE 1/0/1.
# In the dialog box that opens, configure the interface:
a. On the IPv4 Address tab, enter the IP address and mask of the interface. In this example, enter 2.2.2.1/24.
b. Click OK.
# Configure the IP addresses of GE 1/0/2, GE 1/0/3, and GE 1/0/4 as 10.0.12.1/24, 10.0.11.1/24, and 10.0.10.1/24, respectively, in the same way you configure GE 1/0/1.
2. Configure security zones.
# On the top navigation bar, click Network.
# From the navigation pane, click Security Zones.
# Click the Edit icon for security zone Untrust.
# In the dialog box that opens, add GE 1/0/1 to the security zone.
# Create a security zone named president, and add GE 1/0/2 to the security zone.
# Create a security zone named finance, and add GE 1/0/3 to the security zone.
# Create a security zone named market, and add GE 1/0/4 to the security zone.
3. Configure a time range.
# On the top navigation bar, click Objects.
# From the navigation pane, select Object Groups > Time Ranges.
# Click Create.
# In the dialog box that opens, configure the time range:
a. Enter a time range name. In this example, enter work.
b. Create a periodic time range from 8:00 to 18:00 on workdays, and click OK.
c. Click OK.
4. Configure application groups.
# On the top navigation bar, click Objects.
# From the navigation pane, select APPSecurity > APP Recognition > Application Groups.
# Click Create.
# In the dialog box that opens, configure an application group named game-group:
¡ Enter group name game-group.
¡ Add all applications in the Game category to the Selected Applications pane.
¡ Click OK.
Figure 14 Creating application group game-group

# Create an application group named p2p-group, and add all applications in the P2P category to the application group.
# Create an application group named streaming-media-group, and add all applications in the Streaming_Media category to the application group.
# Create an application group named network-community-group, and add all applications in the Network-Community category to the application group.
5. Configure a security policy named finance_permit.
# On the top navigation bar, click Policies.
# From the navigation pane, select Security Policies > Security Policies.
# Click Create.
# In the dialog box that appears, configure the security policy:
¡ Enter policy name finance_permit.
¡ Select source zone finance.
¡ Select destination zone finance.
¡ Select policy type IPv4.
¡ Select action Permit.
# Click OK.
Figure 15 Creating security policy finance_permit

6. Configure a security policy named market_deny1.
# On the top navigation bar, click Policies.
# From the navigation pane, select Security Policies > Security Policies.
# Click Create.
# In the dialog box that appears, configure the security policy:
¡ Enter policy name market_deny1.
¡ Select source zone market.
¡ Select destination zone Untrust.
¡ Select policy type IPv4.
¡ Select action Deny.
¡ Select source IP address market.
¡ Select application groups p2p-group, streaming-media-group, network-community-group, and game-group.
¡ Select time range work.
# Click OK.
Figure 16 Creating security policy market_deny1

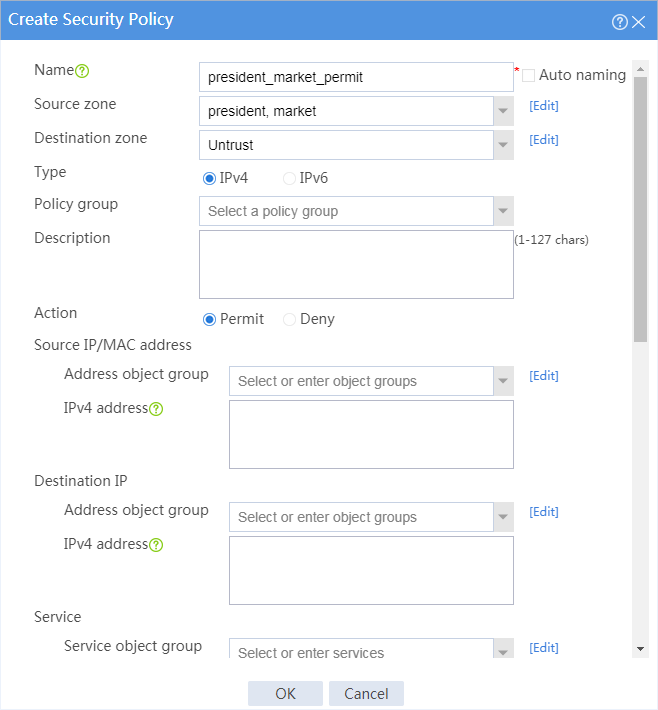
7. Configure a security policy named president_market_permit.
# On the top navigation bar, click Policies.
# From the navigation pane, select Security Policies > Security Policies.
# Click Create.
# In the dialog box that appears, configure the security policy:
¡ Enter policy name president_market_permit.
¡ Select policy type IPv4.
¡ Select action Permit.
# Click OK.
Figure 17 Creating security policy president_market_permit
Verifying the configuration
# Verify that the employees in the president office can freely access any network resources.
# Verify that the employees in the financial office can communicate with one another.
# Verify that the marketing office can access all network resources except video and game applications from 8:00 to 18:00 on workdays and can play games and watch video during non-working hours.
# Verify that security polices can be hit correctly by selecting Monitor > Security Logs > Security Policy Logs. The following are examples of security policy hitting:
Figure 18 Denying Xunleikankan
![]()
Figure 19 Permitting WeChat
