- Table of Contents
-
- 08-Configuration Examples
- 01-Web Login Configuration Examples
- 02-Internet Access Through a Static IP Address Configuration Examples
- 03-Internet access through PPPoE configuration examples
- 04-Signature Library Upgrade Configuration Examples
- 04-Software Upgrade Examples(only for F50X0-D and F5000-AK5X5 firewalls)
- 05-Software Upgrade Examples
- 06-Static routing configuration examples
- 07-OSPF configuration examples
- 08-BGP configuration examples
- 09-RIP configuration examples
- 10-DHCP configuration examples
- 11-DNS configuration examples
- 12-Object Group Configuration Examples
- 13-Public key management configuration examples
- 14-Security Policy Configuration Examples
- 15-Attack defense configuration examples
- 16-Connection Limit Configuration Examples
- 17-IPS Configuration Examples
- 18-URL Filtering Configuration Examples
- 19-Anti-Virus Configuration Examples
- 20-Data Filtering Configuration Examples
- 21-File Filtering Configuration Examples
- 22-APR-Based Security Policy Configuration Examples
- 23-Bandwidth Management Configuration Examples
- 24-NAT configuration examples
- 25-NAT hairpin configuration examples
- 26-IPsec configuration examples
- 27-SSL VPN configuration examples
- 28-Server Load Balancing Configuration Examples
- 29-Outbound Link Load Balancing Configuration Examples
- 30-Inbound Link Load Balancing Configuration Examples
- 31-Transparent DNS Proxy Configuration Examples
- 32-Context Configuration Examples
- 32-Context Configuration Examples(only for F50X0-D and F5000-AK5X5 firewalls)
- 33-IRF configuration examples
- 34-High Availability Group Configuration Examples
- 35-NAT Flow Logging Configuration Examples
- 36-User identification configuration examples
- 37-Server Connection Detection Configuration Examples
- 38-IP Reputation Configuration Examples
- 39-NPTv6 Configuration Examples
- 40-SSL Decryption Configuration Examples
- 41-MAC Address Learning Through a Layer 3 Device Configuration Examples
- 42-WAF Configuration Examples
- 43-NetShare Control Configuration Examples
- 44-4G Configuration Examples
- 45-WLAN Configuration Examples
- Related Documents
-
| Title | Size | Download |
|---|---|---|
| 14-Security Policy Configuration Examples | 418.87 KB |
Security policy configuration examples
The following information provides security policy configuration examples.
This document is not restricted to specific software or hardware versions. Procedures and information in the examples might be slightly different depending on the software or hardware version of the device.
The configuration examples were created and verified in a lab environment, and all the devices were started with the factory default configuration. When you are working on a live network, make sure you understand the potential impact of every command on your network.
The following information is provided based on the assumption that you have basic knowledge of the security policy feature.
Packet filtering, if configured, is performed only on packets that do not match any security policy rule. As a best practice, make sure security policies have stricter filtering criteria than packet filtering, so the unmatched packets can still be filtered by packet filtering.
Network configuration
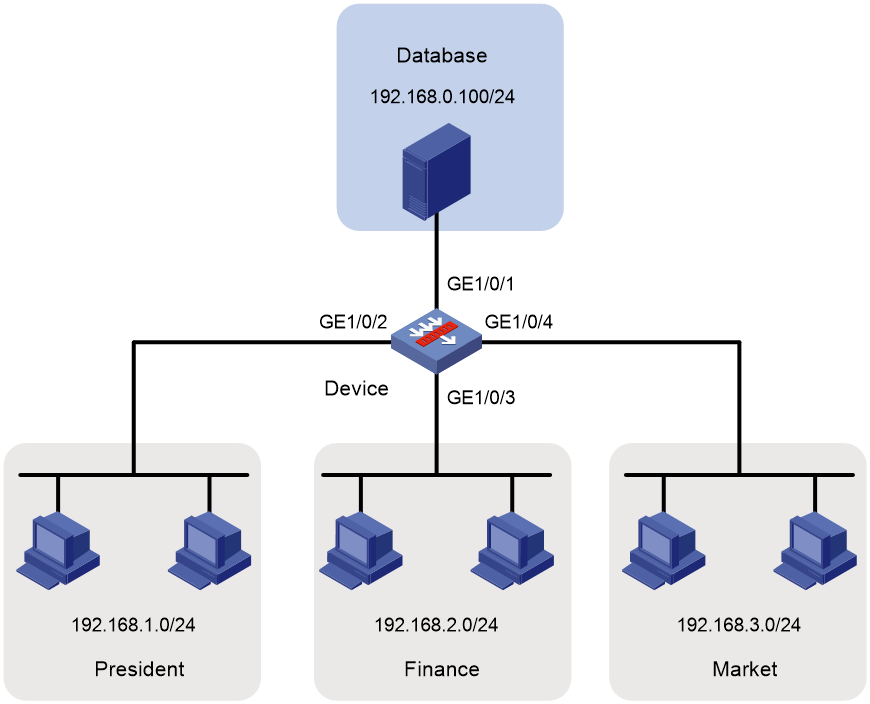
As shown in Figure 1, configure security policy to achieve the following goals:
· The president office can access the financial database server through HTTP at any time.
· The financial office can access the financial database server through HTTP from 8:00 to 18:00 on weekdays.
· The marketing office cannot access the financial database server through HTTP at any time.
Software versions used
This configuration example was created and verified on F9345 of the F1060 device.
Procedure
1. Assign IP addresses to interfaces.
# On the top navigation bar, click Network.
# From the navigation pane, select Interface Configuration > Interfaces.
# Click the Edit icon for GE 1/0/1.
# In the dialog box that opens, configure the interface:
a. On the IPv4 Address tab, enter the IP address and mask of the interface. In this example, enter 192.168.0.1/24.
b. Click OK.
# Set the IP addresses of GE 1/0/2, GE 1/0/3, and GE 1/0/4 to 192.168.1.1/24, 192.168.2.1/24, and 192.168.3.1/24, respectively, in the same way you configure GE 1/0/1.
2. Create a security zone.
# On the top navigation bar, click Network.
# From the navigation pane, select Security Zones.
# Perform the following tasks:
¡ Create a security zone named database, and add GigabitEthernet 1/0/1 to the zone.
¡ Create a security zone named president, and add GigabitEthernet 1/0/2 to the zone.
¡ Create a security zone named finance, and add GigabitEthernet 1/0/3 to the zone.
¡ Create a security zone named market, and add GigabitEthernet 1/0/4 to the zone.
3. Create a time range.
# On the top navigation bar, click Objects.
# From the navigation pane, select Object Groups > Time Ranges.
# Click Create.
# In the dialog box that appears, enter name work and then click Create for Periodic time range.
# In the dialog box that appears, configure the time range:
¡ Set the start time to 08:00.
¡ Set the end time to 18:00.
¡ Select Monday, Tuesday, Wednesday, Thursday, and Friday.
# Click OK.
4. Create a security policy from security zone president to security zone database to allow the president office to access the database through HTTP at any time.
# On the top navigation bar, click Policies.
# From the navigation pane, select Security Policies > Security Policies.
# Click Create.
# In the dialog box that opens, create a security policy as shown in Figure 2:
Figure 2 Create a security policy for the president office
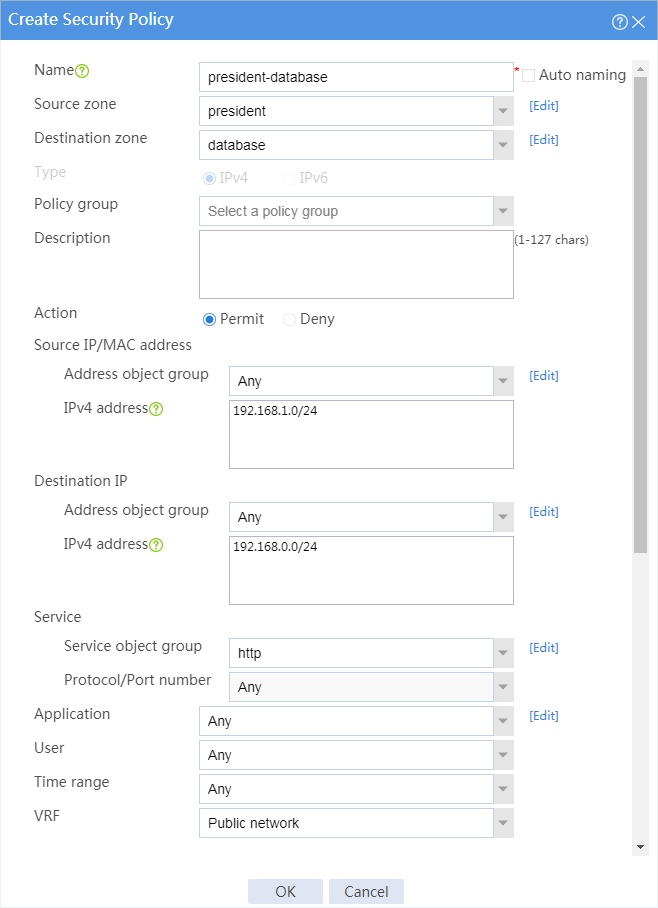
# Click OK.
5. Create a security policy from security zone finance to security zone database to allow the financial office to access the database through HTTP from 8:00 to 18:00 on weekdays.
# On the top navigation bar, click Policies.
# From the navigation pane, select Security Policies > Security Policies.
# Click Create.
# In the dialog box that opens, create a security policy as shown in Figure 3:
Figure 3 Create a security policy for the financial office
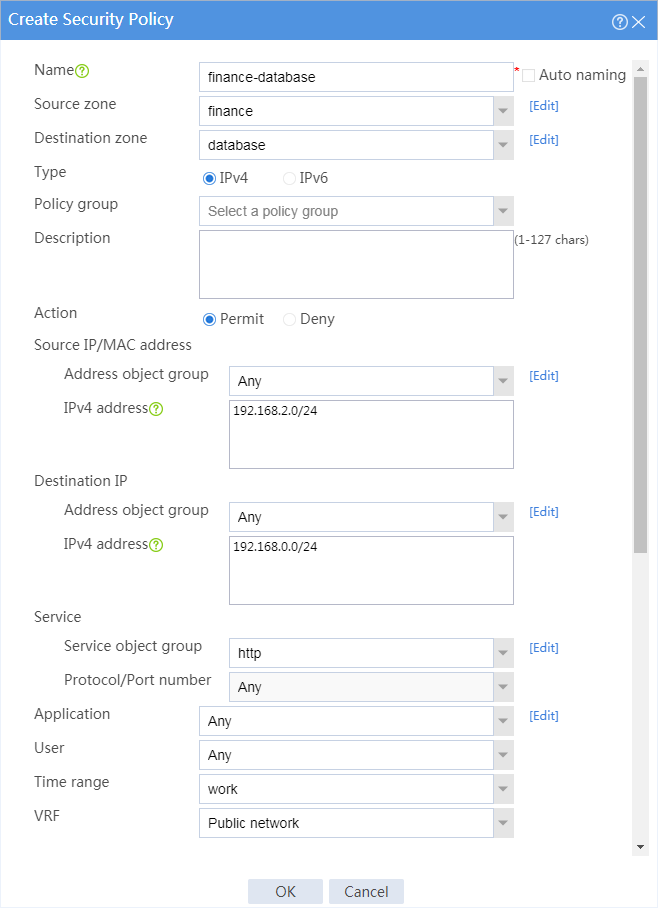
# Click OK.
6. Create a security policy from security zone market to security zone database to forbid the marketing office from accessing the database through HTTP at any time.
# On the top navigation bar, click Policies.
# From the navigation pane, select Security Policies > Security Policies.
# Click Create.
# In the dialog box that opens, create a security policy as shown in Figure 4:
Figure 4 Create a security policy for the marketing office
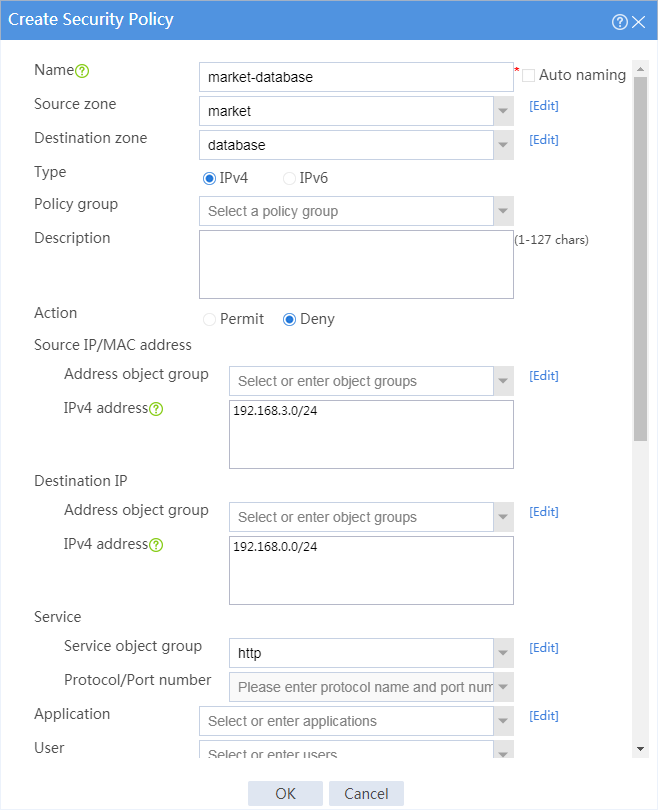
# Click OK.
7. For the security policies to take effect immediately, activate security policy matching acceleration.
# On the top navigation bar, click Policies.
# From the navigation pane, select Security Policies > Security Policies.
# Click Activate (the first Submit in this example).
Figure 5 Activate security policy matching acceleration

Verifying the configuration
# Use a PC in each office to access the Web service of the financial database server through the browser.
Example: Configuring domain name-based security policies
Network configuration
As shown in Figure 6, a Web server with domain name www.abc.com is deployed for financial management, and the domain name has been registered on the DNS server in the internal network. Configure a security policy to achieve the following goals:
· The financial office can access the financial server through HTTP.
· The marketing office cannot access the financial server through HTTP at any time.

Software versions used
This configuration example was created and verified on F9345 of the F1060 device.
Procedure
1. Assign IP addresses to interfaces.
# On the top navigation bar, click Network.
# From the navigation pane, select Interface Configuration > Interfaces.
# Click the Edit icon for GE 1/0/1.
# In the dialog box that opens, configure the interface:
a. On the IPv4 Address tab, enter the IP address and mask of the interface. In this example, enter 10.0.0.1/24.
b. Click OK.
# Set the IP addresses of GE 1/0/2, GE 1/0/3, and GE 1/0/4 to 10.0.12.1/24, 10.0.11.1/24, and 10.0.10.1/24, respectively, in the same way you configure GE 1/0/1.
2. Create a security zone.
# On the top navigation bar, click Network.
# From the navigation pane, select Security Zones.
# Perform the following tasks:
¡ Create a security zone named web, and add GigabitEthernet 1/0/1 to the zone.
¡ Create a security zone named market, and add GigabitEthernet 1/0/2 to the zone.
¡ Create a security zone named finance, and add GigabitEthernet 1/0/3 to the zone.
¡ Create a security zone named dns, and add GigabitEthernet 1/0/4 to the zone.
3. Create an IPv4 address object.
# On the top navigation bar, click Objects.
# From the navigation pane, select Object Groups > IPv4 Address Object Groups.
# Create an IPv4 address object group named web and specify the host name as www.abc.com.
4. Configure DNS settings.
# On the top navigation bar, click Network.
# From the navigation pane, select DNS > DNS Client.
# On the page that opens, enter domain server address 10.10.10.10, and then click the plus icon to add a DNS server.
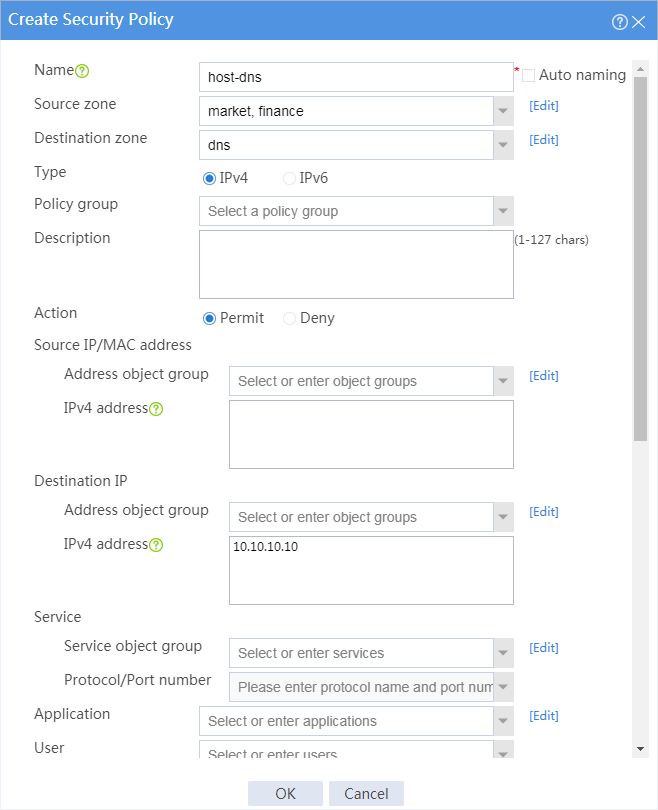
5. Create a security policy from security zone local to security zone dns to allow the device to access the DNS server for host name translation.
# On the top navigation bar, click Policies.
# From the navigation pane, select Security Policies > Security Policies.
# Click Create.
# In the dialog box that opens, create a security policy as shown in Figure 7:
Figure 7 Create a security policy for the device to access the DNS server

# Click OK.
6. Create a security policy from security zones market and finance to security zone dns to allow hosts in the internal network to access the DNS server for host name translation.
# On the top navigation bar, click Policies.
# From the navigation pane, select Security Policies > Security Policies.
# Click Create.
# In the dialog box that opens, create a security policy as shown in Figure 8:
Figure 8 Create a security policy for the internal network
# Click OK.
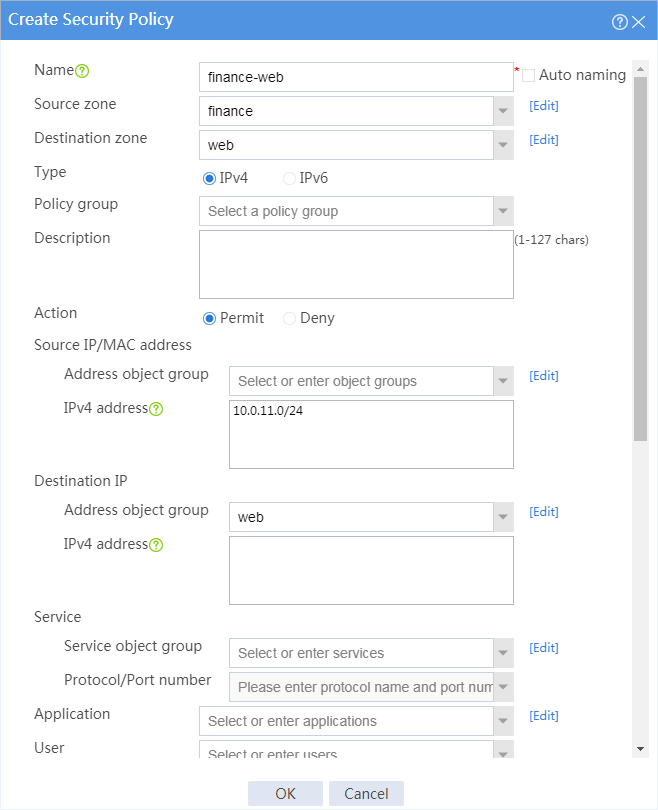
7. Create a security policy from security zone finance to security zone web for the financial office to access the financial Web server through HTTP.
# On the top navigation bar, click Policies.
# From the navigation pane, select Security Policies > Security Policies.
# Click Create.
# In the dialog box that opens, create a security policy as shown in Figure 9:
Figure 9 Create a security policy for the financial office
# Click OK.
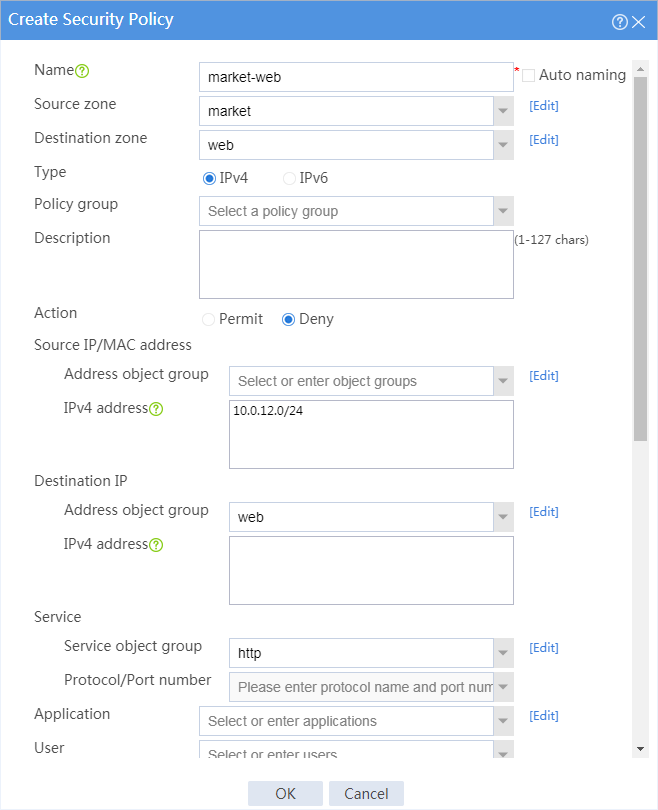
8. Create a security policy from security zone market to security zone web to forbid the marketing office from accessing the financial Web server through HTTP at any time.
# On the top navigation bar, click Policies.
# From the navigation pane, select Security Policies > Security Policies.
# Click Create.
# In the dialog box that opens, create a security policy as shown in Figure 10:
Figure 10 Create a security policy for the marketing office
# Click OK.
9. For the security policies to take effect immediately, activate security policy matching acceleration.
# On the top navigation bar, click Policies.
# From the navigation pane, select Security Policies > Security Policies.
# Click Activate (the first Submit in this example).
Figure 11 Activate security policy matching acceleration

Verifying the configuration
# Use a PC in each office to access the Web service of the financial server through the browser.
Example: Configuring security policies and DPI
Network configuration
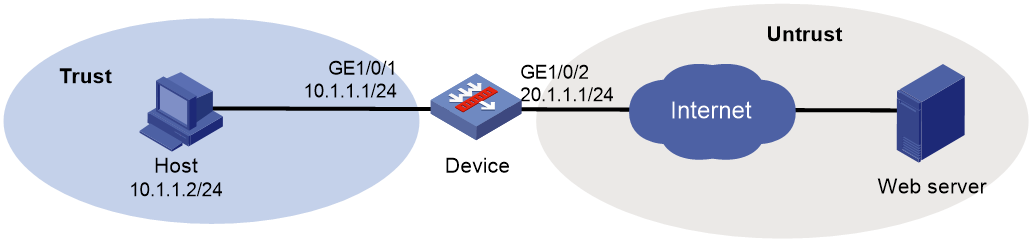
As shown in Figure 12, the host in the internal network accesses the Internet through the device. Configure a security policy and DPI on the device with the following settings:
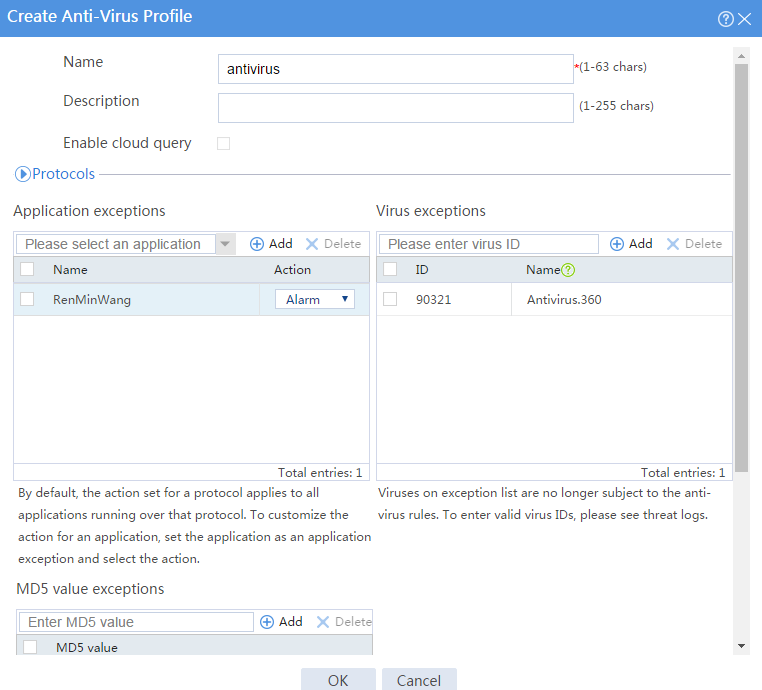
· Perform anti-virus detection on data packets from the internal network and drop packets with viruses.
· Specify virus with ID 90321 as a virus exception.
· Specify RenMinWang as an application exception. Enable the system to permit packets with viruses to RenMinWang and generate alarms.
Software versions used
This configuration example was created and verified on F9345 of the F1060 device.
Procedure
1. Assign IP addresses to interfaces and add the interfaces to security zones.
# On the top navigation bar, click Network.
# From the navigation pane, select Interface Configuration > Interfaces.
# Click the Edit icon for GE 1/0/1.
# In the dialog box that opens, configure the interface:
a. Select the Trust security zone.
b. On the IPv4 Address tab, enter the IP address and mask of the interface. In this example, enter 10.1.1.1/24.
c. Click OK.
# Add GE 1/0/2 to the Untrust security zone and set its IP address to 20.1.1.1/24 in the same way you configure GE 1/0/1.
2. Create an anti-virus profile.
# On the top navigation bar, click Objects.
# From the navigation pane, select APPSecurity > Anti-Virus > Profile.
# Click Create.
# In the dialog box that opens, create an anti-virus profile as shown in Figure 13.
Figure 13 Create an anti-virus profile
# Click OK.
3. Create a security policy.
# On the top navigation bar, click Policies.
# From the navigation pane, select Security Policies > Security Policies.
# Click Create.
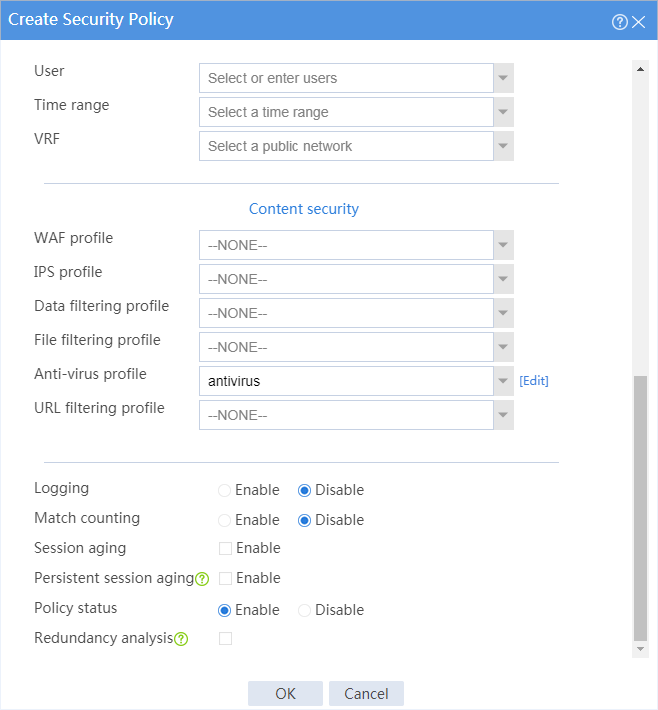
# In the dialog box that appears, create a security policy as shown in Figure 14 and Figure 15.
Figure 14 Create basic security policy settings
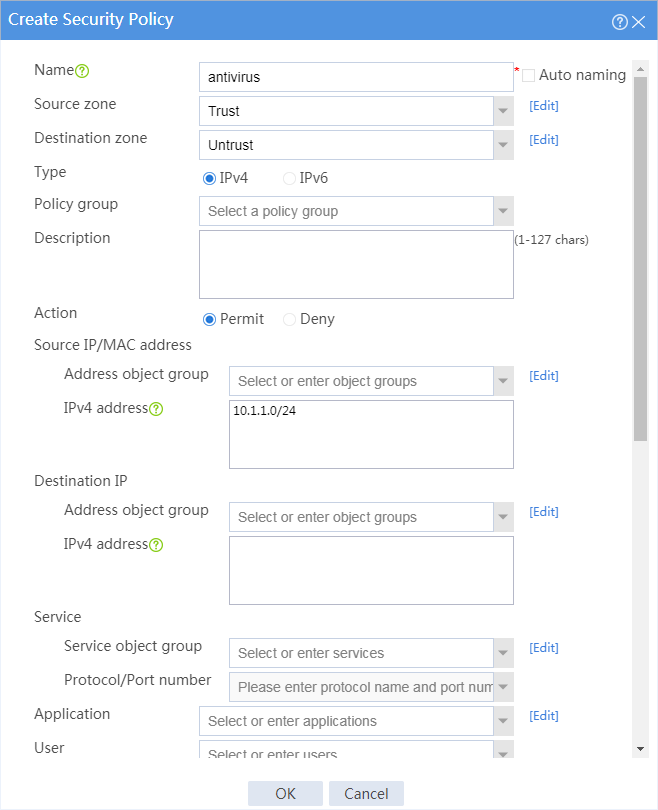
Figure 15 Configure content security settings
# Click OK.
4. For the security policy to take effect immediately, activate security policy matching acceleration.
# On the top navigation bar, click Policies.
# From the navigation pane, select Security Policies > Security Policies.
# Click Activate (the first Submit in this example).
Figure 16 Activate security policy matching acceleration

5. Submit content security settings for the settings to take effect.
# On the top navigation bar, click Policies.
# From the navigation pane, select Security Policies > Security Policies.
# Click Submit (the second Submit in this example).
Figure 17 Submit content security settings

Verifying the configuration
# Verify that virus attacks on internal users can be prohibited effectively.