- Table of Contents
-
- H3C S3600 Operation Manual-Release 1602(V1.02)
- 00-1Cover
- 00-2Product Overview
- 01-CLI Operation
- 02-Login Operation
- 03-Configuration File Management Operation
- 04-VLAN Operation
- 05-IP Address and Performance Operation
- 06-Voice VLAN Operation
- 07-GVRP Operation
- 08-Port Basic Configuration Operation
- 09-Link Aggregation Operation
- 10-Port Isolation Operation
- 11-Port Security-Port Binding Operation
- 12-DLDP Operation
- 13-MAC Address Table Management Operation
- 14-Auto Detect Operation
- 15-MSTP Operation
- 16-Routing Protocol Operation
- 17-Multicast Operation
- 18-802.1x and System Guard Operation
- 19-AAA Operation
- 20-Web Authentication Operation
- 21-MAC Address Authentication Operation
- 22-VRRP Operation
- 23-ARP Operation
- 24-DHCP Operation
- 25-ACL Operation
- 26-QoS-QoS Profile Operation
- 27-Web Cache Redirection Operation
- 28-Mirroring Operation
- 29-IRF Fabric Operation
- 30-Cluster Operation
- 31-PoE-PoE Profile Operation
- 32-UDP Helper Operation
- 33-SNMP-RMON Operation
- 34-NTP Operation
- 35-SSH Operation
- 36-File System Management Operation
- 37-FTP-SFTP-TFTP Operation
- 38-Information Center Operation
- 39-System Maintenance and Debugging Operation
- 40-VLAN-VPN Operation
- 41-HWPing Operation
- 42-IPv6 Management Operation
- 43-DNS Operation
- 44-Smart Link-Monitor Link Operation
- 45-Access Management Operation
- 46-Appendix
- Related Documents
-
| Title | Size | Download |
|---|---|---|
| 29-IRF Fabric Operation | 213.43 KB |
Table of Contents
Establishment of an IRF Fabric
IRF Fabric Configuration Task List
Specifying the Fabric Port of a Switch
Specifying the VLAN Used to Form an IRF Fabric
Setting a Unit ID for a Switch
Assigning a Unit Name to a Switch
Assigning an IRF Fabric Name to a Switch
Setting the IRF Fabric Authentication Mode
Configuring IRF Automatic Fabric for a Switch
Displaying and Maintaining IRF Fabric
IRF Fabric Configuration Example
1 IRF Fabric Configuration
![]()
The IRF automatic fabric feature is newly added. For details, refer to IRF automatic fabric.
When configuring IRF fabric, go to these sections for information you are interested in:
l Displaying and Maintaining IRF Fabric
l IRF Fabric Configuration Example
Introduction to IRF
Intelligent Resilient Framework (IRF), a feature particular to H3C S3600 series switches, is a new technology for building the core of a network. This feature allows you to build an IRF fabric by interconnecting several S3600 series switches to provide more ports for network devices and improve the reliability of your network.
Establishment of an IRF Fabric
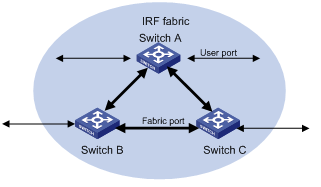
Topology and connections of an IRF fabric
An IRF fabric typically has a ring topology structure. As shown in Figure 1-1, each switch has two ports connected with two other switches in the fabric. These two ports are called fabric ports in general, a left port and a right port respectively; the other ports, which are available for connections with users or devices outside the fabric, are called user ports.
Figure 1-1 A schematic diagram of an IRF fabric
A correctly built IRF fabric features the following:
l Multiple S3600 series switches are interconnected through their fabric ports.
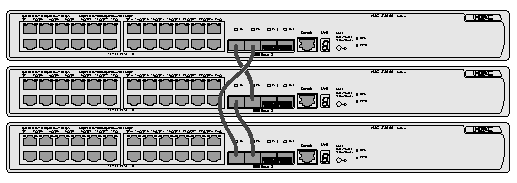
l Given a switch, its left port is connected to the right port of another switch, and its right port is connected to the left port of a third one.
Figure 1-2 Port connection mode for S3600 series ring topology IRF fabric Port connection mode for S3600 series ring topology IRF fabric is shown in Figure 1-2.
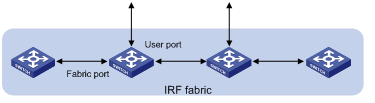
IRF fabric also supports bus topology, which has the same requirements as the ring topology. The difference is that in a bus topology structure, the units at both ends of the bus have only one fabric port connected, as shown in Figure 1-3.
Figure 1-3 IRF fabric bus topology
Fabric ports
On an S3600 series Ethernet switch, only four GigabitEthernet ports can be configured as fabric ports. If not used for fabric connection, these four ports can be used as general data ports. The four ports fall into two groups according to their port numbers:
l GigabitEthernet 1/1/1 and GigabitEthernet 1/1/2 form the first group.
l GigabitEthernet 1/1/3 and GigabitEthernet 1/1/4 form the second group.
Only one group of ports can be configured as fabric ports at a time. Given a group, either GigabitEthernet 1/1/1 or GigabitEthernet 1/1/3 can be configured as the left fabric port, and either GigabitEthernet 1/1/2 or GigabitEthernet 1/1/4 can be configured as the right fabric port.
Once you configure a port as a fabric port, the group that comprises this fabric port becomes the fabric port group, and you cannot configure a port in the other group as a fabric port. For example, once you configure GigabitEthernet 1/1/1 as a fabric port, this port automatically becomes the left port and the first group becomes the fabric port group.
![]()
The system does not require a consistency in the fabric port groups between different switches. That is, the left fabric port in the first group of a switch can be connected to the right fabric port in the second group of the peer switch.
FTM
As the basis of the IRF function, the Fabric Topology Management (FTM) program manages and maintains the entire topology of a fabric.
With fabric ports configured, the FTM program releases information of the device through the fabric ports. The device information includes Unit ID, CPU MAC, device type ID, fabric port information, and all fabric configuration information. The device information is released in the discovery packet (DISC).
After receiving the packet, the peer device will analyze the packet. A device can form a fabric with the peer or join a fabric only when the following conditions are met.
l The number of the existing devices in the fabric does not reach the maximum number of devices allowed by the fabric (up to eight devices can form a fabric).
l The fabric name of the device and the existing devices in the fabric are the same.
l The software version of the device is the same as that of the existing devices in the fabric.
l The device passes the security authentication if security authentication is enabled on the device or in the fabric, that is, the same authentication mode and password are configured on the device and the existing devices in the fabric.
![]()
In case IRF automatic fabric is enabled on both a switch in the fabric and a switch to be added to the fabric (referred to as candidate switch hereinafter), even if the software version of the candidate switch is inconsistent with that used on the device in the fabric, you can still add a device to the fabric by automatic downloading and loading of the software.
IRF fabric detection
Forming a fabric requires a high consistency of connection modes between the devices and device information. Without all the requirements for forming a fabric being met, a fabric cannot be formed.
The FTM program detects the necessary conditions for forming a fabric one by one and displays the detection results. You can use the display ftm information command to view the detection information for the fabric, checking the running status of the fabric or analyzing the problems. Table 1-1 lists the status and solution of the problems.
Table 1-1 Status and solution
|
Status |
Analysis |
Solution |
|
|
normal |
— |
These three kinds of information do not mean a device or a fabric operates improperly. No measure is needed for any of them. |
|
|
temporary |
|||
|
redundance port |
|||
|
connection error |
Indicates three kinds of port matching errors may occur. |
Two fabric ports of the same device (that is, the right port and the left port) are connected. |
Pull out one end of the cable and connect it to a fabric port of another switch. |
|
The left and right fabric ports of the devices are not connected in a crossed way. |
Connect the left and right ports of two devices in a crossed way. |
||
|
A fabric port of the local switch is connected to a non-fabric port, or is connected to a fabric port that does not have fabric port function enabled. |
Check the types of the two interconnected ports on two sides. Make sure a fabric port is only connected to ports of the same type and the fabric ports on both sides are enabled with the fabric port function. |
||
|
reached max units |
The maximum number of units allowed by the current fabric is reached. You will fail to add new devices to the fabric in this case. |
Remove the new device or existing devices in the fabric. |
|
|
different system name |
The fabric name of the device directly connected to the switch and the existing fabric name of the fabric are not the same. |
Modify the fabric name of the new device to be that of the fabric. |
|
|
different product version |
The software version of the directly connected device and that of the current device are not the same. |
Update the software version to make sure the software version of the new device is the same as that of the fabric. |
|
|
auth failure |
The IRF fabric authentication modes configured for the local device and that of the fabric are not the same, or the password configured does not match. |
Configure the IRF fabric authentication modes and the passwords for the local device and the fabric as the same. |
|
IRF automatic fabric
If the software version and fabric name of the candidate switch are inconsistent with those of the device in the IRF fabric, the local device cannot be added to the fabric. In this case, you have to manually download and load the software, and then restart the device, or manually change the fabric name to add the device to the fabric. H3C S3600 series switches provide the IRF automatic fabric function, which enables a candidate switch to automatically download the software and change the fabric name in case that the software version and fabric name of the candidate device and that of the device in the fabric are different, thus reducing the manual maintenance workload.
With IRF automatic fabric enabled, if inconsistency in software version or fabric name occurs when a switch is added to a fabric, the system automatically performs the following operations:
l If the software version of the local device is inconsistent with that of the device in the fabric, the system automatically initiates a download request to the device with the smallest unit ID in the fabric and downloads the software used by the device in the current fabric to the local device. Then the device will automatically restart and be added to the fabric.
l If the fabric name of the local device is inconsistent with that of the device in the fabric, the system automatically ignores the inconsistency check of the fabric name and adds the device to the fabric. Then the system automatically synchronizes the configurations to the device with the smallest unit ID and changes the fabric name.
With the above operations completed, the device can be added to the fabric and work normally.
![]()
l You need to enable the IRF automatic fabric function on all the devices including the candidate switch in the fabric to enable the candidate switch to download software and discovery neighbors and thus be added to the fabric normally.
l If the candidate switch is going to download software from a unit in an IRF fabric, you are recommended to set the ID of the unit to 1 to make the candidate switch download the software of correct version.
How IRF Works
When a fabric is established, the devices determine their respective roles in the fabric by comparing their CPU MAC addresses. The device with the lowest CPU MAC address is elected as the master and the other devices are slaves.
After the election, the fabric can operate normally. The following three functions of IRF can provide simple configuration mode, enhanced network performance and perfect redundancy backup mechanism for users.
![]()
l The S3600-SI series Ethernet switches support basic IRF fabric feature, that is, Distributed Device Management (DDM) function.
l The S3600-EI series Ethernet switches support enhanced IRF fabric feature, including DDM, Distributed Redundancy Routing (DRR) and Distributed Link Aggregation (DLA).
DDM
DDM is a new device management mode provided by IRF. In normal cases, a fabric can be considered as a single device. You can manage the entire fabric by logging onto any device in the fabric with different logging modes. The devices in the fabric synchronize their configurations by exchanging packets, thus ensuring stability of the fabric.
FTM program uses Unit ID, or device ID to distinguish between the devices in a fabric when you manage them. On initialization of the IRF function, each device considers its Unit ID as 1 and after a fabric connection is established, the FTM program automatically re-numbers the devices or you can manually configure the Unit ID of them.
The master in a fabric collects the newest configurations of the user and the slaves periodically synchronize the configurations from the master. In this way, the entire fabric can operate with the same configurations.
DRR
DRR is used to implement redundancy routing backup. The devices in a fabric run their independent routing protocols and maintain their own routing tables. Unlike a common layer 3 switch, a fabric member does not generate a layer 3 forwarding table to forward packets; instead, it uploads the routing table to the master, which generates a forwarding table used by the entire fabric by integrating the routing tables of all the devices. Then each slave synchronizes this forwarding table from the master and takes it as the basis for layer 3 forwarding.
In this way, the forwarding table entries of each device in the fabric can be consistent. Even if the master fails, other devices can use the forwarding table synchronized from the master to perform layer 3 forwarding, thus ensuring the accuracy of forwarding path. After re-electing the master, the fabric will restart routing update.
DLA
As a new link aggregation mode, DLA can improve fault tolerance and redundancy backup of user networks.
Link aggregation enables you to configure ports on the same device as an aggregation port group, avoiding network interruptions resulted from single port failure. Based on link aggregation, DLA provides a more reliable solution, with which you can select ports on different devices to form an aggregation port group. In this way, single port failure can be avoided and network reliability can be greatly improved, because the fabric can communicate with the destination network through ports on other devices in case a single device fails.
IRF Fabric Configuration
IRF Fabric Configuration Task List
Complete the following tasks to configure IRF fabric:
|
Task |
Remarks |
|
Required |
|
|
Optional |
|
|
Optional |
|
|
Optional |
|
|
Optional |
|
|
Optional |
|
|
Optional |
Specifying the Fabric Port of a Switch
You can specify the fabric port of a switch in either system view or Ethernet interface view.
Configurations in system view
Follow these steps to specify a fabric port:
|
To do… |
Use the command… |
Remarks |
|
Enter system view |
system-view |
— |
|
Specify the fabric port of a switch |
fabric-port interface-type interface-number enable |
Required Not specified by default |
Configurations in Ethernet interface view
Follow these steps to specify a fabric port:
|
To do… |
Use the command… |
Remarks |
|
Enter system view |
system-view |
— |
|
Enter Ethernet interface view |
interface interface-type interface-number |
— |
|
Specify the current port as the fabric port of a switch |
port link-type irf-fabric |
Required No port is specified as the fabric port by default. |
![]()
l Establishing an IRF system requires a high consistency of the configuration of each device. Hence, before you enable the fabric port, do not perform any configuration for the port, and do not configure some functions that affect the IRF (such as TACACS and VLAN-VPN) for other ports or globally. Otherwise, you cannot enable the fabric port. For detailed restrictions refer to the error information output by devices.
l After an IRF fabric is created, you are not recommended to enable the Burst function on any fabric device. For the introduction to the Burst function, refer to the QoS-QoS Profile part in this manual.
l When you have enabled fabric port function for a fabric port group, if you need to change the fabric port group, you must disable the fabric function of the current fabric port group before you configure another group. Otherwise, the system will prompt that the current fabric port group is in use, you cannot change the fabric port group.
l As shutting down a fabric port directly may cause the fabric to be split and error messages, do not perform such operations.
l To split a fabric, you can simply remove the cables used to form the fabric or disable the fabric using the undo fabric-port enable command.
l You can shut down/bring up a port after you disable the fabric feature on the port.
l If you need to configure an IRF fabric as a DHCP server, DHCP relay or DHCP client, configure the UDP Helper function in the fabric at the same time to ensure that the client can successfully obtain an IP address. (Since this configuration can be automatically synchronized to the entire fabric, you can perform it on only one unit.) For the configuration of the UDP Helper function, refer to the UDP Helper part in this manual.
l After you use the port link-type irf-fabric command to specify a port as the fabric port, you cannot use the port link-type command to change the port to a port of other types. You must use the undo fabric-port command first to disable the fabric port function of the port to change the port type.
Specifying the VLAN Used to Form an IRF Fabric
When the devices in an IRF fabric are transmitting IRF data, to avoid it being sent to other non fabric ports, the data should be transmitted in a specified VLAN. You can specify the VLAN used to transmit IRF data.
Follow these steps to specify the VLAN used to form an IRF fabric:
|
To do… |
Use the command… |
Remarks |
|
Enter system view |
system-view |
— |
|
Specify the VLAN used to form an IRF fabric |
ftm fabric-vlan vlan-id |
Required By default, the VLAN used to form the IRF fabric is VLAN 4093 |
![]()
You cannot specify an existing VLAN to form an IRF fabric; otherwise, your configuration fails.
Setting a Unit ID for a Switch
On the switches that support automatic numbering, FTM will automatically number the switches to constitute an IRF fabric by default, so that each switch has a unique unit ID in the fabric. You can use the command in the following table to set unit IDs for switches. Make sure to set different unit IDs for different switches in an IRF fabric. Otherwise, FTM will automatically number the switches with the same unit ID.
Follow these steps to set a unit ID for a switch:
|
To do… |
Use the command… |
Remarks |
|
Enter system view |
system-view |
— |
|
Set a unit ID for the switch |
change self-unit to { unit-id | auto-numbering } |
Optional By default, the unit ID of a switch that belongs to no IRF fabric is 1. The unit ID of a switch belonging to an IRF fabric is assigned by FTM. Unit ID ranges from 1 to 8. |
![]()
If you do not configure the fabric port, you cannot change the unit ID of the local switch.
After an IRF fabric is established, you can use the following command to change the unit IDs of the switches in the IRF fabric.
Follow these steps to set a unit ID to a new value:
|
To do… |
Use the command… |
Remarks |
|
Enter system view |
system-view |
— |
|
Set a unit ID to a new value |
change unit-id unit-id1 to { unit-id2 | auto-numbering } |
Optional |
![]()
l Unit IDs in an IRF fabric are not always arranged in order of 1 to 8.
l Unit IDs of an IRF fabric can be inconsecutive.
After you change the unit ID of switches, the following operations are performed.
l If the modified unit ID does not exist in the IRF fabric, the system sets its priority to 5 and saves it in the unit Flash memory.
l If the modified unit ID is an existing one, the system prompts you to confirm if you really want to change the unit ID. If you choose to change it, the existing unit ID is replaced and the priority is set to 5. Then you can use the fabric save-unit-id command to save the modified unit ID into the unit Flash memory and clear the information about the existing one.
l If auto-numbering is selected, the system sets the unit priority to 10. You can use the fabric save-unit-id command to save the modified unit ID into the unit Flash memory and clear the information about the existing one.
![]()
Priority is the reference for FTM program to perform automatic numbering. The value of priority can be 5 or 10. Priority 5 means the switch adopts manual numbering, and priority 10 means the switch adopts automatic numbering. Manual numbering has a higher priority than automatic numbering.
After the configuration of numbering, you can use the following command in the table to save the local unit ID in the unit Flash memory. When you restart the switch, it can load the unit ID configuration automatically.
Follow these steps to save the unit ID of each unit in the IRF fabric:
|
To do… |
Use the command… |
Remarks |
|
Save the unit ID of each unit in the IRF fabric |
fabric save-unit-id |
Optional |
Assigning a Unit Name to a Switch
Follow these steps to assign a unit name to a switch:
|
To do… |
Use the command… |
Remarks |
|
Enter system view |
system-view |
— |
|
Assign a unit name to a switch |
set unit unit-id name unit-name |
Required |
Assigning an IRF Fabric Name to a Switch
Only the switches with the same IRF fabric name can form an IRF fabric.
Follow these steps to assign a fabric name to a switch:
|
To do… |
Use the command… |
Remarks |
|
Enter system view |
system-view |
— |
|
Assign a fabric name to the switch |
sysname sysname |
Optional By default, the IRF fabric name is H3C. |
Setting the IRF Fabric Authentication Mode
Only the switches with the same IRF fabric authentication mode can form an IRF fabric.
Follow these steps to set the IRF fabric authentication mode for a switch:
|
To do… |
Use the command… |
Remarks |
|
Enter system view |
system-view |
— |
|
Set the IRF fabric authentication mode for the switch |
irf-fabric authentication-mode { simple password | md5 key } |
Optional By default, no authentication mode is set on a switch. |
![]()
When an IRF fabric operates normally, you can regard the whole fabric as a single device and perform configuration on it. Multiple switches constitute an IRF fabric. Therefore, data transmission and simultaneous program execution among the switches may cause the IRF fabric in a busy situation. When you configure the IRF fabric, you may receive a prompt “Fabric system is busy, please try later…” which indicates the fabric system does not perform your configuration properly. In this case, you need to verify your previous configuration or perform your configuration again.
Configuring IRF Automatic Fabric for a Switch
Configuration prerequisites
l Make sure that the Flash of the newly added device has enough space to download software used on the device in the fabric.
l Configure the fabric port for the newly added device.
Configuration procedure
Follow these steps to configure IRF automatic fabric for a switch:
|
To do… |
Use the command… |
Remarks |
|
Enter system view |
system-view |
— |
|
Configure IRF automatic fabric for a switch |
fabric member-auto-update software enable |
Required Disabled by default |
![]()
l You need to enable the IRF automatic fabric function on all the devices including the newly added device in the fabric to enable the newly added device to download software and discovery neighbors and thus be added to the fabric normally.
l After you configure the IRF automatic fabric function on Slave, execute the save command to save the configurations as soon as possible. Otherwise, the device may synchronize the configurations from Master and restart repeatedly because the configurations on the device are lost after the device automatically downloads the software and restarts.
Displaying and Maintaining IRF Fabric
|
To do… |
Use the command… |
Remarks |
|
Display the information about an IRF fabric |
display irf-fabric [ port | status ] |
Available in any view |
|
Display the topology information of an IRF fabric |
display ftm { information | topology-database } |
|
|
Clear the FTM statistics |
reset ftm statistics |
Available in user view |
IRF Fabric Configuration Example
Network Requirements
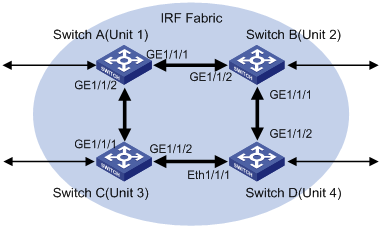
Configure unit ID, unit name, IRF fabric name, and authentication mode for four switches to enable them to form an IRF fabric as shown in Figure 1-4.
The configuration details are as follows:
l Unit IDs: 1, 2, 3, 4
l Unit names: unit 1, unit 2, unit 3, unit 4
l Fabric name: hello
l Authentication mode: simple password
l Password: welcome
Network Diagram
Figure 1-4 Network diagram for forming an IRF fabric
Configuration Procedure
1) Configure Switch A.
# Configure fabric ports.
<Sysname> system-view
[Sysname] fabric-port GigabitEthernet1/1/1 enable
[Sysname] fabric-port GigabitEthernet1/1/2 enable
# Configure the unit name as Unit 1.
[Sysname] set unit 1 name Unit1
# Configure the fabric name as hello.
[Sysname] sysname hello
# Configure the fabric authentication mode as simple and the password as welcome.
[hello] irf-fabric authentication-mode simple welcome
2) Configure Switch B.
# Configure fabric ports.
<Sysname> system-view
[Sysname] fabric-port GigabitEthernet1/1/1 enable
[Sysname] fabric-port GigabitEthernet1/1/2 enable
# Set the unit ID to 2.
[Sysname] change unit-id 1 to 2
# Configure the unit name as Unit 2.
[Sysname] set unit 1 name unit2
# Configure the fabric name as hello.
[Sysname] sysname hello
# Configure the fabric authentication mode as simple and the password as welcome.
[hello] irf-fabric authentication-mode simple welcome
Configurations on Switch C and Switch D are similar with the above configurations.