- Table of Contents
-
- 08-System Volume
- 00-System Volume Organization
- 01-Login Configuration
- 02-Basic System Configuration
- 03-Device Management Configuration
- 04-File System Management Configuration
- 05-SNMP Configuration
- 06-RMON Configuration
- 07-MAC Address Table Management Configuration
- 08-System Maintaining and Debugging Configuration
- 09-Information Center Configuration
- 10-PoE Configuration
- 11-Track Configuration
- 12-NQA Configuration
- 13-NTP Configuration
- 14-VRRP Configuration
- 15-HA Configuration
- 16-Hotfix Configuration
- 17-GR Overview
- Related Documents
-
| Title | Size | Download |
|---|---|---|
| 14-VRRP Configuration | 342.36 KB |
Table of Contents
VRRP Application (Taking IPv4-Based VRRP for Example)
VRRP for IPv4 Configuration Task List
Configuring a VRRP Group to Respond to Ping Packets Destined for Its Virtual IP Address
Configuring the Association Between Virtual IP Address and MAC Address
Creating VRRP Group and Configuring Virtual IP Address
Configuring Router Priority, Preemptive Mode and Tracking Function
Configuring VRRP Packet Attributes
Enabling the Trap Function of VRRP
Displaying and Maintaining VRRP for IPv4
VRRP for IPv6 Configuration Task List
Configuring a VRRP Group to Respond to Ping Packets Destined for the Virtual IPv6 Address·
Configuring the Association Between Virtual IPv6 Address and MAC Address
Creating VRRP Group and Configuring Virtual IPv6 Address
Configuring Router Priority, Preemptive Mode and Interface Tracking
Configuring VRRP Packet Attributes
Displaying and Maintaining VRRP for IPv6
IPv4-Based VRRP Configuration Examples
Single VRRP Group Configuration Example
VRRP Interface Tracking Configuration Example
Multiple VRRP Group Configuration Example
IPv6-Based VRRP Configuration Examples
Single VRRP Group Configuration Example
VRRP Interface Tracking Configuration Example
Multiple VRRP Group Configuration Example
When configuring VRRP, go to these sections for information you are interested in:
l IPv4-Based VRRP Configuration Examples
l IPv6-Based VRRP Configuration Examples
![]()
l The term switch in this document refers to a switch in a generic sense or a Layer 3 switch.
l At present, the interfaces that VRRP involves can only be VLAN interfaces unless otherwise specified.
Introduction to VRRP
VRRP Overview
Normally, as shown in Figure 1-1, you can configure a default route with the gateway as the next hop for every host on a network segment, allowing all packets destined to other network segments to be sent over the default route to the gateway and then be forwarded by the gateway. This enables hosts on a network segment to communicate with external networks. However, when the gateway fails, all the hosts using the gateway as the default next-hop switch fail to communicate with the external network.
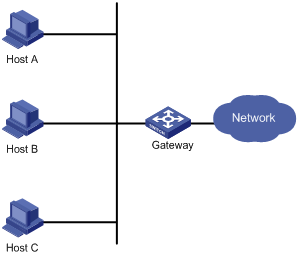
Apparently, this approach to enabling hosts on a network to communicate with external networks is easy to configure, but it imposes a very high requirement of performance stability on the device acting as the gateway. A common way to improve system reliability is to use more egress gateways, introducing the problem of routing among the multiple egresses.
Virtual Router Redundancy Protocol (VRRP) is designed to address this problem. VRRP can add switches that can act as network gateways to a VRRP group, forming a virtual router. Switches in the VRRP group elect a master through the VRRP election mechanism to take the responsibility of a gateway, and hosts on a LAN only need to configure the virtual router as their default network gateway.
VRRP is an error-tolerant protocol, which improves the network reliability and simplifies configurations on hosts. Deploying VRRP on multicast and broadcast LANs such as Ethernet, you can ensure that the system can still provide highly reliable default links without changing configurations (such as dynamic routing protocols, route discovery protocols) when a device fails, and prevent network interruption due to a single link failure.
There are two VRRP versions: VRRPv2 and VRRPv3. VRRPv2 is based on IPv4, while VRRPv3 is based on IPv6. The two versions implement the same functions but provide different commands.
VRRP Group Overview
VRRP combines a group of switches (including a master and multiple backups) on a LAN into a virtual router called VRRP group.
A VRRP group has the following features:
l A virtual router has an IP address. A host on the LAN only needs to know the IP address of the virtual router and uses the IP address as the next hop of the default route.
l Every host on the LAN communicates with external networks through the virtual router.
l Switches in the VRRP group elect the gateway according to their priorities. Once the master acting as the gateway fails, the other switches in the VRRP group elect a new gateway to undertake the responsibility of the failed switch, thus ensuring that the hosts in the network segment can communicate with the external networks uninterruptedly.
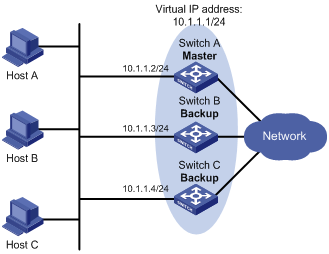
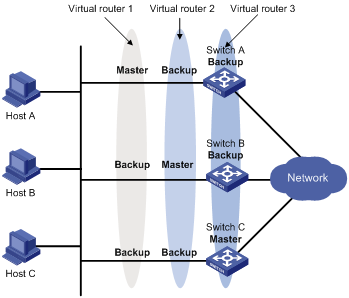
Figure 1-2 Network diagram for VRRP

As shown in Figure 1-2, Switch A, Switch B, and Switch C form a virtual router, which has its own IP address. Hosts on the Ethernet use the virtual router as the default gateway.
The switch with the highest priority of the three switches is elected as the master to act as the gateway, and the other two are backups.
![]()
l The IP address of the virtual router can be either an unused IP address on the segment where the VRRP group resides or the IP address of an interface on a switch in the VRRP group. In the latter case, the switch is called the IP address owner.
l In a VRRP group, there can only be one IP address owner.
VRRP priority
VRRP determines the role (master or backup) of each switch in the VRRP group by priority. A switch with a higher priority has more opportunity to become the master.
VRRP priority is in the range of 0 to 255. A bigger number means a higher priority. Priorities 1 to 254 are configurable. Priority 0 is reserved for special uses and priority 255 for the IP address owner. When a switch acts as the IP address owner, its priority is always 255. That is, if there is an IP address owner in a VRRP group, it acts as the master as long as it works properly.
Working mode
A switch in a VRRP group can work in one of the following two modes:
l Non-preemptive mode
Once a switch in the VRRP group becomes the master, it stays as the master as long as it operates normally, even if a backup is assigned a higher priority later.
l Preemptive mode
Once a backup finds its priority higher than that of the switch acting as the master, it sends VRRP advertisements to start a new master election in the VRRP group and becomes the master. Accordingly, the original master becomes a backup.
Authentication mode
VRRP provides two authentication modes:
l simple: Simple text authentication
You can adopt the simple text authentication mode in a network facing possible security problems. A switch sending a packet fills an authentication key into the packet, and the switch receiving the packet compares its local authentication key with that of the received packet. If the two authentication keys are the same, the received VRRP packet is considered real and valid; otherwise, the received packet is considered an invalid one.
l md5: MD5 authentication
You can adopt MD5 authentication in a network facing severe security problems. The switch encrypts a packet to be sent using the authentication key and MD5 algorithm and saves the encrypted packet in the authentication header. The switch receiving the packet uses the authentication key to decrypt the packet and checks whether the packet is valid.
On a secure network, you need not set the authentication mode.
VRRP Timers
VRRP timers include VRRP advertisement interval timer and VRRP preemption delay timer.
VRRP advertisement interval timer
The master in a VRRP group sends VRRP advertisements periodically to inform the other switches in the VRRP group that it operates properly.
You can adjust the interval of sending VRRP advertisements by setting the VRRP advertisement interval timer. If a backup receives no advertisements in a period three times the interval, the backup regards itself as the master and sends VRRP advertisements to start a new master election.
VRRP preemption delay timer
To avoid members in a VRRP group from changing their states frequently and make backups have enough time to collect information (such as routing information), each backup waits for a period of time (the preemption delay time) after it receives an advertisement with the priority lower than the local priority, then sends VRRP advertisements to start a new master election in the VRRP group and finally becomes the master.
Format of VRRP Packets
VRRP uses multicast packets. The switch acting as the master sends VRRP packets periodically to declare its existence. VRRP packets are also used for checking the parameters of the virtual router and electing the master.
IPv4-based VRRP packet format
Figure 1-3 IPv4-based VRRP packet format
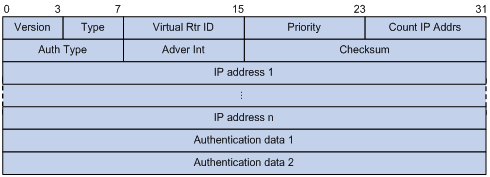
As shown in Figure 1-3, an IPv4-based VRRP packet consists of the following fields:
l Version: Version number of the protocol, 2 for VRRPv2.
l Type: Type of the VRRP packet. Only one VRRP packet type is present, that is, VRRP advertisement, which is represented by 1.
l Virtual Rtr ID (VRID): Serial number of the virtual router, that is, serial number of the VRRP group. It ranges from 1 to 255.
l Priority: Priority of the switch in the VRRP group, in the range 0 to 255. A greater value represents a higher priority.
l Count IP Addrs: Number of virtual IP addresses for the VRRP group. A VRRP group can have multiple virtual IP addresses.
l Auth Type: Authentication type. 0 means no authentication, 1 means simple text authentication, and 2 means MD5 authentication.
l Adver Int: Interval for sending advertisement packets, in seconds. The default is 1.
l Checksum: 16-bit checksum for validating the data in VRRP packets.
l IP Address: Virtual IP address entry of the VRRP group. The allowed number is given by the Count IP Addrs field.
l Authentication Data: Authentication key. Currently, this field is used only for simple authentication and is 0 for any other authentication modes.
IPv6-based VRRP packet format
Figure 1-4 IPv6-based VRRP packet format
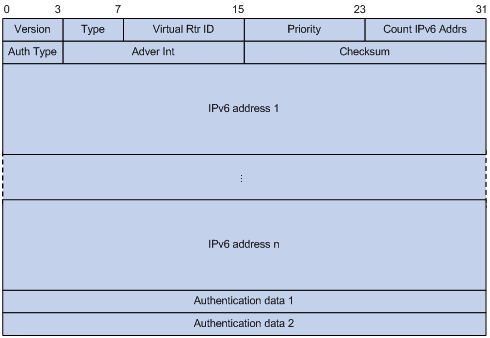
As shown in Figure 1-4, an IPv6-based VRRP packet consists of the following fields:
l Version: Version number of the protocol, 3 for VRRPv3.
l Type: Type of the VRRP packet. Only one VRRP packet type is present, that is, VRRP advertisement, which is represented by 1.
l Virtual Rtr ID (VRID): Serial number of the virtual router, that is, serial number of the VRRP group. It ranges from 1 to 255.
l Priority: Priority of the switch in the VRRP group, in the range 0 to 255. A greater value represents a higher priority.
l Count IPv6 Addrs: Number of virtual IPv6 addresses for the VRRP group. A VRRP group can have multiple virtual IPv6 addresses.
l Auth Type: Authentication type. 0 means no authentication, and 1 means simple authentication. VRRPv3 does not support MD5 authentication.
l Adver Int: Interval for sending advertisement packets, in centiseconds. The default is 100.
l Checksum: 16-bit checksum for validating the data in VRRPv3 packets.
l IPv6 Address: Virtual IPv6 address entry of the VRRP group. The allowed number is given by the Count IPv6 Addrs field.
l Authentication Data: Authentication key. Currently, this field is used only for simple authentication and is 0 for any other authentication modes.
Principles of VRRP
l With VRRP enabled, the switches determine their respective roles in the VRRP group by priority. The switch with the highest priority becomes the master, while the others are the backups. The master sends VRRP advertisement packets periodically to notify the backups that it is working properly, and each of the backups starts a timer to wait for advertisement packets from the master.
l In preemptive mode, when a backup receives a VRRP advertisement packet, it compares the priority in the packet with that of its own. If its priority is higher, it becomes the master; otherwise, it remains a backup.
l In non-preemptive mode, the switch in the VRRP group remains as a master or backup as long as the master does not fail. The backup will not become the master even if the former is configured with a higher priority.
l If the timer of a backup expires but the backup still does not receive any VRRP advertisement packet, it considers that the master fails. In this case, the backup considers itself as the master and sends VRRP advertisements to start a new master election.
VRRP Tracking
Tracking a specified interface
The interface tracking function expands the backup functionality of VRRP. It provides backup not only when the interface to which a VRRP group is assigned fails but also when other interfaces on the switch become unavailable. When a monitored interface goes down, the priority of the switch owning the interface is automatically decreased by a specified value, allowing a higher priority switch in the VRRP group to become the master.
Tracking a Track object
By monitoring a Track object, you can:
l Monitor the upper link. If there is a fault on the upper link, hosts in the LAN cannot access the external network through the switch. In this case, the state of the monitored Track object changes to negative, and the priority of the switch decreases by a specified value, allowing a higher priority switch in the VRRP group to become the master to maintain the proper communication between the hosts in the LAN and the external network.
l Monitor the master on a backup. If there is a fault on the master, the backup working in the switchover mode will switch to the master immediately to maintain normal communication.
![]()
For details of Track object tracking, refer to Track Configuration in the System Volume.
VRRP Application (Taking IPv4-Based VRRP for Example)
Master/backup
In master/backup mode, only one switch, the master, provides services. When the master fails, a new master is elected from the original backups. This mode requires only one VRRP group, in which each switch holds a different priority and the one with the highest priority becomes the master, as shown in Figure 1-5.
Figure 1-5 VRRP in master/backup mode
At the beginning, Switch A is the master and therefore can forward packets to external networks, while Switch B and Switch C are backups and are thus in the state of listening. If Switch A fails, Switch B and Switch C will elect for a new master. The new master takes over the forwarding task to provide services to hosts on the LAN.
Load balancing
You can create more than one VRRP group on an interface of a switch, allowing the switch to be the master of one VRRP group but a backup of another at the same time.
In load balancing mode, multiple switches provide services at the same time. This mode requires two or more VRRP groups, each of which includes a master and one or more backups. The masters of the VRRP groups can be assumed by different switches, as shown in Figure 1-6.
Figure 1-6 VRRP in load balancing mode
A switch can be in multiple VRRP groups and hold a different priority in different group.
In Figure 1-6, three VRRP groups are present:
l VRRP group 1: Switch A is the master; Switch B and Switch C are the backups.
l VRRP group 2: Switch B is the master; Switch A and Switch C are the backups.
l VRRP group 3: Switch C is the master; Switch A and Switch B are the backups.
For load balancing among Switch A, Switch B, and Switch C, hosts on the LAN need to be configured to use VRRP group 1, 2, and 3 as the default gateways respectively. When configuring VRRP priorities, make sure that each switch holds such a priority in each VRRP group that it will take the expected role in the group.
Configuring VRRP for IPv4
VRRP for IPv4 Configuration Task List
Complete these tasks to configure VRRP for IPv4:
|
Task |
Remarks |
|
Configuring a VRRP Group to Respond to Ping Packets Destined for Its Virtual IP Address |
Optional |
|
Configuring the Association Between Virtual IP Address and MAC Address |
Optional |
|
Required |
|
|
Configuring Router Priority, Preemptive Mode and Tracking Function |
Optional |
|
Optional |
|
|
Optional |
Configuring a VRRP Group to Respond to Ping Packets Destined for Its Virtual IP Address
You can configure that the master of a VRRP group responds to the received ICMP echo requests, that is, the virtual IP address of the VRRP group can be successfully pinged.
Follow these steps to configure a VRRP group to respond to ping packets destined for the virtual IP address:
|
To do… |
Use the command… |
Remarks |
|
Enter system view |
system-view |
— |
|
Configure a VRRP group to respond to ping packets destined for its virtual IP address |
vrrp ping-enable |
Optional By default, a VRRP group responds to ping packets destined for its virtual IP address. |
![]()
Configure this function before creating a VRRP group. Otherwise, your configuration will fail.
Configuring the Association Between Virtual IP Address and MAC Address
After the virtual IP address of a VRRP group is associated with a MAC address, the master takes the configured MAC address as the source MAC address of the packets to be sent, so that the hosts in the internal network can learn the association between the IP address and the MAC address and thus forward the packets to be forwarded to the other network segments to the master.
There are two types of association between virtual IP address and MAC address:
l Virtual IP address is associated with virtual router MAC address
By default, a MAC address is created for a VRRP group after the VRRP group is created, and the virtual IP address is associated with the virtual MAC address. With such association adopted, the hosts in the internal network do not need to update the association between IP address and MAC address when the master changes.
l Virtual IP address is associated with real MAC address of the interface
If an IP address owner exists in a VRRP group and you associate the virtual IP address with the virtual MAC address, two MAC addresses are associated with an IP address. In this case, you can associate the virtual IP address of the VRRP group with the real MAC address, so that the packets from a host are forwarded to the IP address owner according the real MAC address.
Follow these steps to configure the association between MAC address and virtual IP address:
|
To do… |
Use the command… |
Remarks |
|
Enter system view |
system-view |
— |
|
Configure the association between virtual IP address and MAC address |
vrrp method { real-mac | virtual-mac } |
Optional The virtual MAC address is associated with the virtual IP address by default. |
![]()
You should configure this function before creating a VRRP group. Otherwise, you cannot modify the mapping between the virtual IP address and the MAC address.
Creating VRRP Group and Configuring Virtual IP Address
You need to configure a virtual IP address for a VRRP group when creating the VRRP group on an interface. If the interface connects to multiple sub-networks, you can configure multiple virtual IP addresses for the VRRP group to realize switch backup on different sub-networks.
A VRRP group is created automatically when you specify the first virtual IP address for the VRRP group. If you specify another virtual IP address for the VRRP group later, the virtual IP address is added to the virtual IP address list of the VRRP group.
![]()
It is not recommended to create VRRP groups on the VLAN interface of a super VLAN. Otherwise, network performance may be affected.
Configuration prerequisites
Before creating a VRRP group and configuring a virtual IP address on an interface, you should first configure an IP address for the interface and ensure that the virtual IP address to be configured is in the same network segment as the IP address of the interface.
Configuration procedure
Follow these steps to create VRRP group and configure virtual IP address:
|
To do… |
Use the command… |
Remarks |
|
Enter system view |
system-view |
— |
|
Enter the specified interface view |
interface interface-type interface-number |
— |
|
Create VRRP group and configure virtual IP address of the VRRP group |
vrrp vrid virtual-router-id virtual-ip virtual-address |
Required VRRP group is not created by default. |
![]()
l For the S7500E series, the maximum number of VRRP groups on a switch is 255; if the real MAC address of the interface is associated with the virtual IP address, the maximum number of VRRP groups on an interface is 16; if the virtual MAC address is associated with the virtual IP address, the maximum number of VRRP groups on an interface is 4.
l For the S7500E series, the maximum number of virtual IP addresses for a VRRP group is 16.
l A VRRP group is removed after you remove all the virtual IP addresses in it. In addition, configurations on that VRRP group no longer take effect.
l The virtual IP address of the virtual router can be either an unused IP address on the segment where the VRRP group resides or the IP address of an interface on a switch in the VRRP group. In the latter case, the switch is called the IP address owner.
l Removal of the VRRP group on the IP address owner will cause IP address collision. In such a case, it is recommended to modify the IP address of the interface on the IP address owner to resolve the collision.
l The virtual IP address of the VRRP group cannot be 0.0.0.0, 255.255.255.255, loopback addresses, non class A/B/C addresses or other illegal IP addresses such as 0.0.0.1.
l Only when the configured virtual IP address and the interface IP address belong to the same segment and are legal host addresses can the VRRP group operate normally. If the configured virtual IP address and the interface IP address do not belong to the same network segment, or the configured IP address is the network address or network broadcast address of the network segment that the interface IP address belongs to, the state of the VRRP group is always initialize though you can perform the configuration successfully, that is, VRRP does not take effect in this case.
Configuring Router Priority, Preemptive Mode and Tracking Function
Configuration prerequisites
Before you configure these features, you should first create a VRRP group on the interface and configure a virtual IP address for it.
Configuration procedure
By configuring switch priority, preemptive mode, interface tracking, or a Track object, you can decide which switch in the VRRP group serves as the Master.
Follow these steps to configure switch priority, preemptive mode and the Track object tracking function:
|
To do… |
Use the command… |
Remarks |
|
Enter system view |
system-view |
— |
|
Enter interface view |
interface interface-type interface-number |
— |
|
Configure switch priority in the VRRP group |
vrrp vrid virtual-router-id priority priority-value |
Optional 100 by default. |
|
Configure the switch in the VRRP group to work in preemptive mode and configure preemption delay |
vrrp vrid virtual-router-id preempt-mode [ timer delay delay-value ] |
Optional The switch in the VRRP group works in preemptive mode and the preemption delay is 0 seconds by default. If the switch in the VRRP group works in non preemptive mode, the preemption delay changes to zero seconds automatically. |
|
Configure the interface to be tracked |
vrrp vrid virtual-router-id track interface interface-type interface-number [ reduced priority-reduced ] |
Optional No interface is being tracked by default. |
|
Configure VRRP to track a specified Track object |
vrrp vrid virtual-router-id track track-entry-number [ reduced priority-reduced | switchover ] |
Optional Not configured by default. |
![]()
l The running priority of an IP address owner is always 255 and you do not need to configure it. An IP address owner always works in the preemptive mode.
l Do not configure VRRP tracking of an interface or an object on an IP address owner.
l If the state of the interface under tracking changes from down to up, the priority of the device corresponding to the interface is restored automatically.
l If the state of a Track object changes from negative to positive, the priority of the device corresponding to the Track object is restored automatically.
Configuring VRRP Packet Attributes
Configuration prerequisites
Before configuring the relevant attributes of VRRP packets, you should first create a VRRP group and configure a virtual IP address.
Configuration procedure
Follow these steps to configure VRRP packet attributes:
|
To do… |
Use the command… |
Remarks |
|
Enter system view |
system-view |
— |
|
Enter the specified interface view |
interface interface-type interface-number |
— |
|
Configure the authentication mode and authentication key when the VRRP groups send and receive VRRP packets |
vrrp vrid virtual-router-id authentication-mode { md5 | simple } key |
Optional Authentication is not performed by default |
|
Configure the time interval for the Master in the VRRP group to send VRRP advertisement |
vrrp vrid virtual-router-id timer advertise adver-interval |
Optional 1 second by default |
|
Disable TTL check on VRRP packets |
vrrp un-check ttl |
Optional Enabled by default You do not need to create a VRRP group before executing this command. |
![]()
l You may configure different authentication modes and authentication keys for the VRRP groups on an interface. However, the members of the same VRRP group must use the same authentication mode and authentication key.
l Excessive traffic or different timer setting on switches can cause the Backup timer to time out abnormally and trigger a change of the state. To solve this problem, you can prolong the time interval to send VRRP packets.
Enabling the Trap Function of VRRP
After the trap function is enabled for a VRRP module, the VRRP module will generate traps with severity level errors to report its key events. The generated traps will be sent to the information center of the device, where you can configure whether to output the trap information and the output destination. For information center configurations, refer to Information Center Configuration in the System Volume.
Follow these steps to enable the trap function of VRRP:
|
To do… |
Use the command… |
Remarks |
|
Enter system view |
system-view |
— |
|
Enable the trap function of VRRP |
snmp-agent trap enable vrrp [ authfailure | newmaster ] |
Optional Enabled by default. |
![]()
For detailed description on the snmp-agent trap enable vrrp command, refer to command snmp-agent trap enable in SNMP Commands in the System Volume.
Displaying and Maintaining VRRP for IPv4
|
To do… |
Use the command… |
Remarks |
|
Display VRRP status |
display vrrp [ verbose ] [ interface interface-type interface-number [ vrid virtual-router-id ] ] |
Available in any view |
|
Display VRRP statistics |
display vrrp statistics [ interface interface-type interface-number [ vrid virtual-router-id ] ] |
Available in any view |
|
Remove VRRP statistics |
reset vrrp statistics [ interface interface-type interface-number [ vrid virtual-router-id ] ] |
Available in user view |
Configuring VRRP for IPv6
VRRP for IPv6 Configuration Task List
Complete these tasks to configure VRRP for IPv6:
|
Task |
Remarks |
|
Configuring a VRRP Group to Respond to Ping Packets Destined for the Virtual IPv6 Address |
Optional |
|
Configuring the Association Between Virtual IPv6 Address and MAC Address |
Optional |
|
Required |
|
|
Configuring Router Priority, Preemptive Mode and Interface Tracking |
Optional |
|
Optional |
Configuring a VRRP Group to Respond to Ping Packets Destined for the Virtual IPv6 Address
You can configure that the master of a VRRP group responds to the received ICMPv6 echo requests, that is, the virtual IPv6 address of the VRRP group can be successfully pinged.
Follow these steps to configure a VRRP group to respond to ping packets destined for its virtual IPv6 address:
|
To do... |
Use the command... |
Remarks |
|
Enter system view |
system-view |
— |
|
Configure a VRRP group to respond to ping packets destined for its virtual IPv6 address |
vrrp ipv6 ping-enable |
Optional By default, a VRRP group responds to ping packets destined for its virtual IPv6 address. |
![]()
You should configure this function before creating a VRRP group. Otherwise, your configuration will fail.
Configuring the Association Between Virtual IPv6 Address and MAC Address
After the virtual IPv6 address of a VRRP group is associated with the MAC address, the master takes the configured MAC address as the source MAC address of the packets to be sent, so that the hosts in the internal network can learn the association between the IPv6 address and the MAC address and thus forward the packets to be forwarded to the other network segments to the master.
There are two types of association between virtual IPv6 address and MAC address:
l Virtual IPv6 address is associated with virtual router MAC address
By default, a MAC address is created for a VRRP group after the VRRP group is created, and the virtual IPv6 address is associated with the virtual MAC address. With such association adopted, the hosts in the internal network do not need to update the association between IPv6 address and MAC address when the master changes.
l Virtual IPv6 address is associated with real MAC address of the interface
If an IP address owner exists in a VRRP group and you associate the virtual IPv6 address with the virtual MAC address, two MAC addresses are associated with an IPv6 address. In this case, you can associate the virtual IPv6 address of the VRRP group with the real MAC address, so that the packets from a host is forwarded to the IP address owner according the real MAC address.
Follow these steps to configure the association between MAC address and virtual IPv6 address:
|
To do… |
Use the command… |
Remarks |
|
Enter system view |
system-view |
— |
|
Configure the association between virtual IPv6 address and MAC address |
vrrp ipv6 method { real-mac | virtual-mac } |
Optional The virtual MAC address of the VRRP group is associated with the virtual IPv6 address by default. |
![]()
You should configure this function before creating a VRRP group. Otherwise, you cannot modify the mapping between the virtual IPv6 address and the MAC address.
Creating VRRP Group and Configuring Virtual IPv6 Address
You need to configure a virtual IPv6 address for a VRRP group when creating the VRRP group. You can configure multiple virtual IPv6 addresses for a VRRP group.
A VRRP group is created automatically when you specify the first virtual IPv6 address for the VRRP group. If you specify another virtual IPv6 address for the VRRP group later, the virtual IPv6 address is added to the virtual IPv6 address list of the VRRP group.
![]()
It is not recommended to create VRRP groups on the VLAN interface of a super VLAN. Otherwise, network performance may be affected.
Configuration prerequisites
Before creating a VRRP group and configuring a virtual IPv6 address, you should first configure an IPv6 address of the interface and ensure that the virtual IPv6 address to be configured is in the same network segment as the IPv6 address of the interface.
Configuration procedure
Follow these steps to create VRRP group and configure its virtual IPv6 address:
|
To do… |
Use the command… |
Remarks |
|
Enter system view |
system-view |
— |
|
Enter the specified interface view |
interface interface-type interface-number |
— |
|
Create a VRRP group and configure its virtual IPv6 address |
vrrp ipv6 vrid virtual-router-id virtual-ip virtual-address [ link-local ] |
Required No VRRP group is created by default. The first virtual IPv6 address of the VRRP group must be a link local address. Only one link local address is allowed in a VRRP group, and must be removed the last. |
![]()
l For the S7500E series, the maximum number of IPv6 VRRP groups on a switch is 128; if the real MAC address of a interface is associated with the virtual IPv6 address, the maximum number of VRRP groups on an interface is 16; if the virtual MAC address is associated with the virtual IPv6 address, the maximum number of VRRP groups on an interface is 4.
l For the S7500E series, the maximum number of virtual IP addresses for a VRRP group is 16.
l A VRRP group is removed after you remove all the virtual IPv6 addresses in it. In addition, configurations on that VRRP group no longer take effect.
l Removal of the VRRP group on the IP address owner will cause IP address collision. In such a case, it is recommended to modify the IPv6 address of the interface on the IP address owner to resolve the collision.
Configuring Router Priority, Preemptive Mode and Interface Tracking
Configuration prerequisites
Before configuring these features, you should first create a VRRP group and configure a virtual IPv6 address.
Configuration procedure
By configuring switch priority, preemptive mode and interface tracking, you can decide which switch in the VRRP group serves as the Master.
Follow these steps to configure switch priority, preemptive mode and interface tracking:
|
To do… |
Use the command… |
Remarks |
|
Enter system view |
system-view |
— |
|
Enter the specified interface view |
interface interface-type interface-number |
— |
|
Configure the priority of the switch in the VRRP group |
vrrp ipv6 vrid virtual-router-id priority priority-value |
Optional 100 by default |
|
Configure the switch in the VRRP group to work in preemptive mode and configure preemption delay of the VRRP group |
vrrp ipv6 vrid virtual-router-id preempt-mode [ timer delay delay-value ] |
Optional The switch in the VRRP group works in preemptive mode and the preemption delay is zero seconds by default. |
|
Configure the interface to be tracked |
vrrp ipv6 vrid virtual-router-id track interface interface-type interface-number [ reduced priority-reduced ] |
Optional No interface is being tracked by default. |
![]()
l The running priority of an IP address owner is always 255 and you do not need to configure it. An IP address owner always works in the preemptive mode.
l Interface tracking is not configurable on an IP address owner.
l If the state of the interface under tracking changes from down to up, the priority of the device corresponding to the interface is restored automatically.
Configuring VRRP Packet Attributes
Configuration prerequisites
Before configuring the relevant attributes of VRRP packets, you should first create a VRRP group and configure a virtual IPv6 address.
Configuration procedure
Follow these steps to configure VRRP packet attributes:
|
To do… |
Use the command… |
Remarks |
|
Enter system view |
system-view |
— |
|
Enter the specified interface view |
interface interface-type interface-number |
— |
|
Configure the authentication mode and authentication key when the VRRP groups send or receive VRRP packets |
vrrp ipv6 vrid virtual-router-id authentication-mode simple key |
Optional Authentication is not performed by default |
|
Configure the time interval for the Master in the VRRP group to send VRRP advertisement |
vrrp ipv6 vrid virtual-router-id timer advertise adver-interval |
Optional 100 centiseconds by default |
You may configure different authentication modes and authentication keys for the VRRP groups on an interface. However, the members of the same VRRP group must use the same authentication mode and authentication key.
Excessive traffic or different timer setting on switches can cause the Backup timer to time out abnormally and change the state. To solve this problem, you can prolong the time interval to send VRRP packets.
Displaying and Maintaining VRRP for IPv6
|
To do… |
Use the command… |
Remarks |
|
Display VRRP status |
display vrrp ipv6 [ verbose ] [ interface interface-type interface-number [ vrid virtual-router-id ] ] |
Available in any view |
|
Display VRRP statistics |
display vrrp ipv6 statistics [ interface interface-type interface-number [ vrid virtual-router-id ] ] |
Available in any view |
|
Remove VRRP statistics |
reset vrrp ipv6 statistics [ interface interface-type interface-number [ vrid virtual-router-id ] ] |
Available in user view |
IPv4-Based VRRP Configuration Examples
This section provides these configuration examples:
l Single VRRP Group Configuration Example
l VRRP Interface Tracking Configuration Example
l Multiple VRRP Group Configuration Example
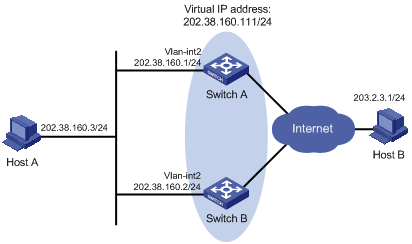
Single VRRP Group Configuration Example
Network requirements
l Host A needs to access Host B on the Internet, using 202.38.160.111/24 as its default gateway.
l Switch A and Switch B belong to VRRP group 1 with the virtual IP address of 202.38.160.111/24.
l If Switch A operates normally, packets sent from Host A to Host B are forwarded by Switch A; if Switch A fails, packets sent from Host A to Host B are forwarded by Switch B.
Network diagram
Figure 1-7 Network diagram for single VRRP group configuration
Configuration procedure
1) Configure Switch A
# Configure VLAN 2.
<SwitchA> system-view
[SwitchA] vlan 2
[SwitchA-vlan2] port gigabitethernet 2/0/5
[SwitchA-vlan2] quit
[SwitchA] interface vlan-interface 2
[SwitchA-Vlan-interface2] ip address 202.38.160.1 255.255.255.0
# Create VRRP group 1 and set its virtual IP address to be 202.38.160.111.
[SwitchA-Vlan-interface2] vrrp vrid 1 virtual-ip 202.38.160.111
# Set the priority of Switch A in VRRP group 1 to 110.
[SwitchA-Vlan-interface2] vrrp vrid 1 priority 110
# Set Switch A to work in preemptive mode. The preemption delay is five seconds.
[SwitchA-Vlan-interface2] vrrp vrid 1 preempt-mode timer delay 5
2) Configure Switch B
# Configure VLAN 2.
<SwitchB> system-view
[SwitchB] vlan 2
[SwitchB-Vlan2] port gigabitethernet 2/0/5
[SwitchB-vlan2] quit
[SwitchB] interface vlan-interface 2
[SwitchB-Vlan-interface2] ip address 202.38.160.2 255.255.255.0
# Create VRRP group 1 and set its virtual IP address to be 202.38.160.111.
[SwitchB-Vlan-interface2] vrrp vrid 1 virtual-ip 202.38.160.111
# Set Switch B to work in preemptive mode. The preemption delay is five seconds.
[SwitchB-Vlan-interface2] vrrp vrid 1 preempt-mode timer delay 5
3) Verify the configuration
After the configuration, Host B can be pinged through on Host A. You can use the display vrrp verbose command to verify the configuration.
# Display detailed information of VRRP group 1 on Switch A.
[SwitchA-Vlan-interface2] display vrrp verbose
IPv4 Standby Information:
Run Method : VIRTUAL-MAC
Total number of virtual routers: 1
Interface : Vlan-interface2
VRID : 1 Adver. Timer : 1
Admin Status : UP State : Master
Config Pri : 110 Run Pri : 110
Preempt Mode : YES Delay Time : 5
Auth Type : NONE
Virtual IP : 202.38.160.111
Virtual MAC : 0000-5e00-0101
Master IP : 202.38.160.1
# Display detailed information of VRRP group 1 on Switch B.
[SwitchB-Vlan-interface2] display vrrp verbose
IPv4 Standby Information:
Run Method : VIRTUAL-MAC
Total number of virtual routers: 1
Interface : Vlan-interface2
VRID : 1 Adver. Timer : 1
Admin Status : UP State : Backup
Config Pri : 100 Run Pri : 100
Preempt Mode : YES Delay Time : 5
Auth Type : NONE
Virtual IP : 202.38.160.111
Master IP : 202.38.160.1
The above information indicates that in VRRP group 1 Switch A is the master, Switch B is the backup and packets sent from Host A to Host B are forwarded by Switch A.
If Switch A fails, you can still ping through Host B on Host A. Use the display vrrp verbose command to view the detailed information of the VRRP group on Switch B.
# If Switch A fails, the detailed information of VRRP group 1 on Switch B is displayed.
[SwitchB-Vlan-interface2] display vrrp verbose
IPv4 Standby Information:
Run Method : VIRTUAL-MAC
Total number of virtual routers: 1
Interface : Vlan-interface2
VRID : 1 Adver. Timer : 1
Admin Status : UP State : Master
Config Pri : 100 Run Pri : 100
Preempt Mode : YES Delay Time : 5
Auth Type : NONE
Virtual IP : 202.38.160.111
Virtual MAC : 0000-5e00-0101
Master IP : 202.38.160.2
The above information indicates that if Switch A fails, Switch B becomes the master, and packets sent from Host A to Host B are forwarded by Switch B.
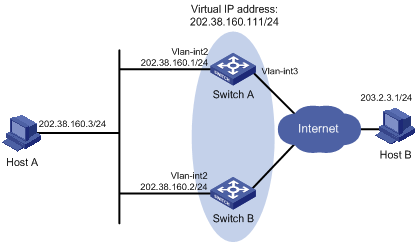
VRRP Interface Tracking Configuration Example
Network requirements
l Host A needs to access Host B on the Internet, using 202.38.160.111/24 as its default gateway.
l Switch A and Switch B belong to VRRP group 1 with the virtual IP address of 202.38.160.111/24.
l If Switch A operates normally, packets sent from Host A to Host B are forwarded by Switch A; if VLAN-interface 3 through which Switch A connects to the Internet is not available, packets sent from Host A to Host B are forwarded by Switch B.
Network diagram
Figure 1-8 Network diagram for VRRP interface tracking
Configuration procedure
1) Configure Switch A
# Configure VLAN 2.
<SwitchA> system-view
[SwitchA] vlan 2
[SwitchA-vlan2] port gigabitethernet 2/0/5
[SwitchA-vlan2] quit
[SwitchA] interface vlan-interface 2
[SwitchA-Vlan-interface2] ip address 202.38.160.1 255.255.255.0
# Create a VRRP group 1 and set its virtual IP address to 202.38.160.111.
[SwitchA-Vlan-interface2] vrrp vrid 1 virtual-ip 202.38.160.111
# Configure the priority of Switch A in the VRRP group to 110.
[SwitchA-Vlan-interface2] vrrp vrid 1 priority 110
# Configure the authentication mode of the VRRP group as simple and authentication key as hello.
[SwitchA-Vlan-interface2] vrrp vrid 1 authentication-mode simple hello
# Set the interval for Master to send VRRP advertisement to five seconds.
[SwitchA-Vlan-interface2] vrrp vrid 1 timer advertise 5
# Set the interface to be tracked.
[SwitchA-Vlan-interface2] vrrp vrid 1 track interface vlan-interface 3 reduced 30
2) Configure Switch B
# Configure VLAN 2.
<SwitchB> system-view
[SwitchB] vlan 2
[SwitchB-vlan2] port gigabitethernet 2/0/5
[SwitchB-vlan2] quit
[SwitchB] interface vlan-interface 2
[SwitchB-Vlan-interface2] ip address 202.38.160.2 255.255.255.0
# Create a VRRP group 1 and set its virtual IP address to 202.38.160.111.
[SwitchB-Vlan-interface2] vrrp vrid 1 virtual-ip 202.38.160.111
# Configure the authentication mode of the VRRP group as simple and authentication key as hello.
[SwitchB-Vlan-interface2] vrrp vrid 1 authentication-mode simple hello
# Set the interval for Master to send VRRP advertisement to five seconds.
[SwitchB-Vlan-interface2] vrrp vrid 1 timer advertise 5
3) Verify the configuration
After the configuration, Host B can be pinged successfully on Host A. You can use the display vrrp verbose command to verify the configuration.
# Display detailed information of VRRP group 1 on Switch A.
[SwitchA-Vlan-interface2] display vrrp verbose
IPv4 Standby Information:
Run Method : VIRTUAL-MAC
Total number of virtual routers: 1
Interface : Vlan-interface2
VRID : 1 Adver. Timer : 5
Admin Status : UP State : Master
Config Pri : 110 Run Pri : 110
Preempt Mode : YES Delay Time : 0
Auth Type : SIMPLE TEXT Key : hello
Track IF : Vlan3 Pri Reduced : 30
Virtual IP : 202.38.160.111
Virtual MAC : 0000-5e00-0101
Master IP : 202.38.160.1
# Display detailed information of VRRP group 1 on Switch B.
[SwitchB-Vlan-interface2] display vrrp verbose
IPv4 Standby Information:
Run Method : VIRTUAL-MAC
Total number of virtual routers: 1
Interface : Vlan-interface2
VRID : 1 Adver. Timer : 5
Admin Status : UP State : Backup
Config Pri : 100 Run Pri : 100
Preempt Mode : YES Delay Time : 0
Auth Type : SIMPLE TEXT Key : hello
Virtual IP : 202.38.160.111
Master IP : 202.38.160.1
The above information indicates that in VRRP group 1 Switch A is the master, Switch B is the backup and packets sent from Host A to Host B are forwarded by Switch A.
If interface VLAN-interface 3 through which Switch A connects to the Internet is not available, you can still ping Host B successfully on Host A. Use the display vrrp verbose command to view the detailed information of the VRRP group.
# If VLAN-interface 3 on Switch A is not available, the detailed information of VRRP group 1 on Switch A is displayed.
[SwitchA-Vlan-interface2] display vrrp verbose
IPv4 Standby Information:
Run Method : VIRTUAL-MAC
Total number of virtual routers: 1
Interface : Vlan-interface2
VRID : 1 Adver. Timer : 5
Admin Status : UP State : Backup
Config Pri : 110 Run Pri : 80
Preempt Mode : YES Delay Time : 0
Auth Type : SIMPLE TEXT Key : hello
Track IF : Vlan3 Pri Reduced : 30
Virtual IP : 202.38.160.111
Master IP : 202.38.160.2
# If VLAN-interface 3 on Switch A is not available, the detailed information of VRRP group 1 on Switch B is displayed.
[SwitchB-Vlan-interface2] display vrrp verbose
IPv4 Standby Information:
Run Method : VIRTUAL-MAC
Total number of virtual routers: 1
Interface : Vlan-interface2
VRID : 1 Adver. Timer : 5
Admin Status : UP State : Master
Config Pri : 100 Run Pri : 100
Preempt Mode : YES Delay Time : 0
Auth Type : SIMPLE TEXT Key : hello
Virtual IP : 202.38.160.111
Virtual MAC : 0000-5e00-0101
Master IP : 202.38.160.2
The above information indicates that if VLAN-interface 3 on Switch A is not available, the priority of Switch A is reduced to 80 and it becomes the backup. Switch B becomes the master and packets sent from Host A to Host B are forwarded by Switch B.
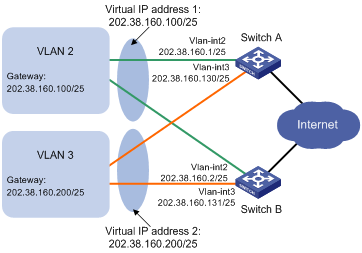
Multiple VRRP Group Configuration Example
Network requirements
l Hosts in VLAN 2 use 202.38.160.100/25 as their default gateway and hosts in VLAN 3 use 202.38.160.200/25 as their default gateway.
l Switch A and Switch B belong to both VRRP group 1 and VRRP group 2. The virtual IP address of VRRP group 1 is 202.38.160.100/25, and that of VRRP group 2 is 202.38.160.200/25.
l In VRRP group 1, Switch A has a higher priority than Switch B. In VRRP group 2, Switch B has a higher priority than Switch A. In this case, hosts in VLAN 2 and VLAN 3 can communicate with the outside through Switch A and Switch B respectively, and if Switch A or Switch B fails, the hosts can use the other switch to communicate with the outside, so as to avoid communication interruption.
Network diagram
Figure 1-9 Network diagram for multiple VRRP group configuration
Configuration procedure
1) Configure Switch A
# Configure VLAN 2.
<SwitchA> system-view
[SwitchA] vlan 2
[SwitchA-vlan2] port gigabitethernet 2/0/5
[SwitchA-vlan2] quit
[SwitchA] interface vlan-interface 2
[SwitchA-Vlan-interface2] ip address 202.38.160.1 255.255.255.128
# Create a VRRP group 1 and set its virtual IP address to 202.38.160.100.
[SwitchA-Vlan-interface2] vrrp vrid 1 virtual-ip 202.38.160.100
# Configure the priority of Switch A in VRRP group 1 as 110.
[SwitchA-Vlan-interface2] vrrp vrid 1 priority 110
[SwitchA-Vlan-interface2] quit
# Configure VLAN 3.
[SwitchA] vlan 3
[SwitchA-vlan3] port gigabitethernet 2/0/6
[SwitchA-vlan3] quit
[SwitchA] interface vlan-interface 3
[SwitchA-Vlan-interface3] ip address 202.38.160.130 255.255.255.128
# Create a VRRP group 2 and set its virtual IP address to 202.38.160.200.
[SwitchA-Vlan-interface3] vrrp vrid 2 virtual-ip 202.38.160.200
2) Configure Switch B
# Configure VLAN 2.
<SwitchB> system-view
[SwitchB] vlan 2
[SwitchB-vlan2] port gigabitethernet 2/0/5
[SwitchB-vlan2] quit
[SwitchB] interface vlan-interface 2
[SwitchB-Vlan-interface2] ip address 202.38.160.2 255.255.255.128
# Create a VRRP group 1 and set its virtual IP address to 202.38.160.100.
[SwitchB-Vlan-interface2] vrrp vrid 1 virtual-ip 202.38.160.100
[SwitchB-Vlan-interface2] quit
# Configure VLAN 3.
[SwitchB] vlan 3
[SwitchB-vlan3] port gigabitethernet 2/0/6
[SwitchB-vlan3] quit
[SwitchB] interface vlan-interface 3
[SwitchB-Vlan-interface3] ip address 202.38.160.131 255.255.255.128
# Create a VRRP group 2 and set its virtual IP address to 202.38.160.200.
[SwitchB-Vlan-interface3] vrrp vrid 2 virtual-ip 202.38.160.200
# Configure the priority of Switch B in VRRP group 2 to 110.
[SwitchB-Vlan-interface3] vrrp vrid 2 priority 110
3) Verify the configuration
You can use the display vrrp verbose command to verify the configuration.
# Display detailed information of the VRRP group on Switch A.
[SwitchA-Vlan-interface3] display vrrp verbose
IPv4 Standby Information:
Run Method : VIRTUAL-MAC
Total number of virtual routers: 2
Interface : Vlan-interface2
VRID : 1 Adver. Timer : 1
Admin Status : UP State : Master
Config Pri : 110 Run Pri : 110
Preempt Mode : YES Delay Time : 0
Auth Type : NONE
Virtual IP : 202.38.160.100
Virtual MAC : 0000-5e00-0101
Master IP : 202.38.160.1
Interface : Vlan-interface3
VRID : 2 Adver. Timer : 1
Admin Status : UP State : Backup
Config Pri : 100 Run Pri : 100
Preempt Mode : YES Delay Time : 0
Auth Type : NONE
Virtual IP : 202.38.160.200
Master IP : 202.38.160.131
# Display detailed information of the VRRP group on Switch B.
[SwitchB-Vlan-interface3] display vrrp verbose
IPv4 Standby Information:
Run Method : VIRTUAL-MAC
Total number of virtual routers: 2
Interface : Vlan-interface2
VRID : 1 Adver. Timer : 1
Admin Status : UP State : Backup
Config Pri : 100 Run Pri : 100
Preempt Mode : YES Delay Time : 0
Auth Type : NONE
Virtual IP : 202.38.160.100
Master IP : 202.38.160.1
Interface : Vlan-interface3
VRID : 2 Adver. Timer : 1
Admin Status : UP State : Master
Config Pri : 110 Run Pri : 110
Preempt Mode : YES Delay Time : 0
Auth Type : NONE
Virtual IP : 202.38.160.200
Virtual MAC : 0000-5e00-0102
Master IP : 202.38.160.131
The above information indicates that in VRRP group 1 Switch A is the master, Switch B is the backup and hosts with the default gateway of 202.38.160.100/25 accesses the Internet through Switch A; in VRRP group 2 Switch A is the backup, Switch B is the master and hosts with the default gateway of 202.38.160.200/25 accesses the Internet through Switch B.
IPv6-Based VRRP Configuration Examples
This section provides these configuration examples:
l Single VRRP Group Configuration Example
l VRRP Interface Tracking Configuration Example
l Multiple VRRP Group Configuration Example
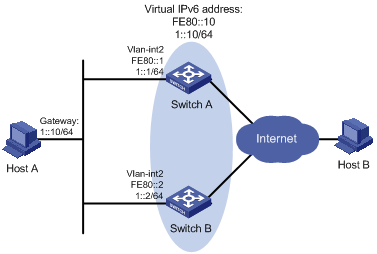
Single VRRP Group Configuration Example
Network requirements
l Host A needs to access Host B on the Internet, using 1::10/64 as its default gateway.
l Switch A and Switch B belong to VRRP group 1 with the virtual IP address of 1::10/64 and FE80::10.
l If Switch A operates normally, packets sent from Host A to Host B are forwarded by Switch A; if Switch A fails, packets sent from Host A to Host B are forwarded by Switch B.
Network diagram
Figure 1-10 Network diagram for single VRRP group configuration
Configuration procedure
1) Configure Switch A
# Configure VLAN 2.
<SwitchA> system-view
[SwitchA] ipv6
[SwitchA] vlan 2
[SwitchA-vlan2] port gigabitethernet 2/0/5
[SwitchA-vlan2] quit
[SwitchA] interface vlan-interface 2
[SwitchA-Vlan-interface2] ipv6 address fe80::1 link-local
[SwitchA-Vlan-interface2] ipv6 address 1::1 64
# Create a VRRP group 1 and set its virtual IPv6 address to FE80::10 and 1::10.
[SwitchA-Vlan-interface2] vrrp ipv6 vrid 1 virtual-ip fe80::10 link-local
[SwitchA-Vlan-interface2] vrrp ipv6 vrid 1 virtual-ip 1::10
# Set the priority of Switch A in VRRP group 1 to 110.
[SwitchA-Vlan-interface2] vrrp ipv6 vrid 1 priority 110
# Set Switch A to work in preemptive mode, with the preemption delay set to 5 seconds.
[SwitchA-Vlan-interface2] vrrp ipv6 vrid 1 preempt-mode timer delay 5
# Enable Switch A to send RA messages.
[SwitchA-Vlan-interface2] undo ipv6 nd ra halt
2) Configure Switch B
# Configure VLAN 2.
<SwitchB> system-view
[SwitchB] ipv6
[SwitchB] vlan 2
[SwitchB-vlan2] port gigabitethernet 2/0/5
[SwitchB-vlan2] quit
[SwitchB] interface vlan-interface 2
[SwitchB-Vlan-interface2] ipv6 address fe80::2 link-local
[SwitchB-Vlan-interface2] ipv6 address 1::2 64
# Create a VRRP group 1 and set its virtual IPv6 address to FE80::10 and 1::10.
[SwitchB-Vlan-interface2] vrrp ipv6 vrid 1 virtual-ip fe80::10 link-local
[SwitchB-Vlan-interface2] vrrp ipv6 vrid 1 virtual-ip 1::10
# Configure Switch B to work in the preemptive mode, with the preemption delay set to 5 seconds.
[SwitchB-Vlan-interface2] vrrp ipv6 vrid 1 preempt-mode timer delay 5
# Enable Switch B to send RA messages.
[SwitchB-Vlan-interface2] undo ipv6 nd ra halt
3) Verify the configuration
After the configuration, Host B can be pinged through on Host A. You can use the display vrrp ipv6 verbose command to verify the configuration.
# Display detailed information of VRRP group 1 on Switch A.
[SwitchA-Vlan-interface2] display vrrp ipv6 verbose
IPv6 Standby Information:
Run Method : VIRTUAL-MAC
Total number of virtual routers: 1
Interface : Vlan-interface2
VRID : 1 Adver. Timer : 100
Admin Status : UP State : Master
Config Pri : 110 Run Pri : 110
Preempt Mode : YES Delay Time : 5
Auth Type : NONE
Virtual IP : FE80::10
1::10
Virtual MAC : 0000-5e00-0201
Master IP : FE80::1
# Display detailed information of VRRP group 1 on Switch B.
[SwitchB-Vlan-interface2] display vrrp ipv6 verbose
IPv6 Standby Information:
Run Method : VIRTUAL-MAC
Total number of virtual routers: 1
Interface : Vlan-interface2
VRID : 1 Adver. Timer : 100
Admin Status : UP State : Backup
Config Pri : 100 Run Pri : 100
Preempt Mode : YES Delay Time : 5
Auth Type : NONE
Virtual IP : FE80::10
1::10
Master IP : FE80::1
The above information indicates that in VRRP group 1 Switch A is the master, Switch B is the backup and packets sent from Host A to Host B are forwarded by Switch A.
If Switch A fails, you can still ping through Host B on Host A. You can use the display vrrp ipv6 verbose command to view the detailed information of the VRRP group on Switch B.
# If Switch A fails, the detailed information of VRRP group 1 on Switch B is displayed.
[SwitchB-Vlan-interface2] display vrrp ipv6 verbose
IPv6 Standby Information:
Run Method : VIRTUAL-MAC
Total number of virtual routers: 1
Interface : Vlan-interface2
VRID : 1 Adver. Timer : 100
Admin Status : UP State : Master
Config Pri : 100 Run Pri : 100
Preempt Mode : YES Delay Time : 5
Auth Type : NONE
Virtual IP : FE80::10
1::10
Virtual MAC : 0000-5e00-0201
Master IP : FE80::2
The above information indicates that if Switch A fails, Switch B becomes the master, and packets sent from Host A to Host B are forwarded by Switch B.
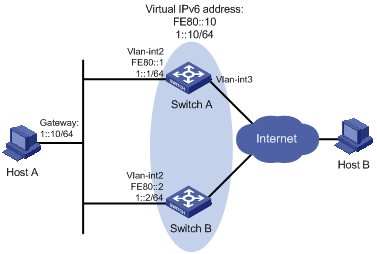
VRRP Interface Tracking Configuration Example
Network requirements
l Host A needs to access Host B on the Internet, using 1::10/64 as its default gateway.
l Switch A and Switch B belong to VRRP group 1 with the virtual IP address of 1::10/64 and FE80::10.
l If Switch A operates normally, packets sent from Host A to Host B are forwarded by Switch A; if VLAN-interface 3 through which Switch A connects to the Internet is not available, packets sent from Host A to Host B are forwarded by Switch B.
Network diagram
Figure 1-11 Network diagram for VRRP interface tracking
Configuration procedure
1) Configure Switch A
# Configure VLAN 2.
<SwitchA> system-view
[SwitchA] ipv6
[SwitchA] vlan 2
[SwitchA-vlan2] port gigabitethernet 2/0/5
[SwitchA-vlan2] quit
[SwitchA] interface vlan-interface 2
[SwitchA-Vlan-interface2] ipv6 address fe80::1 link-local
[SwitchA-Vlan-interface2] ipv6 address 1::1 64
# Create a VRRP group 1 and set its virtual IPv6 address to FE80::10 and 1::10.
[SwitchA-Vlan-interface2] vrrp ipv6 vrid 1 virtual-ip fe80::10 link-local
[SwitchA-Vlan-interface2] vrrp ipv6 vrid 1 virtual-ip 1::10
# Set the priority of Switch A in VRRP group 1 to 110.
[SwitchA-Vlan-interface2] vrrp ipv6 vrid 1 priority 110
# Set the authentication mode for VRRP group 1 to simple and authentication key to hello.
[SwitchA-Vlan-interface2] vrrp ipv6 vrid 1 authentication-mode simple hello
# Set the VRRP advertisement interval to 500 centiseconds.
[SwitchA-Vlan-interface2] vrrp ipv6 vrid 1 timer advertise 500
# Set Switch A work in preemptive mode. The preemption delay is five seconds.
[SwitchA-Vlan-interface2] vrrp ipv6 vrid 1 preempt-mode timer delay 5
# Set the interface to be tracked.
[SwitchA-Vlan-interface2] vrrp ipv6 vrid 1 track interface vlan-interface 3 reduced 30
2) Configure Switch B
# Configure VLAN 2.
<SwitchB> system-view
[SwitchB] ipv6
[SwitchB] vlan 2
[SwitchB-vlan2] port gigabitethernet 2/0/5
[SwitchB-vlan2] quit
[SwitchB] interface vlan-interface 2
[SwitchB-Vlan-interface2] ipv6 address fe80::2 link-local
[SwitchB-Vlan-interface2] ipv6 address 1::2 64
# Create a VRRP group 1 and set its virtual IPv6 address to FE80::10 and 1::10.
[SwitchB-Vlan-interface2] vrrp ipv6 vrid 1 virtual-ip fe80::10 link-local
[SwitchB-Vlan-interface2] vrrp ipv6 vrid 1 virtual-ip 1::10
# Set the authentication mode for VRRP group 1 to simple and authentication key to hello.
[SwitchB-Vlan-interface2] vrrp ipv6 vrid 1 authentication-mode simple hello
# Set the VRRP advertisement interval to 500 centiseconds.
[SwitchB-Vlan-interface2] vrrp ipv6 vrid 1 timer advertise 500
# Set Switch B to work in preemptive mode. The preemption delay is five seconds.
[SwitchB-Vlan-interface2] vrrp ipv6 vrid 1 preempt-mode timer delay 5
3) Verify the configuration
After the configuration, Host B can be pinged through on Host A. You can use the display vrrp ipv6 verbose command to verify the configuration.
# Display detailed information of VRRP group 1 on Switch A.
[SwitchA-Vlan-interface2] display vrrp ipv6 verbose
IPv6 Standby Information:
Run Method : VIRTUAL-MAC
Total number of virtual routers: 1
Interface : Vlan-interface2
VRID : 1 Adver. Timer : 500
Admin Status : UP State : Master
Config Pri : 110 Run Pri : 110
Preempt Mode : YES Delay Time : 5
Auth Type : SIMPLE TEXT Key : hello
Track IF : Vlan3 Pri Reduced : 30
Virtual IP : FE80::10
1::10
Virtual MAC : 0000-5e00-0201
Master IP : FE80::1
# Display detailed information of VRRP group 1 on Switch B.
[SwitchB-Vlan-interface2] display vrrp ipv6 verbose
IPv6 Standby Information:
Run Method : VIRTUAL-MAC
Total number of virtual routers: 1
Interface : Vlan-interface2
VRID : 1 Adver. Timer : 500
Admin Status : UP State : Backup
Config Pri : 100 Run Pri : 100
Preempt Mode : YES Delay Time : 5
Auth Type : SIMPLE TEXT Key : hello
Virtual IP : FE80::10
1::10
Master IP : FE80::1
The above information indicates that in VRRP group 1 Switch A is the master, Switch B is the backup and packets sent from Host A to Host B are forwarded by Switch A.
If interface VLAN-interface 3 on Switch A is not available, you can still ping Host B successfully on Host A. You can use the display vrrp ipv6 verbose command to view the detailed information of the VRRP group.
# If interface VLAN-interface 3 on Switch A is not available, the detailed information of VRRP group 1 on Switch A is displayed.
[SwitchA-Vlan-interface2] display vrrp ipv6 verbose
IPv6 Standby Information:
Run Method : VIRTUAL-MAC
Total number of virtual routers: 1
Interface : Vlan-interface2
VRID : 1 Adver. Timer : 500
Admin Status : UP State : Backup
Config Pri : 110 Run Pri : 80
Preempt Mode : YES Delay Time : 5
Auth Type : SIMPLE TEXT Key : hello
Track IF : Vlan3 Pri Reduced : 30
Virtual IP : FE80::10
1::10
Master IP : FE80::2
# If interface VLAN-interface 3 on Switch A is not available, the detailed information of VRRP group 1 on Switch B is displayed.
[SwitchB-Vlan-interface2] display vrrp ipv6 verbose
IPv6 Standby Information:
Run Method : VIRTUAL-MAC
Total number of virtual routers: 1
Interface : Vlan-interface2
VRID : 1 Adver. Timer : 500
Admin Status : UP State : Master
Config Pri : 100 Run Pri : 100
Preempt Mode : YES Delay Time : 5
Auth Type : SIMPLE TEXT Key : hello
Virtual IP : FE80::10
1::10
Virtual MAC : 0000-5e00-0201
Master IP : FE80::2
The above information indicates that if VLAN-interface 3 on Switch A is not available, the priority of Switch A is reduced to 80 and Switch A becomes the backup. Switch B becomes the master and packets sent from Host A to Host B are forwarded by Switch B.
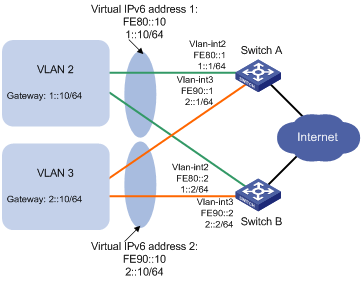
Multiple VRRP Group Configuration Example
Network requirements
l Hosts in VLAN 2 use 1::10/64 as their default gateway and hosts in VLAN 3 use 2::10/64 as their default gateway.
l Switch A and Switch B belong to both VRRP group 1 and VRRP group 2. The virtual IPv6 address of VRRP group 1 is 1::10/64 and FE80::10, and that of VRRP group 2 is 2::10/64 and FE90::10.
l In VRRP group 1, Switch A has a higher priority than Switch B. In VRRP group 2, Switch B has a higher priority than Switch A. In this case, hosts in VLAN 1 and VLAN can communicate with the outside through Switch A and Switch B respectively, and if Switch A or Switch B fails, the hosts can use the other switch to communicate with the outside, so as to avoid communication interruption.
Network diagram
Figure 1-12 Network diagram for multiple VRRP group configuration
Configuration procedure
1) Configure Switch A
# Configure VLAN 2.
<SwitchA> system-view
[SwitchA] ipv6
[SwitchA] vlan 2
[SwitchA-vlan2] port gigabitethernet 2/0/5
[SwitchA-vlan2] quit
[SwitchA] interface vlan-interface 2
[SwitchA-Vlan-interface2] ipv6 address fe80::1 link-local
[SwitchA-Vlan-interface2] ipv6 address 1::1 64
# Create VRRP group 1 and set its virtual IPv6 address to FE80::10 and 1::10.
[SwitchA-Vlan-interface2] vrrp ipv6 vrid 1 virtual-ip fe80::10 link-local
[SwitchA-Vlan-interface2] vrrp ipv6 vrid 1 virtual-ip 1::10
# Set the priority of Switch A in VRRP group 1 to 110.
[SwitchA-Vlan-interface2] vrrp ipv6 vrid 1 priority 110
[SwitchA-Vlan-interface2] quit
# Configure VLAN 3.
[SwitchA] vlan 3
[SwitchA-vlan3] port gigabitethernet 2/0/6
[SwitchA-vlan3] quit
[SwitchA] interface vlan-interface 3
[SwitchA-Vlan-interface3] ipv6 address fe90::1 link-local
[SwitchA-Vlan-interface3] ipv6 address 2::1 64
# Create VRRP group 2 and set its virtual IPv6 address to FE90::10 and 2::10.
[SwitchA-Vlan-interface3] vrrp ipv6 vrid 2 virtual-ip fe90::10 link-local
[SwitchA-Vlan-interface3] vrrp ipv6 vrid 2 virtual-ip 2::10
2) Configure Switch B
# Configure VLAN 2.
<SwitchB> system-view
[SwitchB] ipv6
[SwitchB-vlan2] port gigabitethernet 2/0/5
[SwitchB-vlan2] quit
[SwitchB] interface vlan-interface 2
[SwitchB-Vlan-interface2] ipv6 address fe80::2 link-local
[SwitchB-Vlan-interface2] ipv6 address 1::2 64
# Create VRRP group 1 and set its virtual IPv6 address to FE80::10 and 1::10.
[SwitchB-Vlan-interface2] vrrp ipv6 vrid 1 virtual-ip fe80::10 link-local
[SwitchB-Vlan-interface2] vrrp ipv6 vrid 1 virtual-ip 1::10
[SwitchB-Vlan-interface2] quit
# Configure VLAN 3.
[SwitchB] vlan 3
[SwitchB-vlan3] port gigabitethernet 2/0/6
[SwitchB-vlan3] quit
[SwitchB] interface vlan-interface 3
[SwitchB-Vlan-interface3] ipv6 address fe90::2 link-local
[SwitchB-Vlan-interface3] ipv6 address 2::2 64
# Create VRRP group 2 and set its virtual IPv6 address to FE90::10 and 2::10.
[SwitchB-Vlan-interface3] vrrp ipv6 vrid 2 virtual-ip fe90::10 link-local
[SwitchB-Vlan-interface3] vrrp ipv6 vrid 2 virtual-ip 2::10
# Set the priority of Switch B in VRRP group 2 to 110.
[SwitchB-Vlan-interface3] vrrp ipv6 vrid 2 priority 110
3) Verify the configuration
You can use the display vrrp ipv6 verbose command to verify the configuration.
# Display detailed information of the VRRP group on Switch A.
[SwitchA-Vlan-interface3] display vrrp ipv6 verbose
IPv6 Standby Information:
Run Method : VIRTUAL-MAC
Total number of virtual routers: 2
Interface : Vlan-interface2
VRID : 1 Adver. Timer : 100
Admin Status : UP State : Master
Config Pri : 110 Run Pri : 110
Preempt Mode : YES Delay Time : 0
Auth Type : NONE
Virtual IP : FE80::10
1::10
Virtual MAC : 0000-5e00-0201
Master IP : FE80::1
Interface : Vlan-interface3
VRID : 2 Adver. Timer : 100
Admin Status : UP State : Backup
Config Pri : 100 Run Pri : 100
Preempt Mode : YES Delay Time : 0
Auth Type : NONE
Virtual IP : FE90::10
2::10
Master IP : FE90::2
# Display detailed information of the VRRP group on Switch B.
[SwitchB-Vlan-interface3] display vrrp ipv6 verbose
IPv6 Standby Information:
Run Method : VIRTUAL-MAC
Total number of virtual routers: 2
Interface : Vlan-interface2
VRID : 1 Adver. Timer : 100
Admin Status : UP State : Backup
Config Pri : 100 Run Pri : 100
Preempt Mode : YES Delay Time : 0
Auth Type : NONE
Virtual IP : FE80::10
1::10
Master IP : FE80::1
Interface : Vlan-interface3
VRID : 2 Adver. Timer : 100
Admin Status : UP State : Master
Config Pri : 110 Run Pri : 110
Preempt Mode : YES Delay Time : 0
Auth Type : NONE
Virtual IP : FE90::10
2::10
Virtual MAC : 0000-5e00-0202
Master IP : FE90::2
The above information indicates that in VRRP group 1 Switch A is the master, Switch B is the backup and hosts with the default gateway of 1::10/64 accesses the Internet through Switch A; in VRRP group 2 Switch A is the backup, Switch B is the master and hosts with the default gateway of 2::10/64 accesses the Internet through Switch B.
![]()
Multiple VRRP groups are commonly used in actual networking. In IPv6 network, to implement load sharing among multiple VRRP groups, you need to manually configure the default gateway for hosts.
Troubleshooting VRRP
Symptom 1:
The console screen displays error prompts frequently.
Analysis:
This error is probably caused by the following:
l Inconsistent configuration of the devices in the VRRP group.
l A device is attempting to send illegitimate VRRP packets.
Solution:
l In the first case, modify the configuration.
l In the latter case, you have to resort to non-technical measures.
Symptom 2:
Multiple masters are present in the same VRRP group.
Analysis:
l Multiple masters coexist for a short period: This is normal and requires no manual intervention.
l Multiple masters coexist for a long period: This is because devices in the VRRP group cannot receive VRRP packets, or the received VRRP packets are illegal.
Solution:
Ping between these masters, and do the following:
l If the ping fails, check network connectivity.
l If the ping succeeds, check that their configurations are consistent in terms of number of virtual IP addresses, virtual IP addresses, advertisement interval, and authentication.
Symptom 3:
Frequent VRRP state transition.
Analysis:
The VRRP advertisement interval is set too short.
Solution:
Increase the interval to sent VRRP advertisement or introduce a preemption delay.
