- Table of Contents
-
- 08-System Volume
- 00-System Volume Organization
- 01-Login Configuration
- 02-Basic System Configuration
- 03-Device Management Configuration
- 04-File System Management Configuration
- 05-SNMP Configuration
- 06-RMON Configuration
- 07-MAC Address Table Management Configuration
- 08-System Maintaining and Debugging Configuration
- 09-Information Center Configuration
- 10-PoE Configuration
- 11-Track Configuration
- 12-NQA Configuration
- 13-NTP Configuration
- 14-VRRP Configuration
- 15-HA Configuration
- 16-Hotfix Configuration
- 17-GR Overview
- Related Documents
-
| Title | Size | Download |
|---|---|---|
| 05-SNMP Configuration | 135.36 KB |
Displaying and Maintaining SNMP
SNMP Configuration Example (SNMPv2c)
SNMP Logging Configuration Example
When configuring SNMP, go to these sections for information you are interested in:
l Displaying and Maintaining SNMP
l SNMP Configuration Example (SNMPv2c)
l SNMP Logging Configuration Example
SNMP Overview
Simple Network Management Protocol (SNMP) offers a framework to monitor network devices through TCP/IP protocol suite. It provides a set of basic operations in monitoring and maintaining the Internet and has the following characteristics:
l Automatic network management: SNMP enables network administrators to search and modify information, find and diagnose network problems, plan for network growth, and generate reports on network nodes.
l SNMP shields the physical differences between various devices and thus realizes automatic management of products from different manufacturers. Offering only the basic set of functions, SNMP makes the management tasks independent of both the physical features of the managed devices and the underlying networking technology. Thus, SNMP achieves effective management of devices from different manufacturers, especially in small, high-speed and low cost network environments.
SNMP Mechanism
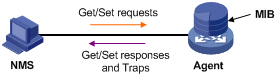
An SNMP enabled network comprises Network Management Station (NMS) and Agent.
l NMS is a station that runs the SNMP client software. It offers a user friendly interface, making it easier for network administrators to perform most network management tasks.
l Agent is a program on the device. It receives and handles requests sent from the NMS. Only under certain circumstances, such as interface state change, will the Agent inform the NMS.
NMS manages an SNMP enabled network, whereas Agent is the managed network device. They exchange management information through the SNMP protocol.
SNMP provides the following four basic operations:
l Get operation: NMS gets the value of one or more objects of Agent through this operation.
l Set operation: NMS can reconfigure the value of one or more objects in the Agent MIB (Management Information Base) by means of this operation.
l Trap operation: Agent sends traps to the NMS through this operation.
l Inform operation: NMS sends traps to other NMSs through this operation.
SNMP Protocol Version
Currently, SNMP agents support SNMPv3 and are compatible with SNMPv1 and SNMPv2c.
l SNMPv1 uses community name for authentication, which defines the relationship between an SNMP NMS and an SNMP Agent. SNMP packets with community names that did not pass the authentication on the device will simply be discarded. A community name performs a similar role as a key word and can be used to regulate access from NMS to Agent.
l SNMPv2c uses community name for authentication. Compatible with SNMPv1, it extends the functions of SNMPv1. SNMPv2c provides more operation modes such as GetBulk and InformRequest; it supports more data types such as Counter64; and it provides various error codes, thus being able to distinguish errors in more detail.
l SNMPv3 offers an authentication that is implemented with a User-Based Security Model (USM). You can set the authentication and privacy functions. The former is used to authenticate the validity of the sending end of the authentication packets, preventing access of illegal users; the latter is used to encrypt packets between the NMS and Agent, preventing the packets from being intercepted. USM ensures a more secure communication between SNMP NMS and SNMP Agent by authentication with privacy, authentication without privacy, or no authentication no privacy.
Successful interaction between NMS and Agent requires consistency of SNMP versions configured on them. You can configure multiple SNMP versions for an Agent to interact with different NMSs.
MIB Overview
Any managed resource can be identified as an object, which is known as the managed object. Management Information Base (MIB) is a collection of all the managed objects. It defines a set of characteristics associated with the managed objects, such as the object identifier (OID), access right and data type of the objects. Each Agent has its own MIB. NMS can read or write the managed objects in the MIB. The relationship between NMS, Agent and MIB is shown in Figure 1-1.
Figure 1-1 Relationship between NMS, Agent and MIB
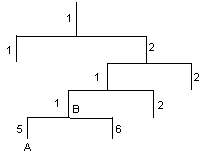
MIB stores data using a tree structure. The node of the tree is the managed object and can be uniquely identified by a path starting from the root node. As illustrated in the following figure, the managed object B can be uniquely identified by a string of numbers {1.2.1.1}. This string of numbers is the OID of the managed object B.
Figure 1-2 MIB tree
SNMP Configuration
As configurations for SNMPv3 differ substantially from those for SNMPv1 and SNMPv2c, their SNMP functionalities are introduced separately as follows.
Follow these steps to configure SNMPv3:
|
To do… |
Use the command… |
Remarks |
|
Enter system view |
system-view |
— |
|
Enable SNMP Agent |
snmp-agent |
Optional Disabled by default You can enable SNMP Agent through this command or any commands that begin with snmp-agent. |
|
Configure SNMP Agent system information |
snmp-agent sys-info { contact sys-contact | location sys-location | version { all | { v1 | v2c | v3 }* } } |
Optional The defaults are as follows: Hangzhou H3C Technologies Co., Ltd. for contact, Hangzhou China for location, and SNMP v3 for the version. |
|
Configure an SNMP agent group |
snmp-agent group v3 group-name [ authentication | privacy ] [ read-view read-view ] [ write-view write-view ] [ notify-view notify-view ] [ acl acl-number ] |
Required |
|
Convert the user-defined plain text password to a cipher text password |
snmp-agent calculate-password plain-password mode { 3desmd5 | 3dessha | md5 | sha } { local-engineid | specified-engineid engineid } |
Optional |
|
Add a new user to an SNMP agent group |
snmp-agent usm-user v3 user-name group-name [ [ cipher ] authentication-mode { md5 | sha } auth-password [ privacy-mode { aes128 | des56 } priv-password ] ] [ acl acl-number ] |
Required If the cipher keyword is specified, the arguments auth-password and priv-password are considered as cipher text password. |
|
Configure the maximum size of an SNMP packet that can be received or sent by an SNMP agent |
snmp-agent packet max-size byte-count |
Optional 1,500 bytes by default |
|
Configure the engine ID for a local SNMP agent |
snmp-agent local-engineid engineid |
Optional Company ID and device ID by default |
|
Create or update the MIB view content for an SNMP agent |
snmp-agent mib-view { excluded | included } view-name oid-tree [ mask mask-value ] |
Optional MIB view name is ViewDefault and OID is 1 by default. |
Follow these steps to configure SNMPv1 and SNMPv2c:
|
To do… |
Use the command… |
Remarks |
||
|
Enter system view |
system-view |
— |
||
|
Enable SNMP Agent |
snmp-agent |
Optional Disabled by default You can enable SNMP Agent through this command or any commands that begin with snmp-agent. |
||
|
Configure SNMP Agent system information |
snmp-agent sys-info { contact sys-contact | location sys-location | version { { v1 | v2c | v3 }* | all } } |
Required The defaults are as follows: Hangzhou H3C Technologies Co., Ltd. for contact, Hangzhou China for location and SNMP v3 for the version. |
||
|
Configure SNMP NMS access right |
Configure directly |
Create an SNMP community |
snmp-agent community { read | write } community-name [ acl acl-number | mib-view view-name ]* |
Use either approach. Both commands can be used to configure SNMP NMS access rights. The second command was introduced to be compatible with SNMPv3. The community name configured on NMS should be consistent with the username configured on the Agent. |
|
Configure indirectly |
Configure an SNMP group |
snmp-agent group { v1 | v2c } group-name [ read-view read-view ] [ write-view write-view ] [ notify-view notify-view ] [ acl acl-number ] |
||
|
Add a new user to an SNMP group |
snmp-agent usm-user { v1 | v2c } user-name group-name [ acl acl-number ] |
|||
|
Configure the maximum size of an SNMP packet that can be received or sent by an SNMP agent |
snmp-agent packet max-size byte-count |
Optional 1500 bytes by default |
||
|
Configure the engine ID for a local SNMP agent |
snmp-agent local-engineid engineid |
Optional Company ID and device ID by default |
||
|
Create or update MIB view content for an SNMP agent |
snmp-agent mib-view { excluded | included } view-name oid-tree [ mask mask-value ] |
Optional ViewDefault by default |
||
![]()
The validity of a USM user depends on the engine ID of the SNMP agent. If the engine ID when the USM user is created is not identical to the current engine ID, the USM user is invalid.
Configuring SNMP Logging
Introduction to SNMP Logging
SNMP logs the GET and SET operations that NMS performs on SNMP Agent. When the GET operation is performed, Agent logs the IP address of NMS, node name of the GET operation and OID of the node. When the SET operation is performed, Agent logs the IP address of NMS, node name of the SET operation, OID of the node, the value set and the error code and error index of the SET response. These logs will be sent to the information center, and the level of them is informational, that is, they are taken as the system prompt information. With parameters for the information center set, the output rules for SNMP logs are decided (that is, whether the logs are permitted to output and the output destinations).
SNMP logs GET request, SET request and SET response, but does not log GET response.
Enabling SNMP Logging
|
To do… |
Use the command… |
Remarks |
|
Enter system view |
system-view |
— |
|
Enable SNMP logging |
snmp-agent log { all | get-operation | set-operation } |
Required Disabled by default. |
|
Configure SNMP log output rules |
info-center source { module-name | default } channel { channel-number | channel-name } [ debug { level severity | state state } * | log { level severity | state state } * | trap { level severity | state state } * ] * |
Optional By default, SNMP logs are output to loghost and logfile only. To output SNMP logs to other destinations such as console or monitor terminal, you need to set the output destinations with this command. |
![]()
l Logs occupy storage space of the device, thus affecting the performance of the device. Therefore, it is recommended to disable SNMP logging.
l The size of SNMP logs cannot exceed that allowed by the information center, and the total length of the node field and value field of each log record cannot exceed 1K bytes; otherwise, the exceeded part will not be output.
l For the detailed description of system information, the information center and the info-center source command, refer to Information Center Configuration in the System Volume.
SNMP Trap Configuration
Enabling the Trap Function
SNMP Agent sends traps to the NMS to inform the NMS of critical and important events (such as reboot of a managed device). Two types of traps are available: generic traps and self-defined traps. Generic traps supported on the device include: authentication, coldstart, linkdown, linkup and warmstart. The others are self-defined traps, which are generated by different modules. As traps that occupy large device memory affect device performance, it is recommended not to enable the trap function for all the modules but for the specific modules as needed.
With the trap function enabled on a module, the traps generated by the module will be sent to the information center. The information center has seven information output destinations. By default, traps of all modules are allowed to be output to the console, monitor terminal (monitor), loghost, and logfile; traps of all modules and with level equal to or higher than warnings are allowed to be output to the trapbuffer and SNMP module (snmpagent); and traps cannot be sent to the logbuffer. You can set parameters for the information center based on the levels of the traps generated by each module, and thus decide the output rules of traps (that is, whether traps are allowed to be output and the output destinations). For the configuration of the information center, refer to Information Center Configuration in the System Volume.
Follow these steps to enable the trap function:
|
To do… |
Use the command… |
Remarks |
|
Enter system view |
system-view |
— |
|
Enable the trap function globally |
snmp-agent trap enable [ bgp | configuration | flash | mpls | ospf [ process-id ] [ ifauthfail | ifcfgerror | ifrxbadpkt | ifstatechange | iftxretransmit | lsdbapproachoverflow | lsdboverflow | maxagelsa | nbrstatechange | originatelsa | vifcfgerror | virifauthfail | virifrxbadpkt | virifstatechange | viriftxretransmit | virnbrstatechange ] * | standard [ authentication | coldstart | linkdown | linkup | warmstart ]* | system | vrrp [ authfailure | newmaster ] ] |
Optional Enabled by default. |
|
Enter interface view |
interface interface-type interface-number |
— |
|
Enable the trap function of interface state changes |
enable snmp trap updown |
Optional Enabled by default. |
![]()
To enable an interface to send linkUp/linkDown traps when its state changes, you need to enable the trap function of interface state changes on an interface and globally. Use the enable snmp trap updown command to enable the trap function on an interface, and use the snmp-agent trap enable [ standard [ linkdown | linkup ] * ] command to enable this function globally.
Configuring Trap Parameters
Configuration prerequisites
To send traps to the NMS, you need to prepare the following:
l Basic SNMP configurations have been completed. These configurations include version configuration: community name is needed when SNMPv1 and v2c are adopted; username and MIB view are needed if SNMPv3 is adopted.
l A connection has bee established between the device and the NMS, and they can operate each other.
Configuration procedure
After traps are sent to the SNMP module, the SNMP module saves the traps in the trap queue. You can set the size of the queue and the holding time of the traps in the queue, and you can also send the traps to the specified destination host (usually NMS).
Follow these steps to configure trap parameters:
|
To do… |
Use the command… |
Remarks |
|
Enter system view |
system-view |
— |
|
Configure target host attribute for traps |
snmp-agent target-host trap address udp-domain { ip-address | ipv6 ipv6-address } [ udp-port port-number ] [ vpn-instance vpn-instance-name ] params securityname security-string [ v1 | v2c | v3 [ authentication | privacy ] ] |
Optional The vpn-instance keyword is applicable in a network supporting IPv4. To send the traps to the NMS, this command is required, and you must specify ip-address as the IP address of the NMS. |
|
Configure the source address for traps |
snmp-agent trap source interface-type interface-number |
Optional |
|
Extend the standard linkUp/linkDown traps defined in RFC |
snmp-agent trap if-mib link extended |
Optional Standard linkUp/linkDown traps defined in RFC are used by default. |
|
Configure the size of the trap sending queue |
snmp-agent trap queue-size size |
Optional 100 by default |
|
Configure the holding time of the traps in the queue |
snmp-agent trap life seconds |
Optional 120 seconds by default |
![]()
l An extended linkUp/linkDown trap is the standard linkUp/linkDown trap (defined in RFC) appended with interface description and interface type information. If the extended messages are not supported on NMS, disable this function to let the device send standard linkUp/linkDown traps.
l If the sending queue of traps is full, the system will automatically delete some oldest traps to receive new traps.
l The system will automatically delete the traps whose lifetime expires.
Displaying and Maintaining SNMP
|
To do… |
Use the command… |
Remarks |
|
Display SNMP-agent system information, including the contact, location, and version of the SNMP |
display snmp-agent sys-info [ contact | location | version ]* |
Available in any view |
|
Display SNMP agent statistics |
display snmp-agent statistics |
|
|
Display the SNMP agent engine ID |
display snmp-agent local-engineid |
|
|
Display SNMP agent group information |
display snmp-agent group [ group-name ] |
|
|
Display basic information of the trap queue |
display snmp-agent trap queue |
|
|
Display the modules that can send traps and whether their trap sending is enabled or not |
display snmp-agent trap-list |
|
|
Display SNMP v3 agent user information |
display snmp-agent usm-user [ engineid engineid | username user-name | group group-name ] * |
|
|
Display SNMP v1 or v2c agent community information |
display snmp-agent community [ read | write ] |
|
|
Display MIB view information for an SNMP agent |
display snmp-agent mib-view [ exclude | include | viewname view-name ] |
SNMP Configuration Example (SNMPv2c)
Network requirements
l The NMS connects to the agent, a switch, through an Ethernet.
l The IP address of the NMS is 1.1.1.2/24.
l The IP address of VLAN interface on the switch is 1.1.1.1/24.
l NMS monitors and manages Agent using SNMPv2c. Agent reports errors or faults to the NMS.
Network diagram
Figure 1-3 Network diagram for SNMP
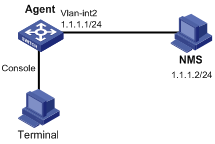
Configuration procedure
1) Configuring SNMP Agent
# Configure the SNMP basic information, including version and community name.
<Sysname> system-view
[Sysname] snmp-agent sys-info version v2c
[Sysname] snmp-agent community read public
[Sysname] snmp-agent community write private
# Configure VLAN-interface 2 (with the IP address of 1.1.1.1/24). Add the port GigabitEthernet 2/0/1 to VLAN 2.
[Sysname] vlan 2
[Sysname-vlan2] port GigabitEthernet 2/0/1
[Sysname-Vlan2] quit
[Sysname] interface vlan-interface 2
[Sysname-Vlan-interface2] ip address 1.1.1.1 255.255.255.0
[Sysname-Vlan-interface2] quit
# Configure the contact person and physical location information of the switch.
[Sysname] snmp-agent sys-info contact Mr.Wang-Tel:3306
[Sysname] snmp-agent sys-info location telephone-closet,3rd-floor
# Enable the sending of traps to the NMS with an IP address of 1.1.1.2/24, using public as the community name.
[Sysname] snmp-agent trap enable
[Sysname] snmp-agent target-host trap address udp-domain 1.1.1.2 udp-port 5000 params securityname public
2) Configuring SNMP NMS
With SNMPv2c, the user needs to specify the read only community, the read and write community, the timeout time, and number of retries. The user can inquire and configure the device through the NMS.
![]()
The configurations on the agent and the NMS must match.
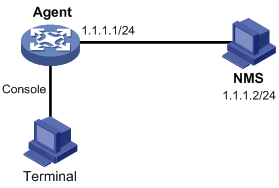
SNMP Logging Configuration Example
Network requirements
l NMS and Agent are connected through an Ethernet
l The IP address of NMS is 1.1.1.2/24
l The IP address of the VLAN interface on Agent is 1.1.1.1/24
l Configure community name, access right and SNMP version on Agent
Network diagram
Figure 1-4 Network diagram for SNMP logging
Configuration procedure
![]()
The configurations for NMS and Agent are omitted.
# Enable logging display on the terminal. (This function is enabled by default, so that you can omit this configuration).
<Sysname> terminal monitor
<Sysname> terminal logging
# Enable the information center to output the system information with the severity level equal to or higher than informational to the console port.
<Sysname> system-view
[Sysname] info-center source snmp channel console log level informational
# Enable SNMP logging on Agent to log the GET and SET operations of NMS.
[Sysname] snmp-agent log get-operation
[Sysname] snmp-agent log set-operation
l The following log information is displayed on the terminal when NMS performs the GET operation on Agent.
%Jan 1 02:49:40:566 2006 Sysname SNMP/6/GET:
seqNO = <10> srcIP = <1.1.1.2> op = <get> node = <sysName(1.3.6.1.2.1.1.5.0)> value=<>
l The following log information is displayed on the terminal when NMS performs the SET operation on Agent.
%Jan 1 02:59:42:576 2006 Sysname SNMP/6/SET:
seqNO = <11> srcIP = <1.1.1.2> op = <set> errorIndex = <0> errorStatus =<noError> node = <sysName(1.3.6.1.2.1.1.5.0)> value = <Sysname>
Table 1-1 Description on the output field of SNMP log
|
Field |
Description |
|
Jan 1 02:49:40:566 2006 |
The time when SNMP log is generated |
|
seqNO |
Sequence number of the SNMP log () |
|
srcIP |
IP address of NMS |
|
op |
SNMP operation type (GET or SET) |
|
node |
Node name of the SNMP operations and OID of the instance |
|
erroIndex |
Error index, with 0 meaning no error |
|
errorstatus |
Error status, with noError meaning no error |
|
value |
Value set when the SET operation is performed (This field is null, meaning the value obtained with the GET operation is not logged.) When the value is a string of characters and the string contains characters not in the range of ASCII 0 to 127 or invisible characters, the string is displayed in hexadecimal. For example, value = <81-43>[hex] |
![]()
The system information of the information center can be output to the terminal or to the log buffer. In this example, SNMP log is output to the terminal. For configuration of SNMP log output to other destinations, see Information Center Configuration in the System Volume.
H3C private MIB involves two styles, H3C compatible MIB and H3C new MIB. In the H3C compatible MIB style, the device sysOID is under the H3C’s enterprise ID 25506, and the private MIB is under the enterprise ID 2011. In the H3C new MIB style, both the device sysOID and the private MIB are under the H3C’s enterprise ID 25506. These two styles of MIBs implement the same management function except for their root nodes. A device is shipped with MIB loaded and the MIB style may vary depending on the device. To implement NMS’s flexible management of the device, the device allows you to configure MIB style, that is, you can switch between the two styles of MIBs. However, you need to ensure that the MIB style of the device is the same as that of the NMS.
Setting the MIB Style
Follow these steps to set the MIB style:
|
To do… |
Use the command… |
Remarks |
|
Enter system view |
system-view |
— |
|
Set the MIB style of the device |
mib-style [ new | compatible ] |
Optional compatible by default |
![]()
The modified MIB style takes effect only after you reboot the device. Therefore, you are recommended to reboot the device after setting the MIB style to ensure that the modification of the MIB style takes effect.
Displaying and Maintaining MIB
|
To do… |
Use the command… |
Remarks |
|
Display the MIB style |
display mib-style |
Available in any view |
