- Table of Contents
-
- H3C WX Series Access Controllers Web-Based Configuration Manual-6PW103
- 00-1Cover
- 01-Quick Start
- 02-Web Overview
- 03-Summary
- 04-Device
- 05-Network
- 06-AP Configuration
- 07-WLAN Service Configuration
- 08-WLAN Roaming Configuration
- 09-Radio Configuration
- 10-Authentication
- 11-Security
- 12-QoS
- 13-SNMP
- 14-Advanced Settings
- Related Documents
-
| Title | Size | Download |
|---|---|---|
| 13-SNMP | 163.58 KB |
l The sample Web page information in this manual was created on the WX5002. The Web page information on your device may vary.
l The models listed in this manual are not applicable to all regions. Please consult the local agents for the models applicable to your region.
1 SNMP Configuration
SNMP Overview
Simple Network Management Protocol (SNMP) offers a framework to monitor network devices through TCP/IP protocol suite. It provides a set of basic operations in monitoring and maintaining the Internet. SNMP has the following advantages:
l Automatic network management. SNMP enables network administrators to search and modify information, find and diagnose network problems, plan for network growth, and generate reports on network nodes.
l SNMP shields the physical differences between various devices and thus realizes automatic management of products from different manufacturers. Offering only the basic set of functions, SNMP makes the management tasks independent of both the physical features of the managed devices and the underlying networking technology. Thus, SNMP achieves effective management of devices from different manufacturers, especially in small, high-speed and low cost network environments.
SNMP Mechanism
An SNMP enabled network comprises Network Management Station (NMS) and Agent.
l NMS is a station that runs the SNMP client software. It offers a user friendly interface, making it easier for network administrators to perform most network management tasks. Currently, the most commonly used NMSs include Quidview, Sun NetManager, and IBM NetView.
l Agent is a program on the device. It receives and handles requests sent from the NMS. Only under certain circumstances, such as interface state change, will the Agent inform the NMS.
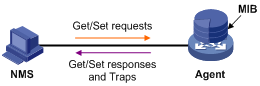
NMS manages an SNMP enabled network, whereas Agent is the managed network device. NMS and Agent exchange management information through the SNMP protocol.
SNMP provides the following four basic operations:
l Get operation: NMS gets the value of a certain variable of Agent through this operation.
l Set operation: NMS can reconfigure the value of an object in the Agent MIB (Management Information Base) by means of this operation to force Agent to accomplish a task.
l Trap operation: Agent sends traps to the NMS through this operation.
l Inform operation: NMS sends traps to other NMSs through this operation.
SNMP Protocol Version
Currently, SNMP agents support SNMPv3 and are compatible with SNMPv1 and SNMPv2c.
l SNMPv1 uses community name for authentication. Community name defines the relationship between an SNMP NMS and an SNMP agent. SNMP packets with community names that do not pass the authentication on the device are simply discarded. A community name plays a similar role as a key word and can be used to control access from NMS to Agent.
l SNMPv2c uses community name for authentication. Compatible with SNMPv1, it extends the functions of SNMPv1. SNMPv2c provides more operation modes such as GetBulk and InformRequest; it supports more data types such as Counter64 and Counter32; and it provides various error codes, thus being able to distinguish errors in more detail.
l SNMPv3 offers an authentication that is implemented with a User-Based Security Model (USM). You can set the authentication and privacy functions. The former is used to authenticate the validity of the sending end of the authentication packets, preventing access of illegal users; the latter is used to encrypt packets between the NMS and Agent, preventing the packets from being intercepted. USM ensures a more secure communication between SNMP NMS and SNMP Agent by authentication with privacy.
Successful interaction between NMS and Agent requires consistency of SNMP versions configured on them. You can configure multiple SNMP versions for an Agent to interact with different NMSs.
MIB Overview
MIB
Any managed resource can be identified as an object, which is known as the managed object. Management Information Base (MIB) is a collection of all the managed objects. It defines a set of characteristics associated with the managed objects, such as the object identifier (OID), access right and data type of the objects. Each Agent has its own MIB. NMS can read or write the managed objects in the MIB. Figure 1-1 shows the relationship between NMS, Agent and MIB.
Figure 1-1 Relationship between NMS, Agent and MIB
Subtree OID
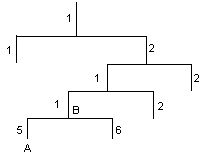
MIB stores data using a tree structure. A node of the tree is a managed object and can be uniquely identified by a path starting from the root node. As illustrated in Figure 1-2, the managed object A can be uniquely identified by a string of numbers {1.2.1.1.5}. This string of numbers is the OID of the managed object A.
A subtree can be identified by the OID of the root node of the subtree. For example, the OID of the subtree with the root node being B is the OID of node B –– {1.2.1.1}.
Subtree mask
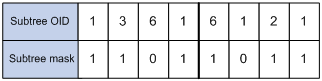
A subtree OID used with a subtree mask defines a view subtree. A subtree mask is in hexadecimal format. After it is converted to binary bits, each bit corresponds to a node of the OID.
l 1 means precise matching, that is, the OID of the MIB object to be accessed must be identical with the subtree OID.
l 0 means wildcard matching, that is, the OID of the MIB object to be accessed can be different from the subtree OID.
For example, provided the subtree mask 0xDB (11011011 in binary) and the subtree OID 1.3.6.1.6.1.2.1, their relationship is as shown in Figure 1-3. The view determined by them includes all the nodes under the subtree whose OID is 1.3.*.1.6.*.2.1, where * represents any number.
Figure 1-3 Subtree OID and subtree mask
![]()
l If the number of bits in the subtree mask is greater than the number of nodes of the OID, the excessive bits of the subtree mask will be ignored during subtree mask-OID matching.
l If the number of bits in the subtree mask is smaller than the number of nodes of the OID, the short bits of the subtree mask will be set to 1 during subtree mask-OID matching.
l If no subtree mask is specified, the default subtree mask (all Fs) will be used for mask-OID matching.
SNMP Configuration
Configuration Task List
Perform the tasks in Table 1-1 to configure SNMP:
Table 1-1 SNMP configuration task list
|
Task |
Remarks |
|
Required Enables the SNMP Agent function. The SNMP Agent function is disabled by default. Only after SNMP is enabled can other SNMP configuration items be available. |
|
|
Optional After creating SNMP views, you can specify an SNMP view for an SNMP group to limit the MIB objects that can be accessed by the SNMP group. |
|
|
Required After creating an SNMP group, you can add SNMP users to the group when creating the users. Therefore, you can realize centralized management of users in the group through the management of the group. |
|
|
Required For SNMPv1 and SNMPv2c, this function equals adding a new community name; for SNMPv3, it equals adding a new user to an SNMP group. Before creating an SNMP user, you need to create the SNMP group to which the user belongs. |
|
|
Optional Configures that Agent can send SNMP traps to NMS. By default, Agent is allowed to send SNMP traps to NMS. |
|
|
Optional Configures information about the target host of the SNMP traps |
|
|
Optional |
Enabling SNMP
Select SNMP > Setup from the navigation tree, then click the Configuration tab to enter the SNMP configuration page, as shown in Figure 1-4.
Figure 1-4 Enabling SNMP configuration
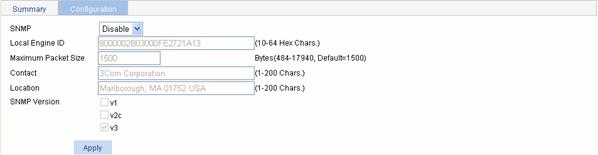
Table 1-2 describes the configuration items for enabling SNMP.
Table 1-2 Enabling SNMP configuration items
|
Item |
Description |
|
SNMP |
Configures to enable or disable SNMP. |
|
Local Engine ID |
Configures the local engine ID. The validity of a user after it is created depends on the engine ID of the SNMP agent. If the engine ID when the user is created is not identical to the current engine ID, the user is invalid. |
|
Maximum Packet Size |
Configures the maximum size of an SNMP packet that Agent can receive/send. |
|
Contact |
Sets a character string to describe the contact information for system maintenance. If the device is faulty, the maintainer can contact the manufacture factory according to the contact information of the device. |
|
Location |
Sets a character string to describe the physical location of the device. |
|
SNMP Version |
Sets the SNMP version run by the system |
Return to SNMP configuration task list.
Creating an SNMP View
Select SNMP > Views from the navigation tree, then click the Create tab to enter the SNMP view configuration page, as shown in Figure 1-5.
Figure 1-5 Creating an SNMP view
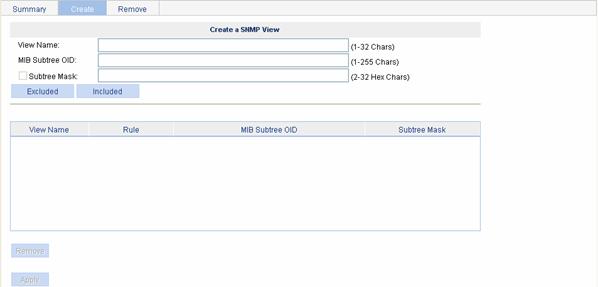
Table 1-3 describes the configuration items for creating an SNMP view.
Table 1-3 Configuration items for creating an SNMP view
|
Item |
Description |
|
View Name |
Sets the SNMP view name, which is case sensitive. |
|
MIB Subtree OID |
Sets the MIB subtree OID (such as 1.4.5.3.1) or name (such as system). |
|
Subtree Mask |
Sets the subtree mask. If no subtree mask is specified, the default subtree mask (all Fs) will be used for mask-OID matching. |
|
Excluded |
Excludes the objects in the view range determined by the MIB subtree OID and subtree mask. If you click this button, the configured rule will be displayed in the list box, and then you can continue to configure another rule. |
|
Included |
Includes the objects in the view range determined by the MIB subtree OID and subtree mask. If you click this button, the configured rule will be displayed in the list box, and then you can continue to configure another rule. |
Return to SNMP configuration task list.
Creating an SNMP Group
Select SNMP > Groups from the navigation tree, then click the Create tab to enter the SNMP group configuration page, as shown in Figure 1-6.
Figure 1-6 Creating an SNMP group

Table 1-4 describes the configuration items for creating an SNMP group.
Table 1-4 Configuration items for creating an SNMP group
|
Item |
Description |
|
Group Name |
Sets the SNMP group name. An SNMP group name is case sensitive. |
|
Read View |
Selects the read view of the SNMP group. The available read views need to be created through the SNMP view configuration. |
|
Write View |
Selects the write view of the SNMP group. The available write views need to be created through the SNMP view configuration. |
|
Notify View |
Selects the notify view of the SNMP group, that is, the view that can send trap messages. The available notify views need to be created through the SNMP view configuration. |
|
Security Model |
Selects the security model for the SNMP group. |
|
Security Level |
Selects the security level for the SNMP group. You can select a security level only when the security model of the SNMP group is v3. The available security levels are: NoAuth/NoPriv: No authentication no privacy. Auth/NoPriv: Authentication without privacy. Auth/Priv: Authentication and privacy. |
Return to SNMP configuration task list.
Creating an SNMP User
Select SNMP > Users from the navigation tree, then click the Create tab to enter the SNMP user configuration page, as shown in Figure 1-7.
Figure 1-7 Creating an SNMP user
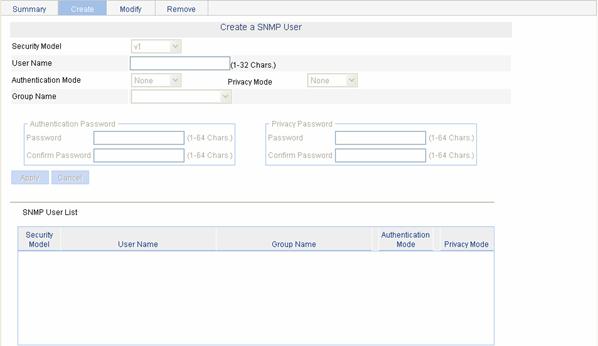
Table 1-5 describes the configuration items for creating an SNMP user.
Table 1-5 Configuration items for creating an SNMP user
|
Item |
Description |
|
|
Security Model |
Selects the security model for the SNMP user. |
|
|
User Name |
Sets the SNMP user name. An SNMP user name is case sensitive. |
|
|
Authentication Mode |
You can select an authentication mode only when the security model of the SNMP group is v3. |
|
|
Privacy Mode |
You can select a privacy mode only when the authentication mode is not None. |
|
|
Group Name |
Selects an SNMP group to which the user belongs. The available SNMP groups need to be created through SNMP group configuration, and are related to the selected user security model, authentication mode, and privacy mode. The specific relationship between them is as shown in Table 1-6. |
|
|
Authentication Password |
Password |
You can input an authentication password only when the authentication mode is not None. |
|
Verify Password |
The password input in the text box of the Password and that of the Verify Password must be consistent. Otherwise, when you apply the configuration, the system will prompt that the two input passwords are not consistent and the user creation failed. |
|
|
Privacy Password |
Password |
You can input a privacy password only when the privacy mode is not None. |
|
Verify Password |
The password input in the text box of the Password and that of the Verify Password must be consistent. Otherwise, when you apply the configuration, the system will prompt that the two input passwords are not consistent and the user creation failed. |
|
|
Security model |
Authentication mode |
Privacy mode |
Available groups |
|
SNMP v1 |
— |
— |
All SNMPv1 groups |
|
SNMP v2c |
— |
— |
All SNMPv2c groups |
|
SNMP v3 |
None |
— |
SNMPv3 groups without authentication and privacy |
|
MD5 |
None |
SNMPv3 groups with no authentication and no privacy or SNMPv3 groups with authentication but no privacy. |
|
|
DES56 |
All SNMPv3 groups |
||
|
AES128 |
All SNMPv3 groups |
||
|
3DES |
All SNMPv3 groups |
||
|
SHA |
None |
SNMPv3 groups with no authentication and no privacy or SNMPv3 groups with authentication but no privacy |
|
|
DES56 |
All SNMPv3 groups |
||
|
AES128 |
All SNMPv3 groups |
||
|
3DES |
All SNMPv3 groups |
Return to SNMP configuration task list.
Enabling Agent to Send SNMP Traps
Select SNMP > Traps from the navigation tree, then click the Setup tab to enter the SNMP traps configuration page, as shown in Figure 1-8.
Figure 1-8 Traps configuration

Table 1-7 describes the configuration items for enabling Agent to send SNMP traps.
Table 1-7 Configuration items for enabling Agent to send SNMP traps
|
Item |
Description |
|
Enable or Disable all SNMP Traps that the agent should send |
You can select No Change, Enable or Disable in the drop-down list. Descriptions on the states: Disable: Prohibits Agent from sending all types of traps. Enable: Allows Agent to send all types of traps. No Change: Keeps the current state. |
Return to SNMP configuration task list.
Adding Target Hosts of SNMP Traps
Select SNMP > Traps from the navigation tree, then click the Add Target Hosts tab to enter the destination host configuration page, as shown in Figure 1-9.
Figure 1-9 Adding target hosts
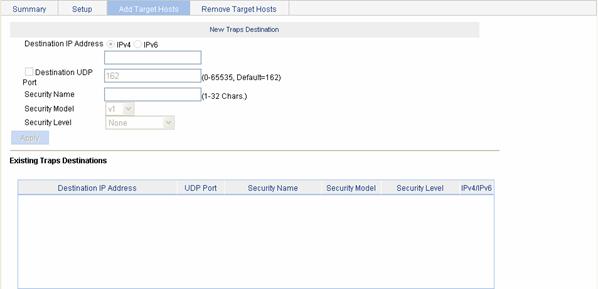
Table 1-8 describes the configuration items for adding a destination host of SNMP traps.
Table 1-8 Configuration items for adding a destination host
|
Item |
Description |
|
Destination IP Address |
Sets the destination IP address. Selects the IP address type: IPv4 or IPv6, and then types the corresponding IP address in the text box according to the IP address type. |
|
Destination UDP Port |
Sets UDP port number. |
|
Security Name |
Sets the security name, which can be an SNMPv1 and SNMPv2c community name or an SNMPv3 username. |
|
Security Model |
Selects the security model, that is, the SNMP version. |
|
Security Level |
Sets the authentication and privacy mode for SNMP traps. Descriptions on the security levels: None: Provides no authentication no privacy for trap messages. Authentication: Provides authentication but no privacy for trap messages. Privacy: Provides authentication and privacy for trap messages. You can select a security level only when the security model is v3. |
Return to SNMP configuration task list.
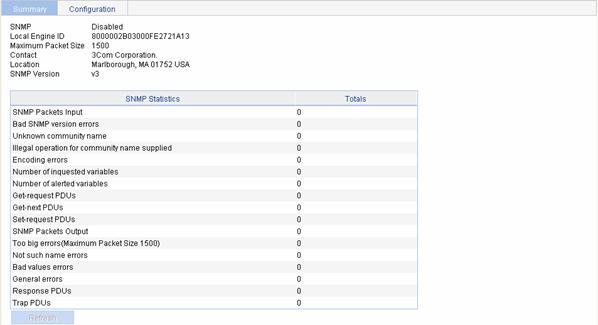
Displaying SNMP Statistics
Select SNMP > Setup from the navigation tree to enter the SNMP configuration page, as shown in Figure 1-10. The lower part of this page displays the SNMP statistics, through which you can understand the running status of the SNMP after your configuration.
Return to SNMP configuration task list.
SNMP Configuration Example
Network requirements
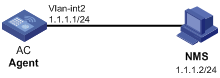
l The NMS connects to the agent, an AC, through an Ethernet.
l The IP address of the NMS is 1.1.1.2/24.
l The IP address of the VLAN interface on the AC is 1.1.1.1/24.
l The NMS monitors the agent using SNMPv3. The agent reports errors or faults to the NMS. The NMS uses port 5000 to receive traps.
l The SNMP user name is user1, authentication mode is MD5, authentication password is 123456, privacy mode is DES56, and privacy password is 654321.
Figure 1-11 Network diagram for SNMP configuration
Configuration procedure
1) Configure the agent
# Configuration IP addresses for the interfaces. (Omitted)
# Enable SNMP.
Select SNMP > Setup from the navigation tree, and then click the Configuration tab.
l Select Enable from the SNMP drop-down list.
l Select v3 in the SNMP version area.
l Click Apply.
# Create an SNMP view.
Select SNMP > Views from the navigation tree, then click the Create tab.
l Type view1 in the text box of View Name.
l Type the MIB subtree OID interfaces.
l Click Included.
l Click Apply.
# Create an SNMP group.
Select SNMP > Groups from the navigation tree, then click the Create tab.
l Type group1 in the text box of Group Name.
l Select view1 from the Read View drop-down list.
l Select view1 from the Write View drop-down list.
l Select v3 from the Security Level drop-down list.
l Click Apply.
# Create an SNMP user.
Select SNMP > Users from the navigation tree, then click the Create tab.
l Select v3 from the Security Level drop-down list.
l Type user1 in the text box of User Name.
l Select MD5 from the Authentication Mode drop-down list.
l Select DES56 from the Privacy Mode drop-down list.
l Select group1 from the Group Name drop-down list.
l Type 123456 in the text box of Password in the Authentication Password area.
l Type 654321 in the text box of Password in the Privacy Password area.
l Click Apply.
# Enable Agent to Send SNMP Traps.
Select SNMP > Traps from the navigation tree, then click the Setup tab.
l Select Enable from the drop-down list.
l Click Apply.
# Add target hosts of SNMP traps.
l Click the Add Target Hosts tab to enter the destination host configuration page.
l Select the destination IP address type as IPv4.
l Type the destination address 1.1.1.2.
l Select the check box before Destination UDP Port to type the UDP port number 5000.
l Type user1 in the text box of Security Name.
l Select v3 from the Security Model drop-down list.
l Click Apply.
2) Configure NMS
![]()
The configuration on NMS must be consistent with that on Agent. Otherwise, you cannot perform corresponding operations.
SNMPv3 adopts a security mechanism of authentication and privacy. You need to configure username and security level. According to the configured security level, you need to configure the related authentication mode, authentication password, privacy mode, privacy password, and so on.
Besides, you need to configure the aging time and retry times. After the above configurations, you can configure the device as needed through the NMS. For related configurations, refer to the manual provided for NMS.
Verify the configuration
l After the above configuration, an SNMP connection is established between the NMS and the agent. The NMS can get and configure the values of some parameters on the agent through MIB nodes.
l If an idle interface on the agent is shut down or brought up, the NMS will receive a trap information sent by the agent.