- Table of Contents
-
- H3C WX Series Access Controllers Web-Based Configuration Manual-6PW103
- 00-1Cover
- 01-Quick Start
- 02-Web Overview
- 03-Summary
- 04-Device
- 05-Network
- 06-AP Configuration
- 07-WLAN Service Configuration
- 08-WLAN Roaming Configuration
- 09-Radio Configuration
- 10-Authentication
- 11-Security
- 12-QoS
- 13-SNMP
- 14-Advanced Settings
- Related Documents
-
| Title | Size | Download |
|---|---|---|
| 06-AP Configuration | 163.05 KB |
Table of Contents
![]()
l The sample Web page information in this manual was created on the WX5002. The Web page information on your device may vary.
l The models listed in this manual are not applicable to all regions. Please consult the local agents for the models applicable to your region.
Overview
The AP configuration module allows you to perform the following configurations:
l Establish a CAPWAP connection
l Configure auto AP
l Configure AP group
Introduction to CAPWAP
Control And Provisioning of Wireless Access Points (CAPWAP) defines how an AP communicates with an AC. It provides a generic encapsulation and transport mechanism between AP and AC, as shown in Figure 1-1.

CAPWAP runs on an AP and an AC to provide a secured connection in between. It is built on a standard client/server model and employs UDP.
On an AP, CAPWAP provides a data tunnel to encapsulate data packets to be sent to the AC. These packets can be raw 802.11 packets or 802.11 to 802.3 translated packets. On an AC, CAPWAP provides a control tunnel to support remote AP configuration and management, and WLAN and mobile management.
With CAPWAP, the AC can dynamically configure an AP based on the information provided by the administrator.
CAPWAP supports both IPv4 and IPv6.
Configuring Auto AP
The auto AP feature allows you to create an AP template with the serial ID auto for the APs of the same model on an AC, namely, an auto AP template. When such an AP tries to connect to the AC, the AC creates a temporary AP template for the AP by using the auto AP template. After the AP is associated with the AC, the AC automatically adds the serial ID of the AP into the template. The auto AP feature avoids configuring AP serial IDs, thus simplifying the configuration of large WLANs.
![]()
l With auto AP enabled, the AC first searches a match from manually configured templates for a requesting AP. If no match is found, it uses the auto AP template for the AP.
l If multiple ACs exist, a requesting AP associates with the AC that provides a manually configured AP template in which the AP model and serial ID match those of the AP.
Configuring AP Group
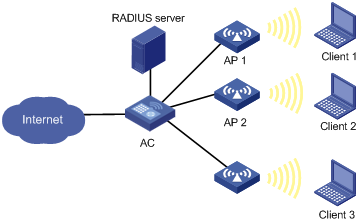
Some wireless service providers need to control the access positions of clients. For example, as shown in the figure below, to meet security or billing needs, it is required to connect wireless clients 1, 2 and 3 to the wired network through APs 1, 2 and 3 respectively. To achieve this, you can configure an AP group and then apply the AP group in a user profile.
Figure 1-2 Client access control
Configuring an AP
AP Setup
Adding an AP
Select AP > AP Setup from the navigation tree, and click Create to enter the page for adding an AP, as shown in Figure 1-3.

Table 1-1 shows the configuration items of adding an AP.
Table 1-1 Configuration items of adding an AP
|
Item |
Description |
|
AP Name |
AP name |
|
Model |
AP model |
|
Serial ID |
l auto: AP serial ID is automatically found. l manual: You need to type an AP serial ID. |
Configure an AP
Select AP > AP Setup from
the navigation tree, find the AP to be configured, and click the ![]() icon in the
Operation column to enter the page for configuring an AP, as shown in Figure 1-4.
icon in the
Operation column to enter the page for configuring an AP, as shown in Figure 1-4.
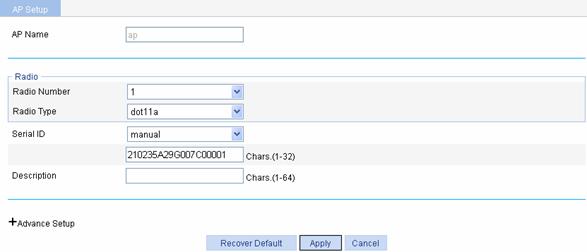
Table 1-2 shows the configuration items of configuring an AP.
Table 1-2 Configuration items of configuring an AP
|
Item |
Description |
|
AP Name |
Displays the name of the AP selected. |
|
Radio Number |
Number of the radios supported by the AP, which takes the value 1 or 2. The value depends on the AP model. |
|
Radio Type |
The value depends on the AP model and radio type. |
|
Serial ID |
Set a serial ID for the AP. l auto: If selected, the AP serial ID is automatically found. This option is used together with the auto AP function. For how to configure auto AP, refer to Configuring Auto AP. l manual: You need to type an AP serial ID.
The serial ID is the unique identity of the AP. If the AP has connected to the AC, changing or deleting its serial ID will render the CAPWAP tunnel down and the AP needs to discover the AC to connect again. |
|
Description |
Description of the AP |
Advanced setting
Select AP > AP Setup from the navigation tree, find the AP to be configured, and click the corresponding icon in the Operation column, and click the + mark before Advance Setup to enter the page for advanced AP setup, as shown in Figure 1-5.

Table 1-3 shows the configuration items of advanced setting.
Table 1-3 Configuration items of advanced setting
|
Item |
Description |
|
AP Connection Priority |
AP connection priority |
|
Broadcast Probe |
l enable: Enables the AP to respond to broadcast probe requests. l disable: Disables the AP from responding to broadcast probe requests. By default, the AP responds to broadcast probe requests. |
|
Configuration File |
Specifies a name for the configuration file in the flash and maps the specified configuration file to the AP. When local forwarding is enabled, you can use the configuration file to configure the AP. |
|
Jumbo Frame Size |
Set the maximum size of jumbo frames. |
|
AP Echo Interval |
Set the interval for sending echo requests. There is a keep-live mechanism between AP and AC, to confirm whether the control channel is working or not. To keep the control channel alive, an AP periodically sends echo requests to an AC. The AC responds to echo requests by sending echo responses. This mechanism is used to make an AC be aware of AP offline. |
|
Client Alive Time |
Set the client keep alive interval. The keep-alive mechanism is used to detect client offline. Normally, when a client gets offline, it sends an offline packet to the AC, and the AC will remove the client after receiving the packet. However, if a client gets offline due to power failure or crash, the client cannot notify the AC. In this case, the AC will keep the client information in its client list, and the client information occupies the AC’s memory and thus reduces AC performance. Therefore, to prevent this situation, you can enable the keep-alive function on the AC. With this function enabled, the AC will periodically scan the client. If the AC does not receive any response, the AC considers the client offline, and removes the client from its client list. By default, the client keep-alive functionality is disabled. |
|
Client Free Time |
Maximum interval for which the link between the AP and a client can be idle. If a client is idle for more than the specified interval, that is, if the AP does not receive any data from the client within the specified interval, the client will be removed from the network. |
|
AP CAR |
You can set this parameter only when you select the check box before AP CAR. By default, no CAR is set for an AP. |
|
CIR |
Committed information rate, in kbps. |
|
CBS |
Committed burst size, in bytes. By default, the CBS is the number of bytes transmitted in 500 ms at the rate of CIR. For example, if CIR is 100, CBS is 500000 bytes by default. |
Configuring Auto AP
Enable auto AP
Select Advance > Auto AP from the navigation tree to enter the page as shown in Figure 1-6.
Figure 1-6 Configure auto AP
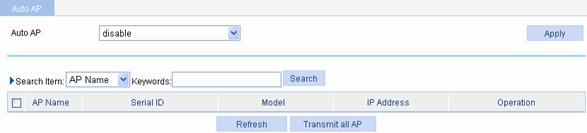
Table 1-4 shows the configuration items of configuring auto AP.
Table 1-4 Configuration items of configuring auto AP
|
Item |
Description |
|
Auto AP |
l enable: Enables the auto AP function. l disable: Disables the auto AP function. To use the auto AP function, you must also select Auto from the Serial ID drop-down list in the AP setup page.
After using the auto AP function, you are recommended to disable the auto AP function. |
Batch switch
If you do not need to modify the AP names automatically found, you can select the AP Name check box, and then click Transmit All AP to complete auto AP setup.
Rename an AP
After enabling auto AP, click Refresh.
Then, to modify an AP name, click the ![]() icon in the Operation
column to modify the AP name.
icon in the Operation
column to modify the AP name.
Figure 1-7 Rename an AP
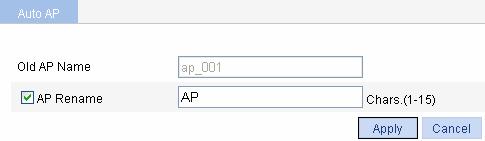
Table 1-5 shows the configuration items of renaming an AP.
Table 1-5 Configuration items of renaming an AP
|
Item |
Description |
|
Old AP Name |
Name of the automatically discovered AP |
|
AP Rename |
Select the AP Rename check box, and type the new AP name. |
For the example of configuring auto AP, refer to Access Service in WLAN Service.
Configuring an AP Group
Creating an AP group
Select AP > AP Group from the navigation tree, click Create to enter the page for creating an AP group, as shown in Figure 1-8.

Table 1-6 shows the configuration items of creating an AP group.
Table 1-6 Configuration items of creating an AP group
|
Item |
Description |
|
AP Group ID |
AP group ID |
Configuring an AP group
Select AP > AP Group from the navigation tree, find the AP group to be configured, and click the corresponding icon in the Operation column to enter the page for configuring an AP group, as shown in Figure 1-9.
Figure 1-9 Configure an AP group
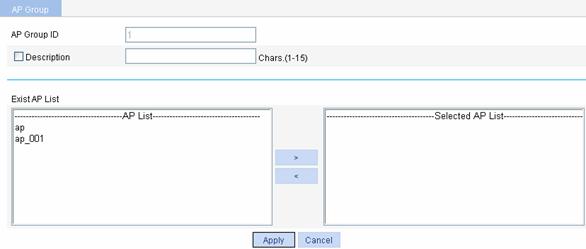
Table 1-7 shows the items of configuring an AP group.
Table 1-7 AP group configuration items
|
Item |
Description |
|
AP Group ID |
Displays the ID of the selected AP group. |
|
Description |
Select this option to configure a description for the AP group. |
|
Exist AP List |
Set the APs in the configured AP group. l To add the APs to the Selected AP List, click the APs to be added to the AP group, and click the > button in the AP List area. l To delete the selected APs from the AP group, select the APs to be deleted in the Selected AP List, and click the < button. The APs to be added in AP Group ID should be created by selecting AP > AP Setup first. |
Applying the AP group
Select Authentication > Users from the navigation tree to apply the AP group. For the related configuration, refer to Users in Authentication.