- Table of Contents
-
- 07-Security Configuration Guide
- 00-Preface
- 01-Security Overview
- 02-AAA Configuration
- 03-802.1X Configuration
- 04-MAC Authentication Configuration
- 05-Portal Configuration
- 06-Port Security Configuration
- 07-User Profile Configuration
- 08-Password Control Configuration
- 09-Public Key Configuration
- 10-PKI Configuration
- 11-SSH Configuration
- 12-SSL Configuration
- 13-SSL VPN Configuration
- 14-TCP Attack Protection Configuration
- 15-ARP Attack Protection Configuration
- 16-IPsec Configuration
- 17-ALG Configuration
- 18-Firewall Configuration
- 19-Session Management Configuration
- 20-Web Filtering Configuration
- 21-User Isolation Configuration
- 22-Source IP Address Verification Configuration
- 23-FIPS Configuration
- 24-Protocol Packet Rate Limit Configuration
- 25-Attack detection and protection configuration
- Related Documents
-
| Title | Size | Download |
|---|---|---|
| 06-Port Security Configuration | 395.72 KB |
Working with guest VLAN and Auth-Fail VLAN
Port security stateful failover
Setting port security's limit on the number of MAC addresses on a port
Setting the port security mode
Configuring port security features
Configuring intrusion protection
Configuring port security for WLAN ports
Setting the port security mode of a WLAN port
Ignoring authorization information from the server
Configuring NAS ID profile for port security
Configuring port security stateful failover
Displaying and maintaining port security
Port security configuration examples
Configuring the userLoginWithOUI mode
Configuring the userLoginSecureExt mode on a WLAN port
Configuring an 802.1X guest VLAN for a port security-enabled port
Configuring port security with guest VLAN and VLAN assignment
Configuring 802.1X stateful failover for port security
Cannot change port security mode when a user is online
Configuring port security
Overview
Port security combines and extends 802.1X and MAC authentication to provide MAC-based network access control. H3C recommends that you configure port security in a WLAN network.
Port security provides the following functions:
· Prevents unauthorized access to a network by checking the source MAC address of inbound traffic.
· Prevents access to unauthorized devices by checking the destination MAC address of outbound traffic.
· Controls MAC address learning and authentication on a port to make sure the port learns only source trusted MAC addresses.
A frame is illegal if its source MAC address cannot be learned in a port security mode, or if it is from a client that has failed 802.1X or MAC authentication. The port security feature automatically takes a pre-defined action on illegal frames. This automatic mechanism enhances network security and reduces human intervention.
For more information about 802.1X and MAC authentication, see "Configuring 802.1X" and "Configuring MAC authentication."
Port security features
Port security supports the need to know (NTK) feature, intrusion protection, and port security traps.
NTK
NTK prevents traffic interception by checking the destination MAC address in outbound frames. The feature ensures that frames are sent only to hosts that have passed authentication or whose MAC addresses have been learned or configured on the access device.
Intrusion protection
The intrusion protection feature checks the source MAC address in inbound frames for illegal frames and takes a pre-defined action on each detected illegal frame. The action can be disabling the port temporarily, disabling the port permanently, or blocking frames from the illegal MAC address for three minutes (not user configurable).
Port security traps
To monitor user behavior, configure the port security module to send traps for port security events such as login, logoff, and MAC authentication.
Port security modes
Port security supports the following categories of security mode:
· MAC learning control—MAC address learning is disabled on ports in secure mode.
· Authentication—Implements MAC authentication, 802.1X authentication, or a combination of the two authentication methods.
Upon receiving a frame, the port in a security mode searches the MAC address table for the source MAC address. If a match is found, the port forwards the frame. If no match is found, the port learns the MAC address or performs authentication, depending on the security mode. If the frame is illegal, the port takes the pre-defined NTK, intrusion protection, or trapping action.
The maximum number of users a port supports equals the maximum number of MAC addresses that port security allows or the maximum number of concurrent users the authentication mode in use allows, whichever is smaller. For example, if 802.1X allows more concurrent users than port security's limit on the number of MAC addresses on the port in userLoginSecureExt mode, port security's limit takes effect.
Table 1 describes the port security modes and the security features.
|
Purpose |
Security mode |
Features that can be triggered |
|
|
Turning off the port security feature |
noRestrictions (the default mode). In this mode, port security is disabled on the port and access to the port is not restricted. |
N/A |
|
|
secure |
NTK/intrusion protection |
||
|
userLogin |
N/A |
||
|
userLoginSecure |
NTK/intrusion protection |
||
|
userLoginSecureExt |
|||
|
userLoginWithOUI |
|||
|
macAddressWithRadius |
NTK/intrusion protection |
||
|
Performing a combination of MAC authentication and 802.1X authentication |
Or |
macAddressOrUserLoginSecure |
NTK/intrusion protection |
|
macAddressOrUserLoginSecureExt |
|||
|
Else |
macAddressElseUserLoginSecure |
||
|
macAddressElseUserLoginSecureExt |
|||
|
|
TIP: · userLogin specifies 802.1X authentication and port-based access control. · macAddress specifies MAC authentication. · Else specifies that the authentication method before Else is applied first. If the authentication fails, whether to turn to the authentication method following Else depends on the protocol type of the authentication request. · Typically, in a security mode with Or, the authentication method to be used depends on the protocol type of the authentication request. For wireless users, the network access device always use 802.1X authentication first. · userLogin with Secure specifies 802.1X authentication and MAC-based access control. · Ext indicates allowing multiple 802.1X users to be authenticated and serviced at the same time. A security mode without Ext allows only one user to pass 802.1X authentication. |
Controlling MAC address learning
secure: MAC address learning is disabled on a port in this mode. You configure MAC addresses by using the mac-address static and mac-address dynamic commands. For more information about configuring MAC address table entries, see Layer 2 Configuration Guide.
A port in secure mode allows only frames sourced from the manually configured MAC addresses to pass.
Performing 802.1X authentication
· userLogin
A port in this mode performs 802.1X authentication and implements port-based access control. The port can service multiple 802.1X users. Once an 802.1X user passes authentication on the port, any subsequent 802.1X users can access the network through the port without authentication.
· userLoginSecure
A port in this mode performs 802.1X authentication and implements MAC-based access control. The port services only one user passing 802.1X authentication.
· userLoginSecureExt
This mode is similar to the userLoginSecure mode except that this mode supports multiple online 802.1X users.
· userLoginWithOUI
This mode is similar to the userLoginSecure mode. The difference is that a port in this mode also permits frames from one user whose MAC address contains a specific OUI.
¡ For wired users, the port performs 802.1X authentication upon receiving 802.1X frames, and performs OUI check upon receiving non-802.1X frames.
¡ For wireless users, the port performs OUI check at first. If the OUI check fails, the port performs 802.1X authentication.
|
|
NOTE: An OUI is a 24-bit number that uniquely identifies a vendor, manufacturer, or organization. In MAC addresses, the first three octets are the OUI. |
Performing MAC authentication
macAddressWithRadius: A port in this mode performs MAC authentication and services multiple users.
Performing a combination of MAC authentication and 802.1X authentication
· macAddressOrUserLoginSecure
This mode is the combination of the macAddressWithRadius and userLoginSecure modes.
¡ For wired users, the port performs MAC authentication 30 seconds after receiving non-802.1X frames and performs 802.1X authentication upon receiving 802.1X frames.
¡ For wireless users, the port performs 802.1X authentication first. If 802.1X authentication fails, MAC authentication is performed.
· macAddressOrUserLoginSecureExt
This mode is similar to the macAddressOrUserLoginSecure mode except that this mode supports multiple 802.1X and MAC authentication users.
· macAddressElseUserLoginSecure
This mode is the combination of the macAddressWithRadius and userLoginSecure modes, with MAC authentication having a higher priority as the Else keyword implies.
¡ For wired users, the port performs MAC authentication 30 seconds after receiving non-802.1X frames.
¡ For wireless users, the port performs MAC authentication upon receiving non-802.1X frames. Upon receiving 802.1X frames, the port performs MAC authentication, and if the MAC authentication fails, it performs 802.1X authentication.
· macAddressElseUserLoginSecureExt
This mode is similar to the macAddressElseUserLoginSecure mode except that this mode supports multiple 802.1X and MAC authentication users as the keyword Ext implies.
Support for WLAN
|
|
CAUTION: Do not configure static MAC address entries for wireless users that use the 802.1X or MAC authentication service. If the source MAC address and the VLAN of a wireless user match a static MAC address entry in the MAC address table, the user cannot pass 802.1X authentication or MAC authentication. |
Table 2 describes the port security modes that implement wireless access security at the link layer.
Table 2 Port security modes for WLAN ports
|
Security mode |
Description |
Features that can be triggered |
|
presharedKey |
A user must use a pre-configured static key, also called "the pre-shared key (PSK)," to negotiate the session key with the device and can access the network only after the negotiation succeeds. |
NTK/intrusion protection |
|
macAddressAndPresharedKey |
A user must pass MAC authentication and then use the pre-configured PSK to negotiate with the device. Only when the negotiation succeeds, can the user access the network. |
|
|
userLoginSecureExtOrPresharedKey |
A user interacts with the device, choosing the UserLoginSecure mode or using the PSK to negotiate with the device. |
PSK users refer to users that have passed authentication in presharedKey mode. The maximum number of PSK users on a port varies with security modes.
· presharedKey mode—The maximum number of PSK users on the port is the port specification limit on the number of wireless users or port security's limit on the number of MAC addresses, whichever is smaller. The actual maximum number of PSK users on the port also depends on the total number of PSK users that the system can support. For more information, see About the H3C Access Controllers Configuration Guides.
· macAddressAndPresharedKey mode—The maximum number of PSK users on the port is the MAC authentication feature's limit on the number of concurrent users or port security's limit on the number of MAC addresses, whichever is smaller. The actual maximum number of PSK users on the port also depends on the total number of PSK users that the system can support.
· userLoginSecureExtOrPresharedKey mode—The number of PSK users on the port cannot exceed the port limit on the number of wireless users, the number of 802.1X users cannot exceed the 802.1X feature's limit on the number of concurrent users, and the total number of PSK and 802.1X users cannot exceed port security's limit on the number of MAC addresses on the port. The maximum number of PSK or 802.1X users also depends on the system specification.
Working with guest VLAN and Auth-Fail VLAN
An 802.1X guest VLAN is the VLAN that a user is in before initiating authentication.
An 802.1X Auth-Fail VLAN or a MAC authentication guest VLAN is the VLAN that a user is in after failing authentication.
Support for the guest VLAN and Auth-Fail VLAN features varies with security modes.
· You can use the 802.1X guest VLAN and 802.1X Auth-Fail VLAN features together with port security modes that support 802.1X authentication. For more information about the 802.1X guest VLAN and Auth-Fail VLAN on a port that performs MAC-based access control, see "Configuring 802.1X."
· You can use the MAC authentication VLAN feature together with security modes that support MAC authentication. For more information about the MAC authentication guest VLAN, see "Configuring MAC authentication."
· If you configure both an 802.1X Auth-Fail VLAN and a MAC authentication guest VLAN on a port that performs MAC-based access control, the 802.1X Auth-Fail VLAN has a higher priority.
Port security stateful failover
Support for this feature depends on the device model. For more information, see About the H3C Access Controllers Configuration Guides.
In a dual-AC network, the ACs can provide client information stateful failover to avoid client logoff during primary/backup AC switchovers. When a client logs in or logs off, the primary AC synchronizes the client information (authentication and authorization information, client data, and client status) to the backup AC through the IACTP tunnel in real time. Therefore, when a primary/backup AC switchover occurs, the backup AC can immediately take over to provide normal communication for online clients. For more information about AC backup, see WLAN Configuration Guide.
Port security supports stateful failover only for 802.1X client information.
The Auth-Fail VLAN and guest VLAN do not support stateful failover. If a client is added to an Auth-Fail VLAN on the primary AC, the VLAN information cannot be synchronized to the backup AC.
Stop-Account-Buffer packets, if any, cannot be synchronized from the primary AC to the backup AC.
The failover link between two ACs is the basic for client information synchronization on both the ACs. Make sure the failover link operates correctly. If the failover link is disconnected and then reconnected, the client information might change.
Configuration task list
|
Task |
Remarks |
|
Required. |
|
|
Setting port security's limit on the number of MAC addresses on a port |
Optional. |
|
Required. |
|
|
Configuring port security features: |
Optional. Configure one or more features as required. |
|
Configuring port security for WLAN ports: |
Required for WLAN ports. |
|
Optional. |
|
|
Optional. |
|
|
Optional. |
Enabling port security
When port security is enabled, you cannot manually enable 802.1X or MAC authentication, or change the access control mode or port authorization state. The port security automatically modifies these settings in different security modes.
Before you enable port security, disable 802.1X and MAC authentication globally.
To enable port security:
|
Step |
Command |
Remarks |
|
1. Enter system view. |
system-view |
N/A |
|
2. Enable port security. |
port-security enable |
By default, port security is enabled. |
You can use the undo port-security enable command to disable port security when no online users are present.
Enabling or disabling port security resets the following security settings to the default:
· 802.1X access control mode is MAC-based, and the port authorization state is auto.
· Port security mode is noRestrictions.
For more information about Configuring 802.1X, see "Configuring 802.1X."
For more information about MAC authentication configuration, see "Configuring MAC authentication."
Setting port security's limit on the number of MAC addresses on a port
You can set the maximum number of MAC addresses that port security allows on a port to control the number of concurrent users on the port. The maximum number of concurrent users on the port equals this limit or the limit of the authentication mode (802.1X for example) in use, whichever is smaller.
The port security's limit on the number of MAC addresses on a port is independent of the MAC learning limit described in MAC address table configuration in the Layer 2 Configuration Guide.
To set the maximum number of secure MAC addresses allowed on a port:
|
Step |
Command |
Remarks |
|
1. Enter system view. |
system-view |
N/A |
|
2. Enter interface view. |
interface interface-type interface-number |
N/A |
|
3. Set the limit of port security on the number of MAC addresses. |
port-security max-mac-count count-value |
Not limited by default. |
Setting the port security mode
After enabling port security, you can change the port security mode of a port only when the port is operating in noRestrictions (the default) mode. To change the port security mode for a port in any other mode, first use the undo port-security port-mode command to restore the default port security mode.
You can specify a port security mode when port security is disabled, but your configuration cannot take effect.
You cannot change the port security mode of a port when online users are present.
Before you set a port security mode for a port, complete the following tasks:
· Disable 802.1X and MAC authentication.
· Check that the port does not belong to any aggregation group.
To enable a port security mode:
|
Step |
Command |
Remarks |
|
1. Enter system view. |
system-view |
N/A |
|
2. Set an OUI value for user authentication. |
port-security oui oui-value index index-value |
Required for the userlogin-withoui mode. Not configured by default. To set multiple OUI values, repeat this step. |
|
3. Enter interface view. |
interface interface-type interface-number |
To specify the userLoginWithOUI mode, you must enter Layer 2 Ethernet interface view or WLAN-ESS interface view. |
|
4. Set the port security mode. |
port-security port-mode { mac-authentication | mac-else-userlogin-secure | mac-else-userlogin-secure-ext | secure | userlogin | userlogin-secure | userlogin-secure-ext | userlogin-secure-or-mac | userlogin-secure-or-mac-ext | userlogin-withoui } |
By default, a port operates in noRestrictions mode. If you configure the MAC authentication quiet timer after you have configured the port-security port-mode { mac-authentication | userlogin-secure-or-mac | userlogin-secure-or-mac-ext } command, the quiet timer does not take effect. For more information about the MAC authentication quiet timer, see "Configuring MAC authentication." |
Configuring port security features
Configuring NTK
The NTK feature checks destination MAC addresses in outbound frames to make sure frames are forwarded only to authenticated devices. Any unicast frame with an unknown destination MAC address is discarded. Not all port security modes support triggering the NTK feature. For more information, see Table 1.
The NTK feature supports the following modes:
· ntkonly—Forwards only unicast frames with authenticated destination MAC addresses.
· ntk-withbroadcasts—Forwards only broadcast frames and unicast frames with authenticated destination MAC addresses.
· ntk-withmulticasts—Forwards only broadcast frames, multicast frames, and unicast frames with authenticated destination MAC addresses.
To configure the NTK feature:
|
Step |
Command |
Remarks |
|
1. Enter system view. |
system-view |
N/A |
|
2. Enter interface view. |
interface interface-type interface-number |
N/A |
|
3. Configure the NTK feature. |
port-security ntk-mode { ntk-withbroadcasts | ntk-withmulticasts | ntkonly } |
By default, NTK is disabled on a port and all frames are allowed to be sent. |
Configuring intrusion protection
Intrusion protection enables a device to take one of the following actions in response to illegal frames:
· blockmac—Adds the source MAC addresses of illegal frames to the blocked MAC addresses list and discards the frames. All subsequent frames sourced from a blocked MAC address will be dropped. A blocked MAC address is restored to normal state after being blocked for three minutes. The interval is fixed and cannot be changed.
· disableport—Disables the port until you bring it up manually.
· disableport-temporarily—Disables the port for a specific period of time. The period can be configured with the port-security timer disableport command.
On a port operating in either the macAddressElseUserLoginSecure mode or the macAddressElseUserLoginSecureExt mode, intrusion protection is triggered only after both MAC authentication and 802.1X authentication fail for the same frame.
To configure the intrusion protection feature:
|
Step |
Command |
Remarks |
|
1. Enter system view. |
system-view |
N/A |
|
2. Enter interface view. |
interface interface-type interface-number |
N/A |
|
3. Configure the intrusion protection feature. |
port-security intrusion-mode { blockmac | disableport | disableport-temporarily } |
By default, intrusion protection is disabled. The disableport keyword is not supported on a WLAN-ESS interface. |
|
4. Return to system view. |
quit |
N/A |
|
5. Set the silence timeout period during which a port remains disabled. |
port-security timer disableport time-value |
Optional. 20 seconds by default. |
Enabling port security traps
You can configure the port security module to send traps for the following categories of events:
· addresslearned—Learning of new MAC addresses.
· dot1xlogfailure/dot1xlogon/dot1xlogoff—802.1X authentication failure, success, and 802.1X user logoff.
· ralmlogfailure/ralmlogon/ralmlogoff—MAC authentication failure, MAC authentication user logon, and MAC authentication user logoff.
· intrusion—Detection of illegal frames.
To enable port security traps:
|
Step |
Command |
Remarks |
|
1. Enter system view. |
system-view |
N/A |
|
2. Enable port security traps. |
port-security trap { addresslearned | dot1xlogfailure | dot1xlogoff | dot1xlogon | intrusion | ralmlogfailure | ralmlogoff | ralmlogon } |
By default, port security traps are disabled. |
Configuring port security for WLAN ports
Table 3 describes the key negotiation and PSK requirements for different port security modes on WLAN ports.
Table 3 Port security configuration for WLAN ports
|
Port security mode |
Description |
|
presharedKey, userLoginSecureExt, userLoginSecureExtOrPresharedKey, and macAddressAndPresharedKey |
On WPA or RSN networks using any of these modes, key negotiation must be enabled. · In presharedKey and macAddressAndPresharedKey modes, you need to configure the PSK. · In userLoginSecureExt mode, you do not need to configure the PSK. · In userLoginSecureExtOrPresharedKey mode, you can determine whether to configure any PSK. |
|
Port security modes other than presharedKey, userLoginSecureExtOrPresharedKey, and macAddressAndPresharedKey |
No key negotiation is performed and you do not need to enable key negotiation. |
For more information about WLAN service templates, see WLAN Configuration Guide.
By default, an 802.1X-enabled access device periodically multicasts Identity EAP-Request packets out of ports to detect 802.1X clients and trigger authentication. To save the bandwidth of WLAN ports, H3C recommends you disable the multicast trigger function (see "Configuring 802.1X").
Setting the port security mode of a WLAN port
|
Step |
Command |
Remarks |
|
1. Enter system view. |
system-view |
N/A |
|
2. Enter interface view. |
interface interface-type interface-number |
N/A |
|
3. Set a port security mode for the WLAN port. |
port-security port-mode { mac-and-psk | mac-authentication | mac-else-userlogin-secure | mac-else-userlogin-secure-ext | psk | userlogin-secure | userlogin-secure-ext | userlogin-secure-ext-or-psk | userlogin-secure-or-mac | userlogin-secure-or-mac-ext | userlogin-withoui } |
By default, a port operates in noRestrictions mode. |
Enabling key negotiation
After a user passes 802.1X authentication, a WLAN port uses EAPOL-Key frames to negotiate the link-layer session key with the user if the key negotiation function is enabled.
· If key negotiation is enabled, an authenticated user is allowed to access to the port only after the key negotiation succeeds.
· If key negotiation is disabled, a user can directly access the port after passing authentication.
To enable key negotiation:
|
Step |
Command |
Remarks |
|
1. Enter system view. |
system-view |
N/A |
|
2. Enter interface view. |
interface interface-type interface-number |
N/A |
|
3. Enable key negotiation of the 11key type. |
port-security tx-key-type 11key |
Disabled by default. |
Configuring a PSK
A PSK pre-configured on the device is used to negotiate the session key between the user and the device.
To configure a PSK:
|
Step |
Command |
Remarks |
|
1. Enter system view. |
system-view |
N/A |
|
2. Enter interface view. |
interface interface-type interface-number |
N/A |
|
3. Configure a PSK. |
port-security preshared-key { pass-phrase | raw-key } [ cipher | simple ] key |
By default, no PSK is configured. |
Ignoring authorization information from the server
You can configure a port to ignore the authorization information received from the server (an RADIUS server or the local device) after an 802.1X user or MAC authentication user passes authentication.
To configure a port to ignore authorization information from the server:
|
Step |
Command |
Remarks |
|
1. Enter system view. |
system-view |
N/A |
|
2. Enter interface view. |
interface interface-type interface-number |
N/A |
|
3. Ignore the authorization information received from the authentication server. |
port-security authorization ignore |
By default, a port uses the authorization information received from the authentication server. |
Configuring NAS ID profile for port security
Perform this task to specify a NAS ID profile for interface-specific or global port security. When a user passes port security authentication on an interface, the device searches the NAS ID to be sent to the RADIUS server in the following order:
1. NAS ID configured in the AP template.
2. NAS ID configured in radio view.
3. NAS ID in the NAS ID profile specified for port security on the interface.
4. NAS ID in the NAS ID profile specified for port security in system view.
5. Device name.
To specify a NAS ID profile for port security in system view:
|
Step |
Command |
Remarks |
|
1. Enter system view. |
system-view |
N/A |
|
2. Specify a NAS ID profile. |
port-security nas-id-profile profile-name |
By default, no NAS ID profile is specified in system view. |
To specify a NAS ID profile for port security on an interface:
|
Step |
Command |
Remarks |
|
1. Enter system view. |
system-view |
N/A |
|
2. Enter interface view. |
interface interface-type interface-number |
N/A |
|
3. Specify a NAS ID profile. |
port-security nas-id-profile profile-name |
By default, no NAS ID profile is specified on an interface. |
Configuring port security stateful failover
Support for this feature depends on the device model. For more information, see About the H3C Access Controllers Configuration Guides.
Perform this task to provide client information stateful failover on two ACs that support stateful failover. After you configure stateful failover for the two ACs and on the WLAN-ESS interfaces (with the same interface number) of the two ACs, the primary AC synchronizes the online client information on the WLAN-ESS interface and the corresponding WLAN-DBSS interface to the backup AC. When a primary/backup AC switchover occurs, the backup AC takes over to provide access services for the online clients without re-authenticating the clients.
Port security supports stateful failover only for 802.1X client information.
To implement port security stateful failover, complete the following tasks:
· Configure AC hot backup (stateful failover). For more information, see WLAN Configuration Guide.
· Configure WLAN client information backup. For more information, see WLAN Configuration Guide.
· Configure VRRP. You need to configure a VRRP group on the interface connected to the authentication server. For more information, see High Availability Configuration Guide.
· Configure stateful failover. You need to configure a backup VLAN for the stateful failover function. For more information, see High Availability Configuration Guide.
· Configure different device IDs for the ACs that back up each other. For more information, see "Configuring AAA."
· Specify the virtual IP address of the VRRP group as the source address of outgoing RADIUS packets. For more information, see "Configuring AAA."
To configure port security stateful failover:
|
Step |
Command |
Remarks |
|
1. Enter system view. |
system-view |
N/A |
|
2. Enter WLAN-ESS interface view. |
interface wlan-ess interface-number |
N/A |
|
3. Enable stateful failover for port security. |
port-security synchronization enable |
By default, stateful failover is disabled for port security. |
Displaying and maintaining port security
|
Task |
Command |
Remarks |
|
Display port security configuration information, operation information, and statistics about one or more ports or all ports. |
display port-security [ interface interface-list ] [ | { begin | exclude | include } regular-expression ] |
Available in any view. |
|
Display information about blocked MAC addresses. |
display port-security mac-address block [ interface interface-type interface-number ] [ vlan vlan-id ] [ count ] [ | { begin | exclude | include } regular-expression ] |
Available in any view. |
|
Display information about PSK users. |
display port-security preshared-key user [ interface interface-type interface-number ] [ | { begin | exclude | include } regular-expression ] |
Available in any view. |
Port security configuration examples
Configuring the userLoginWithOUI mode
Network requirements
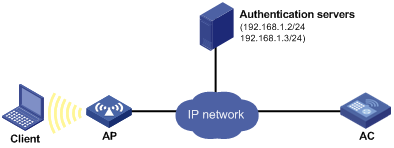
As shown in Figure 1, a client is connected to the AC through port WLAN-ESS 1. The AC authenticates the client with a RADIUS server. If the authentication succeeds, the client is authorized to access the Internet.
· The RADIUS server at 192.168.1.2/24 functions as the primary authentication server and the secondary accounting server. The RADIUS server at 192.168.1.3/24 functions as the secondary authentication server and the primary accounting server. The shared key for authentication is name, and the shared key for accounting is money.
· All users use the default authentication, authorization, and accounting methods of ISP domain sun, which can accommodate up to 30 users.
· The RADIUS server response timeout time is five seconds. The maximum number of RADIUS packet retransmission attempts is five. The AC sends real-time accounting packets to the RADIUS server at an interval of 15 minutes, and sends user names without domain names to the RADIUS server.
Configure port WLAN-ESS 1 of the AC to:
· Allow only one 802.1X user to be authenticated.
· Allow up to five OUI values to be configured and allow one terminal that uses any of the OUI values to access the port in addition to an 802.1X user.
Configuration procedure
The following configuration steps cover some AAA/RADIUS configuration commands. For more information about the commands, see Security Command Reference.
Configuration procedures for the client and RADIUS servers are not shown.
1. Configure the RADIUS protocol:
# Configure a RADIUS scheme named radsun.
<AC> system-view
[AC] radius scheme radsun
# Specify the IP address of the primary authentication RADIUS server as 192.168.1.2/24, and that of the primary accounting RADIUS server as 192.168.1.3/24.
[AC-radius-radsun] primary authentication 192.168.1.2
[AC-radius-radsun] primary accounting 192.168.1.3
# Specify the IP address of the secondary authentication RADIUS server as 192.168.1.3/24, and that of the secondary accounting RADIUS server as 192.168.1.2/24.
[AC-radius-radsun] secondary authentication 192.168.1.3
[AC-radius-radsun] secondary accounting 192.168.1.2
# Set the shared key for authenticating RADIUS authentication/authorization packets as name.
[AC-radius-radsun] key authentication name
# Set the shared key for authenticating RADIUS accounting packets as money.
[AC-radius-radsun] key accounting money
# Set the RADIUS server response timeout to 5 seconds, and set the maximum transmission attempts of RADIUS packets to 5.
[AC-radius-radsun] timer response-timeout 5
[AC-radius-radsun] retry 5
# Set the interval between sending real time accounting packets to the RADIUS server to 15 minutes.
[AC-radius-radsun] timer realtime-accounting 15
# Exclude the ISP domain name in the username sent to the RADIUS server.
[AC-radius-radsun] user-name-format without-domain
[AC-radius-radsun] quit
# Configure ISP domain sun to use RADIUS scheme radsun for authentication, authorization, and accounting of all types of users.
[AC] domain sun
[AC-isp-sun] authentication default radius-scheme radsun
[AC-isp-sun] authorization default radius-scheme radsun
[AC-isp-sun] accounting default radius-scheme radsun
# Specify that the ISP domain can contain up to 30 users.
[AC-isp-sun] access-limit enable 30
[AC-isp-sun] quit
2. Set the 802.1X authentication method to CHAP. By default, the authentication method is CHAP for 802.1X.
[AC] dot1x authentication-method chap
3. Configure port security:
# Enable port security.
[AC] port-security enable
# Add five OUI values.
[AC] port-security oui 1234-0100-1111 index 1
[AC] port-security oui 1234-0200-1111 index 2
[AC] port-security oui 1234-0300-1111 index 3
[AC] port-security oui 1234-0400-1111 index 4
[AC] port-security oui 1234-0500-1111 index 5
# Configure the mandatory authentication domain sun for 802.1X users on WLAN-ESS 1. Set the port security mode to userLoginWithOUI.
[AC] interface wlan-ess 1
[AC-WLAN-ESS1] dot1x mandatory-domain sun
[AC-WLAN-ESS1] port-security port-mode userlogin-withoui
[AC-WLAN-ESS1] quit
# Create service template 2, set its template type to clear and SSID to mactest, bind interface WLAN-ESS 1 to it, and enable open system authentication.
[AC] wlan service-template 2 clear
[AC-wlan-st-2] ssid mactest
[AC-wlan-st-2] bind wlan-ess 1
[AC-wlan-st-2] authentication-method open-system
[AC-wlan-st-2] service-template enable
[AC-wlan-st-2] quit
# Create an AP template named ap1, and set its model to WA3628i-AGN and serial ID to 210235A29G007C000020.
[AC] wlan ap ap1 model WA3628i-AGN
[AC-wlan-ap-ap1] serial-id 210235A29G007C000020
[AC-wlan-ap-ap1] radio 1 type dot11an
# Map service template 2 to radio 1, and enable the radio.
[AC-wlan-ap-ap1-radio-1] service-template 2
[AC-wlan-ap-ap1-radio-1] radio enable
[AC-wlan-ap-ap1-radio-1] quit
[AC-wlan-ap-ap1] quit
Verifying the configuration
# Display the configuration of the RADIUS scheme named radsun.
[AC] display radius scheme radsun
SchemeName : radsun
Index = 1 Type : standard
Primary Auth Server:
IP: 192.168.1.2 Port: 1812 State: active
Encryption Key : N/A
Probe username : N/A
Probe interval : N/A
Primary Acct Server:
IP: 192.168.1.3 Port: 1813 State: active
Encryption Key : N/A
Probe username : N/A
Probe interval : N/A
Second Auth Server:
IP: 192.168.1.3 Port: 1812 State: active
Encryption Key : N/A
Probe username : N/A
Probe interval : N/A
Second Acct Server:
IP: 192.168.1.2 Port: 1813 State: active
Encryption Key : N/A
Probe username : N/A
Probe interval : N/A
Auth Server Encryption Key : ******
Acct Server Encryption Key : ******
Accounting-On packet disable, send times = 5 , interval : 3s
Interval for timeout(second) : 5
Retransmission times for timeout : 5
Interval for realtime accounting(minute) : 15
Retransmission times of realtime-accounting packet : 5
Retransmission times of stop-accounting packet : 500
Quiet-interval(min) : 5
Username format : without-domain
Data flow unit : Byte
Packet unit : one
# Display the configuration of the ISP domain named sun.
[AC] display domain sun
Domain = sun
State = Active
Access-limit = 30
Accounting method = Required
Default authentication scheme : radius=radsun
Default authorization scheme : radius=radsun
Default accounting scheme : radius=radsun
Domain User Template:
Idle-cut = Disable
Session-time : exclude-idle-time
Self-service = Disable
Authorization attributes:
# Display the port security configuration.
[AC] display port-security interface wlan-ess 1
Equipment port-security is enabled
Trap is disabled
Disableport Timeout: 20s
OUI value:
Index is 1, OUI value is 123401
Index is 2, OUI value is 123402
Index is 3, OUI value is 123403
Index is 4, OUI value is 123404
Index is 5, OUI value is 123405
WLAN-ESS1 is link-up
Port mode is userLoginWithOUI
NeedToKnow mode is disabled
Intrusion Protection mode is NoAction
Max MAC address number is not configured
Stored MAC address number is 0
Authorization is permitted
Synchronization is disabled
After an 802.1X user gets online, you can see that the number of MAC addresses stored is 1.
# Display the 802.1X user connection.
[AC] display connection
Index=1,Username= test@sun
MAC=12-34-01-00-11-11
IP=10.1.0.1
IPv6=N/A
Total 1 connection(s) matched.
[AC] display connection ucibinedx 1
Index=1, Username= test@sun
MAC=12-34-01-00-11-11
IP=10.1.0.1
IPv6=N/A
Access=8021X ,AuthMethod=CHAP
Port Type=Wireless-802.11,Port Name=WLAN-DBSS1:1
Initial VLAN=1, Authorization VLAN= N/A
ACL Group=Disable
User Profile=N/A
CAR=Disable
InputOctets =12121212 OutputOctets =12120
InputGigawords=1 OutputGigawords=0
Priority=Disable
SessionTimeout=86236(s), Terminate-Action=Default
Start=2011-07-01 15:39:49 ,Current=2011-07-01 15:50:07 ,Online=00h10m18s
Total 1 connection matched.
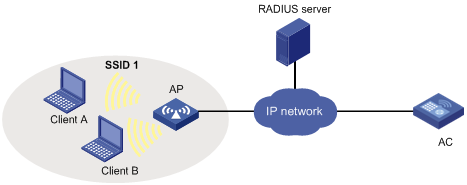
Configuring the userLoginSecureExt mode on a WLAN port
Network requirements
Clients are wirelessly connected to the AC through port WLAN-ESS 1. The AC uses the RADIUS server to authenticate its clients. If the authentication for a client succeeds, key negotiation is performed. If key negotiation succeeds, the client can access the network resources.
The RADIUS server at 192.168.1.2/24 is the primary authentication server and the backup accounting server. The RADIUS server at 192.168.1.3/24 is the backup authentication server and the primary accounting server. Both the authentication and accounting shared keys are name.
All users use the default authentication, authorization, and accounting methods of the ISP domain sun.
Configuration procedure
This example covers only some of the required AAA and RADIUS configuration commands. For more information, see Security Command Reference.
The client-side and RADIUS server-side configuration procedures are not shown in this example.
For more information about WLAN configuration, see WLAN Configuration Guide.
1. Enable port security.
<AC> system-view
[AC] port-security enable
2. Configure RADIUS:
# Configure RADIUS scheme 2000.
[AC] radius scheme 2000
# Specify the IP address of the primary authentication RADIUS server as 192.168.1.2/24, and that of the primary accounting RADIUS server as 192.168.1.3/24.
[AC-radius-2000] primary authentication 192.168.1.2
[AC-radius-2000] primary accounting 192.168.1.3
# Specify the IP address of the secondary authentication RADIUS server as 192.168.1.3/24, and that of the secondary accounting RADIUS server as 192.168.1.2/24.
[AC-radius-2000] secondary authentication 192.168.1.3
[AC-radius-2000] secondary accounting 192.168.1.2
# Set the shared keys for authenticating RADIUS authentication and accounting packets as name.
[AC-radius-2000] key authentication name
[AC-radius-2000] key accounting name
# Exclude the ISP domain name in the username sent to the RADIUS server.
[AC-radius-2000] user-name-format without-domain
[AC-radius-2000] quit
# Configure ISP domain sun, and configure the domain to use RADIUS scheme 2000 for authentication, authorization, and accounting of all types of users.
[AC] domain sun
[AC-isp-sun] authentication default radius-scheme 2000
[AC-isp-sun] authorization default radius-scheme 2000
[AC-isp-sun] accounting default radius-scheme 2000
[AC-isp-sun] quit
# Create interface WLAN-ESS 1.
[AC] interface wlan-ess 1
# Set the port security mode to userLoginSecureExt.
[AC-WLAN-ESS1] port-security port-mode userlogin-secure-ext
# Enable key negotiation of the 11key type.
[AC-WLAN-ESS1] port-security tx-key-type 11key
# Disable the 802.1X multicast trigger and online user handshake functions.
[AC-WLAN-ESS1] undo dot1x multicast-trigger
[AC-WLAN-ESS1] undo dot1x handshake
[AC-WLAN-ESS1] quit
# Specify domain sun as the default authentication domain.
[AC] domain default sun
# Set the 802.1X authentication mode to EAP.
[AC] dot1x authentication-method eap
3. Configure the WLAN service template, and the AP:
# Create a WLAN service template of the crypto type, enter its view, and set an SSID.
[AC] wlan service-template 1 crypto
[AC-wlan-st-1] ssid SSID1
# Bind the interface to the service template.
[AC-wlan-st-1] bind wlan-ess 1
# Enable open system authentication, the AES-CCMP cipher suite, and the RSN-IE in the beacon and probe responses.
[AC-wlan-st-1] authentication-method open-system
[AC-wlan-st-1] cipher-suite ccmp
[AC-wlan-st-1] security-ie rsn
# Enable the service template function.
[AC-wlan-st-1] service-template enable
[AC-wlan-st-1] quit
# Create an AP template named ap1, and set its model to WA3628i-AGN and serial ID to 210235A29G007C000020.
[AC] wlan ap ap1 model WA3628i-AGN
[AC-wlan-ap-ap1] serial-id 210235A29G007C000020
# Bind the service template 1 to the port radio 1, and enable the radio.
[AC-wlan-ap-ap1] radio 1 type dot11an
[AC-wlan-ap-ap1-radio-1] service-template 1
[AC-wlan-ap-ap1-radio-1] radio enable
[AC-wlan-ap-ap1-radio-1] return
Verifying the configuration
# Display the port security configuration.
<AC> display port-security interface wlan-ess 1
Equipment port-security is enabled
Trap is disabled
Disableport Timeout: 20s
OUI value:
WLAN-ESS1 is link-up
Port mode is userLoginSecureExt
NeedToKnow mode is disabled
Intrusion Protection mode is NoAction
Max MAC address number is not configured
Stored MAC address number is 0
Authorization is permitted
Synchronization is disabled
# If a user comes online, you can use the display connection command and the display wlan client command to display information about the user.
<AC> display connection ucibindex 315
Index=315 , [email protected]
MAC=00-17-9A-00-7B-2F
IP=N/A
IPv6=N/A
Access=8021X ,AuthMethod=EAP
Port Type=Wireless-802.11,Port Name=WLAN-DBSS1:0
Initial VLAN=1, Authorization VLAN=N/A
ACL Group=Disable
User Profile=N/A
CAR=Disable
Traffic Statistic:
InputOctets =12121212 OutputOctets =12120
InputGigawords=1 OutputGigawords=0
Priority=Disable
SessionTimeout=86236(s), Terminate-Action=Default
Start=2013-11-16 16:58:51 ,Current=2013-11-16 16:59:29 ,Online=00h00m38s
Total 1 connection matched.
<AC> display wlan client verbose
Total Number of Clients : 1
----------------------------------------------------------------------
MAC Address : 0017-9a00-7b2f
User Name : test
IP Address : 192.168.1.48
AID : 1
AP Name : AP1
Radio Id : 1
Service Template Number : 1
SSID : SSID1
BSSID : 000f-e278-8020
Port : WLAN-DBSS1:0
VLAN : 1
State : Running
Power Save Mode : Active
Wireless Mode : 11an
Channel Band-width : 40MHz
SM Power Save Enable : Disabled
Short GI for 20MHz : Not Supported
Short GI for 40MHz : Supported
LDPC : Not Supported
STBC Tx Capability : Supported
STBC Rx Capability : Supported
Support MCS Set : 0,1,2,3,4,5,6,7,8,9,10,11,12,13,14,15
BLOCK ACK-TID 0 : IN
QoS Mode : WMM
Listen Interval (Beacon Interval) : 10
RSSI : 37
Rx/Tx Rate : 5.5/18
Client Type : ccmp
Authentication Method : Open System
Authentication Mode : Central
AKM Method : Dot1x
4-Way Handshake State : -NA-
Group Key State : IDLE
Encryption Cipher : RSN
Roam Status : Normal
Roam Count : 0
Up Time (hh:mm:ss) : 00:01:13
----------------------------------------------------------------------
Configuring an 802.1X guest VLAN for a port security-enabled port
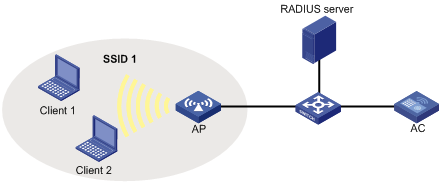
Network requirements
As shown in Figure 3, an AP connects to an AC through a switch. The AC performs 802.1X authentication for the wireless users, implements MAC-based access control on the ingress port, and accepts concurrent 802.1X users.
Configure a guest VLAN on the ingress port of the AC, so any user that has failed authentication can access VLAN 1.
Configuration procedure
This example covers only some of the required AAA and RADIUS configuration commands. For more information, see Security Command Reference.
The client-side and RADIUS server-side configuration procedures are not shown in this example.
For more information about WLAN configuration, see WLAN Configuration Guide.
1. Perform RADIUS-related configurations. See steps in "Configuring the userLoginWithOUI mode."
2. Configure the AC:
# Create VLAN 2.
<AC> system-view
[AC] vlan 2
[AC-vlan2] quit
# Enable port security.
[AC] port-security enable
# Set the 802.1X authentication method to EAP.
[AC] dot1x authentication-method eap
# Set the port security mode of WLAN-ESS 1 to userLoginSecureExt. In this mode, the port performs 802.1X authentication, implements MAC-based access control, and allows more than one 802.1X user.
[AC] interface wlan-ess 1
[AC-WLAN-ESS1] port-security port-mode userlogin-secure-ext
# Enable the MAC-based VLAN function and configure VLAN 1 as the guest VLAN.
[AC-WLAN-ESS1] port link-type hybrid
[AC-WLAN-ESS1] port hybrid vlan 1 to 2 untagged
[AC-WLAN-ESS1] port hybrid pvid vlan 2
[AC-WLAN-ESS1] mac-vlan enable
[AC-WLAN-ESS1] dot1x guest-vlan 1
# Disable the 802.1X multicast trigger and online user handshake functions.
[AC-WLAN-ESS1] undo dot1x handshake
[AC-WLAN-ESS1] undo dot1x multicast-trigger
[AC-WLAN-ESS1] quit
# Configure the WLAN service template.
[AC] wlan service-template 1 clear
[AC-wlan-st-1] ssid SSID1
[AC-wlan-st-1] bind wlan-ess 1
[AC-wlan-st-1] authentication-method open-system
[AC-wlan-st-1] service-template enable
[AC-wlan-st-1] quit
# Configure the service template of the AP.
[AC] wlan ap 1 model WA3628i-AGN
[AC-wlan-ap-1] serial-id 210235A29G007C000020
[AC-wlan-ap-1] radio 1
[AC-wlan-ap-1-radio-1] service-template 1
[AC-wlan-ap-1-radio-1] radio enable
[AC-wlan-ap-1-radio-1] quit
[AC-wlan-ap-1] quit
Verifying the configuration
# Before Client 1 is authenticated (using the username of mac and MAC address of 000f-e2cc-6a21), the guest VLAN function takes effect. You can use the display mac-vlan all command to display the MAC-to-VLAN mapping.
[AC] display mac-vlan all
The following MAC VLAN addresses exist:
S:Static D:Dynamic
MAC ADDR MASK VLAN ID PRIO STATE
--------------------------------------------------------
000f-e2cc-6a21 ffff-ffff-ffff 1 0 D
Total MAC VLAN address count:1
# If Client 1 initiates authentication and passes the authentication, you can use the display connection command to display the user information, and use the display mac-vlan all command to verify that the MAC-to-VLAN mapping entry has been removed.
[AC] display connection user-name mac@sun
Index=18 , Username=mac@sun
MAC=000f-e2cc-6a21
IP=8.4.4.199
IPv6=N/A
Online=00h00m31s
Total 1 connection(s) matched.
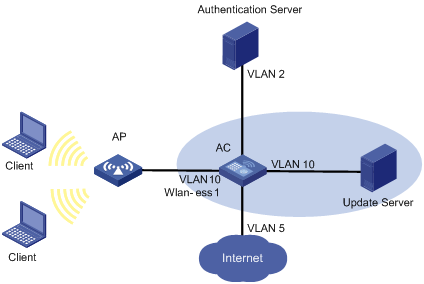
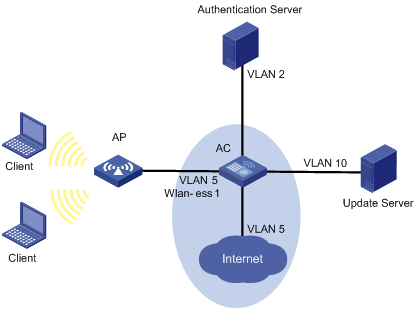
Configuring port security with guest VLAN and VLAN assignment
Network requirements
Clients connect to the AC through the AP. he AC uses the RADIUS server to authenticate its clients. The access port WLAN-ESS 1 of the AC is in VLAN 1, the RADIUS server is in VLAN 2, and the update server for client software download and upgrade is in VLAN 10.
Clients can access the Internet after passing authentication.
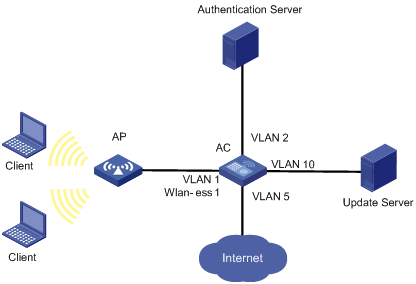
As shown in Figure 5, enable 802.1X and set VLAN 10 as the guest VLAN on port WLAN-ESS 1. If the AC sends an EAP-Request/Identity packet from the port for the maximum number of times but still receives no response, the AC adds the MAC address of the client to its guest VLAN. In this case, the client and the update server are both in VLAN 10, and therefore the host can access the update server and download the 802.1X client.
As shown in Figure 6, after the host passes the authentication and logs in, the client is added to VLAN 5. In this case, the client and WLAN-ESS 1 are both in VLAN 5, and therefore the client can access the Internet.
Configuration procedure
Use the iNode client in this example. The client that comes with Windows does not support the function.
This example covers only some of the required AAA and RADIUS configuration commands. For more information, see Security Command Reference.
# Configure RADIUS scheme 2000.
<AC> system-view
[AC] radius scheme 2000
[AC-radius-2000] primary authentication 10.11.1.1 1812
[AC-radius-2000] primary accounting 10.11.1.1 1813
[AC-radius-2000] key authentication abc
[AC-radius-2000] key accounting abc
[AC-radius-2000] user-name-format without-domain
[AC-radius-2000] quit
# Create ISP domain test, and set it as the default ISP domain. By default, the system default ISP domain is system.
[AC] domain test
[AC-isp-test] quit
[AC] domain default enable test
# And apply RADIUS scheme 2000 to the domain test.
[AC] domain test
[AC-isp-test] authentication lan-access radius-scheme 2000
[AC-isp-test] authorization lan-access radius-scheme 2000
[AC-isp-test] accounting lan-access radius-scheme 2000
[AC-isp-test] quit
# Enable port security in system view.
[AC] port-security enable
# Set the 802.1X authentication method to EAP.
[AC] dot1x authentication-method eap
# Configure wireless port WLAN-ESS 1.
[AC] interface wlan-ess 1
[AC-WLAN-ESS1] port link-type hybrid
[AC-WLAN-ESS1] port hybrid vlan 1 to 2 5 10 untagged
[AC-WLAN-ESS1] port-security port-mode userlogin-secure-ext
[AC-WLAN-ESS1] mac-vlan enable
[AC-WLAN-ESS1] dot1x guest-vlan 10
[AC-WLAN-ESS1] dot1x mandatory-domain test
[AC-WLAN-ESS1] quit
# Configure service template 1. The template must be in clear text mode.
[AC] wlan service-template 1 clear
[AC-wlan-st-1] ssid dot1x
[AC-wlan-st-1] bind wlan-ess 1
[AC-wlan-st-1] authentication-method open-system
[AC-wlan-st-1] service-template enable
[AC-wlan-st-1] quit
# Configure an AP template named 1.
[AC] wlan ap 1 model WA3628i-AGN
[AC-wlan-ap-1] serial-id 210235A29G007C000020
[AC-wlan-ap-1] radio 1
[AC-wlan-ap-1-radio-1] service-template 1
[AC-wlan-ap-1-radio-1] radio enable
[AC-wlan-ap-1-radio-1] quit
[AC-wlan-ap-1] quit
Verifying the configuration
# Before Client 1 is authenticated (using the username of mac and MAC address of 000f-e2cc-6a21), the guest VLAN function takes effect. You can use the display mac-vlan all command to display the MAC-to-VLAN mapping.
[AC] display mac-vlan all
The following MAC VLAN addresses exist:
S:Static D:Dynamic
MAC ADDR MASK VLAN ID PRIO STATE
--------------------------------------------------------
000f-e2cc-6a21 ffff-ffff-ffff 10 0 D
Total MAC VLAN address count:1
# If Client 1 initiates authentication and passes the authentication, you can use the display connection command to display the user information, and use the display mac-vlan all command to verify that the MAC-to-VLAN mapping entry has been removed.
[AC] display connection user-name mac@test
Index=18 , Username=mac@test
MAC=000f-e2cc-6a21
IP=8.4.4.199
IPv6=N/A
Online=00h00m31s
Total 1 connection(s) matched.
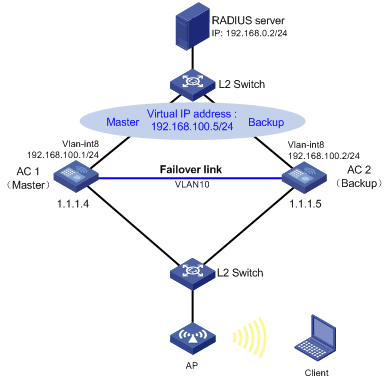
Configuring 802.1X stateful failover for port security
Network requirements
AC 1 and AC 2 support stateful failover. To avoid 802.1X client re-authentication and traffic interruption in case of a primary/backup AC switchover, configure AC 1 and AC 2 to support stateful failover for 802.1X client information and use VRRP to implement traffic switchover between the ACs.
When AC 1 operates normally, the client passes 802.1X authentication on AC 1 to access the external network. When AC 1 fails, the client accesses the external network through AC 2.
A RADIUS server is used as the AAA server. The NAS IP of the access device configured on the RADIUS server is 192.168.100.5/24.
AC 1 and AC 2 use a failover link to transmit the stateful failover packets and the backup VLAN for stateful failover is VLAN 10.
Figure 7 Network diagram
Configuration considerations
Complete the following tasks:
· Configure IP addresses for interfaces. Create VLAN 8 and VLAN 10. Configure the RADIUS server. (Details not shown.)
· Create the WLAN-ESS interface, set a port security mode for 802.1X authentication on the interface, and enable stateful failover for port security.
· Enable global port security.
· Enable stateful failover and specify the backup VLAN.
· Configure a VRRP group on the interface connected to the RADIUS server.
· Configure an AAA authentication domain and a RADIUS scheme.
· Configure AC backup and the client information backup.
· Enable the AC hot backup function
Configuring AC 1
1. Configure port security:
# Specify the 802.1X authentication method as EAP.
<AC1> system-view
[AC1] dot1x authentication-method eap
# Create interface WLAN-ESS 1 and enter its view.
[AC1] interface wlan-ess 1
# Set the port security mode to userlogin-secure-ext.
[AC1-WLAN-ESS1] port-security port-mode userlogin-secure-ext
# Enable stateful failover for port security.
[AC1-WLAN-ESS1] port-security synchronization enable
# Enable key negotiation.
[AC1-WLAN-ESS1] port-security tx-key-type 11key
# Specify the authentication domain for 802.1X users as domain 2003.
[AC1-WLAN-ESS1] dot1x mandatory-domain 2003
# Disable the 802.1X multicast trigger and online user handshake functions.
[AC1-WLAN-ESS1] undo dot1x multicast-trigger
[AC1-WLAN-ESS1] undo dot1x handshake
[AC1-WLAN-ESS1] quit
# Enable global port security.
[AC1] port-security enable
2. Configure stateful failover:
# Specify VLAN 10 as the backup VLAN for stateful failover.
[AC1] dhbk vlan 10
# Enable symmetric-path mode stateful failover.
[AC1] dhbk enable backup-type symmetric-path
3. Create VRRP group 1 on interface VLAN-interface 8.
[AC1] interface vlan 8
[AC1-Vlan-interface8] ip address 192.168.100.1 24
[AC1-Vlan-interface8] vrrp vrid 1 virtual-ip 192.168.100.5
[AC1-Vlan-interface8] quit
4. Configure AAA:
# Specify the device ID to be used in stateful failover mode as 1.
[AC1] nas device-id 1
# Configure RADIUS scheme 2003.
[AC1] radius scheme 2003
[AC1-radius-2003] primary authentication 192.168.0.2
[AC1-radius-2003] primary accounting 192.168.0.2
[AC1-radius-2003] key authentication simple aabbcc
[AC1-radius-2003] key accounting simple aabbcc
[AC1-radius-2003] user-name-format without-domain
[AC1-radius-2003] nas-ip 192.168.100.5
[AC1-radius-2003] quit
# Create authentication domain 2003, and specify the AAA methods.
[AC1] domain 2003
[AC1-isp-2003] authentication lan-access radius-scheme 2003
[AC1-isp-2003] authorization lan-access radius-scheme 2003
[AC1-isp-2003] accounting lan-access radius-scheme 2003
[AC1-isp-2003] quit
5. Configure AC backup and client information backup:
# Specify AC 2 as the backup AC of AC 1.
[AC1] wlan backup-ac ip 1.1.1.5
# Configure a WLAN service template, configure the SSID as abc, encryption mode as AES-CCMP, and bind interface WLAN-ESS 1 to the service template.
[AC1] wlan service-template 1 crypto
[AC1-wlan-st-1] ssid abc
[AC1-wlan-st-1] bind wlan-ess 1
[AC1-wlan-st-1] authentication-method open-system
[AC1-wlan-st-1] cipher-suite ccmp
[AC1-wlan-st-1] security-ie rsn
[AC1-wlan-st-1] service-template enable
[AC1-wlan-st-1] quit
# Configure the AP information.
[AC1] wlan ap ap1 model WA3628i-AGN
[AC1-wlan-ap-ap1] serial-id 210235A29G007C000020
[AC1-wlan-ap-ap1] radio 1 type dot11an
[AC1-wlan-ap-ap1-radio-1] service-template 1
[AC1-wlan-ap-ap1-radio-1] radio enable
[AC1-wlan-ap-ap1-radio-1] quit
[AC1-wlan-ap-ap1] quit
# Configure the source IP address of the IACTP tunnel as 1.1.1.4 (the address of AC 1) and the IP address of the IACTP tunnel member (AC 2) as 1.1.1.5.
[AC1] wlan mobility-group roam
[AC1-wlan-mg-roam] source ip 1.1.1.4
[AC1-wlan-mg-roam] member ip 1.1.1.5
# Enable the IACTP tunnel.
[AC1-wlan-mg-roam] mobility-group enable
[AC1-wlan-mg-roam] quit
# Enable client information backup.
[AC1] wlan backup-client enable
# Enable the AC hot backup function.
[AC1] hot-backup enable
# Set VLAN 10 as the VLAN for AC hot backup.
[AC1] hot-backup vlan 10
Configuring AC 2
1. Configure port security:
# Specify the 802.1X authentication method as EAP.
<AC2> system-view
[AC2] dot1x authentication-method eap
# Create interface WLAN-ESS 1 and enter its view.
[AC2] interface wlan-ess 1
# Set the port security mode to userlogin-secure-ext.
[AC2-WLAN-ESS1] port-security port-mode userlogin-secure-ext
# Enable stateful failover for port security.
[AC2-WLAN-ESS1] port-security synchronization enable
# Enable key negotiation.
[AC2-WLAN-ESS1] port-security tx-key-type 11key
# Specify the authentication domain for 802.1X users as domain 2003.
[AC2-WLAN-ESS1] dot1x mandatory-domain 2003
# Disable the 802.1X multicast trigger and online user handshake functions.
[AC2-WLAN-ESS1] undo dot1x multicast-trigger
[AC2-WLAN-ESS1] undo dot1x handshake
[AC2-WLAN-ESS1] quit
# Enable global port security.
[AC2] port-security enable
2. Configure stateful failover:
# Specify VLAN 10 as the backup VLAN for stateful failover.
[AC2] dhbk vlan 10
# Enable symmetric-path mode stateful failover.
[AC2] dhbk enable backup-type symmetric-path
3. Create VRRP group 1 on interface VLAN-interface 8.
[AC2] interface vlan 8
[AC2-Vlan-interface8] ip address 192.168.100.2 24
[AC2-Vlan-interface8] vrrp vrid 1 virtual-ip 192.168.100.5
[AC2-Vlan-interface8] quit
4. Configure AAA:
# Specify the device ID to be used in stateful failover mode as 2.
[AC2] nas device-id 2
# Configure RADIUS scheme 2003.
[AC2] radius scheme 2003
[AC2-radius-2003] primary authentication 192.168.0.2
[AC2-radius-2003] primary accounting 192.168.0.2
[AC2-radius-2003] key authentication simple aabbcc
[AC2-radius-2003] key accounting simple aabbcc
[AC2-radius-2003] user-name-format without-domain
[AC2-radius-2003] nas-ip 192.168.100.5
[AC2-radius-2003] quit
# Create authentication domain 2003, and specify the AAA methods.
[AC2] domain 2003
[AC2-isp-2003] authentication lan-access radius-scheme 2003
[AC2-isp-2003] authorization lan-access radius-scheme 2003
[AC2-isp-2003] accounting lan-access radius-scheme 2003
[AC2-isp-2003] quit
5. Configure AC backup and client information backup:
# Specify AC 1 as the backup AC of AC 2.
[AC2] wlan backup-ac ip 1.1.1.4
# Configure a WLAN service template, configure the SSID as abc, encryption mode as AES-CCMP, and bind interface WLAN-ESS 1 to the service template.
[AC2] wlan service-template 1 crypto
[AC2-wlan-st-1] ssid abc
[AC2-wlan-st-1] bind wlan-ess 1
[AC2-wlan-st-1] authentication-method open-system
[AC2-wlan-st-1] cipher-suite ccmp
[AC2-wlan-st-1] security-ie rsn
[AC2-wlan-st-1] service-template enable
[AC2-wlan-st-1] quit
# Configure the AP information.
[AC2] wlan ap ap1 model WA3628i-AGN
[AC2-wlan-ap-ap1] serial-id 210235A29G007C000020
[AC2-wlan-ap-ap1] radio 1 type dot11an
[AC2-wlan-ap-ap1-radio-1] service-template 1
[AC2-wlan-ap-ap1-radio-1] radio enable
[AC2-wlan-ap-ap1-radio-1] quit
[AC2-wlan-ap-ap1] quit
# Configure the source IP address of the IACTP tunnel as 1.1.1.5 (the address of AC 2) and the IP address of the IACTP tunnel member (AC 1) as 1.1.1.4.
[AC2] wlan mobility-group roam
[AC2-wlan-mg-roam] source ip 1.1.1.5
[AC2-wlan-mg-roam] member ip 1.1.1.4
# Enable the IACTP tunnel.
[AC2-wlan-mg-roam] mobility-group enable
[AC2-wlan-mg-roam] quit
# Enable client information backup.
[AC2] wlan backup-client enable
# Enable the AC hot backup function.
[AC2] hot-backup enable
# Set VLAN 10 as the VLAN for AC hot backup.
[AC2] hot-backup vlan 10
Verifying the configuration
After you complete the configurations, use the display dot1x synchronization status command to display the 802.1X stateful failover status on AC 1 and AC 2.
After the client passes 802.1X authentication, execute the display wlan client verbose command on AC 1 (the primary AC) to display detailed information about the client. Execute the display wlan client verbose command on AC 2 (the backup AC), and you can see the same client information as that on AC 1.
Execute the display dot1x synchronization connection command on AC 1 and AC 2 to display the 802.1X synchronization information. You can see that the client information is the same on the ACs and the primary and backup link states are different, indicating that the ACs have synchronized the client information.
When AC 1 fails, AC 2 becomes active. In case of a primary/backup AC switchover, the client can access the network through AC 2 without being re-authenticated.
Troubleshooting port security
Cannot change port security mode when a user is online
Symptom
Port security mode cannot be changed when an 802.1X authenticated or MAC authenticated user is online.
[AC-WLAN-ESS1] undo port-security port-mode
Error:Cannot configure port-security for there is 802.1X user(s) on line on port WLAN-ESS1.
Analysis
Changing port security mode is not allowed when an 802.1X authenticated or MAC authenticated user is online.
Solution
1. Unbind the interface from the service template.
2. Use the cut connection command to disconnect the user connection.
3. Use the undo port-security port-mode command to set the port security mode to noRestrictions.
4. Set the port to operate in the desired port security mode.