- Table of Contents
-
- 03-IP Routing Volume
- 00-IP Routing Volume Organization
- 01-IP Routing Overview
- 02-Static Routing Configuration
- 03-RIP Configuration
- 04-OSPF Configuration
- 05-IS-IS Configuration
- 06-BGP Configuration
- 07-IPv6 Static Routing Configuration
- 08-IPv6 Ripng Configuration
- 09-IPv6 OSPFv3 Configuration
- 10-IPv6 IS-IS Configuration
- 11-IPv6 BGP Configuration
- 12-Routing Policy Configuration
- Related Documents
-
| Title | Size | Download |
|---|---|---|
| 07-IPv6 Static Routing Configuration | 83.7 KB |
Table of Contents
1 IPv6 Static Routing Configuration
Introduction to IPv6 Static Routing
Features of IPv6 Static Routes
Configuring an IPv6 Static Route
Configuring an IPv6 Static Route
Displaying and Maintaining IPv6 Static Routes
IPv6 Static Routing Configuration Example
When configuring IPv6 Static Routing, go to these sections for information you are interested in:
l Introduction to IPv6 Static Routing
l Configuring an IPv6 Static Route
l Displaying and Maintaining IPv6 Static Routes
l IPv6 Static Routing Configuration Example
![]()
l The term “router” in this document refers to a router in a generic sense or a Layer 3 switch.
l EA boards (such as LSQ1GP12EA and LSQ1TGX1EA) do not support IPv6 features.
Introduction to IPv6 Static Routing
Static routes are special routes that are manually configured by network administrators. They work well in simple networks. Configuring and using them properly can improve the performance of networks and guarantee enough bandwidth for important applications.
However, static routes also have shortcomings: any topology changes could result in unavailable routes, requiring the network administrator to manually configure and modify the static routes.
Features of IPv6 Static Routes
Similar to IPv4 static routes, IPv6 static routes work well in simple IPv6 network environments.
Their major difference lies in the destination and next hop addresses. IPv6 static routes use IPv6 addresses whereas IPv4 static routes use IPv4 addresses. Currently, IPv6 static routes do not support VPN instance.
Default IPv6 Route
The IPv6 static route that has the destination address configured as ::/0 (indicating a prefix length of 0) is the default IPv6 route. If the destination address of an IPv6 packet does not match any entry in the routing table, this default route will be used to forward the packet.
Configuring an IPv6 Static Route
In small IPv6 networks, IPv6 static routes can be used to forward packets. In comparison to dynamic routes, it helps to save network bandwidth.
Configuration prerequisites
l Enabling IPv6 packet forwarding
l Ensuring that the neighboring nodes are IPv6 reachable
Configuring an IPv6 Static Route
Follow these steps to configure an IPv6 static route:
|
To do… |
Use the commands… |
Remarks |
|
Enter system view |
system-view |
— |
|
Configure an IPv6 static route |
ipv6 route-static ipv6-address prefix-length [ interface-type interface-number ] nexthop-address [ preference preference-value ] |
Required The default preference of IPv6 static routes is 60. |
Displaying and Maintaining IPv6 Static Routes
|
To do… |
Use the command… |
Remarks |
|
Display IPv6 static route information |
display ipv6 routing-table protocol static [ inactive | verbose ] |
Available in any view |
|
Remove all IPv6 static routes |
delete ipv6 static-routes all |
Available in system view |
![]()
Using the undo ipv6 route-static command can delete a single IPv6 static route, while using the delete ipv6 static-routes all command deletes all IPv6 static routes including the default route.
IPv6 Static Routing Configuration Example
Network requirements
With IPv6 static routes configured, all hosts and switches can interact with each other.
Network diagram
Figure 1-1 Network diagram for static routes
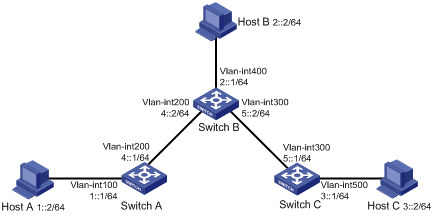
Configuration procedure
1) Configure the IPv6 addresses of all VLAN interfaces (Omitted)
2) Configure IPv6 static routes.
# Configure the default IPv6 static route on SwitchA.
<SwitchA> system-view
[SwitchA] ipv6 route-static :: 0 4::2
# Configure two IPv6 static routes on SwitchB.
<SwitchB> system-view
[SwitchB] ipv6 route-static 1:: 64 4::1
[SwitchB] ipv6 route-static 3:: 64 5::1
# Configure the default IPv6 static route on SwitchC.
<SwitchC> system-view
[SwitchC] ipv6 route-static :: 0 5::2
3) Configure the IPv6 addresses of hosts and gateways.
Configure the IPv6 addresses of all the hosts based upon the network diagram, configure the default gateway of Host A as 1::1, that of Host B as 2::1, and that of Host C as 3::1.
4) Display configuration information
# Display the IPv6 routing table of SwitchA.
[SwitchA] display ipv6 routing-table
Routing Table :
Destinations : 5 Routes : 5
Destination : ::/128 Protocol : Static
NextHop : FE80::510A:0:8D7:1 Preference : 60
Interface : Vlan-interface200 Cost : 0
Destination : ::1/128 Protocol : Direct
NextHop : ::1 Preference : 0
Interface : InLoop0 Cost : 0
Destination : 1::/64 Protocol : Direct
NextHop : 1::1 Preference : 0
Interface : Vlan-interface100 Cost : 0
Destination : 1::1/128 Protocol : Direct
NextHop : ::1 Preference : 0
Interface : InLoop0 Cost : 0
Destination : FE80:: /10 Protocol : Direct
NextHop : :: Preference : 0
Interface : NULL0 Cost : 0
# Verify the connectivity with the ping command.
[SwitchA] ping ipv6 3::1
PING 3::1 : 56 data bytes, press CTRL_C to break
Reply from 3::1
bytes=56 Sequence=1 hop limit=254 time = 63 ms
Reply from 3::1
bytes=56 Sequence=2 hop limit=254 time = 62 ms
Reply from 3::1
bytes=56 Sequence=3 hop limit=254 time = 62 ms
Reply from 3::1
bytes=56 Sequence=4 hop limit=254 time = 63 ms
Reply from 3::1
bytes=56 Sequence=5 hop limit=254 time = 63 ms
--- 3::1 ping statistics ---
5 packet(s) transmitted
5 packet(s) received
0.00% packet loss
round-trip min/avg/max = 62/62/63 ms
