- Table of Contents
-
- H3C HDM Configuration Examples-6W100
- 01-H3C Redfish Configuration Examples
- 02-H3C LDAP Configuration Examples
- 03-H3C IPMI Configuration Examples
- 04-H3C SNMP Configuration Examples
- 05-H3C HDM Mobile Configuration Examples for Remote Access to a Server Through L2TP VPN
- 06-H3C HDM Configuration Examples for Obtaining Event Logs Through the Redfish Interface
- 07-H3C HDM SMTP Configuration Examples
- 08-H3C HDM Zabbix-Based Server Monitoring Configuration Examples
- 09-H3C HDM Network Settings Configuration Examples
- 10-H3C hREST Configuration Examples for Configuring SNMP and Obtaining the CPU Information
- 11-H3C HDM Configuration Management Configuration Examples
- 12-HDM AD Configuration Examples
- 13-H3C HDM SOL Configuration Examples
- 14-HDM Unified Control Configuration Examples
- Related Documents
-
| Title | Size | Download |
|---|---|---|
| 12-HDM AD Configuration Examples | 347.54 KB |
H3C HDM
AD Configuration Examples
Copyright © 2023 New H3C Technologies Co., Ltd. All rights reserved.
No part of this manual may be reproduced or transmitted in any form or by any means without prior written consent of New H3C Technologies Co., Ltd.
Except for the trademarks of New H3C Technologies Co., Ltd., any trademarks that may be mentioned in this document are the property of their respective owners.
The information in this document is subject to change without notice.
Introduction
Active Directory (AD) is an application instance of Lightweight Directory Access Protocol (LDAP) in the Windows Server system. AD adopts the structured data storage mode, which enables users to quickly and conveniently find directory information. The following information provides examples for configuring the AD management features of the H3C Hardware Device Management (HDM) software.
Prerequisites
Procedures and information in the examples might be slightly different depending on the software or hardware version of the products.
The configuration was created and verified in a lab environment, and all the servers and software were started with the factory default configuration. If the device has been configured, ensure that the existing configuration does not conflict with the configuration in the following examples.
The following information is provided based on the assumption that you have basic knowledge of the AD management features.
Applicable scenarios
The following information applies to scenarios where AD role groups need to be associated with HDM management permissions. The purpose is to meet the needs of AD users to access HDM and achieve hierarchical permission control.
Example: Configuring the AD
Network configuration
As shown in Figure 1, the H3C UniServer R4900 G5 server is connected to the AD server and PC client through the HDM dedicated network port, and can communicate with each other normally. On the AD server, the Windows Server 2012 R2 operating system is installed, and Active Directory (AD) server is configured. After the AD server is bound and the AD role groups are added on HDM, it is required that AD users can access HDM.
· HDM software:
¡ IP address: 192.168.19.87/24
¡ Administrator account: admin
¡ Password: Password@_
· AD server:
¡ AD username: aduser1
¡ Password: Password@_
¡ Role group of the AD user: group1
¡ IP address of the AD server: 192.168.19.219/24
¡ Domain name of the AD server: adtest.com
· PC client:
¡ IP address: 192.168.19.55/24

Analysis
On the AD server, add an AD user aduser1 and a role group group1. On HDM, bind the AD server and add the AD role group group1. Access HDM as the AD user in the role group to verify the configuration.
Software versions used
This example was created and verified on HDM 2.98.
Procedures
Configuring the AD server
Adding an organizational unit (OU)
1. Log in to the Windows Server 2012 R2, and open the AD. Select Start > Administrative Tools, and double-click Active Directory Users and Computers.
2. Right-click the domain name adtest.com, and select New > Organizational Unit.
3. Navigate to the OU name company, as shown in Figure 2.

4. Click OK. Level-1 OU company is created.
5. Right-click company, and select New > Organizational Unit to open the New Object – Organizational Unit dialog box.
6. Enter the OU name product, as shown in Figure 3.

7. Click OK. The level-2 OU named product is created.
Adding a role group
1. Right-click the OU product, and select New > Group to open the New Object – Group dialog box.
2. Enter the group name group1, as shown in Figure 4.
Figure 4 Entering the group name

3. Click OK.
Adding a user
1. Right-click the OU product, and select New > User to open the New Object – User dialog box.
2. Enter the username aduser1 and user login name aduser1, and click Next.
3. Enter the password Password@_ and uncheck theUser must change password at next logon option.
4. Click Next to open the confirmation page, and click Finish.
Adding the user to a group
1. Right-click the user aduser1, and select Add to Group to open the Select Groups dialog box.
2. As shown in Figure 5, enter the target group name group1, and click Check Names to search for the user group.
Figure 5 Entering the group information
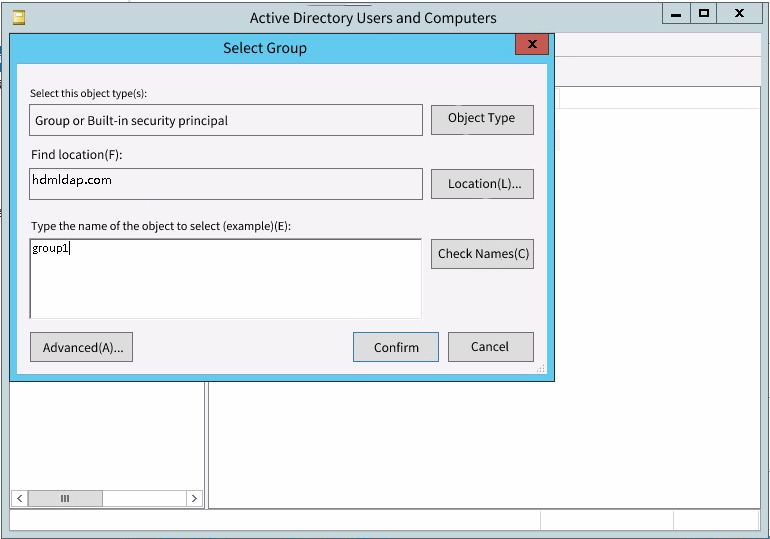
3. Click OK.
Configuring data on the HDM Web page
Logging in to HDM
1. Open a browser on a client, and then enter the HDM management IP address 192.168.19.87 to open the HDM login page. On the HDM login page, enter the default username admin and the default password Password@_, and then click Login, as shown in Figure 6.

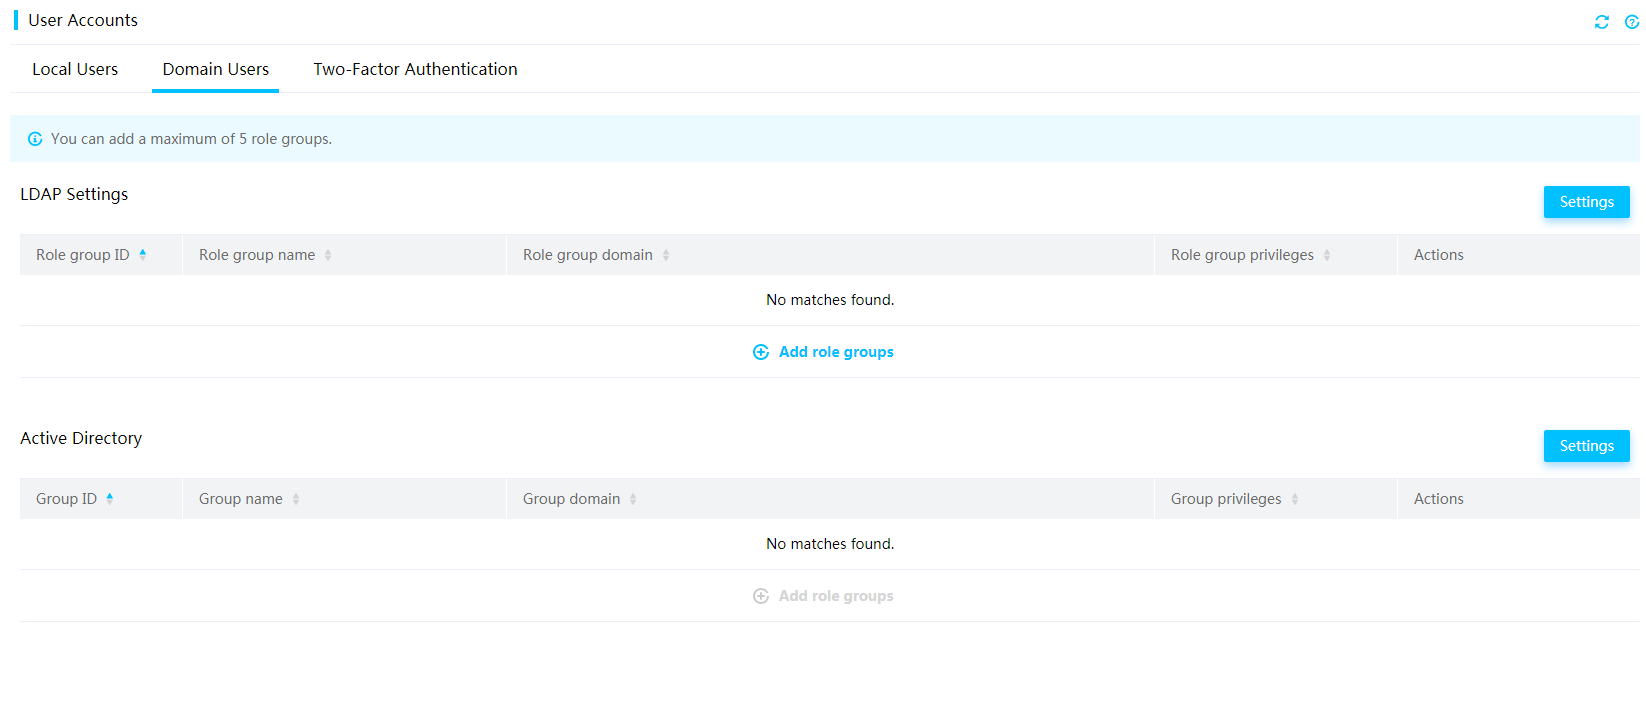
2. Select Users & Security > Users, and select the Domain Users tab, as shown in Figure 7.

Configuring the AD Server
1. Click Settings in the AD settings area, and configure the AD server information in the AD settings dialog box, as shown in Figure 8.
Secret username: (Optional) Enter aduser1.
Secret password: (Optional) Enter Password@_, which is the password of aduser1.
User domain name: (Required) Enter adtest.com, which is the domain name of aduser1.
Domain controller address 1: (Required) Enter 192.168.19.219, which is the address of the AD server.
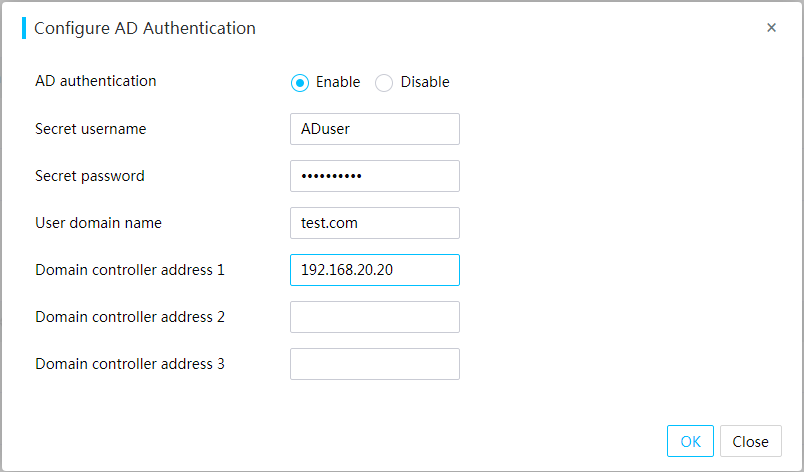
2. Click OK. The HDM starts to establish a connection with the AD server.
Adding an AD role group
1. Click Add Role Group in the AD settings area, and add the role group information in the Add AD role group dialog box, as shown in Figure 9.
Role group name: Enter group1, which is the group name of the AD user aduser1.
Role group domain name: Enter adtest.com, which is the domain name of group1.
Role group permission: Select Administrator.
Figure 9 Adding an AD role group
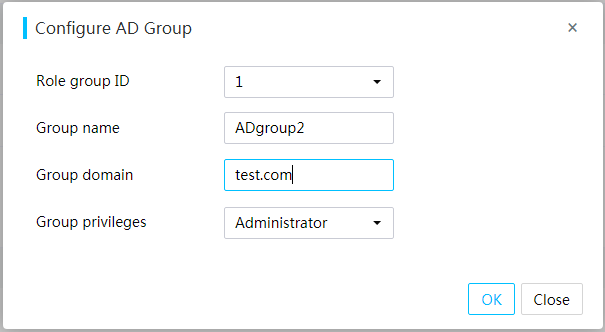
2. Click OK.
Verifying the configuration
1. Open a browser on a client, and then enter the IP address 192.168.19.87 to open the HDM login page. On the HDM login page, enter the user information in the role group group1, for example, the username aduser1 and password Password@_, to log in to the HDM Web page, as shown in Figure 10.
Figure 10 Using the AD user to log in to the HDM Web page

2. After successful login, check the permission of aduser1. As shown in Figure 11, aduser1 has the permission to configure domain users, which indicates that aduser1 is an Administrator user. This is consistent with the settings in "Adding an AD role group."
Related documentation
· H3C HDM Technology White Paper
· H3C Servers HDM User Guide
