- Table of Contents
-
- H3C HDM Configuration Examples-6W100
- 01-H3C Redfish Configuration Examples
- 02-H3C LDAP Configuration Examples
- 03-H3C IPMI Configuration Examples
- 04-H3C SNMP Configuration Examples
- 05-H3C HDM Mobile Configuration Examples for Remote Access to a Server Through L2TP VPN
- 06-H3C HDM Configuration Examples for Obtaining Event Logs Through the Redfish Interface
- 07-H3C HDM SMTP Configuration Examples
- 08-H3C HDM Zabbix-Based Server Monitoring Configuration Examples
- 09-H3C HDM Network Settings Configuration Examples
- 10-H3C hREST Configuration Examples for Configuring SNMP and Obtaining the CPU Information
- 11-H3C HDM Configuration Management Configuration Examples
- 12-HDM AD Configuration Examples
- 13-H3C HDM SOL Configuration Examples
- 14-HDM Unified Control Configuration Examples
- Related Documents
-
| Title | Size | Download |
|---|---|---|
| 11-H3C HDM Configuration Management Configuration Examples | 1023.18 KB |
H3C HDM
Configuration Management Configuration Examples
Copyright © 2023 New H3C Technologies Co., Ltd. All rights reserved.
No part of this manual may be reproduced or transmitted in any form or by any means without prior written consent of New H3C Technologies Co., Ltd.
Except for the trademarks of New H3C Technologies Co., Ltd., any trademarks that may be mentioned in this document are the property of their respective owners.
The information in this document is subject to change without notice.
Example: Managing the configuration file
Modifying the configuration file
Verifying the user information
Verifying the SNMP trap information
Introduction
The following information describes how to export, modify, and import the configuration file on the HDM Web page.
Prerequisites
Procedures and information in the examples might be slightly different depending on the software or hardware version of the products.
The configuration was created and verified in a lab environment, and all the servers and software were started with the factory default configuration. When you are working on a live network, make sure you understand the potential impact of every command on your network.
The following information is provided based on the assumption that you have learned about functions related to HDM configuration management.
Applicable scenarios
The following information applies to scenarios where the HDM configuration file is imported and exported for fast migration or replication, realizing efficient deployment of new devices.
Example: Managing the configuration file
Network configuration
As shown in Figure 1, the target server (H3C UniServer R4900 G5 server in this example) communicates with the switch and PC client normally through the HDM management interface. It is required that users can log in to the HDM Web page through the PC, and export, modify, and import the configuration file.

· HDM software:
¡ IP address of the management interface: 192.168.55.22/24
¡ Administrator account: admin
¡ Administrator password: Password@_
· PC client:
¡ IP address: 192.168.55.177/24
Software versions used
This example was created and verified on HDM 2.97.
Restrictions and guidelines
· Exporting the configuration
¡ Before exporting the RAID configuration, ensure that the storage controller has been initialized.
¡ The PMC storage controller does not support export of the RAID configuration.
¡ Before exporting the RAID configuration, ensure that the logical disks under the RAID card are in normal state, and no expansion, migration, reconstruction, erasure and other operations have been performed.
· Importing the configuration
¡ When importing the RAID and BIOS configuration files, ensure that the device model and component configuration (such as storage controller model, number of hard disks, and slots) are the same. When importing the RAID configuration, ensure that the storage controller works in RAID mode and the host is powered on.
¡ When importing the HDM configuration, ensure that the device model is the same.
¡ When importing the HDM configuration, ensure that the bonding mode setting of the device to which the configuration is imported is consistent with that in the configuration file, otherwise the import will fail.
¡ When importing the RAID configuration, if the previous RAID information on the hard disk is not cleared, the hard disk enters the Foreign state, resulting in an import failure. Therefore, clear the RAID configuration from the hard disk in BIOS before configuration import.
¡ When importing the HDM configuration, if a configuration item in the configuration file is deleted or does not exist, the state of this configuration item will remain unchanged after the configuration is imported.
¡ During the configuration import process, do not power on or off the server. Otherwise, some HDM functions and the operating system may be abnormal.
¡ When importing the HDM, BIOS, or RAID configuration, if the Web page prompts a failed item, the import will be suspended. In this case, modify the failed item and import the configuration again until the import process is completed.
¡ When importing the configuration, ensure that only the currently logged in user is performing the operation. Otherwise, configuration import may fail.
Procedures
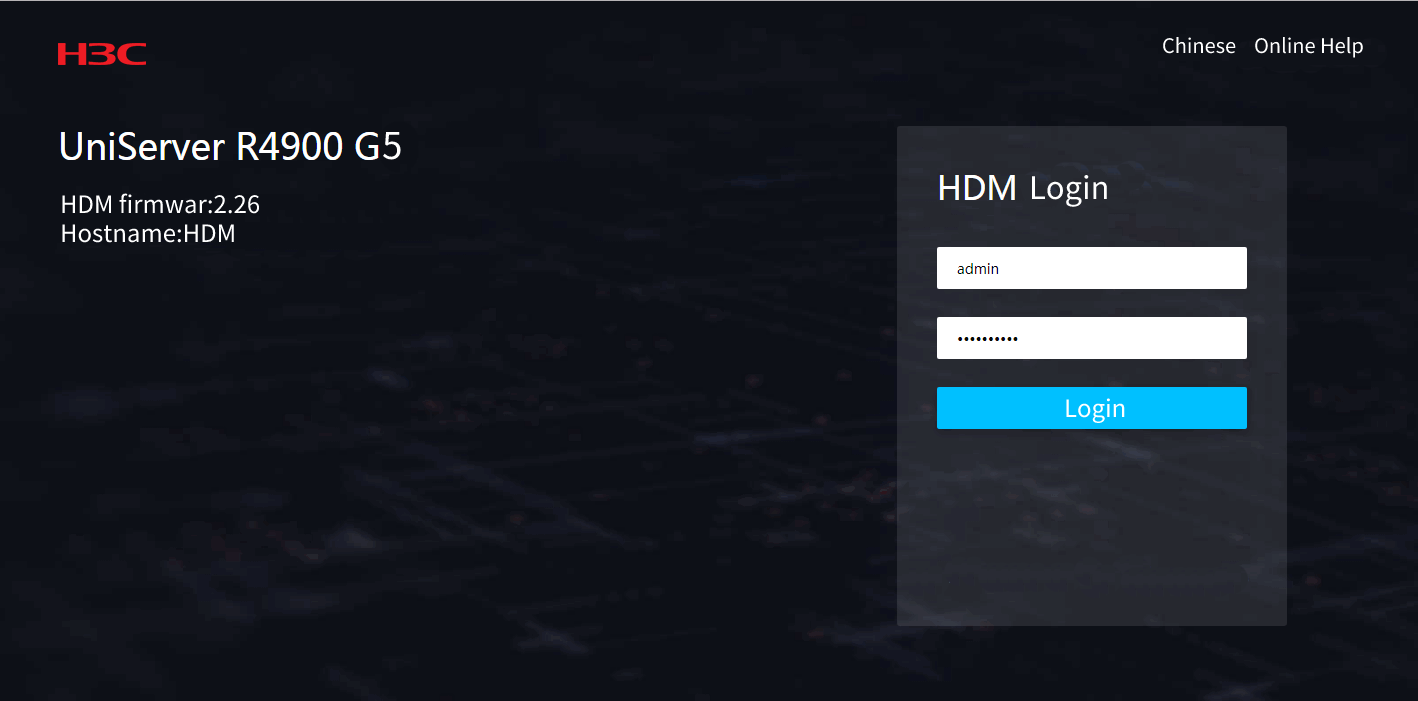
Logging in to HDM
1. Open a browser on a client, and enter the default IP address of the HDM management interface 192.168.1.2 in the address bar to navigate to the HDM login page, as shown in Figure 2. On the HDM login page, enter the default username admin and default password Password@_, and then click Login.
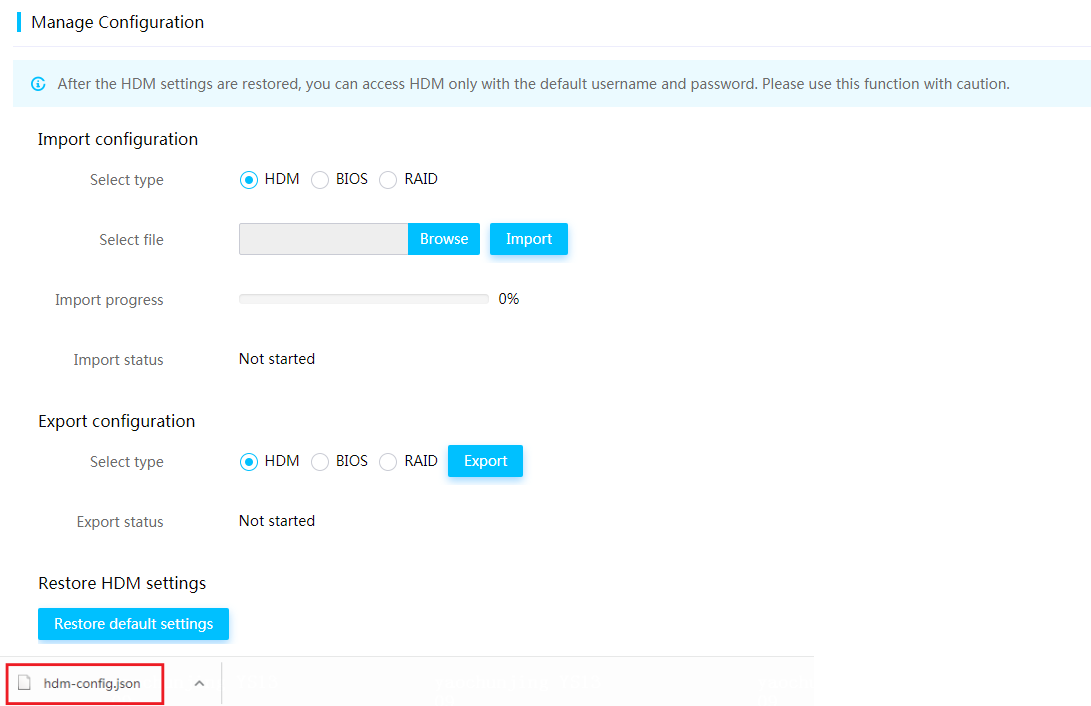
2. The Manage Configuration page opens, as shown in Figure 3.
Figure 3 Configuration management

Exporting the configuration
Configuration export refers to exporting the HDM, BIOS or RAID configuration from the current server, generating a configuration file, and saving it to the HDM client for backup.
1. In the Export configuration area, select the configuration type (HDM in this example), and click Export to export the configuration file.
2. The exported configuration file is displayed, as shown in Figure 4.
Figure 4 Exporting the HDM configuration file
Modifying the configuration file
|
|
NOTE: · Modify the configuration file with caution and ensure the validity of the modified configuration. Otherwise, the import operation may fail. To obtain the description about validity of the configuration information, contact Technical Support. · If the edited configuration file contains the information "This_is_comment", delete such information. · The password in the configuration file is blank. If you import the configuration file to the original server, you do not need to add the password manually, and the original password is retained after the import. If you import the configuration file to another server, you need to add the password manually, and the added password takes effect after the import. |
Adding an HDM local user
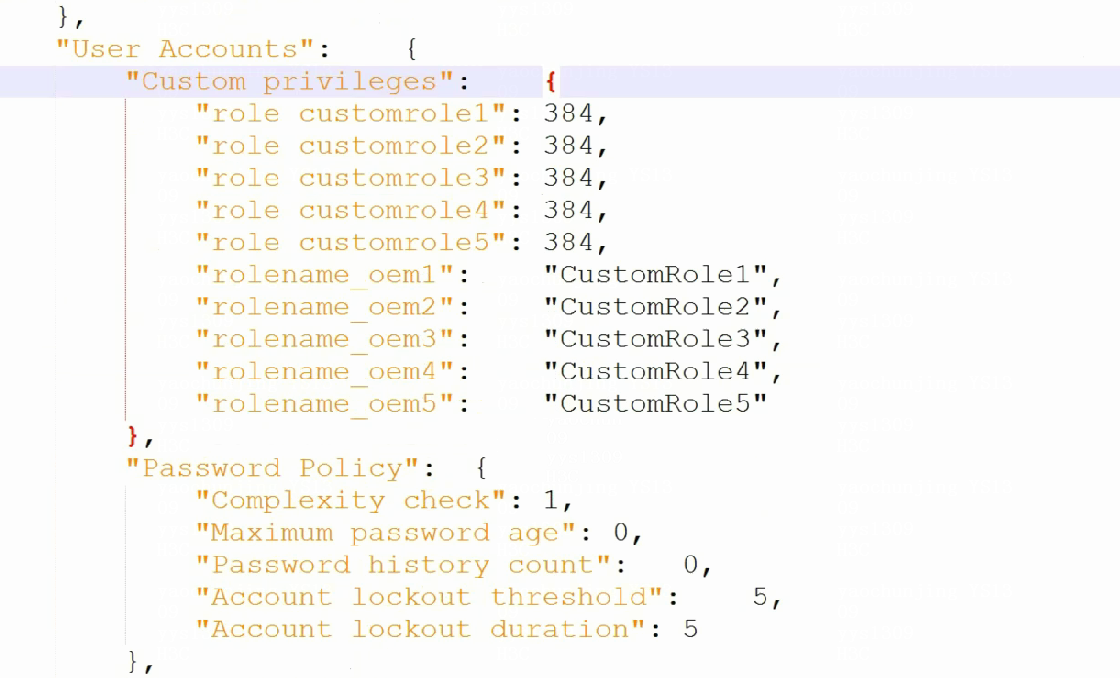
1. Use a text tool to open the configuration file, search "User Accounts", and find the user configuration, as shown in Figure 5.
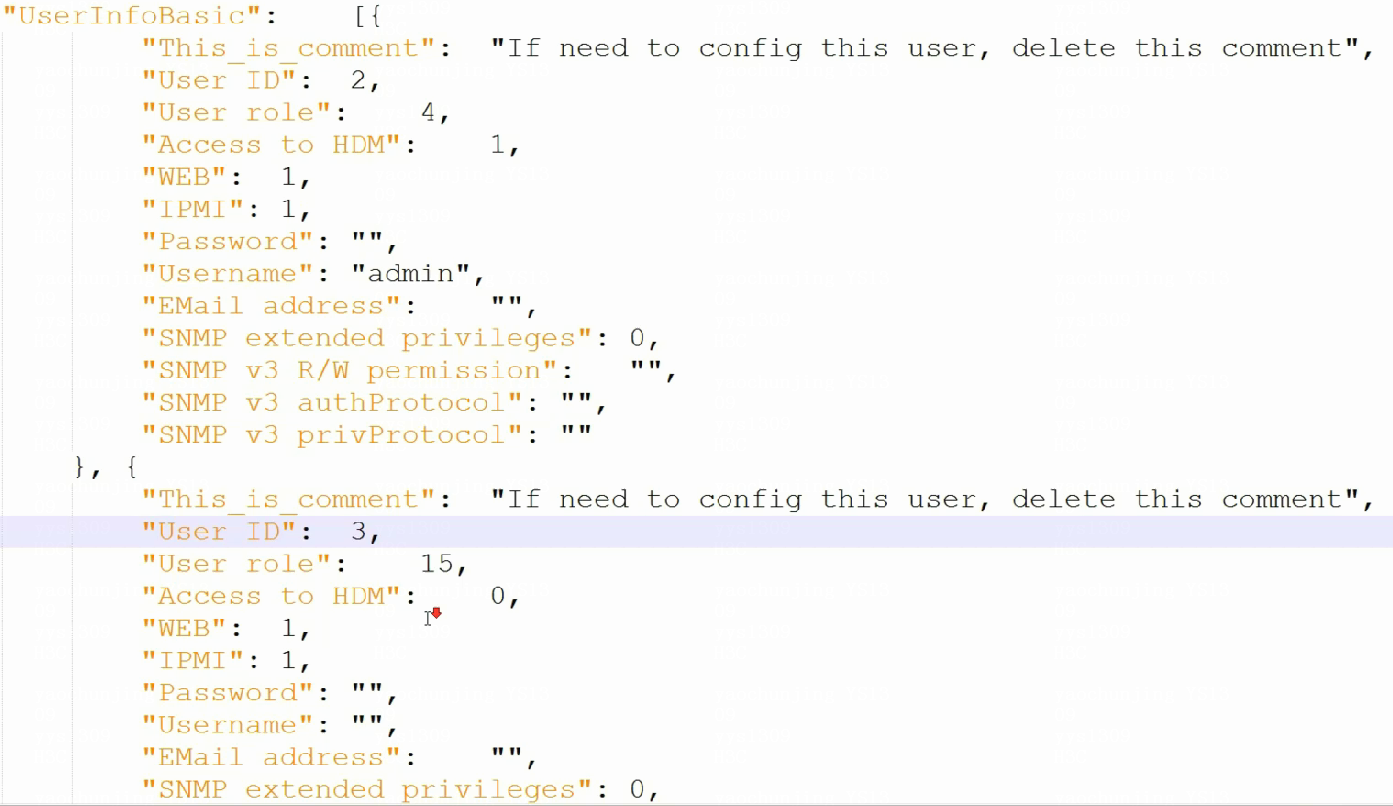
2. Under "UserInfoBasic", view the local user list, as shown in Figure 6.
3. Add a user (user 5 in this example), as shown in Figure 7.

4. Delete "This_is_comment", and enter the information of user 5, including the username, password, and permissions, as shown in Figure 8. Table 1 describes the user information.
Figure 8 Entering the information of user 5
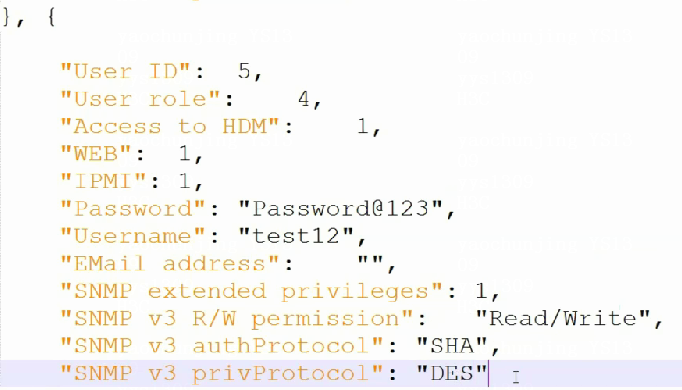
Table 1 Description of user information
|
Parameter |
Description |
Settings |
|
User role |
Network permission level |
(Required) 4 indicates the Administrator user. |
|
Access to HDM |
Permission to navigate to the HDM Web page |
(Required) 1 indicates the permission is granted. |
|
WEB |
Permission to access the HDM Web interface |
1 indicates the permission is granted. By default, the Administrator and Operator users have the WEB and IPMI permissions, which cannot be modified. |
|
IPMI |
Permission to access the HDM IPMI interface |
1 indicates the permission is granted. By default, the Administrator and Operator users have the WEB and IPMI permissions, which cannot be modified. |
|
Username |
Username |
(Required) test12 |
|
Password |
Password |
(Required) Passsword@123 |
|
Email address |
Email address |
(Optional) The email address is not specified. |
|
SNMP extended privileges |
SNMP extended privileges |
(Optional) 1 indicates the permission is granted. |
|
SNMP v3 R/W permission |
SNMP read/write permission |
This parameter is required when SNMP extended privileges is set to 1. |
|
SNMP v3 authProtocol |
SNMP v3 authentication algorithm |
SHA, which stands for secure hashing algorithm. This parameter is required when SNMP extended privileges is set to 1. |
|
SNMP v3 privProtocol |
SNMP v3 encryption algorithm |
DES, which stands for data encryption standard and is a symmetric encryption algorithm. This parameter is required when SNMP extended privileges is set to 1. |
Modifying the SNMP trap information
1. Under "SNMP Trap", view the SNMP trap information, as shown in Figure 9.
Figure 9 SNMP trap information

2. Modify the SNMP trap information, as shown in Figure 10. Table 2 describes the SNMP trap information
Figure 10 Modifying the SNMP trap information

Table 2 Description of the SNMP trap information
|
Parameter |
Description |
Settings |
|
SnmpEnable |
Whether to enble SNMP |
(Required) 1 indicates the permission is granted. |
|
TrapMode |
SNMP trap mode |
(Required) 0 indicates the module OID mode |
|
Version |
SNMP trap version |
(Required) 2 indicates that the SNMP trap version is V3. |
|
V3_User |
Used ID for sending the SNMP V3 trap information |
(Required) 2 indicates the HDM local user with the user ID 2. |
|
Location |
Server location |
(Required) A117 |
|
Contact |
Device contact name and contact information |
(Required) test |
|
Trap_community |
Trap community name |
(Required) public |
|
AlarmSendLevel |
Alarm sending level |
(Required) 2 indicates all levels. |
|
Port_N |
Port number |
(Required) The port number ranges from 1 to 65535. |
|
Enable_N |
Channel enable status |
(Required) 1 indicates that the channel is enabled. |
|
Destination_N |
SNMP trap server address |
(Required) The address can be an IP address or a domain name. |
Importing the configuration
1. Log in to the HDM Web page again, navigate to the Manage configuration page, and import the modified configuration file.
2. The configuration directly takes effect after the import.
|
|
NOTE: If the network configuration is updated in the HDM configuration file, HDM automatically restarts to make the configuration take effect. Otherwise, the HDM configuration directly takes effect. |
Verifying the configuration
Verifying the user information
1. On the HDM Web login page as shown in Figure 11, enter the username test12 and password Password@123 to log in to the HDM Web page again.

2. Navigate to the Users page, and view the user list, as shown in Figure 12.

3. Click Modify in the Actions column. On the Edit user account dialog box that opens, check the detailed information of user 5, as shown in Figure 13. The detailed information of user 5 should be consistent with that configured in "Adding an HDM local user."
Figure 13 Detailed information of user 5

Verifying the SNMP trap information
Select Alarm Settings > SNMP Trap, and check the SNMP trap settings. If the SNMP trap settings and alarm trap server settings are consistent with those in "Modifying the SNMP trap information", the configuration is imported successfully.
Related documentation
H3C Servers HDM User Guide
