- Table of Contents
-
- H3C HDM Configuration Examples-6W100
- 01-H3C Redfish Configuration Examples
- 02-H3C LDAP Configuration Examples
- 03-H3C IPMI Configuration Examples
- 04-H3C SNMP Configuration Examples
- 05-H3C HDM Mobile Configuration Examples for Remote Access to a Server Through L2TP VPN
- 06-H3C HDM Configuration Examples for Obtaining Event Logs Through the Redfish Interface
- 07-H3C HDM SMTP Configuration Examples
- 08-H3C HDM Zabbix-Based Server Monitoring Configuration Examples
- 09-H3C HDM Network Settings Configuration Examples
- 10-H3C hREST Configuration Examples for Configuring SNMP and Obtaining the CPU Information
- 11-H3C HDM Configuration Management Configuration Examples
- 12-HDM AD Configuration Examples
- 13-H3C HDM SOL Configuration Examples
- 14-HDM Unified Control Configuration Examples
- Related Documents
-
| Title | Size | Download |
|---|---|---|
| 01-H3C Redfish Configuration Examples | 676.42 KB |
H3C HDM
Redfish Configuration Examples
Copyright © 2022-2023 New H3C Technologies Co., Ltd. All Rights Reserved.
No part of this manual may be reproduced or transmitted in any form or by any means without prior written consent of New H3C Technologies Co., Ltd.
Except for the trademarks of New H3C Technologies Co., Ltd., any trademarks that may be mentioned in this document are the property of their respective owners.
The information in this document is subject to change without notice.
Using Postman to manage servers through the Redfish interface
Example 1: Using Postman to control the server UID LED
Example 2: Using Postman to perform the HDM firmware upgrade
Using Redfish to perform the upgrade
Using Curl to manage servers through the Redfish interface
Introduction
The following information provides configuration examples by using hardware device management (HDM) Redfish interfaces, including operations of using Postman and Curl to manage servers through the Redfish interface..
Prerequisites
Procedures and information in the examples might be slightly different depending on the software or hardware version of the products.
The configuration was created and verified in a lab environment, and all the servers and software were started with the factory default configuration. When you are working on a live network, make sure you understand the potential impact of every command on your network.
The following information is provided based on the assumption that you have basic knowledge of the Redfish feature.
Applicable scenarios
The following information applies to scenarios where HDM needs to be quickly invoked through the Redfish interface. You can combine HDM with the O&M tools to efficiently and easily configure and manage the server.
Using Postman to manage servers through the Redfish interface
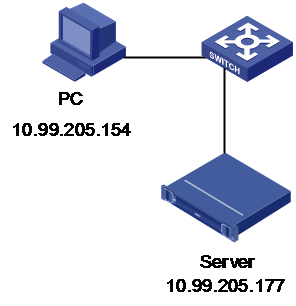
Network configuration
As shown in Figure 1, the server connects to the host through the HDM dedicated interface, the network connection is normal, and the server HDM can be accessed normally. It is required to use Postman on the host to control the server Unit Identification (UID) LED through the HDM Redfish interface and perform an HDM firmware upgrade.
· Server HDM information:
¡ IP address: 10.99.205.177
¡ Administrator account: admin
¡ Administrator password: Password@_
· Host environment:
¡ IP address: 10.99.160.247
¡ OS: Windows 7
Figure 1 Redfish networking

Analysis
· Use the HTTP basic authentication.
· Use the GET, PATCH, and POST operations to set the server UID LED status and perform the HDM firmware upgrade.
· During the HDM firmware upgrade, use the HTTP file server (HFS) as the target firmware of the hypertext transfer protocol (HTTP) file transfer server.
Software versions used
This example was created and verified on HDM-1.30.18. The Postman software version is v7.22.1 and the HFS version is 2.3k.
Example 1: Using Postman to control the server UID LED
Viewing the UID LED status
1. Open Postman, as shown in Figure 2. Click + to open a new page.

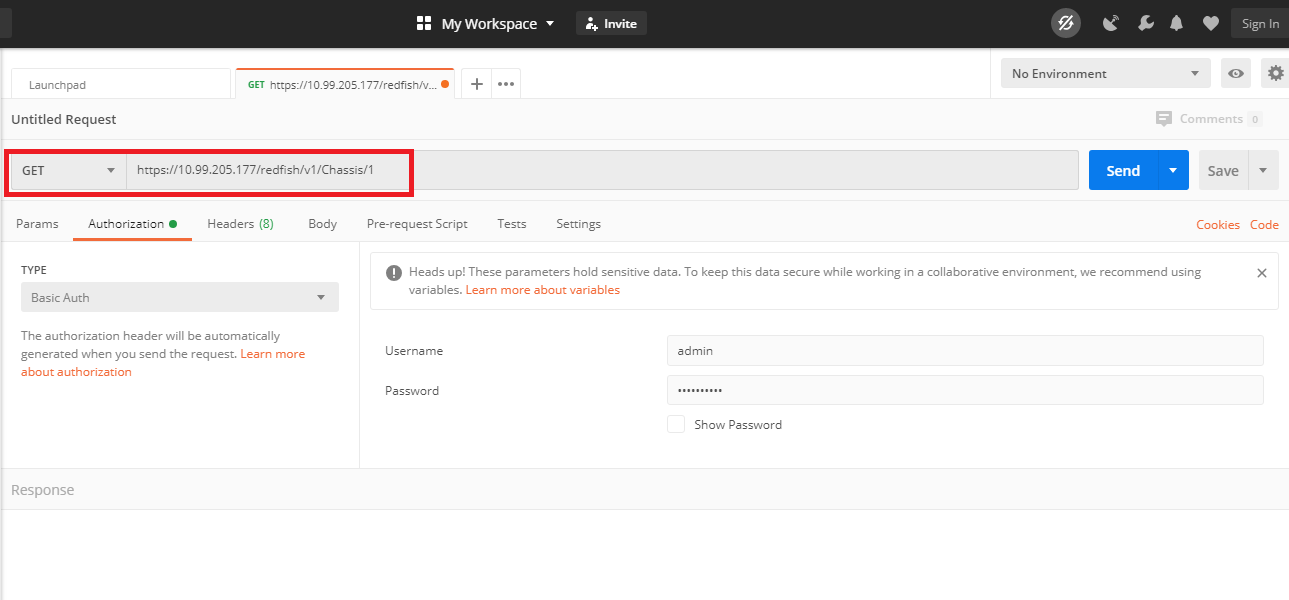
2. Click Authorization, as shown in Figure 3. In the TYPE drop-down box, select Basic Auth and enter the username and password.
¡ Username: admin
¡ Password: Password@_
Figure 3 Configuring authentication information

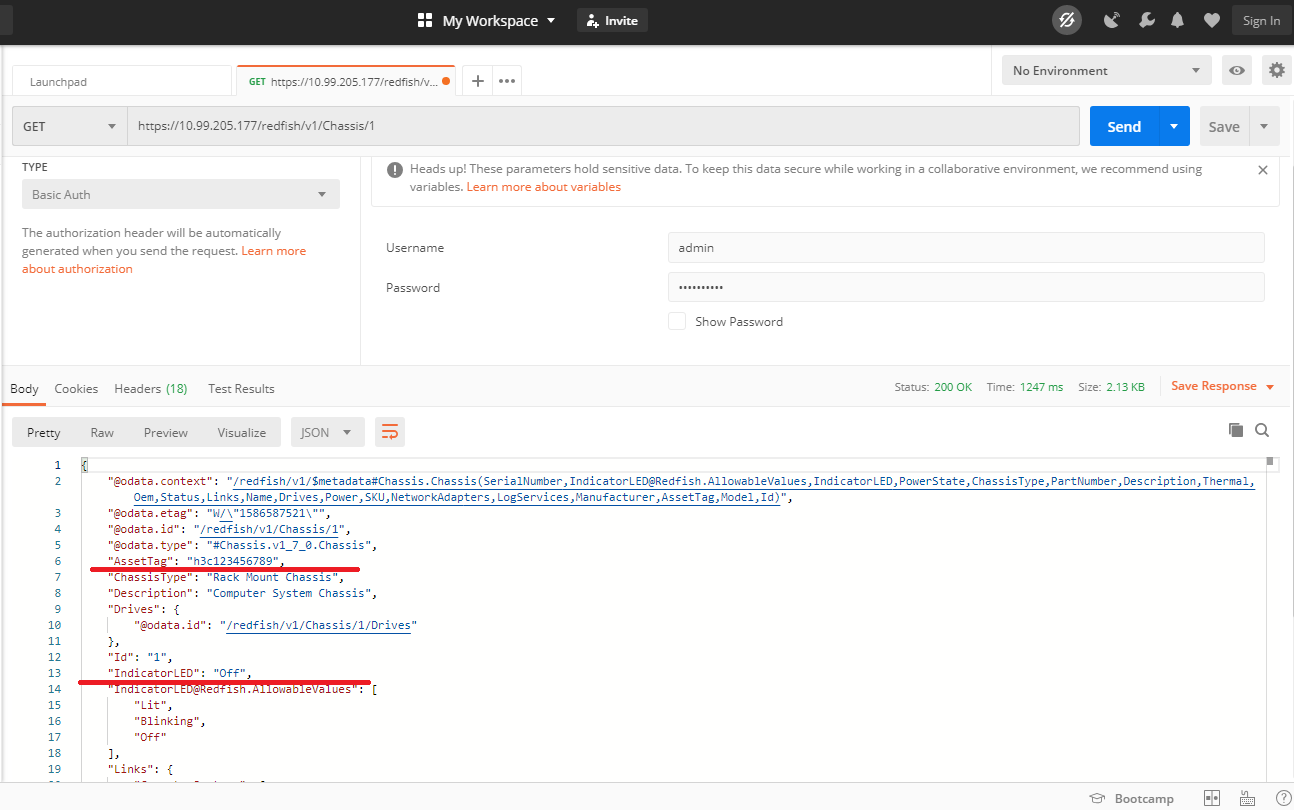
3. As shown in Figure 4, select the GET operation, and enter the uniform resource locator (URL) https://10.99.205.177/redfish/v1/Chassis/1.
Figure 4 Sending query requests
4. Click Send to request device information query from HDM.
5. When the request is successfully queried, you can view the server device information on the Body tab in the return body, including the asset label, UID LED status, power status, and so on. As shown in Figure 5, the value of the IndicatorLED parameter is Off, meaning the UID LED is in the off state.
Figure 5 Querying the current UID LED status
Setting the UID LED status
1. As shown in Figure 6, select the PATCH operation, and keep the URL https://10.99.205.177/redfish/v1/Chassis/1 unchanged.
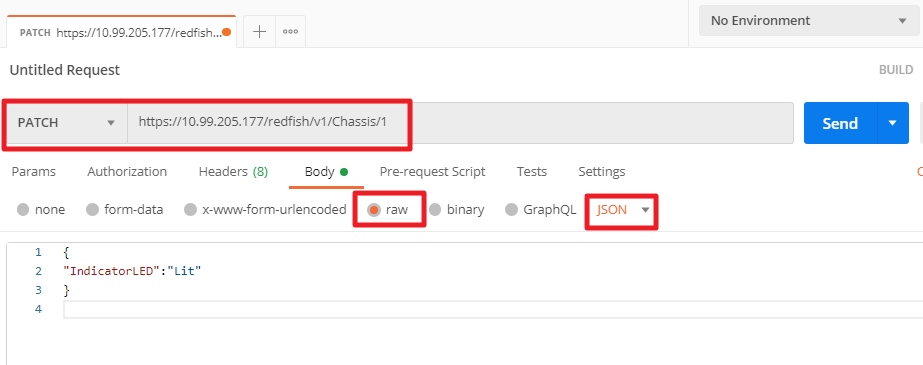
2. Select the Body tab, and select raw as the request body format and json as the content type. Enter the following content in the request body.
{
"IndicatorLED":"Lit"
}
3. Click Send, to set the UID LED status.
Verifying the configuration
The following two methods can be applied to verify that the settings are successful.
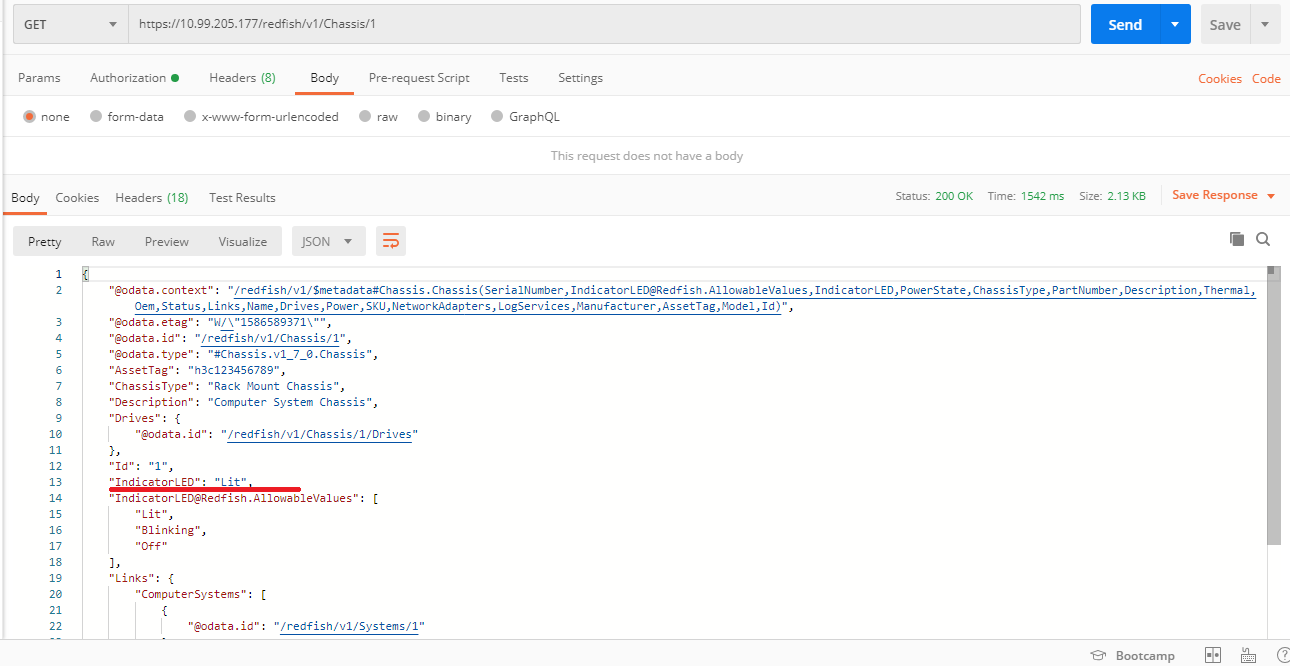
· See "Viewing the UID LED status" to query the device information again. As shown in Figure 7, you can see that the status of the IndicatorLED parameter is Lit.
· If possible, you can directly view the UID LED on the server and confirm that the UID LED is lit.
Figure 7 Verifying the UID LED status
Example 2: Using Postman to perform the HDM firmware upgrade
Preparations for upgrading
Create the D:\http_srv folder on the host, and move the target HDM file HDM-1.30.18P92_signed.bin to be upgraded to the folder.
Configuring the HTTP server
1. As shown in Figure 8, open the HTTP server tool HFS.exe. Right-click / and select Add folder from disk.
Figure 8 HFS configuration (1)

2. Browse folders and select D:\http_srv.
3. As shown in Figure 9, select Real folder.
Figure 9 HFS configuration (3)

Using Redfish to perform the upgrade
1. Select the POST operation.
2. As shown in Figure 10, enter the URL. The URL for the firmware upgrade is https://10.99.205.177/redfish/v1/UpdateService/Actions/UpdateService.SimpleUpdate.
Figure 10 Performing the firmware upgrade
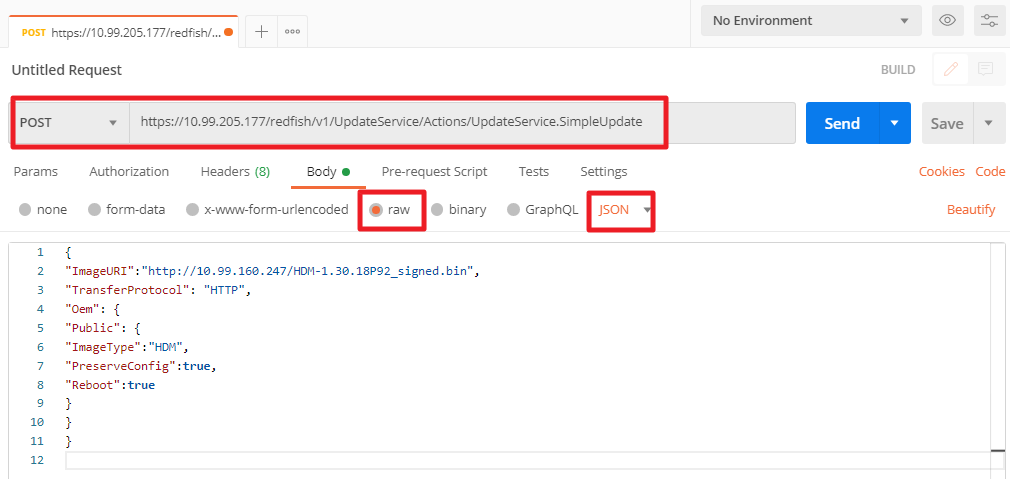
3. Select the Body tab, and select raw as the request body format and json as the content type. Enter the following content in the request body. See Table 1 for specific parameter descriptions.
{
"ImageURI":"http://10.99.160.247/HDM-1.30.18P92_signed.bin",
"TransferProtocol": "HTTP",
"Oem": {
"Public": {
"ImageType":"HDM",
"PreserveConfig":true,
"Reboot":true,
}
}
}
Table 1 Description of command request body parameters for Redfish upgrade
|
Parameter |
Remarks |
|
ImageURI |
The path where the firmware to be upgraded is located. In this case, it is the URL of the firmware obtained from the HFS. |
|
TransferProtocol |
The file transfer protocol, supporting HTTP, TFTP, and SFTP |
|
ImageType |
Firmware upgrade type, supporting HDM, BIOS, and CPLD |
|
PreserveConfig |
Flag for configuration reservation: · true: Upgrade with configuration reserved. · false: Upgrade with configuration overridden. |
|
Reboot |
Flag for reboot: · true: Automatic reboot after upgrade · false: No reboot after upgrade |
4. Click Send.
Querying the upgrade process
1. Select the GET operation.
2. As shown in Figure 11, enter the URL https://10.99.205.177/redfish/v1/TaskServcie/Tasks/1 to query the firmware upgrade process.
Figure 11 Perform the firmware upgrade

3. Click Send.
Verifying the configuration
Follow the above configuration, and the host will reboot after the HDM firmware upgrade. After a while, when the upgrade is complete, verify the upgrade result.
Verification method 1
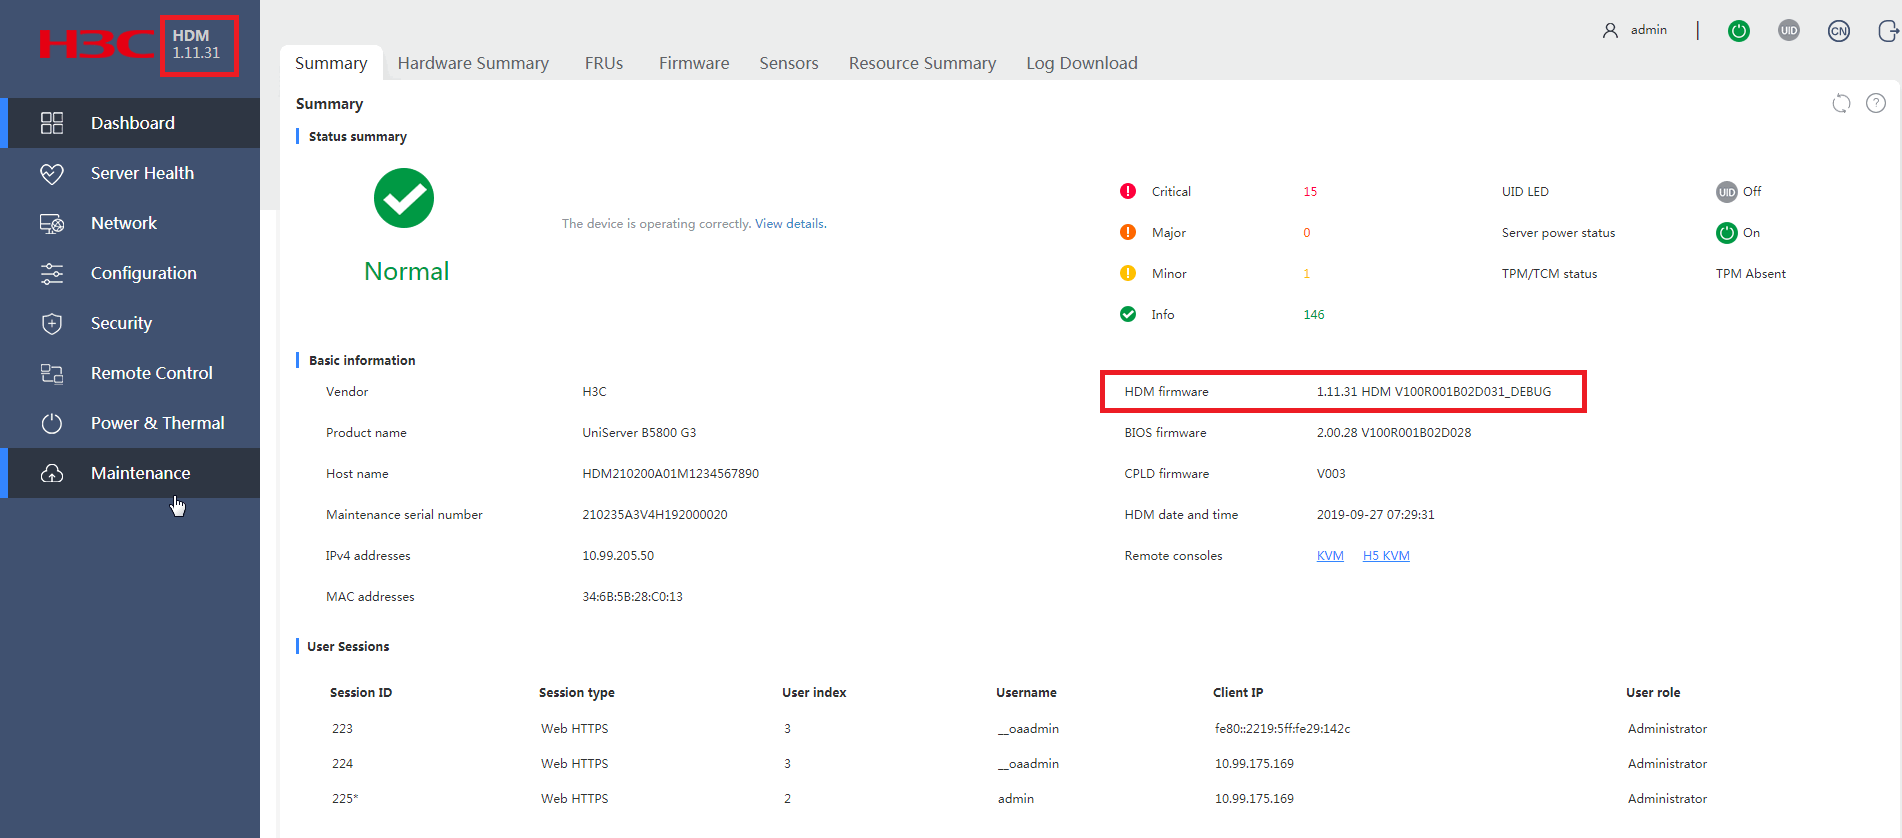
As shown in Figure 12, when the upgrade is complete, log in to the HDM page to verify that the HDM version number is the upgraded version.
Figure 12 Viewing the HDM firmware version on the HDM page
Verification method 2
Query the firmware information through the Redfish interface.
1. Open Postman, as shown in Figure 13. Select the GET operation and enter the URL https://10. 99.205.177/redfish/v1/UpdateService/FirmwareInventory/HDM.
Figure 13 Viewing the HDM firmware version through the Redfish interface

2. Click Send.
Using Curl to manage servers through the Redfish interface
Network requirement
As shown in Figure 14, the server connects to the host through the HDM dedicated interface, the network connection is normal, and the server HDM can be accessed normally. It is required to use the Curl tool on the host to control the server UID LED through the HDM Redfish interface.
Server HDM information:
· IP address: 10.99.205.177
· Administrator account: admin
· Administrator password: Password@_
Host information:
· IP address: 10.99.205.154
· OS: Ubuntu, with the version of Ubuntu-hp 3.19.0-25
· Installed Curl tool
Figure 14 Redfish networking 2
Analysis
This example introduces the operation of managing servers through the Redfish interface by using the Curl tool, in the environment of Linux Shell.
1. Perform the GET operation to query the device information.
2. Perform the PATCH operation to set the UID LED status.
3. Query the device information again to verify the UID LED status.
Software versions used
This example was created and verified on HDM-1.30.18. The version of the Curl tool is 7.64.1 and that of the Ubuntu OS is Ubuntu-hp 3.19.0-25.
Figure 15 Viewing the Linux server environment information

Procedures
Viewing the UID LED status
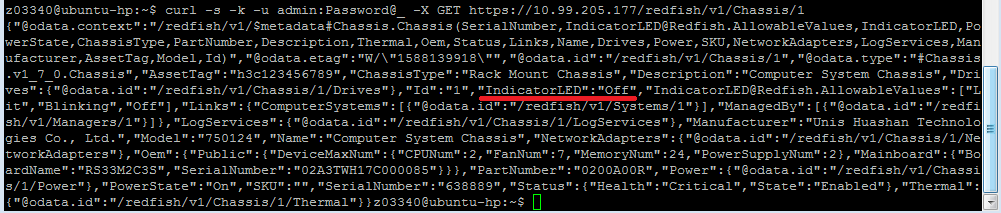
1. Perform the GET operation to query the device information. The -u parameter specifies the username and password, and the -X parameter specifies the request action and the URL path.
curl -s -k -u admin:Password@_ -X GET https://10.99.205.177/redfish/v1/Chassis/1
2. As shown in Figure 16, get the server device information, and the current UID LED status is Off.
Figure 16 Querying the device information
Setting the UID LED status
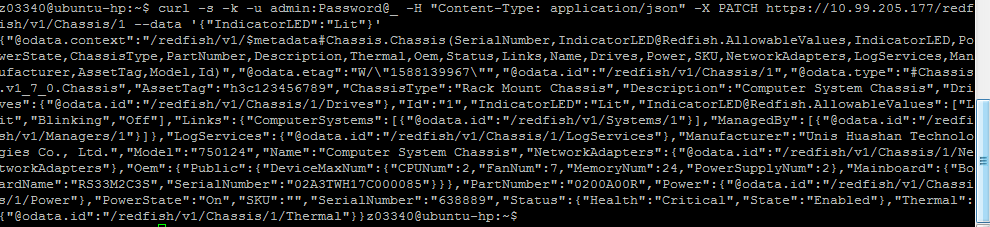
As shown in Figure 17, perform the GET operation to query the device information. The -H parameter specifies the request header parameter information and the --data parameter specifies the parameters carried in the request body.
curl -s -k -u admin:Password@_ -H "Content-Type: application/json" -X PATCH https://10.99.205.177/redfish/v1/Chassis/1 --data '{"IndicatorLED":"Lit"}'
Figure 17 Setting the UID LED status
Verifying the configuration
The following two methods can be applied to verify that the settings are successful.
· See "Viewing the UID LED status" to query the device information again. As shown in Figure 18, you can see that the status of the parameter IndicatorLED is Lit.
· If possible, you can directly view the UID LED on the server and confirm that the UID LED is lit.
Figure 18 Viewing the UID LED status again

Related documentation
· H3C HDM Redfish Reference Manual
· H3C HDM Redfish Technology White Paper
