- Table of Contents
-
- H3C HDM Configuration Examples-6W100
- 01-H3C Redfish Configuration Examples
- 02-H3C LDAP Configuration Examples
- 03-H3C IPMI Configuration Examples
- 04-H3C SNMP Configuration Examples
- 05-H3C HDM Mobile Configuration Examples for Remote Access to a Server Through L2TP VPN
- 06-H3C HDM Configuration Examples for Obtaining Event Logs Through the Redfish Interface
- 07-H3C HDM SMTP Configuration Examples
- 08-H3C HDM Zabbix-Based Server Monitoring Configuration Examples
- 09-H3C HDM Network Settings Configuration Examples
- 10-H3C hREST Configuration Examples for Configuring SNMP and Obtaining the CPU Information
- 11-H3C HDM Configuration Management Configuration Examples
- 12-HDM AD Configuration Examples
- 13-H3C HDM SOL Configuration Examples
- 14-HDM Unified Control Configuration Examples
- Related Documents
-
| Title | Size | Download |
|---|---|---|
| 04-H3C SNMP Configuration Examples | 971.35 KB |
SNMP Configuration Examples
Copyright © 2023 New H3C Technologies Co., Ltd. All rights reserved.
No part of this manual may be reproduced or transmitted in any form or by any means without prior written consent of New H3C Technologies Co., Ltd.
Except for the trademarks of New H3C Technologies Co., Ltd., any trademarks that may be mentioned in this document are the property of their respective owners.
The information in this document is subject to change without notice.
Introduction
The following information describes Simple Network Management Protocol (SNMP) configuration examples.
Prerequisites
Procedures and information in the examples might be slightly different depending on the software or hardware version of the products.
The configuration was created and verified in a lab environment, and all the servers and software were started with the factory default configuration. When you are working on a live network, make sure you understand the potential impact of every command on your network.
The following information is provided based on the assumption that you have basic knowledge of SNMP.
Configuration example
|
|
NOTE: · The configuration procedure is the same for SNMPv1 and SNMPv2c. This example uses SNMPv2c. · The configuration procedure is not the same for SNMPv3 and SNMPv2c. This document will introduce the different parts of the two, and will not describe the same or similar parts of the two. |
Network requirement
As shown in Figure 1, the ManageEngine MibBrowser 5 is installed on the PC to act as the management software of the SNMP Network Management System (NMS). The NMS uses SNMP to manage the agent (uses the R4900 G5 server as an example), and the agent automatically sends an alarm to the NMS in case of exceptions.

Software versions used
This example was created and verified on HDM 2.32.
Restrictions and guidelines
· For the NMS to manage and maintain the agent, the SNMP version number and community name on the agent and the NMS must match.
· The NMS software configuration varies by vendor. For information about configuring the NMS, see the NMS manual.
Procedures (SNMPv1/SNMPv2c)
Configuring the agent
Enter the HDM SNMP configuration screen
1. Open the browser on the server client, and enter the server's HDM management IP 10.99.205.138 in the address bar, as shown in Figure 2. On the login page, enter the default username admin and the default password Password@_, and then click Sign In.

2. Click Remote Services > SNMP. On the SNMP configuration page, configure the following settings as shown in Figure 3, and then click Save.
¡ SNMP version: v2c
¡ Long community string: Disable
¡ Read-only community string: public
¡ Confirm the read-only community string: public
¡ Read/write community string: private
¡ Confirm the read/write community: private
Figure 3 Configuring SNMP settings

Configure SNMP trap settings
1. Click Remote O&M > Alarm Settings > SNMP trap. On the SNMP trap configuration page, configure the following settings as shown in Figure 4, and then click OK.
¡ SNMP trap: Enable
¡ SNMP trap mode: Event mode (recommended)
¡ SNMP version: v2c
¡ Trap community: public
¡ Alarm sending level: All
Figure 4 Configuring SNMP trap packet settings

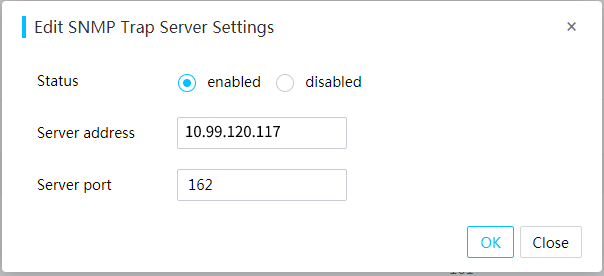
2. Configure the target address of trap alarms.
Click Remote O&M > Alarm Settings > SNMP trap. On the SNMP trap configuration page, click Edit in a server entry. In the dialog box that opens, configure the following settings as shown in Figure 5, and then click OK.
¡ Status: enabled
¡ Server address: 10.99.120.117
¡ Server port: 162
Figure 5 Editing trap server settings
After the configuration is complete, click Test in the Actions column for an alarm trap server. If a prompt displaying You have sent the test alarm successfully, it indicates the settings are successfully configured.
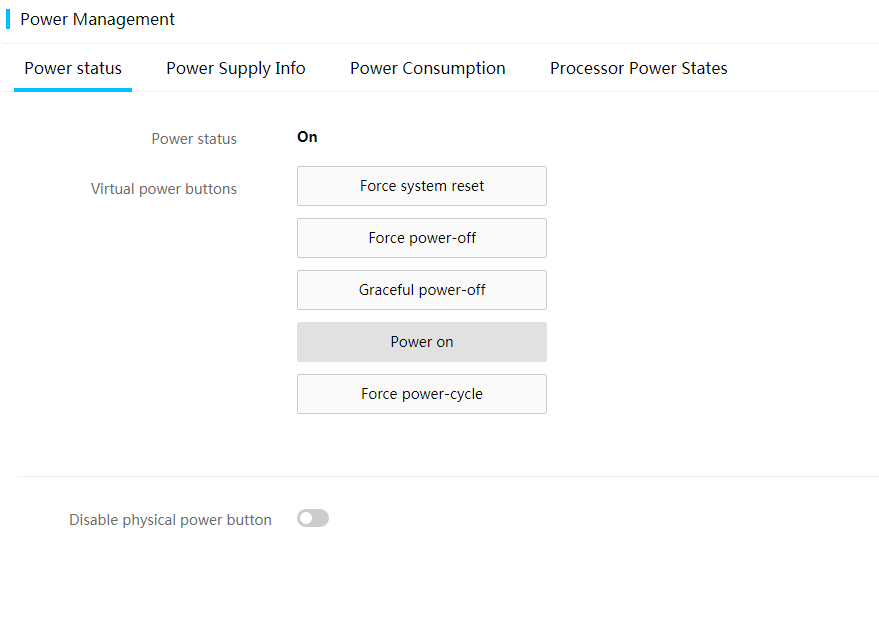
Power on the server
Click System > Power Management > Power Management to view the current power status, as shown in Figure 6.
If the server is not in the Power on status, the system can not read the information of some branch nodes. If it is in the Power on status, you do not need to perform this task.
Configuring the NMS
Obtain the MIB file
The MIB file of the HDM version is released with the version. To get the MIB file, open a browser, access H3C's official website, and navigate to Support > Resource Center > Software Download > Servers. Select a product to navigate to the firmware download page, select the target HDM version, and download the target MIB file.
Load MIB files
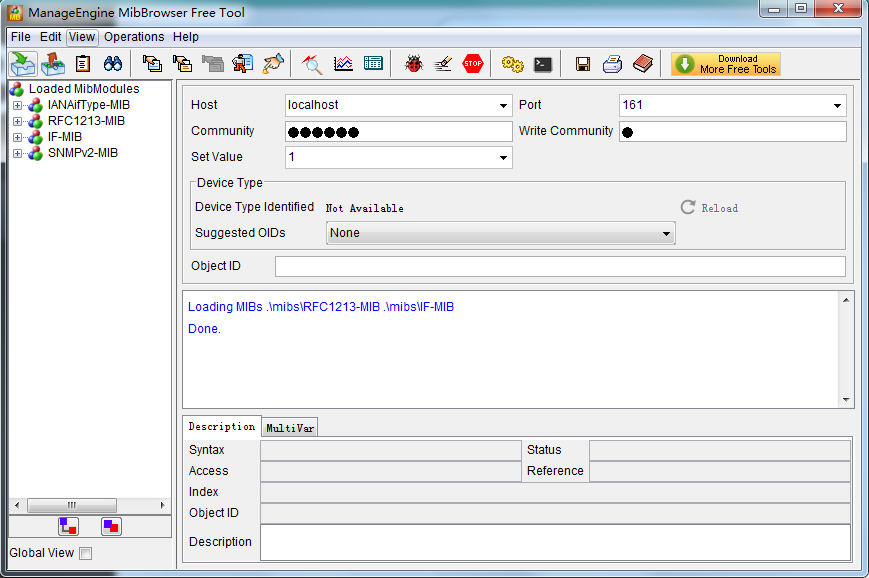
1. Open the management software ManageEngine MibBrowser 5 of the NMS, as shown in Figure 7.
Figure 7 Opening the management software
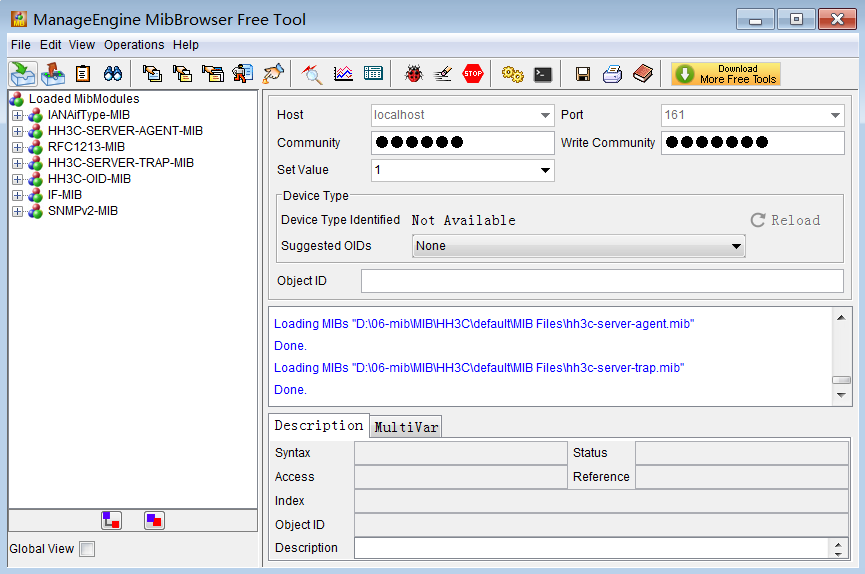
2. From the menu of the NMS management software, select File > Load Mib, select all files with the suffix mib in the decompressed folder MIB > HH3C > MIB Files, and then click Open, as shown in Figure 8.

3. After the files are loaded, three items with the prefix HH3C are displayed under the Loaded MibModules box on the left of the SNMP NMS management software, as shown in Figure 9.
Figure 9 Loading MIB files successfully
Configure the SNMP NMS management software parameters
1. Configure related parameters in SNMP NMS, as shown in Figure 10.
¡ Host: 10.99.205.138
¡ Port: 161
¡ Community: public
¡ Write Community: private
Figure 10 Configuring the SNMP NMS parameters

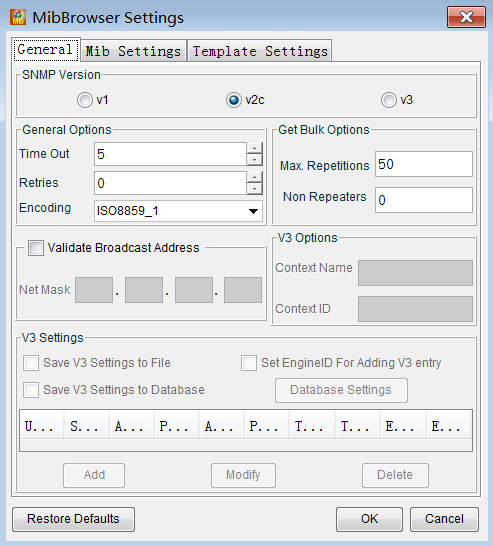
2. From the menu of the SNMP NMS management software, select Edit > Settings. On the settings page that opens, select v2c for SNMP Version, keep the default settings for other parameters, as shown in Figure 11, and then click OK.
Figure 11 Selecting the SNMP NMS version
Get the server information through the management software (Get)
In the SNMP NMS management software, click HH3C-SERVER-AGENT-MIB to expand the file, select a node to be read, and right-click the mouse. In the dialog box that opens, select GET to read the MIB node information.
This section describes how to get the information of the node named hh3cSrvLdapEnable. This node indicates the enabling status of the LDAP service on the server. hh3cSrvLdapEnable.0 under the blue text on the lower right part of the management software indicates the information that has been read, and Disable(0) indicates that the LDAP service is not enabled, as shown in Figure 12.
Figure 12 Getting hh3cSrvLdapEnable information from the SNMP NMS management software

Set the server information through the management software (Set)
1. As shown in Figure 12, select node hh3cSrvLdapEnable, and enter 1 in the Set Value field, which indicates that the value of hh3cSrvLdapEnable is set to enable(1).
2. Right-click the hh3cSrvLdapEnable node. In the dialog box that opens, select SET to set the MIB node information, as shown in Figure 13.
Figure 13 Setting hh3cSrvLdapEnable on the SNMP NMS

Configure trap viewer through the management software
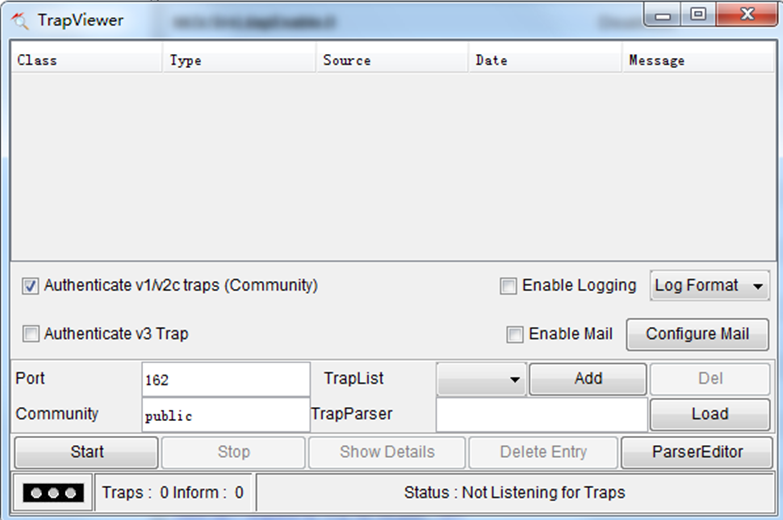
From the menu of the management software, select View > Trap Viewer. In the dialog box that opens, configure the following settings, and then click Start to enable the trap alarm receiving feature, as shown in Figure 14.
· Authenticate v1/v2c traps(Community): Select this checkbox.
· Port: 162
· Community: public
Figure 14 Configuring trap viewer
Procedures (SNMPv3)
Configuring the agent
Configure the SNMPv3 permission user
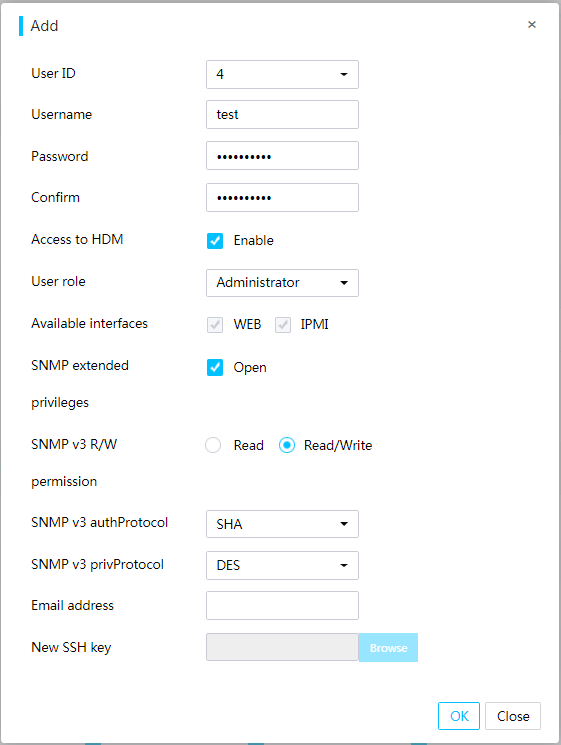
Click Users & Security > User Accounts. On the local user page, click Add. In the dialog box that opens, enter the user information of the new users, as shown in Figure 15, and then click OK.
· Username: test
· Password: Pasword@_
· Confirm: Pasword@_
· Navigate to HDM: Enable
· User role: Administrator
· SNMP extended privileges: Open
· SNMP v3 R/W permission: Read/Write
· SNMP v3 authProtocol: SHA
· SNMP v3 privProtocol: DES
Figure 15 Adding an SNMPv3 permission user
Configure SNMP trap settings
Click Remote O&M > Alarms Settings > SNMP trap. On the SNMP trap packet settings page, configure the following settings as shown in Figure 16, and then click OK.
· SNMP trap: Enable
· SNMP trap mode: Event mode (recommended)
· SNMP version: v3
· Choose trap v3 user: test
· Alarm sending level: All
Figure 16 Configuring SNMPv3 alarm settings

Configuring the NMS
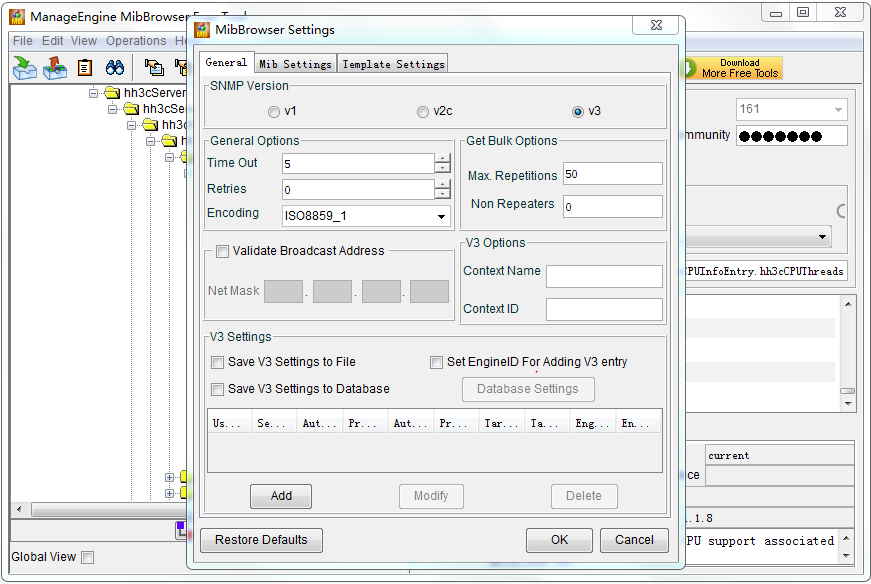
1. From the menu of the management software, select Edit > Settings. On the settings page that opens, select v3 for SNMP Version, and keep the default settings for other parameters, as shown in Figure 17.
Figure 17 Selecting the SNMP NMS version
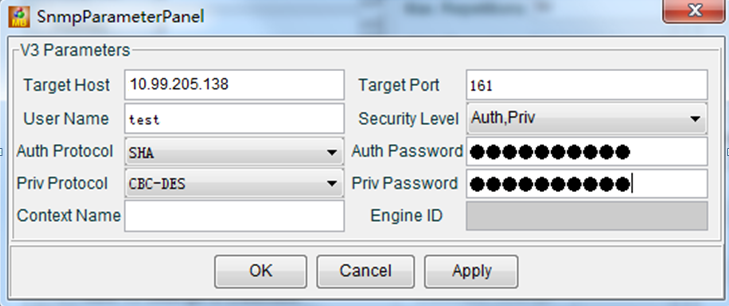
2. Click Add in Figure 17. In the dialog box that opens, add the user information as shown in Figure 18, and then click OK.
· Target Host: 10.99.205.138
· Port: 161
· User Name: test
· Security Level: Auth, Priv
· Auth Protocol: SHA
· Priv Protocol: CBC-DES
· Auth Password: Password@_
· Priv Password: Password@_
Figure 18 Adding an SNMPv3 user
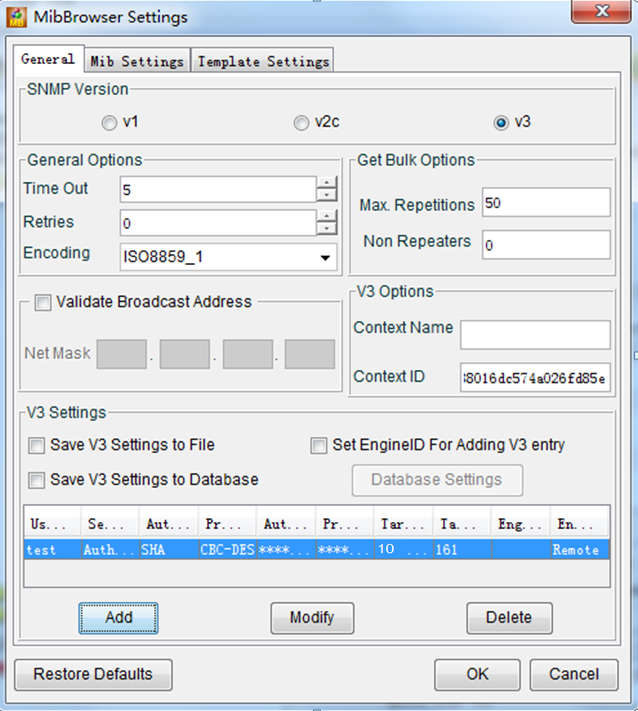
3. After the SNMPv3 user is added, the MibBrowser Settings page is as shown in Figure 19 and a user named test appears in the bottommost box. Click OK.
Figure 19 Addition of an SNMPv3 user completed
Verifying the configuration
View the GET result
If the hh3cSrvLdapEnable information got through NMS is 0 and the LDAP settings status is Disable on the HDM page, it indicates that the configuration has taken effect.
View the SET result
If the hh3cSrvLdapEnable information set through NMS is 1 and the LDAP settings status is Enable on the HDM page, as shown in Figure 20, it indicates that the configuration has taken effect.
View the trap result
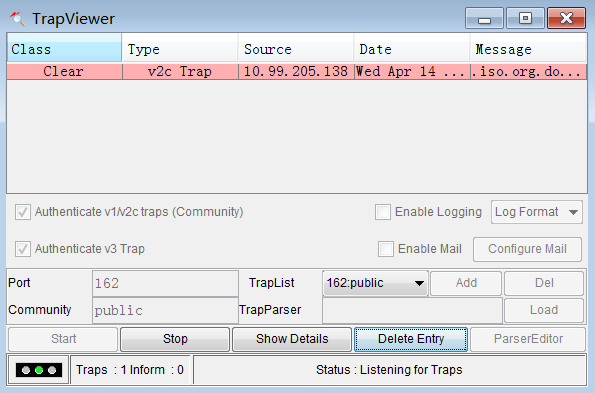
1. After you finish the above trap settings, the server will send trap information to the NMS if you unplug a power supply on a server with multiple power supplies connected. On the TrapViewer section of the SNMP NMS management software, you can view the trap alarm information sent by HDM, as shown in Figure 21.
Figure 21 Trap alarm information received in TrapViewer
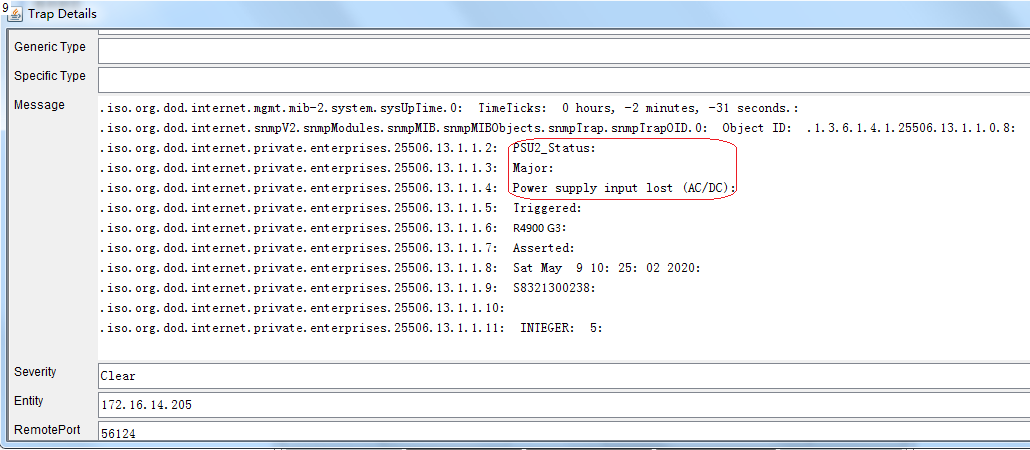
2. Select the trap information, and click Show Details in TrapViewer to view the detailed information of the alarm. As shown in Figure 22, the information in the red box is the component that triggered the alarm, the severity level of the alarm, and the event description.
Figure 22 Clicking Show Details to view the detailed information received in TrapViewer
Related documentation
· H3C HDM Technology White Paper
· H3C Servers HDM User Guide
