- Table of Contents
-
- H3C S6820 Switch Series Configuration Examples-Release 630x-6W100
- 01-Login Management Configuration Examples
- 02-RBAC Configuration Examples
- 03-Software Upgrade Examples
- 04-ISSU Configuration Examples
- 05-Software Patching Examples
- 06-Ethernet Link Aggregation Configuration Examples
- 07-Port Isolation Configuration Examples
- 08-Spanning Tree Configuration Examples
- 09-VLAN Configuration Examples
- 10-VLAN Tagging Configuration Examples
- 11-DHCP Snooping Configuration Examples
- 12-Cross-Subnet Dynamic IP Address Allocation Configuration Examples
- 13-IPv6 over IPv4 Manual Tunneling with OSPFv3 Configuration Examples
- 14-ISATAP Tunnel and 6to4 Tunnel Configuration Examples
- 15-IPv6 over IPv4 GRE Tunnel Configuration Examples
- 16-GRE with OSPF Configuration Examples
- 17-OSPF Configuration Examples
- 18-IS-IS Configuration Examples
- 19-BGP Configuration Examples
- 20-Policy-Based Routing Configuration Examples
- 21-OSPFv3 Configuration Examples
- 22-IPv6 IS-IS Configuration Examples
- 23-Routing Policy Configuration Examples
- 24-IGMP Snooping Configuration Examples
- 25-IGMP Configuration Examples
- 26-BIDIR-PIM Configuration Examples
- 27-Multicast VPN Configuration Examples
- 28-MLD Snooping Configuration Examples
- 29-IPv6 Multicast VLAN Configuration Examples
- 30-Basic MPLS Configuration Examples
- 31-MPLS L3VPN Configuration Examples
- 32-ACL Configuration Examples
- 33-Control Plane-Based QoS Policy Configuration Examples
- 34-Traffic Policing Configuration Examples
- 35-GTS and Rate Limiting Configuration Examples
- 36-Priority Mapping and Queue Scheduling Configuration Examples
- 37-Traffic Filtering Configuration Examples
- 38-AAA Configuration Examples
- 39-Port Security Configuration Examples
- 40-Portal Configuration Examples
- 41-SSH Configuration Examples
- 42-IP Source Guard Configuration Examples
- 43-Ethernet OAM Configuration Examples
- 44-CFD Configuration Examples
- 45-DLDP Configuration Examples
- 46-VRRP Configuration Examples
- 47-BFD Configuration Examples
- 48-NTP Configuration Examples
- 49-SNMP Configuration Examples
- 50-NQA Configuration Examples
- 51-Mirroring Configuration Examples
- 52-sFlow Configuration Examples
- 53-FCoE Configuration Examples
- 54-OpenFlow Configuration Examples
- 55-MAC Address Table Configuration Examples
- 56-Static Multicast MAC Address Entry Configuration Examples
- 57-IP Unnumbered Configuration Examples
- 58-MVRP Configuration Examples
- 59-MCE Configuration Examples
- 60-Congestion Avoidance and Queue Scheduling Configuration Examples
- 61-Attack Protection Configuration Examples
- 62-Smart Link Configuration Examples
- 63-RRPP Configuration Examples
- 64-BGP Route Selection Configuration Examples
- 65-IS-IS Route Summarization Configuration Examples
- 66-IRF Configuration Examples
- 67-MPLS OAM Configuration Examples
- 68-MPLS TE Configuration Examples
- 69-NetStream Configuration Examples
- 70-VXLAN Configuration Examples
- 71-DRNI Configuration Examples
- 72-DRNI and EVPN Configuration Examples
- 73-EVPN-DCI over an MPLS L3VPN Network Configuration Examples
- 74-S-MLAG Configuration Examples
- 75-MPLS SR Configuration Examples
- 76-Puppet Configuration Examples
- Related Documents
-
| Title | Size | Download |
|---|---|---|
| 76-Puppet Configuration Examples | 67.72 KB |
|
|
|
H3C S6820 Switches |
|
Puppet Configuration Examples |
|
|
|
Copyright © 2020 New H3C Technologies Co., Ltd. All rights reserved. No part of this manual may be reproduced or transmitted in any form or by any means without prior written consent of New H3C Technologies Co., Ltd. The information in this document is subject to change without notice. |
|
Contents
Introduction
This document provides Puppet configuration examples.
Puppet is an open-source configuration management tool. It provides the Puppet language. You can use the Puppet language to create configuration manifests and save them to a server. You can then use the server for centralized configuration enforcement and management.
Prerequisites
The configuration examples in this document were created and verified in a lab environment, and all the devices were started with the factory default configuration. When you are working on a live network, make sure you understand the potential impact of every command on your network.
This document assumes that you have basic knowledge of Puppet.
Example: Configuring Puppet
Network configuration
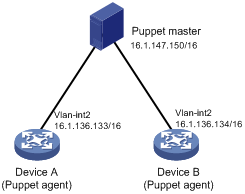
As shown in Figure 1, Puppet agents Device A and Device B are connected to the Puppet master. Use Puppet to create VLAN 100 on each Puppet agent.
Software versions used
This configuration example was created and verified on R6301.
Procedures
Configuring the Puppet master
1. Assign an IP address to the Puppet master. (Details not shown.)
2. Install Puppet on the Puppet master.
$ sudo apt-get install puppetmaster
3. Verify that Puppet configuration file puppet.conf is created in directory /etc/puppet.
If the file does not exist, execute the following command to create the file:
$ sudo puppet master –genconfig > puppet.conf
4. Add files provided by H3C:
# Create directory costom/lib/puppet in directory /etc/puppet/modules.
$ sudo mkdir –p /etc/puppet/modules/costom/lib/puppet
# Copy the type and provider library files to directory /etc/puppet/modules/custom/lib/puppet. (Details not shown.)
# Create directory nodes in directory /etc/puppet/manifests.
$ sudo mkdir –p /etc/puppet/manifests/nodes
# Edit file puppet.master.com.pp in directory /etc/puppet/manifests/nodes/. (String puppet.master.com is the host name of the Puppet master in file hostname.)
node 'puppet.master.com' {
include custom
}
5. Configure file site.pp:
# Go to directory /etc/puppet/manifests/ and create file site.pp in the directory.
$ cd ..
$ sudo touch site.pp
# Edit file site.pp.
node '16.1.136.133'{
netdev_device{'device':
ensure => undo_shutdown,
username => 'test',
password => 'test',
ipaddr => '16.1.136.133',
}
include custom
}
node '16.1.136.134'{
netdev_device{'device':
ensure => undo_shutdown,
username => 'test',
password => 'test',
ipaddr => '16.1.136.134',
}
include custom
}
6. Configure file init.pp:
# Create directory custom/manifests in directory /etc/puppet/modules to store configuration manifests.
$ sudo mkdir -p /etc/puppet/modules/custom/manifests
# Create configuration manifest init.pp in directory /etc/puppet/modules/custom/manifests.
$ sudo touch init.pp
# Edit file init.pp.
class custom{
netdev_vlan{'vlan100':
ensure => undo_shutdown,
id => 100,
require => Netdev_device['device'],
}
}
Configuring Puppet agent Device A
1. Assign an IP address to Device A. (Details not shown.)
<DeviceA> system-view
[DeviceA] interface vlan-interface 2
[DeviceA-Vlan-interface2] ip address 16.1.136.133 255.255.0.0
[DeviceA-Vlan-interface2] quit
2. Configure the device as the NETCONF over SSH server:
# Generate RSA key pairs. Leave the key pair to use the default key pair name.
[DeviceA] public-key local create rsa
# Enable NETCONF over SSH.
[DeviceA] netconf ssh server enable
# Enable scheme authentication for NETCONF over SSH users.
[DeviceA] line vty 0 63
[DeviceA-line-vty0-63] authentication-mode scheme
[DeviceA-line-vty0-63] quit
# Create device management user test. Set the password to test, and assign the SSH service and network-admin user role to the user.
[DeviceA] local-user test class manage
[DeviceA-luser-manage-test] password simple test
[DeviceA-luser-manage-test] service-type ssh
[DeviceA-luser-manage-test] authorization-attribute user-role network-admin
[DeviceA-luser-manage-test] quit
3. Configure the device as an NTP client to synchronize its system time to the system time on the Puppet master:
# Enable the NTP service
[DeviceA] ntp-service enable
# Configure the device to use NTP to obtain the UTC time.
[DeviceA] clock protocol ntp mdc 1
# Configure the device to operate in NTP broadcast client mode and use VLAN-interface 2 to receive NTP broadcast packets.
[DeviceA] interface vlan-interface 2
[DeviceA-Vlan-interface2] ntp-service broadcast-client
[DeviceA-Vlan-interface2] quit
4. Start Puppet on the device.
[DeviceA] third-part-process start name puppet arg agent --certname=16.1.136.133 --server=16.1.147.150
The device will act as a Puppet client to request a certificate from the Puppet master.
Configuring Puppet agent Device B
The steps are similar to the steps for Device A
Using the Puppet master to issue certificates to the Puppet clients
# Use the puppet cert list command to display devices that require a certificate. (Details not shown.)
# Sign a certificate for Device A.
$ sudo puppet cert sign 16.1.136.133
After Device A obtains a certificate, it obtains a configuration manifest from the Puppet master and run the manifest.
# Sign a certificate for Device B. (Details not shown.)
Verifying the configuration
# Display device configuration information. VLAN 100 is created. (Details not shown.)
Configuration files
The type and provider library files and the puppet.master.com.pp file are provided by H3C.
· Device A
#
clock protocol ntp
#
interface Vlan-interface2
ip address 16.1.136.133 255.255.0.0
ntp-service broadcast-client
#
ntp-service enable
#
line vty 0 63
authentication-mode scheme
user-role network-admin
user-role network-operator
idle-timeout 0 0
#
local-user test class manage
password hash $h$6$x0kIJnaHZkFFa3Ga$H4yMQnG96xjHiTID+6UPyJrTLXru6RJaGqrCKpxmo2O
KUVWujeoTcDEovLt6LzKIUyN7J3i5Tq2rOQPdj2Nrww==
service-type ssh
authorization-attribute user-role network-admin
authorization-attribute user-role network-operator
#
netconf ssh server enable
#
Related documentation
· H3C S6800[S6860][S6861] (R27xx) & S6820 (R630x) Switch Series Network Management and Monitoring Configuration Guide
· H3C S6800[S6860][S6861] (R27xx) & S6820 (R630x) Switch Series Network Management and Monitoring Command Reference