- Table of Contents
-
- H3C Access Controllers Web-Based Configuration Guide(E3703P61 R2509P61 R3709P61 R2609P61 R3509P61)-6W103
- 00-Preface
- 01-About
- 02-Web overview
- 03-Login
- 04-Quick Start
- 05-Summary
- 06-Device
- 07-Network
- 08-AP Configuration
- 09-Wireless Service
- 10-WLAN Roaming Configuration
- 11-Radio Configuration
- 12-Authentication
- 13-Security
- 14-QoS Configuration
- 15-Advanced Settings
- 16-Stateful Failover Configuration
- 17-VPN
- 18-SSL VPN Configuration
- Related Documents
-
| Title | Size | Download |
|---|---|---|
| 18-SSL VPN Configuration | 1.29 MB |
Recommended configuration procedure
Viewing online user information and logging out an online user
Viewing history user information
Configuring the text information
Configuring the login page logo
Configuring the service page logo
Configuring the service page background
Using a customized webpage file
Configuring Web proxy server resources
Configuring TCP application resources
Configuring a remote access service resource
Configuring a desktop sharing service resource
Configuring an email service resource
Configuring a Notes service resource
Configuring a common TCP service resource·
Configuring IP network resources
Recommended configuration procedure
Configuring a predefined domain name
Performing basic configurations for the SSL VPN domain
Configuring the caching policy
Configuring authentication policies
Configuring local authentication
Configuring RADIUS authentication
Configuring LDAP authentication
Configuring combined authentication
Configuring the SSL VPN service
Configuring user access to SSL VPN
Logging in to the SSL VPN service interface
Configuring the SSL VPN service
SSL VPN overview
Support for this feature depends on the device model. For more information, see the feature matrix in About the H3C access controllers configuration guides.
SSL VPN is a VPN technology based on SSL. It works between the transport layer and the application layer. Using the certificate-based identity authentication, data encryption, and integrity verification mechanisms that SSL provides, SSL VPN can establish secure connections for communications at the application layer.
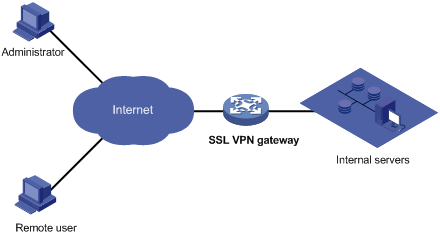
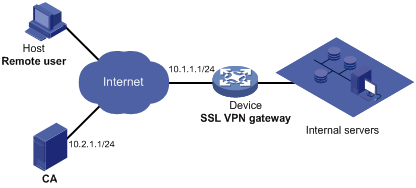
SSL VPN has been widely used for secure, remote Web-based access. For example, it can allow remote users to access the corporate network securely. Figure 1 shows a typical SSL VPN network. On the SSL VPN gateway, you can create resources to represent the resources on the servers in the internal network. To access an internal server, a remote user first needs to establish an HTTPS connection with the SSL VPN gateway and select the resources to be accessed. Then, the SSL VPN gateway forwards the resource access request to the internal server. In the SSL VPN deployed network, the SSL VPN gateway will establish an SSL connection to a remote user and then authenticate the user before allowing the user to access an internal server, protecting the internal servers.
Figure 1 Network diagram for SSL VPN configuration
How SSL VPN operates
SSL VPN operates as follows:
1. The administrator logs in to the Web interface of the SSL VPN gateway, and then creates resources to represent resources on the internal servers.
2. A remote user establishes an HTTPS connection to the SSL VPN gateway. The SSL VPN gateway and the remote user authenticate each other by using the certificate-based authentication function provided by SSL.
3. After the HTTPS connection is established, the user can try to log in to the Web interface of the SSL VPN gateway by entering the username and password and selecting the authentication method (for example, RADIUS authentication). The SSL VPN gateway will verify the user information.
4. After logging in to the Web interface, the user finds the resources of interest on the Web interface. The user client then sends an access request to the SSL VPN gateway through an SSL connection.
5. The SSL VPN gateway resolves the request, interacts with the corresponding server, and then forwards the server's reply to the user.
Advantages of SSL VPN
Support for various application protocols
SSL VPN can secure any application without knowing the details. SSL VPN classifies the service resources provided by applications into three categories:
· Web proxy server resources—Web-based access enables users to establish HTTPS connections to the SSL VPN gateway through a browser. Thus, users can access the Web proxy server resources of the servers.
· TCP application resources—TCP-based access allows users to use their applications to access the open service ports of the server securely. Such resources include remote access services, desktop sharing services, email services, Notes mail services, and common application service resources.
· IP network resources—IP-based access allows user hosts to communicate with servers at Layer 3 securely. It supports all IP-based applications to communicate with the servers.
Simple deployment
SSL is integrated into most browsers, such as IE. Almost every PC installed with a browser supports SSL. To access Web-based resources, a user only needs to launch a browser that supports SSL. When a user tries to access TCP-based or IP-based resources, the SSL VPN client software runs automatically, without requiring any manual intervention.
Support for multiple authentication methods
In addition to the certificate authentication method provided by SSL, SSL VPN also supports the following authentication methods and any combination of two of the following methods:
· Local authentication
· RADIUS authentication
· LDAP authentication
· AD authentication
Granular access control of network resources
On the SSL VPN gateway, you can configure multiple resources and users, add resources to resource groups, add users to user groups, and assign resource groups to user groups. After a user logs in, the SSL VPN gateway finds the user groups to which the user belongs, and checks the resource groups assigned to the user groups to determine which resources to provide for the user.
Configuring SSL VPN gateway
Recommended configuration procedure
|
Step |
Remarks |
|
Optional. View the online user information and the history user information, and log out online users. |
|
|
2. Configuring local SSL VPN users: |
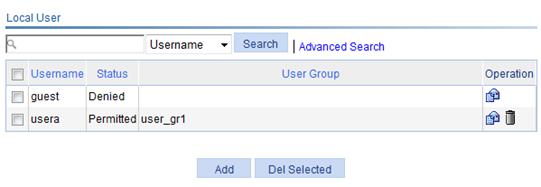
Required. Configure local SSL VPN users—users that need to pass local authentication to log in to the SSL VPN system. By default, a local user named guest (without a password) exists, in denied state. |
|
Required. Configure a user group, add local users to the user group, and select the resource groups that the user group can access. By default, a user group named Guests exists, and no users and resource groups are assigned for it. You can also add a local user to existing user groups when you create the local user. |
|
|
Optional. Customize service interfaces for SSL VPN users. |
|
|
6. Configuring resources: ¡ Configuring Web proxy server resources |
Configure at least one type of resources. By default, no resources are configured. |
|
Required. Configure a resource group, and add resources to the resource group. By default, resource groups named autohome and autostart exist. |
|
|
Optional Configure the domain policy, caching policy, bulletin information for the SSL VPN domain. |
|
|
Optional. Configure authentication methods and authentication parameters for an SSL VPN domain. Local authentication is always enabled. To use other authentication methods, manually enable them. |
|
|
Optional. Configure the check items and protected resources for a security policy. Only user hosts that pass the security policy's check can access the configured resources.
To perform security check for user hosts, you must also enable security check in the domain policy. |
|
|
Required. Enable SSL VPN, and configure the port number for the SSL VPN service and the PKI domain to be used. |
Viewing user information
Viewing online user information and logging out an online user
Select SSL VPN > View User Information from the navigation tree. The Online Users tab appears, showing information for the current online users.
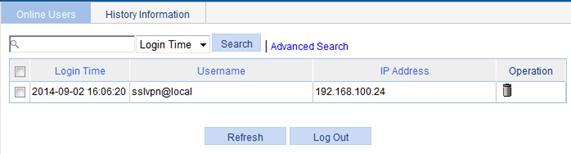
Table 1 Field description
|
Field |
Description |
|
Login Time |
Time when the user logged in to the SSL VPN system. |
|
Username |
Username of the user, with the domain name. |
|
IP Address |
IP address of the user host. |
Logging out a user
1. Select SSL VPN > View User Information from the navigation tree.
The Online Users tab appears, as shown in Figure 2.
2. Select the user that you want to log out.
3. Click the Log Out button.
4. Click OK on the dialog box that appears.
To log out a user, you can also click the ![]() icon for
the user.
icon for
the user.
Viewing history user information
1. Select SSL VPN > View User Information from the navigation tree.
2. Click the History Information tab.
The tab displays the history maximum number of concurrent users and the history maximum number of concurrent connections.

Adding a local user manually
This feature allows you to configure local users one by one in the SSL VPN system. When adding a user, you can configure all parameters for the user, including the username, password, the certificate and MAC addresses to be bound, public account settings, user status, and user groups.
To add a local user:
1. Select SSL VPN > Add User from the navigation tree.
The local user list appears, as shown in Figure 4.
2. Click Add to enter the page for adding a local user.
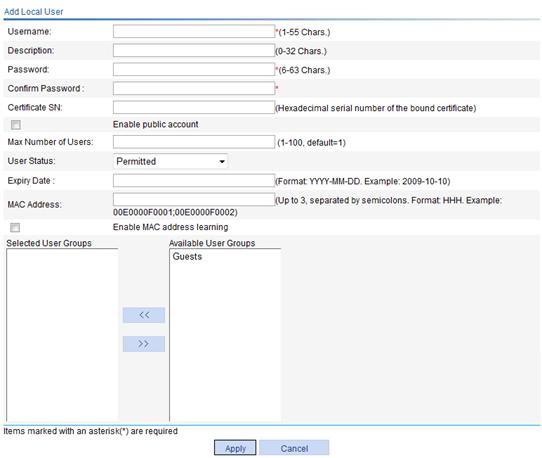
3. Configure the local user as described in Table 2.
4. Click Apply.
|
Item |
Description |
|
|
Username |
Enter a name for the local user. |
|
|
Description |
Enter a description for the local user. |
|
|
Password |
Specify a password for the local user and enter the password again to confirm the password. |
|
|
Confirm Password |
||
|
Certificate SN |
Specify a certificate sequence number for the local user. The certificate sequence number is used for identity authentication of the local user. |
|
|
Enable public account |
Select this item to set the local user account as a public account. A public account can be concurrently used by multiple users to log in to the SSL VPN system. If you do not select this item, only one user can use the local user account to log in to the SSL VPN system at a time. |
|
|
Max Number of Users |
Set the maximum number of concurrent users that can log in to the SSL VPN system by using the public account. |
|
|
User Status |
Select a user status, which can be Permitted, Permitted When Valid, and Denied. |
|
|
Expiry Date |
Set the expiry date for the user when the user status is set to Permitted When Valid. |
|
|
MAC Address |
Specify the MAC addresses to be bound with the username. The MAC addresses are used for user identity authentication. |
To implement the two functions, you must also enable the MAC address binding function in the domain policy. See "Configuring the domain policy." |
|
Enable MAC address learning |
Select this item to enable MAC address learning. With this function enabled, when a user uses this user account to log in, the SSL VPN system automatically learns the MAC address of the user host and records the MAC address for the account. The SSL VPN can record up to three MAC addresses for an account. The recorded MAC addresses are still effective after you disable the MAC address learning function. |
|
|
Selected User Groups |
Specify the user groups to which the local user belongs. |
|
|
Available User Groups |
||
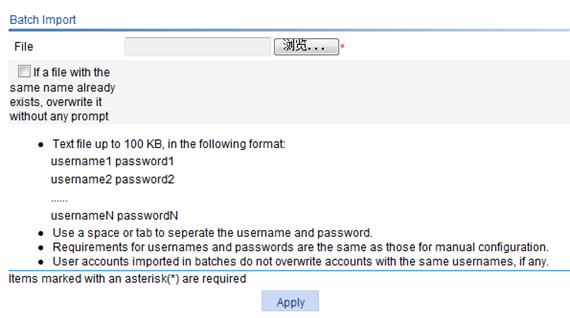
Importing local users in bulk
This feature allows you import users from a text file to the SSL VPN system. Imported users only contain the username and password information, with the user status of Permitted. You can configure more parameters for an imported user by modifying the user's information.
Before importing users, edit a text file for the users in the format specified in Figure 6.
To import users in bulk:
1. Select SSL VPN > Import Users from the navigation tree.
The batch import page appears, as shown in Figure 6.
2. Click Browse to locate the local file that saves the user information.
3. Set whether to directly overwrite the file with the same name on the device.
4. Click Apply to import local users into the SSL VPN.
Figure 6 Batch import of local users
Configuring a user group
1. Select SSL VPN > Configure User Group from the navigation tree.
The user group list page appears, as shown in Figure 7.
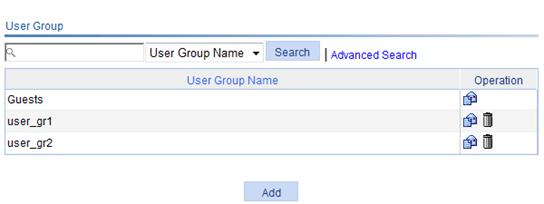
2. Click Add to add a user group.
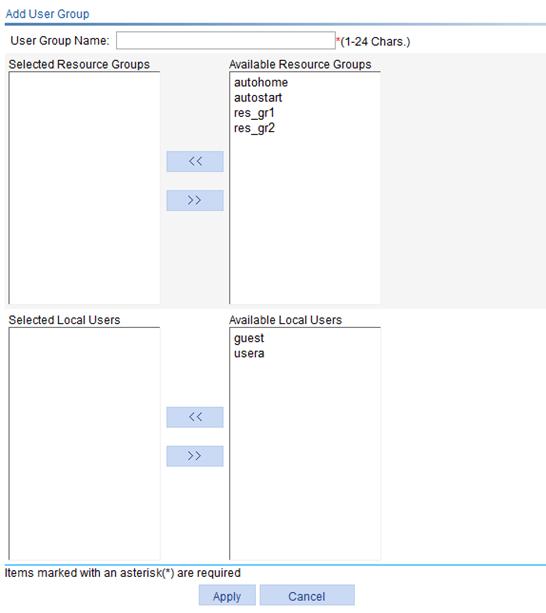
3. Configure the user group as described in Table 3.
4. Click Apply.
|
Item |
Description |
|
User Group Name |
Enter a name for the user group. |
|
Selected Resource Groups |
Select resource groups for the user group. Users in the user group are able to access the resources in the selected resource groups. |
|
Available Resource Groups |
|
|
Selected Local Users |
Select local users for the user group. |
|
Available Local Users |
Customizing SSL VPN webpages
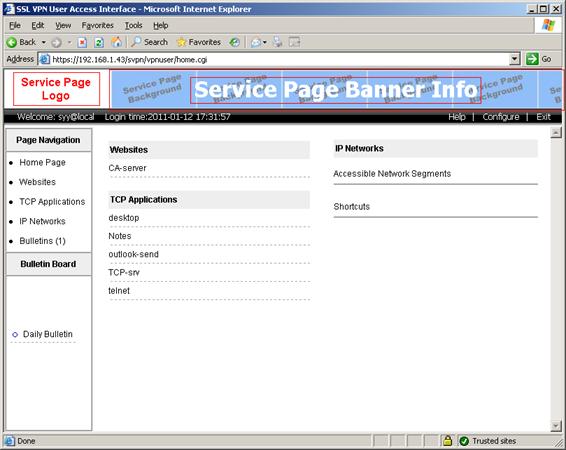
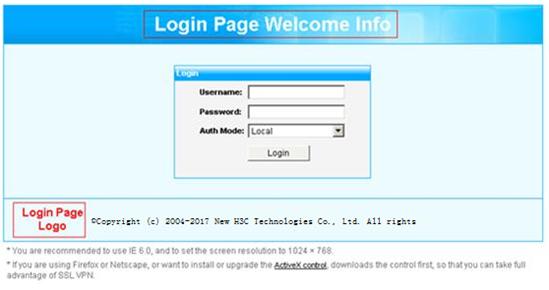
You can use the webpage files provided by the system and edit some contents in the files as needed, including the login page title, login page welcome information, login page logo, service page banner information, service page logo, and service page background. For the locations of the information items, see the red boxes in Figure 9 and Figure 10.
Figure 9 Customizable information on the login page
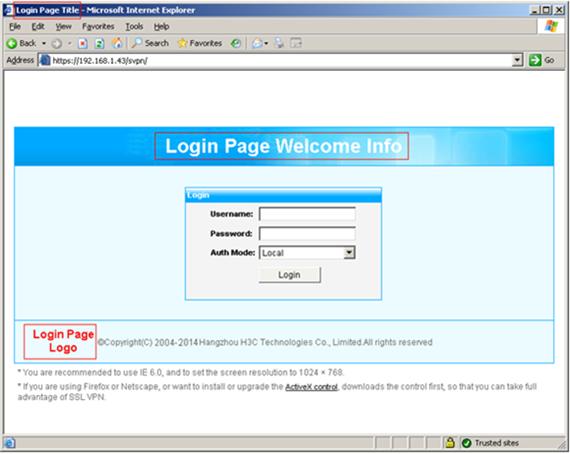
Figure 10 Customizable information on the service page
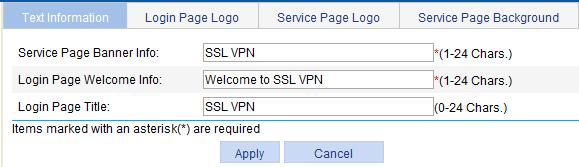
Configuring the text information
1. Select SSL VPN > Customize Page from the navigation tree.
The Text Information tab appears.
2. Configure the service page banner information, login page welcome information, and login page title on the page.
3. Click Apply.
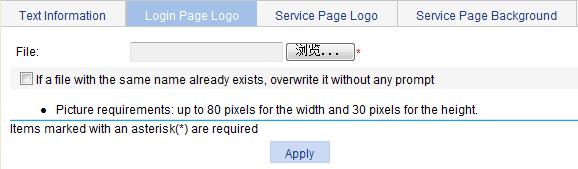
Configuring the login page logo
1. Select SSL VPN > Customize Page from the navigation tree.
2. Click the Login Page Logo tab to enter the page shown in Figure 12.
3. Click Browse to select a local picture file.
4. Set whether to directly overwrite the file with the same name on the device.
5. Click Apply.
The picture is uploaded to the SSL VPN system and is used as the logo picture on the login page.
Figure 12 Specifying a login page logo picture
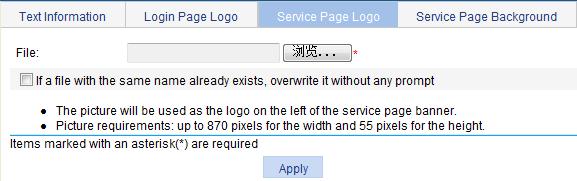
Configuring the service page logo
1. Select SSL VPN > Customize Page from the navigation tree.
2. Click the Service Page Logo tab to enter the page shown in Figure 13.
3. Click Browse to select a local picture file.
4. Set whether to directly overwrite the file with the same name on the device.
5. Click Apply.
The picture is uploaded to the SSL VPN system and is used as the logo picture on the service page.
Figure 13 Specifying a service page logo picture
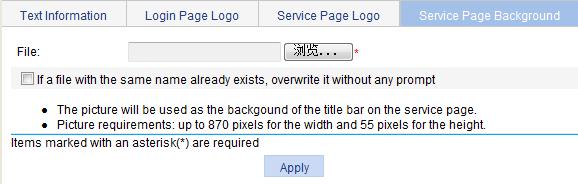
Configuring the service page background
1. Select SSL VPN > Customize Page from the navigation tree.
2. Click the Service Page Background tab to enter the page shown in Figure 14.
3. Click Browse to select a local picture file.
4. Set whether to directly overwrite the file with the same name on the device.
5. Click Apply.
The picture is uploaded to the SSL VPN system and is used as the service page background picture.
Figure 14 Specifying a service page background picture
Using a customized webpage file
You can edit a webpage file of your own to provide a fully customized user access interface.
Before you configure full customization, upload the customized page file to the SSL VPN gateway through FTP or TFTP.
To use a customized webpage file:
1. Select SSL VPN > Customize Page by File from the navigation tree.
The full customization page appears, as shown in Figure 15.
Figure 15 Page customization by file
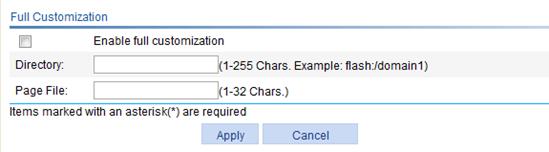
2. Configure the customization information as described in Table 4.
3. Click Apply.
|
Item |
Description |
|
Enable full customization |
Select this item to enable the full customization function. |
|
Directory |
Enter the directory where the customized page files are saved on the SSL VPN gateway. |
|
Page File |
Enter the name of the customized login page file. |
Configuring Web proxy server resources
Typically, Web servers provide services in webpages. Users can get desired information by clicking the links on the pages. On the Internet, information exchanged between Web servers and users is transmitted in plain text. The HTTP data may be intercepted in transit. SSL VPN provides secure connections for users to access Web servers and can prevent illegal users from accessing the protected Web servers.
1. Select SSL VPN > Manage Web Proxy from the navigation tree.
A page that lists the Web proxy server resources appears, as shown in Figure 16.
Figure 16 Web proxy server resources list
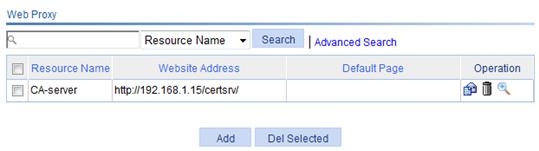
2. Click Add to enter the page for adding a Web proxy server resource.
Figure 17 Adding a Web proxy server resource
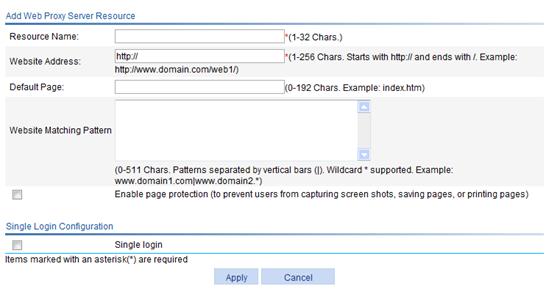
3. Configure the Web proxy server resource as described in Table 5.
|
Item |
Description |
|
Resource Name |
Enter a name for the Web proxy server source. The resource name must be unique in the SSL VPN system. Resources are uniquely identified by their names. |
|
Website Address |
Specify the website address for providing Web services. It must start with http:// and end with /, for example, http://www.domain.com/web1/. The website address can be an IP address or a domain name. If you specify a domain name, make sure that you configure domain name resolution on Network > DNS. |
|
Default Page |
Specify the home page to be displayed after an SSL VPN user logs in. For example, index.htm. |
|
Website Matching Pattern |
Specify website matching patterns to determine which webpages a user can access through the website specified in the Website Address field. Website matching supports fuzzy match based on wildcard *. Use vertical bars (|) to separate multiple matching patterns. Assume that you have specified a website address in the Website Address field. To allow access to specific webpages provided at the website, for example, the webpages www.domain1.com, www.domain2.com, www.domain2.org, and www.domain2.edu, you can specify www.domain1.com|www.domain2.* as the matching patterns. |
|
Enable page protection |
Select this box to enable page protection. With page protection enabled, a login user cannot capture screen shots, save pages, or printing pages. |
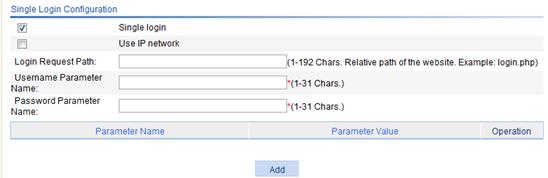
4. Set whether to enable single login:
To enable single login, select the box before the Single login field to expand the configuration area (as shown in Figure 18), and then configure the single login parameters as described in Table 6.
After you enable single login and configure single login parameters, when a user accesses the resource through the SSL VPN service interface, the user is redirected to the specified website if the user's username and password for accessing the website are the same as those for logging in to the SSL VPN service interface.
5. Click Apply.
Figure 18 Configuring single login
|
Item |
Description |
|
Use IP network |
Select this box to allow IP access to the resource. If you select this item, you must configure an IP network resource for a website and associate the IP network resource with the relevant users. When such a user accesses the website from the SSL VPN Web interface, the system automatically logs the user in to the website through the IP network resource. If you do not select this item, users access the resource through the Web proxy server. |
|
Login Request Path |
· When you select the IP network mode, this item specifies the path that the system submits during single login. If you leave this field blank, the system uses the address that is specified in the Website Address field. · When the IP network mode is not selected, this item specifies the relative path of the Web proxy website. If you leave this field blank, the SSL VPN system uses the default page specified in the Default Page field. |
|
Username Parameter Name |
Specify the username parameter name that the system submits during automatic login. |
|
Password Parameter Name |
Specify the password parameter name that the system submits during automatic login. |
|
Other parameters |
Specify the other parameters for the system to submit during automatic login. To add a parameter other than the username and password, click Add, enter the parameter name and parameter value on the popup page and click Apply. |
Another way to configure the single login function is as follows:
1. Click the ![]() icon
of a resource on the Web proxy server resource list, as shown in Figure 16.
icon
of a resource on the Web proxy server resource list, as shown in Figure 16.
2. Enter a username and a password (the password must be different from the username) on the popup page, and click Apply.
The login page for the website in the resource pops up.
3. Enter the username and password again and log in.
A message will tell you that the single login function is configured successfully.
During this process, the system automatically gets the username parameter name and the password parameter name. When the website login page requires parameters other than the username and password, you cannot configure single login in this method.
Configuring TCP application resources
You can configure the following types of TCP application resources:
· Remote access service resources
· Desktop sharing service resources
· Email service resources
· Notes mail service resources
· Common TCP service resources
Configuring a remote access service resource
The remote access service includes remote character terminal services (such as Telnet and SSH) and traditional terminal services (such as IBM3270). These services each simulate a server's terminal window on a local host through which you can control a remote host as if you were sitting before it. Between the local and remote hosts, data is transmitted in plain text over the Internet. To ensure the security of data transmission, SSL VPN uses the SSL encryption technology to encrypt service data.
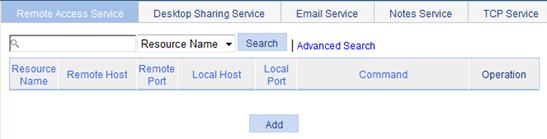
1. Select SSL VPN > Manage TCP Application from the navigation tree.
The Remote Access Service page appears, as shown in Figure 19.
Figure 19 Remote access service resource list
2. Click Add to enter the page for adding a remote access service.
Figure 20 Adding a remote access service
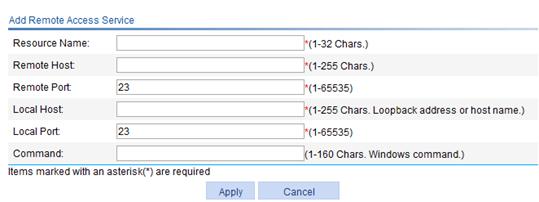
3. Configure the remote access service as described in Table 7.
4. Click Apply.
|
Item |
Description |
|
Resource Name |
Enter a name for the remote access service resource. The resource name must be unique in the SSL VPN system. Resources are uniquely identified by their names.
If you do not configure the command for Command, H3C recommends including the resource type, local address, and local port in the resource name so that users can view the desired information after they log in to the SSL VPN system. |
|
Remote Host |
Specify the host name or IP address of the remote host that provides the remote access service. |
|
Remote Port |
Specify the port number that the remote host uses for the remote access service. |
|
Local Host |
Specify a loopback address or a character string that represents a loopback address. |
|
Local Port |
Specify the port number that the local host uses for the remote access service. H3C recommends using a port number greater than 1024 that is rarely used. |
|
Command |
Configure the Windows command for the resource. After you configure the command, users can start the related application to access the remote server by clicking the resource name on the SSL VPN service interface. For example, you can configure the command for a Telnet service in the format telnet <local address> <local port>, such as telnet 127.0.0.1 2300. If you specified the default port number of the remote access service as the local port number, you can omit the local port in the command. |
Configuring a desktop sharing service resource
Desktop sharing, or remote desktop, allows users to access the sessions on a remote host from your local host. With desktop sharing, you can connect the computer in office, and access all the applications, files, and network resources at home as if you were working on the computer at the office. Common desktop sharing services include Windows remote desktop, VNC desktop sharing, and Citrix desktop sharing. For some desktop sharing applications, data is transmitted in plain text and can be easily intercepted. SSL VPN can encrypt the data to ensure data security.
1. Select SSL VPN > Manage TCP Application from the navigation tree.
2. Click the Desktop Sharing Service tab to view existing desktop sharing services, as shown in Figure 21.
Figure 21 Desktop sharing services
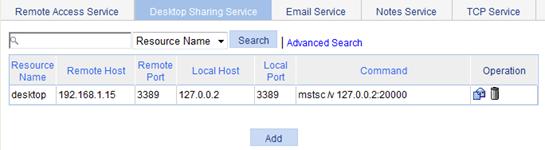
3. Click Add to enter the page for adding a desktop sharing service.
Figure 22 Adding a desktop sharing service resource
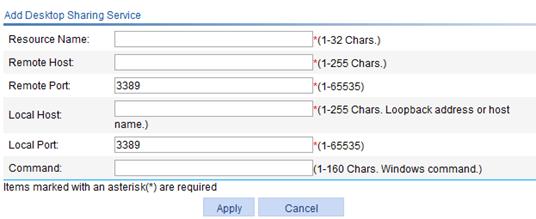
4. Configure the desktop sharing service as described in Table 8.
5. Click Apply.
|
Item |
Description |
|
Resource Name |
Enter a name for the desktop sharing service resource. The resource name must be unique in the SSL VPN system. Resources are uniquely identified by their names.
If you do not configure the command for Command, H3C recommends including the resource type, local address, and local port in the resource name so that users can view the desired information after they log in to the SSL VPN system. |
|
Remote Host |
Specify the host name or IP address of the remote host that provides the desktop sharing service. |
|
Remote Port |
Specify the port number that the remote host uses for the desktop sharing service. |
|
Local Host |
Specify a loopback address or a character string that represents a loopback address. |
|
Local Port |
Specify the port number that the local host uses for the remote access service. H3C recommends using a port number greater than 1024 that is rarely used. |
|
Command |
Configure the Windows command for the resource. For example, you can configure the command for a Windows desktop sharing service in the format mstsc /v <local address> <local port>, such as mstsc /v 127.0.0.2 20000. If you specified the default port number of the desktop sharing service as the local port number, you can omit the local port in the command. |
Configuring an email service resource
The email service is widely used to exchange texts and graphics over the network. Generally, emails are transmitted in plain text on the network. Users can encrypt emails to protect the content of emails, but this method cannot ensure transmission security. SSL VPN can ensure the transmission security of emails.
|
|
IMPORTANT: For an email service, you must configure at least two resources: a receiving server and a sending server. |
1. Select SSL VPN > Manage TCP Application from the navigation tree.
2. Click the Email Service tab to view existing email services, as shown in Figure 23.
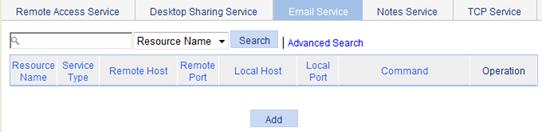
3. Click Add to enter the page for adding an email service.
Figure 24 Adding an email service resource
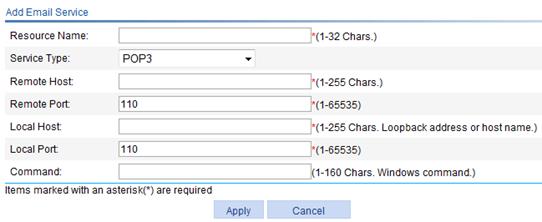
4. Configure the email service as described in Table 9.
5. Click Apply.
|
Item |
Description |
|
Resource Name |
Enter a name for the email service resource. The resource name must be unique in the SSL VPN system. Resources are uniquely identified by their names.
If you do not configure the command for Command, H3C recommends including the resource type, local address, and local port in the resource name so that users can view the desired information after they log in to the SSL VPN system. |
|
Service Type |
Select an email service type, which can be POP3, IMAP, or SMTP. |
|
Remote Host |
Enter the host name or IP address of the email server. |
|
Remote Port |
Enter the service port number of the email server. |
|
Local Address |
Enter a loopback address or a character string that represents a loopback address. |
|
Local Port |
Enter the local port number. It must be the default port number for the email service of the specified type. |
|
Command |
Configure the Windows command for the resource. Users must manually start the email service application. You do not need to configure this item. |
Configuring a Notes service resource
1. Select SSL VPN > Manage TCP Application from the navigation tree.
2. Click the Notes Service tab to view existing notes services, as shown in Figure 25.
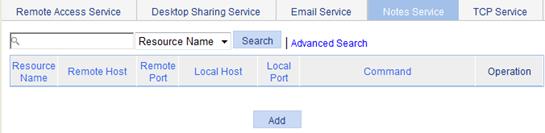
3. Click Add to enter the page for adding a Notes service.
Figure 26 Adding a Notes service resource
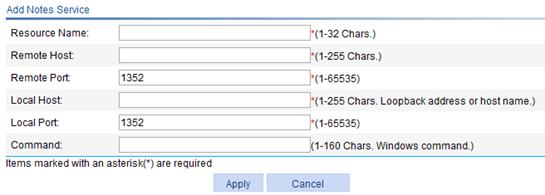
4. Configure the Notes service as described in Table 10.
5. Click Apply.
|
Item |
Description |
|
Resource Name |
Enter a name for the Notes service resource. The resource name must be unique in the SSL VPN system. Resources are uniquely identified by their names.
If you do not configure the command for Command, H3C recommends including the resource type, local address, and local port in the resource name so that users can view the desired information after they log in to the SSL VPN system. |
|
Remote Host |
Enter the host name or IP address of the Notes mail server. |
|
Remote Port |
Enter the service port number of the Notes mail server. |
|
Local Host |
Enter a loopback address or a character string that represents a loopback address. The local host character string must be the same as the mail server name in the Notes application. Otherwise, the Notes service resource cannot be used normally. |
|
Local Port |
Enter the local port number. It must be the default port number of the Notes service. |
|
Command |
Configure the command for the resource. Users must manually start the Notes service application. You do not need to configure this item. |
Configuring a common TCP service resource
The common TCP service of SSL VPN is designed to support various client/server applications. It is widely used to access client/server TCP applications other than the ones previously mentioned. Generally, you can configure all network ports that are possibly used by applications in common TCP services. To access an application provided by a common TCP service, a user only needs to configure the corresponding IP address and port number listed on the common TCP service page as the access address and port number for the application.
1. Select SSL VPN > Manage TCP Application from the navigation tree.
2. Click the TCP Service tab to view existing TCP services, as shown in Figure 27.
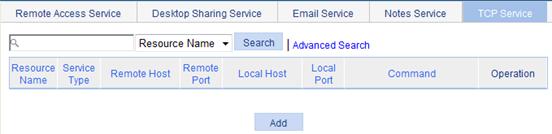
3. Click Add to enter the page for adding a common TCP service.
Figure 28 Adding a TCP service resource
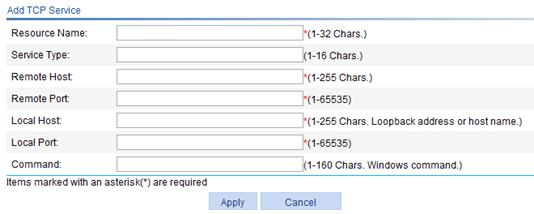
4. Configure the common TCP service as described in Table 11.
5. Click Apply.
|
Item |
Description |
|
Resource Name |
Enter a name for the common TCP service resource. The resource name must be unique in the SSL VPN system. Resources are uniquely identified by their names.
If you do not configure the command for Command, H3C recommends including the resource type, local address, and local port in the resource name so that users can view the desired information after they log in to the SSL VPN system. |
|
Service Type |
Enter the type for the TCP service. |
|
Remote Host |
Enter the host name or IP address of the remote host that provides the common TCP service. |
|
Remote Port |
Enter the port number that the remote host uses for the common TCP service. |
|
Local Host |
Enter a loopback address or a character string that represents a loopback address. |
|
Local Port |
Enter the port number that the local host uses for the common TCP service. |
|
Command |
Configure the Windows command for the resource. |
Configuring IP network resources
The SSL VPN IP network access service supports all applications that operate at the IP layer and above, providing secure communication between users and servers. Users do not need to know the application types and configurations. After they log in to the SSL VPN service interface, the ActiveX SSL VPN client is automatically downloaded and started, and the users can access authorized services of certain hosts securely.
Recommended configuration procedure
|
Task |
Remarks |
|
Required. Configure global parameters, such as the IP address pool, gateway address, timeout time, WINS server, and DNS server, for IP network resources. |
|
|
Required. Configure the host resources that users can access from the IP networks list of the SSL VPN interface. |
|
|
Optional. Configure user-IP bindings. After a user is bound with an IP address, when the user accesses IP network resource, the system does not assign a virtual network adapter IP address to the user from the global IP pool but assigns the bound IP address to the user. |
|
|
Optional. With a predefined domain name configured, the gateway sends the mapping between the predefined domain name and the IP address to clients. When accessing this domain, a client directly uses the corresponding IP address, eliminating the requirement for DNS resolution. |
Configuring global parameters
1. Select SSL VPN > Manage IP Network from the navigation tree.
The Global Configuration tab appears, as shown in Figure 29.
Figure 29 Global configuration page
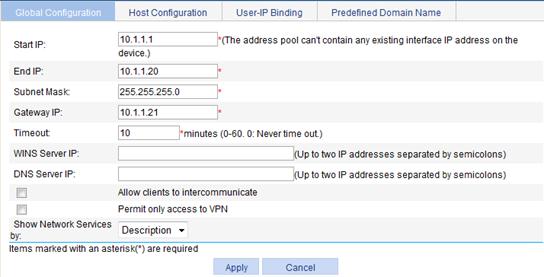
2. Configure the global parameters for IP network resources, as described in Table 12.
3. Click Apply.
|
Item |
Description |
|
Start IP |
Specify the IP address pool from which the gateway assigns IP addresses for clients' virtual network adapters. |
|
End IP |
|
|
Subnet Mask |
Enter the subnet mask to be assigned to a client's virtual network adapter. |
|
Gateway IP |
Enter the default gateway IP address to be assigned to a client's virtual network adapter. |
|
Timeout |
Set an idle timeout for client connections. If the gateway does not receive any packet from a client during this period, the gateway disconnects the client. |
|
WINS Server IP |
Enter the WINS server IP addresses to be assigned to a client's virtual network adapter. |
|
DNS Server IP |
Enter the DNS server IP addresses to be assigned to a client's virtual network adapter. |
|
Allow clients to intercommunicate |
Select this item to allow IP access between online users. |
|
Permit only access to VPN |
Select this item to allow online users to access only the VPN. If you do not select this item, online users can access both the VPN and the Internet. |
|
Show Network Services by |
Specify how to display network services for online users. · Description—Shows the description information for the network services that host resources allow users to access. · IP address—Shows the destination address, subnet mask, and protocol type of the network services that host resources allow users to access. |
Configuring host resources
1. Select SSL VPN > Manage IP Network from the navigation tree.
2. Click the Host Configuration tab to view existing host resources, as shown in Figure 30.
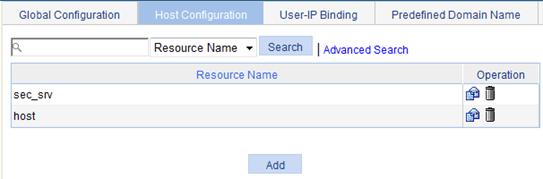
3. Click Add to enter the page for adding a host resource.
Figure 31 Adding a host resource

4. Enter a name for the host resource.
The resource name must be unique in the SSL VPN system. Resources are uniquely identified by their names.
5. Click Add under the Network Services list.
The following dialog box appears:
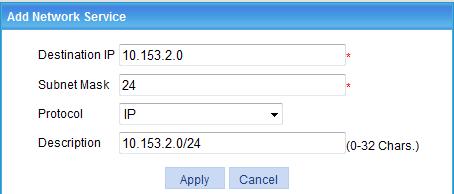
Figure 32 Adding an available network service
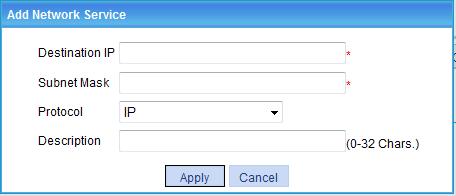
6. Configure the network service as described in Table 13.
|
Item |
Description |
|
Destination IP |
Enter the destination address of the network service. |
|
Subnet Mask |
Enter the subnet mask of the network service. |
|
Protocol |
Specify the protocol type of the network service, which can be IP, TCP, or UDP. |
|
Description |
Enter a description for the network service. If you have configured the system to show network services by description, H3C recommends that you include the network services' network information (subnet IP/mask) in the description so that users can view desired information after they log in to the SSL VPN system. |
7. Click Apply to add the network service to the network service list.
8. Repeat steps 5 to 7 to add multiple network services.
9. Click the Add button under the shortcuts list to enter the page for adding a network service shortcut.
Figure 33 Adding a network service shortcut
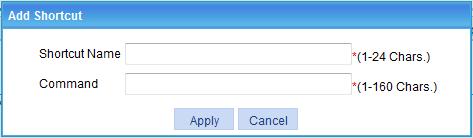
10. Enter a name for the shortcut and specify the Windows command of the shortcut.
11. Click Apply to add the shortcut to the shortcut list.
12. Repeat steps 9 to 11 to add multiple shortcuts.
13. Click Apply at the bottom of the Add Host Resource page.
Configuring a user-IP binding
1. Select SSL VPN > Manage IP Network from the navigation tree.
2. Click the User-IP Binding tab to view existing user-IP bindings, as shown in Figure 34.
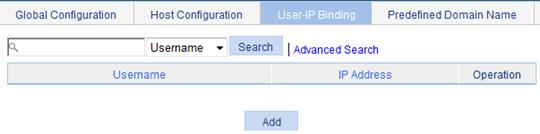
3. Click Add to enter the page for adding a user-IP binding.
Figure 35 Adding a user-IP binding
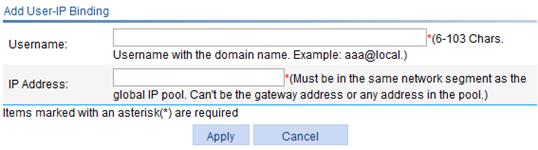
4. Configure the user-IP binding as described in Table 14.
5. Click Apply.
|
Item |
Description |
|
Username |
Specify the username to be bound with an IP address. The username must contain the domain name. For example, aaa@local. |
|
IP Address |
Specify the IP address to be bound with the username. The specified IP address must be in the same network segment as the global IP address pool and must not be the gateway address or any address in the global IP pool. |
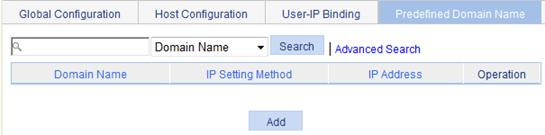
Configuring a predefined domain name
1. Select SSL VPN > Manage IP Network from the navigation tree.
2. Click the Predefined Domain Name tab to view existing predefined domain names, as shown in Figure 36.
Figure 36 Predefined domain names
3. Click Add to enter the page for adding a predefined domain name.
Figure 37 Adding a predefined domain name
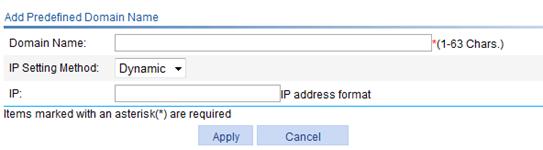
4. Configure the predefined domain name as described in Table 15.
5. Click Apply.
|
Item |
Description |
|
Domain Name |
Enter a domain name to be issued to clients. |
|
IP Setting Method |
Select the IP setting method, including Dynamic and Static. · Dynamic—To use this method, you also need to navigate to page Network > DNS to configure domain name resolution. The gateway will first resolve the domain name to get an IP address and then issue the IP address to clients. · Static—To use this method, you must specify an IP address in the next field. The gateway will issue the domain name-IP address mapping to clients. |
|
IP |
Specify an IP address for the domain name when the IP setting method is Static. When the IP setting method is Dynamic, this IP setting does not take effect. |
Configuring a resource group
1. Select SSL VPN > Manage Resource Group from the navigation tree.
The Resource Group page appears, listing all existing resource groups, as shown in Figure 38.
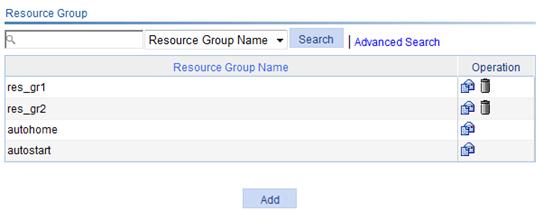
2. Click Add to enter the page for adding a resource group.
Figure 39 Adding a resource group
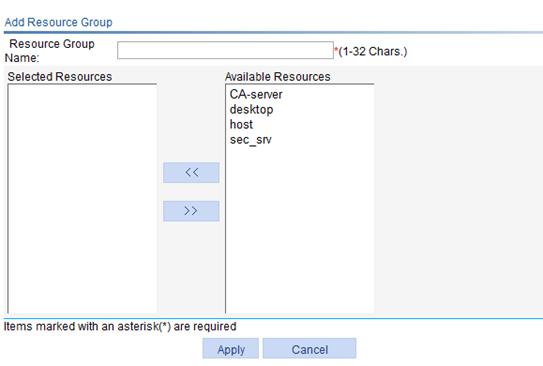
3. Configure the resource group as described in Table 16.
4. Click Apply.
|
Item |
Description |
|
Resource Group Name |
Enter a name for the resource group. |
|
Selected Resources |
Specify resources for the resource group. |
|
Available Resources |
Performing basic configurations for the SSL VPN domain
Configure a domain policy, caching policy, and a bulletin:
· Domain policy—Defines the common parameters and functions for the SSL VPN domain.
· Caching policy—Specifies which cached contents to clear from user hosts when users log out from the SSL VPN system.
· Bulletin management—Allows you to provide different information to different users.
Configuring the domain policy
1. Select SSL VPN > Configure Basic Settings from the navigation tree.
The Domain Policy tab appears, as shown in Figure 40.
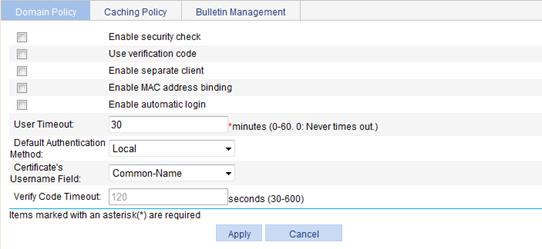
2. Configure the domain policy as described in Table 17.
3. Click Apply.
|
Item |
Description |
|
Enable security check |
Select this item to enable security check. With security check enabled, the SSL VPN system checks a user host based on the security policy and determines whether to allow the user to access resources according to the check result.
To implement user host security check, you must also configure the security policy. See "Configuring a security policy." |
|
Use verification code |
Select this item to use verification codes. After you select this item, users must enter the correct verification codes to log in to the SSL VPN system. |
|
Enable separate client |
Select this item to enable the separate client function. After a user logs in to SSL VPN, the SSL VPN client automatically runs. With separate client enabled, the system automatically closes the SSL VPN Web interface, leaving the client software running alone. |
|
Enable MAC address binding |
Select this item to enable MAC address binding. With MAC address binding enabled, the SSL VPN system obtains the MAC address of a user when the user logs in, for user identity authentication or MAC address learning. |
|
Enable automatic login |
Select this item to enable automatic login. With automatic login enabled, when a user enters the SSL VPN login page, the system will automatically log the user in by using the guest account or the certificate account, depending on the authentication mode specified in the default authentication method. · When the authentication mode is password, the system uses the guest account for automatic login. · When the authentication mode is certificate, the system uses the username carried in the client certificate for automatic login. · When the authentication mode is password+certificate, the system uses the guest account for automatic login and requires that the user have the client certificate for the guest account. |
|
User Timeout |
Set an idle timeout for users. If a login user does not perform any operation during this period, the system logs out the user. |
|
Default Authentication Method |
Select the default authentication method used on the SSL VPN login page.
To specify an authentication method other than local authentication as the default authentication method, you must also enable the authentication method. See "Configuring authentication policies." |
|
Certificate's Username Field |
Select the certificate field to be used as the username when the authentication mode is certificate. Options include the Common-Name filed and the Email-Address field. |
|
Verify Code Timeout |
Set a timeout for the verification code displayed on the SSL VPN login page. If a user does not enter the displayed verification code in this period, the verification code becomes invalid. The user can refresh the login page to get a new verification code. |
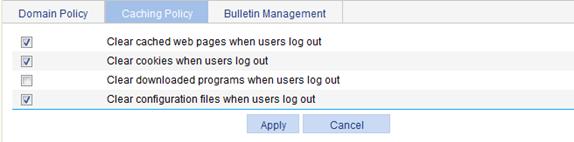
Configuring the caching policy
1. Select SSL VPN > Configure Basic Settings from the navigation tree.
2. Click the Caching Policy tab.
The caching policy configuration page appears, as shown in Figure 41.
3. Select the operations to be done on a user host when the user logs out.
¡ Downloaded programs refer to the SSL VPN client software that was automatically downloaded and run when the users logged in to the SSL VPN system.
¡ Configuration files refer to the configuration file that was automatically saved when a user changed the settings of the SSL VPN client software, if any.
4. Click Apply.
Configuring a bulletin
1. Select SSL VPN > Configure Basic Settings from the navigation tree.
2. Click the Bulletin Management tab.
The bulletin management page appears, as shown in Figure 42.
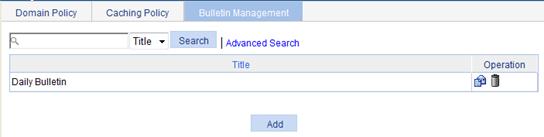
3. Click Add to add a new bulletin, as shown in Figure 43.

4. Configure the bulletin as described in Table 18.
5. Click Apply.
|
Item |
Description |
|
Title |
Enter a name for the bulletin. |
|
Content |
Enter the contents of the bulletin. |
|
Selected User Groups |
Select the user groups that can view the bulletin. |
|
Available User Groups |
Configuring authentication policies
SSL VPN supports local authentication, RADIUS authentication, LDAP authentication, AD authentication, and combined authentication of any two of the previous four authentication methods.
Local authentication, LDAP authentication, and AD authentication each supports the following authentication modes:
· Password—Authenticates only a user's password.
· Password+Certificate—Authenticates a user's password and client certificate.
· Certificate—Authenticates only a user's client certificate.
RADIUS authentication supports only the password and password+certificate authentication modes.
Configuring local authentication
Local authentication authenticates users by using the user information saved on the SSL VPN gateway. This authentication method is the fastest because user information is locally saved, and the SSL VPN gateway does not need to exchange information with an external authentication server. However, the number of local users is limited by the capacity of the SSL VPN gateway.
1. Select SSL VPN > Configure AuthN Policy from the navigation tree.
The Local Authentication tab appears, as shown in Figure 44.
2. Select an authentication mode for local authentication.
Options include Password, Password+Certificate, and Certificate.
3. Click Apply.
Figure 44 Local authentication

Configuring RADIUS authentication
The Remote Authentication Dial-In User Service (RADIUS) protocol is a distributed, client/server mode information exchange protocol for protecting networks against unauthorized access. It is usually deployed in networks that require secure remote access. The SSL VPN system can cooperate with the existing RADIUS server of an enterprise seamlessly to provide RADIUS authentication. Users in the enterprise can use their original accounts for RADIUS authentication through SSL VPN.
To enable RADIUS authentication in the SSL VPN system, navigate to Authentication > RADIUS page to configure a RADIUS scheme named system. For more configuration information, see "Configuring RADIUS."
For successful RADIUS authentication of a user, you must also configure the account information and the user group attribute information for the user on the RADIUS authentication server, and make sure that the user groups configured on the RADIUS authentication server exist on the SSL VPN gateway. Otherwise, the user cannot log in.
1. Select SSL VPN > Configure AuthN Policy from the navigation tree.
2. Click the RADIUS Authentication tab to enter the RADIUS authentication configuration page.
Figure 45 RADIUS authentication
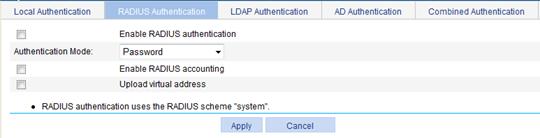
3. Configure the RADIUS authentication as described in Table 19.
4. Click Apply.
|
Item |
Description |
|
Enable RADIUS authentication |
Select this item to enable RADIUS authentication. |
|
Authentication Mode |
Select an authentication mode for RADIUS authentication. Options include Password and Password+Certificate. |
|
Enable RADIUS accounting |
Select this item to enable RADIUS accounting. |
|
Upload virtual address |
With this item selected, the system uploads the IP address of the client's virtual network adapter to the RADIUS server after RADIUS accounting succeeds. |
Configuring LDAP authentication
The LDAP is a cross-platform, standard directory service system that is based on TCP/IP. It is developed on the basis of the X.500 protocol but is better than X.500 in data reading, browsing, and search.
LDAP is suitable for saving data that will not change frequently. A typical application of LDAP is to save user information of a system. For example, Microsoft Windows operating systems use an Active Directory Server to save user information and user group information, providing LDAP based authentication and authorization for Windows users. The SSL VPN system can cooperate with an LDAP server to provide LDAP authentication and obtain resource access rights for users.
For successful LDAP authentication of a user, you must also configure the account information and the user group attribute information for the user on the LDAP server, and make sure that the user groups configured on the authentication server exist on the SSL VPN gateway. Otherwise, the user cannot log in.
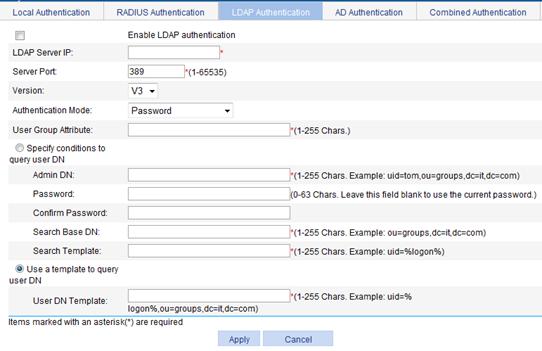
1. Select SSL VPN > Configure AuthN Policy from the navigation tree.
2. Click the LDAP Authentication tab.
The LDAP authentication configuration page appears, as shown in Figure 46.
Figure 46 LDAP authentication
3. Configure the LDAP authentication as described in Table 20.
4. Click Apply.
|
Item |
Description |
|
Enable LDAP authentication |
Select this item to enable LDAP authentication. |
|
LDAP Sever IP |
Specify the IP address of the LDAP server. |
|
Server Port |
Specify the TCP port number used by the LDAP server. |
|
Version |
Specify the supported LDAP protocol version. |
|
Authentication Mode |
Select an authentication mode for LDAP authentication. Options include Password, Password+Certificate, and Certificate. |
|
User Group Attribute |
Specify the name of the user group attribute configured on the LDAP server. |
|
Specify conditions to query user DN |
Select this option to query user DN by specified conditions, including the administrator DN, password, search base DN, and search template. |
|
Admin DN |
Enter a user DN that has the administrator rights, which include the right to view the login user information. |
|
Password |
Enter a user password that has the administrator right and enter the password again to confirm the password. |
|
Confirm Password |
|
|
Search Base DN |
Specify a search base DN. |
|
Search Template |
Specify a search template. |
|
Use a template to query user DN |
Select this option to query the user DN by a template. |
|
User DN template |
Specify the user DN template to be used to query the user DN. |
Configuring AD authentication
AD is a directory service provided by Windows 2000 Server and later versions. It saves information of objects on a network and allows administrators and users to query the information. AD uses structured data storage, which is the basis of the directory information logical structure. The SSL VPN system can cooperate with the existing AD server of an enterprise seamlessly to provide AD authentication for users in the enterprise.
For successful AD authentication of a user, you must also configure the user information on the AD authentication server, create user groups, and add the user to the user groups. Make sure that the user groups configured on the authentication server exist on the SSL VPN gateway. Otherwise, the user cannot log in.
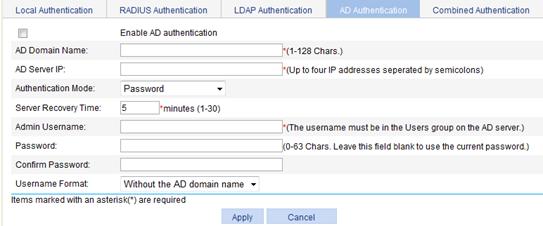
1. Select SSL VPN > Configure AuthN Policy from the navigation tree.
2. Click the AD Authentication tab.
The LDAP authentication configuration page appears, as shown in Figure 47.
Figure 47 AD authentication
3. Configure the AD authentication as described in Table 21.
4. Click Apply.
|
Item |
Description |
|
Enable AD authentication |
Select this item to enable AD authentication. |
|
AD Domain Name |
Enter the name of the AD domain. |
|
AD Server IP |
Enter the IP addresses of the AD servers. You can specify four AD servers at most. When one server fails, the system uses another server to authenticate users. The system selects the specified servers in the configuration order of the servers. The first configured server has the highest priority. |
|
Authentication Mode |
Select an authentication mode for AD authentication. Options include Password, Password+Certificate, and Certificate. |
|
Server Recovery Time |
Set the interval at which the system checks whether the failed AD server recovers. |
|
Admin Username |
Set an administrator account. It must be a user account that has the directory search right in the User directory in the AD domain. |
|
Password |
Set a password for the administrator account, and enter the password again to confirm the password. |
|
Confirm Password |
|
|
Username Format |
Set the username format used to log in to the AD server. Options include Without the AD domain name, With the AD domain name, and Login name. |
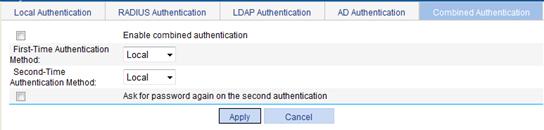
Configuring combined authentication
A combination authentication method can combine any two of the four authentication methods (local authentication, RADIUS authentication, LDAP authentication, and AD authentication) in any order. With combined authentication configured, the system authenticates a user twice by using the two specified authentication methods. You can specify which method is used first, and specify whether to ask for a password during the second authentication.
Which resources are available for a user who has passed a combined authentication and the online username used are both determined by the first authentication. When the user accesses single login resources, the system takes the password used in the first authentication as the login password.
1. Select SSL VPN > Configure AuthN Policy from the navigation tree.
2. Click the Combined Authentication tab.
The combined authentication configuration page appears, as shown in Figure 48.
Figure 48 Combined authentication
3. Configure the combined authentication as described in Table 22.
4. Click Apply.
|
Item |
Description |
|
Enable combined authentication |
Select this item to enable combined authentication. |
|
First-Time Authentication Method |
Select an authentication method as the first-time authentication method. |
|
Second-Time Authentication Method |
Select an authentication method as the second-time authentication method. |
|
Ask password again on the second authentication |
With this item selected, the system provides the login page and asks a user for a password again after the user passes the first authentication. If you do not select this item, the system automatically uses the password for the first authentication for the second authentication.
This function takes effect only when you enable full customization of the user interface and the customized user interface can provide a login page twice. |
Configuring a security policy
Insecure user hosts may bring potential security threats to the internal network. Configure security policies for the SSL VPN system so that when a user logs in, the SSL VPN system checks the user host's operating systems, browsers, antivirus software, firewall software, files and processes, and determines which resources to provide for the user according to the check result.
A security policy defines multiple check categories, each of which contains multiple check rules. To pass the check of a category, a host must satisfy at least one rule of the category. To pass the check of a security policy, a host must satisfy all categories of the policy.
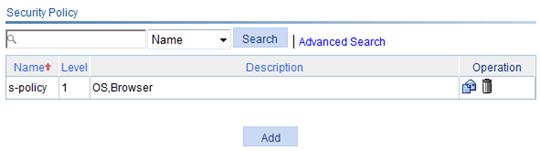
1. Select SSL VPN > Configure Security Policy from the navigation tree.
The security policy list page appears, as shown in Figure 49.
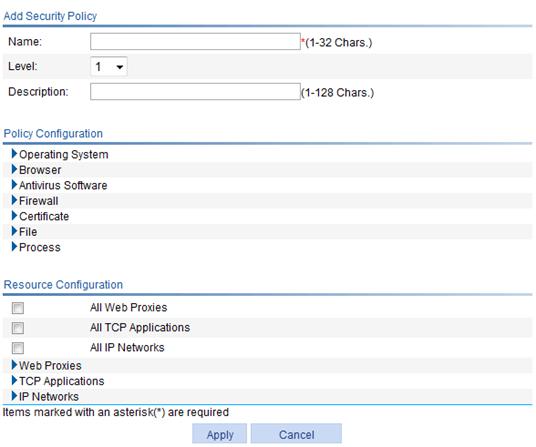
2. Click Add to add a new security policy.
Figure 50 Adding a security policy
3. Configure the security policy as described in Table 23.
4. Click Apply.
|
Item |
Description |
|
Name |
Enter a name for the security policy. |
|
Level |
Set a level for the security policy. A larger number means a higher level. If multiple security policies are defined, the system first uses the security policy with the highest priority to check the user host. If the host does not satisfy the security policy, the system uses the security policy with the second highest priority, and so forth until the host satisfies a security policy or fails security check. The resources that the user can access are those defined in the security policy that the user first passes. Therefore, when you configure security policies, specify more resources for a security policy that has a higher level. |
|
Description |
Enter a description for the security policy. |
|
Policy Configuration |
Set check rules for the security policy. Check rules fall into seven categories: operating system, browser, antivirus software, firewall, certificate, file, and process. To pass the check of a category, a host needs to satisfy at least one rule of the category. To pass the check of a security policy, a host must satisfy all categories of the policy. Click the expansion button before a category to view the rule information. Click the Add button to add a rule for the category. For more information about rule configuration, see Table 24. |
|
Resource Configuration |
Specify the resources that can be accessed by user hosts that satisfy the security policy. You can select All Web Proxies, All TCP Applications, and all IP Networks. To select specific Web proxies, TCP applications, or IP networks, click the corresponding expansion button. |
Table 24 Rule configuration items
|
Item |
Description |
|
|
Operating System |
Rule Name |
Enter a name for the operating system rule. |
|
Type |
Specify the operating system type. A user host must run the specified type of operating system to pass security check. |
|
|
Version |
Specify the operating system version. The operating system of a user host must satisfy the version requirement to pass security check. |
|
|
Patch |
Specify the operating system patches. The operating system of a user host must have the specified patches installed to pass security check. |
|
|
Browser |
Rule Name |
Enter a name for the browser rule. |
|
Type |
Specify the browser type. A user host must use the specified type of browser to pass security check. |
|
|
Operator |
Set an operator for the browser version check. · >=—A user host must use the specified version or a later version. · >—A user host must use a version later than the specified version. · =—A user host must use the specified version. · <=—A user host must use the specified version or an earlier version. · <—A user host must use a version earlier than the specified version. |
|
|
Version |
Specify the browser version. An IE browser version must be a floating point number with up to two digits after the radix point. |
|
|
Patch |
Specify the browser patches. The browser of a user host must have the specified patches installed to pass security check. |
|
|
Antivirus Software |
Rule Name |
Enter a name for the antivirus software rule. |
|
Type |
Specify the antivirus software type. A user host must use the specified type of antivirus software to pass security check. |
|
|
Operator |
Set an operator for antivirus software version check and virus definitions version check. · >=—The antivirus software and its virus definitions must be of the specified version or a later version. · >—The antivirus software and its virus definitions must have a version later than the specified version. · =—The antivirus software and its virus definitions must be of the specified version. · <=—The antivirus software and its virus definitions must be of the specified version or an earlier version. · <—The antivirus software and its virus definitions must have a version earlier than the specified version. |
|
|
Version |
Specify the antivirus software version. |
|
|
Virus Definitions Version |
Specify the virus definitions version. |
|
|
Firewall |
Rule Name |
Enter a name for the firewall rule. |
|
Type |
Specify the firewall type. A user host must use the specified type of firewall to pass security check. |
|
|
Operator |
Set an operator for firewall version check. · >=—A user host must use the specified version or a later version. · >—A user host must use a version later than the specified version. · =—A user host must use the specified version. · <=—A user host must use the specified version or an earlier version. · <—A user host must use a version earlier than the specified version. |
|
|
Version |
Specify the firewall version. |
|
|
Certificate |
Rule Name |
Enter a name for the certificate rule. |
|
Issuer |
Specify the certificate issuer. A user host must have a client certificate issued by the specified issuer to pass security check. |
|
|
File |
Rule Name |
Enter a name for the file rule. |
|
File Name |
Specify the files. A user host must have the specified files to pass security check. |
|
|
Process |
Rule Name |
Enter a name for the process rule. |
|
Process Name |
Specify the processes. A user host must have the specified processes to pass security check. |
|
Configuring the SSL VPN service
Before you configure the SSL VPN service, go to Authentication > Certificate Management to configure a PKI domain and get a certificate for the SSL VPN gateway. An administrator or user uses the certificate to authenticate the SSL VPN gateway to avoid logging in to an invalid SSL VPN gateway. For more information about certificates, see "Managing certificates."
1. Select SSL VPN > Enable Service from the navigation tree to enter the service management page.
Figure 51 Service management
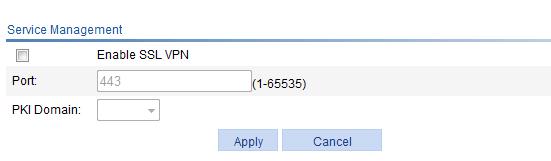
2. Configure the SSL VPN service as describe in Table 25.
3. Click Apply.
|
Item |
Description |
|
Enable SSL VPN |
Select the box before this item to enable the SSL VPN service. |
|
Port |
Specify the port for providing the SSL VPN service. The default port number is 443. |
|
PKI Domain |
Select a PKI domain for the SSL VPN service. |
Configuring user access to SSL VPN
This chapter introduces user access to the SSL VPN service interface provided by the system. It is not suitable for user access to a fully customized SSL VPN service interface.
After you finish configurations on the SSL VPN gateway, remote users can establish HTTPS connections to the SSL VPN gateway, and access resources through the user service interface provided by the SSL VPN gateway.
Logging in to the SSL VPN service interface
2. Enter https://host:port/svpn/ in the address bar to enter the SSL VPN login page, as shown in Figure 52. host and port are the SSL VPN gateway's host address and service port number, and port can be omitted when the SSL VPN service port number is 443, the default value.
3. On the login page, enter the username and password, and select an authentication method.
4. Click Login to enter the SSL VPN service interface, as shown in Figure 53.
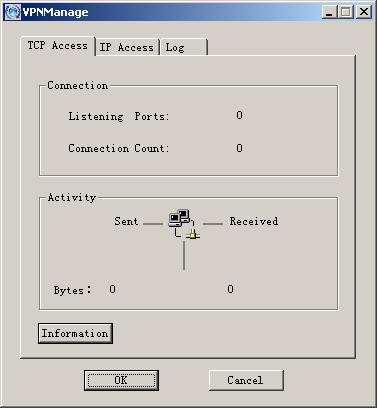
If you have specified TCP applications or IP network resources for the user, the system automatically runs the SSL VPN client software for the user, as shown in Figure 54.
|
|
IMPORTANT: If you have enabled verification code authentication, the login page also provides the verification code and the user must enter the correct verification code to log in. |
Figure 53 SSL VPN service interface
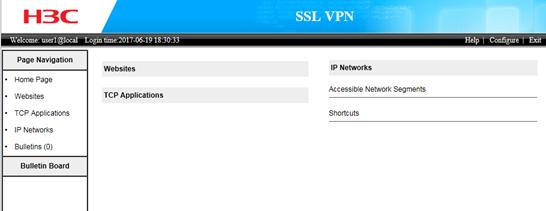
Figure 54 SSL VPN client software
Accessing SSL VPN resources
After logging in to the SSL VPN service interface, a user can see all resources that you have authorized the user to access, and perform the following operations:
· Click a resource name under Websites to access the website.
· Click a resource name under TCP Applications to run the command you configured for the resource (if any), or perform configurations according to the information provided by the resource name and then access the resource. For example, a user can configure the Outlook email receiving and sending servers according to the email resource name, logs in by using the username and password, and then uses the email service.
· For an IP network resource, the user can access any host in any accessible network segment and can click a shortcut name to execute the corresponding command of the shortcut.
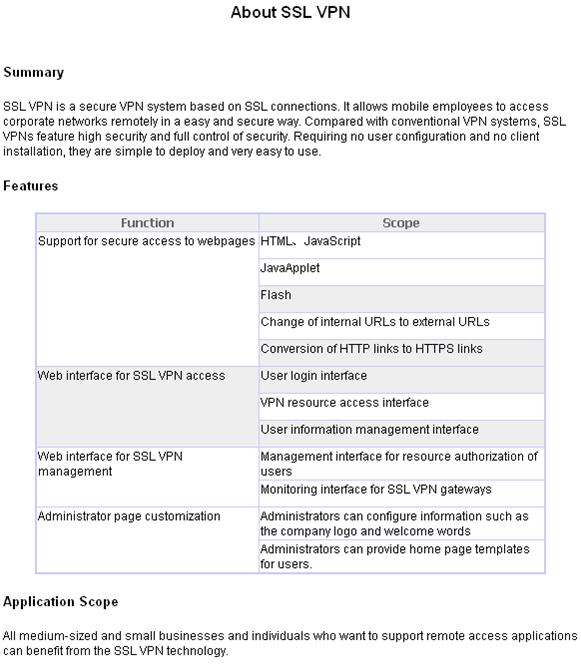
Getting help information
To get help information, a user only needs to click the Help link in the right upper corner of the SSL VPN service interface. A popup window appears, showing the SSL VPN system help information, as shown in Figure 55.
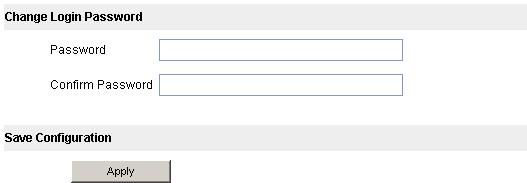
Changing the login password
1. Click the Configure button in the upper right corner of the SSL VPN service interface to enter the page shown in Figure 56.
2. Enter the new password, and confirm the new password.
3. Click Apply.
When the user logs in again, the user must enter the new password.
Figure 56 Change login password
SSL VPN configuration example
Network requirements
As shown in Figure 57, request a certificate and enable SSL VPN service on the SSL VPN gateway so that users can use HTTPS to log in to the SSL VPN gateway to access the internal resources of the corporate network.
In this configuration example:
· The Certificate Authority (CA) runs the Windows Server and the Simple Certificate Enrollment Protocol (SCEP) plugin is required on the CA.
· The IP address of the SSL VPN gateway is 10.1.1.1/24. The IP address of the CA is 10.2.1.1/24, and the name of the CA is CA server. The CA is used to issue certificates to the SSL VPN gateway and remote users.
· Perform RADIUS authentication for SSL VPN users. The IP address of the RADIUS server (an IMC server) is 10.153.10.131/24. After passing authentication, an SSL VPN user can access the internal technology website whose IP address is 10.153.1.223, all hosts on subnet 10.153.2.0/24, and the security sever whose IP address is 10.153.2.25 through the FTP shortcut.
· Configure a public account named usera. Specify that only one user can use the public account to log in at a time. Configure local authentication for the public account and authorize a user who logs in by using the public account to access the shared desktop provided by internal host 10.153.70.120.
· Specify the default authentication method as RADIUS for the SSL VPN domain and enable verification code authentication.
Configuration prerequisites
Before performing the following configurations, make sure that:
· The SSL VPN gateway, the CA, and the hosts used by remote users can reach each other.
· The CA is enabled with the CA service and can issue certificates to the SSL VPN gateway and the hosts.
· The RADIUS server is properly configured to provide normal authentication function for users. In this example, you need to configure the shared key as expert, configure the user account and user group information, and add users to user group user_gr2.
Configuring the SSL VPN service
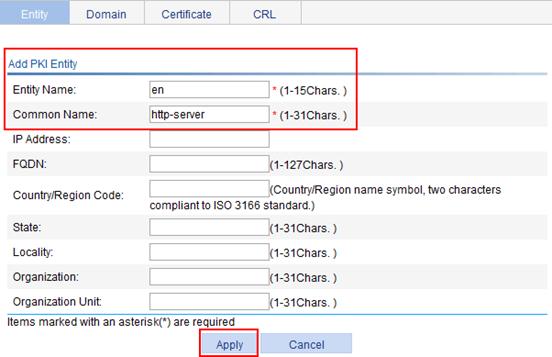
1. Configure a PKI entity named en:
a. Select VPN > Certificate Management > Entity from the navigation tree.
b. Click Add to add a PKI entity.
c. Enter the PKI entity name en.
d. Enter common name http-server for the entity.
e. Click Apply.
Figure 58 Configuring a PKI entity named en
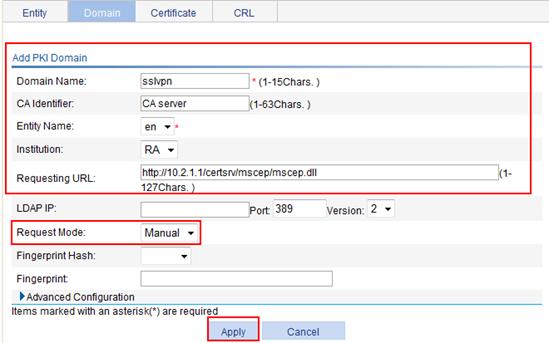
2. Configure a PKI domain named sslvpn:
a. Select VPN > Certificate Management > Domain from the navigation tree.
b. Click Add to add a PKI domain.
c. Enter the PKI domain name sslvpn and the CA identifier CA server.
d. Select en as the local entity, and RA as the registration authority.
e. Enter the certificate requesting URL http://10.2.1.1/certsrv/mscep/mscep.dll.
f. Select Manual as the certificate request mode.
g. Click Apply.
The system displays Fingerprint of the root certificate not specified. No root certificate validation will occur. Continue?
h. Click OK.
Figure 59 Configuring a PKI domain named sslvpn
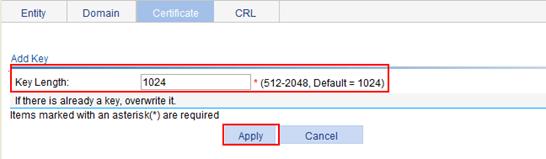
3. Generate an RSA key pair:
a. Select VPN > Certificate Management > Certificate from the navigation tree.
b. Click Create Key to enter the key generation page.
c. Set the key length to 1024.
d. Click Apply.
Figure 60 Generating an RSA key pair
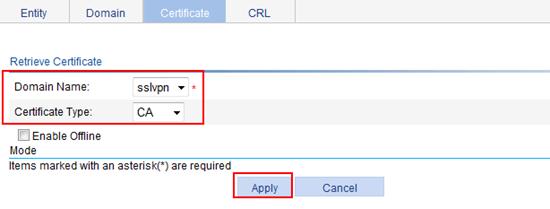
4. Retrieve the CA certificate:
a. After the key pair is generated, click the Retrieve Cert button on the certificate management page.
b. Select sslvpn as the PKI domain and CA as the certificate type.
c. Click Apply.
Figure 61 Retrieving the CA certificate to the local device
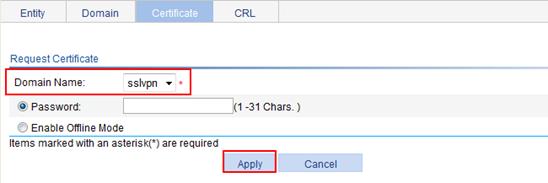
5. Request a local certificate:
a. After the CA certificate retrieval operation is complete, click Request Cert on the certificate management page.
b. Select sslvpn as the PKI domain.
c. Click Apply.
The system displays Certificate request has been submitted.
d. Click OK to confirm the operation.
Figure 62 Requesting a local certificate
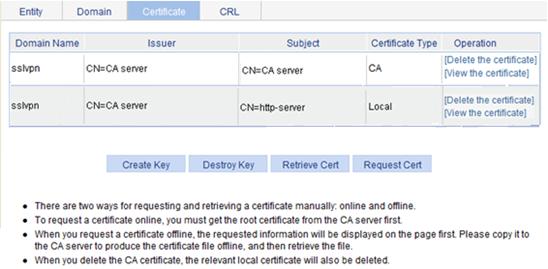
You can view the retrieved CA certificate and the local certificate on the certificate management page.
Figure 63 Certificate management page
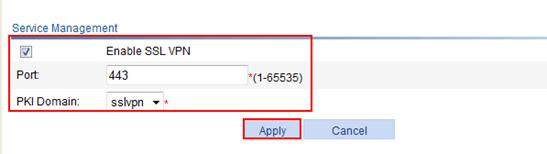
6. Enable SSL VPN, and configure a port and a PKI domain for the SSL VPN service:
a. Select SSL VPN > Enable Service from the navigation tree.
b. Select the box before Enable SSL VPN.
c. Set the port number to 443.
d. Select sslvpn as the PKI domain.
e. Click Apply.
Figure 64 SSL VPN service management page
Configuring SSL VPN resources
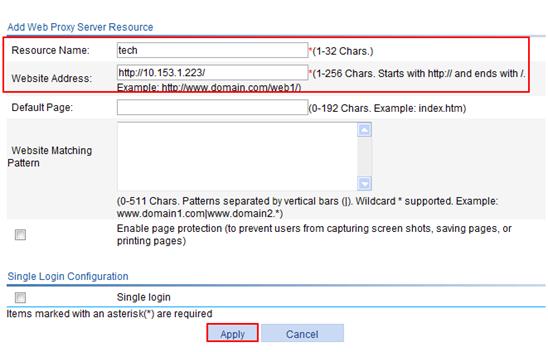
1. Configure a Web proxy resource named tech for the internal technology website 10.153.1.223:
a. Select SSL VPN > Manage Web Proxy from the navigation tree.
b. Click Add.
c. Enter the resource name tech.
d. Enter the website address http://10.153.1.223/.
e. Click Apply.
Figure 65 Configuring a Web proxy resource
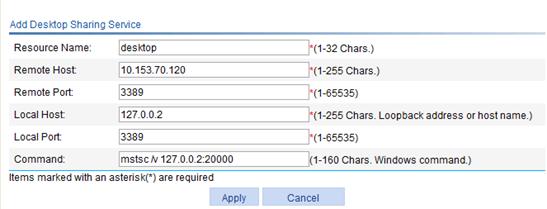
2. Configure a resource named desktop for the desktop sharing service provided by host 10.153.70.120:
a. Select SSL VPN > Manage TCP Application from the navigation tree.
b. Click the Desktop Sharing Service tab.
c. Enter the resource name desktop.
d. Enter the remote host address 10.153.70.120.
e. Set the remote port for the server to 3389.
f. Enter the local host address 127.0.0.2.
g. Set the local port for the service to 20000.
h. Enter the command line mstsc /v 127.0.0.2:20000.
i. Click Apply.
Figure 66 Configuring a desktop sharing service resource
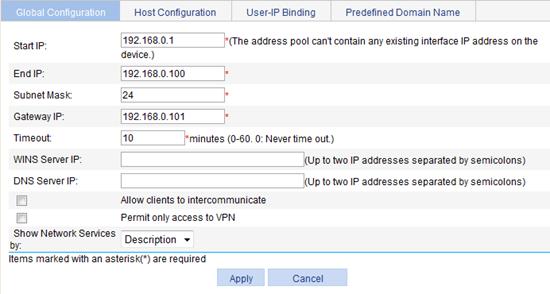
3. Configure global parameters for IP network resources:
a. Select SSL VPN > Manage IP Network from the navigation tree.
The Global Configuration tab appears.
b. Enter the start IP address 192.168.0.1.
c. Enter the end IP address 192.168.0.100.
d. Enter the subnet mask 24.
e. Enter the gateway IP address 192.168.0.101.
f. Click Apply.
Figure 67 Configuring global parameters for IP network resources
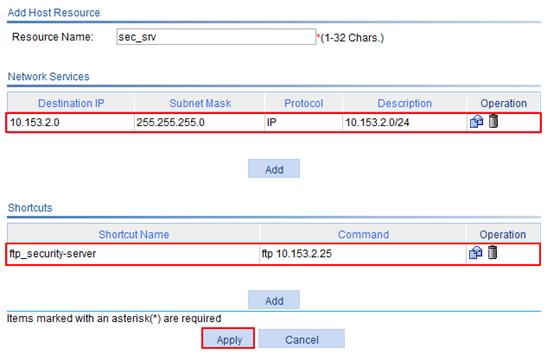
4. Configure a host resource named sec_srv for hosts in subnet 10.153.2.0/24 in IP network mode:
a. Click the Host Configuration tab.
b. Click Add.
c. Enter the resource name sec_srv.
d. Click the Add button under the Network Services list.
e. Enter the destination IP address 10.153.2.0, enter the subnet mask 24, select IP as the protocol type, specify the description information as 10.153.2.0/24, and click Apply.
The network service is added to the host resource.
Figure 68 Adding a network service
f. Click the Add button under the Shortcuts list.
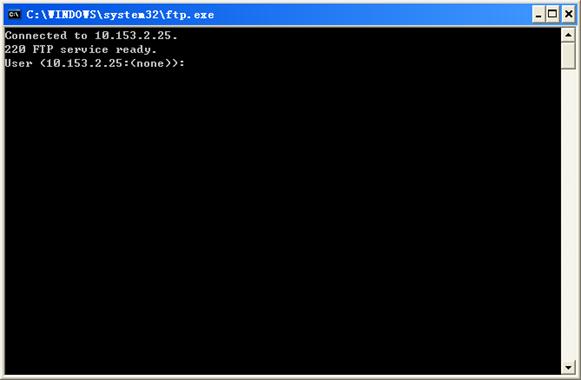
g. Enter the shortcut name ftp_security-server, enter the shortcut command ftp 10.153.2.25, and click Apply.
The shortcut is added to the host resource.

h. Click Apply on the Add Host Resource page as shown in Figure 70.
Figure 70 Configuring a host resource
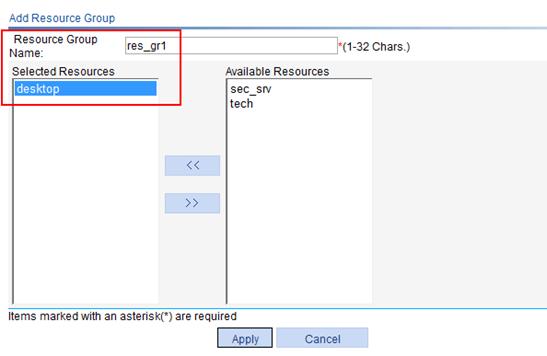
5. Configure resource group res_gr1, and add resource desktop to it:
a. Select SSL VPN > Manage Resource Group from the navigation tree.
The resource group list page appears.
b. Click Add.
c. Enter the resource group name res_gr1.
d. Select desktop on the Available Resources list and click the << button to add it to the Selected Resources list.
e. Click Apply.
Figure 71 Configuring resource group res_gr1
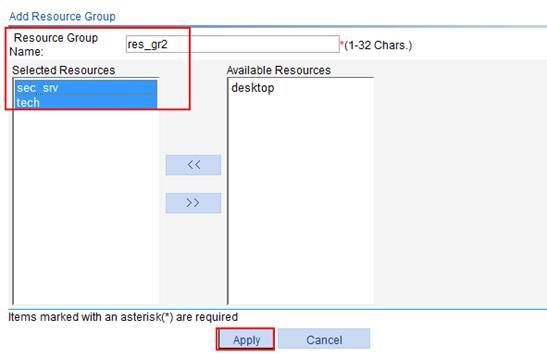
6. Configure resource group res_gr2, and add resources tech and sec_srv to it:
a. Click Add on the resource group list page.
b. Enter the resource group name res_gr2.
c. Select resources tech and sec_srv on the Available Resources list and click the << button to add them to the Selected Resources list.
d. Click Apply.
Figure 72 Configuring resource group res_gr2
Configuring SSL VPN users
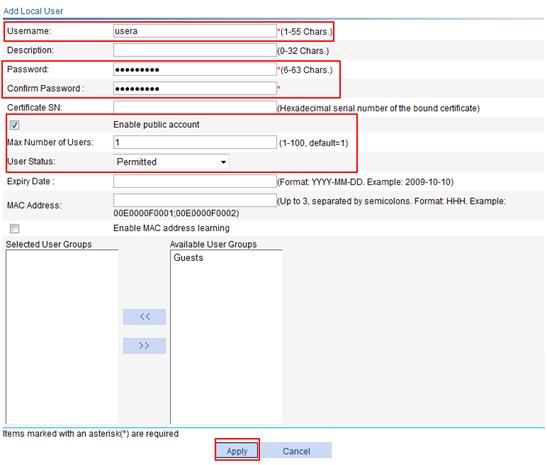
1. Configure a local user account usera:
a. Select SSL VPN > Add User from the navigation tree.
b. Click Add.
c. Enter the username usera, enter the password passworda, and confirm the password.
d. Select the box before Enable public account.
e. Set the maximum number of users for the public account to 1.
f. Select Permitted as the user status.
g. Click Apply.
Figure 73 Adding local user usera
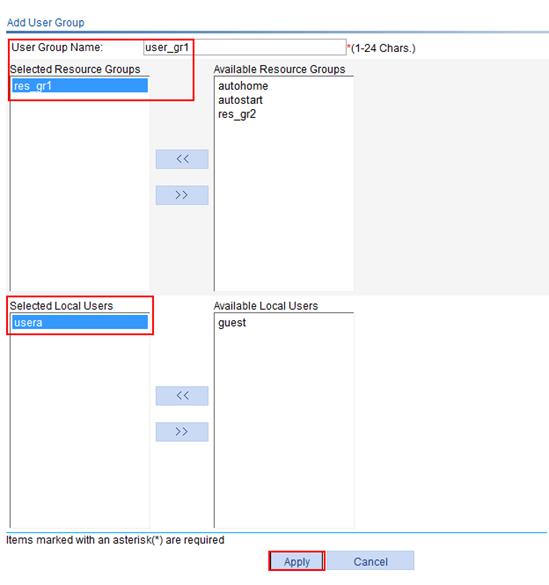
2. Configure user group user_gr1, assign resource group res_gr1 to the user group and add local user usera to the user group:
a. Select SSL VPN > Configure User Group from the navigation tree.
b. Click Add.
c. Enter the user group name user_gr1.
d. Select res_gr1 on the Available Resource Groups list and click << to add it to the Selected Resource Groups list.
e. Select usera on the Available Local Users list and click << to add the user to the Selected Local Users list.
f. Click Apply.
Figure 74 Configuring user group user_gr1
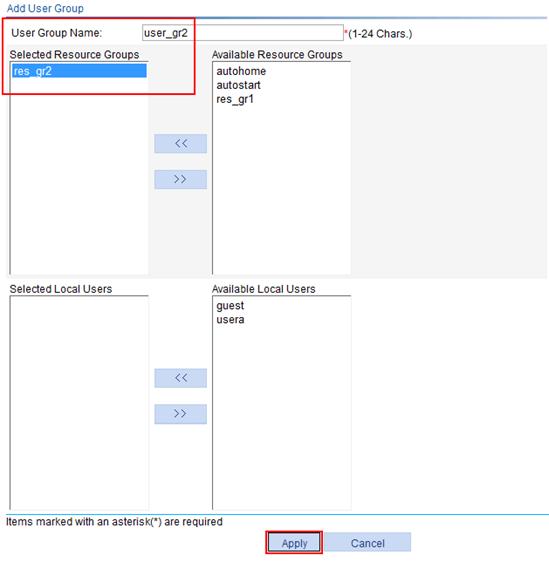
3. Configure user group user_gr2, and assign resource group res_gr2 to the user group:
a. Click Add on the user group list page.
b. Enter the user group name user_gr2.
c. Select res_gr2 on the Available Resource Groups list and click << to add it to the Selected Resource Groups list.
d. Click Apply.
Figure 75 Configuring user group user_gr2
Configuring an SSL VPN domain
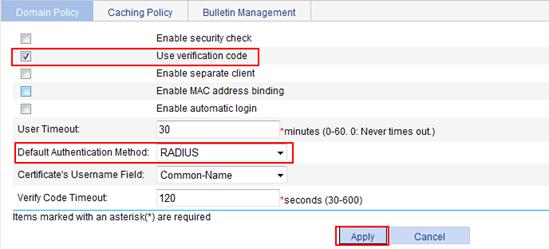
1. Configure the default authentication method for the SSL VPN domain as RADIUS and enable verification code authentication:
a. Select SSL VPN > Configure Basic Settings from the navigation tree.
b. Select the box before Use verification code.
c. Select RADIUS as the default authentication method.
d. Click Apply.
Figure 76 Configuring the domain policy
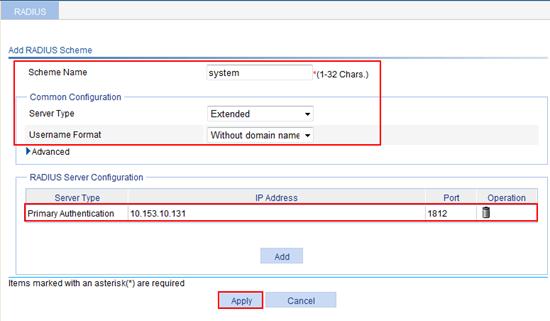
2. Configure a RADIUS scheme named system:
a. Select User > RADIUS from the navigation tree.
b. Click Add.
c. Enter the scheme name system, select Extended as the supported server type, and select Without domain name as the username format.
d. Click the Add button in the RADIUS Server Configuration area.
e. Select Primary Authentication Server as the server type, select IPv4 and enter IP address 10.153.10.131, enter port number 1812 and key expert, enter expert again to confirm the key, and click Apply.
The RADIUS server is then added to the RADIUS server list.
Figure 77 Configuring the primary authentication server

f. Click Apply on the RADIUS page, as shown in Figure 78.
Figure 78 Configuring RADIUS scheme named system
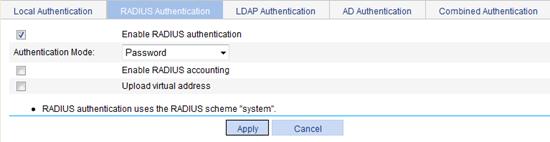
3. Enable RADIUS authentication:
a. Select SSL VPN > Configure AuthN Policy from the navigation tree.
b. Click the RADIUS Authentication tab.
c. Select the box before Enable RADIUS authentication.
d. Click Apply.
Figure 79 Enabling RADIUS authentication
Verifying the configuration
Launch a browser on a host, and enter https://10.1.1.1/svpn/ in the address bar to enter the SSL VPN login page, which uses RADIUS as the default authentication method and requires the verification code.
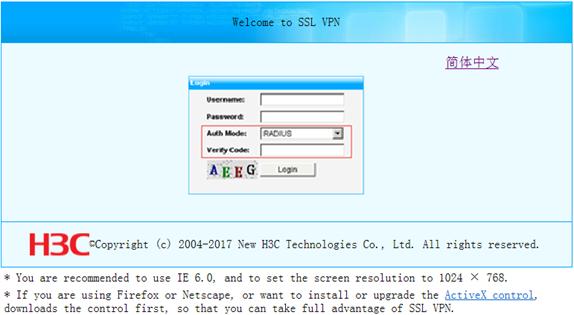
Change the authentication mode to Local. Use the public account usera to log in. You can see the resource desktop, as shown in Figure 81. Click the resource name to access the shared desktop of the specified host, as shown in Figure 82.
Figure 81 Resource that the public account usera can access
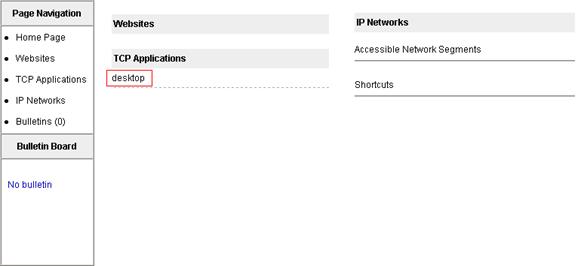
Figure 82 Accessing the desktop sharing resource
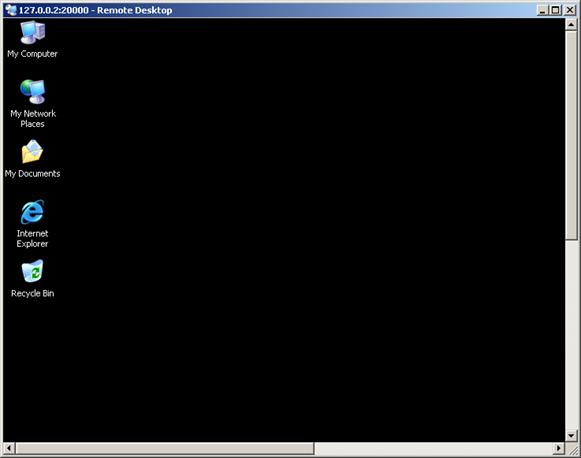
Assume that a user named userb is configured and added to user group user_gr2 on the RADIUS server. Use this user account and the default authentication method RADIUS to log in. You can see website tech, all hosts in subnet 10.153.2.0/24, and the security server. Click tech to access the technology website. Click shortcut ftp_security-server to access the security server through FTP.
Figure 83 Resources that a non-public account can access
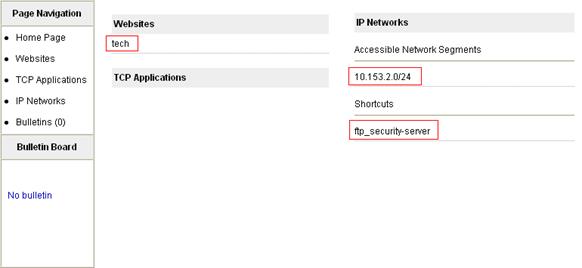
Figure 84 Accessing the IP network resource