- Table of Contents
-
- H3C Servers UniSystem Configuration Examples-6W102
- 01-UniSystem Bulk HDM&BIOS Import Configuration Examples
- 02-H3C UniSystem Cloning Installation Configuration Examples
- 03-UniSystem SMTP Configuration Examples
- 04-H3C UniSystem Cluster Creation Configuration Examples
- 05-H3C UniSystem SNMP Configuration Examples
- 06-H3C UniSystem RAID Configuration Examples
- 07-H3C UniSystem Rack Server Deployment Configuration Examples
- 08-UniSystem Bulk Component Update Configuration Examples
- 09-H3C UniSystem Server Inspection Configuration Example
- 10-H3C Unisystem REPO Acquisition and Use Configuration Examples
- 11-H3C UniSystem LDAP Management Configuration Example
- 12-H3C UniSystem Secure Erase Configuration Examples
- 13-H3C UniSystem Intelligent Version Management Configuration Examples
- 14-H3C UniSystem Bulk IP Settings Configuration Examples
- Related Documents
-
| Title | Size | Download |
|---|---|---|
| 10-H3C Unisystem REPO Acquisition and Use Configuration Examples | 2.58 MB |
H3C UniSystem REPO Acquisition and Use
Configuration Example
Copyright © 2025 New H3C Technologies Co., Ltd. All rights reserved.
No part of this manual may be reproduced or transmitted in any form or by any means without prior written consent of New H3C Technologies Co., Ltd.
Except for the trademarks of New H3C Technologies Co., Ltd., any trademarks that may be mentioned in this document are the property of their respective owners.
The information in this document is subject to change without notice.
Introduction
|
|
NOTE: Starting from version 2.59, FIST software has been renamed as UniSystem. |
A repository (REPO) is a collection of firmware and driver installation packages, through which you can install or update a component as needed. In this document, the term "component" refers to both firmware and drivers.
Table 1 displays the OS requirements for each REPO update method and their application scenarios.
Table 1 OS requirements and application scenarios
|
Update method |
Supported component type |
OS required or not |
Application scenarios |
|
Offline firmware update |
Firmware |
No, but LiveCD is required |
· Update firmware for components on multiple servers in bulk. · This method is interruptive. It requires a reboot to access the LiveCD system included in the REPO for an update. |
|
Out-of-band firmware update |
Firmware |
No |
· Update firmware for components on multiple servers in bulk. · With this method, you can have the system execute the update at the next startup to avoid interrupting the running operating system. |
|
Update components |
Firmware+driver |
· Server firmware update: No · Component firmware and driver update: Yes (FIST SMS also required) |
Update components on multiple servers in bulk. |
|
Server configuration template |
Driver |
No |
Install drivers during OS installation. A server template on UniSystem can be used to update firmware for servers in bulk repeatedly. Custom setup and cycle setup are supported. |
|
|
IMPORTANT: · The firmware mentioned in this document includes both server firmware (HDM, BIOS, and various CPLD) and component firmware (storage controller, network adapter, and drive firmware). · Starting from version 2.59, FIST software has been renamed as UniSystem. |
Prerequisites
This document is not restricted to specific software or hardware versions. Procedures and information in the examples might be slightly different depending on the software or hardware version of the device.
The configuration examples were created and verified in a lab environment, and all the devices were started with the factory default configuration.
When you are working on a live network, make sure you understand the potential impact of every command on your network.
This document assumes that you already understand the related features of REPO and UniSystem.
Configuration example
Network configuration
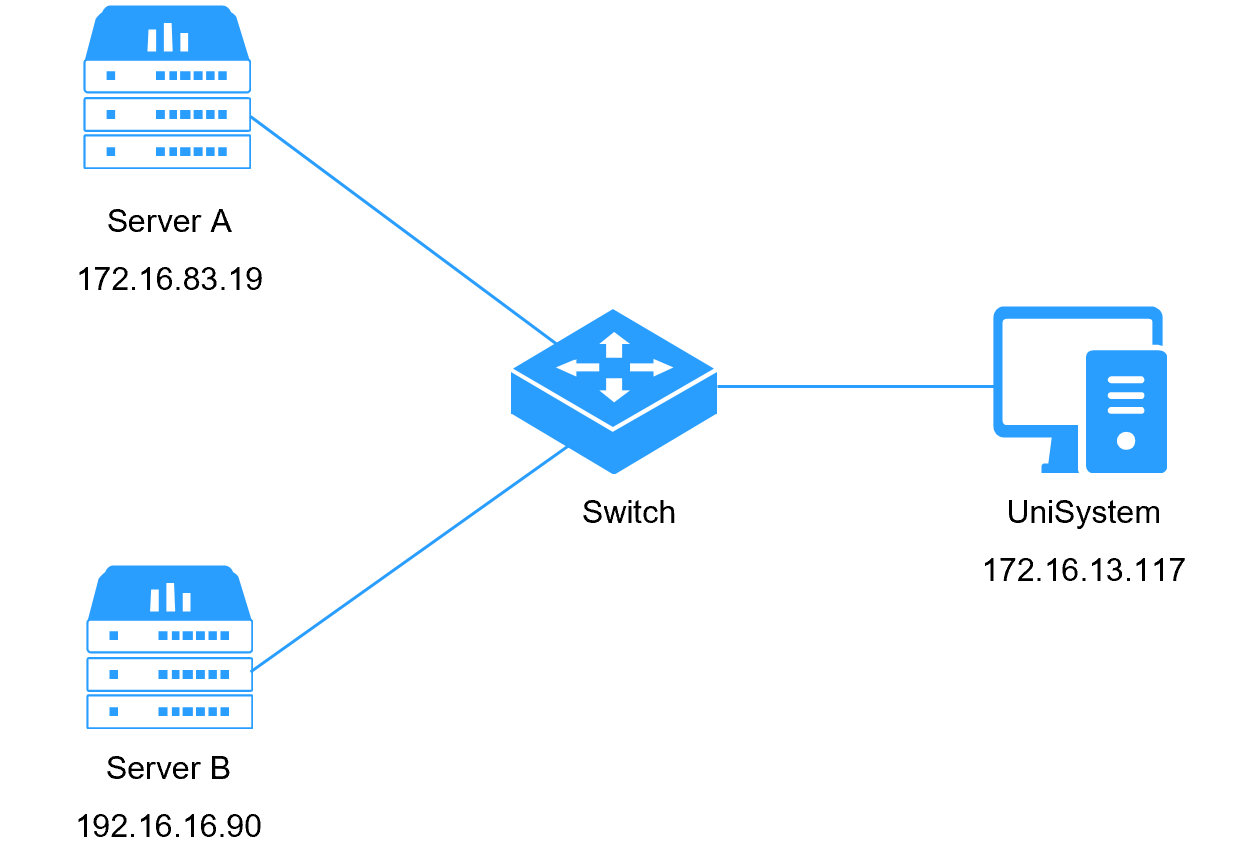
As shown in Figure 1, deploy UniSystem on the PC for the PC to act as both the UniSystem server and client. Connect the PC and the servers to the switch in the same LAN, and configure IP settings for UniSystem and the servers to communicate with each other. In this deployment, use UniSystem to manage the servers and apply the server configuration templates automatically when the servers come online. Table 1 shows the networking details.
|
Device role |
Device information |
Description |
|
UniSystem |
UniSystem IP address |
172.16.13.117 |
|
UniSystem administrator default user |
admin |
|
|
UniSystem administrator default password |
Password@_ |
|
|
Server A |
Server model |
H3C UniServer R6700 G3 |
|
HDM IP address |
172.16.83.19 |
|
|
Server B |
Server model |
H3C UniServer R2700 G3 |
|
HDM IP address |
192.16.16.90 |
Analysis
1. Obtain the REPO firmware package.
2. Upload the REPO to UniSystem and add the target servers.
3. Create tasks for offline firmware updates, out-of-band firmware updates, component updates, and server configuration templates. Execute the update tasks.
4. Restart the servers in bulk for the updates to take effect.
Software version used
This configuration and validation are performed on UniSystem-2.58.
Restrictions and guidelines
· By default, UniSystem performs configuration-reserved upgrades for HDM and BIOS firmware. When you upgrade the HDM firmware, G3 and G5 servers only support upgrading the backup partition, and G6 servers only support upgrading the primary partition.
· Before upgrading the firmware, read the corresponding firmware release notes. To perform a cross-version upgrade (for example, upgrading from BIOS 1.00.XX to BIOS 2.00.XX) or if the target version does not support configuration-reserved upgrades, contact Technical Support.
Procedure
Customizing a REPO
Building a custom REPO
Users can customize the REPO based on server products, operating systems, and other environmental factors. Scenario-based customization is supported for update in various ways and the REPO Manager Tool is provided to create online REPO packages for HDM, BIOS, and CPLD updates.
To build a custom REPO:
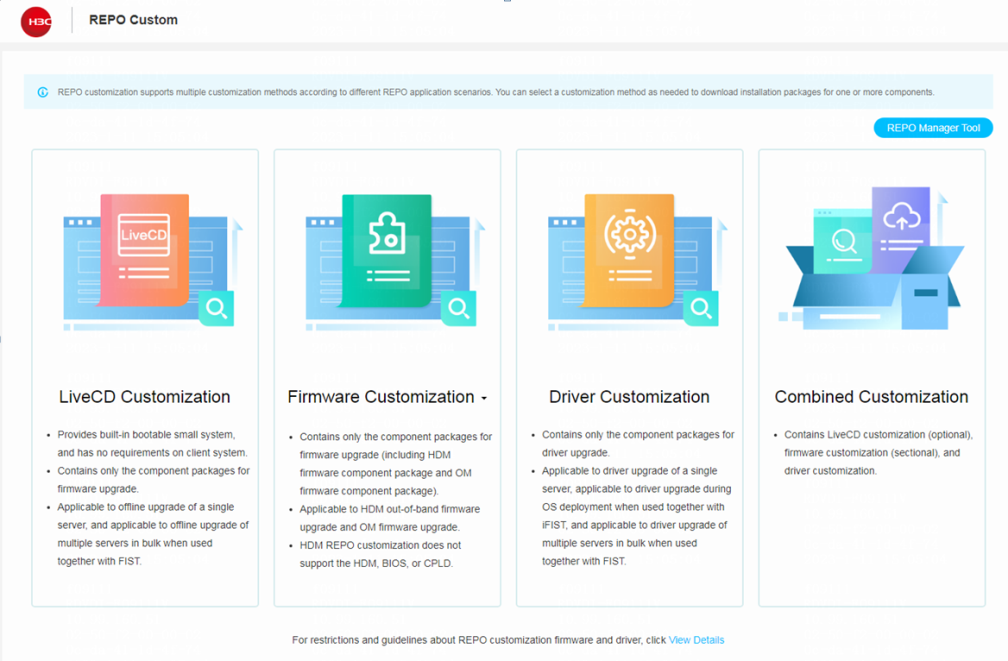
1. Access the REPO customization page at http://supportrepo.h3c.com/repo-en.htm.
Figure 2 Customizing a REPO

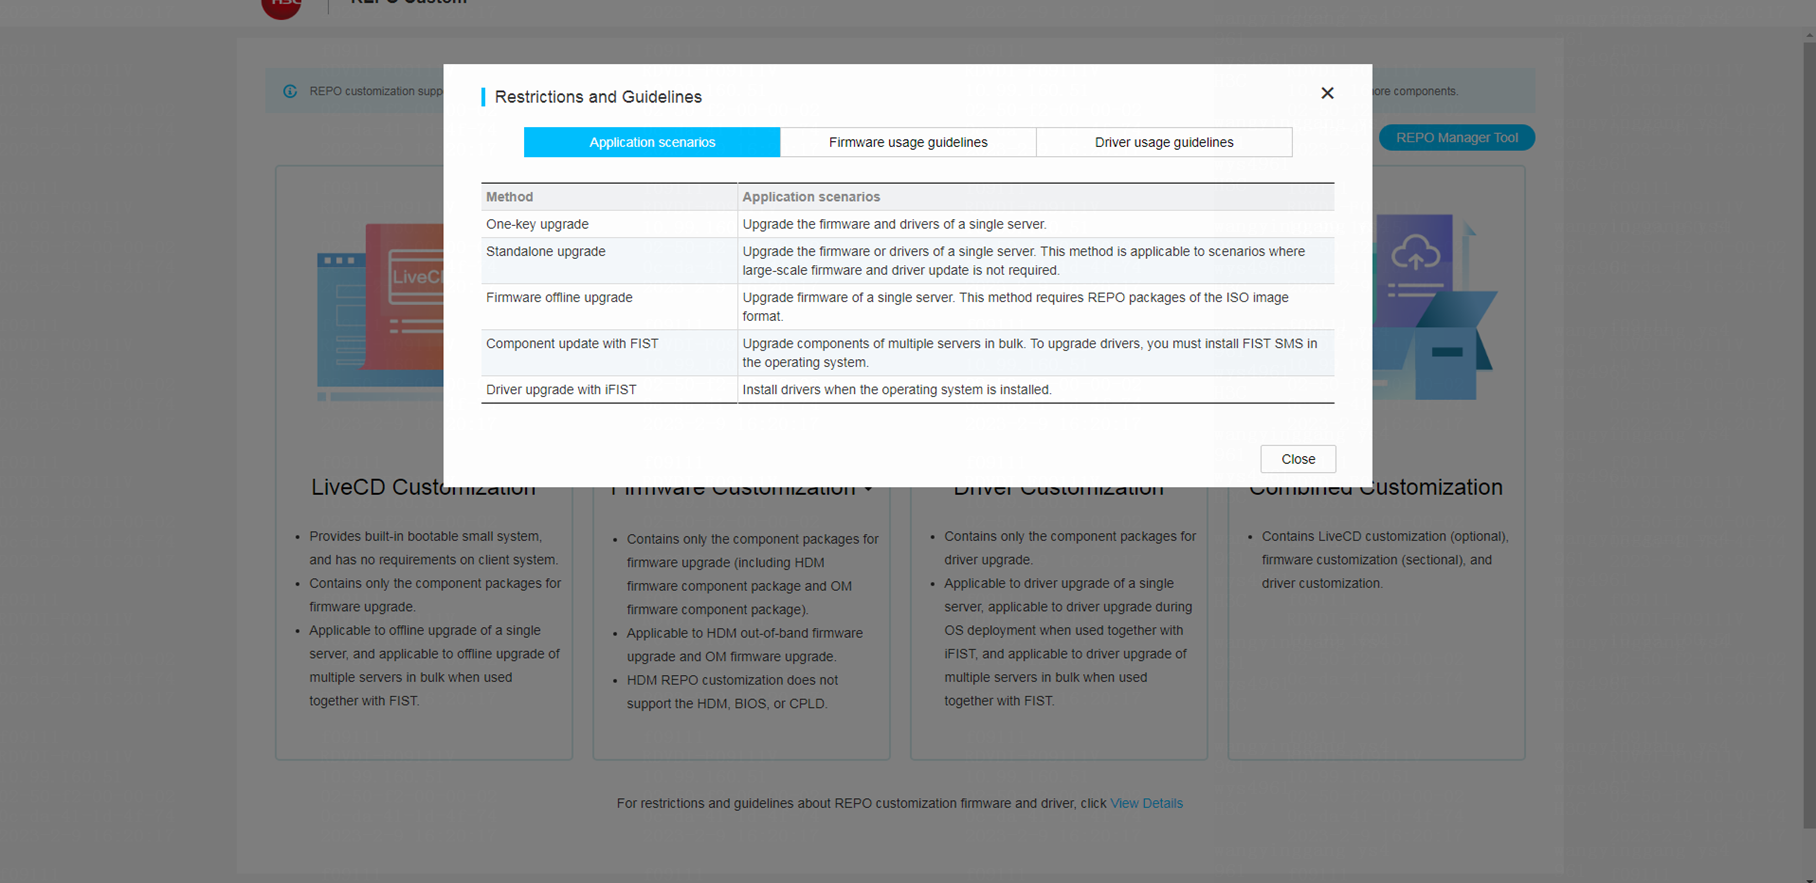
2. To view more information about the application scenarios, firmware usage guidelines, and driver usage guidelines, click View Details.
Figure 3 Usage guidelines
3. Select a customization method as needed:
¡ LiveCD Customization—To customize a LiveCD REPO image that contains only firmware for offline firmware update, select this option. This option is applicable to offline update for one server from the virtual media device mounted through HDM KVM or for multiple servers from UniSystem.
¡ Firmware Customization—Selects HDM REPO or OM customization.
- Customizing an HDM REPO allows you to export a REPO image that only contains firmware. This is suitable for updating firmware of the REPO type through HDM and for UniSystem's HDM out-of-band firmware update function. Make sure the HDM REPO image file does not exceed 300 MB in size. This method supports updating only firmware for storage controllers, network adapters, and drives.
- Customizing OM firmware allows you to export a .tar.gz file containing firmware for each module of the chassis. This is suitable for updating the entire package through OM.
¡ Driver Customization—To customize a REPO image that contains only drivers for the following scenarios, select this option:
- Driver update during OS installation from iFIST.
- Bulk driver update from UniSystem.
¡ Combined Customization—To customize a REPO image that contains both firmware and drivers for update from UniSystem, iFIST, or LiveCD, select this option.
4. Identify the components of interest by using keyword filters or by importing a server configuration list.
|
|
NOTE: File import is available only for combined customization. |
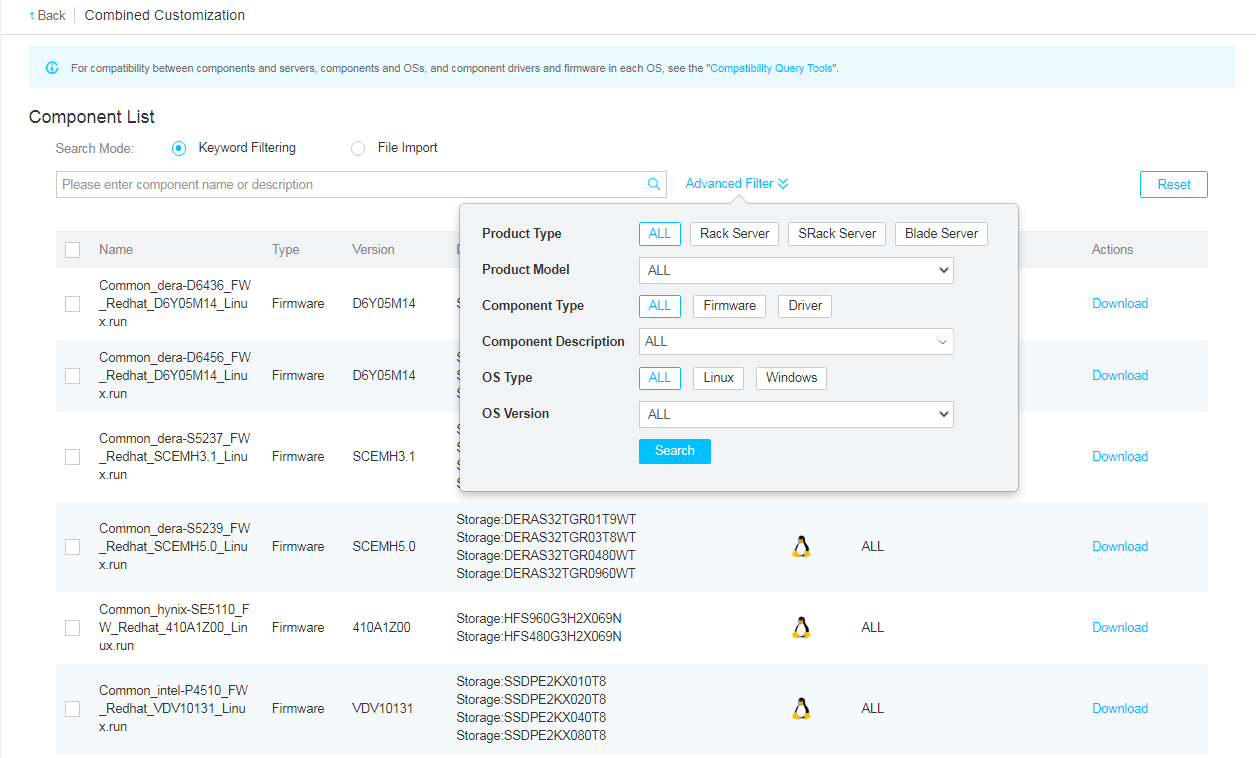
¡ If you select Keyword Filtering, enter a component description keyword or select settings for advanced filters, and then click Search.
|
|
NOTE: The supported filters differ depending on REPO customization method. |
Figure 4 Filtering components
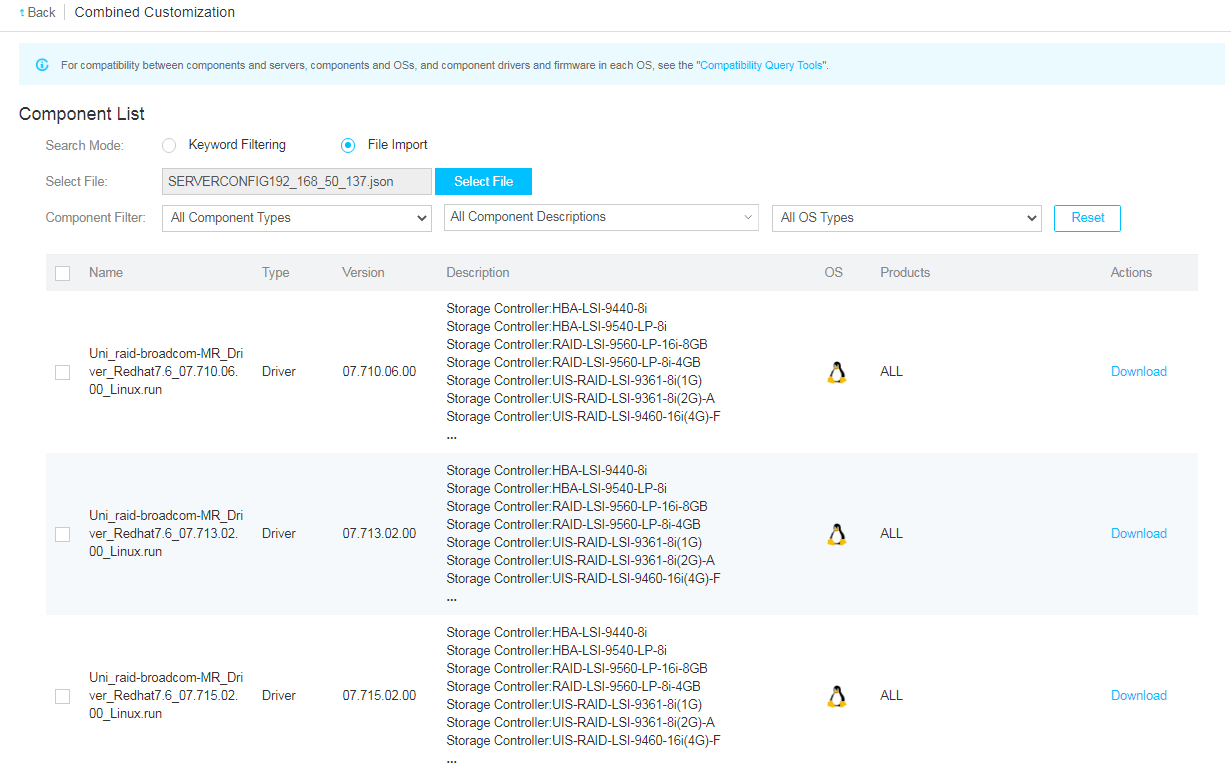
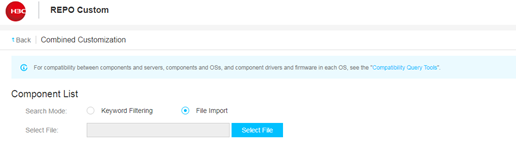
¡ If you select File Import, click Select File, and then upload the server configuration list from a .json file. The system will automatically display the available component update files.
For more information about exporting the server configuration list, see "Exporting the configuration list."
Figure 5 Importing a service configuration list
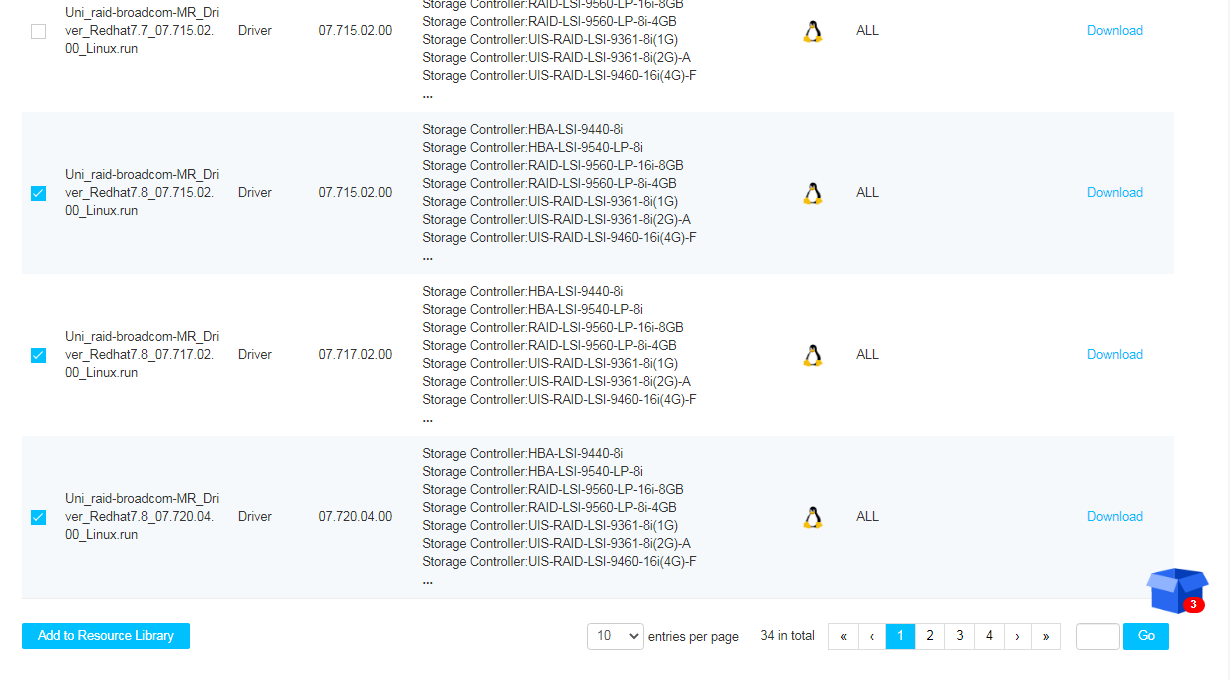
5. Select the target components, and then click Add to Resource Library.
The number of selected component update files is displayed over the box at the bottom right of the page.
Figure 6 Adding components to the resource library
6. Click the box icon at the bottom right of the page.
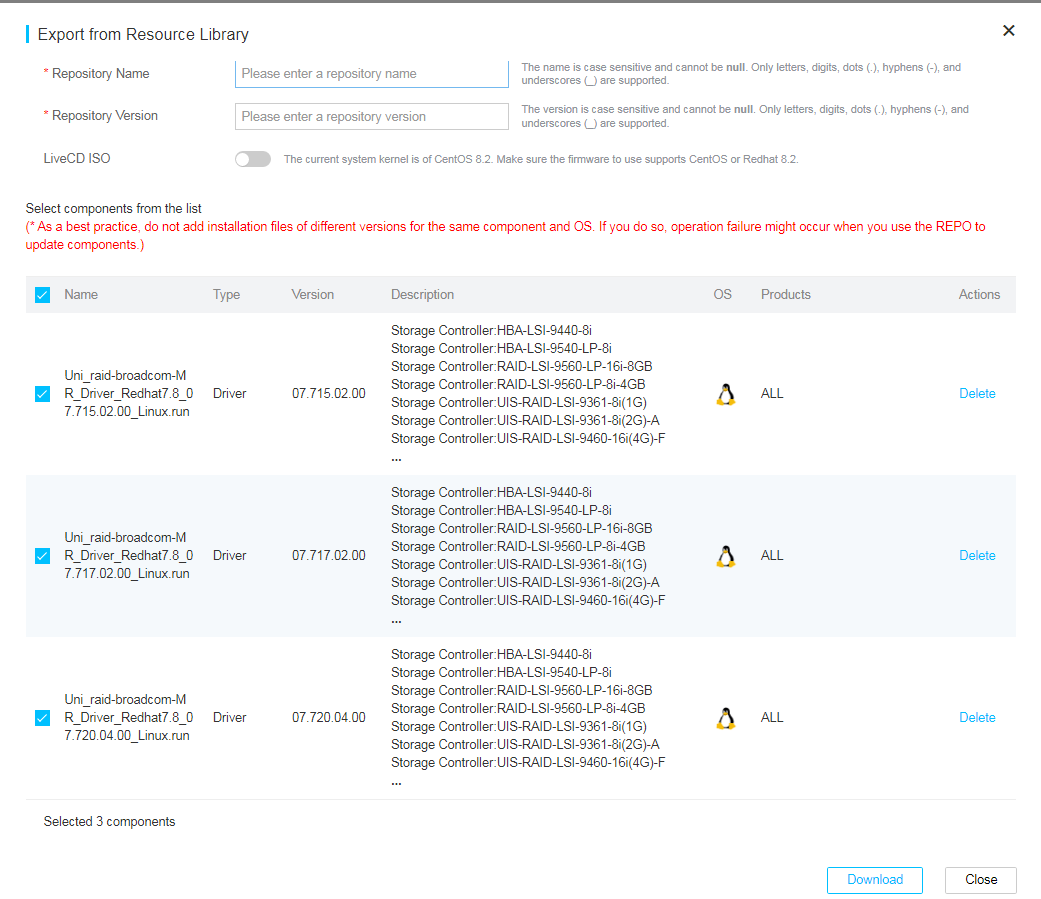
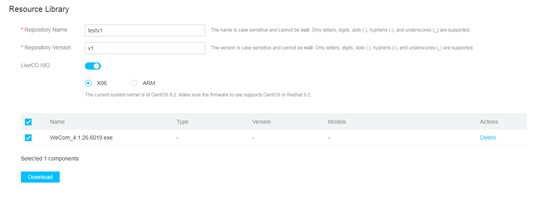
7. In the dialog box that opens, perform the following steps:
a. Enter the repository name and version, and then select the component files to be exported as a REPO.
b. To do combined customization for an offline firmware update, select the LiveCD ISO option.
c. To download the MD5 checksum file when you do a firmware customization for out-of-band update from HDM, select the option that enables MD5 checksum file downloading.
d. Click Download.
Figure 7 Specifying the repository name and version
Exporting the configuration list
1. Log in to UniSystem, and access Menu > Devices > Server List.
2. Select the servers whose configuration information you want to export, click More, and then select Configuration List.
3. In the confirmation box that opens, click OK.
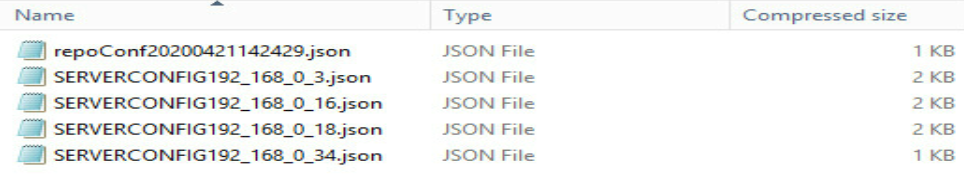
4. Decompress the downloaded file. Then, you can import the .json repoConf file for multiple servers or .json SERVERSONFIG file for a single server when you do combined customization.
Figure 8 Decompressed configuration list files
Using REPO Manager Tool
|
|
IMPORTANT: · If you select .bin as the upload type, REPO Manager Tool supports only signed firmware for HDM, the BIOS, and CPLD, and does not support DBCPLD, STBCPLD, AUXCPLD, PDBCPLD, NDCPLD, and PDBSCPLD. · You can upload a file of up to 1 GB. If the system prompts insufficient drive space, contact the administrator to release the space before uploading the file again. · The file name cannot exceed 128 characters. To avoid a downloading failure, do not modify the name of a single component package in .run/exe format during uploading. · The resource library supports selecting a maximum of 16 components for downloading. |
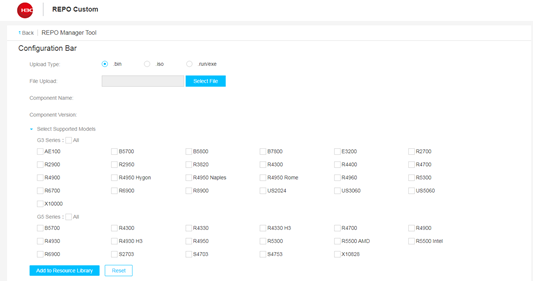
1. Access the REPO Custom page, and click REPO Manager Tool in the upper right corner.
Figure 9 REPO Custom

2. Select the upload type. Options include .bin, .iso, and .run/exe.
¡ If you select the .bin upload type, click Select File and select local signed firmware for HDM, the BIOS, or CPLD. The page will display the component name and version for the uploaded file. Then, select supported models. You can select multiple models of the same series. After selecting models, click Add to the Resource Library.
Figure 10 Selecting the .bin upload type
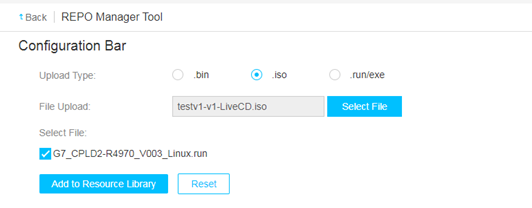
¡ If you select the .iso upload type, click Select File and select a local .iso file. After uploading, select single component packages to be created, and then click Add to Resource Library.
Figure 11 Selecting the .iso upload type
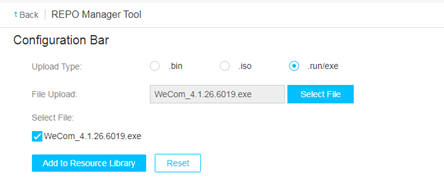
¡ If you select the .run/exe upload type, click Select File and select a single component file in .run/exe format. After uploading, the page will select the file automatically. Then, click Add to Resource Library.
Figure 12 Selecting the .run/exe upload type
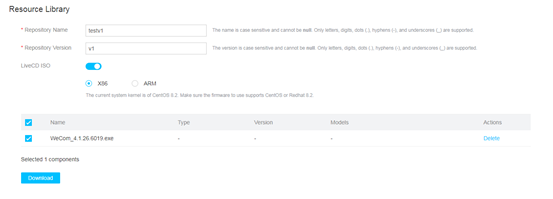
3. Enter the repository name and version, enable LiveCD ISO as needed, select components, and click Download.
Figure 13 Creating and downloading a REPO
Obtaining a complete REPO
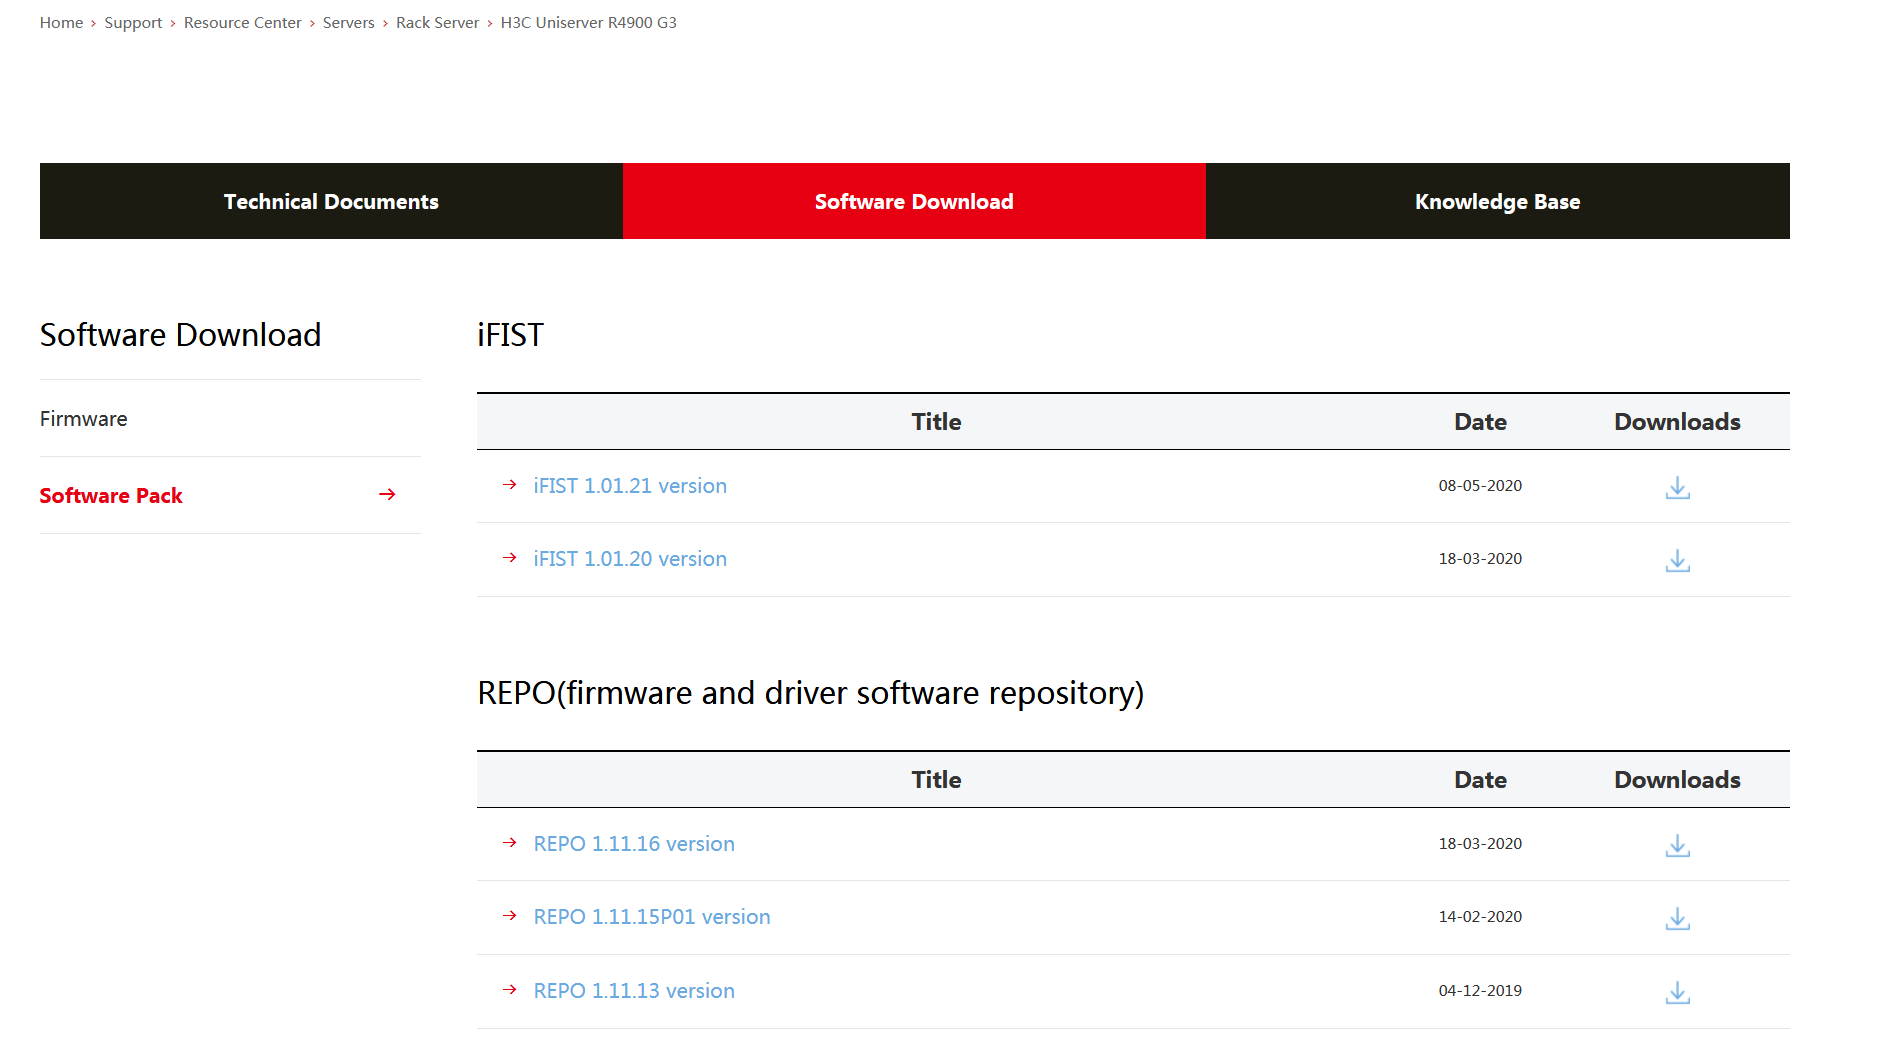
As shown in Figure 14, access the H3C website to obtain a REPO that contains the installation packages for all components. This figure uses REPO-1.11.11 as an example.
A complete REPO has a large size and takes a long time to download or upload. If you are not to update all components of a server, use a custom REPO as a best practice.
Figure 14 Obtaining a complete REPO
Logging in to UniSystem
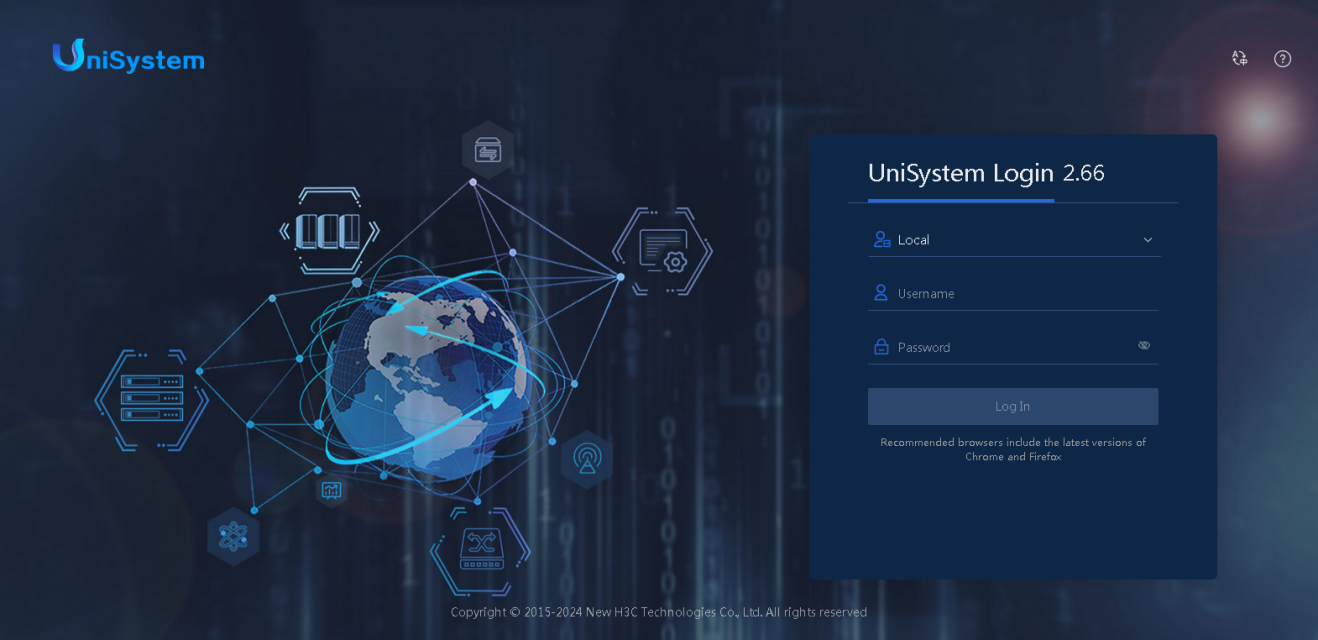
1. Open the browser on the UniSystem client and enter the UniSystem server address.
2. As shown in Figure 15, enter the default username admin and password Password@_ on the login interface.
3. Click Log In.
Figure 15 UniSystem login page
Adding the server
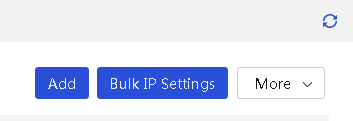
1. Click Menu > Servers > Server List. Click Add the Server, as shown in Figure 16.
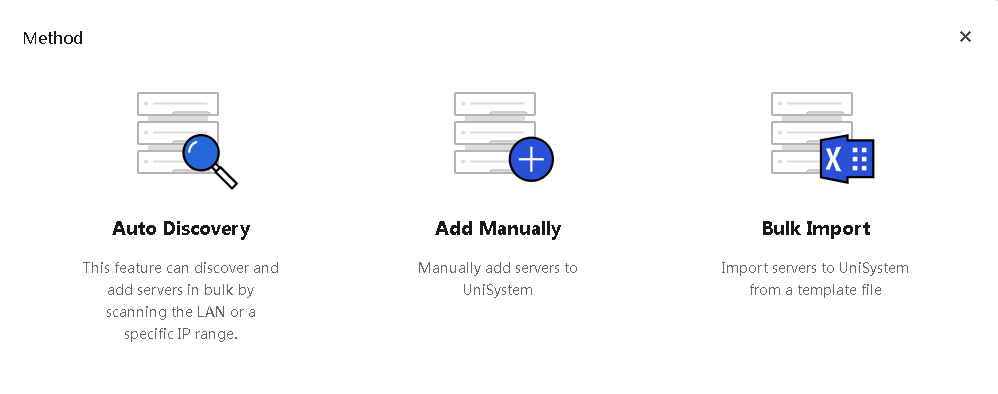
2. Select Bulk Import, as shown in Figure 17.
Figure 17 Importing servers in bulk
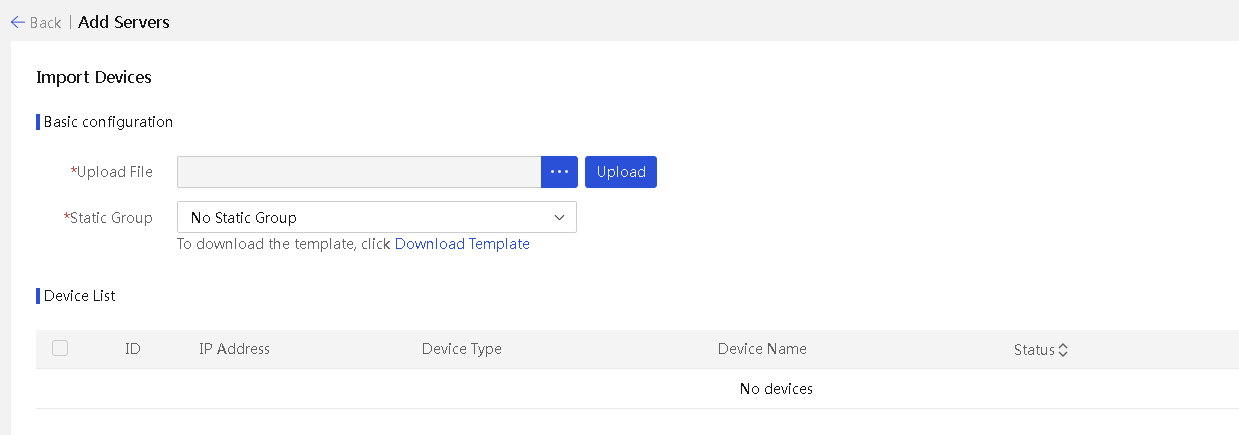
3. Navigate to the server importing page, as shown in Figure 18. Click Upload to add multiple servers at a time, as shown in _Ref121496340.
Uploading REPO
1. Navigate to the REPO customization website, as shown in Figure 19.
Figure 19 REPO customization website
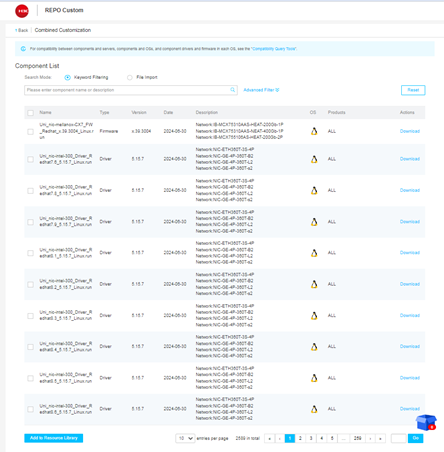
2. Select Combined Customization and customize the REPO package, as shown in Figure 20.
Figure 20 Combined customization
3. Select File Import and upload the repo JSON file in the downloaded configuration list.
Figure 21 Importing the component filter
4. Select the components and click Add to Resource Library, as shown in Figure 22.
Figure 22 Filtering and adding components to resource library

5. Click the resource library and navigate to Repository Name and Repository Version on the resource exporting and downloading page, as shown in Figure 23. Then click Download.
Figure 23 Exporting from the resource library
6. Return to UniSystem. Click Menu > Templates > REPO Repository to navigate to the Repositories page, as shown in Figure 24.
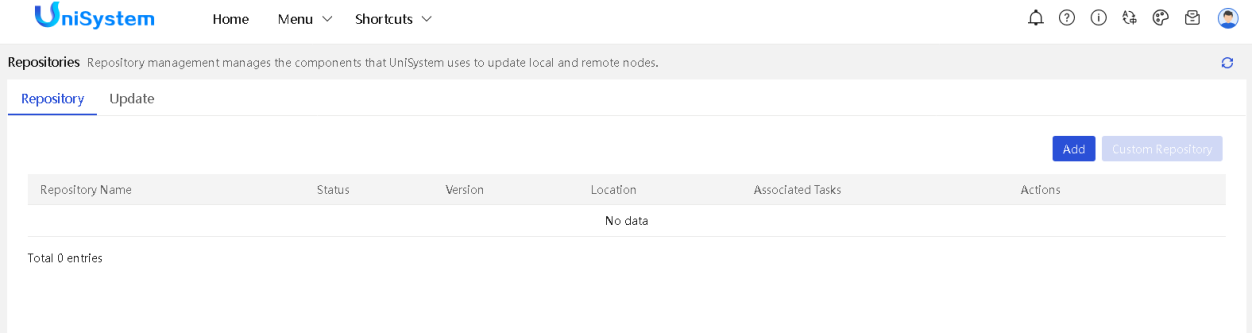
7. Click Add to navigate to the page shown in Figure 25.
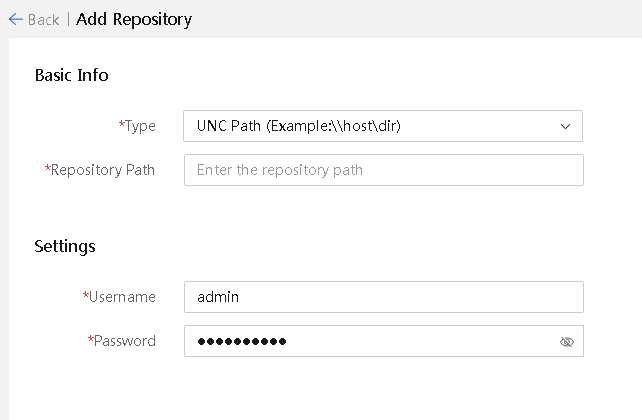
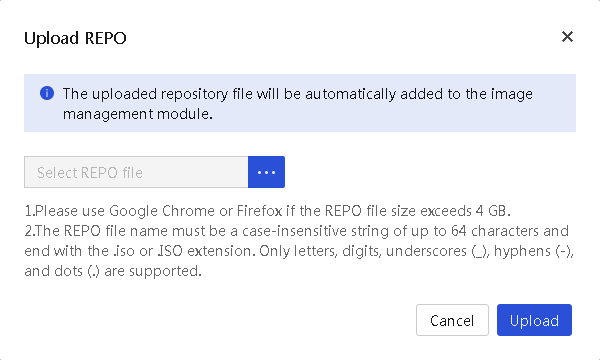
8. Select the local path type and click Upload to upload the downloaded REPO file, as shown in Figure 26.
9. After the repositories are added, UniSystem will perform an inventory count automatically, as shown in Figure 27.

Updating firmware and drivers through REPO and UniSystem
Offline firmware update
Offline firmware update is supported in REPO-1.11.10 and later versions.
Offline firmware update requires a REPO that comes with a LiveCD system (a small bootable operating system). This feature allows users to update firmware in bulk on servers without any operating systems or servers with operating systems that require permissions.
|
|
IMPORTANT: Only UniSystem 2.00.22 and later versions support offline firmware update of servers in bulk. |
1. Log in to UniSystem. On the top navigation bar, click Menu, and then select Server List from the Devices menu.
2. Click Add and select the target servers.
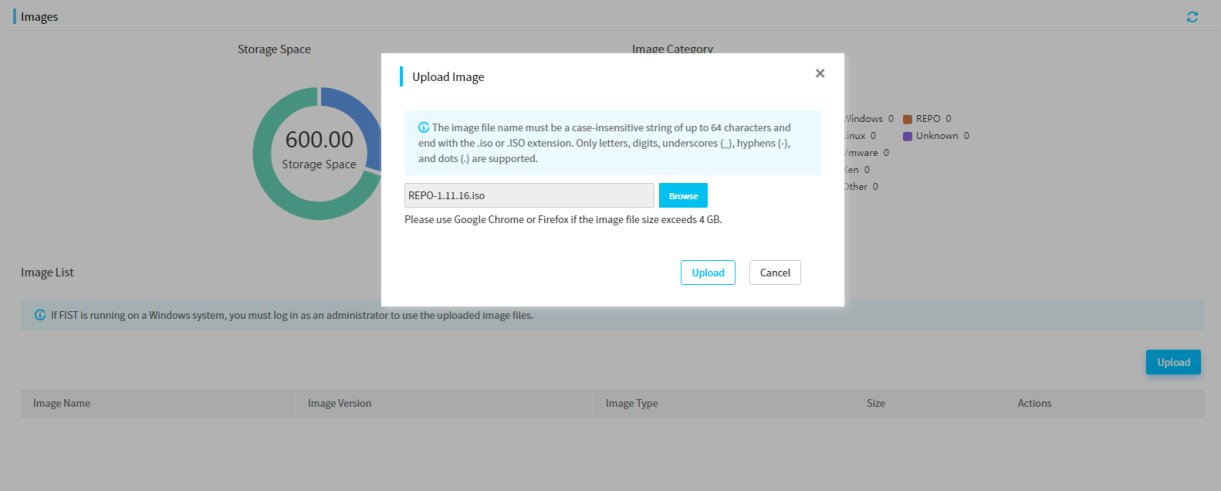
3. On the top navigation bar, click Menu, and then select Images from the Templates menu.
4. Click Upload. In the dialog box that opens, browse to the target image file, and then click Upload.
Figure 28 Uploading the target image file
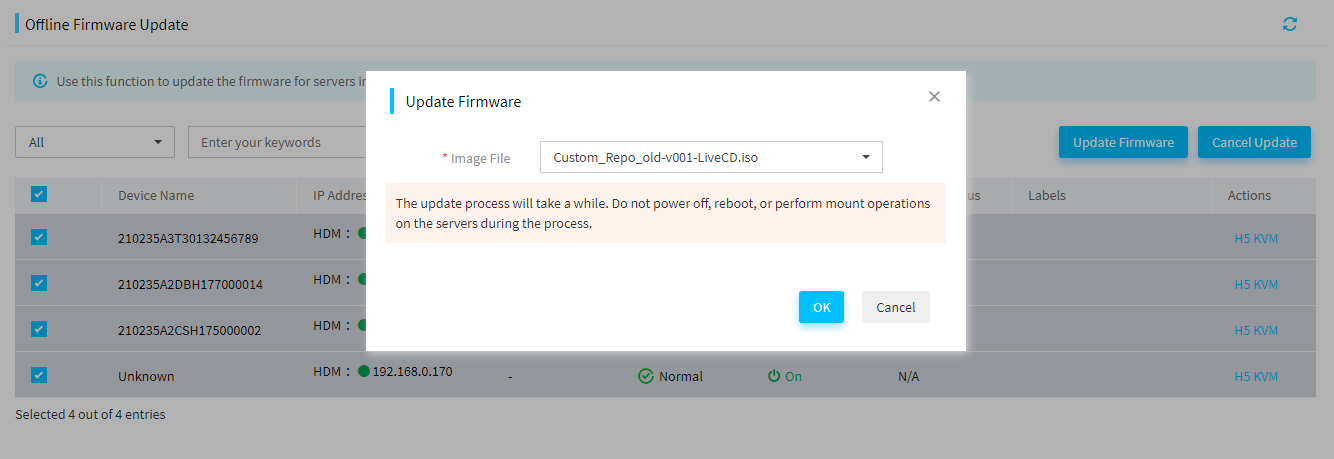
5. On the top navigation bar, click Menu, and then select Offline Firmware Update from the Server Deployment menu.
6. Select the target devices and click Update Firmware. In the dialog box that opens, select the uploaded REPO file, and then click OK. The update process runs automatically and requires no manual intervention.
Figure 29 Performing offline update
7. (Optional.) To view the firmware update information of a server, click the H5 KVM link in the Actions column for the server.
8. Restart the server to make components effective. Click Devices > Servers > Server List. Select the servers. Click More and select Force System Restart under Power Control in the drop-down box. Click OK to restart the servers.
|
|
NOTE: The offline firmware update logs are stored in .log files in the /tmp/componentName/log/ directory in the LiveCD system. |
Out-of-band firmware update
With out-of-band firmware update, you can update the firmware for the following components in bulk:
· Storage controllers.
· Network adapters.
· Drives.
UniSystem 2.32 and later versions support bulk update through the HDM out-of-band method.
This function requires the use of HDM-2.52 and iFIST-1.32 or later versions.
When uploading REPO firmware image files for out-of-band firmware updates, make sure the size of the file does not exceed 300 MB.
To perform out-of-band firmware update:
1. Log in to UniSystem. For more information about the procedure, see H3C Servers UniSystem User Guide.
2. Select Menu > Devices > Server List, and then click Add to add servers to the server list.
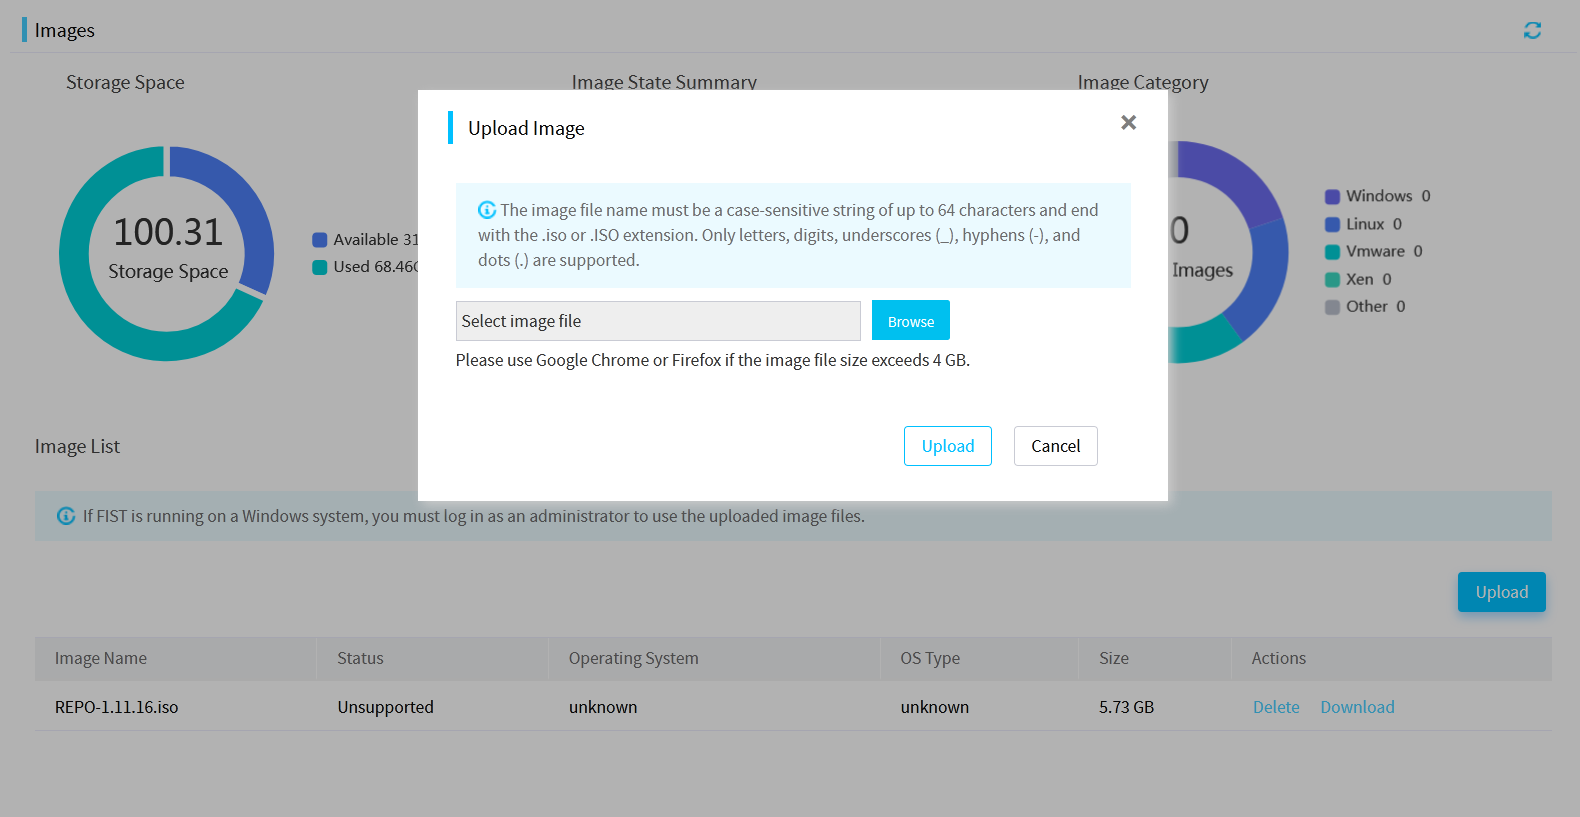
3. Select Menu > Templates > Images, and then click Upload.
In the dialog box that opens, browse to the REPO image, select it, and then click Upload.
Figure 30 Uploading a REPO image
4. Select Menu > Deployment > Firmware Update, and then click the HDM Out-of-Band Firmware Update tab.
Figure 31 HDM out-of-band firmware update

5. Select the target servers, and then click Update Firmware.
To quickly find the target servers, select a filter and enter a keyword in the search box as needed.
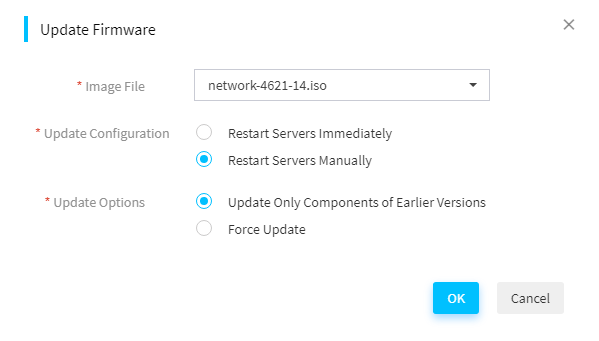
6. In the dialog box that opens, select the REPO image file for the update, configure update settings, and then click OK.
Because HDM requires that the REPO image file size should not exceed 300 MB, the image list contains only REPO images that do not exceed 300 MB.
Figure 32 Firmware update settings
7. Click OK to update the firmware.
To cancel the update, click Cancel Update.
You can cancel a firmware update at any time before the system starts verifying the update file. Once file verification starts, you cannot cancel the firmware update.
The servers execute the firmware update file at startup to have the update take effect. On completion of this process, the servers restart automatically.
|
|
CAUTION: Do not restart or power cycle the server while it is updating firmware. Doing so might cause the operating system to become inaccessible. |
8. Verify that the update is completed successfully.
¡ If you selected to restart the server immediately, identify the update result for each selected server in the Update Status column on the HDM Out-of-Band Firmware Update tab.
¡ If you selected to manually restart the server, access the Web interface of HDM and then review the operation log.
Component update
1. Access the Menu > Deployment > Update Component page.
Figure 33 Components update tasks

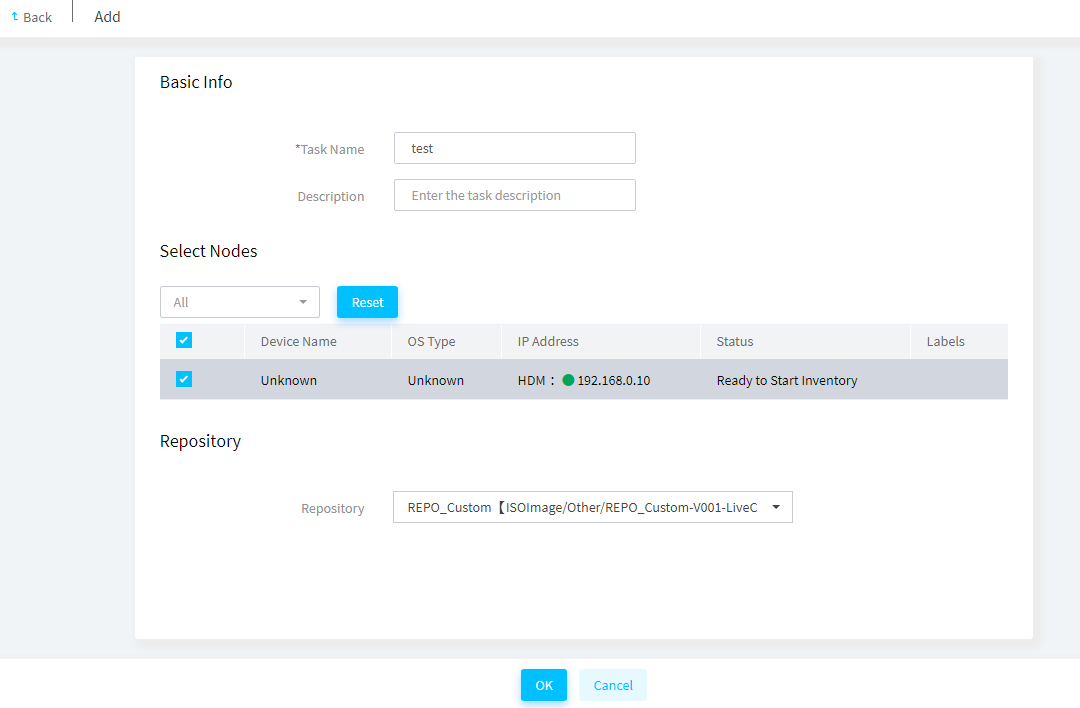
2. Click Add, and configure the task as follows:
¡ Specify the task name and task description.
¡ Select the target nodes.
¡ Select the target repository assigned to the task.
¡ Set the configuration retention policy and server restart policy for the HDM and BIOS firmware.
¡ Click OK.
Figure 34 Creating a task
The system displays the created task in the component update task list.
Figure 35 Component update tasks

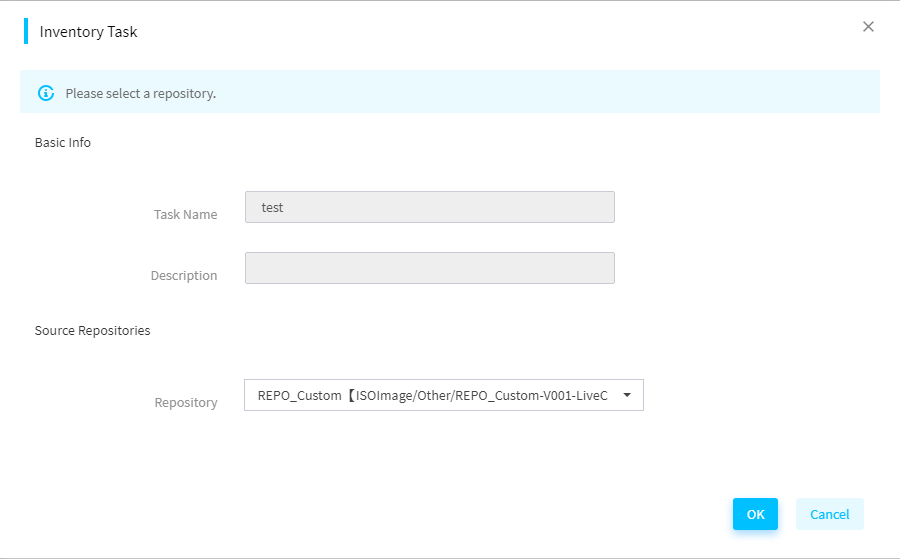
3. Click Inventory for the created task. Then, select the target repository, and click OK. UniSystem will automatically filter out applicable components from the REPO repository.
Figure 36 Inventorying the created task
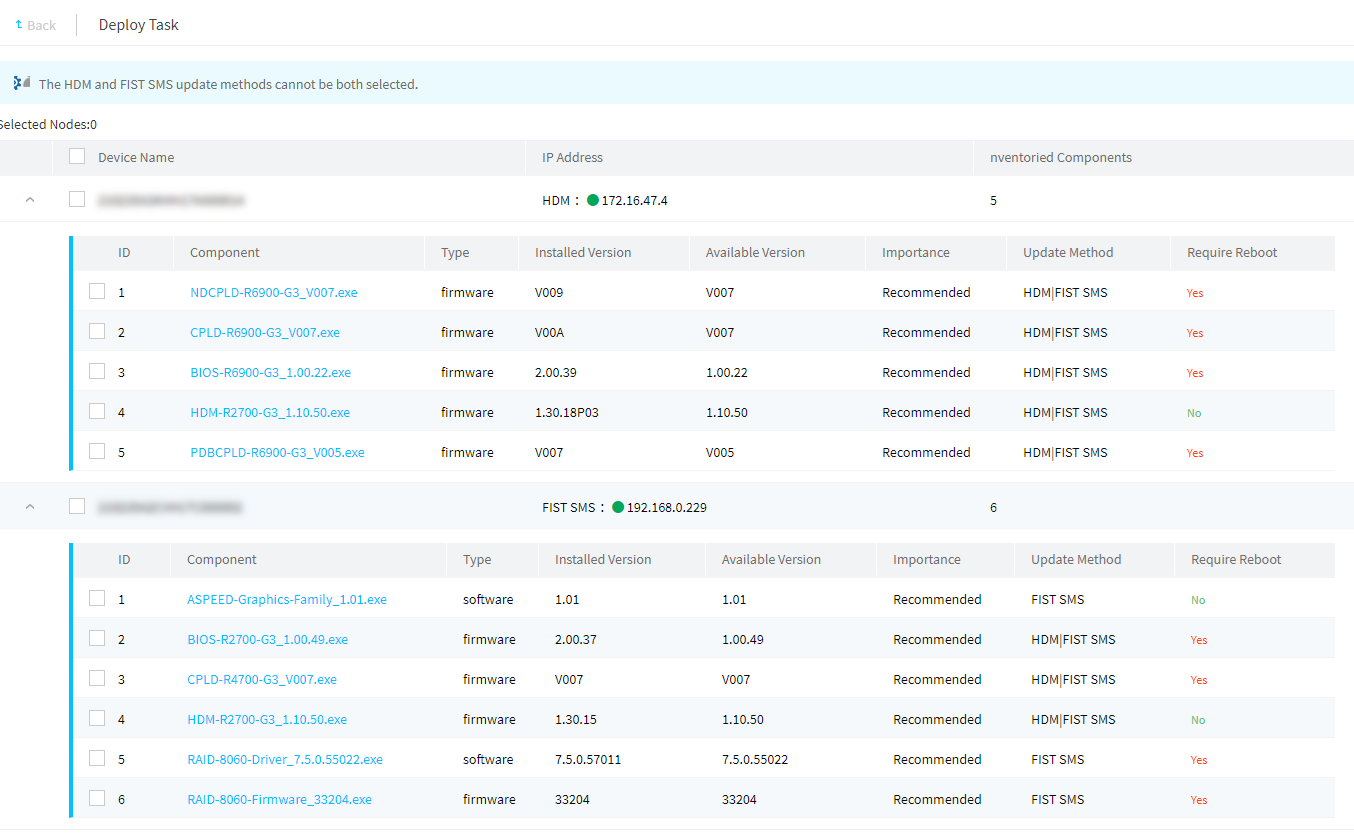
4. Wait for the inventory to finish and then click Deploy for the task. UniSystem then automatically selects components included in the REPO package if the package provides a higher version than the installed system. To update all components, select all components, and then click OK.
|
|
IMPORTANT: If the added device type is HDM, only the HDM, BIOS, and CPLD firmware can be identified. If the added device type is FIST SMS, the HDM, BIOS, CPLD firmware, storage controller firmware, network adapter firmware, and drive firmware can be identified. |
Figure 37 Verifying components to update
5. After the deployment, click Logs for the task, and view the deployment result.
Figure 38 Deployment completion

Figure 39 Component deployment logs

Server configuration template
A server template defines a set of server configurations for bulk server deployment, including RAID settings, drivers, and OS. This method allows you to install drivers while installing the OS for servers in bulk.
To perform this task, upload a REPO to UniSystem as a repository, create a server template using drivers in the repository, and then use the server template to deploy servers. For more information about REPO uploading, see "Uploading REPO."
During the template application process, the drivers will be automatically installed at the same time as the operating system.
To configure a server configuration template:
1. Log in to UniSystem, and access the Menu > Templates > Server Templates page.
2. Click Add.
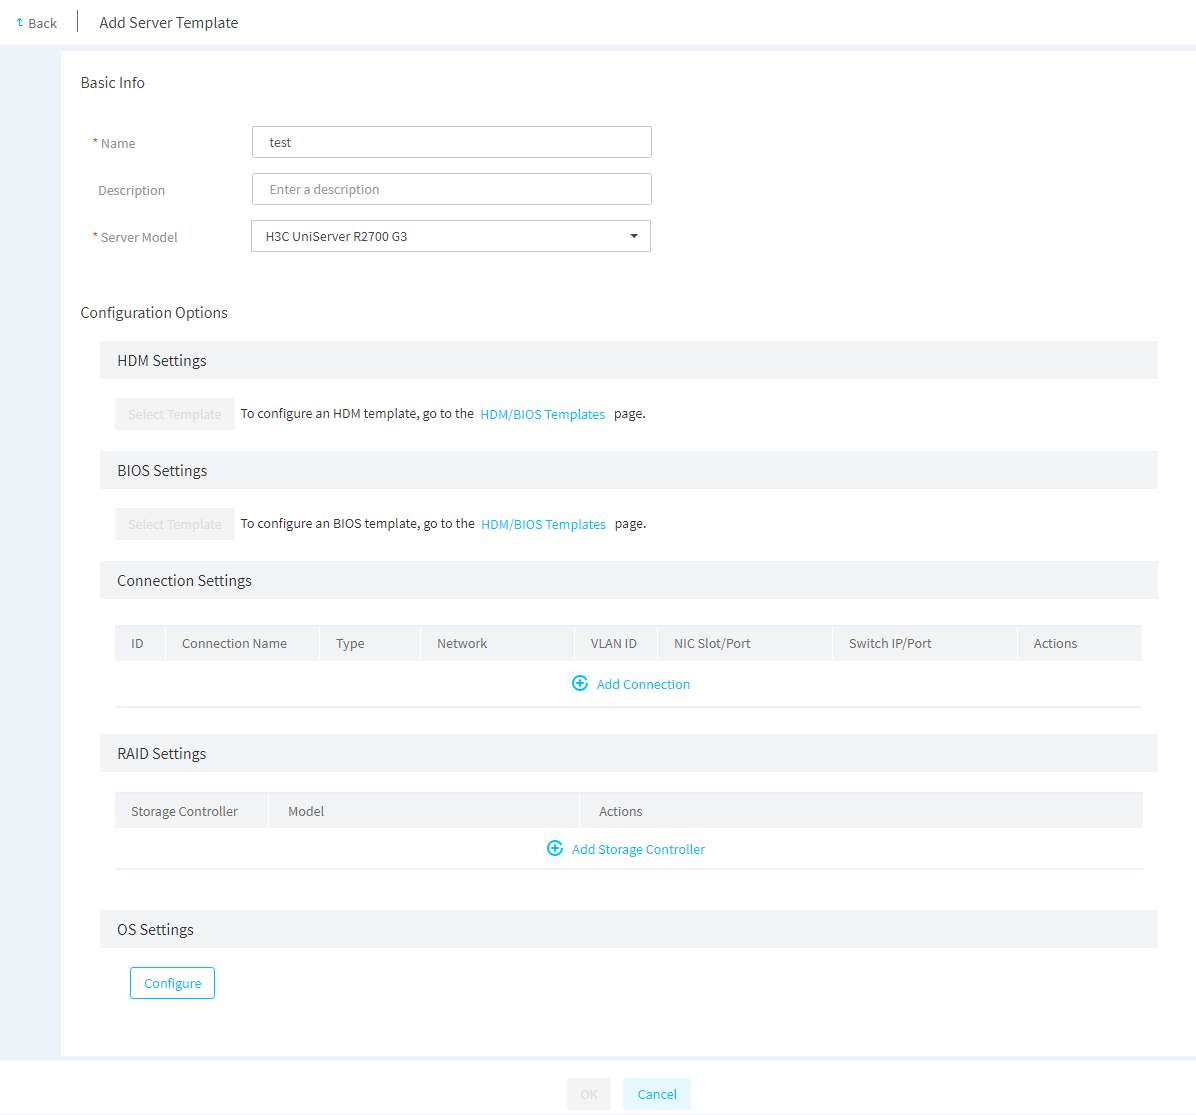
3. Specify the server template name and select an applicable server model.
Figure 40 Creating a server template
4. Click Configure in the OS Settings area.
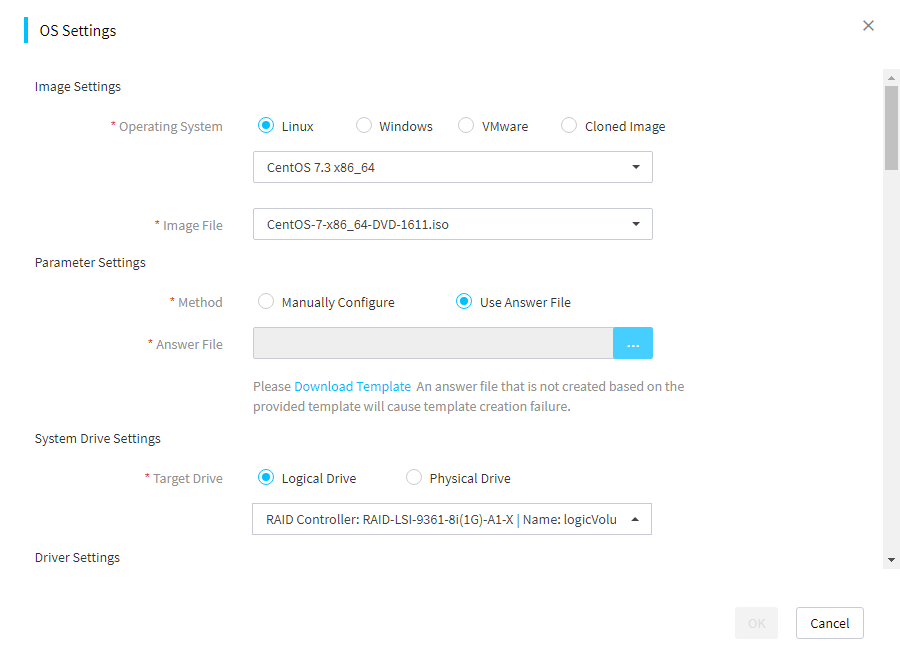
5. Select the OS and image file, configure the other required parameters, and configure system drive settings.
Figure 41 Configuring OS settings
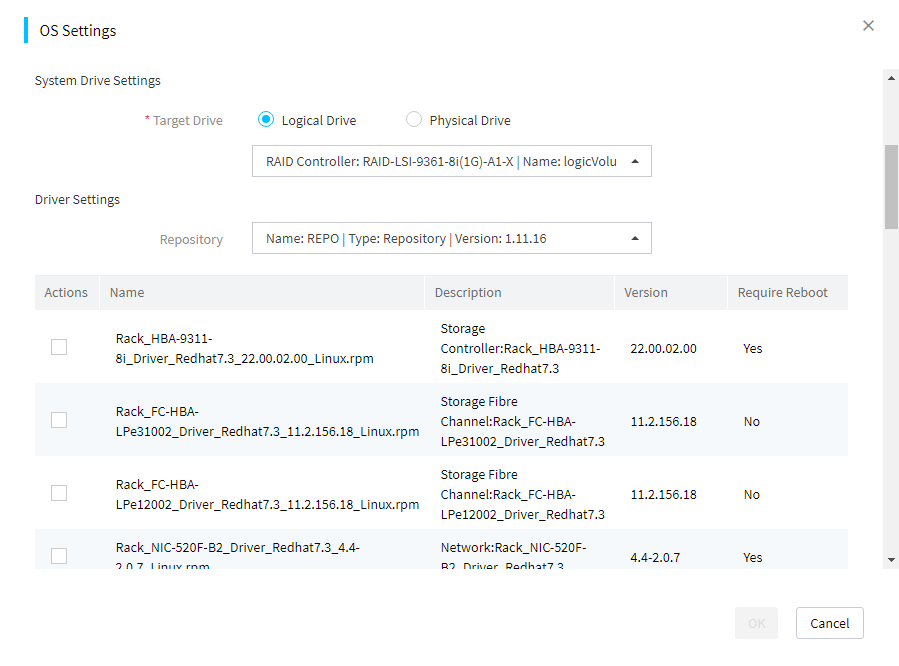
6. Select the repository and the target driver files, and then click OK to submit the system configurations.
Figure 42 Configuring driver settings
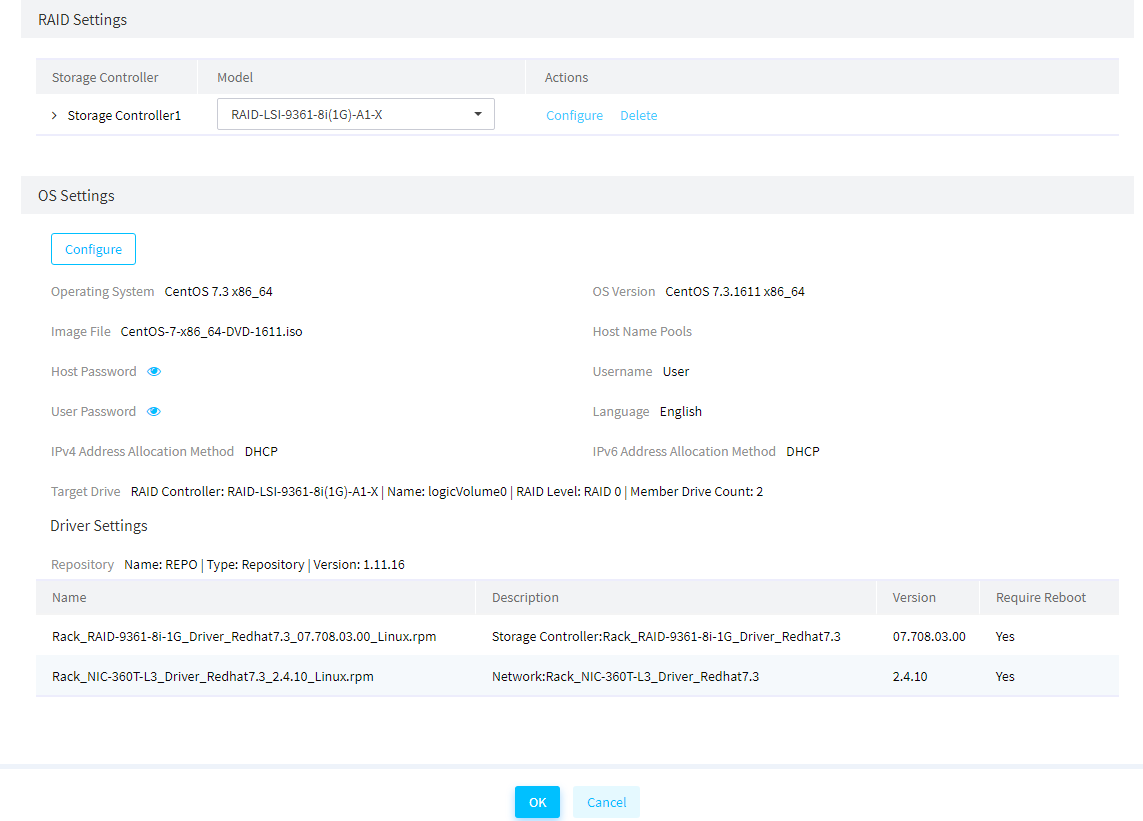
7. Verify the server template settings and then click OK.
Figure 43 Verifying the server template settings
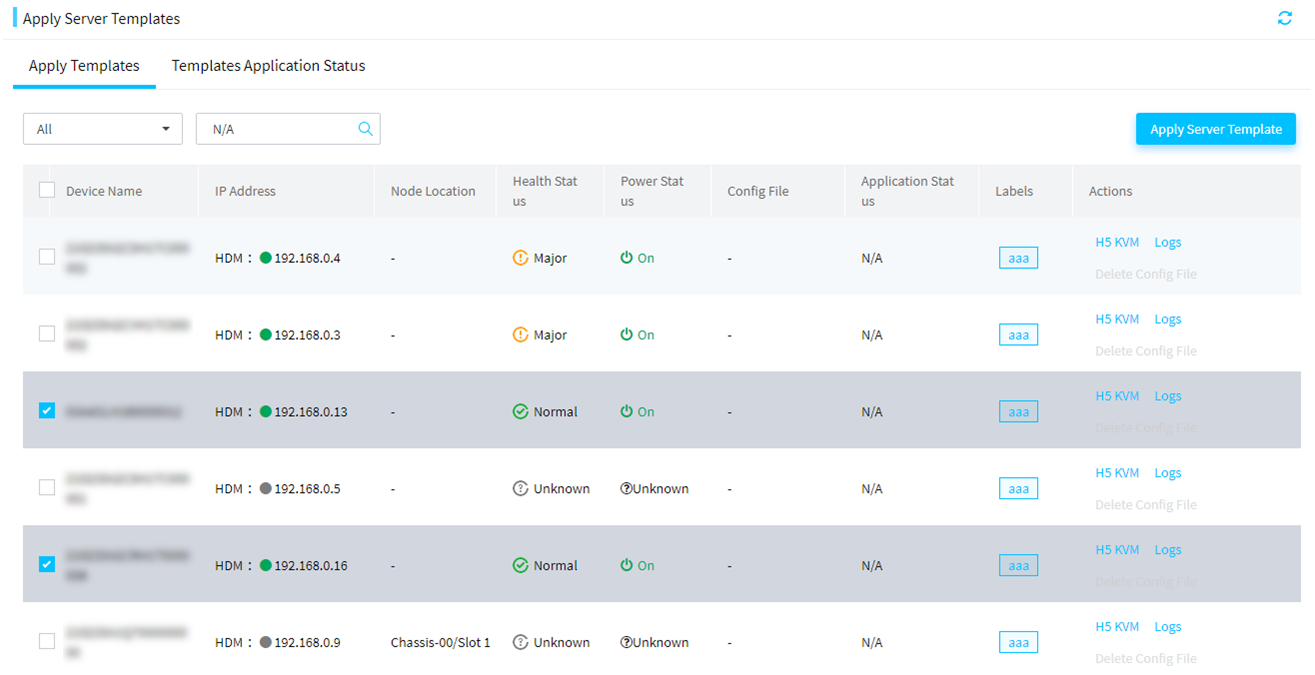
8. Access the Menu > Server Deployment > Apply Server Templates page.
9. Select the target servers, and then click Apply Server Template.
Figure 44 Applying a server template to servers
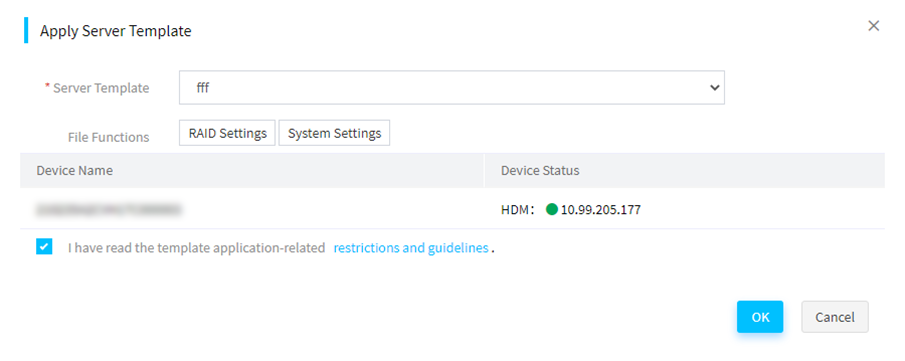
10. Select the created server template, specify the image, and select I have read the template application-related restrictions and guidelines. Then, click OK.
Figure 45 Applying a server template
The application status tab opens. You can view the deployment progress on the page.
|
|
NOTE: To view logs for the operations: · If the template is applied to Linux, access /home/log/XXX.log. · If the template is applied to Windows, access C:\log\XXX.txt. |
Verifying the configuration
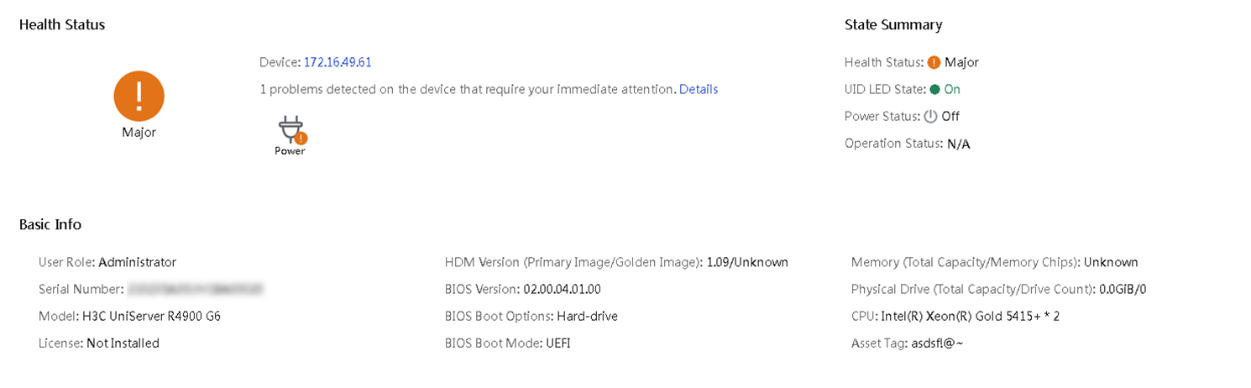
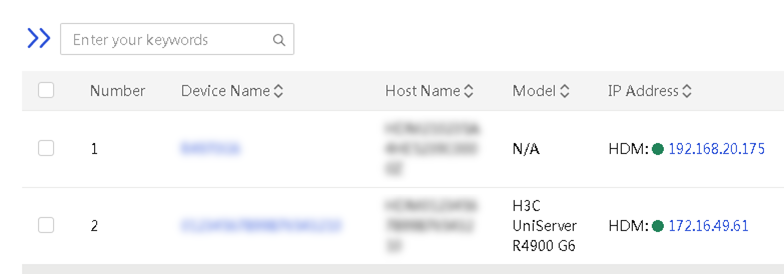
1. Log in to UniSystem. Click Devices > Servers > Server List. Click the device name to navigate to the server details page, as shown in Figure 46.

2. Check the details of Server A. Verify that the component version information is consistent with the HDM 1.11.35P07 and BIOS 2.00.39 version information in the REPO package, as shown in Figure 47.
3. Click Devices > Servers > Server List. Click the device name to navigate to the server details page, as shown in Figure 48.
4. Check the details of Server B. Verify that the component version information is consistent with the HDM 1.11.35P06 and BIOS 2.00.39 version information in the REPO package.
Related documentation
· H3C Servers UniSystem User Guide
· H3C Servers UniSystem Installation Guide
