- Table of Contents
-
- H3C Servers UniSystem Configuration Examples-6W102
- 01-UniSystem Bulk HDM&BIOS Import Configuration Examples
- 02-H3C UniSystem Cloning Installation Configuration Examples
- 03-UniSystem SMTP Configuration Examples
- 04-H3C UniSystem Cluster Creation Configuration Examples
- 05-H3C UniSystem SNMP Configuration Examples
- 06-H3C UniSystem RAID Configuration Examples
- 07-H3C UniSystem Rack Server Deployment Configuration Examples
- 08-UniSystem Bulk Component Update Configuration Examples
- 09-H3C UniSystem Server Inspection Configuration Example
- 10-H3C Unisystem REPO Acquisition and Use Configuration Examples
- 11-H3C UniSystem LDAP Management Configuration Example
- 12-H3C UniSystem Secure Erase Configuration Examples
- 13-H3C UniSystem Intelligent Version Management Configuration Examples
- 14-H3C UniSystem Bulk IP Settings Configuration Examples
- Related Documents
-
| Title | Size | Download |
|---|---|---|
| 09-H3C UniSystem Server Inspection Configuration Example | 282.42 KB |
H3C UniSystem
Server Inspection Configuration Example
Copyright © 2025 New H3C Technologies Co., Ltd. All rights reserved.
No part of this manual may be reproduced or transmitted in any form or by any means without prior written consent of Hangzhou H3C Technologies Co., Ltd.
Except for the trademarks of New H3C Technologies Co., Ltd., any trademarks that may be mentioned in this document are the property of their respective owners.
The information in this document is subject to change without notice.
Example: Configuring UniSystem server inspection
Viewing server inventory information
Exporting an Excel inspection report
Exporting a PDF inspection report
Introduction
|
|
NOTE: Starting from version 2.59, FIST software has been renamed as UniSystem. |
UniSystem supports inspecting servers and exporting inspection reports in PDF and XLSX formats. The reports contain server overview, CPU, memory, PCIe, NIC, power, fan, storage, health status, BIOS, serial number, device model, asset tag, and firmware version. Additionally, the reports include the macro distribution of devices by health status, product model, firmware version, processor core count, and memory size for user convenience.
Prerequisites
Procedures and information in the document might be slightly different depending on the software or hardware version of the device.
The configuration examples were created and verified in a lab environment, and all the devices were started with the factory default configuration. When you are working on a live network, make sure you understand the potential impact of every command on your network.
The following information is provided based on the assumption that you have basic knowledge of UniSystem server configuration templates.
Example: Configuring UniSystem server inspection
Network configuration
As shown in Figure 1, deploy UniSystem as both the UniSystem server and client on a PC. Connect the Ethernet port of the PC and two servers to a switch in the same LAN, and configure IP addresses to ensure communication between UniSystem and the servers. Configure UniSystem to inspect the two servers and export inspection reports.
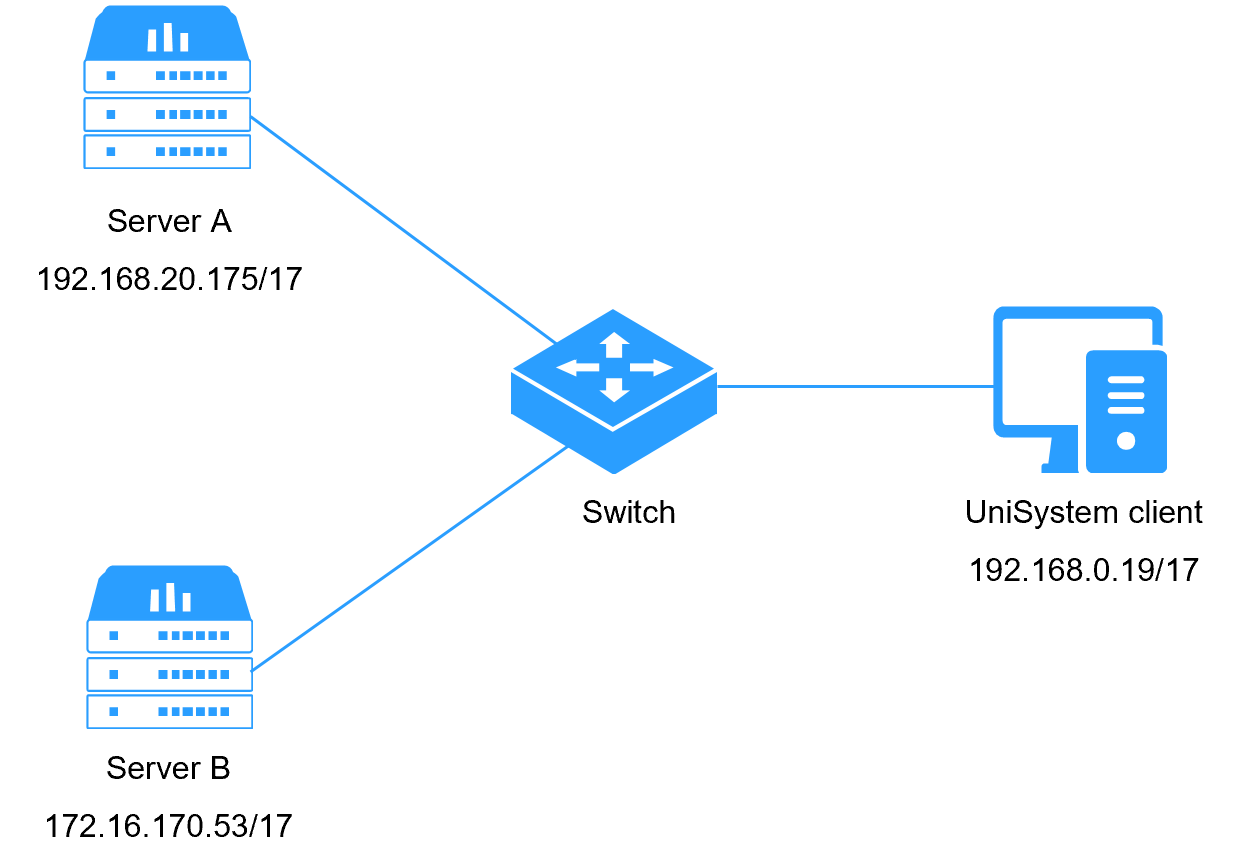
Table 1 Network configuration information
|
Device role |
Device information |
Description |
|
UniSystem |
UniSystem IP address |
192.168.0.19 |
|
Username of the default UniSystem administrator |
admin |
|
|
Password of the default UniSystem administrator |
Password@_ |
|
|
Server A |
Server model |
H3C UniServer R4900 G6 |
|
HDM IP address |
192.168.20.175 |
|
|
Server B |
Server model |
H3C UniServer R5300 G3 |
|
HDM IP address |
172.16.170.53 |
Analysis
1. Add servers to UniSystem.
2. Export the server inspection report to an Excel file.
3. Select the parameters to be exported and export the inspection report to a PDF file.
4. View inspection reports.
Software versions use
This configuration example was created and verified on UniSystem-2.54.
Procedures
Logging in to UniSystem
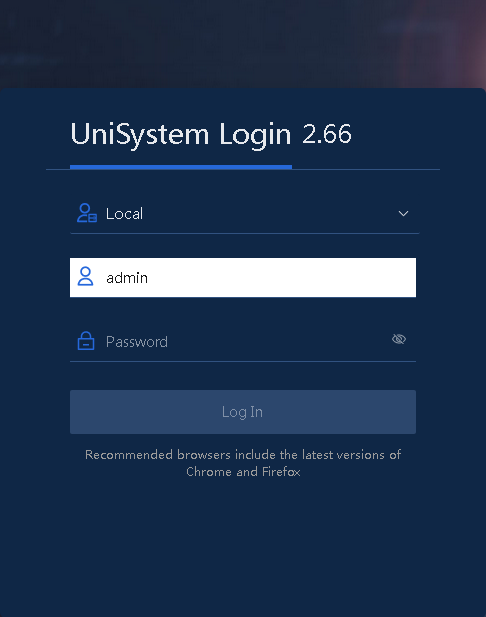
1. Open a browser on the UniSystem client and enter the address of the UniSystem server.
2. As shown in Figure 2, enter the default username admin and password Password@_ on the login interface.
3. Click Log In to access the UniSystem homepage.
Adding servers
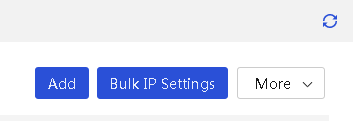
1. In the navigation pane, select Menu > Devices > Server List.
2. Click Add.
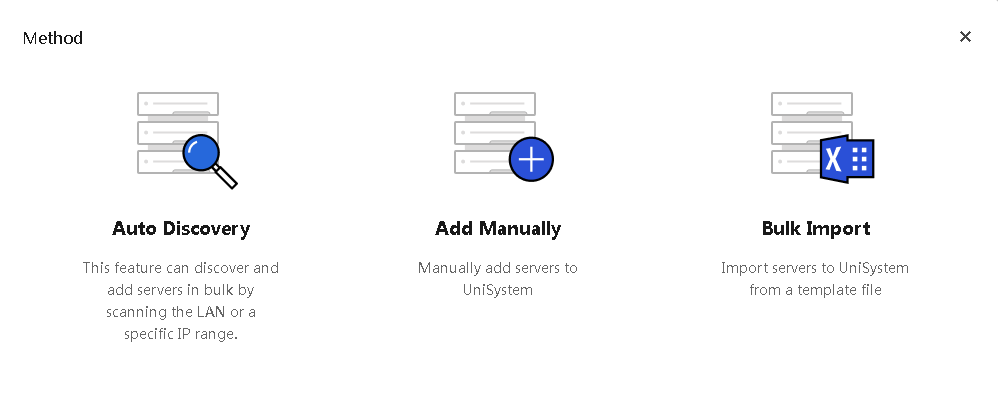
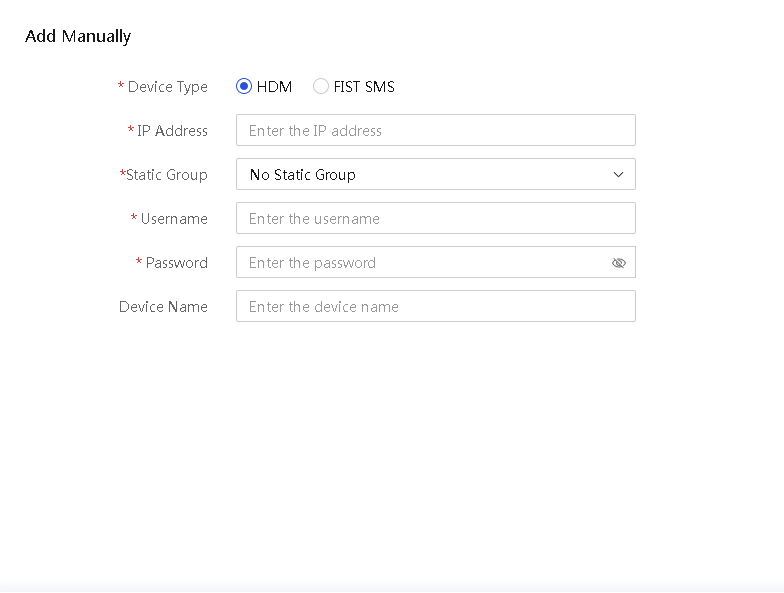
3. Select the manual method, as shown in Figure 4.
Figure 4 Adding servers manually
4. Enter server information and click OK, as shown in Figure 5 and Figure 6.
¡ Device Type: Select a device type. Options include HDM and FIST SMS.
¡ IP Address: If the device type is HDM, specify the HDM management IP address for the server. If the device type is FIST SMS, specify the system IP address for the server.
¡ Static Group: Select a static group to which the server belongs for further management.
¡ Username: Specify the username of an HDM user, including administrator users and non-administrator users.
¡ Password: Specify the password of an HDM user.

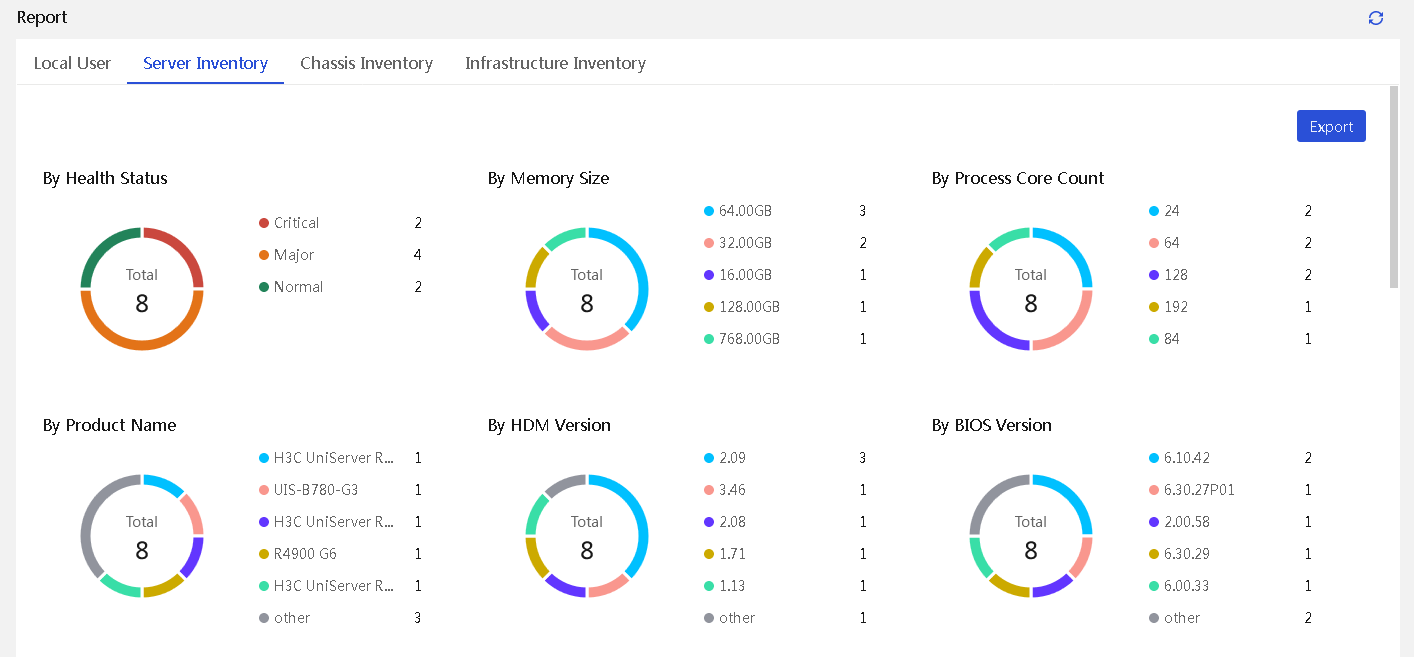
Viewing server inventory information
1. In the navigation pane, select Menu > Monitor > Reports.
2. Click the Server Inventory tab. You can view the server inventory list, as shown in Figure 7.
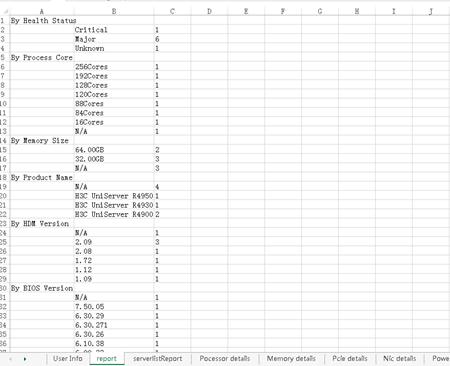
Exporting an Excel inspection report
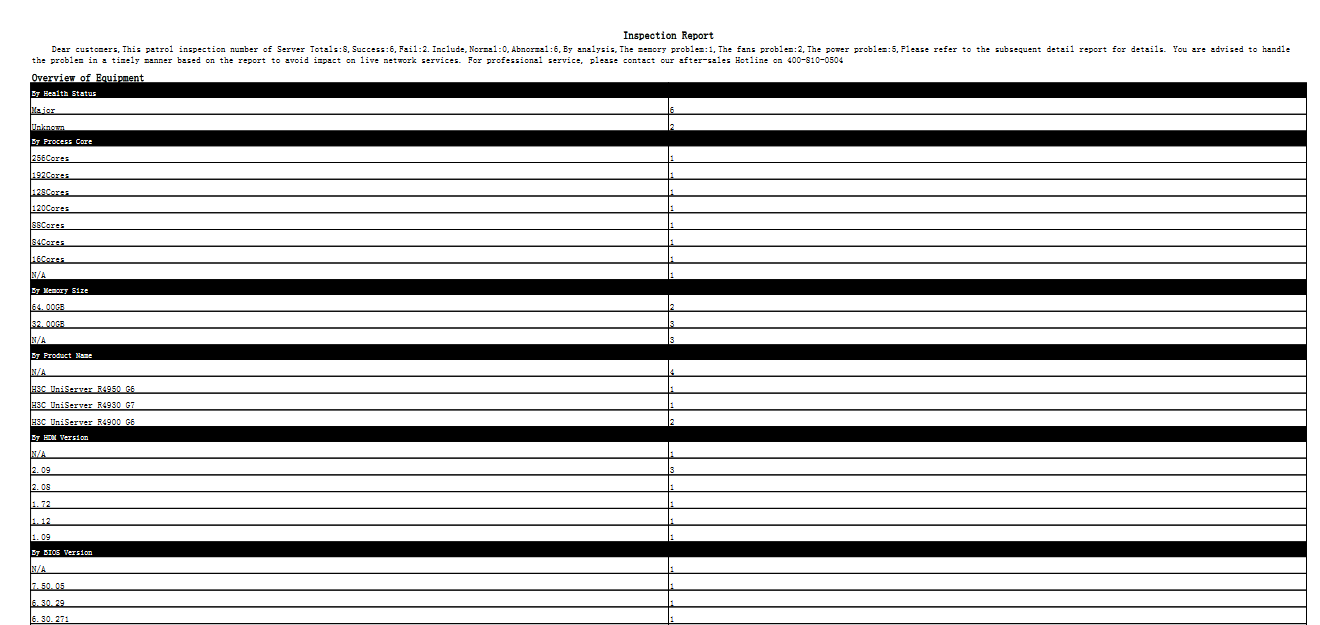
1. Click Export as Excel to export an inspection report in XLSX format. The contents of the inspection report are as shown in Figure 8.
Figure 8 Inspection report in Excel format
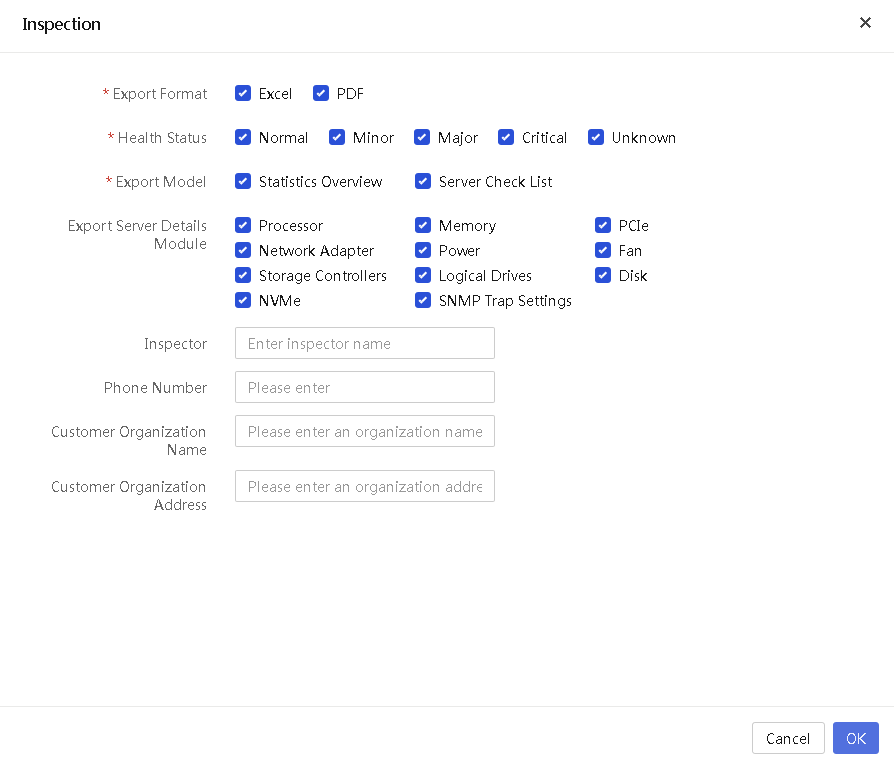
Exporting a PDF inspection report
1. Click Export as PDF. In the dialog box that opens, select health status values, PDF export modules, and server modules for details export. In addition, you can also enter the inspector name, phone number, customer organization name, and customer organization address, as shown in Figure 9.
¡ Health Status: Select the health status values for servers to be exported. The matching servers will be exported to the server inventory.
¡ Export Model: Select modules to be exported to the server inventory. UniSystem exports information about the selected modules.
- Statistics Overview: Exports the server summary, including total number of devices, number of devices in different aspects, and status summary.
- Server Check List: Exports product information about each server and hardware list.
¡ Export Server Details Module: Select server modules whose details are to be exported to the server inventory. The available modules include Processor, Memory, PCIe, Network Adapter, Power, Fan, Storage Controllers, Logical Drives, Disk, and NVMe.
¡ Inspector: Enter an inspector name, which will be displayed in the exported file as the inspection report.
¡ Phone Number: Enter the phone number of the inspector, which will be displayed in the exported file as the inspection report.
¡ Customer Organization Name: Enter the customer organization name, which will be displayed in the exported file as the inspection report.
¡ Customer Organization Address: Enter the customer organization address, which will be displayed in the exported file as the inspection report.
Figure 9 Customizing inspection information
2. Click OK. The contents of a PDF inspection report are as shown in Figure 10.
Figure 10 PDF inspection report
Verifying the configuration
1. On UniSystem, in the navigation pane, select Menu > Monitor > Reports.
2. Click the Server Inventory tab.
You can view the server inventory list. For the R4900 G6, the version of the primary HDM image is 1.12 and the BIOS version is 6.00.03. For the R5300 G3, the version of the primary HDM image is 3.32 and the BIOS version is 2.00.63P10.
3. View information of the exported inspection report. The version of the primary HDM image and the BIOS version are the same as those on the UniSystem Web interface.
4. On UniSystem, in the navigation pane, select Menu > Devices > Server List. Then, click the IP address of a server to enter HDM for that server.
5. On HDM for the R4960 G6, in the navigation pane, select System > Summary. You can view information about the product, processors, memory, and PCIe devices.
6. View information of the exported inspection report. The version of the primary HDM image and the BIOS version are the same as those on the UniSystem Web interface.
