- Table of Contents
- Related Documents
-
| Title | Size | Download |
|---|---|---|
| 03-Web Overview | 314.67 KB |
Contents
Logging in to the web interface
Logging in through the browser
Logging in through the access controller engine
Logging out of the web interface
Introduction to the web interface
Introduction to the web-based NM functions
Introduction to the common items on the web pages
Failure to access devices through the web console
Overview
The device provides web-based configuration interfaces for visual device management and maintenance.
Figure 1 Web-based network management operating environment

Logging in to the web interface
You can log in to the web interface through the browser or through the switching engine on a WX3000E series wireless switch.
Logging in through the browser
You can use the following default settings to log in to the web interface:
|
Item |
Access controller engine |
Switching engine |
|
Username |
admin |
admin |
|
Password |
admin |
admin |
|
Default IP address |
192.168.0.100/24 |
192.168.0.101/24 |
To log in to the web interface of the device from a PC:
1. Connect the GigabitEthernet interface of the switching engine to the PC by using a crossover Ethernet cable.
By default, all ports belong to VLAN 1.
2. Configure an IP address for the PC and make sure that the PC and the device can reach each other.
For example, assign the PC an IP address (for example, 192.168.0.7) within 192.168.0.0/24.
3. Open the browser and input the login information:
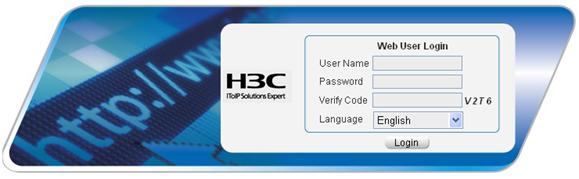
a. Type the IP address http:// 192.168.0.101 in the address bar and press Enter.
The login page of the web interface (see Figure 2) appears.
b. Enter the username admin, password admin, and the verification code, select the language (English and Chinese are supported at present), and click Login.
Figure 2 Login page of the web interface
|
|
NOTE: · The PC where you configure the device is not necessarily a web-based network management terminal. A web-based network management terminal is a PC used to log in to the web interface and is required to be reachable to the device. · After logging in to the web interface, you can select Device > Users from the navigation tree, create a new user, and select Wizard or Network > VLAN interface to configure the IP address of the VLAN interface acting as the management interface. For more information, see the corresponding configuration guides of these modules. · If you click the verification code displayed on the web login page, you can get a new verification code. · Up to 5 users can concurrently log in to the device through the web interface. · The procedures for logging in to the access controller engine are the same except that the default IP address of the access controller engine is 192.168.0.100. |
Logging in through the access controller engine
To log in to the switching engine through the access controller engine:
1. Log in to the access controller engine by following Logging in through the browser.
2. Configure the oap management-ip ip-address slot 0 command in system view.
ip-address represents the default IP address of the switching engine.
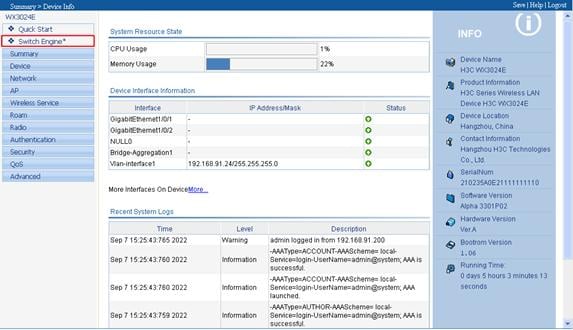
3. Click Switch Engine.
4. On the page that appears, enter the login settings (see Figure 3).
Figure 3 Switch from the access controller engine to the switching engine
Logging out of the web interface
Click Logout in the upper-right corner of the web interface, as shown in Figure 4 to quit the web interface.
The system does not automatically save the current configuration, so save the current configuration before logout.
Introduction to the web interface
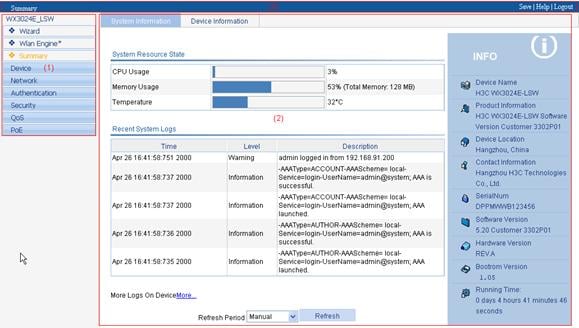
The web interface is composed of three parts: navigation tree, title area, and body area.
Figure 4 Web-based configuration interface
|
(1) Navigation tree |
(2) Body area |
· Navigation tree—Organizes the web-based NM functions as a navigation tree, where you can select and configure functions as needed. The result is displayed in the body area.
· Body area—Allows you to configure and display features.
· Title area—On the left, displays the path of the current configuration interface in the navigation area; on the right, provides the Save button to quickly save the current configuration, the Help button to display the web related help information, and the Logout button to log out of the web interface
Web user level
Web user levels, from low to high, are visitor, monitor, configure, and management. A user with a higher level has all the operating rights of a user with a lower level.
· Visitor—Users of this level can use the network diagnostic tools ping and Trace Route, but they can neither access the device data nor configure the device.
· Monitor—Users of this level can only access the device data but cannot configure the device.
· Configure—Users of this level can access device data and configure the device, but they cannot upgrade the host software, add/delete/modify users, or back up/restore configuration files.
· Management—Users of this level can perform any operations to the device.
Introduction to the web-based NM functions
|
|
NOTE: User level in Table 1 indicates that users of this level or users of a higher level can perform the corresponding operations. |
Table 1 Description of web-based NM functions
|
Function menu |
Description |
User level |
|||||
|
Wizard |
IP Setup |
Perform quick configuration of the device. |
Management |
||||
|
Summary |
System Information |
Display the system information, system resource status, and the recent system operation logs. |
Monitor |
||||
|
Device Information |
Display the port, power supply, and fan information of the device. |
Monitor |
|||||
|
Device Management |
Display the card information of the device, and log in to some cards to configure them. |
Monitor |
|||||
|
Device |
Basic |
System Name |
Display and configure the system name. |
Configure |
|||
|
Web Idle Timeout |
Display and configure the idle timeout period for logged-in users. |
Configure |
|||||
|
Reboot |
Reboot the device. |
Management |
|||||
|
Electronic Label |
Display the electronic label of the device. |
Monitor |
|||||
|
Diagnostic Information |
Generate diagnostic information file, and view or save the file to local host. |
Management |
|||||
|
System Time |
System Time |
Display the system date and time. |
Monitor |
||||
|
Configure the system date and time |
Configure |
||||||
|
Net Time |
Display the synchronization status of system clock and network time configuration information. |
Monitor |
|||||
|
Configure the network time. |
Configure |
||||||
|
Syslog |
Loglist |
Display and refresh system logs. |
Monitor |
||||
|
Clear system logs. |
Configure |
||||||
|
Loghost |
Display and configure the loghost. |
Configure |
|||||
|
Log Setup |
Display and configure the buffer capacity, and interval for refreshing system logs. |
Configure |
|||||
|
Configuration |
Backup |
Back up the configuration file to be used at the next startup from the device to the host of the current user. |
Management |
||||
|
Restore |
Upload the configuration file to be used at the next startup from the host of the current user to the device. |
Management |
|||||
|
Save |
Save the current configuration to the configuration file to be used at the next startup. |
Configure |
|||||
|
Initialize |
Restore the factory default settings. |
Configure |
|||||
|
File Manage |
File Manage |
Manage files on the device, such as displaying the file list, downloading a file, uploading a file, removing a file, and setting the main boot file. |
Management |
||||
|
Port Management |
Summary |
Display port information by features. |
Monitor |
||||
|
Detail |
Display feature information by ports. |
Monitor |
|||||
|
Setup |
Create, modify, delete, or enable/disable a port, and clear port statistics. |
Configure |
|||||
|
Port Mirroring |
Summary |
Display the configuration information of a port mirroring group. |
Monitor |
||||
|
Create |
Create a port mirroring group. |
Configure |
|||||
|
Remove |
Remove a port mirroring group. |
Configure |
|||||
|
Modify Port |
Configure ports for a mirroring group. |
Configure |
|||||
|
Users |
Summary |
Display the brief information of FTP and Telnet users. |
Monitor |
||||
|
Super Password |
Configure a password for a lower-level user to switch from the current access level to the management level. |
Management |
|||||
|
Create |
Create an FTP or Telnet user. |
Management |
|||||
|
Modify |
Modify FTP or Telnet user information. |
Management |
|||||
|
Remove |
Remove an FTP or a Telnet user. |
Management |
|||||
|
Switch To Management |
Switch the current user level to the management level. |
Visitor |
|||||
|
Loopback |
Loopback |
Perform loopback tests on Ethernet interfaces. |
Configure |
||||
|
VCT |
VCT |
Check the status of the cables connected to Ethernet ports. |
Configure |
||||
|
Flow Interval |
Port Traffic Statistics |
Display the number of packets and bytes received and sent by the interface, and the bandwidth usage within a specified time interval. |
Monitor |
||||
|
Interval Configuration |
Set an interval for collecting traffic statistics on interfaces. |
Configure |
|||||
|
Storm Constrain |
Storm Constrain |
Display and set the interval for collecting storm constrain statistics. Display, create, modify, and remove the port traffic threshold. |
Configure |
||||
|
RMON |
Statistics |
Display, create, modify, and clear RMON statistics. |
Configure |
||||
|
History |
Display, and create, modify, and clear RMON history sampling information. |
Configure |
|||||
|
Alarm |
View, create, modify, and clear alarm entries. |
Configure |
|||||
|
Event |
View, create, modify, and clear event entries. |
Configure |
|||||
|
Log |
Display log information about RMON events. |
Configure |
|||||
|
Energy Saving |
Energy Saving |
Display and configure the energy saving settings of an interface. |
Configure |
||||
|
SNMP |
Setup |
Display and refresh SNMP configuration and statistics information. |
Monitor |
||||
|
Configure SNMP. |
Configure |
||||||
|
Community |
Display SNMP community information. |
Monitor |
|||||
|
Create, modify, and delete an SNMP community. |
Configure |
||||||
|
Group |
Display SNMP group information. |
Monitor |
|||||
|
Create, modify, and delete an SNMP group. |
Configure |
||||||
|
User |
Display SNMP user information. |
Monitor |
|||||
|
Create, modify, and delete an SNMP user. |
Configure |
||||||
|
Trap |
Display the status of the SNMP trap function and information about target hosts. |
Monitor |
|||||
|
Enable or disable the SNMP trap function, or create, modify and delete a target host. |
Configure |
||||||
|
View |
Display SNMP view information. |
Monitor |
|||||
|
Create, modify, and delete an SNMP view. |
Configure |
||||||
|
Interface Statistics |
Interface Statistics |
Display and clear the statistics information of an interface. |
Configure |
||||
|
Network |
VLAN |
Select VLAN |
Select a VLAN range. |
Monitor |
|||
|
Create |
Create VLANs. |
Configure |
|||||
|
Port Detail |
Display the VLAN-related details of a port. |
Monitor |
|||||
|
Detail |
Display the member port information of a VLAN. |
Monitor |
|||||
|
Modify VLAN |
Modify the description and member ports of a VLAN. |
Configure |
|||||
|
Modify Port |
Change the VLAN to which a port belongs, the connection type and PVID of the port. |
Configure |
|||||
|
Remove |
Remove VLANs. |
Configure |
|||||
|
VLAN Interface |
Summary |
Display information about VLAN interfaces by address type. |
Monitor |
||||
|
Create |
Create VLAN interfaces and configure IP addresses for them. |
Configure |
|||||
|
Modify |
Modify the IP addresses and status of VLAN interfaces. |
Configure |
|||||
|
Remove |
Remove VLAN interfaces. |
Configure |
|||||
|
Voice VLAN |
Summary |
Display voice VLAN information globally or on a port. |
Monitor |
||||
|
Setup |
Configure the global voice VLAN. |
Configure |
|||||
|
Port Setup |
Configure a voice VLAN on a port. |
Configure |
|||||
|
OUI Summary |
Display the addresses of the OUIs that can be identified by voice VLAN. |
Monitor |
|||||
|
OUI Add |
Add the address of an OUI that can be identified by voice VLAN. |
Configure |
|||||
|
OUI Remove |
Remove the address of an OUI that can be identified by voice VLAN. |
Configure |
|||||
|
MAC |
MAC |
Display MAC address information. |
Monitor |
||||
|
Create and remove MAC addresses. |
Configure |
||||||
|
Setup |
Display and configure MAC address aging time. |
Configure |
|||||
|
MSTP |
Region |
Display information about MST regions. |
Monitor |
||||
|
Modify MST regions. |
Configure |
||||||
|
Global |
Set global MSTP parameters. |
Configure |
|||||
|
Port Summary |
Display the MSTP information of ports. |
Monitor |
|||||
|
Port Setup |
Set MSTP parameters on ports. |
Configure |
|||||
|
Link Aggregation |
Summary |
Display information about aggregated interface, and information about member ports. |
Monitor |
||||
|
Create |
Create link aggregation groups. |
Configure |
|||||
|
Modify |
Modify link aggregation groups. |
Configure |
|||||
|
Remove |
Remove link aggregation groups. |
Configure |
|||||
|
LACP |
Summary |
Display information about LACP-enabled ports and their partner ports. |
Monitor |
||||
|
Setup |
Set LACP priorities. |
Configure |
|||||
|
LLDP |
Port Setup |
Display the LLDP configuration information, local information, neighbor information, statistics information, and status information of a port. |
Monitor |
||||
|
Modify LLDP configuration on a port. |
Configure |
||||||
|
Global Setup |
Display global LLDP configuration information. |
Monitor |
|||||
|
Configure global LLDP parameters. |
Configure |
||||||
|
Global Summary |
Display global LLDP local information and statistics. |
Monitor |
|||||
|
Neighbor Summary |
Display global LLDP neighbor information. |
Monitor |
|||||
|
ARP Management |
ARP Table |
Display ARP table information. |
Monitor |
||||
|
Add, modify, or delete an ARP entry. |
Configure |
||||||
|
Gratuitous ARP |
Display configuration information of gratuitous ARP. |
Monitor |
|||||
|
Configure gratuitous ARP. |
Configure |
||||||
|
ARP Anti-Attack |
ARP Detection |
Display the configuration information of ARP detection. |
Monitor |
||||
|
Configure ARP detection. |
Configure |
||||||
|
IGMP Snooping |
Basic |
Display global IGMP snooping configuration information or the IGMP snooping configuration information in a VLAN, and view the IGMP snooping multicast entry information. |
Monitor |
||||
|
Configure IGMP snooping globally or in a VLAN. |
Configure |
||||||
|
Advanced |
Display the IGMP snooping configuration information on a port. |
Monitor |
|||||
|
Configure IGMP snooping on a port. |
Configure |
||||||
|
IPv4 Routing |
Summary |
Display the IPv4 active route table. |
Monitor |
||||
|
Create |
Create an IPv4 static route. |
Configure |
|||||
|
Remove |
Delete the selected IPv4 static routes. |
Configure |
|||||
|
IPv6 Routing |
Summary |
Display the IPv6 active route table. |
Monitor |
||||
|
Create |
Create an IPv6 static route. |
Configure |
|||||
|
Remove |
Delete the selected IPv6 static routes. |
Configure |
|||||
|
DHCP |
DHCP Server |
Display the DHCP service status, the DHCP address pool information, the DHCP server status on an interface, and the information of an address assigned from a DHCP address pool. |
Monitor |
||||
|
Set the DHCP service status, add, modify, or delete a DHCP address pool, and modify the DHCP server status on an interface. |
Configure |
||||||
|
DHCP Relay |
Display information about the DHCP status, advanced configuration information of the DHCP relay agent, DHCP server group configuration, DHCP relay agent interface configuration, and the DHCP client information. |
Monitor |
|||||
|
Enable or disable DHCP, configure advanced DHCP relay agent settings, configure a DHCP server group, and enable or disable the DHCP relay agent on an interface. |
Configure |
||||||
|
DHCP Snooping |
Display the status, trusted and untrusted ports and DHCP client information of DHCP snooping. |
Monitor |
|||||
|
Enable or disable DHCP snooping, and configure DHCP snooping trusted and untrusted ports. |
Configure |
||||||
|
Service |
Service |
Display the states of services: enabled or disabled. |
Configure |
||||
|
Enable or disable services, and set related parameters. |
Management |
||||||
|
Diagnostic Tools |
Ping |
Ping an IP address and display the operation result. |
Visitor |
||||
|
Trace Route |
Perform trace route operation and display the operation result. |
Visitor |
|||||
|
Authentication |
MAC Authentication |
MAC Authentication |
Display MAC authentication configuration information. |
Monitor |
|||
|
Configure MAC authentication. |
Configure |
||||||
|
802.1X |
802.1X |
Display 802.1X configuration information globally or on a port. |
Monitor |
||||
|
Configure 802.1X globally or on a port. |
Configure |
||||||
|
Port Security |
Port Security |
Display port security configuration information. |
Monitor |
||||
|
Configure port security. |
Configure |
||||||
|
Portal |
Portal Server |
Display configuration information about the portal server and advanced parameters for portal authentication. |
Monitor |
||||
|
Add and delete a portal server, and modify advanced parameters for portal authentication. |
Configure |
||||||
|
Free Rule |
Display the portal-free rule configuration information. |
Monitor |
|||||
|
Add and delete a portal-free rule. |
Configure |
||||||
|
AAA |
Domain Setup |
Display ISP domain configuration information. |
Monitor |
||||
|
Add and remove ISP domains. |
Management |
||||||
|
Authentication |
Display the authentication configuration information of an ISP domain. |
Monitor |
|||||
|
Specify authentication methods for an ISP domain. |
Management |
||||||
|
Authorization |
Display the authorization method configuration information of an ISP domain. |
Monitor |
|||||
|
Specify authorization methods for an ISP domain. |
Management |
||||||
|
Accounting |
Display the accounting method configuration information of an ISP domain. |
Monitor |
|||||
|
Specify accounting methods for an ISP domain. |
Management |
||||||
|
RADIUS |
Display, add, modify, and delete a RADIUS scheme. |
Management |
|||||
|
Users |
Local User |
Display configuration information about local users. |
Monitor |
||||
|
Create, modify, and remove a local user. |
Management |
||||||
|
User Group |
Display configuration information about user groups. |
Monitor |
|||||
|
Create, modify, and remove a user group. |
Management |
||||||
|
PKI |
Entity |
Display information about PKI entities. |
Monitor |
||||
|
Add, modify, and delete a PKI entity. |
Configure |
||||||
|
Domain |
Display information about PKI domains. |
Monitor |
|||||
|
Add, modify, and delete a PKI domain. |
Configure |
||||||
|
Certificate |
Display the certificate information of PKI domains and view the contents of a certificate. |
Monitor |
|||||
|
Generate a key pair, destroy a key pair, retrieve a certificate, request a certificate, and delete a certificate. |
Configure |
||||||
|
CRL |
Display the contents of the CRL. |
Monitor |
|||||
|
Receive the CRL of a domain. |
Configure |
||||||
|
Port Isolate Group (for multiple isolation groups) |
Summary |
Display port isolation group information. |
Monitor |
||||
|
Group Setup |
Add and delete an isolation group. |
Configure |
|||||
|
Port Setup |
Configure the ports in an isolation group. |
Configure |
|||||
|
Authorized IP |
Summary |
Display the configurations of authorized IP, the associated IPv4 ACL list, and the associated IPv6 ACL list. |
Management |
||||
|
Setup |
Configure authorized IP. |
Management |
|||||
|
QoS |
Time Range |
Summary |
Display time range configuration information. |
Monitor |
|||
|
Add |
Add a time range. |
Configure |
|||||
|
Remove |
Delete a time range. |
Configure |
|||||
|
ACL IPv4 |
Summary |
Display IPv4 ACL configuration information. |
Monitor |
||||
|
Add |
Add an IPv4 ACL. |
Configure |
|||||
|
Basic Setup |
Configure a rule for a basic IPv4 ACL. |
Configure |
|||||
|
Advanced Setup |
Configure a rule for an advanced IPv4 ACL. |
Configure |
|||||
|
Link Layer Setup |
Create a rule for a link layer ACL. |
Configure |
|||||
|
Remove |
Delete an IPv4 ACL or its rules. |
Configure |
|||||
|
ACL IPv6 |
Summary |
Display IPv6 ACL configuration information. |
Monitor |
||||
|
Add |
Add an IPv6 ACL. |
Configure |
|||||
|
Basic Setup |
Configure a rule for a basic IPv6 ACL. |
Configure |
|||||
|
Advanced Setup |
Configure a rule for an advanced IPv6 ACL. |
Configure |
|||||
|
Remove |
Delete an IPv6 ACL or its rules. |
Configure |
|||||
|
Queue |
Summary |
Display the queue information of a port. |
Monitor |
||||
|
Setup |
Configure a queue on a port. |
Configure |
|||||
|
Line Rate |
Summary |
Display line rate configuration information. |
Monitor |
||||
|
Setup |
Configure the line rate. |
Configure |
|||||
|
Classifier |
Summary |
Display classifier configuration information. |
Monitor |
||||
|
Add |
Add a class. |
Configure |
|||||
|
Setup |
Configure the classification rules for a class. |
Configure |
|||||
|
Remove |
Delete a class or its classification rules. |
Configure |
|||||
|
Behavior |
Summary |
Display traffic behavior configuration information. |
Monitor |
||||
|
Add |
Add a traffic behavior. |
Configure |
|||||
|
Setup |
Configure actions for a traffic behavior. |
Configure |
|||||
|
Port Setup |
Configure traffic mirroring and traffic redirecting for a traffic behavior. |
Configure |
|||||
|
Remove |
Delete a traffic behavior. |
Configure |
|||||
|
QoS Policy |
Summary |
Display QoS policy configuration information. |
Monitor |
||||
|
Add |
Add a QoS policy. |
Configure |
|||||
|
Setup |
Configure the classifier-behavior associations for a QoS policy. |
Configure |
|||||
|
Remove |
Delete a QoS policy or its classifier-behavior associations. |
Configure |
|||||
|
Port Policy |
Summary |
Display the QoS policy applied to a port. |
Monitor |
||||
|
Setup |
Apply a QoS policy to a port. |
Configure |
|||||
|
Remove |
Remove the QoS policy from the port. |
Configure |
|||||
|
Priority Mapping |
Priority Mapping |
Display priority mapping table information. |
Monitor |
||||
|
Modify the priority mapping entries. |
Configure |
||||||
|
Port Priority |
Port Priority |
Display port priority and trust mode information. |
Monitor |
||||
|
Modify port priority and trust mode. |
Configure |
||||||
|
PoE |
PoE |
Summary |
Display PSE information and PoE interface information. |
Monitor |
|||
|
Setup |
Configure a PoE interface. |
Configure |
|||||
Introduction to the common items on the web pages
Buttons and icons
Table 2 Commonly used buttons and icons
|
Button and icon |
Function |
|
|
Apply the configuration on the current page. |
|
|
Cancel the configuration on the current page, and return to the corresponding list page or the Device Info page. |
|
|
Refresh the information on the current page. |
|
|
Clear all the information on a list or all statistics. |
|
|
Enter a page for adding an item. |
|
|
Remove the selected items. |
|
|
Select all the entries on a list, or all the ports on the device panel. |
|
|
Clear all the entries on a list, or all the ports on the device panel. |
|
|
Generally present on the configuration wizard; used to buffer but not apply the configuration of the current step and enter the next configuration step. |
|
|
Generally present on the configuration wizard; used to buffer but not apply the configuration of the current step and return to the previous configuration step. |
|
|
Generally present on the configuration wizard; used to apply the configurations of all configuration steps. |
|
|
Generally present on the “Operation” column on a list; used to enter the modification page of an item so that you can modify the configurations of the item. |
|
|
Generally present on the “Operation” column on a list; used to delete the item corresponding to this icon. |
Page display
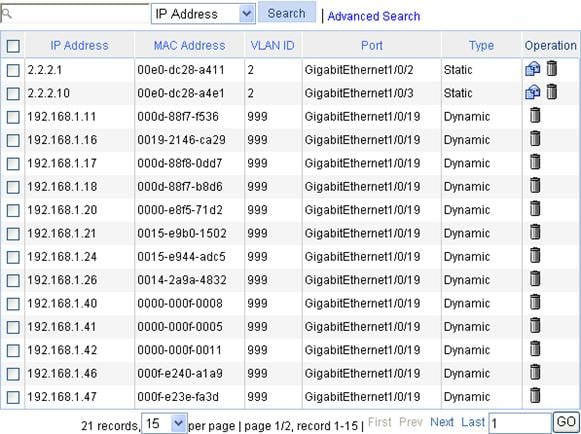
The web interface can display a long list by pages, as shown in Figure 5. You can set the number of entries displayed per page, and use the First, Prev, Next, and Last links to view the contents on the first, previous, next, and last pages, or go to any page that you want to view.
Figure 5 Content display by pages
Search function
On some list pages, the web interface provides basic search function. You can use the search function to display those entries matching certain search criteria.
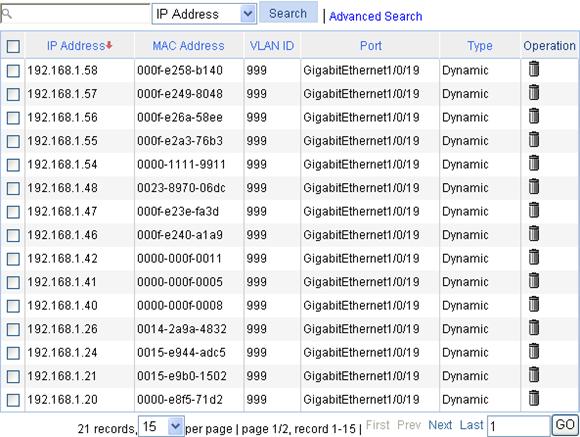
Basic search function: Enter the keyword in the field above the list, select a search item from the list and click Search to display the entries that match the criteria. Figure 6 shows an example of searching for entries with VLAN ID 2.
Figure 6 Basic search function example

Sorting function
On some list pages, the web interface provides basic sorting function to display the entries in certain orders.
On a list page, you can click the blue heading item of each column to sort the entries based on the heading item you selected. Then the heading item is displayed with an arrow beside it as shown in Figure 7. The upward arrow indicates the ascending order, and the downward arrow indicates the descending order.
Figure 7 Basic sorting function (based on IP address in the descending order)
Configuration guidelines
· The web interface supports Windows XP, Windows 2000, Windows Server 2003 Enterprise Edition, Windows Server 2003 Standard Edition, Windows Vista, Linux and MAC OS operating systems.
· The web console supports Microsoft Internet Explorer 6.0 SP2 and higher, Mozilla Firefox 3.0 and higher, Google Chrome 2.0.174.0 and higher.
· The web console does not support the Back, Next, Refresh buttons. Using these buttons may result in abnormal display of web pages.
· The Windows firewall limits the number of TCP connections, so when you use IE to log in to the web interface, sometimes you may be unable to open the web interface. To avoid this problem, turn off the Windows firewall before login.
· If the software version of the device changes, when you log in to the device through the web interface, delete the cached data of IE; otherwise, the web page content may not be displayed correctly.
· A list can contain a maximum of 20000 entries if displayed in pages.
Troubleshooting web console
Failure to access devices through the web console
Symptom
You can ping and Telnet to a device, on which the HTTP service is running and the versions of the used operating system and IE browser comply with the requirements of the web console. However, you are unable to access the web console of the device.
Analysis
To access the web console:
· When using the Microsoft Internet Explorer browser, you must enable the security settings, including Run ActiveX controls and plug-ins, Script ActiveX controls marked safe for scripting, and Active scripting.
· When using the Mozilla Firefox browser, you must enable JavaScript.
For IE Browser
1. Launch the Internet Explorer, and select Tools > Internet Options from the main menu.
2. Click the Security tab, and select the content zone where the target website resides.
Figure 8 Internet Explorer settings (I)

3. Click Custom Level.
The Security Settings dialog box appears.
4. Enable Run ActiveX controls and plug-ins, Script ActiveX controls marked safe for scripting, and Active scripting.
Figure 9 Internet Explorer settings (II)
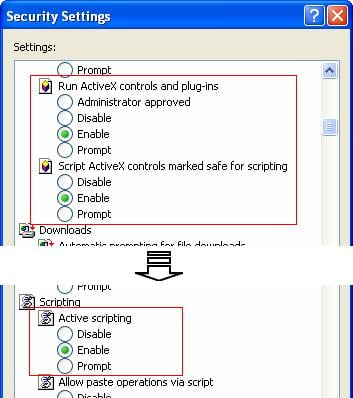
5. Click OK to save your settings.
For Firefox Browser
1. Launch the Firefox browser, and select Tools > Options.
The Options dialog box appears.
2. Click Content, and select the Enable JavaScript box.
Figure 10 Firefox browser settings
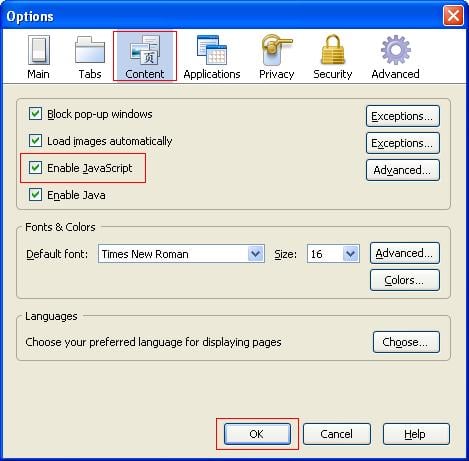
3. Click OK to save your settings.