- Table of Contents
-
- H3C Campus Fixed-Port Switches CLI-Based Quick Start Configuration Guide-6W101
- 01-H3C Devices CLI Reference
- 02-Login Management Quick Start Configuration Guide
- 03-Configuration File Management Quick Start Configruation Guide
- 04-Software Upgrade Quick Start Configuration Guide
- 05-Device Management Quick Start Configuration Guide
- 06-NTP Quick Start Configuration Guide
- 07-RBAC Quick Start Configuration Guide
- 08-IRF Quick Start Configuration Guide
- 09-Ethernet Interface Quick Start Configuration Guide
- 10-VLAN Quick Start Configuration Guide
- 11-Port Isolation Quick Start Configuration Guide
- 12-Loop Detection Quick Start Configuration Guide
- 13-QinQ Quick Start Configuration Guide
- 14-MAC Address Table Quick Start Configuration Guide
- 15-Ethernet Link Aggregation Quick Start Configuration Guide
- 16-Spanning Tree Quick Start Configuration Guide
- 17-DHCP Quick Start Configuration Guide
- 18-OSPF Quick Start Configuration Guide
- 19-Static Routing Quick Start Configuration Guide
- 20-Basic RIP Quick Start Configuration Guide
- 21-PBR Quick Start Configuration Guide
- 22-IGMP Snooping Quick Start Configuration Guide
- 23-Packet Filtering Quick Start Configuration Guide
- 24-QoS Quick Start Configuration Guide
- 25-IP Source Guard Quick Start Configuration Guide
- 26-SSH Quick Start Configuration Guide
- 27-Port Security Quick Start Configuration Guide
- 28-VRRP Quick Start Configuration Guide
- 29-PoE Quick Start Configuration Guide
- 30-Mirroring Quick Start Configuration Guide
- 31-Information Center Quick Start Configuration Guide
- 32-SNMP Quick Start Configuration Guide
- 33-LAN Networks Quick Start Configuration Guide
- Related Documents
-
| Title | Size | Download |
|---|---|---|
| 02-Login Management Quick Start Configuration Guide | 799.38 KB |
Login Management Quick Start Configuration Guide
Copyright © 2022 New H3C Technologies Co., Ltd. All rights reserved.
No part of this manual may be reproduced or transmitted in any form or by any means without prior written consent of New H3C Technologies Co., Ltd.
Except for the trademarks of New H3C Technologies Co., Ltd., any trademarks that may be mentioned in this document are the property of their respective owners.
The information in this document is subject to change without notice.
Contents
Configuring console login with local authentication
Recovering the password of the console port
Recovering the password for Telnet/Web login
Configuring console login
Introduction
The following information uses an example to describe the basic procedure for logging in to the device through a console port.
Network configuration
Figure 1 Connecting to the console port on the device with a DB9-to-RJ45 console cable
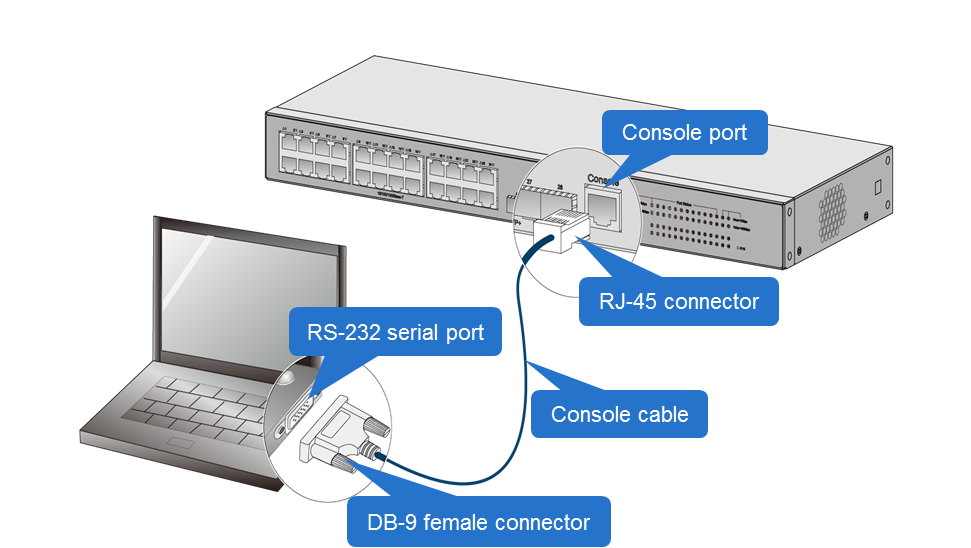
Prerequisites
Before logging in to the device through a console port, make sure the following requirements are met:
· The terminal software PuTTY or VTP is installed.
· Make sure the console cable is supported by the device. Table 1 and Table 2 show the console cables supported by H3C devices. The available console cables vary by device model. For more information, see the installation guide for the device.
|
|
NOTE: The pin definition for an RJ-45 connector of a serial console cable varies by device model. To avoid abnormal configuration terminal display, use a serial console cable provided by H3C, as shown in Table 2. If you use a third-party serial console cable, make sure the pin definition for an RJ-45 connector is as shown in Table 3. |
Table 1 Connection methods and console cables
|
Connection method |
Console cable type |
Configuration terminal-side connector |
Switch-side connector |
|
Using the serial console cable for connection |
DB9-to-RJ45 console cable |
DB-9 female connector |
RJ-45 connector |
|
USB-to-RJ45 console cable |
USB connector |
RJ-45 connector |
|
|
Using the mini USB console cable for connection |
Mini USB console cable |
USB connector |
USB mini-Type B connector |
|
Using the micro USB console cable for connection |
Micro USB console cable |
USB connector |
USB micro-Type B connector |
Table 2 Pictures of console cables
|
Console cable |
Picture |
Product code |
|
DB9-to-RJ45 console cable |
|
04042967 |
|
USB-to-RJ45 console cable |
|
0404A1EE |
|
Mini USB console cable |
|
N/A |
|
Micro USB console cable |
|
N/A |


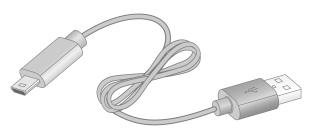
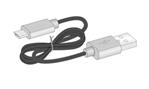
Table 3 DB9-to-RJ45 console cable signal pinout
|
RJ-45 |
Signal |
DB-9 |
Signal |
|
1 |
RTS |
8 |
CTS |
|
2 |
DTR |
6 |
DSR |
|
3 |
TXD |
2 |
RXD |
|
4 |
SG |
5 |
SG |
|
5 |
SG |
5 |
SG |
|
6 |
RXD |
3 |
TXD |
|
7 |
DSR |
4 |
DTR |
|
8 |
CTS |
7 |
RTS |
Procedure
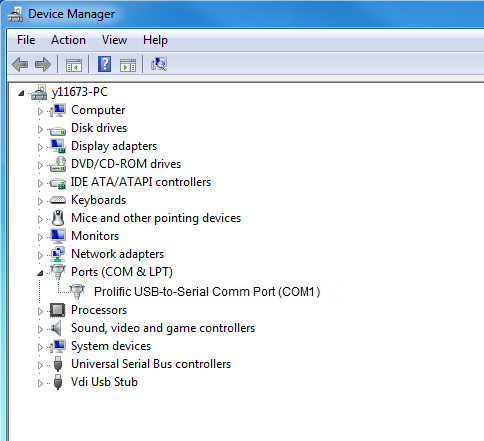
1. As shown in Figure 1, use a DB9-to-RJ45 console cable to connect the PC to the device. Then, right-click Computer, and select Properties > Device Manager > Ports to identify communications ports used on the PC. This example uses port COM1, as shown in Figure 2.
|
|
IMPORTANT: Before using a USB-to-RJ45 console cable, a mini USB console cable, or a micro USB console cable to connect the device to the PC, first download and install the corresponding driver on the PC for port identification. For more information about downloading and installing drivers, see the installation guide for the device. |
Figure 2 Identifying the communications port
2. Open the terminal software on the PC to create a serial port terminal, as shown in Figure 3.
Figure 3 Creating a serial port terminal

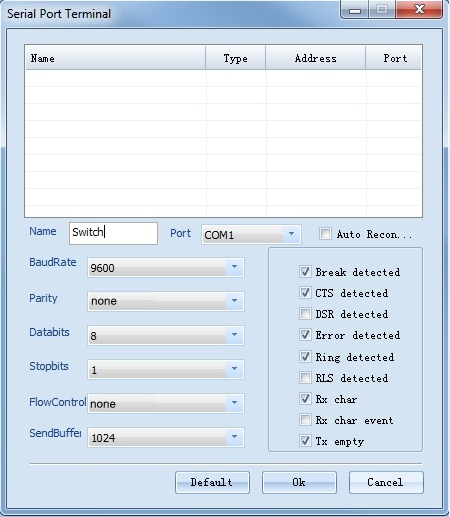
3. As shown in Figure 4, enter device name Switch, select port COM1, configure the terminal parameters as follows, and then click OK:
¡ BaudRate—9600 bps.
¡ Databits—8.
¡ Stopbits—1.
¡ Parity—None.
¡ FlowControl—None.
Figure 4 Configuring terminal parameters
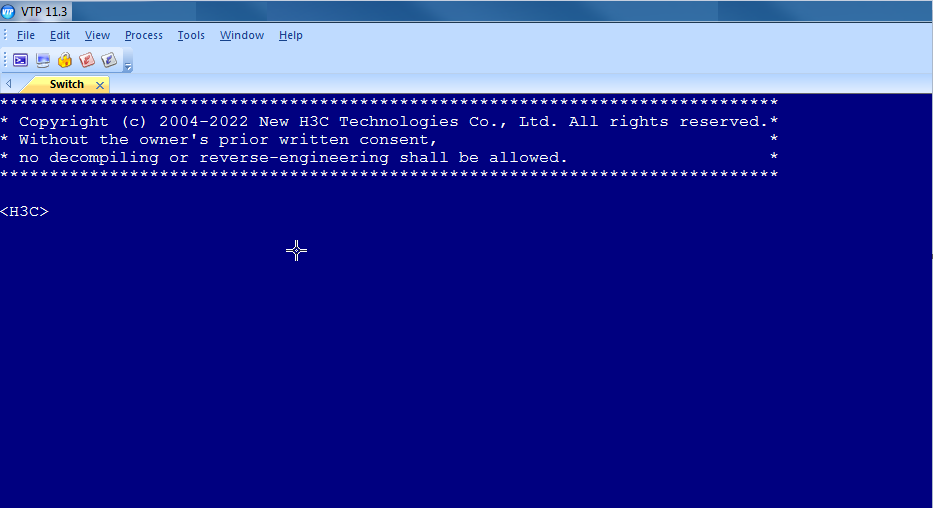
4. Enter the system, as shown in Figure 5, which indicates that the PC is connected to the device by using the console cable successfully.
Figure 5 Connected to the device
Configuration files
None.
Related documentation
· Login management configuration in the fundamentals configuration guide for the device.
· Login management commands in the fundamentals command reference for the device.
Configuring Telnet login
Introduction
The following information uses an example to describe the basic Telnet login procedure.
Network configuration
As shown in Figure 6, users need to log in to the device remotely to manage the device.
· Configure Telnet login to enable users to Telnet to the device.
· Configure Telnet user authentication so a Telnet user must provide the correct username and password at login.
· Assign the user role network-admin to the user.

Prerequisites
· Configure an IP address for the device and obtain the IP address for the Telnet server. If the device and the Telnet server are not in the same subnet, make sure the device and the Telnet server can reach each other.
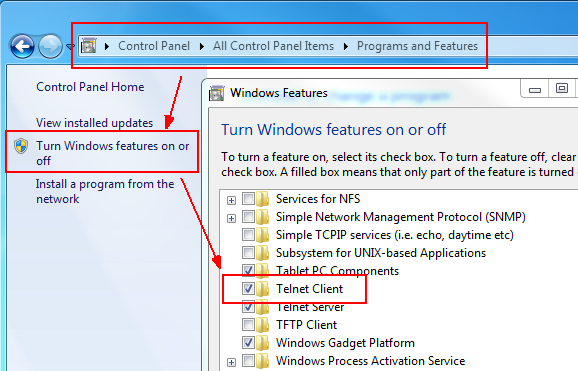
· The Command Prompt window of the Windows system can act as a Telnet client. By default, the Telnet client service is disabled in Windows 7 and later. A shown in Figure 7, to manually enable the Telnet client service, go to Select Control Panel > Programs and Features > Turn Windows features on or off, and then select Telnet Client.
Figure 7 Enable the Telnet Client service
Procedure
# Log in to the device through the console port. (Details not shown.)
# Enter system view and enable Telnet service.
<Sysname> system-view
[Sysname] telnet server enable
# Enable scheme authentication to use AAA to authenticate VTY login users.
[Sysname] line vty 0 63
[Sysname-line-vty0-63] authentication-mode scheme
[Sysname-line-vty0-63] quit
# Create the local user abc. Set the password to hello12345. Assign the network-admin user role to the user.
[Sysname] local-user abc
[Sysname-luser-manage-abc] password simple hello12345
[Sysname-luser-manage-abc] service-type telnet
[Sysname-luser-manage-abc] authorization-attribute user-role network-admin
[Sysname-luser-manage-abc] quit
Verifying the configuration
# Press Win+R, and enter cmd to open the Command Prompt window. Enter Telnet device management IP address, and then press Enter.
C:\Users\Administrator> telnet 192.168.3.1
# Enter the user account and press Enter. Enter the password and press Enter. The password is not displayed. Then, you are logged in to the system.
Login: abc
Password:
******************************************************************************
* Copyright (c) 2004-2019 New H3C Technologies Co., Ltd. All rights reserved.*
* Without the owner's prior written consent, *
* no decompiling or reverse-engineering shall be allowed. *
******************************************************************************
<Sysname>
Configuration files
#
telnet server enable
#
line vty 0 63
authentication-mode scheme
#
local-user abc
password hash $h$6$I2Sg4Llj1qVUWQZ3$JA6KkU3zfVVRg48MM92X6cVpdiqR2JF887PKi3GQMwn
XXXcsWBuz7GIeJZeeNFMmMBaV7DPkKblnb0sGT2axvg==
service-type telnet
authorization-attribute user-role network-admin
#
Related documentation
· Login management configuration in the fundamentals configuration guide for the device.
· Login management commands in the fundamentals command reference for the device.
Configuring console login with local authentication
Introduction
The following information uses an example to describe the basic procedure for logging in to the device through a console port with local authentication.
Prerequisites
Enter the CLI. For more information, see Configuring console login.
Procedure
The local authentication methods include password authentication and scheme authentication.
Password authentication
# Enter system view.
<Sysname> system-view
# Configure password authentication for AUX line 0 (console port).
[Sysname] line aux 0
[Sysname-line-aux0] authentication-mode password
# Set the password to hello12345 in plain text.
[Sysname-line-aux0] set authentication password simple hello12345
# Assign the network-admin user role to the user for the user to manage the device and access all resources.
[Sysname-line-aux0] user-role network-admin
# Return to system view.
[Sysname-line-aux0] quit
# Save the configuration.
[Sysname] save
Scheme authentication
# Enter system view.
<Sysname> system-view
# Configure scheme authentication for AUX line 0 (console port) with username/password authentication.
[Sysname] line aux 0
[Sysname-line-aux0] authentication-mode scheme
# Return to system view.
[Sysname-line-aux0] quit
# Create local user Client. Set the password to hello12345 in plain text. Assign the network-admin user role to the user for the user to manage the device and access all resources.
[Sysname] local-user Client
[Sysname-luser-manage-Client] password simple hello12345
[Sysname-luser-manage-Client] authorization-attribute user-role network-admin
# Specify the terminal service type.
[Sysname-luser-manage-Client] service-type terminal
# Return to system view.
[Sysname-luser-manage-Client] quit
# Save the configuration.
[Sysname] save
Verifying the configuration
Log in to the device after configuration:
· For password authentication, enter password hello12345 as prompted. You are logged in to the system. The password is not displayed.
Line aux0 is available.
Press ENTER to get started.
Password:
******************************************************************************
* Copyright (c) 2004-2021 New H3C Technologies Co., Ltd. All rights reserved.*
* Without the owner's prior written consent, *
* no decompiling or reverse-engineering shall be allowed. *
******************************************************************************
<Sysname>
· For scheme authentication, enter username Client in the Login field and enter password hello12345 as prompted. You area logged in to the system. The password is not displayed.
Line aux0 is available.
Press ENTER to get started.
Login: Client
Password:
******************************************************************************
* Copyright (c) 2004-2021 New H3C Technologies Co., Ltd. All rights reserved.*
* Without the owner's prior written consent, *
* no decompiling or reverse-engineering shall be allowed. *
******************************************************************************
<Sysname>
Configuration files
· Password authentication:
#
line aux 0
authentication-mode password
user-role network-admin
set authentication password hash $h$6$fHkW5VqkiATx1+QX$1c5xycW0hx3f9TJi2vMzCwUS
tFKCPNvM+M8KyCWPc1f1Q4nhm1SUDGp59LGlSHn+tsjjxpxEfA+00Y6yr00Ojg==
#
· Scheme authentication:
#
line aux 0
authentication-mode scheme
#
local-user Client class manage
password hash $h$6$nz1haYkZ7nMNDuD8$61zQWor52DYHpv2KFyCdVHX/d4W9VNRPfyEEU2zyuoB
oOZ5lIS8bLYqUFSjVlBncRIA25FIiz4Js13akTZ3SXw==
service-type terminal
authorization-attribute user-role network-admin
#
Related documentation
· Login management configuration in the fundamentals configuration guide for the device.
· Login management commands in the fundamentals command reference for the device.
Recovering the password of the console port
Introduction
The following information uses examples to describe the methods to recover the password of the console port. Different methods are suitable for different scenarios as follows:
· Method 1—Used when you forget only the password of the console port but Telnet or SSH login is available.
· Methods 2 and 3—Used when all passwords are forgotten, and you cannot log in to the device. In addition, the configuration file must be saved.
· Methods 4—Used when all passwords are forgotten, and you cannot log in to the device. In addition, the configuration file does not need to be saved.
Network configuration
None.
Procedure
|
|
IMPORTANT: As a best practice, use method 1 to recover the password of the console port. If you forget all login passwords, use other methods. |
Method 1
To change the password of the console port after you log in to the device through Telnet or SSH:
1. Log in to the device through Telnet or SSH.
2. Reconfigure the password. For more information, see "Configuring console login with local authentication."
Method 2
To skip the startup configuration file to start up the device from the BootWare menu and change the password of the console port:
|
|
NOTE: BootWare menu varies by device model. This example uses the BootWare menu of the S5130 switch series. |
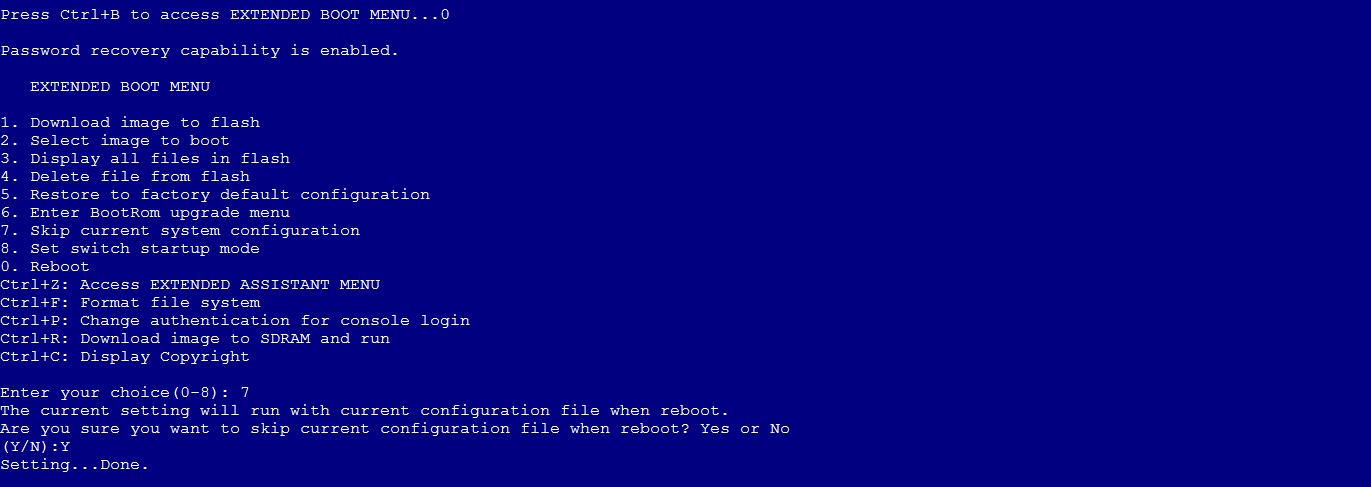
1. Connect a configuration terminal to the console port of the device, and reboot the device.
2. During device reboot, press Ctrl+B to enter the BootWare menu. Then, select Skip current system configuration as shown in Figure 8.
Figure 8 Entering the BootWare menu and selecting Skip current system configuration
3. Select Reboot to reboot the device as shown in Figure 9.

4. During the reboot, press Ctrl+C or Ctrl+D to skip automatic configuration as shown in Figure 10.
Figure 10 Skipping automatic configuration

5. Press Enter to skip the startup configuration file to enter the CLI.
6. View the content of the startup configuration file. The file-name argument specifies the name of the startup configuration file.
<Sysname> more startup.cfg
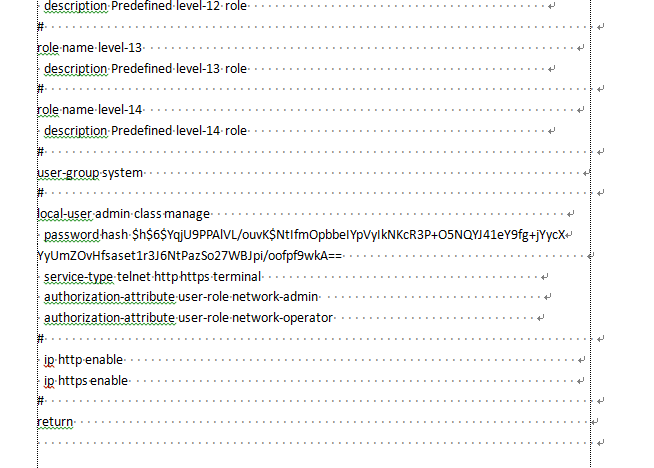
7. Select all command lines in the startup configuration file, copy them, and save them to a local file in TXT format, as shown in Figure 11 and Figure 12.
Figure 11 Copying the content in the startup configuration file
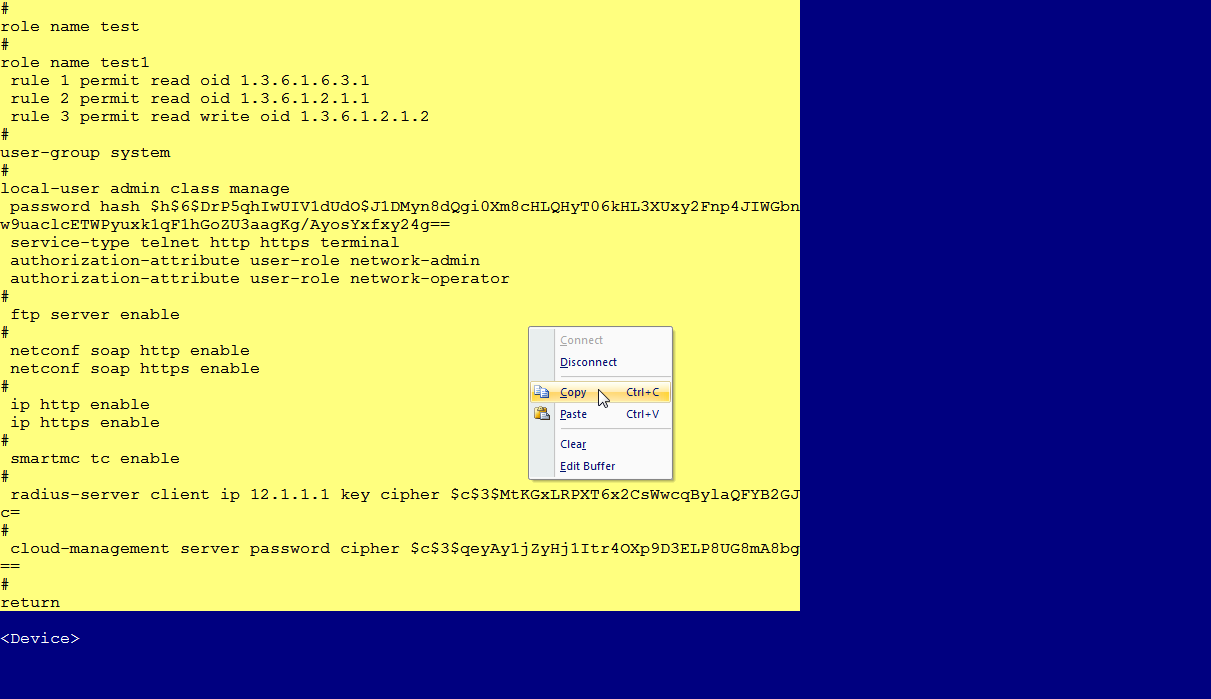
Figure 12 Saving the content of the startup configuration file to a local file
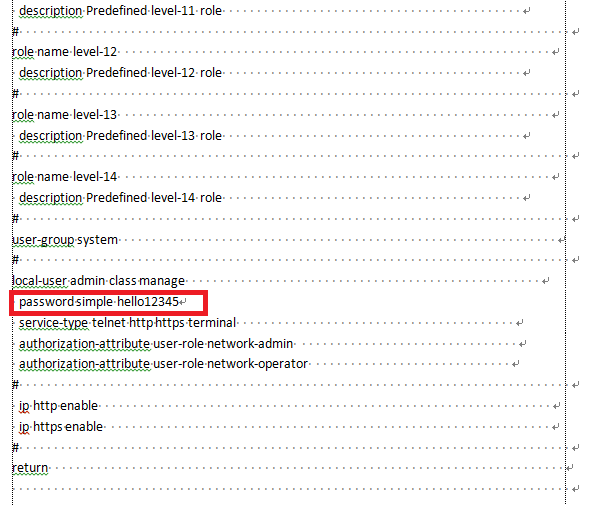
8. Modify the startup configuration file and delete the password or specify a new password, as shown in Figure 13. In this example, the new password is hello12345.
|
|
IMPORTANT: The password for password authentication is configured in AUX line view. The password for scheme authentication is configured in local user view. This example modifies the password for scheme authentication. |
Figure 13 Configuring a new password
9. Enter system view.
<Sysname> system-view
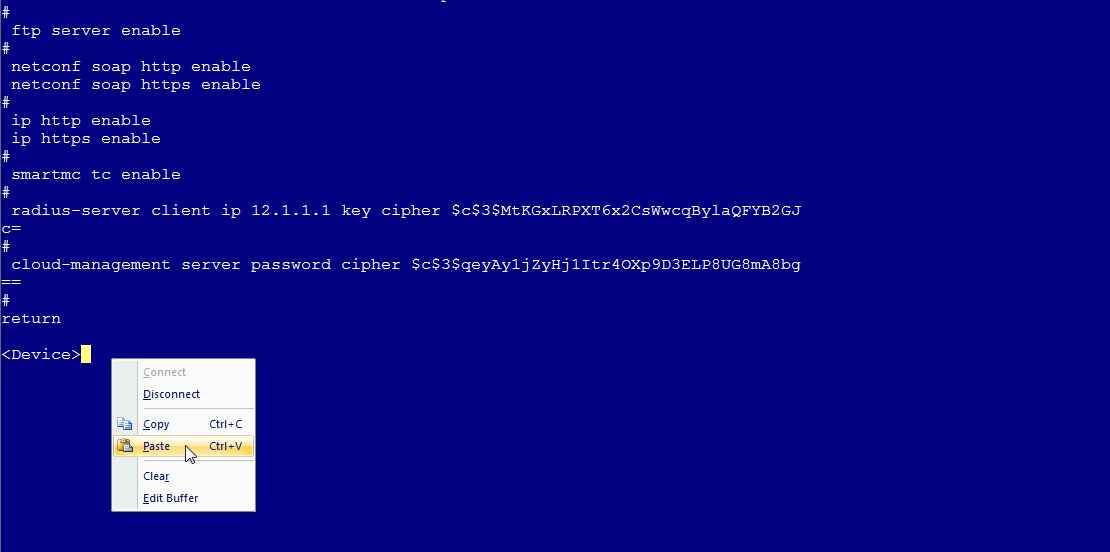
10. Copy the content in the startup configuration file and paste them to the device, as shown in Figure 14.
Figure 14 Pasting the startup configuration file at the CLI
11. Save the configuration.
[Sysname] save
12. Return to user view and reboot the device.
[Sysname] quit
<Sysname> reboot
Method 3
To skip the startup configuration file to start up the device from the BootWare menu and roll back the running configuration:
1. Skip the startup configuration file to start up the device as described in method 2.
<Sysname> system-view
2. Roll back the running configuration to the configuration in a configuration file, for example, startup.cfg. Then, enter N to not save the running configuration.
[Sysname] configuration replace file startup.cfg
Current configuration will be lost, save current configuration? [Y/N]:N
Now replacing the current configuration. Please wait...
Succeeded in replacing current configuration with the file startup.cfg.
3. Reconfigure the password. For more information, see "Configuring console login with local authentication."
Method 4
To skip the startup configuration file to start up the device from the BootWare menu and save the running configuration:
device configuration to the factory defaults:
|
|
CAUTION: The operations in this method clear all settings from the device. Make sure you fully understand the impacts of the operations on services. |
1. Skip the startup configuration file to start up the device as described in method 2, and save the running configuration.
<Sysname> system-view
[Sysname] save
2. Reconfigure the password. For more information, see "Configuring console login with local authentication."
Configuration files
None.
Related documentation
· Login management configuration in the fundamentals configuration guide for the device.
· Configuration file management configuration in the fundamentals configuration guide for the device.
· Login management commands in the fundamentals command reference for the device.
· Configuration file management commands in the fundamentals command reference for the device.
Recovering the password for Telnet/Web login
Introduction
The following information uses an example to describe the method to use when a user forgets Telnet or Web login password.
Network configuration
None.
Procedure
When the password for Telnet login is forgotten
Log in to the device through the console port, and reconfigure the password for Telnet login. For more information, see "Configuring Telnet login."
When the password for Web login is forgotten
Log in to the device through the console port, and reconfigure the password for Web login as follows:
<Sysname> system-view
# Enter the view of the target Web user and set password to hello12345. This example uses user client.
[Sysname] local-user client
[Sysname-luser-manage-client] password simple hello12345
[Sysname-luser-manage-client] quit
# Save the configuration.
[Sysname] save
Configuration files
· Telnet login:
For more information, see "Configuring Telnet login."
· Web login:
#
ip http enable
#
ip https enable
#
local-user client
password hash $h$6$I2Sg4Llj1qVUWQZ3$JA6KkU3zfVVRg48MM92X6cVpdiqR2JF887PKi3GQMwn
XXXcsWBuz7GIeJZeeNFMmMBaV7DPkKblnb0sGT2axvg==
service-type http https
authorization-attribute user-role network-admin
#
Related documentation
· Login management configuration in the fundamentals configuration guide for the device.
· Login management commands in the fundamentals command reference for the device.