- Table of Contents
-
- H3C S9500 Command Manual-Release1648[v1.24]-08 System Volume
- 00-1Cover
- 01-Command Line Interface Commands
- 02-Login and User Interface Commands
- 03-FTP and TFTP Commands
- 04-HA Commands
- 05-NQA Commands
- 06-NetStream Commands
- 07-NTP Commands
- 08-RMON Commands
- 09-SNMP Commands
- 10-Packet Statistics Accounting Commands
- 11-Device Management Commands
- 12-Configuration File Management Commands
- 13-File System Management Commands
- 14-Cluster Management Commands
- 15-System Maintenance and Debugging Commands
- 16-Information Center Commands
- 17-PoE Commands
- 18-Clock Module Commands
- 19-ACSEI Server Commands
- 20-OAP Module Commands
- Related Documents
-
| Title | Size | Download |
|---|---|---|
| 01-Command Line Interface Commands | 44.87 KB |
Table of Contents
Chapter 1 Command Line Interface Commands
1.1 Command Line Interface Commands
1.1.5 super password authentication-mode
Chapter 1 Command Line Interface Commands
1.1 Command Line Interface Commands
1.1.1 command-privilege level
Syntax
command-privilege level level view view command
undo command-privilege view view command
View
System view
Parameters
level: Specifies the command level, ranging from 0 to 3.
view: Specifies the command view, which can be any of the views supported by the switch.
command: Specifies the command to be configured. When entering a command, enter its keywords completely. For a parameter of the command, you can enter any valid value completely.
Description
Use the command-privilege level command to configure the priority of the command in a specified view.
Use the undo command-privilege view command to restore the default command priority.
The command levels include visit, monitor, system, and manage, which are identified as 0 through 3 respectively. An administrator assigns authorities as per user requirements and allows them to operate in corresponding views. When a user logs into the switch, the command level that can be accessed depends on two points. One is the command level that the user can access, and the other is the command level that can be accessed from this user interface. If the two levels are different, the former will be taken. For example, the command level of VTY 0 user interface is 1, however, user Tom has the right to access commands of level 3; if Tom logs in from VTY 0 user interface, he can access commands of level 3 and lower.
By default, ping, tracert, and telnet are at visit level (0); display and debugging are at monitor level (1); all the configuration commands are at system level (2); and FTP, TFTP and commands for file system operations are at manage level (3).
& Note:
When using the undo command-privilege view command to cancel the privilege setting, the command argument specified in the undo command-privilege view command must the same as the command argument set previously.
Examples
# Configure the level of the interface interface-type interface-number command as 0. The interface-type interface-number argument is the parameter of this command, and you can enter valid values for it. Ethernet 3/1/1 is taken as example.
<H3C>system-view
System View: return to User View with Ctrl+Z.
[H3C] command-privilege level 0 view system interface
# Configure the level of the interface interface-type interface-number command as 0. Specify the interface-type interface-number argument as Vlan-interface 1.
<H3C> system-view
System View: return to User View with Ctrl+Z.
[H3C] command-privilege level 0 view system interface Vlan-interface 1
# Restore the level of the interface interface-type interface-number command to the default.
<H3C> system-view
System View: return to User View with Ctrl+Z.
[H3C] command-privilege level 0 view system interface Vlan-interface 2
[H3C]display current-configuration | include command-privilege
command-privilege level 0 view system interface Vlan-interface 2
[H3C] undo command-privilege view system interface Vlan-interface 2
1.1.2 display history-command
Syntax
display history-command [Command-Number] [ | { begin | include | exclude } Match-string ]
View
Any view
Parameters
Command-Number: The number of history commands the user wants to query. The value range is 1 to 256.
|: Operator, indicating that a regular expression follows.
begin: Displays all commands starting from the one that matches the match string.
include: Displays only the command that matches the string.
exclude: Displays only the commands that do not match the match string.
Match-string: The regular expression to match.
Description
Use the display history-command command to query selectively the history commands. All the history commands are stored in the history command buffer. When the history command buffer is full, the oldest information in the buffer will be replaced by new information.
The number of history commands obtained through the display history-command command, Command-Number, depends on the size of the history command buffer set through the history-command max-size command, and Command-Number should not be bigger than the size of the history command buffer Max-size. If the specified Command-Number is bigger than the Max-size, all the commands in the history command buffer will be queried.
Refer to Figure 1-1.
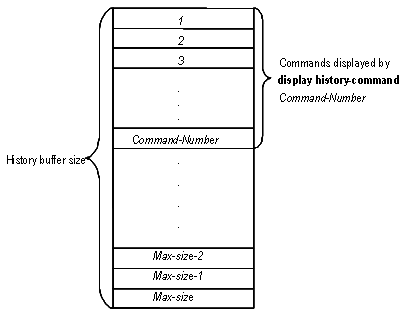
Figure 1-1 Relation between history buffer size and the command-number argument
You can either specify the number of commands to be queried (Command-Number) or input a string to query commands that match the string. You can use the two methods separately or in combination.
l If you enter a value for the command-number argument, the command-number pieces of commands executed recently will be displayed.
l If you specify a regular expression “| { begin | include | exclude } Match-string”, all the commands that have been successfully executed by the user and that match the regular expression will be displayed.
l If you specify both the number of commands Command-Number and a regular expression “| { begin | include | exclude } Match-string”, the system will display the commands that match the regular expression among the command-number pieces of commands executed recently.
Related commands: history-command max-size.
Examples
# Display all history commands in the buffer.
<H3C> display history-command
system-view
user-interface vty 0
user-interface vty 0 4
history-command max-size 100
quit
display vlan
display vlan all
acl name lc
interface Vlan-interface 1
ip address 10.11.113.14 24
quit
quit
# Display five commands executed recently in the history command buffer.
<H3C> display history-command 5
acl name lc
interface Vlan-interface 1
ip address 10.11.113.14 24
quit
quit
# Display all the buffered history commands that match the specified regular expression.
<H3C>display history-command | begin ip
ip address 10.11.113.14 24
quit
quit
display history-command
# Display all the buffered history commands that do not match the specified regular expression.
<H3C>display history-command | exclude ip
system-view
user-interface vty 0
user-interface vty 0 4
history-command max-size 100
quit
display vlan
display vlan all
acl name lc
interface Vlan-interface 1
quit
quit
display history-command
display history-command 5
display history-command | include 10\.11\.113\.14
display history-command 5
1.1.3 super
Syntax
super [ level ]
View
User view
Parameters
level: User level, ranging 0 to 3. The default value is 3.
Description
Use the super command to enable the user to change to user level from the current user level. The user may need to input a correct username and password, or just a correct password to perform remote or local authentication. Only after the user passes the authentication can the user level be changed; otherwise, the former user level will not change.
Login users are classified into four levels that correspond to the four command levels respectively. After users of different levels log in, they can only use commands at the levels that are equal to or lower than their own level.
Related commands: super password, quit.
Examples
# Change to user level 3 from the current user level.
<H3C> super 3
Password:
1.1.4 super password
Syntax
super password [ level level ] { simple | cipher } password
undo super password [ level level ]
View
System view
Parameters
level: Specifies the entering password of the specified priority, ranging from 1 to 3. The default value is 3, i.e. user level is not specified. It means the password to be set is used for entering level 3.
simple: Displays the current password with plain text.
cipher: Displays the current password with cipher text.
password: If the authentication is in the simple mode, the password must be in plain text. If the authentication is in the cipher mode, the password can either be in encrypted text or in plain text. The result is determined by the input. A plain text password is a string of 1 to 16 consecutive characters, for example, test918. The length of an encrypted password must be 24 digits and in encrypted text, for example, _(TT8F]Y\5SQ=^Q`MAF4<1!!.
Description
Use the super password command to configure the password for changing the user from a lower level to a higher level. In order to prevent unauthorized users from illegal intrusion, user ID authentication is performed when users switch from a lower level to a higher level. For security purpose, the password entered is not displayed when users switch to another user level. Users will remain at the original user level if they have tried three times but failed to enter the correct authentication information. Use the undo super password command to cancel the current settings.
The password in plain text is required when performing authentication, regardless whether the configuration is plain text or encrypted text.
Examples
# Configure the password to zbr for changing the user from the current level to level 3.
<H3C>system-view
System View: return to User View with Ctrl+Z.
[H3C] super password level 3 simple zbr
1.1.5 super password authentication-mode
Syntax
super password authentication-mode { local | hwtacacs hwtacacs-scheme [ local ] }
View
System view
Parameters
hwtacacs-scheme: Name of the HWTACACS scheme used to authenticate the super password, a string of no more than 32 characters.
Description
Use the super password authentication-mode local command to authenticate the super password by using local authentication mode, that is, authenticate the super password based on the super password configured on the device.
Use the super password authentication-mode hwtacacs hwtacacs-scheme [ local ] command to authenticate the super password by using the hwtacacs server; if the local keyword is specified, it indicates to authenticate the super password using the local authentication mode if the specified hwtacacs server does not respond normally.
& Note:
You can specify one HWTACACS scheme to authenticate the super password only; if you specify another HWTACACS scheme, the original one will be overwritten.
By default, local authentication mode is used to authenticate the super password.
Examples
# Authenticate the super password using the HWTACACS server named hwt.
<H3C> system-view
System View: return to User View with Ctrl+Z.
[H3C] super password authentication-mode hwtacacs hwt