- Table of Contents
-
- H3C S3100-52P Operation Manual-Release 1602(V1.01)
- 00-1Cover
- 00-2Product Overview
- 01-CLI Operation
- 02-Login Operation
- 03-Configuration File Management Operation
- 04-VLAN Operation
- 05-IP Address and Performance Operation
- 06-Voice VLAN Operation
- 07-GVRP Operation
- 08-Port Basic Configuration Operation
- 09-Link Aggregation Operation
- 10-Port Isolation Operation
- 11-Port Security-Port Binding Operation
- 12-DLDP Operation
- 13-MAC Address Table Management Operation
- 14-MSTP Operation
- 15-Static Route Operation
- 16-Multicast Operation
- 17-802.1x and System Guard Operation
- 18-AAA Operation
- 19-Web Authentication Operation
- 20-MAC Address Authentication Operation
- 21-ARP Operation
- 22-DHCP Operation
- 23-ACL Operation
- 24-QoS-QoS Profile Operation
- 25-Mirroring Operation
- 26-Stack-Cluster Operation
- 27-SNMP-RMON Operation
- 28-NTP Operation
- 29-SSH Operation
- 30-File System Management Operation
- 31-FTP-SFTP-TFTP Operation
- 32-Information Center Operation
- 33-System Maintenance and Debugging Operation
- 34-VLAN-VPN Operation
- 35-HWPing Operation
- 36-IPv6 Management Operation
- 37-DNS Operation
- 38-Smart Link-Monitor Link Operation
- 39-Appendix
- Related Documents
-
| Title | Size | Download |
|---|---|---|
| 29-SSH Operation | 1.5 MB |
1.1.3 Asymmetric Key Algorithm
1.2 SSH Server and Client Configuration Task List
1.3 Configuring the SSH Server
1.3.1 Configuring the User Interfaces for SSH Clients
1.3.2 Configuring the SSH Management Functions
1.3.3 Configuring the SSH Server to Be Compatible with SSH1 Clients
1.3.4 Generating/Destroying Key Pairs
1.3.5 Creating an SSH User and Specifying an Authentication Type
1.3.6 Specifying a Service Type for an SSH User
1.3.7 Configuring the Public Key of a Client on the Server
1.3.8 Assigning a Public Key to an SSH User
1.3.9 Exporting the RSA or DSA Public Key
1.4 Configuring the SSH Client
1.4.1 SSH Client Configuration Task List
1.4.2 Configuring an SSH Client that Runs SSH Client Software
1.4.3 Configuring an SSH Client Assumed by an SSH2-Capable Switch
1.5 Displaying and Maintaining SSH Configuration
1.6 Comparison of SSH Commands with the Same Functions
1.7 SSH Configuration Examples
1.7.1 When Switch Acts as Server for Local Password Authentication
1.7.2 When Switch Acts as Server for Password and RADIUS Authentication
1.7.3 When Switch Acts as Server for Password and HWTACACS Authentication
1.7.4 When Switch Acts as Server for Publickey Authentication
1.7.5 When Switch Acts as Client for Password Authentication
1.7.6 When Switch Acts as Client for Publickey Authentication
1.7.7 When Switch Acts as Client and First-Time Authentication is not Supported
Chapter 1 SSH Configuration
& Note:
The DSA algorithm is newly added in SSH configuration. Click the following links for related information:
l Generating/Destroying Key Pairs
l Creating an SSH User and Specifying an Authentication Type
When configuring SSH, go to these sections for information you are interested:
l SSH Server and Client Configuration Task List
l Displaying and Maintaining SSH Configuration
l Comparison of SSH Commands with the Same Functions
1.1 SSH Overview
1.1.1 Introduction to SSH
Secure Shell (SSH) is a protocol that provides secure remote login and other security services in insecure network environments. In an SSH connection, data are encrypted before being sent out and decrypted after they reach the destination. This prevents attacks such as plain text password interception. Besides, SSH also provides powerful user authentication functions that prevent attacks such as DNS and IP spoofing.
SSH adopts the client-server model. The device can be configured as an SSH client or an SSH server. In the former case, the device establishes a remote SSH connection to an SSH server. In the latter case, the device provides connections to multiple clients.
Furthermore, SSH can also provide data compression to increase transmission speed, take the place of Telnet or provide a secure “channel” for FTP.
![]() Caution:
Caution:
l Currently, the device that serves as an SSH server supports two SSH versions: SSH2 and SSH1, and the device that serves as an SSH client supports only SSH2.
l Unless otherwise noted, SSH refers to SSH2 throughout this document.
1.1.2 Algorithm and Key
Algorithm is a set of transformation rules for encryption and decryption. Information without being encrypted is known as plain text, while information that is encrypted is known as cipher text. Encryption and decryption are performed using a string of characters called a key, which controls the transformation between plain text and cipher text, for example, changing the plain text into cipher text or cipher text into plain text.

Figure 1-1 Encryption and decryption
Key-based algorithm is usually classified into symmetric key algorithm and asymmetric key algorithm.
1.1.3 Asymmetric Key Algorithm
Asymmetric key algorithm means that a key pair exists at both ends. The key pair consists of a private key and a public key. The public key is effective for both ends, while the private key is effective only for the local end. Normally you cannot use the private key through the public key.
Asymmetric key algorithm encrypts data using the public key and decrypts the data using the private key, thus ensuring data security.
You can also use the asymmetric key algorithm for data signature. For example, user 1 adds his signature to the data using the private key, and then sends the data to user 2. User 2 verifies the signature using the public key of user 1. If the signature is correct, this means that the data originates from user 1.
Both Revest-Shamir-Adleman Algorithm (RSA) and Digital Signature Algorithm (DSA) are asymmetric key algorithms. RSA is used for data encryption and signature, whereas DSA is used for adding signature.
& Note:
Currently, SSH supports both RSA and DSA.
1.1.4 SSH Operating Process
The session establishment between an SSH client and the SSH server involves the following five stages:
Table 1-1 Stages in establishing a session between the SSH client and server
|
Stages |
Description |
|
Version negotiation |
SSH1 and SSH2 are supported. The two parties negotiate a version to use. |
|
Key and algorithm negotiation |
SSH supports multiple algorithms. The two parties negotiate an algorithm for communication. |
|
Authentication |
The SSH server authenticates the client in response to the client’s authentication request. |
|
Session request |
This client sends a session request to the server. |
|
Data exchange |
The client and the server start to communicate with each other. |
I. Version negotiation
l The server opens port 22 to listen to connection requests from clients.
l The client sends a TCP connection request to the server. After the TCP connection is established, the server sends the first packet to the client, which includes a version identification string in the format of “SSH-<primary protocol version number>.<secondary protocol version number>-<software version number>”. The primary and secondary protocol version numbers constitute the protocol version number, while the software version number is used for debugging.
l The client receives and resolves the packet. If the protocol version of the server is lower but supportable, the client uses the protocol version of the server; otherwise, the client uses its own protocol version.
l The client sends to the server a packet that contains the number of the protocol version it decides to use. The server compares the version carried in the packet with that of its own to determine whether it can cooperate with the client.
l If the negotiation is successful, the server and the client go on to the key and algorithm negotiation. If not, the server breaks the TCP connection.
& Note:
All the packets above are transferred in plain text.
II. Key negotiation
l The server and the client send algorithm negotiation packets to each other, which contain public key algorithm lists supported by the server and the client, encrypted algorithm list, message authentication code (MAC) algorithm list, and compressed algorithm list.
l The server and the client calculate the final algorithm according to the algorithm lists supported.
l The server and the client generate the session key and session ID based on the Diffie-Hellman (DH) exchange algorithm and the host key pair.
l Then, the server and the client get the same session key and use it for data encryption and decryption to secure data communication.
III. Authentication negotiation
The negotiation steps are as follows:
l The client sends an authentication request to the server. The authentication request contains username, authentication type, and authentication-related information. For example, if the authentication type is password, the content is the password.
l The server starts to authenticate the user. If authentication fails, the server sends an authentication failure message to the client, which contains the list of methods used for a new authentication process.
l The client selects an authentication type from the method list to perform authentication again.
l The above process repeats until the authentication succeeds, or the connection is torn down when the authentication times reach the upper limit.
SSH provides two authentication methods: password authentication and publickey authentication.
l In password authentication, the client encrypts the username and password, encapsulates them into a password authentication request, and sends the request to the server. Upon receiving the request, the server decrypts the username and password, compares them with those it maintains, and then informs the client of the authentication result.
l The publickey authentication method authenticates clients using digital signatures. Currently, the device supports two publickey algorithms to implement digital signatures: RSA and DSA. The client sends to the server a publickey authentication request containing its user name, public key and algorithm. The server verifies the public key. If the public key is invalid, the authentication fails; otherwise, the server generates a digital signature to authenticate the client, and then sends back a message to inform the success or failure of the authentication.
IV. Session request
After passing authentication, the client sends a session request to the server, while the server listens to and processes the request from the client. If the client passes authentication, the server sends back to the client an SSH_SMSG_SUCCESS packet and goes on to the interactive session stage with the client. Otherwise, the server sends back to the client an SSH_SMSG_FAILURE packet, indicating that the processing fails or it cannot resolve the request. The client sends a session request to the server, which processes the request and establishes a session.
V. Data exchange
In this stage, the server and the client exchanges data in this way:
l The client encrypts and sends the command to be executed to the server.
l The server decrypts and executes the command, and then encrypts and sends the result to the client.
l The client decrypts and displays the result on the terminal.
1.2 SSH Server and Client Configuration Task List
Many devices can act as the SSH server and client. This document describes two cases:
l The H3C switch acts as the SSH server to cooperate with software that supports the SSH client functions.
l The H3C switch acts as the SSH server to cooperate with another H3C switch that acts as an SSH client.
Complete the following tasks to configure the SSH server and clients:
|
Server |
Client |
Server side configuration |
Client side configuration |
|
An H3C switch |
Software that supports the SSH client functions |
||
|
An H3C switch |
Another H3C switch |
1.3 Configuring the SSH Server
The session establishment between an SSH client and the SSH server involves five stages. Similarly, SSH server configuration involves five aspects, as shown in the following table.
Table 1-2 Complete the following tasks to configure the SSH server:
|
Task |
Remarks |
|
|
Preparation |
Required |
|
|
Optional |
||
|
Version |
Configuring the SSH Server to Be Compatible with SSH1 Clients |
Optional This task determines which SSH versions the server should support. By default, the SSH server is compatible with SSH1 clients. |
|
Key |
Required |
|
|
Authentication |
Required |
|
|
Optional By default, an SSH user can use the service type of stelnet. |
||
|
Data exchange |
l Not necessary when the authentication mode is password. l Required when the authentication mode is publickey. |
|
|
l Not necessary when the authentication mode is password. l Required when the authentication mode is publickey. |
||
|
Optional If a client does not support first-time authentication, you need to export the server’s public key and configure the key on the client. |
||
& Note:
The SSH server needs to cooperate with an SSH client to complete the interactions between them. For SSH client configuration, refer to Configuring the SSH Client.
1.3.1 Configuring the User Interfaces for SSH Clients
An SSH client accesses the device through a VTY user interface. Therefore, you need to configure the user interfaces for SSH clients to allow SSH login. Note that the configuration takes effect at the next login.
Table 1-3 Follow these steps to configure the user interface for SSH clients:
|
To do... |
Use the command... |
Remarks |
|
Enter system view |
system-view |
— |
|
Enter user interface view of one or more user interfaces |
user-interface vty first-number [ last-number ] |
— |
|
Configure the authentication mode as scheme |
authentication-mode scheme [ command-authorization ] |
Required By default, the user interface authentication mode is password. |
|
Specify the supported protocol(s) |
protocol inbound { all |ssh | telnet } |
Optional By default, both Telnet and SSH are supported. |
![]() Caution:
Caution:
l If you have configured a user interface to support SSH protocol, you must configure AAA authentication for the user interface by using the authentication-mode scheme command to ensure successful login.
l On a user interface, if the authentication-mode password or authentication-mode none command has been executed, the protocol inbound ssh command is not available. Similarly, if the protocol inbound ssh command has been executed, the authentication-mode password and authentication-mode none commands are not available.
1.3.2 Configuring the SSH Management Functions
The SSH server provides a number of management functions. Some functions can prevent illegal operations such as malicious password guess, further guaranteeing the security of SSH connections. Some other functions allow you to specify the source IP address or interface for the SSH server to provide SSH access services for clients, increasing the service manageability.
Table 1-4 Follow these steps to configure SSH management functions:
|
To do... |
Use the command... |
Remarks |
|
Enter system view |
system-view |
— |
|
Set the SSH authentication timeout time |
ssh server timeout seconds |
Optional By default, the SSH authentication timeout time is 60 seconds. |
|
Set the number of SSH authentication retry attempts |
ssh server authentication-retries times |
Optional By default, the number of SSH authentication retry attempts is 3. |
|
Set the RSA server key update interval |
ssh server rekey-interval hours |
Optional By default, the system does not update the RSA server keys. |
|
Configure a login header |
header shell text |
Optional By default, no login header is configured. |
|
Specify a source IP address for the SSH server |
ssh-server source-ip ip-address |
Optional By default, the system determines the IP address for clients to access. |
|
Specify a source interface for the SSH server |
ssh-server source-interface interface-type interface-number |
Optional By default, the system determines the interface for clients to access. |
![]() Caution:
Caution:
l You can configure a login header only when the service type is stelnet. For configuration of service types, refer to Specifying a Service Type for an SSH User.
l For details of the header command, refer to the corresponding section in Login Command.
1.3.3 Configuring the SSH Server to Be Compatible with SSH1 Clients
Follow these steps to configure the SSH server to be compatible with SSH1 clients:
|
To do... |
Use the command... |
Remarks |
|
Enter system view |
system-view |
— |
|
Configure the SSH server to be compatible with SSH1 clients |
ssh server compatible-ssh1x enable |
Optional By default, the SSH server is compatible with SSH1 clients. |
1.3.4 Generating/Destroying Key Pairs
This configuration task lets you generate or destroy a key pair. You must generate an RSA and DSA key pair on the server for an SSH client to log in successfully. When generating a key pair, you will be prompted to enter the key length in bits, which is between 512 and 2048. The default length is 1024. In case a key pair already exists, the system will ask whether to replace the existing key pair.
Table 1-5 Follow these steps to create or destroy key pairs:
|
To do... |
Use the command... |
Remarks |
|
Enter system view |
system-view |
— |
|
Generate an RSA key pair |
public-key local create rsa |
Required By default, no RSA key pair is created. |
|
Destroy the RSA key pair |
public-key local destroy rsa |
Optional Use the command to destroy the generated RSA key pair. |
|
Generate a DSA key pair |
public-key local create dsa |
Required By default, no DSA key pair is created. |
|
Destroy the DSA key pair |
public-key local destroy dsa |
Optional Use the command to destroy the generated DSA key pair. |
& Note:
l The SSH server’s key pairs are for generating session keys and for SSH clients to authenticate the server. As different clients may support different public key algorithms, the server may use different key pair for negotiation with different clients. Therefore, you need to generate both RSA and DSA key pairs on the server to help ensure that clients can log in to the server successfully.
l The command for generating a key pair can survive a reboot. You only need to configure it once.
l Some third-party software, for example, WinSCP, requires that the modulo of a public key must be greater than or equal to 768. Therefore, a local key pair of more than 768 bits is recommended.
1.3.5 Creating an SSH User and Specifying an Authentication Type
This task is to create an SSH user and specify an authentication type for it. Specifying an authentication type for a new user is a must to get the user login.
Table 1-6 Follow these steps to configure an SSH user and specify an authentication type for the user:
|
To do... |
Use the command... |
Remarks |
|
Enter system view |
system-view |
— |
|
Specify the default authentication type for all SSH users |
ssh authentication-type default { all | password | password-publickey | publickey } |
Use either command. By default, no SSH user is created and no authentication type is specified. Note that: If both commands are used and different authentication types are specified, the authentication type specified with the ssh user authentication-type command takes precedence. |
|
ssh user username |
||
|
Create an SSH user, and specify an authentication type for it |
ssh user username authentication-type { all | password | password-publickey | publickey } |
![]() Caution:
Caution:
l For password authentication type, the username argument must be consistent with the valid user name defined in AAA; for publickey authentication, the username argument is the SSH local user name, so that there is no need to configure a local user in AAA.
l If the default authentication type for SSH users is password and local AAA authentication is adopted, you need not use the ssh user command to create an SSH user. Instead, you can use the local-user command to create a user name and its password and then set the service type of the user to SSH.
l If the default authentication type for SSH users is password and remote authentication (RADIUS authentication, for example) is adopted, you need not use the ssh user command to create an SSH user, because it is created on the remote server. And the user can use its username and password configured on the remote server to access the network.
l Under the publickey authentication mode, the level of commands available to a logged-in SSH user can be configured using the user privilege level command on the server, and all the users with this authentication mode will enjoy this level.
l Under the password or password-publickey authentication mode, the level of commands available to a logged-in SSH user is determined by the AAA scheme. Meanwhile, for different users, the available levels of commands are also different.
l Under the all authentication mode, the level of commands available to a logged-in SSH user is determined by the actual authentication method used for the user.
1.3.6 Specifying a Service Type for an SSH User
Table 1-7 Follow these steps to specify the service type for an SSH user:
|
To do... |
Use the command... |
Remarks |
|
Enter system view |
system-view |
— |
|
Specify a service type for an SSH user |
ssh user username service-type { stelnet | sftp | all } |
Required By default, an SSH user can use the service type of stelnet. |
![]() Caution:
Caution:
If the ssh user service-type command is executed with a username that does not exist, the system will automatically create the SSH user. However, the user cannot log in unless you specify an authentication type for it.
1.3.7 Configuring the Public Key of a Client on the Server
This configuration is not necessary if the password authentication mode is configured for SSH users.
With the publickey authentication mode configured for an SSH client, you must configure the client’s RSA or DSA host public key(s) on the server for authentication.
You can manually configure the public key or import it from a public key file. In the former case, you can manually copy the client’s public key to the server. In the latter case, the system automatically converts the format of the public key generated by the client to complete the configuration on the server, but the client’s public key should be transferred from the client to the server beforehand through FTP/TFTP.
Table 1-8 Follow these steps to configure the public key of a client manually:
|
To do... |
Use the command... |
Remarks |
|
Enter system view |
system-view |
— |
|
Enter public key view |
public-key peer keyname |
Required |
|
Enter public key edit view |
public-key-code begin |
— |
|
Configure a public key for the client |
Enter the content of the public key |
When you input the key data, spaces are allowed between the characters you input (because the system can remove the spaces automatically); you can also press <Enter> to continue your input at the next line. But the key you input should be a hexadecimal digit string coded in the public key format. |
|
Return to public key view from public key edit view |
public-key-code end |
— |
|
Exit public key view and return to system view |
peer-public-key end |
— |
Table 1-9 Follow these steps to import the RSA public key from a public key file:
|
To do... |
Use the command... |
Remarks |
|
Enter system view |
system-view |
— |
|
Import the public key from a public key file |
public-key peer keyname import sshkey filename |
Required |
1.3.8 Assigning a Public Key to an SSH User
![]() Caution:
Caution:
This configuration task is unnecessary if the SSH user’s authentication mode is password.
For the publickey authentication mode, you must specify the client’s public key on the server for authentication.
Table 1-10 Follow these steps to assign a public key for an SSH user:
|
To do... |
Use the command... |
Remarks |
|
Enter system view |
system-view |
— |
|
Assign a public key to an SSH user |
ssh user username assign publickey keyname |
Required If you issue this command multiple times, the last command overrides the previous ones. |
1.3.9 Exporting the RSA or DSA Public Key
You can display the generated RSA or DSA public key on the screen in a specified format or export it to a specified file, so that you can configure the key at a remote end when necessary.
Table 1-11 Follow these steps to export the RSA public key:
|
To do... |
Use the command... |
Remarks |
|
Enter system view |
system-view |
— |
|
Display the RSA key on the screen in a specified format or export it to a specified file |
public-key local export rsa { openssh | ssh1 | ssh2 } [ filename ] |
Required |
Table 1-12 Follow these steps to export the DSA public key:
|
To do... |
Use the command... |
Remarks |
|
Enter system view |
system-view |
— |
|
Display the DSA key on the screen in a specified format or export it to a specified file |
public-key local export dsa { openssh | ssh2 } [ filename ] |
Required |
& Note:
The DSA public key format can be SSH2 and OpenSSH, while the RSA public key format can be SSH1, SSH2 and OpenSSH.
1.4 Configuring the SSH Client
The configurations required on the SSH client are related to the authentication mode that the SSH server uses. In addition, if an SSH client does not support first-time authentication, you need to configure the public key of the server on the client, so that the client can authenticate the server.
1.4.1 SSH Client Configuration Task List
Table 1-13 Complete the following tasks to configure the SSH client:
|
Scenario |
SSH client configuration task |
|
|
For a client running SSH client software |
For a client assumed by an SSH2-capable switch |
|
|
The authentication mode is password |
||
|
The authentication mode is publickey |
||
|
Whether first-authentication is supported |
— |
|
1.4.2 Configuring an SSH Client that Runs SSH Client Software
A variety of SSH client software are available, such as PuTTY and OpenSSH. For an SSH client to establish a connection with an SSH server, use the following commands:
Complete the following tasks to configure an SSH client that runs SSH client software:
|
Task |
Remarks |
|
Required for publickey authentication; unnecessary for password authentication |
|
|
Required |
|
|
Required |
|
|
Required |
|
|
Required for password authentication; unnecessary for publickey authentication |
|
|
Required for publickey authentication; unnecessary for password authentication |
& Note:
l Selecting the protocol for remote connection as SSH. Usually, a client can use a variety of remote connection protocols, such as Telnet, Rlogin, and SSH. To establish an SSH connection, you must select SSH
l Selecting the SSH version. Since the device supports SSH2.0 now, select 2.0 or lower for the client.
l Specifying the private key file. On the server, if public key authentication is enabled for an SSH user and a public key is set for the user, the private key file corresponding to the public key must be specified on the client. RSA key pairs and DSA key pairs are generated by a tool of the client software.
The following takes the client software of PuTTY Version 0.58 as an example to illustrate how to configure the SSH client:
I. Generating a client key
To generate a client key, run PuTTYGen.exe, and select from the Parameters area the type of key you want to generate, either SSH-2 RSA or SSH-2 DSA, then click Generate.

Figure 1-2 Generate a client key (1)
Note that while generating the key pair, you must move the mouse continuously and keep the mouse off the green process bar in the blue box of shown in Figure 1-3. Otherwise, the process bar stops moving and the key pair generating process is stopped.
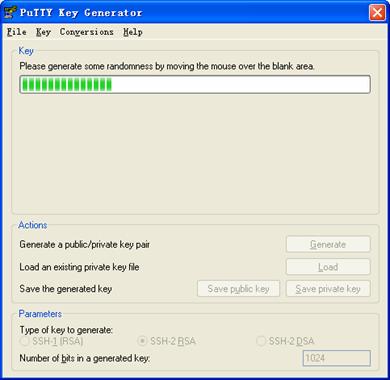
Figure 1-3 Generate the client keys (2)
After the key pair is generated, click Save public key and enter the name of the file for saving the public key (public in this case) to save the public key.

Figure 1-4 Generate the client keys (3)
Likewise, to save the private key, click Save private key. A warning window pops up to prompt you whether to save the private key without any precaution. Click Yes and enter the name of the file for saving the private key (“private” in this case) to save the private key.

Figure 1-5 Generate the client keys (4)
To generate RSA public key in PKCS format, run SSHKEY.exe, click Browse and select the public key file, and then click Convert.

Figure 1-6 Generate the client keys (5)
II. Specifying the IP address of the Server
Launch PuTTY.exe. The following window appears.

Figure 1-7 SSH client configuration interface 1
In the Host Name (or IP address) text box, enter the IP address of the server. Note that there must be a route available between the IP address of the server and the client.
III. Selecting a protocol for remote connection
As shown in Figure 1-7, select SSH under Protocol.
IV. Selecting an SSH version
From the category on the left pane of the window, select SSH under Connection. The window as shown in Figure 1-8 appears.

Figure 1-8 SSH client configuration interface 2
Under Protocol options, select 2 from Preferred SSH protocol version.
& Note:
Some SSH client software, for example, Tectia client software, supports the DES algorithm only when the ssh1 version is selected. The PuTTY client software supports DES algorithm negotiation ssh2.
V. Opening an SSH connection with password authentication
From the window shown in Figure 1-8, click Open. If the connection is normal, you will be prompted to enter the username and password.
Enter the username and password to establish an SSH connection.
To log out, enter the quit command.
VI. Opening an SSH connection with publickey authentication
If a user needs to be authenticated with a public key, the corresponding private key file must be specified. A private key file is not required for password-only authentication.
From the category on the left of the window, select Connection/SSH/Auth. The following window appears.

Figure 1-9 SSH client configuration interface 3
Click Browse… to bring up the file selection window, navigate to the private key file and click Open. If the connection is normal, a user will be prompted for a username. Once passing the authentication, the user can log in to the server.
1.4.3 Configuring an SSH Client Assumed by an SSH2-Capable Switch
Table 1-14 Complete the following tasks to configure an SSH client that is assumed by an SSH2-capable switch:
|
Task |
Remarks |
|
l Not necessary when the authentication mode is password. l Required when the authentication mode is publickey. |
|
|
Optional |
|
|
Optional |
|
|
Establishing the connection between the SSH client and server |
Required |
I. Configuring the SSH client for publickey authentication
When the authentication mode is publickey, you need to configure the RSA or DSA public key of the client on the server:
l To generate a key pair on the client, refer to Generating/Destroying Key Pairs.
l To export the RSA or DSA public key of the client, refer to Exporting the RSA or DSA Public Key.
l To configure the public key of a client on the server, refer to Configuring the Public Key of a Client on the Server.
II. Configuring whether first-time authentication is supported
When the device connects to the SSH server as an SSH client, you can configure whether the device supports first-time authentication.
l With first-time authentication enabled, an SSH client that is not configured with the server host public key can continue accessing the server when it accesses the server for the first time, and it will save the host public key on the client for use in subsequent authentications.
l With first-time authentication disabled, an SSH client that is not configured with the server host public key will be denied of access to the server. To access the server, a user must configure in advance the server host public key locally and specify the public key name for authentication.
Table 1-15 Follow these steps to enable the device to support first-time authentication:
|
To do... |
Use the command... |
Remarks |
|
Enter system view |
system-view |
— |
|
Enable the device to support first-time authentication |
ssh client first-time enable |
Optional By default, the client is enabled to run first-time authentication. |
Table 1-16 Follow these steps to disable first-time authentication support:
|
To do... |
Use the command... |
Remarks |
|
Enter system view |
system-view |
— |
|
Disable first-time authentication support |
undo ssh client first-time |
Required By default, the client is enabled to run first-time authentication. |
|
Configure server public key |
Refer to Configuring the Public Key of a Client on the Server |
Required The method of configuring server public key on the client is similar to that of configuring client public key on the server. |
|
Specify the host key name of the server |
ssh client { server-ip | server-name } assign publickey keyname |
Required |
III. Specifying a source IP address/interface for the SSH client
This configuration task allows you to specify a source IP address or interface for the client to use to access the SSH server. This feature improves the service manageability.
Table 1-17 Follow these steps to specify a source IP address/interface for the SSH client:
|
To do... |
Use the command... |
Remarks |
|
Enter system view |
system-view |
— |
|
Specify a source IP address for the SSH client |
ssh2 source-ip ip-address |
Optional By default, the system determines a source IP address. |
|
Specify a source interface for the SSH client |
ssh2 source-interface interface-type interface-number |
Optional By default, the system determines a source interface. |
IV. Establishing the connection between the SSH client and server
The client’s method of establishing an SSH connection to the SSH server varies with authentication types.
Table 1-18 Follow these steps to establish an SSH connection:
|
To do... |
Use the command... |
Remarks |
|
Enter system view |
system-view |
— |
|
Start the client to establish a connection with an SSH server |
ssh2 { host-ip | host-name } [ port-num ] [ identity-key { dsa | rsa } | prefer_kex { dh_group1 | dh_exchange_group } | prefer_ctos_cipher { 3des | des | aes128 } | prefer_stoc_cipher { 3des | des | aes128 } | prefer_ctos_hmac { sha1 | sha1_96 | md5 | md5_96 } | prefer_stoc_hmac { sha1 | sha1_96 | md5 | md5_96 } ] * |
Required In this command, you can also specify the preferred key exchange algorithm, encryption algorithms and HMAC algorithms between the server and client. HMAC: Hash-based message authentication code Note that: l The identity-key keyword is unnecessary in password authentication and optional in public key authentication. l Support for the 3des keyword depends on the number of encryption bits of the software version. The 168-bit version supports this keyword, while the 56-bit version does not. |
& Note:
When logging into the SSH server using public key authentication, an SSH client needs to read its local private key for authentication. As two algorithms (RSA or DSA) are available, the identity-key keyword must be used to specify one algorithm in order to get the correct private key.
1.5 Displaying and Maintaining SSH Configuration
|
To do... |
Use the command... |
Remarks |
|
Display the public key part of the current switch’s key pairs |
display public-key local { dsa | rsa } public |
Available in any view |
|
Display information about locally saved public keys of SSH peers |
display public-key peer [ brief | name pubkey-name ] |
|
|
Display SSH status and session information |
display ssh server { session | status } |
|
|
Display SSH user information |
display ssh user-information [ username ] |
|
|
Display the current source IP address or the IP address of the source interface specified for the SSH server. |
display ssh-server source-ip |
|
|
Display the current source IP address specified for the SSH Client. |
display ssh2 source-ip |
|
|
Display the mappings between host public keys and SSH servers saved on a client |
display ssh server-info |
1.6 Comparison of SSH Commands with the Same Functions
After the SSH protocol supports the DSA asymmetric key algorithm, some SSH configuration commands are changed. For the sake of SSH configuration compatibility, the original commands are still supported. Table 1-19 lists both the original commands and current commands.
Table 1-19 List of SSH configuration commands with the same functions
|
Operation |
Original commands |
Current commands |
|
Display local RSA public key(s) |
display rsa local-key-pair public |
display public-key local rsa public |
|
Display information about the peer RSA public keys |
display rsa peer-public-key [ brief | name keyname ] |
display public-key peer [ brief | name pubkey-name ] |
|
Generate a RSA key pair |
rsa local-key-pair create |
public-key local create rsa |
|
Destroy a RSA key pair |
rsa local-key-pair destroy |
public-key local destroy rsa |
|
Enter public key view |
rsa peer-public-key keyname |
public-key peer keyname |
|
Import RSA public key from public key file |
rsa peer-public-key keyname import sshkey filename |
public-key peer keyname import sshkey filename |
|
Specify publickey authentication as the default authentication type |
ssh authentication-type default rsa |
ssh authentication-type default publickey |
|
Specify on the client the host public key of the server to be connected |
ssh client { server-ip | server-name } assign rsa-key keyname |
ssh client { server-ip | server-name } assign publickey keyname |
|
Assign a public key to an SSH user |
ssh user username assign rsa-key keyname |
ssh user username assign publickey keyname |
|
Create an SSH user and specify pubblickey authentication as its authentication type |
ssh user username authentication-type rsa |
ssh user username authentication-type publickey |
& Note:
l After the RSA key pair is generated, the display rsa local-key-pair public command displays two public keys (the host public key and server public key) when the switch is working in SSH1-compatible mode, but only one public key (the host public key) when the switch is working in SSH2 mode.
l The result of the display rsa local-key-pair public command or the public key converted with the SSHKEY tool contains no information such as the authentication type, so they cannot be directly used as parameters in the public-key peer command. For the same reason, neither can the result of the display public-key local rsa public command be used in the rsa peer-public-key command directly.
1.7 SSH Configuration Examples
1.7.1 When Switch Acts as Server for Local Password Authentication
I. Network requirements
As shown in Figure 1-10, establish an SSH connection between the host (SSH Client) and the switch (SSH Server) for secure data exchange. The host runs SSH2.0 client software. Password authentication is required.
II. Network diagram

Figure 1-10 Switch acts as server for local password authentication
III. Configuration procedure
l Configure the SSH server
# Create a VLAN interface on the switch and assign an IP address, which the SSH client will use as the destination for SSH connection.
<Switch> system-view
[Switch] interface vlan-interface 1
[Switch-Vlan-interface1] ip address 192.168.0.1 255.255.255.0
[Switch-Vlan-interface1] quit
& Note:
Generating the RSA and DSA key pairs on the server is prerequisite to SSH login.
# Generate RSA and DSA key pairs.
[Switch] public-key local create rsa
[Switch] public-key local create dsa
# Set the authentication mode for the user interfaces to AAA.
[Switch] user-interface vty 0 4
[Switch-ui-vty0-4] authentication-mode scheme
# Enable the user interfaces to support SSH.
[Switch-ui-vty0-4] protocol inbound ssh
[Switch-ui-vty0-4] quit
# Create local client client001, and set the authentication password to abc, protocol type to SSH, and command privilege level to 3 for the client.
[Switch] local-user client001
[Switch-luser-client001] password simple abc
[Switch-luser-client001] service-type ssh level 3
[Switch-luser-client001] quit
# Specify the authentication method of user client001 as password.
[Switch] ssh user client001 authentication-type password
l Configure the SSH client
# Configure an IP address (192.168.0.2 in this case) for the SSH client. This IP address and that of the VLAN interface on the switch must be in the same network segment.
# Configure the SSH client software to establish a connection to the SSH server.
Take SSH client software Putty (version 0.58) as an example:
1) Run PuTTY.exe to enter the following configuration interface.

Figure 1-11 SSH client configuration interface
In the Host Name (or IP address) text box, enter the IP address of the SSH server.
2) From the category on the left pane of the window, select SSH under Connection. The window as shown in Figure 1-12 appears.
Figure 1-12 SSH client configuration interface 2
Under Protocol options, select 2 from Preferred SSH protocol version.
3) As shown in Figure 1-12, click Open. If the connection is normal, you will be prompted to enter the user name client001 and password abc. Once authentication succeeds, you will log in to the server.
1.7.2 When Switch Acts as Server for Password and RADIUS Authentication
I. Network requirements
As shown in Figure 1-13, an SSH connection is required between the host (SSH client) and the switch (SSH server) for secure data exchange. Password authentication is required.
l The host runs SSH2.0 client software to establish a local connection with the switch.
l The switch cooperates with a RADIUS server to authenticate SSH users.
II. Network diagram

Figure 1-13 Switch acts as server for password and RADIUS authentication
III. Configuration procedure
1) Configure the RADIUS server
& Note:
This document takes CAMS Version 2.10 as an example to show the basic RADIUS server configurations required.
# Add an access device.
Log into the CAMS management platform and select System Management > System Configuration from the navigation tree. In the System Configuration window, click Modify of the Access Device item, and then click Add to enter the Add Access Device window and perform the following configurations:
l Specify the IP address of the switch as 192.168.1.70.
l Set both the shared keys for authentication and accounting packets to expert.
l Select LAN Access Service as the service type.
l Specify the ports for authentication and accounting as 1812 and 1813 respectively.
l Select Extensible Protocol as the protocol type.
l Select Standard as the RADIUS packet type.

Figure 1-14 Add an access device
# Add a user for device management.
From the navigation tree, select User Management > User for Device Management, and then in the right pane, click Add to enter the Add Account window and perform the following configurations:
l Add a user named hello, and specify the password.
l Select SSH as the service type.
l Specify the IP address range of the hosts to be managed.

Figure 1-15 Add an account for device management
2) Configure the SSH server
# Create a VLAN interface on the switch and assign it an IP address. This address will be used as the IP address of the SSH server for SSH connections.
<Switch> system-view
[Switch] interface vlan-interface 2
[Switch-Vlan-interface2] ip address 192.168.1.70 255.255.255.0
[Switch-Vlan-interface2] quit
![]() Caution:
Caution:
Generating the RSA and DSA key pairs on the server is prerequisite to SSH login.
# Generate RSA and DSA key pairs.
[Switch] public-key local create rsa
[Switch] public-key local create dsa
# Set the authentication mode for the user interfaces to AAA.
[Switch] user-interface vty 0 4
[Switch-ui-vty0-4] authentication-mode scheme
# Enable the user interfaces to support SSH.
[Switch-ui-vty0-4] protocol inbound ssh
[Switch-ui-vty0-4] quit
# Configure the RADIUS scheme.
[Switch] radius scheme rad
[Switch-radius-rad] accounting optional
[Switch-radius-rad] primary authentication 10.1.1.1 1812
[Switch-radius-rad] key authentication expert
[Switch-radius-rad] server-type extended
[Switch-radius-rad] user-name-format without-domain
[Switch-radius-rad] quit
# Apply the scheme to the ISP domain.
[Switch] domain bbb
[Switch-isp-bbb] scheme radius-scheme rad
[Switch-isp-bbb] quit
# Configure an SSH user, specifying the switch to perform password authentication for the user.
[Switch] ssh user hello authentication-type password
3) Configure the SSH client
# Configure an IP address (192.168.1.1 in this case) for the SSH client. This IP address and that of the VLAN interface on the switch must be in the same network segment.
# Configure the SSH client software to establish a connection to the SSH server. Take SSH client software Putty Version 0.58 as an example:
l Run PuTTY.exe to enter the following configuration interface.

Figure 1-16 SSH client configuration interface (1)
In the Host Name (or IP address) text box, enter the IP address of the SSH server.
l From the category on the left pane of the window, select Connection > SSH. The window as shown in Figure 1-17 appears.
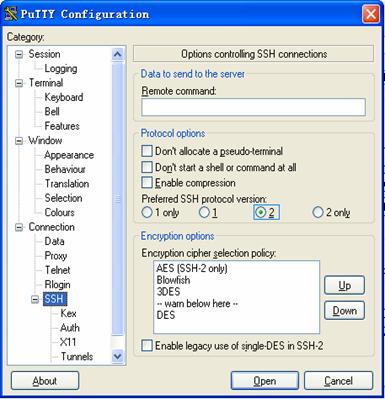
Figure 1-17 SSH client configuration interface (2)
Under Protocol options, select 2 from Preferred SSH protocol version. Then, click Open. If the connection is normal, you will be prompted to enter the user name hello and the password. Once authentication succeeds, you will log in to the server. The level of commands that you can access after login is authorized by the CAMS server. You can specify the level by setting the EXEC Privilege Level argument in the Add Account window shown in Figure 1-15.
1.7.3 When Switch Acts as Server for Password and HWTACACS Authentication
I. Network requirements
As shown in Figure 1-18, an SSH connection is required between the host (SSH client) and the switch (SSH server) for secure data exchange. Password authentication is required.
l The host runs SSH2.0 client software to establish a local connection with the switch.
l The switch cooperates with an HWTACACS server to authenticate SSH users.
II. Network diagram

Figure 1-18 Switch acts as server for password and HWTACACS authentication
III. Configuration procedure
l Configure the SSH server
# Create a VLAN interface on the switch and assign it an IP address. This address will be used as the IP address of the SSH server for SSH connections.
<Switch> system-view
[Switch] interface vlan-interface 2
[Switch-Vlan-interface2] ip address 192.168.1.70 255.255.255.0
[Switch-Vlan-interface2] quit
![]() Caution:
Caution:
Generating the RSA and DSA key pairs on the server is prerequisite to SSH login.
# Generate RSA and DSA key pairs.
[Switch] public-key local create rsa
[Switch] public-key local create dsa
# Set the authentication mode for the user interfaces to AAA.
[Switch] user-interface vty 0 4
[Switch-ui-vty0-4] authentication-mode scheme
# Enable the user interfaces to support SSH.
[Switch-ui-vty0-4] protocol inbound ssh
[Switch-ui-vty0-4] quit
# Configure the HWTACACS scheme.
[Switch] hwtacacs scheme hwtac
[Switch-hwtacacs-hwtac] primary authentication 10.1.1.1 49
[Switch-hwtacacs-hwtac] primary authorization 10.1.1.1 49
[Switch-hwtacacs-hwtac] key authentication expert
[Switch-hwtacacs-hwtac] key authorization expert
[Switch-hwtacacs-hwtac] user-name-format without-domain
[Switch-hwtacacs-hwtac] quit
# Apply the scheme to the ISP domain.
[Switch] domain bbb
[Switch-isp-bbb] scheme hwtacacs-scheme hwtac
[Switch-isp-bbb] quit
# Configure an SSH user, specifying the switch to perform password authentication for the user.
[Switch] ssh user client001 authentication-type password
l Configure the SSH client
# Configure an IP address (192.168.1.1 in this case) for the SSH client. This IP address and that of the VLAN interface on the switch must be in the same network segment.
# Configure the SSH client software to establish a connection to the SSH server. Take SSH client software Putty Version 0.58 as an example:
1) Run PuTTY.exe to enter the following configuration interface.

Figure 1-19 SSH client configuration interface (1)
In the Host Name (or IP address) text box, enter the IP address of the SSH server.
2) From the category on the left pane of the window, select Connection > SSH. The window as shown in Figure 1-20 appears.

Figure 1-20 SSH client configuration interface (2)
Under Protocol options, select 2 from Preferred SSH protocol version. Then, click Open. If the connection is normal, you will be prompted to enter the user name client001 and the password. Once authentication succeeds, you will log in to the server. The level of commands that you can access after login is authorized by the HWTACACS server. For authorization configuration of the HWTACACS server, refer to relevant HWTACACS server configuration manuals.
1.7.4 When Switch Acts as Server for Publickey Authentication
I. Network requirements
As shown in Figure 1-21, establish an SSH connection between the host (SSH client) and the switch (SSH Server) for secure data exchange. The host runs SSH2.0 client software. Publickey authentication is required.
II. Network diagram
Figure 1-21 Switch acts as server for publickey authentication
III. Configuration procedure
& Note:
Under the publickey authentication mode, either the RSA or DSA public key can be generated for the server to authenticate the client. Here takes the RSA public key as an example.
l Configure the SSH server
# Create a VLAN interface on the switch and assign an IP address, which the SSH client will use as the destination for SSH connection.
<Switch> system-view
[Switch] interface vlan-interface 1
[Switch-Vlan-interface1] ip address 192.168.0.1 255.255.255.0
[Switch-Vlan-interface1] quit
& Note:
Generating the RSA and DSA key pairs on the server is prerequisite to SSH login.
# Generate RSA and DSA key pairs.
[Switch] public-key local create rsa
[Switch] public-key local create dsa
# Set the authentication mode for the user interfaces to AAA.
[Switch] user-interface vty 0 4
[Switch-ui-vty0-4] authentication-mode scheme
# Enable the user interfaces to support SSH.
[Switch-ui-vty0-4] protocol inbound ssh
# Set the client’s command privilege level to 3
[Switch-ui-vty0-4] user privilege level 3
[Switch-ui-vty0-4] quit
# Configure the authentication type of the SSH client named client 001 as publickey.
[Switch] ssh user client001 authentication-type publickey
& Note:
Before performing the following steps, you must generate an RSA public key pair (using the client software) on the client, save the key pair in a file named public, and then upload the file to the SSH server through FTP or TFTP. For details, refer to Configuring the SSH Client.
# Import the client’s public key named Switch001 from file public.
[Switch] public-key peer Switch001 import sshkey public
# Assign the public key Switch001 to client client001.
[Switch] ssh user client001 assign publickey Switch001
l Configure the SSH client (taking PuTTY version 0.58 as an example)
# Generate an RSA key pair.
1) Run PuTTYGen.exe, choose SSH2(RSA) and click Generate.
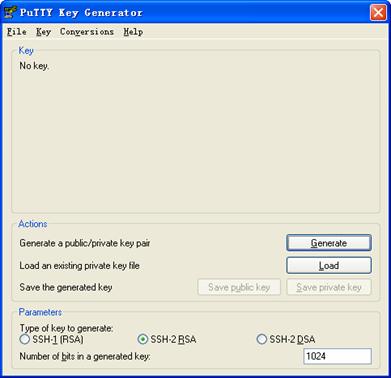
Figure 1-22 Generate a client key pair (1)
& Note:
While generating the key pair, you must move the mouse continuously and keep the mouse off the green process bar shown in Figure 1-23. Otherwise, the process bar stops moving and the key pair generating process is stopped.

Figure 1-23 Generate a client key pair (2)
After the key pair is generated, click Save public key and enter the name of the file for saving the public key (public in this case).
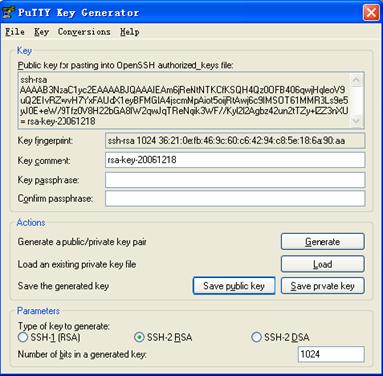
Figure 1-24 Generate a client key pair (3)
Likewise, to save the private key, click Save private key. A warning window pops up to prompt you whether to save the private key without any protection. Click Yes and enter the name of the file for saving the private key (private.ppk in this case).

Figure 1-25 Generate a client key pair (4)
& Note:
After a public key pair is generated, you need to upload the pubic key file to the server through FTP or TFTP, and complete the server end configuration before you continue to configure the client.
# Establish a connection with the SSH server
2) Launch PuTTY.exe to enter the following interface.
Figure 1-26 SSH client configuration interface 1
In the Host Name (or IP address) text box, enter the IP address of the server.
3) From the category on the left pane of the window, select SSH under Connection. The window as shown in Figure 1-27 appears.
Figure 1-27 SSH client configuration interface 2
Under Protocol options, select 2 from Preferred SSH protocol version.
4) Select Connection/SSH/Auth. The following window appears.
Figure 1-28 SSH client configuration interface (2)
Click Browse… to bring up the file selection window, navigate to the private key file and click OK.
5) From the window shown in Figure 1-28, click Open. If the connection is normal, you will be prompted to enter the username.
1.7.5 When Switch Acts as Client for Password Authentication
I. Network requirements
As shown in Figure 1-29, establish an SSH connection between Switch A (SSH Client) and Switch B (SSH Server) for secure data exchange. The user name for login is client001 and the SSH server’s IP address is 10.165.87.136. Password authentication is required.
II. Network diagram

Figure 1-29 Switch acts as client for password authentication
III. Configuration procedure
l Configure Switch B
# Create a VLAN interface on the switch and assign an IP address, which the SSH client will use as the destination for SSH connection.
<SwitchB> system-view
[SwitchB] interface vlan-interface 1
[SwitchB-Vlan-interface1] ip address 10.165.87.136 255.255.255.0
[SwitchB-Vlan-interface1] quit
& Note:
Generating the RSA and DSA key pairs on the server is prerequisite to SSH login.
# Generate RSA and DSA key pairs.
[SwitchB] public-key local create rsa
[SwitchB] public-key local create dsa
# Set the authentication mode for the user interfaces to AAA.
[SwitchB] user-interface vty 0 4
[SwitchB-ui-vty0-4] authentication-mode scheme
# Enable the user interfaces to support SSH.
[SwitchB-ui-vty0-4] protocol inbound ssh
[SwitchB-ui-vty0-4] quit
# Create local user client001, and set the authentication password to abc, the login protocol to SSH, and user command privilege level to 3.
[SwitchB] local-user client001
[SwitchB-luser-client001] password simple abc
[SwitchB-luser-client001] service-type ssh level 3
[SwitchB-luser-client001] quit
# Configure the authentication type of user client001 as password.
[SwitchB] ssh user client001 authentication-type password
l Configure Switch A
# Create a VLAN interface on the switch and assign an IP address, which serves as the SSH client’s address in an SSH connection.
<SwitchA> system-view
[SwitchA] interface vlan-interface 1
[SwitchA-Vlan-interface1] ip address 10.165.87.137 255.255.255.0
[SwitchA-Vlan-interface1] quit
# Establish a connection to the server 10.165.87.136.
[SwitchA] ssh2 10.165.87.136
Username: client001
Trying 10.165.87.136 ...
Press CTRL+K to abort
Connected to 10.165.87.136 ...
The Server is not authenticated. Do you continue to access it?(Y/N):y
Do you want to save the server's public key?(Y/N):n
Enter password:
**************************************************************************
* Copyright(c) 2004-2007 Hangzhou H3C Tech. Co., Ltd. All rights reserved.*
* Without the owner's prior written consent, *
* no decompiling or reverse-engineering shall be allowed. *
**************************************************************************
<SwitchB>
1.7.6 When Switch Acts as Client for Publickey Authentication
I. Network requirements
As shown in Figure 1-30, establish an SSH connection between Switch A (SSH Client) and Switch B (SSH Server) for secure data exchange. The user name is client001 and the SSH server’s IP address is 10.165.87.136. Publickey authentication is required.
II. Network diagram

Figure 1-30 Switch acts as client for publickey authentication
III. Configuration procedure
& Note:
In public key authentication, you can use either RSA or DSA public key. Here takes the DSA public key as an example.
l Configure Switch B
# Create a VLAN interface on the switch and assign an IP address, which the SSH client will use as the destination for SSH connection.
<SwitchB> system-view
[SwitchB] interface vlan-interface 1
[SwitchB-Vlan-interface1] ip address 10.165.87.136 255.255.255.0
[SwitchB-Vlan-interface1] quit
& Note:
Generating the RSA and DSA key pairs on the server is prerequisite to SSH login.
# Generate RSA and DSA key pairs.
[SwitchB] public-key local create rsa
[SwitchB] public-key local create dsa
# Set the authentication mode for the user interfaces to AAA.
[SwitchB] user-interface vty 0 4
[SwitchB-ui-vty0-4] authentication-mode scheme
# Enable the user interfaces to support SSH.
[SwitchB-ui-vty0-4] protocol inbound ssh
# Set the user command privilege level to 3.
[SwitchB-ui-vty0-4] user privilege level 3
[SwitchB-ui-vty0-4] quit
# Specify the authentication type of user client001 as publickey.
[SwitchB] ssh user client001 authentication-type publickey
& Note:
Before doing the following steps, you must first generate a DSA public key pair on the client and save the key pair in a file named Switch001, and then upload the file to the SSH server through FTP or TFTP. For details, refer to “Configure Switch A”.
# Import the client public key pair named Switch001 from the file Switch001.
[SwitchB] public-key peer Switch001 import sshkey Switch001
# Assign the public key Switch001 to user client001.
[SwitchB] ssh user client001 assign publickey Switch001
l Configure Switch A
# Create a VLAN interface on the switch and assign an IP address, which serves as the SSH client’s address in an SSH connection.
<SwitchA> system-view
[SwitchA] interface vlan-interface 1
[SwitchA-Vlan-interface1] ip address 10.165.87.137 255.255.255.0
[SwitchA-Vlan-interface1] quit
# Generate a DSA key pair
[SwitchA] public-key local create dsa
# Export the generated DSA key pair to a file named Switch001.
[SwitchA] public-key local export dsa ssh2 Switch001
& Note:
After the key pair is generated, you need to upload the pubic key file to the server through FTP or TFTP and complete the server end configuration before you continue to configure the client.
# Establish an SSH connection to the server 10.165.87.136.
[SwitchA] ssh2 10.165.87.136 identity-key dsa
Username: client001
Trying 10.165.87.136 ...
Press CTRL+K to abort
Connected to 10.165.87.136 ...
The Server is not authenticated. Do you continue to access it?(Y/N):y
Do you want to save the server's public key?(Y/N):n
**************************************************************************
* Copyright(c) 2004-2007 Hangzhou H3C Tech. Co., Ltd. All rights reserved.*
* Without the owner's prior written consent, *
* no decompiling or reverse-engineering shall be allowed. *
**************************************************************************
<SwitchB>
1.7.7 When Switch Acts as Client and First-Time Authentication is not Supported
I. Network requirements
As shown in Figure 1-31, establish an SSH connection between Switch A (SSH Client) and Switch B (SSH Server) for secure data exchange. The user name is client001 and the SSH server’s IP address is 10.165.87.136. The publickey authentication mode is used to enhance security.
II. Network diagram
Figure 1-31 Switch acts as client and first-time authentication is not supported
III. Configuration procedure
l Configure Switch B
# Create a VLAN interface on the switch and assign an IP address for it to serve as the destination of the client.
<SwitchB> system-view
[SwitchB] interface vlan-interface 1
[SwitchB-Vlan-interface1] ip address 10.165.87.136 255.255.255.0
[SwitchB-Vlan-interface1] quit
& Note:
Generating the RSA and DSA key pairs on the server is prerequisite to SSH login.
# Generate RSA and DSA key pairs.
[SwitchB] public-key local create rsa
[SwitchB] public-key local create dsa
# Set AAA authentication on user interfaces.
[SwitchB] user-interface vty 0 4
[SwitchB-ui-vty0-4] authentication-mode scheme
# Configure the user interfaces to support SSH.
[SwitchB-ui-vty0-4] protocol inbound ssh
# Set the user command privilege level to 3.
[SwitchB-ui-vty0-4] user privilege level 3
[SwitchB-ui-vty0-4] quit
# Specify the authentication type for user client001 as publickey.
[SwitchB] ssh user client001 authentication-type publickey
& Note:
Before doing the following steps, you must first generate a DSA key pair on the client and save the key pair in a file named Switch001, and then upload the file to the SSH server through FTP or TFTP. For details, refer to the following “Configure Switch A”.
# Import the client’s public key file Switch001 and name the public key as Switch001.
[SwitchB] public-key peer Switch001 import sshkey Switch001
# Assign public key Switch001 to user client001
[SwitchB] ssh user client001 assign publickey Switch001
# Export the generated DSA host public key pair to a file named Switch002.
[SwitchB] public-key local export dsa ssh2 Switch002
& Note:
When first-time authentication is not supported, you must first generate a DSA key pair on the server and save the key pair in a file named Switch002, and then upload the file to the SSH client through FTP or TFTP.
l Configure Switch A
# Create a VLAN interface on the switch and assign an IP address, which serves as the SSH client’s address in an SSH connection.
<SwitchA> system-view
[SwitchA] interface vlan-interface 1
[SwitchA-Vlan-interface1] ip address 10.165.87.137 255.255.255.0
[SwitchA-Vlan-interface1] quit
# Generate a DSA key pair
[SwitchA] public-key local create dsa
# Export the generated DSA key pair to a file named Switch001.
[SwitchA] public-key local export dsa ssh2 Switch001
& Note:
After generating the key pair, you need to upload the key pair file to the server through FTP or TFTP and complete the server end configuration before you continue to configure the client.
# Disable first-time authentication on the device.
[SwitchA] undo ssh client first-time
& Note:
When first-time authentication is not supported, you must first generate a DSA key pair on the server and save the key pair in a file named Switch002, and then upload the file to the SSH client through FTP or TFTP. For details, refer to the above part “Configure Switch B”.
# Import the public key pair named Switch002 from the file Switch002.
[SwitchA] public-key peer Switch002 import sshkey Switch002
# Specify the host public key pair name of the server.
[SwitchA] ssh client 10.165.87.136 assign publickey Switch002
# Establish the SSH connection to server 10.165.87.136.
[SwitchA] ssh2 10.165.87.136 identity-key dsa
Username: client001
Trying 10.165.87.136 ...
Press CTRL+K to abort
Connected to 10.165.87.136 ...
**************************************************************************
* Copyright(c) 2004-2007 Hangzhou H3C Tech. Co., Ltd. All rights reserved.*
* Without the owner's prior written consent, *
* no decompiling or reverse-engineering shall be allowed. *
**************************************************************************
<SwitchB>