- Table of Contents
-
- H3C Campus Fixed-Port Switches CLI-Based Quick Start Configuration Guide-6W101
- 01-H3C Devices CLI Reference
- 02-Login Management Quick Start Configuration Guide
- 03-Configuration File Management Quick Start Configruation Guide
- 04-Software Upgrade Quick Start Configuration Guide
- 05-Device Management Quick Start Configuration Guide
- 06-NTP Quick Start Configuration Guide
- 07-RBAC Quick Start Configuration Guide
- 08-IRF Quick Start Configuration Guide
- 09-Ethernet Interface Quick Start Configuration Guide
- 10-VLAN Quick Start Configuration Guide
- 11-Port Isolation Quick Start Configuration Guide
- 12-Loop Detection Quick Start Configuration Guide
- 13-QinQ Quick Start Configuration Guide
- 14-MAC Address Table Quick Start Configuration Guide
- 15-Ethernet Link Aggregation Quick Start Configuration Guide
- 16-Spanning Tree Quick Start Configuration Guide
- 17-DHCP Quick Start Configuration Guide
- 18-OSPF Quick Start Configuration Guide
- 19-Static Routing Quick Start Configuration Guide
- 20-Basic RIP Quick Start Configuration Guide
- 21-PBR Quick Start Configuration Guide
- 22-IGMP Snooping Quick Start Configuration Guide
- 23-Packet Filtering Quick Start Configuration Guide
- 24-QoS Quick Start Configuration Guide
- 25-IP Source Guard Quick Start Configuration Guide
- 26-SSH Quick Start Configuration Guide
- 27-Port Security Quick Start Configuration Guide
- 28-VRRP Quick Start Configuration Guide
- 29-PoE Quick Start Configuration Guide
- 30-Mirroring Quick Start Configuration Guide
- 31-Information Center Quick Start Configuration Guide
- 32-SNMP Quick Start Configuration Guide
- 33-LAN Networks Quick Start Configuration Guide
- Related Documents
-
| Title | Size | Download |
|---|---|---|
| 32-SNMP Quick Start Configuration Guide | 122.85 KB |
SNMP Quick Start Configuration Guide
Copyright © 2022 New H3C Technologies Co., Ltd. All rights reserved.
No part of this manual may be reproduced or transmitted in any form or by any means without prior written consent of New H3C Technologies Co., Ltd.
Except for the trademarks of New H3C Technologies Co., Ltd., any trademarks that may be mentioned in this document are the property of their respective owners.
The information in this document is subject to change without notice.
Contents
Configuring SNMPv1/v2c
Introduction
The following information uses an example to describe the basic SNMPv1/v2c configuration procedure.
Network configuration
As shown in Figure 1, configure the device (agent) and IMC server (NMS) to meet the following requirements:
· Enable the IMC server to monitor and manage the device through SNMPv1/SNMPv2c as an NMS.
· Enable the device to automatically send notifications to report events to the NMS as an agent.

Restrictions and guidelines
· The configuration procedure is the same for SNMPv1 and SNMPv2c. SNMPv2c is configured in this example.
· Configure the same SNMP version and community string on the device and the NMS so that the NMS can monitor and manage the device.
· The NMS configuration method varies by vendor. For information about configuring the NMS, see the manual for the NMS. This example uses the IMC PLAT 7.0 (E0202) NMS.
Procedure
Configuring the device
# Assign an IP address to VLAN-interface 2.
<Agent> system-view
[Agent] interface Vlan-interface 2
[Agent-Vlan-interface 2] ip address 192.168.100.68 24
[Agent-Vlan-interface 2] quit
# Specify SNMPv2c, and create read-only community string readtest and read-write community string writetest.
[Agent] snmp-agent sys-info version v2c
[Agent] snmp-agent community read readtest
[Agent] snmp-agent community write writetest
# Configure contact and physical location information for the device.
[Agent] snmp-agent sys-info contact Mr.Wang-Tel:3306
[Agent] snmp-agent sys-info location telephone-closet,3rd-floor
[Agent] snmp-agent trap enable
[Agent] snmp-agent target-host trap address udp-domain 192.168.100.4 params securityname readtest v2c
Configuring the IMC server
2. Add the device to the IMC server:
a. Click the Resource tab.
b. From the navigation tree, select Add Device.
c. Configure the following parameters on the page that opens:
- Enter the host name or IP address of the device in the Host Name/IP field.
- Use the default values for other parameters.
d. Click Configure in the SNMP Settings area.

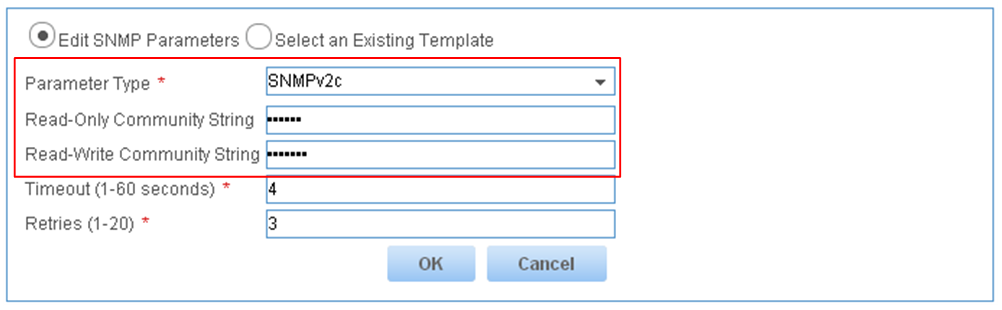
3. Edit SNMP parameters:
a. Select the SNMPv2c parameter type.
b. Set the read-only community string to readtest.
c. Set the read-write community string to writetest.
d. Use the default values for other parameters.
e. Click OK.
Figure 3 Configuring SNMP parameters
4. On the Add Device page, click OK. If the configuration succeeds, IMC returns a message as shown in Figure 4. Then you can monitor and manage the device from the IMC server.
Figure 4 Device adding success message

Verifying the configuration
Verify that the device sends notifications to the NMS when the state of an interface changes:
1. Execute the shutdown or undo shutdown command on an idle interface to shut down or bring up the interface.
2. Navigate to the Alarm > Alarm Browse > All Alarms page on the IMC server to identify whether a notification about the interface state change exists.
Configuration files
#
snmp-agent
snmp-agent community write writetest
snmp-agent community read readtest
snmp-agent sys-info contact Mr.Wang-Tel:3306
snmp-agent sys-info location telephone-closet,3rd-floor
snmp-agent sys-info version v2c
snmp-agent trap enable arp
snmp-agent trap enable syslog
snmp-agent target-host trap address udp-domain 192.168.100.4 params securityname readtest v2c
#
Related documentation
· SNMP configuration in the network management and monitoring configuration guide for the device.
· SNMP commands in the network management and monitoring command reference for the device.
Configuring SNMPv3
Introduction
The following information uses an example to describe the basic SNMPv3 configuration procedure.
Network configuration
As shown in Figure 5, configure the device (agent) and IMC server (NMS) to meet the following requirements:
· Enable the IMC server to monitor and manage the device through SNMPv3 as an NMS.
· Enable the device to send notifications to report events to the NMS as an agent.
· Ensure secure communication between the NMS and device.

Restrictions and guidelines
· SNMPv3 supports view-based access control (VACM) and role-based access control (RBAC) models. This example provides the SNMPv3 configuration procedure in both access control models.
· Configure the same SNMP version and community string on the NMS and device to make sure the NMS can monitor and manage the device.
· The NMS configuration method varies by vendor. For information about configuring the NMS, see the manual for the NMS. This example uses the IMC PLAT 7.0 (E0202) NMS.
· The security name used for the NMS to receive SNMPv3 notifications must be an existing SNMPv3 username.
· The NMS and agent must use the same security model.
· The SNMPv3 authentication and encryption passwords are saved to the configuration file in encrypted form. An encrypted-form password is calculated from the plaintext-form password and the local engine ID. To configure the same authentication and encryption passwords for two devices, configure plaintext-form passwords manually on the two devices. Do not copy the encrypted-from passwords in the configuration file from one device to another. If you do so, you will get different plaintext-form passwords on the two devices because the two devices use different local engine IDs.
Procedure
Configuring the device
Configuring SNMPv3 settings in RBAC model
# Assign an IP address to VLAN-interface 2.
<Agent> system-view
[Agent] interface Vlan-interface2
[Agent-Vlan-interface2] ip address 192.168.100.68 24
[Agent-Vlan-interface2] quit
# Enable SNMPv3.
[Agent] snmp-agent sys-info version v3
# Create user role test, and assign test read and write access to the objects of the internet subtree (OID: 1.3.6.1).
[Agent] role name test
[Agent-role-test] rule 1 permit read write oid 1.3.6.1
[Agent-role-test] quit
# Create SNMPv3 user managev3user. Assign user role test to managev3user. Set the authentication algorithm to sha, authentication key to 123456TESTauth&!, encryption algorithm to aes128, and encryption key to 123456TESTencr&! for the user.
[Agent] snmp-agent usm-user v3 managev3user user-role test simple authentication-mode sha 123456TESTauth&! privacy-mode aes128 123456TESTencr&!
# Configure contact and physical location information for the device.
[Agent] snmp-agent sys-info contact Mr.Wang-Tel:3306
[Agent] snmp-agent sys-info location telephone-closet,3rd-floor
# Enable SNMP notifications.
[Agent] snmp-agent trap enable
# Specify the NMS at 192.168.100.4 as the notifications target host and set the security name to managev3user.
[Agent] snmp-agent target-host trap address udp-domain 192.168.100.4 params securityname managev3user v3 privacy
Configuring SNMPv3 settings in VACM model
# Assign an IP address to VLAN-interface 2.
<Agent> system-view
[Agent] interface Vlan-interface2
[Agent-Vlan-interface2] ip address 192.168.100.68 24
[Agent-Vlan-interface2] quit
# Enable SNMPv3.
<Agent> system-view
[Agent] snmp-agent sys-info version v3
# Create a MIB view named midtest to contain all objects in the internet subtree (OID 1.3.6.1).
[Agent] snmp-agent mib-view included mibtest 1.3.6.1
# Create SNMPv3 group managev3group, and specify the authentication with privacy security model for the group. Assign the group read, write, and notification accesses to the mibtest view.
[Agent] snmp-agent group v3 managev3group privacy read-view mibtest write-view mibtest notify-view mibtest
# Add user managev3user to SNMPv3 group managev3group, and set the authentication algorithm to sha, authentication key to 123456TESTauth&!, encryption algorithm to aes128, and encryption key to 123456TESTencr&! for the user.
[Agent] snmp-agent usm-user v3 managev3user managev3group simple authentication-mode sha 123456TESTauth&! privacy-mode aes128 123456TESTencr&!
# Configure contact and physical location information for the device.
[Agent] snmp-agent sys-info contact Mr.Wang-Tel:3306
[Agent] snmp-agent sys-info location telephone-closet,3rd-floor
# Enable SNMP notifications.
[Agent] snmp-agent trap enable
# Specify the NMS at 192.168.100.4 as the notifications target host and set the security name to managev3user.
[Agent] snmp-agent target-host trap address udp-domain 192.168.100.4 params securityname managev3user v3 privacy
Configuring the IMC server
1. Add an SNMP template:
a. Click the System tab.
b. From the navigation tree, select Resource Management > SNMP Template.
c. On the SNMP Template page, click Add.
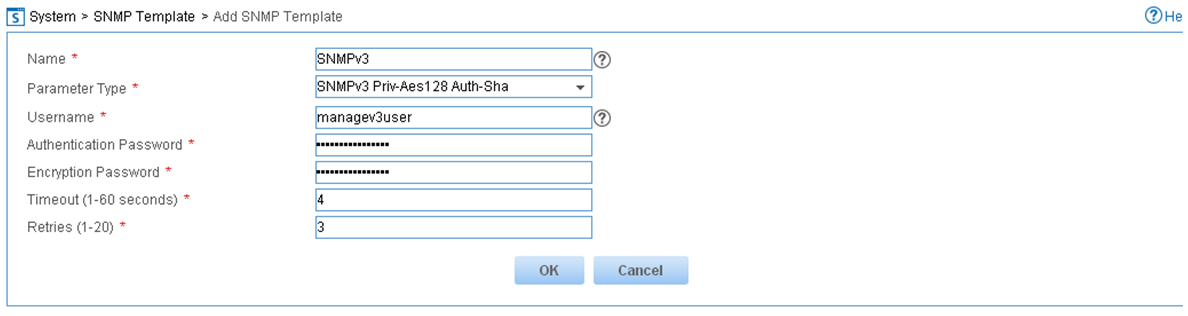
d. On the Add SNMP Template page, configure the following parameters:
- Set the SNMP template name to SNMPv3.
- Select the SNMPv3 Priv-Aes128 Auth-Sha parameter type.
- Set the username to managev3user.
- Set the authentication password to 123456TESTauth&! in plaintext form.
- Set the encryption password to 123456TESTencr&! in plaintext form.
- Use the default values for other parameters.
- Click OK.
Figure 6 Adding an SNMP template
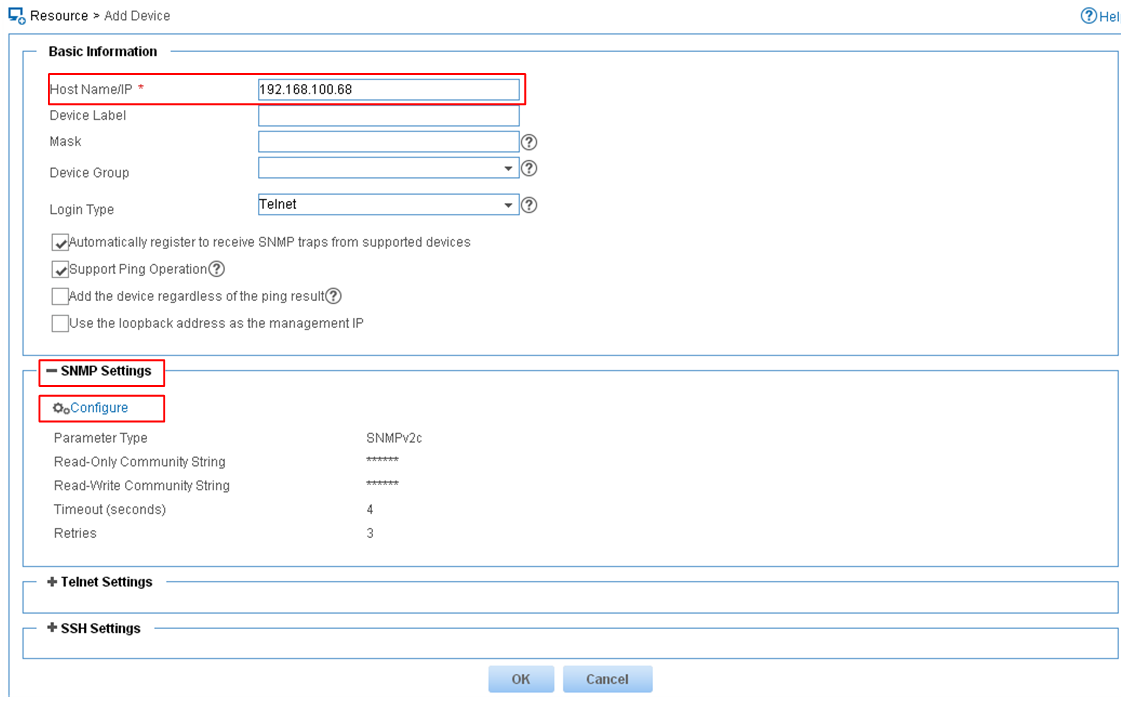
2. Add the device:
a. Click the Resource tab.
b. From the navigation tree, select Resource Management > Add Device.
c. On the Add Device page, configure the following parameters:
- Enter the IP address or host name of the device in the Host Name/IP field.
- Use the default values for other parameters.
d. Click Configure in the SNMP Settings area.
Figure 7 Adding the device
3. Edit SNMP parameters:
a. Select the Select an Existing Template option.
b. Select the SNMP template named SNMPv3.
c. Click OK.
Figure 8 Selecting SNMP parameters

4. On the Add Device page, click OK. If the configuration succeeds, IMC returns a message as shown in Figure 9. Then you can monitor and manage the device from the IMC server.

Verifying the configuration
Verify that the device sends notifications to the NMS when the state of an interface changes:
1. Execute the shutdown or undo shutdown command on an idle interface to shut down or bring up the interface.
2. Navigate to the Alarm > Alarm Browse > All Alarms page on the IMC server to identify whether a notification about the interface state change exists..
Configuration files
· SNMPv3 settings in RBAC model
#
snmp-agent
snmp-agent sys-info contact Mr.Wang-Tel:3306
snmp-agent sys-info location telephone-closet,3rd-floor
snmp-agent sys-info version v3
snmp-agent trap enable arp
snmp-agent trap enable syslog
snmp-agent target-host trap address udp-domain 192.168.100.4 params securityname managev3user v3 privacy
snmp-agent usm-user v3 managev3user user-role test cipher authentication-mode sha $c$3$5JaJZ6gNXlyNRq2FR2ELDT3QQH1exwJRWdYYq7eLfcBewuM5ncM= privacy-mode aes128 $c$3$+bbXZS4+PnsLDyr16OogzBckaLzR6XMDwZQuLBU8RM+dpw==
#
role name test
rule 1 permit read write oid 1.3.6.1
#
· SNMPv3 settings in VACM model
#
snmp-agent
snmp-agent sys-info contact Mr.Wang-Tel:3306
snmp-agent sys-info location telephone-closet,3rd-floor
snmp-agent sys-info version v3
snmp-agent group v3 managev3group privacy read-view mibtest write-view mibtest notify-view mibtest
snmp-agent mib-view included mibtest internet
snmp-agent trap enable arp
snmp-agent trap enable syslog
snmp-agent target-host trap address udp-domain 192.168.100.4 params securityname managev3user v3 privacy
snmp-agent usm-user v3 managev3user managev3group cipher authentication-mode sha $c$3$5JaJZ6gNXlyNRq2FR2ELDT3QQH1exwJRWdYYq7eLfcBewuM5ncM= privacy-mode aes128 $c$3$+bbXZS4+PnsLDyr16OogzBckaLzR6XMDwZQuLBU8RM+dpw==
#
Related documentation
· SNMP configuration in the network management and monitoring configuration guide for the device.
· SNMP commands in the network management and monitoring command reference for the device.