- Table of Contents
-
- H3C Campus Fixed-Port Switches CLI-Based Quick Start Configuration Guide-6W101
- 01-H3C Devices CLI Reference
- 02-Login Management Quick Start Configuration Guide
- 03-Configuration File Management Quick Start Configruation Guide
- 04-Software Upgrade Quick Start Configuration Guide
- 05-Device Management Quick Start Configuration Guide
- 06-NTP Quick Start Configuration Guide
- 07-RBAC Quick Start Configuration Guide
- 08-IRF Quick Start Configuration Guide
- 09-Ethernet Interface Quick Start Configuration Guide
- 10-VLAN Quick Start Configuration Guide
- 11-Port Isolation Quick Start Configuration Guide
- 12-Loop Detection Quick Start Configuration Guide
- 13-QinQ Quick Start Configuration Guide
- 14-MAC Address Table Quick Start Configuration Guide
- 15-Ethernet Link Aggregation Quick Start Configuration Guide
- 16-Spanning Tree Quick Start Configuration Guide
- 17-DHCP Quick Start Configuration Guide
- 18-OSPF Quick Start Configuration Guide
- 19-Static Routing Quick Start Configuration Guide
- 20-Basic RIP Quick Start Configuration Guide
- 21-PBR Quick Start Configuration Guide
- 22-IGMP Snooping Quick Start Configuration Guide
- 23-Packet Filtering Quick Start Configuration Guide
- 24-QoS Quick Start Configuration Guide
- 25-IP Source Guard Quick Start Configuration Guide
- 26-SSH Quick Start Configuration Guide
- 27-Port Security Quick Start Configuration Guide
- 28-VRRP Quick Start Configuration Guide
- 29-PoE Quick Start Configuration Guide
- 30-Mirroring Quick Start Configuration Guide
- 31-Information Center Quick Start Configuration Guide
- 32-SNMP Quick Start Configuration Guide
- 33-LAN Networks Quick Start Configuration Guide
- Related Documents
-
| Title | Size | Download |
|---|---|---|
| 31-Information Center Quick Start Configuration Guide | 219.56 KB |
Information Center Quick Start Configuration Guide
Copyright © 2022 New H3C Technologies Co., Ltd. All rights reserved.
No part of this manual may be reproduced or transmitted in any form or by any means without prior written consent of New H3C Technologies Co., Ltd.
Except for the trademarks of New H3C Technologies Co., Ltd., any trademarks that may be mentioned in this document are the property of their respective owners.
The information in this document is subject to change without notice.
Contents
Configuring the device to output logs to a log host server
Configuring the device to save logs to a specific folder in the flash drive
Configuring the device to output logs to a log host server
Introduction
The following information uses an example to describe the basic procedure for configuring the device to output logs to a log host server.
Network configuration
As shown in Figure 1, configure the device to output logs with severity levels from 0 through 7 to the log host server.

Prerequisites
· Configure IP addresses and routes. Make sure the device and the log host can reach each other. (Details not shown.)
· Install 3CDaemon on the host as a log host server.
Procedure
1. Configure the device:
# Enable the information center.
<Device> system-view
[Device] info-center enable
# Specify log host 1.2.0.1/16 with local7 as the logging facility.
[Device] info-center loghost 1.2.0.1 facility local7
2. Configure the log host:
The log host server configuration procedure varies by the vendor. The following example uses 3CDaemon as the log host server to receive the logs sent by the switch.
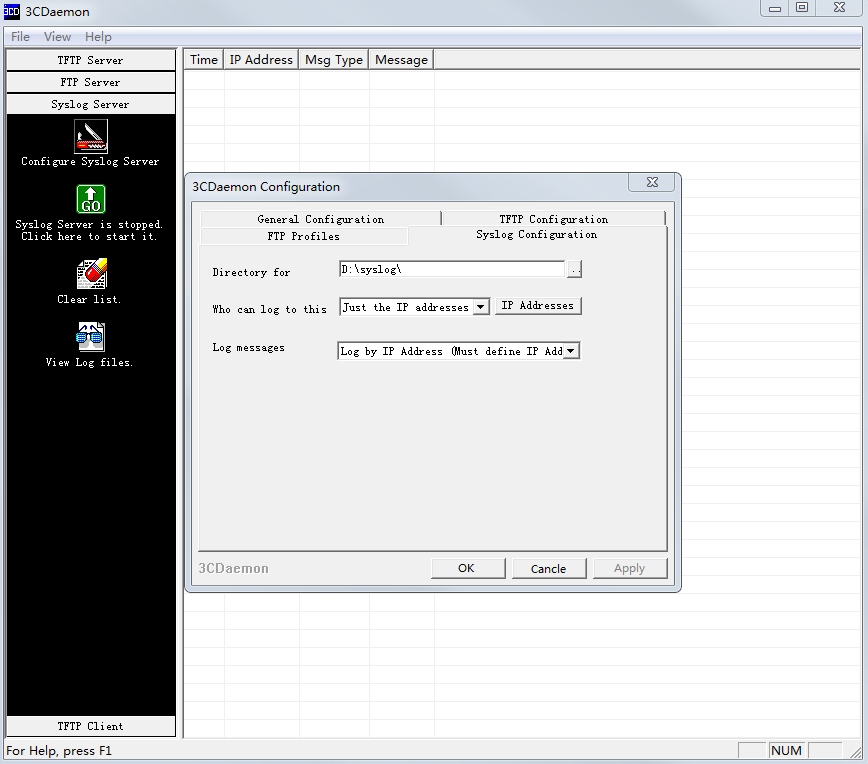
# Open 3CDaemon and complete corresponding configurations.
Figure 2 Configuring 3CDaemon as the log host server
# Launch the log host server.
Verifying the configuration
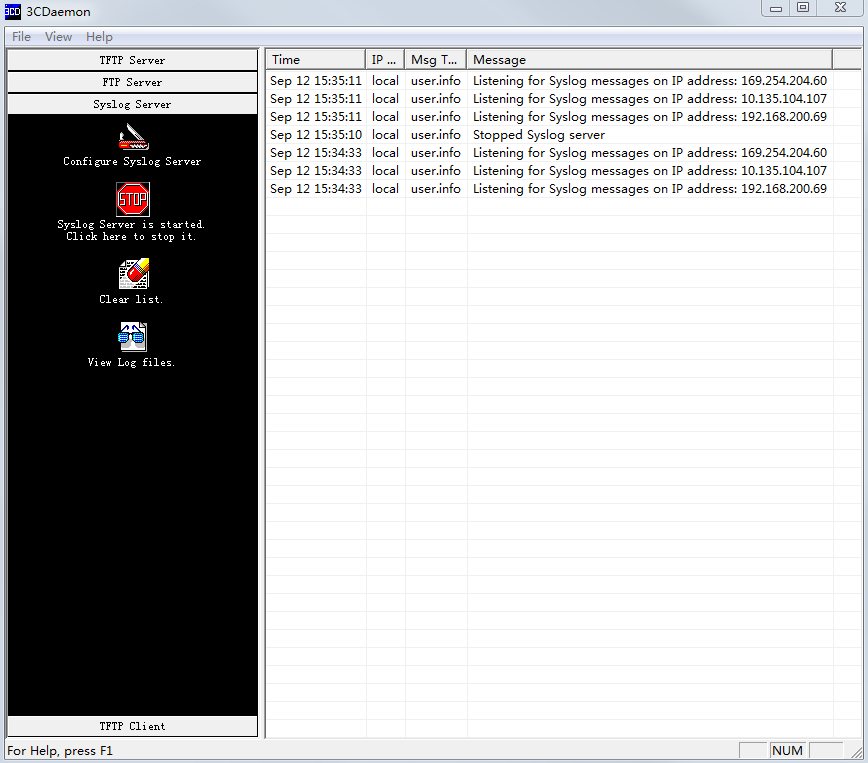
# Verify that you can view logs sent by the switch on the log host server.
Figure 3 Viewing logs on 3CDaemon
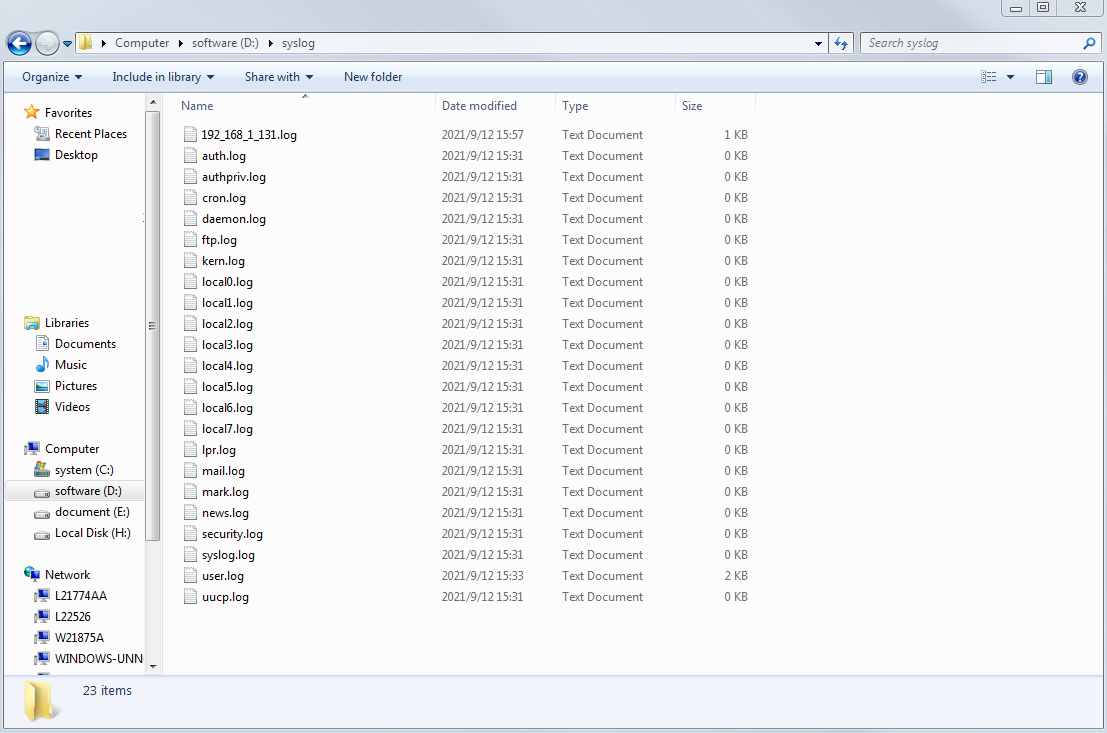
# Open the directory where the log files are saved to view logs.
Figure 4 Viewing log file directory
Configuration files
#
info-center enable
info-center loghost 1.2.0.1 facility local7
#
Related documentation
· Information center configuration in the network management and monitoring configuration guide for the device.
· Information center commands in the network management and monitoring command reference for the device.
Configuring the device to save logs to a specific folder in the flash drive
Introduction
The following information uses an example to describe the basic procedure for configuring the device to save logs to a specific folder in the flash drive.
Network configuration
· Configure the device to output logs with severity levels from 0 through 7 to a log file in the flash drive. Set the maximum log file size to 1 MB.
· Log user logins and commands executed by the user after login.
· Save the logs to the log buffer before saving them to the log file. Set the maximum number of logs that can be buffered to 500. Set the log file saving interval to 60000 seconds.
· Set the timestamp format to boot for output logs.
Restrictions and guidelines
The log file feature saves logs from the log file buffer to the log file at the specified saving interval. You can also manually trigger an immediate saving of buffered logs to the log file. After saving logs to the log file, the system clears the log file buffer.
Procedure
# Enter system view.
<Device> system-view
# Configure an output rule for sending logs with severity levels from 0 through 7 to the log buffer.
[Device] info-center source default logbuffer level debugging
# Enable log output to the log buffer.
[Device] info-center logbuffer
# Set the maximum number of logs that can be buffered to 500.
[Device] info-center logbuffer size 500
# Configure output of logs with severity levels from 0 through 7 to the log file.
[Device] info-center source default logfile level debugging
# Enable the log file feature.
[Device] info-center logfile enable
# Set the maximum log file size to 1 MB.
[Device] info-center logfile size-quota 1
# Configure the device to save logs to the flash:/test directory.
[Device] info-center logfile directory flash:/test
# Set the log file saving interval to 60000 seconds.
[Device] info-center logfile frequency 60000
# Set the timestamp format to boot for output logs.
[Device] info-center timestamp boot
Verifying the configuration
# View the summary of log file configurations.
[Device] display logfile summary
Log file: Enabled
Log file size quota: 1 MB
Log file directory: flash:/test
Writing frequency: 16 hour 40 min 0 sec
The output shows that the log file feature is enabled, the maximum log file size is 1 MB, the log file directory is flash:/test, and the log file saving interval is 60000 seconds.
# View information about the log buffer and the buffered logs.
[Device] display logbuffer
Log buffer: Enabled
Max buffer size: 1024
Actual buffer size: 500
Dropped messages: 0
Overwritten messages: 402788
Current messages: 500
---- More ----
The output shows that log output to the log buffer is enabled, the maximum log file buffer size is 1 MB, and the maximum number of logs that can be buffered is 500.
# View the logs sent to the flash:/test directory.
[Device] more test/logfile.log
%@3049495%0.2409505789 H3C ARP/6/ARP_TARGET_IP_INVALID: Target IP 192.168.1.60 w
as not the IP of the receiving interface M-GigabitEthernet0/0/0.
%@3049496%0.2409506971 H3C ARP/6/ARP_TARGET_IP_INVALID: Target IP 10.1.1.2 was n
ot the IP of the receiving interface M-GigabitEthernet0/0/0.
%@3049497%0.2409510823 H3C ARP/6/ARP_TARGET_IP_INVALID: Target IP 10.1.1.2 was n
ot the IP of the receiving interface M-GigabitEthernet0/0/0. This message repeat
ed 2 times in last 3 seconds.
%@3049498%0.2409510789 H3C ARP/6/ARP_TARGET_IP_INVALID: Target IP 192.168.1.60 w
as not the IP of the receiving interface M-GigabitEthernet0/0/0.
%@3049499%0.2409520259 H3C ARP/6/ARP_TARGET_IP_INVALID: Target IP 192.168.1.60 w
as not the IP of the receiving interface M-GigabitEthernet0/0/0. This message re
peated 1 times in last 10 seconds.
---- More ----
Configuration files
#
info-center timestamp boot
info-center logfile frequency 6000
info-center logfile size-quota 1
info-center source default monitor deny
info-center source default logbuffer level debugging
info-center source default logfile level debugging
#
Related documentation
· Information center configuration in the network management and monitoring configuration guide for the device.
· Information center commands in the network management and monitoring command reference for the device.