- Table of Contents
-
- 10-Security
- 00-Preface
- 01-AAA configuration
- 02-802.1X configuration
- 03-802.1X client configuration
- 04-MAC authentication configuration
- 05-Portal configuration
- 06-User profile configuration
- 07-Password control configuration
- 08-Public key management
- 09-PKI configuration
- 10-IPsec configuration
- 11-SSH configuration
- 12-SSL configuration
- 13-Session management
- 14-Connection limit configuration
- 15-Attack detection and prevention configuration
- 16-IP source guard configuration
- 17-ARP attack protection configuration
- 18-ND attack defense configuration
- 19-User isolation configuration
- 20-ASPF configuration
- Related Documents
-
| Title | Size | Download |
|---|---|---|
| 12-SSL configuration | 110.41 KB |
Contents
Configuring an SSL server policy
Configuring an SSL client policy
Displaying and maintaining SSL
SSL server policy configuration example
Configuring SSL
Overview
Secure Sockets Layer (SSL) is a cryptographic protocol that provides communication security for TCP-based application layer protocols such as HTTP. SSL has been widely used in applications such as e-business and online banking to provide secure data transmission over the Internet.
SSL security services
SSL provides the following security services:
· Privacy—SSL uses a symmetric encryption algorithm to encrypt data. It uses the asymmetric key algorithm of RSA to encrypt the key used by the symmetric encryption algorithm. For more information about RSA, see "Managing public keys."
· Authentication—SSL uses certificate-based digital signatures to authenticate the SSL server and client. The SSL server and client obtain digital certificates through PKI. For more information about PKI and digital certificates, see "Configuring PKI."
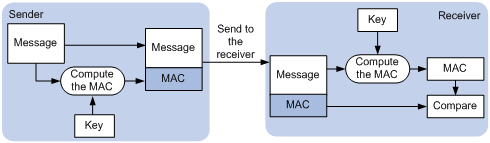
· Integrity—SSL uses the message authentication code (MAC) to verify message integrity. It uses a MAC algorithm and a key to transform a message of any length to a fixed-length message. Any change to the original message will result in a change to the calculated fixed-length message. As shown in Figure 1, the message integrity verification process is as follows:
a. The sender uses a MAC algorithm and a key to calculate a MAC value for a message. Then, it appends the MAC value to the message and sends the message to the receiver.
b. The receiver uses the same key and MAC algorithm to calculate a MAC value for the received message, and compares it with the MAC value appended to the message.
c. If the two MAC values match, the receiver considers the message intact. Otherwise, the receiver considers that the message was tampered with and it discards the message.
Figure 1 MAC algorithm diagram
SSL protocol stack
The SSL protocol stack includes the following protocols:
· SSL record protocol at the lower layer.
· SSL handshake protocol, SSL change cipher spec protocol, and SSL alert protocol at the upper layer.
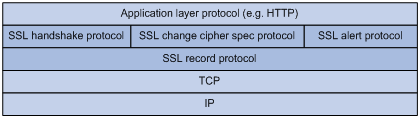
The following describes the major functions of SSL protocols:
· SSL record protocol—Fragments data received from the upper layer, computes and adds MAC to the data, and encrypts the data.
· SSL handshake protocol—Negotiates the cipher suite used for secure communication, authenticates the server and client, and securely exchanges the keys between the server and client. The cipher suite that needs to be negotiated includes the symmetric encryption algorithm, key exchange algorithm, and MAC algorithm.
· SSL change cipher spec protocol—Notifies the receiver that subsequent packets are to be protected based on the negotiated cipher suite and key.
· SSL alert protocol—Sends alert messages to the receiving party. An alert message contains the alert severity level and a description.
SSL configuration task list
|
Tasks at a glance |
Remarks |
|
Perform this configuration task on the SSL server. |
|
|
Perform this configuration task on the SSL client. |
Configuring an SSL server policy
An SSL server policy is a set of SSL parameters used by the SSL server. An SSL server policy takes effect only after it is associated with an application such as HTTPS.
SSL versions include SSL 2.0, SSL 3.0, and TLS 1.0 (or SSL 3.1). By default, the SSL server can communicate with clients running SSL 3.0 or TLS 1.0. When the server receives an SSL 2.0 Client Hello message from a client that supports both SSL 2.0 and SSL 3.0/TLS 1.0, it notifies the client to use SSL 3.0 or TLS 1.0 for communication.
You can disable SSL 3.0 on the device to enhance system security.
To configure an SSL server policy:
|
Step |
Command |
Remarks |
|
1. Enter system view. |
system-view |
N/A |
|
2. (Optional.) Disable SSL 3.0. |
ssl version ssl3.0 disable |
By default, SSL 3.0 is enabled. |
|
3. (Optional.) Disable SSL session renegotiation for the SSL server. |
ssl renegotiation disable |
By default, SSL session renegotiation is enabled. |
|
4. Create an SSL server policy and enter its view. |
ssl server-policy policy-name |
By default, no SSL server policies exist on the device. |
|
5. (Optional.) Specify a PKI domain for the SSL server policy. |
pki-domain domain-name |
By default, no PKI domain is specified for an SSL server policy. If SSL server authentication is required, you must specify a PKI domain and request a local certificate for the SSL server in the domain. For information about how to create and configure a PKI domain, see "Configuring PKI." |
|
6. Specify the cipher suites that the SSL server policy supports. |
ciphersuite { dhe_rsa_aes_128_cbc_sha | exp_rsa_des_cbc_sha | exp_rsa_rc2_md5 | exp_rsa_rc4_md5 | rsa_3des_ede_cbc_sha | rsa_aes_128_cbc_sha | rsa_aes_256_cbc_sha | rsa_des_cbc_sha | rsa_rc4_128_md5 | rsa_rc4_128_sha } * |
By default, an SSL server policy supports all cipher suites. |
|
7. Set the maximum number of sessions that the SSL server can cache and the session cache timeout time. |
session { cachesize size | timeout time } |
By default, the SSL server can cache a maximum of 500 sessions, and the session cache timeout time is 3600 seconds. |
|
8. (Optional.) Enable mandatory or optional SSL client authentication. |
By default, SSL client authentication is disabled. The SSL server does not perform digital certificate-based authentication on SSL clients. When authenticating a client by using the digital certificate, the SSL server verifies the certificate chain presented by the client. It also verifies that the certificates in the certificate chain (except the root CA certificate) are not revoked. |
|
|
9. (Optional.) Enable the SSL server to send the complete certificate chain to the client during SSL negotiation. |
certificate-chain-sending enable |
By default, the SSL server sends the server certificate rather than the complete certificate chain to the client during negotiation, |
Configuring an SSL client policy
An SSL client policy is a set of SSL parameters that the client uses to establish a connection to the server. An SSL client policy takes effect only after it is associated with an application such as DDNS. For information about DDNS, see Layer 3—IP Services Configuration Guide.
You can specify the SSL version (SSL 3.0 or TLS 1.0) for an SSL client policy:
· If TLS 1.0 is specified and SSL 3.0 is not disabled, the client first uses TLS 1.0 to connect to the SSL server. If the connection attempt fails, the client uses SSL 3.0.
· If TLS 1.0 is specified and SSL 3.0 is disabled, the client only uses TLS 1.0 to connect to the SSL server.
· If SSL 3.0 is specified, the client uses SSL 3.0 to connect to the SSL server, whether you disable SSL 3.0 or not.
As a best practice to enhance system security, disable SSL 3.0 on the device and specify TLS 1.0 for an SSL client policy.
To configure an SSL client policy:
|
Step |
Command |
Remarks |
|
1. Enter system view. |
system-view |
N/A |
|
2. (Optional.) Disable SSL 3.0. |
ssl version ssl3.0 disable |
By default, SSL 3.0 is enabled. |
|
3. (Optional.) Disable SSL session renegotiation for the SSL client. |
ssl renegotiation disable |
By default, SSL session renegotiation is enabled. |
|
4. Create an SSL client policy and enter its view. |
ssl client-policy policy-name |
By default, no SSL client policies exist on the device. |
|
5. (Optional.) Specify a PKI domain for the SSL client policy. |
pki-domain domain-name |
By default, no PKI domain is specified for an SSL client policy. If SSL client authentication is required, you must specify a PKI domain and request a local certificate for the SSL client in the PKI domain. For information about how to create and configure a PKI domain, see "Configuring PKI." |
|
6. Specify the preferred cipher suite for the SSL client policy. |
prefer-cipher { dhe_rsa_aes_128_cbc_sha | dhe_rsa_aes_256_cbc_sha | exp_rsa_des_cbc_sha | exp_rsa_rc2_md5 | exp_rsa_rc4_md5 | rsa_3des_ede_cbc_sha | rsa_aes_128_cbc_sha | rsa_aes_256_cbc_sha | rsa_des_cbc_sha | rsa_rc4_128_md5 | rsa_rc4_128_sha } |
The default preferred cipher suite is rsa_rc4_128_md5. |
|
7. Specify the SSL version for the SSL client policy. |
version { ssl3.0 | tls1.0 } |
By default, an SSL client policy uses TLS 1.0. |
|
8. Enable the SSL client to authenticate servers through digital certificates. |
server-verify enable |
By default, SSL server authentication is enabled. |
Displaying and maintaining SSL
Execute display commands in any view.
|
Task |
Command |
|
Display SSL server policy information. |
display ssl server-policy [ policy-name ] |
|
Display SSL client policy information. |
display ssl client-policy [ policy-name ] |
SSL server policy configuration example
Network requirements
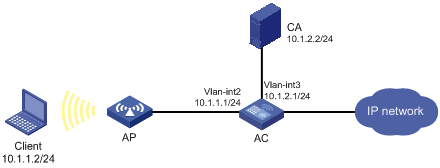
As shown in Figure 3, users need to access and manage the AC through the Web page.
To protect the AC and prevent data from being eavesdropped or tampered with, configure the AC to be accessible through HTTPS only.
In this example, the CA server runs Windows Server and has the SCEP plug-in installed.
Configuration considerations
To meet the network requirements, perform the following tasks:
· Configure the AC as the HTTPS server and request a server certificate for the AC. For more information about HTTPS, see Fundamentals Configuration Guide.
· Request a client certificate for the client so that the AC can authenticate the identity of the client.
Configuration procedure
1. Make sure the AC, the client, and the CA server can reach each other. (Details not shown.)
2. Configure the HTTPS server on the AC:
# Create a PKI entity named en. Set the common name and FQDN for the entity.
[AC] pki entity en
[AC-pki-entity-en] common-name http-server1
[AC-pki-entity-en] fqdn ssl.security.com
[AC-pki-entity-en] quit
# Create PKI domain 1 and specify the name of the trusted CA as CA server. Set the URL of the registration server to http://10.1.2.2/certsrv/mscep/mscep.dll, the authority for certificate request to RA, and the entity for certificate request to en. Set the URL of the CRL repository to http://10.1.2.2/CertEnroll/caserver.crl.
[AC-pki-domain-1] ca identifier CA server
[AC-pki-domain-1] certificate request url http://10.1.2.2/certsrv/mscep/mscep.dll
[AC-pki-domain-1] certificate request from ra
[AC-pki-domain-1] certificate request entity en
[AC-pki-domain-1] crl url http://10.1.2.2/CertEnroll/caserver.crl
# Configure a general-purpose RSA key pair named abc and set the key modulus length to 1024 bits.
[AC-pki-domain-1] public-key rsa general name abc length 1024
[AC-pki-domain-1] quit
# Generate the RSA key pair named abc.
[AC] public-key local create rsa name abc
The range of public key modulus is (512 ~ 2048).
If the key modulus is greater than 512,it will take a few minutes.
Press CTRL+C to abort.
Input the modulus length [default = 1024]:
Generating Keys...
..........................++++++
.....................................++++++
Create the key pair successfully.
# Obtain the CA certificate.
[AC] pki retrieve-certificate domain 1 ca
The trusted CA's finger print is:
MD5 fingerprint:7682 5865 ACC2 7B16 6F52 D60F D998 4484
SHA1 fingerprint:DF6B C53A E645 5C81 D6FC 09B0 3459 DFD1 94F6 3DDE
Is the finger print correct?(Y/N):y
Retrieved the certificates successfully.
# Request a certificate the AC.
[AC] pki request-certificate domain 1
Start to request general certificate ...
Certificate requested successfully.
# Create an SSL server policy named myssl.
[AC] ssl server-policy myssl
# Specify PKI domain 1 for the SSL server policy.
[AC-ssl-server-policy-myssl] pki-domain 1
# Enable client authentication.
[AC-ssl-server-policy-myssl] client-verify enable
[AC-ssl-server-policy-myssl] quit
# Configure the HTTPS service to use SSL server policy myssl.
[AC] ip https ssl-server-policy myssl
# Enable the HTTPS service.
[AC] ip https enable
# Create a local user named usera. Set the password to 123, service type to https, and user role to network-admin.
[AC-luser-usera] password simple 123
[AC-luser-usera] service-type https
[AC-luser-usera] authorization-attribute user-role network-admin
3. Request a certificate for the client:
a. Launch IE on the client, and then enter http://10.1.2.2/certsrv in the address bar.
b. Request a client certificate for the client. (Details not shown.)
Verifying the configuration
Perform the following tasks on the client:
1. Launch IE and enter https://10.1.1.1 in the address bar.
2. Select the client certificate issued by the CA server.
The login page of the AC should appear.
3. Enter username usera and password 123.
Verify that now you can log in to the Web interface to access and manage the AC.