- Table of Contents
-
- 10-Security
- 00-Preface
- 01-AAA configuration
- 02-802.1X configuration
- 03-802.1X client configuration
- 04-MAC authentication configuration
- 05-Portal configuration
- 06-User profile configuration
- 07-Password control configuration
- 08-Public key management
- 09-PKI configuration
- 10-IPsec configuration
- 11-SSH configuration
- 12-SSL configuration
- 13-Session management
- 14-Connection limit configuration
- 15-Attack detection and prevention configuration
- 16-IP source guard configuration
- 17-ARP attack protection configuration
- 18-ND attack defense configuration
- 19-User isolation configuration
- 20-ASPF configuration
- Related Documents
-
| Title | Size | Download |
|---|---|---|
| 06-User profile configuration | 185.14 KB |
Command and hardware compatibility
Configuration restrictions and guidelines
Displaying and maintaining user profiles
User profile configuration example
Configuring user profiles
Overview
A user profile saves a set of predefined parameters.
The user profile application allows flexible traffic policing on a per-user basis. Each time a user passes authentication, the device automatically applies the parameters in the user profile to this user.
The user profile restricts authenticated user behavior as follows:
1. After the authentication server verifies a user, the server sends the device the name of the user profile specified for the user.
2. The device applies the parameters in the user profile to the user.
3. When the user logs out, the device automatically removes the user profile parameters.
Command and hardware compatibility
The WX1800H series, WX2500H series, and WX3000H series access controllers do not support the slot keyword or the slot-number argument.
Configuration restrictions and guidelines
When you configure user profiles, follow these restrictions and guidelines:
· Configure authentication parameters before you create a user profile. The user profile supports working with 802.1X, portal, PPP, and MAC authentication methods.
· Specify a user profile for each user account:
¡ In remote authentication, specify a user profile on the authentication server.
¡ In local authentication, specify a user profile in the local user view. For information about local users, see "Configuring AAA."
Configuring a user profile
|
Command |
Remarks |
|
|
1. Enter system view. |
system-view |
N/A |
|
2. Create a user profile and enter user profile view. |
user-profile profile-name |
You can use the command to enter the view of an existing user profile. |
Displaying and maintaining user profiles
Execute display commands in any view.
|
Task |
Command |
|
Display configuration and online user information for the specified user profile or all user profiles. |
display user-profile [ name profile-name ] [ slot slot-number ] |
User profile configuration example
Network requirements
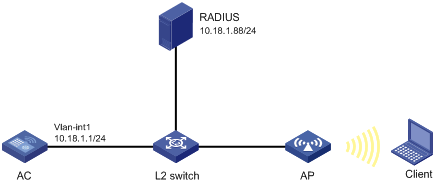
As shown in Figure 1, the AC is connected to the RADIUS server through a Layer 2 switch.
Configure the AC to meet the following requirements:
· MAC authentication is used.
· MAC-authenticated users access the wireless network through the specified AP.
Configuration procedure
Before configuring the AC, make sure:
· The AC and the RADIUS server can reach each other.
· An account with username 123 and password aaa_maca has been added on the RADIUS server.
1. Configure a RADIUS scheme:
# Create a RADIUS scheme named imcc.
<AC> system-view
[AC] radius scheme imcc
# Specify the primary authentication server.
[AC-radius-imcc] primary authentication 10.18.1.88 1812
# Specify the primary accounting server.
[AC-radius-imcc] primary accounting 10.18.1.88 1813
# Set the authentication key to 12345678 in plaintext form.
[AC-radius-imcc] key authentication simple 12345678
# Set the accounting key to 12345678 in plaintext form.
# Exclude domain names from the usernames sent to the RADIUS server.
[AC-radius-imcc] user-name-format without-domain
[AC-radius-imcc] quit
2. Configure AAA methods for an ISP domain:
# Create an ISP domain named imc.
[AC] domain imc
# Apply RADIUS scheme imcc to ISP domain imc for authentication, authorization, and accounting.
[AC-isp-imc] authentication lan-access radius-scheme imcc
[AC-isp-imc] authorization lan-access radius-scheme imcc
[AC-isp-imc] accounting lan-access radius-scheme imcc
[AC-isp-imc] quit
3. Configure MAC authentication:
# Specify username 123 and password aaa_maca in plain text for the account shared by MAC authentication users.
[AC] mac-authentication user-name-format fixed account 123 password simple aaa_maca
# Configure SSID maca_imc for wireless service template maca_imc.
[AC] wlan service-template maca_imc
[AC-wlan-st-maca_imc] ssid maca_imc
# Set the authentication mode to MAC authentication.
[AC-wlan-st-maca_imc] client-security authentication-mode mac
# Specify the ISP domain imc for the service template.
[AC-wlan-st-maca_imc] mac-authentication domain imc
# Enable the service template.
[AC-wlan-st-maca_imc] service-template enable
[AC-wlan-st-maca_imc] quit
4. Configure the manual AP ap1, and bind the service template to an AP radio:
# Create a manual AP named ap1, and specify the AP model and serial ID.
[AC] wlan ap ap1 model WA4320i-ACN
[AC-wlan-ap-ap1] serial-id 210235A1BSC123000050
# Configure channel 149 as the working channel for radio 1 of the AP, and enable radio 1.
[AC-wlan-ap-ap1-radio-1] channel 149
[AC-wlan-ap-ap1-radio-1] radio enable
# Bind the service template maca_imc to radio 1.
[AC-wlan-ap-ap1-radio-1] service-template maca_imc
[AC-wlan-ap-ap1-radio-1] quit
[AC-wlan-ap-ap1] quit
5. Configure a user profile:
# Create an AP group named macauth1, and add AP ap1 to the AP group.
[AC] wlan ap-group macauth1
[AC-wlan-ap-group-macauth1] ap ap1
[AC-wlan-ap-group-macauth1] quit
# Create a user profile named mac1, and specify AP group macauth1 as the permitted AP group for client access.
[AC] user-profile mac1
[AC-user-profile-mac1] wlan permit-ap-group macauth1
[AC-user-profile-mac1] quit
6. Configure the RADIUS server on IMC 7.0:
|
|
NOTE: In this example, the RADIUS server runs on IMC PLAT 7.2 and IMC EIA 7.2. |
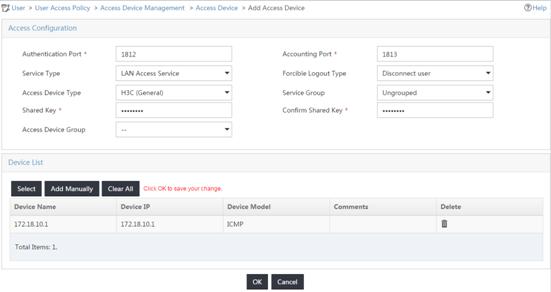
# Add the AC to IMC EIA as an access device.
Log in to IMC, click the User tab, and select User Access Policy > Access Device Management > Access Device from the navigation tree. Then, click Add to configure an access device as follows:
a. Set the shared key for secure RADIUS communication to 12345678.
b. Select the access device from the device list or manually add the access device (with the IP address 10.18.1.1).
c. Leave the default settings for other parameters and click OK.
Figure 2 Adding the AC as an access device
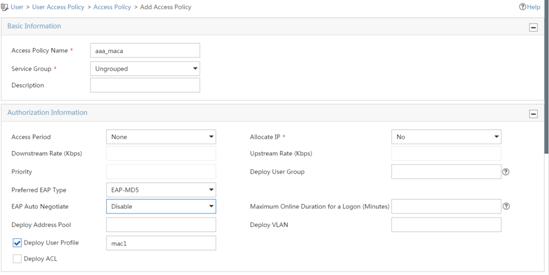
# Add an access policy.
a. Click the User tab, and select User Access Policy > Access Policy from the navigation tree. Then, click Add to configure an access policy.
b. Set the policy name to aaa_maca, and use default settings for other parameters.
Figure 3 Adding an access policy
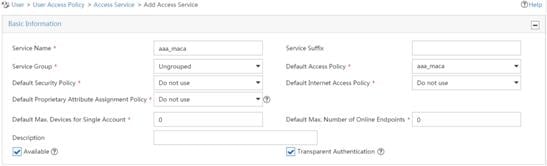
# Add an access service.
a. Click the User tab, and select User Access Policy > Access Service from the navigation tree. Then, click Add to configure an access service.
b. Set the service name to aaa_maca, and specify access policy aaa_maca as the default access policy.
Figure 4 Adding an access service
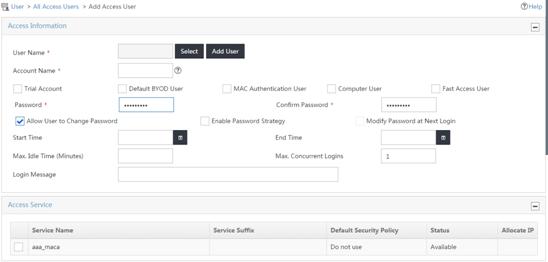
# Add an access user.
Click the User tab, and select Access User > All Access Users from the navigation tree. Then, click Add to configure an access user as follows:
a. Enter username 123.
b. Enter account name 123 and password aaa_maca.
c. Select access service aaa_maca.
Figure 5 Adding an access user
Verifying the configuration
# Display information about online MAC authentication users.
[AC] display mac-authentication connection
Total connections: 1
User MAC address : 0452-f33a-02fa
AP name : ap1
Radio ID : 1
SSID : maca_imc
BSSID : 741f-4a35-7b40
Username : 123
Authentication domain : imc
Initial VLAN : 1
Authorization VLAN : N/A
Authorization ACL number : N/A
Authorization user profile : mac1
Termination action : Default
Session timeout period : 86400 s
Online from : 2016/06/23 20:42:00
Online duration : 0h 0m 21s
# Display client information.
[AC] display wlan client
Total number of clients : 1
MAC address Username APID/RID IP address IPv6 address VLAN
0452-f33a-02fa 123 1/1 10.18.1.100 1