- Table of Contents
- Related Documents
-
| Title | Size | Download |
|---|---|---|
| 01-AAA Configuration | 518.81 KB |
Table of Contents
Security Authentication Mechanism
Basic Message Exchange Process of RADIUS
Differences Between HWTACACS and RADIUS
Basic Message Exchange Process of HWTACACS
RADIUS Configuration Task List
HWTACACS Configuration Task List
Configuring ISP Domain Attributes
Configuring AAA Authentication Methods for an ISP Domain
Configuring AAA Authorization Methods for an ISP Domain
Configuring AAA Accounting Methods for an ISP Domain
Configuring Local User Attributes
Tearing down User Connections Forcibly
Displaying and Maintaining AAA
Specifying the RADIUS Authentication/Authorization Servers
Specifying the RADIUS Accounting Servers and Relevant Parameters
Setting the Shared Key for RADIUS Packets
Setting the Upper Limit of RADIUS Request Retransmission Attempts
Setting the Supported RADIUS Server Type
Setting the Status of RADIUS Servers
Configuring Attributes Related to the Data Sent to the RADIUS Server
Setting Timers Regarding RADIUS Servers
Specifying Security Policy Servers
Enabling the Listening Port of the RADIUS Client
Displaying and Maintaining RADIUS
Specifying the HWTACACS Authentication Servers
Specifying the HWTACACS Authorization Servers
Specifying the HWTACACS Accounting Servers
Setting the Shared Key for HWTACACS Packets
Configuring Attributes Related to the Data Sent to HWTACACS Server
Setting Timers Regarding HWTACACS Servers
Displaying and Maintaining HWTACACS
AAA for Telnet Users by a HWTACACS Server
AAA for Telnet Users by Separate Servers
AAA for SSH Users by a RADIUS Server
When configuring AAA, go to these sections for information you are interested in:
Introduction to AAA
Authentication, Authorization, and Accounting (AAA) provides a uniform framework for configuring these three security functions to implement network security management.
AAA usually uses a client/server model, where the client runs on the network access server (NAS) and the server maintains user information centrally. In an AAA network, a NAS is a server for users but a client for the AAA servers, as shown in Figure 1-1.
Figure 1-1 AAA networking diagram
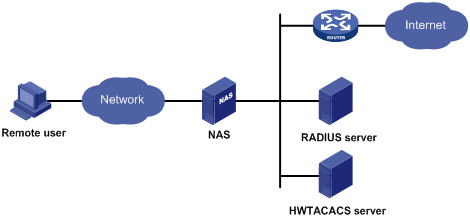
When a user tries to establish a connection to the NAS and to obtain the rights to access other networks or some network resources, the NAS authenticates the user or the corresponding connection. The NAS can transparently pass the user’s AAA information to the server (RADIUS server or HWTACACS server). The RADIUS/HWTACACS protocol defines how to exchange user information between a NAS and a server.
In the AAA network shown in Figure 1-1, there is a RADIUS server and a HWTACACS server. You can determine the authentication, authorization and accounting scheme according to the actual requirements. For example, you can use the HWTACACS server for authentication and authorization, and the RADIUS server for accounting.
The three security functions are described as follows:
l Authentication: Identifies remote users and judges whether a user is legal.
l Authorization: Grants different users different rights. For example, a user logging into the server can be granted the permission to access and print the files in the server.
l Accounting: Records all network service usage information of users, including the service type, start and end time, and traffic. In this way, accounting can be used for not only accounting itself, but also network security surveillance.
You can use AAA to provide only one or two security functions, if desired. For example, if your company only wants employees to be authenticated before they access specific resources, you can configure only an authentication server. If network usage information is expected to be recorded, you also need to configure an accounting server.
As mentioned above, AAA provides a uniform framework to implement network security management. It is a security mechanism that enables authenticated and authorized entities to access specific resources and records operations by the entities. The AAA framework thus allows for excellent scalability and centralized user information management.
AAA can be implemented through multiple protocols. Currently, the device supports using RADIUS and HWTACACS for AAA, and RADIUS is often used in practice.
Introduction to RADIUS
Remote Authentication Dial-In User Service (RADIUS) is a distributed information interaction protocol in the client/server model. RADIUS can protect networks against unauthorized access and is often used in network environments where both high security and remote user access are required. Based on UDP, RADIUS defines the RADIUS packet format and the message transfer mechanism, and uses UDP port 1812 as the authentication port and 1813 as the accounting port.
RADIUS was originally designed for dial-in user access. With the diversification of access methods, RADIUS has been extended to support more access methods, for example, Ethernet access and ADSL access. It uses authentication and authorization to provide access service and uses accounting to collect and record usage information of network resources.
Client/Server Model
l Client: The RADIUS client runs on the NASs located throughout the network. It passes user information to designated RADIUS servers and acts on the responses (for example, rejects or accepts user access requests).
l Server: The RADIUS server runs on the computer or workstation at the network center and maintains information related to user authentication and network service access. It authenticates a user after receiving a connection request and returns the processing result (for example, rejecting or accepting user access requests) to the client.
In general, the RADIUS server maintains three databases, namely, Users, Clients, and Dictionary, as shown in Figure 1-2:
Figure 1-2 RADIUS server components
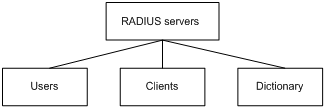
l Users: Stores user information such as the username, password, applied protocols, and IP address.
l Clients: Stores information about RADIUS clients such as the shared keys and IP addresses.
l Dictionary: Stores information about the meaning of RADIUS protocol attributes and their values.
Security Authentication Mechanism
Information exchanged between the RADIUS client and the RADIUS server is authenticated with a shared key, which is never transmitted over the network, thus enhancing the security of information exchange. To prevent user passwords from being intercepted in non-secure networks, the passwords are encrypted during transmission.
A RADIUS server supports multiple user authentication methods, such as the Password Authentication Protocol (PAP) and Challenge Handshake Authentication Protocol (CHAP). In addition, a RADIUS server can act as the client of another AAA server to provide proxy authentication service.
Basic Message Exchange Process of RADIUS
For the interaction among the host, the RADIUS client, and the RADIUS server, see Figure 1-3.
Figure 1-3 Basic message exchange process of RADIUS

The following is how RADIUS operates:
1) The host initiates a connection request carrying the username and password to the RADIUS client.
2) Having received the username and password, the RADIUS client sends an authentication request (Access-Request) to the RADIUS server, with the user password encrypted by using the Message-Digest 5 (MD5) algorithm and the shared key.
3) The RADIUS server authenticates the username and password. If the authentication succeeds, it sends back an Access-Accept message containing the information of the user’s right. If the authentication fails, it returns an Access-Reject message.
4) The RADIUS client permits or denies the user according to the returned authentication result. If it permits the user, it sends a start-accounting request (Accounting-Request) to the RADIUS server.
5) The RADIUS server returns a start-accounting response (Accounting-Response) and starts accounting.
6) The subscriber accesses the network resources.
7) The host requests the RADIUS client to tear down the connection and the RADIUS client sends a stop-accounting request (Accounting-Request) to the RADIUS server.
8) The RADIUS server returns a stop-accounting response (Accounting-Response) and stops accounting.
9) The subscriber stops access to network resources.
RADIUS Packet Format
RADIUS uses UDP to transmit messages. It ensures the smooth message exchange between the RADIUS server and the client through a series of mechanisms, including the timer management mechanism, retransmission mechanism, and slave server mechanism. Figure 1-4 shows the RADIUS packet format.
Figure 1-4 RADIUS packet format
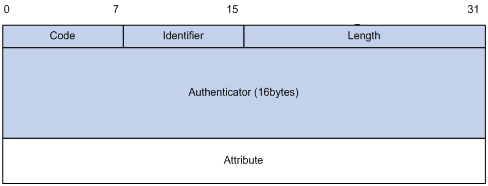
Descriptions of fields are as follows:
1) The Code field (1-byte long) is for indicating the type of the RADIUS packet. Table 1-1 gives the possible values and their meanings.
Table 1-1 Main values of the Code field
|
Code |
Packet type |
Description |
|
1 |
Access-Request |
From the client to the server. A packet of this type carries user information for the server to authenticate the user. It must contain the User-Name attribute and can optionally contain the attributes of NAS-IP-Address, User-Password, and NAS-Port. |
|
2 |
Access-Accept |
From the server to the client. If all the attribute values carried in the Access-Request are acceptable, that is, the authentication succeeds, the server sends an Access-Accept response. |
|
3 |
Access-Reject |
From the server to the client. If any attribute value carried in the Access-Request is unacceptable, the server rejects the user and sends an Access-Reject response. |
|
4 |
Accounting-Request |
From the client to the server. A packet of this type carries user information for the server to start/stop accounting for the user. It contains the Acct-Status-Type attribute, which indicates whether the server is requested to start the accounting or to end the accounting. |
|
5 |
Accounting-Response |
From the server to the client. The server sends to the client a packet of this type to notify that it has received the Accounting-Request and has correctly started recording the accounting information. |
2) The Identifier field (1-byte long) is for matching request packets and response packets and detecting retransmitted request packets. The request and response packets of the same type have the same identifier.
3) The Length field (2-byte long) indicates the length of the entire packet, including the Code, Identifier, Length, Authenticator, and Attribute fields. The value of the field is in the range 20 to 4096. Bytes beyond the length are considered the padding and are neglected after being received. If the length of a received packet is less than that indicated by the Length field, the packet is dropped.
4) The Authenticator field (16-byte long) is used to authenticate the reply from the RADIUS server, and is also used in the password hiding algorithm. There are two kinds of authenticators: Request authenticator and Response authenticator.
5) The Attribute field, with a variable length, carries specific authentication, authorization, and accounting information to define configuration details of a request or response. This field is represented in triplets of Type, Length, and Value.
l Type: One byte, in the range 1 to 255. It indicates the type of the attribute. Commonly used attributes for RADIUS authentication, authorization and accounting are listed in Table 1-2.
l Length: One byte for indicating the length of the attribute in bytes, including the Type, Length, and Value fields.
l Value: Value of the attribute, up to 253 bytes. Its format and content depend on the Type and Length fields.
|
No. |
Attribute |
No. |
Attribute |
|
1 |
User-Name |
45 |
Acct-Authentic |
|
2 |
User-Password |
46 |
Acct-Session-Time |
|
3 |
CHAP-Password |
47 |
Acct-Input-Packets |
|
4 |
NAS-IP-Address |
48 |
Acct-Output-Packets |
|
5 |
NAS-Port |
49 |
Acct-Terminate-Cause |
|
6 |
Service-Type |
50 |
Acct-Multi-Session-Id |
|
7 |
Framed-Protocol |
51 |
Acct-Link-Count |
|
8 |
Framed-IP-Address |
52 |
Acct-Input-Gigawords |
|
9 |
Framed-IP-Netmask |
53 |
Acct-Output-Gigawords |
|
10 |
Framed-Routing |
54 |
(unassigned) |
|
11 |
Filter-ID |
55 |
Event-Timestamp |
|
12 |
Framed-MTU |
56-59 |
(unassigned) |
|
13 |
Framed-Compression |
60 |
CHAP-Challenge |
|
14 |
Login-IP-Host |
61 |
NAS-Port-Type |
|
15 |
Login-Service |
62 |
Port-Limit |
|
16 |
Login-TCP-Port |
63 |
Login-LAT-Port |
|
17 |
(unassigned) |
64 |
Tunnel-Type |
|
18 |
Reply_Message |
65 |
Tunnel-Medium-Type |
|
19 |
Callback-Number |
66 |
Tunnel-Client-Endpoint |
|
20 |
Callback-ID |
67 |
Tunnel-Server-Endpoint |
|
21 |
(unassigned) |
68 |
Acct-Tunnel-Connection |
|
22 |
Framed-Route |
69 |
Tunnel-Password |
|
23 |
Framed-IPX-Network |
70 |
ARAP-Password |
|
24 |
State |
71 |
ARAP-Features |
|
25 |
Class |
72 |
ARAP-Zone-Access |
|
26 |
Vendor-Specific |
73 |
ARAP-Security |
|
27 |
Session-Timeout |
74 |
ARAP-Security-Data |
|
28 |
Idle-Timeout |
75 |
Password-Retry |
|
29 |
Termination-Action |
76 |
Prompt |
|
30 |
Called-Station-Id |
77 |
Connect-Info |
|
31 |
Calling-Station-Id |
78 |
Configuration-Token |
|
32 |
NAS-Identifier |
79 |
EAP-Message |
|
33 |
Proxy-State |
80 |
Message-Authenticator |
|
34 |
Login-LAT-Service |
81 |
Tunnel-Private-Group-id |
|
35 |
Login-LAT-Node |
82 |
Tunnel-Assignment-id |
|
36 |
Login-LAT-Group |
83 |
Tunnel-Preference |
|
37 |
Framed-AppleTalk-Link |
84 |
ARAP-Challenge-Response |
|
38 |
Framed-AppleTalk-Network |
85 |
Acct-Interim-Interval |
|
39 |
Framed-AppleTalk-Zone |
86 |
Acct-Tunnel-Packets-Lost |
|
40 |
Acct-Status-Type |
87 |
NAS-Port-Id |
|
41 |
Acct-Delay-Time |
88 |
Framed-Pool |
|
42 |
Acct-Input-Octets |
89 |
(unassigned) |
|
43 |
Acct-Output-Octets |
90 |
Tunnel-Client-Auth-id |
|
44 |
Acct-Session-Id |
91 |
Tunnel-Server-Auth-id |
![]()
The attribute types listed in Table 1-2 are defined by RFC 2865, RFC 2866, RFC 2867, and RFC 2568.
Extended RADIUS Attributes
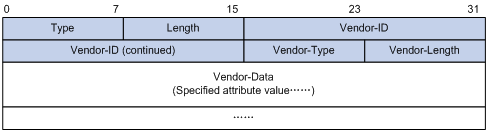
The RADIUS protocol features excellent extensibility. Attribute 26 (Vender-Specific) defined by RFC 2865 allows a vender to define extended attributes to implement functions that the standard RADIUS protocol does not provide.
A vendor can encapsulate multiple type-length-value (TLV) sub-attributes in RADIUS packets for extension in applications. As shown in Figure 1-5 a sub-attribute that can be encapsulated in Attribute 26 consists of the following four parts:
l Vendor-ID (four bytes): Indicates the ID of the vendor. Its most significant byte is 0 and the other three bytes contain a code complying with RFC 1700. The vendor ID of H3C is 2011.
l Vendor-Type: Indicates the type of the sub-attribute.
l Vendor-Length: Indicates the length of the sub-attribute.
l Vendor-Data: Indicates the contents of the sub-attribute.
Figure 1-5 Segment of a RADIUS packet containing an extended attribute
Introduction to HWTACACS
HWTACACS implements AAA mainly for such users as terminal users. In a typical HWTACACS application, a terminal user needs to log onto the device for operations, and HWTACACS is used to authenticate, authorize and keep accounting for the user. Working as the HWTACACS client, the device sends the username and password to the HWTACACS sever for authentication. After passing authentication and being authorized, the user can log into the device to perform operations.
Differences Between HWTACACS and RADIUS
HWTACACS and RADIUS have many common features, like implementing AAA, using a client/server model, using shared keys for user information security and having good flexibility and extensibility. Meanwhile, they also have differences, as listed in Table 1-3.
Table 1-3 Primary differences between HWTACACS and RADIUS
|
HWTACACS |
RADIUS |
|
Uses TCP, providing more reliable network transmission |
Uses UDP, providing higher transport efficiency |
|
Encrypts the entire packet except for the HWTACACS header |
Encrypts only the user password field in an authentication packet |
|
Protocol packets are complicated and authorization is independent of authentication. Authentication and authorization can be deployed on different HWTACACS servers. |
Protocol packets are simple and authorization is combined with authentication. |
|
Supports authorized use of configuration commands. For example, an authenticated login user can be authorized to configure the device. |
Does not support authorized use of configuration commands. |
Basic Message Exchange Process of HWTACACS
The following takes a Telnet user as an example to describe how HWTACACS performs user authentication, authorization, and accounting. Figure 1-6 illustrates the basic message exchange process of HWTACACS.
Figure 1-6 Basic message exchange process of HWTACACS for a Telnet user
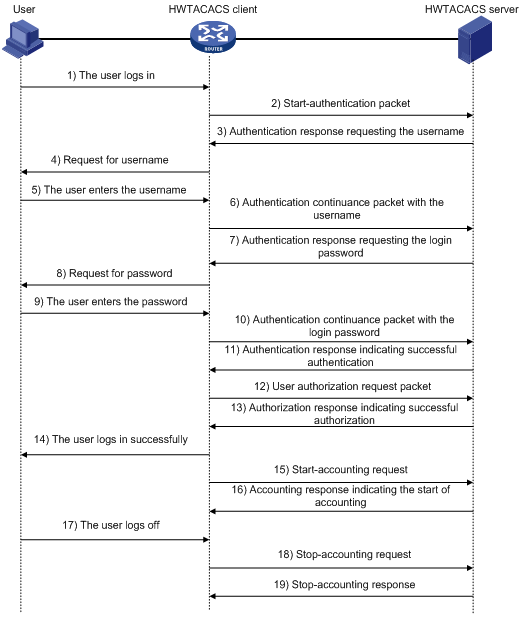
1) A Telnet user requests to access the NAS.
2) Upon receiving the request, the HWTACACS client sends a start-authentication packet to the HWTACACS server.
3) The HWTACACS server sends back an authentication response requesting the username.
4) Upon receiving the request, the HWTACACS client asks the user for the username.
5) The user enters the username.
6) After receiving the username from the user, the HWTACACS client sends to the server a continue-authentication packet carrying the username.
7) The HWTACACS server sends back an authentication response, requesting the login password.
8) Upon receipt of the response, the HWTACACS client requests the login password.
9) The user enters the password.
10) After receiving the login password, the HWTACACS client sends to the HWTACACS server a continue-authentication packet carrying the login password.
11) The HWTACACS server sends back an authentication response indicating that the user has passed authentication.
12) The HWTACACS client sends the user authorization request packet to the HWTACACS server.
13) The HWTACACS server sends back the authorization response, indicating that the user is authorized now.
14) Knowing that the user is now authorized, the HWTACACS client pushes the configuration interface of the NAS to the user.
15) The HWTACACS client sends a start-accounting request to the HWTACACS server.
16) The HWTACACS server sends back an accounting response, indicating that it has received the start-accounting request.
17) The user logs off.
18) The HWTACACS client sends a stop-accounting request to the HWTACACS server.
19) The HWTACACS server sends back a stop-accounting packet, indicating that the stop-accounting request has been received.
Protocols and Standards
The protocols and standards related to AAA, RADIUS, HWTACACS include:
l RFC 2865: Remote Authentication Dial In User Service (RADIUS)
l RFC 2866: RADIUS Accounting
l RFC 2867: RADIUS Accounting Modifications for Tunnel Protocol Support
l RFC 2868: RADIUS Attributes for Tunnel Protocol Support
l RFC 2869: RADIUS Extensions
l RFC 1492: An Access Control Protocol, Sometimes Called TACACS
AAA Configuration Task List
The basic procedure to configure AAA is as follows:
1) Configure an AAA scheme (local authentication or remote authentication).
l Local authentication: Configure local users and related attributes, including usernames and passwords of the users to be authenticated.
l Remote authentication: Configure a RADIUS or HWTACACS scheme, and configure user attributes on the server accordingly.
2) Specify the AAA method: Reference the configured AAA scheme in the users’ ISP domain.
l Authentication method: No authentication (none), local authentication (local), or remote authentication (scheme)
l Authorization method: No authorization (none) , local authorization (local), or remote authorization (scheme)
l Accounting method: No accounting (none), local accounting (local), or remote accounting (scheme)
![]()
For login users, it is necessary to configure the authentication mode for logging into the user interface as scheme. For detailed information, refer to User Interface Configuration of the System Volume.
AAA Configuration Task List
|
Task |
Remarks |
|
Required |
|
|
Optional |
|
|
Required For local authentication, refer to Configuring Local User Attributes. For RADIUS authentication, refer to Configuring RADIUS. For HWTACACS authentication, refer to Configuring HWTACACS. |
|
|
Optional |
|
|
Optional |
|
|
Optional |
|
|
Optional |
|
|
Optional |
RADIUS Configuration Task List
|
Task |
Remarks |
|
Required |
|
|
Required |
|
|
Specifying the RADIUS Accounting Servers and Relevant Parameters |
Optional |
|
Required |
|
|
Setting the Upper Limit of RADIUS Request Retransmission Attempts |
Optional |
|
Optional |
|
|
Optional |
|
|
Configuring Attributes Related to the Data Sent to the RADIUS Server |
Optional |
|
Optional |
|
|
Optional |
|
|
Optional |
|
|
Optional |
HWTACACS Configuration Task List
|
Task |
Remarks |
|
Required |
|
|
Required |
|
|
Optional |
|
|
Optional |
|
|
Required |
|
|
Configuring Attributes Related to the Data Sent to HWTACACS Server |
Optional |
|
Optional |
|
|
Optional |
Configuring AAA
By configuring AAA, you can provide network access service for legal users, protect the networking devices, and avoid unauthorized access and repudiation. In addition, you can configure ISP domains to perform AAA on accessing users.
In AAA, users are divided into LAN users (such as 802.1X users and MAC authentication users), login users (such as SSH, Telnet, FTP, and terminal access users), portal users and command line users (that is, command line authentication users). Except for command line users, you can configure separate authentication/authorization/accounting policies for all the other types of users. Command line users can be configured with authorization policy independently.
Configuration Prerequisites
For remote authentication, authorization, or accounting, you must create the RADIUS or HWTACACS scheme first. For RADIUS scheme configuration, refer to Configuring RADIUS. For HWTACACS scheme configuration, refer to Configuring HWTACACS.
Creating an ISP Domain
An Internet service provider (ISP) domain represents a group of users that belong to it. For a username in the userid@isp-name format, the access device considers the userid part the username for authentication and the isp-name part the domain name.
In a networking scenario with multiple ISPs, an access device may connect users of different ISPs. As users of different ISPs may have different user attributes (such as username and password structure, service type, and rights), you need to configure multiple ISP domains for the users to distinguish them and to configure different attribute sets including the AAA policies (such as the RADIUS schemes) for the ISP domains.
For the NAS, each accessing user belongs to an ISP domain. Up to 16 ISP domains can be configured on a NAS. If a user does not provide the ISP domain name, the system considers that the user belongs to the default ISP domain.
Follow these steps to create an ISP domain:
|
To do… |
Use the command… |
Remarks |
|
Enter system view |
system-view |
— |
|
Create an ISP domain and enter ISP domain view |
domain isp-name |
Required |
|
Return to system view |
quit |
— |
|
Specify the default ISP domain |
domain default { disable | enable isp-name } |
Optional By default, the system has a default ISP domain named system. |
![]()
l You cannot delete the default ISP domain unless you change it to a non-default ISP domain (with the domain default disable command) first.
l If a user enters a username without an ISP domain name, the device uses the authentication scheme configured for the default ISP domain to authenticate the user.
Configuring ISP Domain Attributes
Follow these steps to configure ISP domain attributes:
|
To do… |
Use the command… |
Remarks |
|
Enter system view |
system-view |
— |
|
Create an ISP domain and enter ISP domain view |
domain isp-name |
Required |
|
Place the ISP domain to the state of active or blocked |
state { active | block } |
Optional When created, an ISP domain is in the active state by default, and users in the domain can request network services. |
|
Specify the maximum number of users in the ISP domain |
access-limit { disable | enable max-user-number } |
Optional No limit by default |
|
Configure the idle cut function |
idle-cut { disable | enable minute } |
Optional Disabled by default Currently, this command is effective only for LAN users. |
|
Configure the self-service server localization function |
self-service-url { disable | enable url-string } |
Optional Disabled by default |
![]()
Configuring AAA Authentication Methods for an ISP Domain
In AAA, authentication, authorization, and accounting are separate processes. Authentication refers to the interactive authentication process of username/password/user information during access or service request. The authentication process neither sends authorization information to a supplicant nor triggers any accounting.
AAA supports the following authentication methods:
l No authentication: All users are trusted and no authentication is performed. Generally, this method is not recommended.
l Local authentication: Authentication is performed by the NAS. User information (including username, password, and attributes) is configured on the access device. Local authentication features high speed and low cost, but the amount of information that can be stored is limited by the hardware.
l Remote authentication: The access device cooperates with a RADIUS or HWTACACS server to authenticate users. As for RADIUS, the device can use the standard RADIUS protocol or extended RADIUS protocol in collaboration with systems like iMC to implement user authentication. Remote authentication features centralized information management, high capacity, high reliability, and support for centralized authentication for multiple devices. You can configure local authentication as the backup authentication method in case the remote server is not available.
You can configure only AAA authentication. If you do not perform any authentication configuration, the system-default ISP domain uses the local authentication method.
Before configuring authentication methods, complete these three tasks:
l For RADIUS or HWTACACS authentication, configure the RADIUS or HWTACACS scheme to be referenced first. The local and none authentication methods do not require any scheme.
l Determine the access mode or service type to be configured. With AAA, you can configure an authentication scheme specifically for each access mode and service type, limiting the authentication protocols that can be used for access.
l Determine whether to configure an authentication scheme for all access modes or service types.
Follow these steps to configure AAA authentication methods for an ISP domain:
|
To do… |
Use the command… |
Remarks |
|
Enter system view |
system-view |
— |
|
Create an ISP domain and enter ISP domain view |
domain isp-name |
Required |
|
Specify the default authentication method for all types of users |
authentication default { hwtacacs-scheme hwtacacs-scheme-name [ local ] | local | none | radius-scheme radius-scheme-name [ local ] } |
Optional local by default |
|
Specify the authentication method for LAN users |
authentication lan-access { local | none | radius-scheme radius-scheme-name [ local ] } |
Optional The default authentication method is used by default. |
|
Specify the authentication method for login users |
authentication login { hwtacacs-scheme hwtacacs-scheme-name [ local ] | local | none | radius-scheme radius-scheme-name [ local ] } |
Optional The default authentication method is used by default. |
|
Specify the authentication method for portal users |
authentication portal { none | radius-scheme radius-scheme-name } |
Optional The default authentication method is used by default. |
![]()
l The authentication method specified with the authentication default command is for all types of users and has a priority lower than that for a specific access mode.
l With a RADIUS authentication method configured, AAA accepts only the authentication result from the RADIUS server. The Access-Accept message from the RADIUS server does include the authorization information, but the authentication process ignores the information.
l With the radius-scheme radius-scheme-name local or hwtacacs-scheme hwtacacs-scheme-name local configured, the local authentication is the backup authentication method and is used only when the remote server is not available.
l If the primary authentication method is local or none, the system performs local authentication or does not perform any authentication, and will not use any RADIUS or HWTACACS authentication scheme.
Configuring AAA Authorization Methods for an ISP Domain
In AAA, authorization is a separate process at the same level as authentication and accounting. Its responsibility is to send authorization requests to the specified authorization server and to send authorization information to users. Authorization method configuration is optional in AAA configuration.
AAA supports the following authorization methods:
l No authorization: All users are trusted and authorized. A user gets the corresponding default rights of the system.
l Local authorization: Users are authorized by the access device according to the attributes configured for them.
l Remote authorization: The access device cooperates with a RADIUS or HWTACACS server to authorize users. RADIUS authorization is bound with RADIUS authentication. RADIUS authorization can work only after RADIUS authentication is successful, and the authorization information is carried in the Access-Accept message. HWTACACS authorization is separate from HWTACACS authentication, and the authorization information is carried in the authorization response after successful authentication. You can configure local authorization as the backup authorization method in case the remote server is not available.
If you do not perform any authorization configuration, the system-default domain uses the local authorization method. If the no authorization method (none) is configured, the users are not required to be authorized, in which case an authenticated user has the default right. The default right is visiting (the lowest one) for EXEC users (that is, console users who use the console, AUX, or asynchronous serial port or Telnet or SSH to connect to the device, such as Telnet or SSH users. Each connection of these types is called an EXEC user). The default right for FTP users is to use the root directory of the device.
![]()
Support for EXEC user access mode depends on the device model.
Before configuring authorization methods, complete these three tasks:
1) For HWTACACS authorization, configure the HWTACACS scheme to be referenced first. For RADIUS authorization, the RADIUS authorization scheme must be the same as the RADIUS authentication scheme; otherwise, it does not take effect.
2) Determine the access mode or service type to be configured. With AAA, you can configure an authorization scheme specifically for each access mode and service type, limiting the authorization protocols that can be used for access.
3) Determine whether to configure an authorization scheme for all access modes or service types.
Follow these steps to configure an AAA authorization method for an ISP domain:
|
To do… |
Use the command… |
Remarks |
|
Enter system view |
system-view |
— |
|
Create an ISP domain and enter ISP domain view |
domain isp-name |
Required |
|
Specify the default authorization method for all types of users |
authorization default { hwtacacs-scheme hwtacacs-scheme-name [ local ] | local | none | radius-scheme radius-scheme-name [ local ] } |
Optional local by default |
|
Specify the authorization method for command line users |
authorization command hwtacacs-scheme hwtacacs-scheme-name |
Optional The default authorization method is used by default. |
|
Specify the authorization method for LAN users |
authorization lan-access { local | none | radius-scheme radius-scheme-name [ local ] } |
Optional The default authorization method is used by default. |
|
Specify the authorization method for login users |
authorization login { hwtacacs-scheme hwtacacs-scheme-name [ local ] | local | none | radius-scheme radius-scheme-name [ local ] } |
Optional The default authorization method is used by default. |
|
Specify the authorization method for portal users |
authorization portal { none | radius-scheme radius-scheme-name } |
Optional The default authorization method is used by default. |
![]()
l The authorization method specified with the authorization default command is for all types of users and has a priority lower than that for a specific access mode.
l RADIUS authorization is special in that it takes effect only when the RADIUS authorization scheme is the same as the RADIUS authentication scheme. In addition, if a RADIUS authorization fails, the error message returned to the NAS says that the server is not responding.
l With the radius-scheme radius-scheme-name local, hwtacacs-scheme hwtacacs-scheme-name local configured, the local authorization is the backup authorization method and is used only when the remote server is not available.
l If the primary authorization method is local or none, the system performs local authorization or does not perform any authorization, and will not use the RADIUS or HWTACACS authorization scheme.
l The authorization information of the RADIUS server is sent to the RADIUS client along with the authentication response message; therefore, you cannot specify a separate RADIUS authorization server. If you use RADIUS for authorization and authentication, you must use the same scheme setting for authorization and authentication; otherwise, the system will prompt you with an error message.
Configuring AAA Accounting Methods for an ISP Domain
In AAA, accounting is a separate process at the same level as authentication and authorization. Its responsibility is to send accounting start/update/end requests to the specified accounting server. Accounting is not required, and therefore accounting method configuration is optional. If you do not perform any accounting, the system-default domain uses the local accounting.
AAA supports the following accounting methods:
l No accounting: The system does not perform accounting on the users.
l Local accounting: Local accounting is implemented on the access device. It is for controlling the number of local user connections and collecting statistics on the number of users; it does not provide statistics on the charges of users.
l Remote accounting: Accounting is implemented by a RADIUS server or HWTACACS server remotely. You can configure local accounting as the backup accounting method in case the remote server is not available.
Before configuring accounting methods, complete these three tasks:
1) For RADIUS or HWTACACS accounting, configure the RADIUS or HWTACACS scheme to be referenced first. The local and none authentication methods do not require any scheme.
2) Determine the access mode or service type to be configured. With AAA, you can configure an accounting scheme specifically for each access mode and service type, limiting the accounting protocols that can be used for access.
3) Determine whether to configure an accounting scheme for all access modes or service types.
Follow these steps to configure an AAA accounting method for an ISP domain:
|
To do… |
Use the command… |
Remarks |
|
Enter system view |
system-view |
— |
|
Create an ISP domain and enter ISP domain view |
domain isp-name |
Required |
|
Enable the accounting optional feature |
accounting optional |
Optional Disabled by default |
|
Specify the default accounting method for all types of users |
accounting default { hwtacacs-scheme hwtacacs-scheme-name [ local ] | local | none | radius-scheme radius-scheme-name [ local ] } |
Optional local by default |
|
Specify the accounting method for LAN users |
accounting lan-access { local | none | radius-scheme radius-scheme-name [ local ] } |
Optional The default accounting method is used by default. |
|
Specify the accounting method for login users |
accounting login { hwtacacs-scheme hwtacacs-scheme-name [ local ] | local | none | radius-scheme radius-scheme-name [ local ] } |
Optional The default accounting method is used by default. |
|
Specify the accounting method for portal users |
accounting portal { none | radius-scheme radius-scheme-name } |
Optional The default accounting method is used by default. |
![]()
l With the accounting optional command configured, a user to be disconnected can still use the network resources even when there is no available accounting server or communication with the current accounting server fails.
l The local accounting is not used for accounting implementation, but together with the attribute access-limit command for limiting the number of local user connections. However, with the accounting optional command configured, the limit on the number of local user connections is not effective.
l The accounting method specified with the accounting default command is for all types of users and has a priority lower than that for a specific access mode.
l With the radius-scheme radius-scheme-name local or hwtacacs-scheme hwtacacs-scheme-name local keyword and argument combination configured, the local accounting is the backup method, which is used only when the remote server is not available.
l If the primary accounting method is local or none, the system performs local accounting or does not perform any accounting, and will not use the RADIUS or HWTACACS accounting scheme.
l In login access mode, accounting is not supported for FTP services.
Configuring Local User Attributes
For local authentication, you must create a local user and configure the attributes.
A local user represents a set of users configured on a device, which are uniquely identified by the username. For a user requesting network service to pass local authentication, you must add an entry as required in the local user database of the device.
Follow these steps to configure the attributes for a local user:
|
To do… |
Use the command… |
Remarks |
|
|
Enter system view |
system-view |
— |
|
|
Set the password display mode for all local users |
local-user password-display-mode { auto | cipher-force } |
Optional auto by default, indicating to display the password of a local user in the way indicated by the password command. |
|
|
Add a local user and enter local user view |
local-user user-name |
Required No local user is configured by default |
|
|
Configure a password for the local user |
password { cipher | simple } password |
Optional |
|
|
Place the local user to the state of active or blocked |
state { active | block } |
Optional When created, a local user is in the state of active by default, and the user can request network services. |
|
|
Specify the service types for the user |
LAN, Telnet, terminal, SSH services |
service-type { lan-access | { telnet | terminal | ssh } * [ level level ] } |
Optional No service is authorized to a user by default. |
|
FTP service |
service-type ftp |
Optional By default, no service is authorized to a user and anonymous access to FTP service is not allowed. If you authorize a user to use the FTP service but do not specify a directory that the user can access, the user can access the root directory of the device by default. |
|
|
Set the directory accessible to FTP/SFTP users |
work-directory directory-name |
Optional By default, FTP/SFTP users can access the root directory. |
|
|
Set the level of the user |
level level |
Optional 0 by default |
|
|
Set attributes for a LAN access user |
attribute { access-limit max-user-number | idle-cut minute | ip ip-address | location { nas-ip ip-address port slot-number subslot-number port-number | port slot-number subslot-number port-number } | mac mac-address | vlan vlan-id } * |
Optional If the user is bound with a remote port, you must specify the nas-ip parameter. If the user is bound to a local port, you need not specify the nas-ip parameter. The default value of nas-ip is 127.0.0.1, meaning the current host. |
|
![]()
l With the local-user password-display-mode cipher-force command configured, a local user password is always displayed in cipher text, regardless of the configuration of the password command. In this case, if you use the save command to save the configuration, all existing local user passwords will still be displayed in cipher text after the device restarts, even if you restore the display mode to auto.
l Local authentication checks the service types of a local user. If the service types are not available, the user cannot pass authentication.
l In the authentication method that requires the username and password, including local authentication, RADIUS authentication and HWTACACS authentication, the commands that a login user can use after logging in depend on the level of the user. In other authentication methods, which commands are available depends on the level of the user interface. For an SSH user using RSA public key authentication, the commands that can be used depend on the level configured on the user interface. For details regarding authentication method and commands accessible to user interface, refer to User Interface Configuration in the System Volume.
l Both the service-type and level commands can be used to specify user levels. The one used later has the final effect.
l The attribute access-limit command for local users is effective only after local accounting scheme is configured.
l The attribute ip command only applies to authentications that support IP address passing, such as 802.1X. If you configure the command to authentications that do not support IP address passing, such as MAC address authentication, the local authentication will fail.
l The attribute port command binds a port by its number only, regardless of the port type.
Tearing down User Connections Forcibly
Follow these steps to tear down user connections forcibly:
|
To do… |
Use the command… |
Remarks |
|
Enter system view |
system-view |
— |
|
Tear down AAA user connections forcibly |
cut connection { access-type { dot1x | mac-authentication | portal } | all | domain isp-name | interface interface-type interface-number | ip ip-address | mac mac-address | ucibindex ucib-index | user-name user-name | vlan vlan-id } [ slot slot-number ] |
Required Applies to only LAN access and portal user connections at present |
Displaying and Maintaining AAA
|
To do… |
Use the command… |
Remarks |
|
Display the configuration information of a specified ISP domain or all ISP domains |
display domain [ isp-name ] |
Available in any view |
|
Display information about specified or all user connections |
display connection [ access-type { dot1x | mac-authentication | portal } | domain isp-name | interface interface-type interface-number | ip ip-address | mac mac-address | ucibindex ucib-index | user-name user-name | vlan vlan-id ] [ slot slot-number ] |
Available in any view |
|
Display information about specified or all local users |
display local-user [ idle-cut { disable | enable } | service-type { ftp | lan-access | ssh | telnet | terminal } | state { active | block } | user-name user-name | vlan vlan-id ] [ slot slot-number ] |
Available in any view |
Configuring RADIUS
The RADIUS protocol is configured scheme by scheme. After creating a RADIUS scheme, you need to configure the IP addresses and UDP ports of the RADIUS servers for the scheme. The servers include authentication/authorization servers and accounting servers, or primary servers and secondary servers. In other words, the attributes of a RADIUS scheme mainly include IP addresses of primary and secondary servers, shared key, and RADIUS server type.
Actually, the RADIUS protocol configurations only set the parameters necessary for the information interaction between a NAS and a RADIUS server. For these settings to take effect, you must reference the RADIUS scheme containing those settings in ISP domain view. For information about the commands for referencing a scheme, refer to Configuring AAA.
![]()
When there are users online, you cannot modify RADIUS parameters other than the retransmission ones and the timers.
Creating a RADIUS Scheme
Before performing other RADIUS configurations, follow these steps to create a RADIUS scheme and enter RADIUS scheme view:
|
To do… |
Use the command… |
Remarks |
|
Enter system view |
system-view |
— |
|
Create a RADIUS scheme and enter RADIUS scheme view |
radius scheme radius-scheme-name |
Required Not defined by default |
![]()
A RADIUS scheme can be referenced by more than one ISP domain at the same time.
Specifying the RADIUS Authentication/Authorization Servers
Follow these steps to specify the RADIUS authentication/authorization servers:
|
To do… |
Use the command… |
Remarks |
|
Enter system view |
system-view |
— |
|
Create a RADIUS scheme and enter RADIUS scheme view |
radius scheme radius-scheme-name |
Required Not defined by default |
|
Specify the primary RADIUS authentication/authorization server |
primary authentication ip-address [ port-number ] |
Required Use either approach By default, neither the primary nor the secondary authentication/authorization server is specified. |
|
Specify the secondary RADIUS authentication/authorization server |
secondary authentication ip-address [ port-number ] |
![]()
l It is recommended to specify only the primary RADIUS authentication/authorization server if backup is not required.
l If both the primary and secondary authentication/authorization servers are specified, the secondary one is used when the primary one is unreachable.
l In practice, you may specify two RADIUS servers as the primary and secondary authentication/authorization servers respectively. At one time, a server can be the primary authentication/authorization server for a scheme and the secondary authentication/authorization servers for another scheme.
l The IP addresses of the primary and secondary authentication/authorization servers for a scheme cannot be the same. Otherwise, the configuration fails.
Specifying the RADIUS Accounting Servers and Relevant Parameters
Follow these steps to specify the RADIUS accounting servers and perform related configurations:
|
To do… |
Use the command… |
Remarks |
|
Enter system view |
system-view |
— |
|
Create a RADIUS scheme and enter RADIUS scheme view |
radius scheme radius-scheme-name |
Required Not defined by default |
|
Specify the primary RADIUS accounting server |
primary accounting ip-address [ port-number ] |
Required Use either approach By default, neither the primary nor the secondary accounting server is specified |
|
Specify the secondary RADIUS accounting server |
secondary accounting ip-address [ port-number ] |
|
|
Enable the device to buffer stop-accounting requests getting no responses |
stop-accounting-buffer enable |
Optional Enabled by default |
|
Set the maximum number of stop-accounting request transmission attempts |
retry stop-accounting retry-times |
Optional 500 by default |
|
Set the maximum number of accounting request transmission attempts |
retry realtime-accounting retry-times |
Optional 5 by default |
![]()
l It is recommended to specify only the primary RADIUS accounting server if backup is not required.
l If both the primary and secondary accounting servers are specified, the secondary one is used when the primary one is not reachable.
l In practice, you can specify two RADIUS servers as the primary and secondary accounting servers respectively; or specify one server to function as the primary accounting server in a scheme and the secondary accounting server in another scheme. Besides, because RADIUS uses different UDP ports to receive authentication/authorization and accounting packets, the port for authentication/authorization must be different from that for accounting.
l You can set the maximum number of stop-accounting request transmission buffer, allowing the device to buffer and resend a stop-accounting request until it receives a response or the number of transmission retries reaches the configured limit. In the latter case, the device discards the packet.
l You can set the maximum number of accounting request transmission attempts on the device, allowing the device to disconnect a user when the number of accounting request transmission attempts for the user reaches the limit but it still receives no response to the accounting request.
l The IP addresses of the primary and secondary accounting servers cannot be the same. Otherwise, the configuration fails.
l Currently, RADIUS does not support keeping accounts on FTP users.
Setting the Shared Key for RADIUS Packets
The RADIUS client and RADIUS server use the MD5 algorithm to encrypt packets exchanged between them and a shared key to verify the packets. Only when the same key is used can they properly receive the packets and make responses.
Follow these steps to set the shared key for RADIUS packets:
|
To do… |
Use the command… |
Remarks |
|
Enter system view |
system-view |
— |
|
Create a RADIUS scheme and enter RADIUS scheme view |
radius scheme radius-scheme-name |
Required Not defined by default |
|
Set the shared key for RADIUS authentication/authorization or accounting packets |
key { accounting | authentication } string |
Required No key by default |
![]()
The shared key configured on the device must be the same as that configured on the RADIUS server.
Setting the Upper Limit of RADIUS Request Retransmission Attempts
Because RADIUS uses UDP packets to carry data, the communication process is not reliable. If a NAS receives no response from the RADIUS server before the response timeout timer expires, it is required to retransmit the RADIUS request. If the number of transmission attempts exceeds the specified limit but it still receives no response, it considers that the authentication has failed.
Follow these steps to set the upper limit of RADIUS request retransmission attempts:
|
To do… |
Use the command… |
Remarks |
|
Enter system view |
system-view |
— |
|
Create a RADIUS scheme and enter RADIUS scheme view |
radius scheme radius-scheme-name |
Required Not defined by default |
|
Set the number of retransmission attempts of RADIUS packets |
retry retry-times |
Optional 3 by default |
![]()
l The maximum number of retransmission attempts of RADIUS packets multiplied by the RADIUS server response timeout period cannot be greater than 75.
l Refer to the timer response-timeout command in the command manual for configuring RADIUS server response timeout period.
Setting the Supported RADIUS Server Type
Follow these steps to set the supported RADIUS server type:
|
To do… |
Use the command… |
Remarks |
|
Enter system view |
system-view |
— |
|
Create a RADIUS scheme and enter RADIUS scheme view |
radius scheme radius-scheme-name |
Required Not defined by default |
|
Specify the RADIUS server type supported by the device |
server-type { extended | standard } |
Optional By default, the supported RADIUS server type is standard. |
![]()
l If you change the type of RADIUS server, the data stream destined to the original RADIUS server will be restored to the default unit.
l When a third-party RADIUS is used, you can configure the RADIUS server to standard or extended. When iMC server is used, you must configure the RADIUS server to extended.
Setting the Status of RADIUS Servers
When a primary server fails, the device automatically tries to communicate with the secondary server.
When both the primary and secondary servers are available, the device sends request packets to the primary server.
Once the primary server fails, the primary server turns into the state of block, and the device turns to the secondary server. In this case:
l If the secondary server is available, the device triggers the primary server quiet timer. After the quiet timer times out, the status of the primary server is active again and the status of the secondary server remains the same.
l If the secondary server fails, the device restores the status of the primary server to active immediately.
If the primary server has resumed, the device turns to use the primary server and stops communicating with the secondary server. After accounting starts, the communication between the client and the secondary server remains unchanged.
Follow these steps to set the status of RADIUS servers:
|
To do… |
Use the command… |
Remarks |
|
Enter system view |
system-view |
— |
|
Create a RADIUS scheme and enter RADIUS scheme view |
radius scheme radius-scheme-name |
Required Not defined by default |
|
Set the status of the primary RADIUS authentication/authorization server |
state primary authentication { active | block } |
Optional active for every server configured with IP address in the RADIUS scheme |
|
Set the status of the primary RADIUS accounting server |
state primary accounting { active | block } |
|
|
Set the status of the secondary RADIUS authentication/authorization server |
state secondary authentication { active | block } |
|
|
Set the status of the secondary RADIUS accounting server |
state secondary accounting { active | block } |
![]()
l If both the primary server and the secondary server are in the blocked state, it is necessary to manually turn the secondary server to the active state so that the secondary server can perform authentication. If the secondary server is still in the blocked state, the primary/secondary switchover cannot take place.
l If one server is in the active state while the other is blocked, the primary/secondary switchover will not take place even if the active server is not reachable.
l The server status set by the state command cannot be saved in the configuration file and will be restored to active every time the server restarts.
Configuring Attributes Related to the Data Sent to the RADIUS Server
Follow these steps to configure the attributes related to the data sent to the RADIUS server:
|
To do… |
Use the command… |
Remarks |
|
|
Enter system view |
system-view |
— |
|
|
Enable the RADIUS trap function |
radius trap { accounting-server-down | authentication-server-down } |
Optional Disabled by default |
|
|
Create a RADIUS scheme and enter RADIUS scheme view |
radius scheme radius-scheme-name |
Required Not defined by default |
|
|
Specify the format of the username to be sent to a RADIUS server |
user-name-format { with-domain | without-domain } |
Optional By default, the ISP domain name is included in the username. |
|
|
Specify the unit for data flows or packets to be sent to a RADIUS server |
data-flow-format { data { byte | giga-byte | kilo-byte | mega-byte } | packet { giga-packet | kilo-packet | mega-packet | one-packet } }* |
Optional The defaults are as follows: byte for data flows, and one-packet for data packets. |
|
|
Set the source IP address of the device to send RADIUS packets |
In RADIUS scheme view |
nas-ip ip-address |
Use either command By default, the outbound port serves as the source IP address to send RADIUS packets |
|
In system view |
quit |
||
|
radius nas-ip ip-address |
|||
![]()
l Some earlier RADIUS servers cannot recognize usernames that contain an ISP domain name, therefore before sending a username including a domain name to such a RADIUS server, the device must remove the domain name. The user-name-format command is thus provided for you to decide whether to include a domain name in a username to be sent to a RADIUS server.
l If a RADIUS scheme defines that the username is sent without the ISP domain name, do not apply the RADIUS scheme to more than one ISP domain, thus avoiding the confused situation where the RADIUS server regards two users in different ISP domains but with the same userid as one.
l The unit of data flows sent to the RADIUS server must be consistent with the traffic statistics unit of the RADIUS server. Otherwise, accounting cannot be performed correctly.
l The nas-ip command in RADIUS scheme view is only for the current RADIUS scheme, while the radius nas-ip command in system view is for all RADIUS schemes. However, the nas-ip command in RADIUS scheme view takes precedence over the radius nas-ip command.
Setting Timers Regarding RADIUS Servers
When communicating with the RADIUS server, a device can enable the following three timers:
l RADIUS server response timeout (response-timeout): If a NAS receives no response from the RADIUS server in a period of time after sending a RADIUS request (authentication/authorization or accounting request), it has to resend the request so that the user has more opportunity to obtain the RADIUS service. The NAS uses the RADIUS server response timeout timer to control the transmission interval.
l Primary server quiet timer (timer quiet): If the primary server is not reachable, its state changes to blocked, and the device will turn to the specified secondary server. If the secondary server is reachable, the device starts this timer and communicates with the secondary server. After this timer expires, the device turns the state of the primary server to active and tries to communicate with the primary server while keeping the state of the secondary server unchanged. If the primary server has come back into operation, the device interacts with the primary server and terminates its communication with the secondary server.
l Real-time accounting interval (realtime-accounting): This timer defines the interval for performing real-time accounting of users. After this timer is set, the switch will send accounting information of online users to the RADIUS server at the specified interval.
Follow these steps to set timers regarding RADIUS servers:
|
To do… |
Use the command… |
Remarks |
|
Enter system view |
system-view |
— |
|
Create a RADIUS scheme and enter RADIUS scheme view |
radius scheme radius-scheme-name |
Required Not defined by default |
|
Set the RADIUS server response timeout timer |
timer response-timeout seconds |
Optional 3 seconds by default |
|
Set the quiet timer for the primary server |
timer quiet minutes |
Optional 5 minutes by default |
|
Set the real-time accounting interval |
timer realtime-accounting minutes |
Optional 12 minutes by default |
![]()
l The maximum number of retransmission attempts of RADIUS packets multiplied by the RADIUS server response timeout period cannot be greater than 75. This product is also the upper limit of the timeout time of different access modules.
l For an access module, the maximum number of retransmission attempts multiplied by the RADIUS server response timeout period must be smaller than the timeout time. Otherwise, stop-accounting messages cannot be buffered, and the primary/secondary server switchover cannot take place. For example, as the timeout time of voice access is 10 seconds, the product of the two parameters cannot exceed 10 seconds; as the timeout time of Telnet access is 30 seconds, the product of the two parameters cannot exceed 30 seconds. For detailed information about timeout time of a specific access module, refer to the corresponding part in the Access Volume.
l To configure the maximum number of retransmission attempts of RADIUS packets, refer to the command retry in the command manual.
Specifying Security Policy Servers
The core of the EAD solution is integration and cooperation, and the security policy server system is the management and control center. As a collection of software, the security policy server system can run on Windows and Linux to provide functions such as user management, security policy management, security status assessment, security cooperation control, and security event audit.
Follow these steps to specify a security policy server:
|
To do… |
Use the command… |
Remarks |
|
Enter system view |
system-view |
— |
|
Create a RADIUS scheme and enter its view |
radius scheme radius-scheme-name |
Required Not defined by default |
|
Specify a security policy server |
security-policy-server ip-address |
Optional Not specified by default |
![]()
l If more than one interface of the device is configured with user access authentication functions, the interfaces may use different security policy servers. You can specify up to eight security policy servers for a RADIUS scheme.
l If the RADIUS server and the security policy server reside on the same physical device, you do not need to configure the IP address of the security policy server.
l The specified security policy server must be a security policy server or RADIUS server that is correctly configured and working normally. Otherwise, the device will regard it as an illegal server.
Enabling the Listening Port of the RADIUS Client
Follow these steps to enable the listening port of the RADIUS client:
|
To do… |
Use the command… |
Remarks |
|
Enter system view |
system-view |
— |
|
Enable the listening port of the RADIUS client |
radius client enable |
Optional Enabled by default |
Displaying and Maintaining RADIUS
|
To do… |
Use the command… |
Remarks |
|
Display the configuration information of a specified RADIUS scheme or all RADIUS schemes |
display radius scheme [ radius-scheme-name ] [ slot slot-number ] |
Available in any view |
|
Display statistics about RADIUS packets |
display radius statistics [ slot slot-number ] |
Available in any view |
|
Display information about buffered stop-accounting requests that get no responses |
display stop-accounting-buffer { radius-scheme radius-server-name | session-id session-id | time-range start-time stop-time | user-name user-name } [ slot slot-number ] |
Available in any view |
|
Clear RADIUS statistics |
reset radius statistics [ slot slot-number ] |
Available in user view |
|
Clear buffered stop-accounting requests that get no responses |
reset stop-accounting-buffer { radius-scheme radius-server-name | session-id session-id | time-range start-time stop-time | user-name user-name } [ slot slot-number ] |
Available in user view |
Configuring HWTACACS
![]()
Different from RADIUS, except for deleting HWTACACS schemes and changing the IP addresses of the HWTACACS servers, you can make any changes to HWTACACS parameters, whether there are users online or not.
Creating a HWTACACS scheme
The HWTACACS protocol is configured on a per scheme basis. Before performing other HWTACACS configurations, follow these steps to create a HWTACACS scheme and enter HWTACACS scheme view:
|
To do… |
Use the command… |
Remarks |
|
Enter system view |
system-view |
— |
|
Create a HWTACACS scheme and enter HWTACACS scheme view |
hwtacacs scheme hwtacacs-scheme-name |
Required Not defined by default |
![]()
l Up to 16 HWTACACS schemes can be configured.
l A scheme can be deleted only when it is not referenced.
Specifying the HWTACACS Authentication Servers
Follow these steps to specify the HWTACACS authentication servers:
|
To do… |
Use the command… |
Remarks |
|
Enter system view |
system-view |
— |
|
Create a HWTACACS scheme and enter HWTACACS scheme view |
hwtacacs scheme hwtacacs-scheme-name |
Required Not defined by default |
|
Specify the primary HWTACACS authentication server |
primary authentication ip-address [ port-number ] |
Required Use either approach By default, neither the primary nor the secondary authentication server is specified. |
|
Specify the secondary HWTACACS authentication server |
secondary authentication ip-address [ port-number ] |
![]()
l It is recommended to specify only the primary HWTACACS authentication server if backup is not required.
l If both the primary and secondary authentication servers are specified, the secondary one is used when the primary one is not reachable.
l The IP addresses of the primary and secondary authentication servers cannot be the same. Otherwise, the configuration fails.
l You can remove an authentication server only when no active TCP connection for sending authentication packets is using it.
Specifying the HWTACACS Authorization Servers
Follow these steps to specify the HWTACACS authorization servers:
|
To do… |
Use the command… |
Remarks |
|
Enter system view |
system-view |
— |
|
Create a HWTACACS scheme and enter HWTACACS scheme view |
hwtacacs scheme hwtacacs-scheme-name |
Required Not defined by default |
|
Specify the primary HWTACACS authorization server |
primary authorization ip-address [ port-number ] |
Required Use either approach By default, neither the primary nor the secondary authorization server is specified. |
|
Specify the secondary HWTACACS authorization server |
secondary authorization ip-address [ port-number ] |
![]()
l It is recommended to specify only the primary HWTACACS authorization server if backup is not required.
l If both the primary and secondary authorization servers are specified, the secondary one is used when the primary one is not reachable.
l The IP addresses of the primary and secondary authorization servers cannot be the same. Otherwise, the configuration fails.
l You can remove an authorization server only when no active TCP connection for sending authorization packets is using it.
Specifying the HWTACACS Accounting Servers
Follow these steps to specify the HWTACACS accounting servers and perform related configurations:
|
To do… |
Use the command… |
Remarks |
|
Enter system view |
system-view |
— |
|
Create a HWTACACS scheme and enter HWTACACS scheme view |
hwtacacs scheme hwtacacs-scheme-name |
Required Not defined by default |
|
Specify the primary HWTACACS accounting server |
primary accounting ip-address [ port-number ] |
Required Use either approach By default, neither the primary nor the secondary accounting server is specified. |
|
Specify the secondary HWTACACS accounting server |
secondary accounting ip-address [ port-number ] |
|
|
Enable the device to buffer stop-accounting requests getting no responses |
stop-accounting-buffer enable |
Optional Enabled by default |
|
Set the maximum number of stop-accounting request transmission attempts |
retry stop-accounting retry-times |
Optional 100 by default |
![]()
l It is recommended to specify only the primary HWTACACS accounting server if backup is not required.
l If both the primary and secondary accounting servers are specified, the secondary one is used when the primary one is not reachable.
l The IP addresses of the primary and secondary accounting servers cannot be the same. Otherwise, the configuration fails.
l You can remove an accounting server only when no active TCP connection for sending accounting packets is using it.
l Currently, HWTACACS does not support keeping accounts on FTP users.
Setting the Shared Key for HWTACACS Packets
When using a HWTACACS server as an AAA server, you can set a key to secure the communications between the device and the HWTACACS server.
The HWTACACS client and HWTACACS server use the MD5 algorithm to encrypt packets exchanged between them and a shared key to verify the packets. Only when the same key is used can they properly receive the packets and make responses.
Follow these steps to set the shared key for HWTACACS packets:
|
To do… |
Use the command… |
Remarks |
|
Enter system view |
system-view |
— |
|
Create a HWTACACS scheme and enter HWTACACS scheme view |
hwtacacs scheme hwtacacs-scheme-name |
Required Not defined by default |
|
Set the shared keys for HWTACACS authentication, authorization, and accounting packets |
key { accounting | authentication | authorization } string |
Required No shared key exists by default. |
Configuring Attributes Related to the Data Sent to HWTACACS Server
Follow these steps to configure the attributes related to the data sent to the HWTACACS server:
|
To do… |
Use the command… |
Remarks |
|
|
Enter system view |
system-view |
— |
|
|
Create a HWTACACS scheme and enter HWTACACS scheme view |
hwtacacs scheme hwtacacs-scheme-name |
Required Not defined by default |
|
|
Specify the format of the username to be sent to a HWTACACS server |
user-name-format { with-domain | without-domain } |
Optional By default, the ISP domain name is included in the username. |
|
|
Specify the unit for data flows or packets to be sent to a HWTACACS server |
data-flow-format { data { byte | giga-byte | kilo-byte | mega-byte } | packet { giga-packet | kilo-packet | mega-packet | one-packet } }* |
Optional The defaults are as follows: byte for data flows, and one-packet for data packets. |
|
|
Set the source IP address of the device to send HWTACACS packets |
In HWTACACS scheme view |
nas-ip ip-address |
Use either command By default, the outbound port serves as the source IP address to send HWTACACS packets. |
|
In system view |
quit |
||
|
hwtacacs nas-ip ip-address |
|||
![]()
l If a HWTACACS server does not support a username with the domain name, you can configure the device to remove the domain name before sending the username to the server.
l The nas-ip command in HWTACACS scheme view is only for the current HWTACACS scheme, while the hwtacacs nas-ip command in system view is for all HWTACACS schemes. However, the nas-ip command in HWTACACS scheme view overwrites the configuration of the hwtacacs nas-ip command.
Setting Timers Regarding HWTACACS Servers
Follow these steps to set timers regarding HWTACACS servers:
|
To do… |
Use the command… |
Remarks |
|
Enter system view |
system-view |
— |
|
Create a HWTACACS scheme and enter HWTACACS scheme view |
hwtacacs scheme hwtacacs-scheme-name |
Required Not defined by default |
|
Set the HWTACACS server response timeout timer |
timer response-timeout seconds |
Optional 5 seconds by default |
|
Set the quiet timer for the primary server |
timer quiet minutes |
Optional 5 minutes by default |
|
Set the real-time accounting interval |
timer realtime-accounting minutes |
Optional 12 minutes by default |
![]()
l For real-time accounting, a NAS must transmit the accounting information of online users to the HWTACACS accounting server periodically. Note that if the device does not receive any response to the information, it does not disconnect the online users forcibly
l The real-time accounting interval must be a multiple of 3.
l The setting of the real-time accounting interval somewhat depends on the performance of the NAS and the HWTACACS server: a shorter interval requires higher performance.
Displaying and Maintaining HWTACACS
|
To do… |
Use the command… |
Remarks |
|
Display configuration information or statistics of the specified or all HWTACACS schemes |
display hwtacacs [ hwtacacs-server-name [ statistics ] ] [ slot slot-number ] |
Available in any view |
|
Display information about buffered stop-accounting requests that get no responses |
display stop-accounting-buffer hwtacacs-scheme hwtacacs-scheme-name [ slot slot-number ] |
Available in any view |
|
Clear HWTACACS statistics |
reset hwtacacs statistics { accounting | all | authentication | authorization } [ slot slot-number ] |
Available in user view |
|
Clear buffered stop-accounting requests that get no responses |
reset stop-accounting-buffer hwtacacs-scheme hwtacacs-scheme-name [ slot slot-number ] |
Available in user view |
AAA Configuration Examples
AAA for Telnet Users by a HWTACACS Server
Network requirements
As shown in Figure 1-7, configure the switch to use the HWTACACS server to provide authentication, authorization, and accounting services to login users.
The HWTACACS server is used for authentication, authentication, and accounting. Its IP address is 10.1.1.1.
On the switch, set the shared keys for authentication, authorization, and accounting packets to expert. Configure the switch to remove the domain name from a user name before sending the user name to the HWTACACS server.
On the HWTACACS server, set the shared keys for packets exchanged with the switch to expert.
Network diagram
Figure 1-7 Configure AAA for Telnet users by a HWTACACS server

Configuration procedure
# Configure the IP addresses of various interfaces (omitted).
# Enable the Telnet server on the switch.
<Switch> system-view
[Switch] telnet server enable
# Configure the switch to use AAA for Telnet users.
[Switch] user-interface vty 0 4
[Switch-ui-vty0-4] authentication-mode scheme
[Switch-ui-vty0-4] quit
# Configure the HWTACACS scheme.
[Switch] hwtacacs scheme hwtac
[Switch-hwtacacs-hwtac] primary authentication 10.1.1.1 49
[Switch-hwtacacs-hwtac] primary authorization 10.1.1.1 49
[Switch-hwtacacs-hwtac] primary accounting 10.1.1.1 49
[Switch-hwtacacs-hwtac] key authentication expert
[Switch-hwtacacs-hwtac] key authorization expert
[Switch-hwtacacs-hwtac] key accounting expert
[Switch-hwtacacs-hwtac] user-name-format without-domain
[Switch-hwtacacs-hwtac] quit
# Apply the AAA schemes to the domain.
[Switch] domain bbb
[Switch-isp-bbb] authentication login hwtacacs-scheme hwtac
[Switch-isp-bbb] authorization login hwtacacs-scheme hwtac
[Switch-isp-bbb] accounting login hwtacacs-scheme hwtac
[Switch-isp-bbb] quit
# You can achieve the same purpose by setting AAA schemes for all types of users.
[Switch] domain bbb
[Switch-isp-bbb] authentication default hwtacacs-scheme hwtac
[Switch-isp-bbb] authorization default hwtacacs-scheme hwtac
[Switch-isp-bbb] accounting default hwtacacs-scheme hwtac
When telneting into the switch, a user enters username userid@bbb for authentication using domain bbb.
AAA for Telnet Users by Separate Servers
Network requirements
As shown in Figure 1-8, configure the switch to provide local authentication, HWTACACS authorization, and RADIUS accounting services to Telnet users. The user name and the password for Telnet users are both hello.
The HWTACACS server is used for authorization. Its IP address is 10.1.1.2. On the switch, set the shared keys for packets exchanged with the HWTACACS server to expert. Configure the switch to remove the domain name from a user name before sending the user name to the HWTACACS server.
The RADIUS server is used for accounting. Its IP address is 10.1.1.1. On the switch, set the shared keys for packets exchanged with the RADIUS server to expert.
![]()
Configuration of separate AAA for other types of users is similar to that given in this example. The only difference lies in the access type.
Network diagram
Figure 1-8 Configure AAA by separate servers for Telnet users
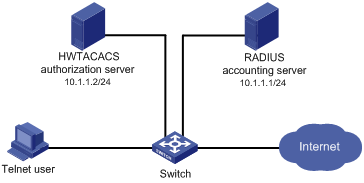
Configuration procedure
# Configure the IP addresses of various interfaces (omitted).
# Enable the Telnet server on the switch.
<Switch> system-view
[Switch] telnet server enable
# Configure the switch to use AAA for Telnet users.
[Switch] user-interface vty 0 4
[Switch-ui-vty0-4] authentication-mode scheme
[Switch-ui-vty0-4] quit
# Configure the HWTACACS scheme.
[Switch] hwtacacs scheme hwtac
[Switch-hwtacacs-hwtac] primary authorization 10.1.1.2 49
[Switch-hwtacacs-hwtac] key authorization expert
[Switch-hwtacacs-hwtac] user-name-format without-domain
[Switch-hwtacacs-hwtac] quit
# Configure the RADIUS scheme.
[Switch] radius scheme rd
[Switch-radius-rd] primary accounting 10.1.1.1 1813
[Switch-radius-rd] key accounting expert
[Switch-radius-rd] server-type extended
[Switch-radius-rd] user-name-format without-domain
[Switch-radius-rd] quit
# Create a local user named hello.
[Switch] local-user hello
[Switch-luser-hello] service-type telnet
[Switch-luser-hello] password simple hello
[Switch-luser-hello] quit
# Configure the AAA schemes of the ISP domain.
[Switch] domain bbb
[Switch-isp-bbb] authentication login local
[Switch-isp-bbb] authorization login hwtacacs-scheme hwtac
[Switch-isp-bbb] accounting login radius-scheme rd
[Switch-isp-bbb] quit
# Configure the default AAA schemes for all types of users.
[Switch] domain bbb
[Switch-isp-bbb] authentication default local
[Switch-isp-bbb] authorization default hwtacacs-scheme hwtac
[Switch-isp-bbb] accounting default radius-scheme imc
When telneting into the switch, a user enters username telnet@bbb for authentication using domain bbb.
AAA for SSH Users by a RADIUS Server
Network requirements
As shown in Figure 1-9,
l Configure an iMC server to act as the RADIUS server to provide authentication, authorization, and accounting services to SSH users. The IP address of the RADIUS server is 10.1.1.1/24.
l The RADIUS server is responsible for both authentication and accounting. Its IP address is 10.1.1.1.
l Set both the shared keys for authentication and accounting packets exchanged with the RADIUS server to expert; and specify that a username sent to the RADIUS server carry the domain name. The RADIUS server provides different user services according to the domain names.
l The RADIUS server runs the iMC server.
Network diagram
Figure 1-9 Configure AAA for SSH users by a RADIUS server
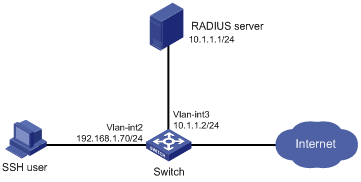
Configuration procedure
1) Configure the RADIUS server (iMC).
![]()
This example assumes that the RADIUS server runs iMC PLAT 3.20-R2602 or iMC UAM 3.60-E6102.
# Add an access device.
Log into the iMC management platform, select the Service tab, and select Access Service > Service Configuration from the navigation tree to enter the Service Configuration page. Then, click Add to enter the Add Access Device window and perform the following configurations:
l Set both the shared keys for authentication and accounting packets to expert
l Specify the ports for authentication and accounting as 1812 and 1813 respectively
l Select Device Management Service as the service type
l Select H3C as the access device type
l Select the access device from the device list or manually add the device with the IP address of 10.1.1.2
l Click OK to finish the operation
Figure 1-10 Add an access device
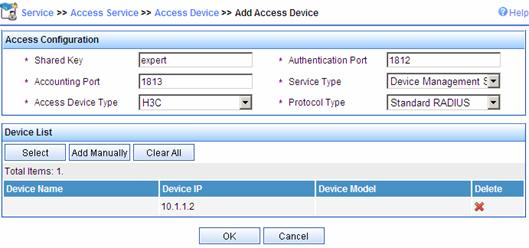
# Add a user for device management
Log into the iMC management platform, select the User tab, and select Access User View > All Access Users from the navigation tree to enter the All Access Users page. Then, click Add to enter the Add Device Management User window and perform the following configurations:
l Add a user named hello@bbb and specify the password
l Select SSH as the service type
l Specify the IP address range of the hosts to be managed as 192.168.1.0 to 192.168.1.255, and click Add to finish the operation
Figure 1-11 Add an account for device management
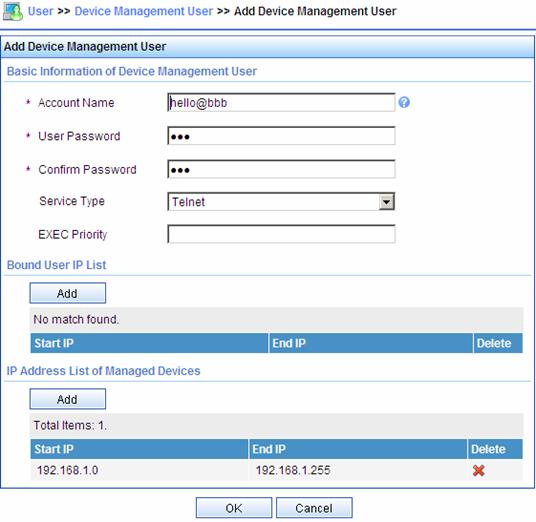
2) Configure the switch
# Configure the IP address of VLAN interface 2, through which the SSH user accesses the switch.
<Switch> system-view
[Switch] interface vlan-interface 2
[Switch-Vlan-interface2] ip address 192.168.1.70 255.255.255.0
[Switch-Vlan-interface2] quit
# Configure the IP address of VLAN-interface 3, through which the switch access the server.
[Switch] interface vlan-interface 3
[Switch-Vlan-interface3] ip address 10.1.1.2 255.255.255.0
[Switch-Vlan-interface3] quit
# Generate RSA key pairs and enable the SSH server.
[Switch] public-key local create rsa
[Switch] ssh server enable
# Configure the switch to use AAA for SSH users.
[Switch] user-interface vty 0 4
[Switch-ui-vty0-4] authentication-mode scheme
# Configure the user interfaces to support SSH.
[Switch-ui-vty0-4] protocol inbound ssh
[Switch-ui-vty0-4] quit
# Configure the RADIUS scheme.
[Switch] radius scheme rad
[Switch-radius-rad] primary authentication 10.1.1.1 1812
[Switch-radius-rad] primary accounting 10.1.1.1 1813
[Switch-radius-rad] key authentication expert
[Switch-radius-rad] key accounting expert
[Switch-radius-rad] user-name-format with-domain
[Switch-radius-rad] quit
# Apply the AAA scheme to the domain.
[Switch] domain bbb
[Switch-isp-bbb] authentication login radius-scheme rad
[Switch-isp-bbb] authorization login radius-scheme rad
[Switch-isp-bbb] accounting login radius-scheme rad
[Switch-isp-bbb] quit
When using SSH to log in, a user enters a username in the form userid@bbb for authentication using domain bbb.
3) Verify the configuration
After the above configuration, the SSH user should be able to use the configured account to access the user interface of the switch. The commands that the user can access depend on the settings for EXEC users on the iMC server.
Troubleshooting AAA
Troubleshooting RADIUS
Symptom 1: User authentication/authorization always fails.
Analysis:
1) A communication failure exists between the NAS and the RADIUS server.
2) The username is not in the format of userid@isp-name or no default ISP domain is specified for the NAS.
3) The user is not configured on the RADIUS server.
4) The password of the user is incorrect.
5) The RADIUS server and the NAS are configured with different shared key.
Solution:
Check that:
1) The NAS and the RADIUS server can ping each other.
2) The username is in the userid@isp-name format and a default ISP domain is specified on the NAS.
3) The user is configured on the RADIUS server.
4) The password entered by the user is correct.
5) The same shared key is configured on both the RADIUS server and the NAS.
Symptom 2: RADIUS packets cannot reach the RADIUS server.
Analysis:
1) The communication link between the NAS and the RADIUS server is down (at the physical layer and data link layer).
2) The NAS is not configured with the IP address of the RADIUS server.
3) The UDP ports for authentication/authorization and accounting are not correct.
4) The port numbers of the RADIUS server for authentication, authorization and accounting are being used by other applications.
Solution:
Check that:
1) The communication links between the NAS and the RADIUS server work well at both physical and link layers.
2) The IP address of the RADIUS server is correctly configured on the NAS.
3) UDP ports for authentication/authorization/accounting configured on the NAS are the same as those configured on the RADIUS server.
4) The port numbers of the RADIUS server for authentication, authorization and accounting are available.
Symptom 3: A user is authenticated and authorized, but accounting for the user is not normal.
Analysis:
1) The accounting port number is not correct.
2) Configuration of the authentication/authorization server and the accounting server are not correct on the NAS. For example, one server is configured on the NAS to provide all the services of authentication/authorization and accounting, but in fact the services are provided by different servers.
Solution:
Check that:
1) The accounting port number is correctly set.
2) The authentication/authorization server and the accounting server are correctly configured on the NAS.
Troubleshooting HWTACACS
Refer to Troubleshooting RADIUS if you encounter a HWTACACS fault.
