- Table of Contents
-
- H3C Unified Platform Configuration Examples-E71xx-5W101
- 01-Unified Platform Operator Permission Management Configuration Examples
- 02-Unified Platform Dashboard Configuration Examples
- 03-Unified Platform Trap Filter Rule Configuration Examples
- 04-Unified Platform Trap-to-Alarm Rule Configuration Examples
- 05-Unified Platform Alarm Forwarding via SMS Configuration Examples
- 06-Unified Platform Alarm Aggregation Configuration Examples
- 07-Unified Platform Component License Registration and Expansion Configuration Examples
- 08-Unified Platform Alarm Forwarding via Mail Configuration Examples
- 09-Unified Platform Two-Factor Authentication Configuration Examples
- 10-Unified Platform Alarm Rendering Configuration Examples
- 11-Unified Platform Syslog Configuration Examples
- Related Documents
-
| Title | Size | Download |
|---|---|---|
| 11-Unified Platform Syslog Configuration Examples | 1.97 MB |
Configuration Examples
Document version: 5W100-20250425
Product version: E7101
Copyright © 2025 New H3C Technologies Co., Ltd. All rights reserved.
No part of this manual may be reproduced or transmitted in any form or by any means without prior written consent of New H3C Technologies Co., Ltd.
Except for the trademarks of New H3C Technologies Co., Ltd., any trademarks that may be mentioned in this document are the property of their respective owners.
The information in this document is subject to change without notice.
Contents
Introduction
Syslog allows you to perform unified log management, such as such as exporting and dumping logs. When the system or device encounters an issue, you can use the alarming notification feature to view detailed log information, which helps you quickly identify the issue. You can also save relevant logs for future management.
The system displays received syslog information in a list, allowing you to browse all logs in the system. The list displays the receiving time, level, system name, module name, resource IP, description, and digest for each log. You can easily locate and save logs as needed.
Prerequisites
To view syslog information in the environment, you must configure the device to push syslogs to the environment. When you configure the device, make sure the port number of the environment matches the port number used during syslog component deployment (the default port number is 514). Use the following commands to configure the device:
[H3C-208]info-center enable
[H3C-208]info-center loghost 10.121.45.85 facility local5
# The IP address is the northbound VIP of the receiving environment. By default, syslogs are pushed to port number 514.
# To send the log to other ports, configure the following command:
[H3C-208]info-center loghost 10.121.45.85 port 30200 facility local5
# The IP address is the northbound VIP, and the port number is 30200.
Example: Configuring Syslog
Network configuration
Company A has the following log requirements:
· Syslogs on the device can be viewed from the system page. If multiple logs have the same level, system name, module name, resource IP, description, and digest, only the most recent log is displayed.
· You can filter syslogs that match the specified rules. The corresponding information will not be displayed in the list.
· The syslogs that match the specified rules can be upgraded to alarms.
· Only the syslogs that are from devices added to this system and match the specified rules can be received.
· The syslogs can be dumped and forwarded.
Analysis
1. Configure alarm upgrade rules.
2. Configure the parse template library.
3. Configure advanced settings, including filter rules, decoding formats, dump, and forwarding.
Software versions used
This configuration example was created and verified on Unified Platform E71xx.
Procedures
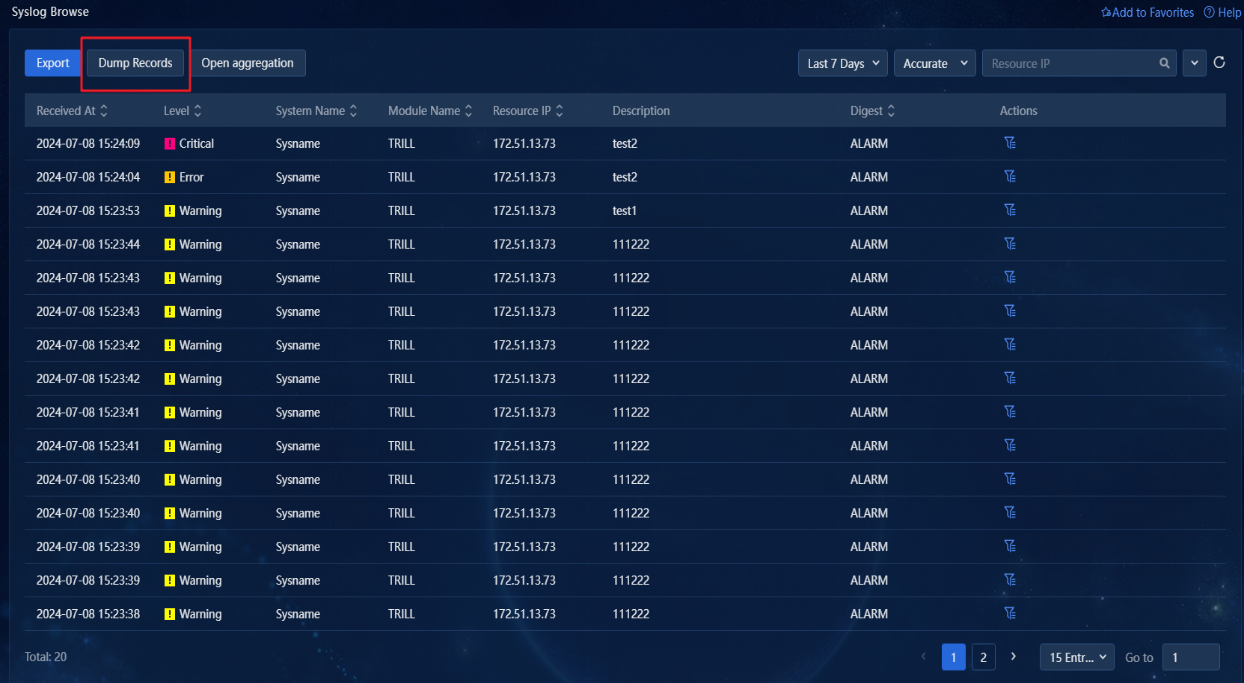
Browsing the syslog list
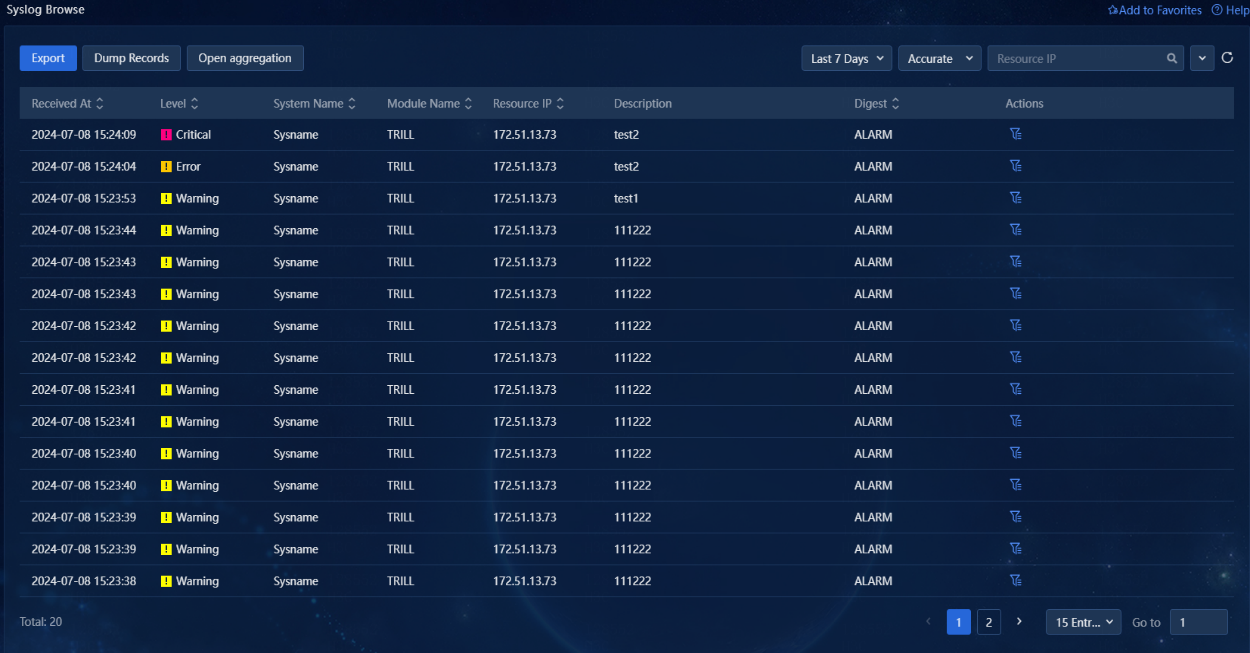
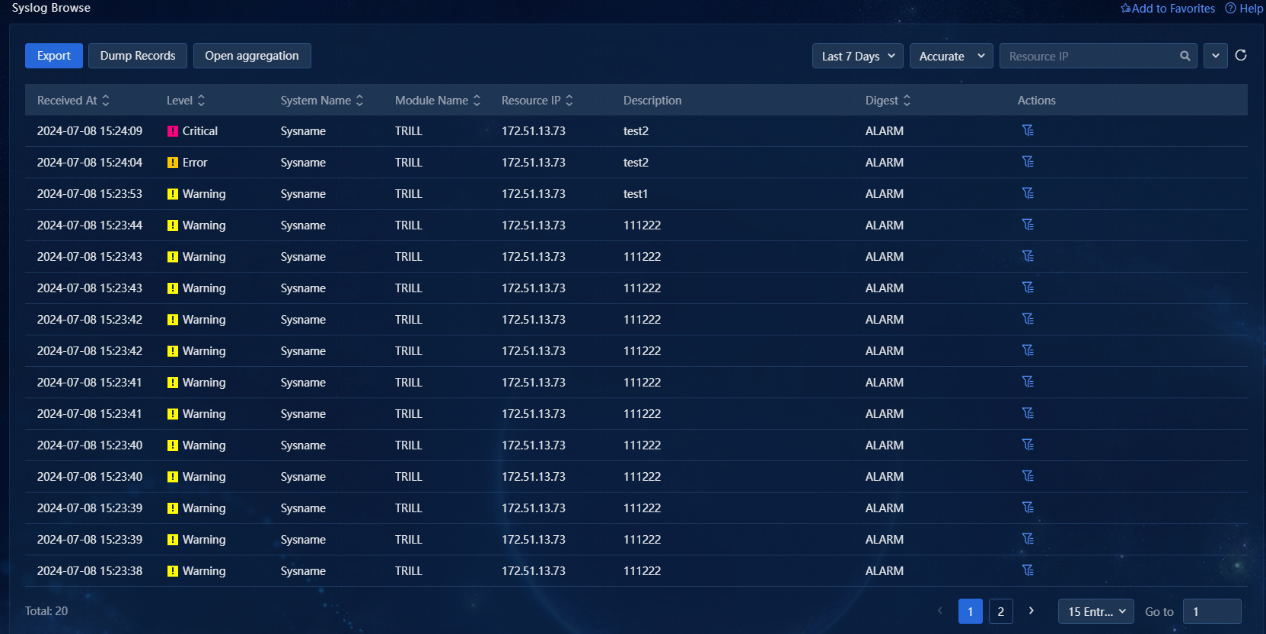
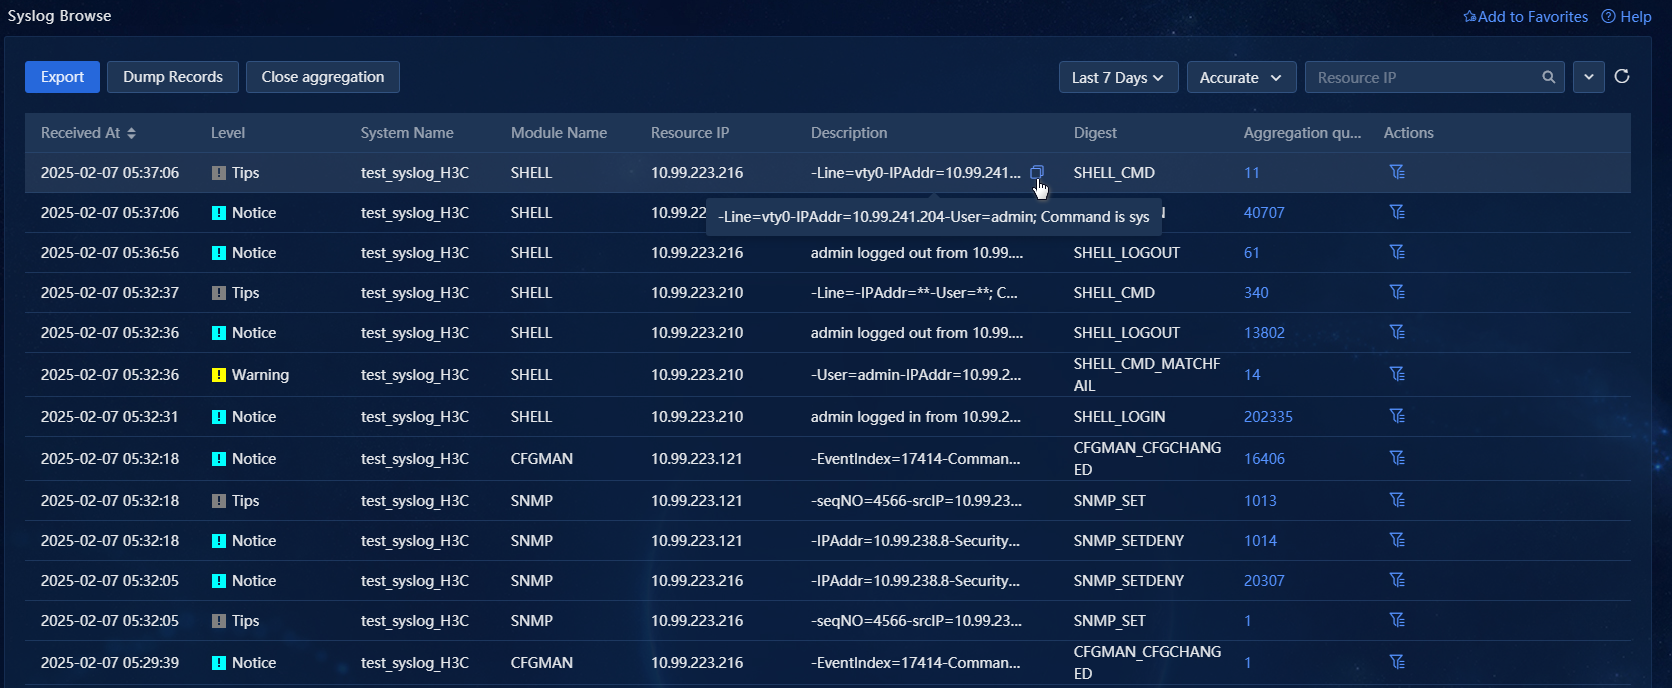
1. Navigate to the Alarm > Alarming Notification > Syslog Browse page of Unified Platform. The system displays received syslog information in a list, including the receiving time, level, system name, module name, resource IP, description, and digest for each log, as shown in the following figure.
Figure 1 Browsing syslogs
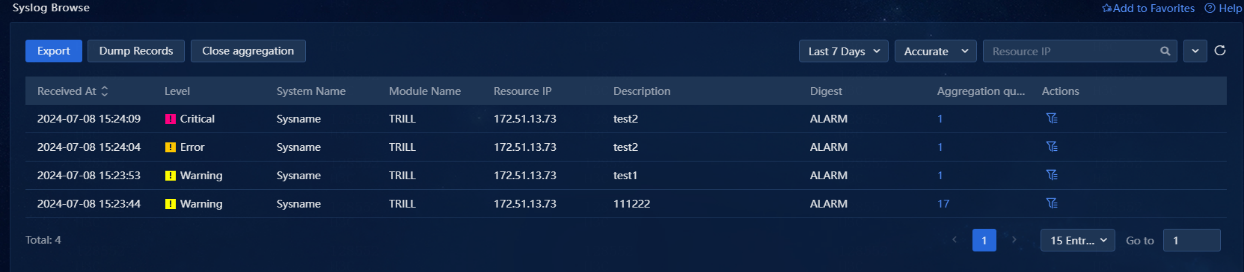
2. Click Export to export the syslog information on the page as a CSV file. Click Open aggregation to aggregate log entries with the same level, system name, module name, resource IP, description, and digest. The page will display only the most recent entry and use a new Aggregation quantity column to indicate the number of aggregated logs, as shown in the following figure.
Figure 2 Enabling aggregation
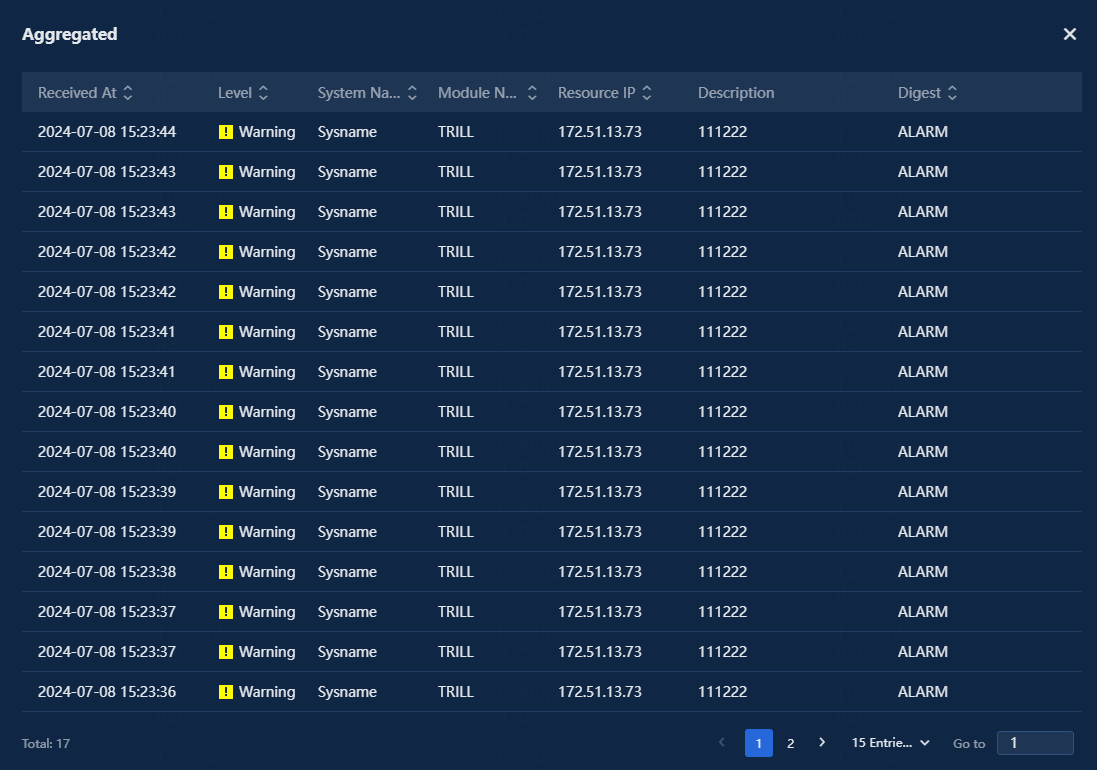
3. Click the number in the Aggregation quantity column to view detailed information about the aggregated logs, as shown in the following figure.
Figure 3 Aggregated logs
4. Click Close aggregation to cancel the aggregation. The original syslog information will be displayed in the list, as shown in the following figure.
Figure 4 Disabling aggregation
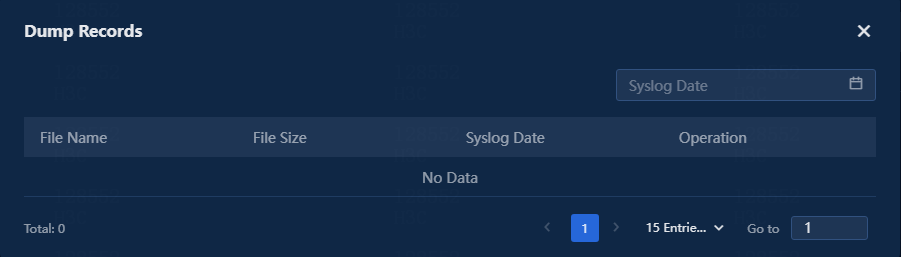
5. Click Dump Records to view the file name, file size, and syslog date for generated dump files. For more information dump configuration, see Dump. This section only displays dump records, as shown in the following figure.
Figure 5 Dump records
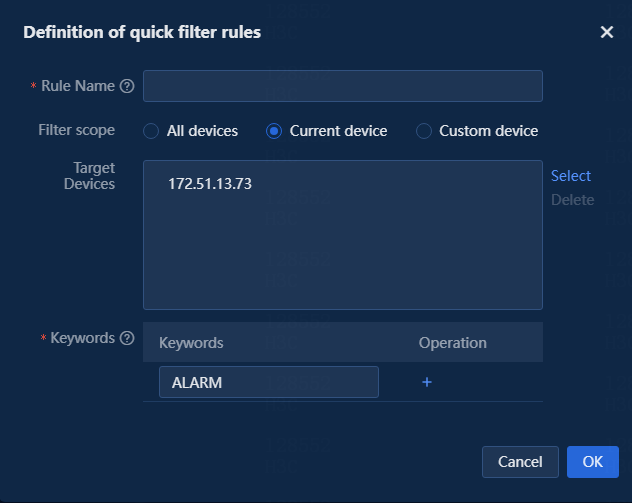
6. Click ![]() in
the Actions column for an entry in the syslog list to access the Definition of
quick filter rules page. On this page, you can configure various parameters as
needed, as shown in the following figure.
in
the Actions column for an entry in the syslog list to access the Definition of
quick filter rules page. On this page, you can configure various parameters as
needed, as shown in the following figure.
Figure 6 Quick filter rule definition

Filter scope: Options are All devices, Current device, and Custom device.
¡ All devices: Applicable to all resource IPs received by the system.
¡ Current device: Automatically adds the current resource IP to the target device. To set other devices, click Select to select resource IPs in the system. After configuration, this filter rule will apply to all IPs in the target devices, as shown in the following figure.
Figure 7 Setting the filter scope to current device
¡ Custom device: Allows you to add a nonexistent resource IPs or existing resource IPs in the system. You can also select a user-defined resource group. After configuration, this filter rule will apply to all IPs in the target devices and the user-defined resource group, as shown in the following figure.
Figure 8 Custom device
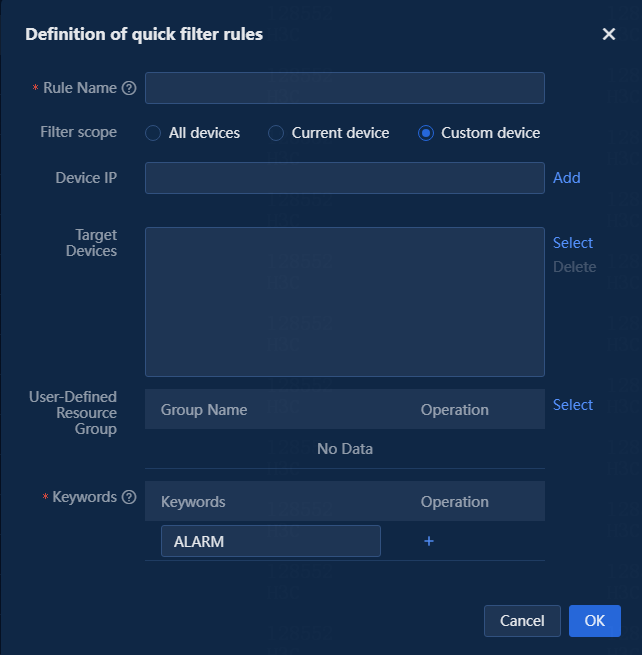
Keywords: You can specify one or multiple keywords. When you specify multiple keywords, the system filters only the syslogs matching all the specified keywords, as shown in the following figure.
Figure 9 Multiple keywords
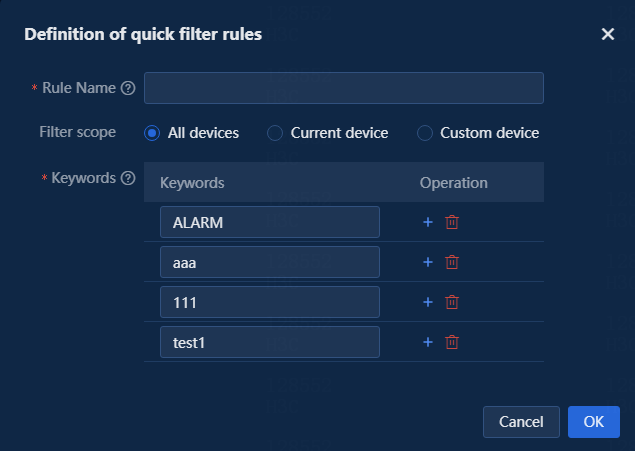
After configuration, the system filters new syslogs that match the filter rules and does not display them in the list.
7. Hover the cursor over the Description column and click the copy icon to copy the syslog description.
Figure 10 Copying syslog description
Alarm upgrade rules
1. Navigate to the Alarm > Alarming Notification > Upgrade Alarming Rules page. This page displays all configured alarm upgrade rules and system predefined alarm upgrade rules. The rule list includes the name, description, method, severity level, type, and state of each rule, as shown in the following figure.
Figure 11 Alarm upgrade rule list

2. The alarm upgrade rule name is configured when the rule is added. Click the rule name to view detailed information about the alarm upgrade rule, as shown in the following figure.
Figure 12 Alarm upgrade rule details

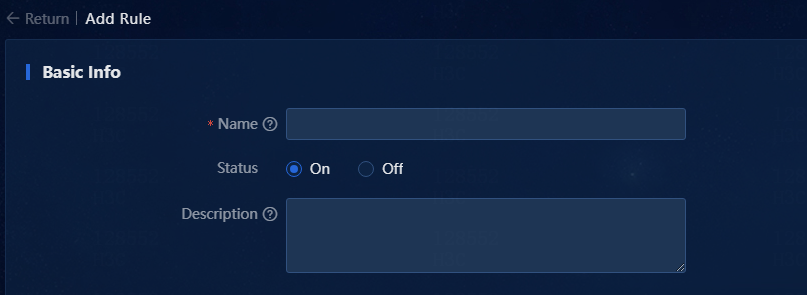
3. Click Add. On the Add Rule page that opens, you can configure basic information, device range settings, alarm triggering settings, and alarm clearing settings for the rule.
a. Basic information includes name, status, and description.
|
Parameter |
Description |
|
Name |
This field is required. The value is a string of 1 to 32 characters. |
|
Status |
If you turn on this option, this rule will be displayed as enabled by default in the list. If you turn off this option, this rule will be displayed as disabled by default in the list. |
|
Description |
This field is optional. The value is a string of 0 to 64 characters. |
Figure 13 Basic information
b. Device range settings: The settings are optional. If you do not specify device range settings, the rule applies to all resources. If you specify device range settings, the rule applies to the selected resources or resource group. The configuration items include device IP, target devices, and user-defined resource group.
|
Parameter |
Description |
|
Device IP |
You can customize the resource IP without requiring management of the resource. Click Add to add it to the target devices. |
|
Target Devices |
Select the resources already managed in the system and click Select to select the resources. |
|
User-Defined Resource Group |
Click Select to select a resource group in the system. |
Figure 14 Device range settings

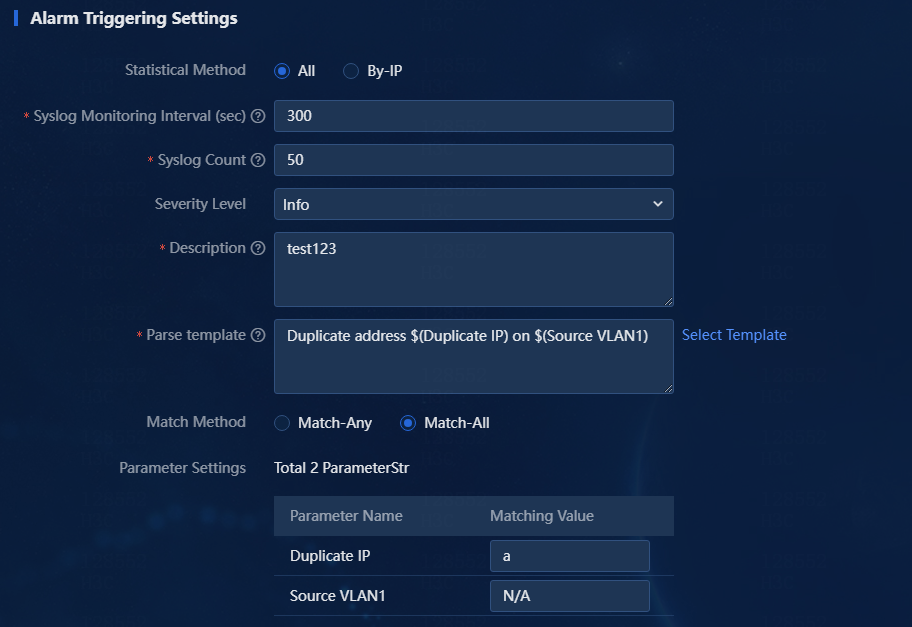
c. Alarm triggering settings include statistical method, syslog monitoring interval, syslog count, severity level, description, parse template, match method, and parameter settings.
|
Parameter |
Description |
|
Statistical Method |
Options are All and By-IP. Select All to collect statistics for all IPs in the network. Select By-IP to collect statistics for resources separately by resource IP. |
|
Syslog Monitoring Interval/Syslog Count |
Specify the times the syslog has occurred within the specified interval. If you configure the syslog monitoring interval to m seconds and the syslog count to n, the syslog is upgraded to an alarm if it has occurred n+1 times within m seconds. |
|
Severity Level |
Specify the severity level for the generated alarm. |
|
Description |
Specify the information displayed for the generated alarm. |
|
Parse template |
Only the syslog that matches this parse template can match the alarm upgrade rule. |
|
Match Method |
Options are Match-Any and Match-All. Select Match-Any to count received syslogs as long as they match the parse template without restriction on parameter values of the syslogs. Select Match-All to count received syslogs that match the parameter values set in the rule. |
|
Parameter Settings |
Specify the name of parameters and the matching values. You can configure parameter settings only when you select Match-All for Match Method. |
Figure 15 Alarm triggering settings
d. You can enable or disable alarm clearing settings. If you enable alarm clearing settings, specify the description, parse template, and recovery alarm parameters. The generated alarms that match the specified criteria will be automatically recovered to previous alarms.
|
Parameter |
Description |
|
Description |
Specify the information displayed for the generated recovery alarm. |
|
Parse template |
Only the syslogs that match this parse template can be upgraded to a recovery alarm. |
|
Recovery Alarm Param |
Parameter information included in the parse template, which is automatically displayed after you select the parse template. |
Figure 16 Alarm clearing settings
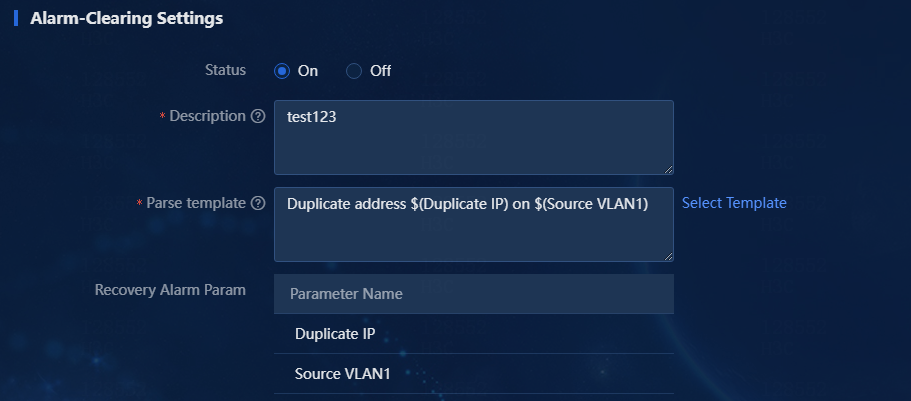
e. If the parse template selected for the alarm has IP and interface parameters, the parse template for the associated recovery alarm must also have exactly the two parameters.
4. An alarm upgrade rule takes effect only when its state is On. You can click the State column to switch between the On and Off states. The alarm upgrade rule type can be User-Defined or Predefined.
|
Parameter |
Description |
|
User-defined alarm upgrade rule |
Supports copy, edit, and delete operations. |
|
Predefined alarm upgrade rule |
Supports only the copy operation. |
Figure 17 User-defined and predefined types

5. Click the ![]() icon
in the Actions column for an alarm upgrade rule to access the page for editing
the rule. The page allows you to configure the same parameters as those on the Add
Rule page, except that you cannot change the rule name.
icon
in the Actions column for an alarm upgrade rule to access the page for editing
the rule. The page allows you to configure the same parameters as those on the Add
Rule page, except that you cannot change the rule name.
6. Click the ![]() icon
in the Actions column for an alarm upgrade rule to access the page for copying
the rule. The parameters of the rule are automatically populated on this page.
You can edit the parameters as needed.
icon
in the Actions column for an alarm upgrade rule to access the page for copying
the rule. The parameters of the rule are automatically populated on this page.
You can edit the parameters as needed.
7. Click the ![]() icon
in the Actions column for an alarm upgrade rule to delete it. Once deleted, the
rule will no longer take effect. To delete multiple alarm upgrade rules in
bulk, select the rules, and then click Delete, as shown in the following
figure. Note that you cannot delete predefined alarm upgrade rules.
icon
in the Actions column for an alarm upgrade rule to delete it. Once deleted, the
rule will no longer take effect. To delete multiple alarm upgrade rules in
bulk, select the rules, and then click Delete, as shown in the following
figure. Note that you cannot delete predefined alarm upgrade rules.
Figure 18 Deleting rules in bulk

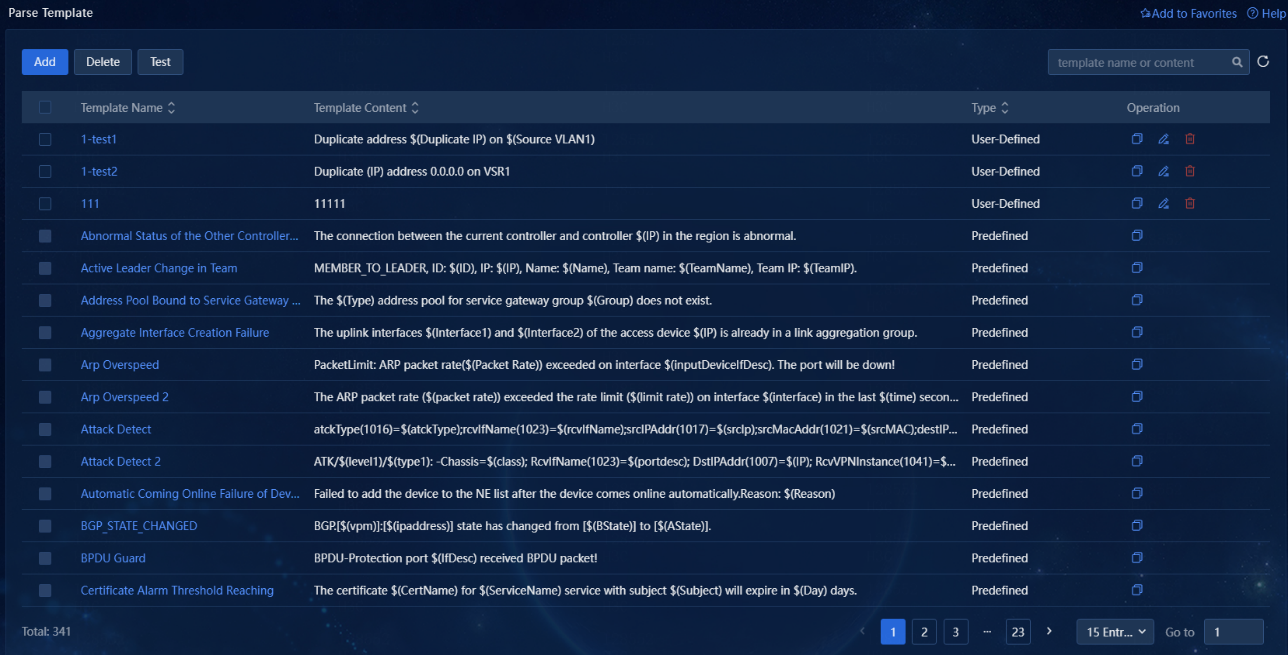
Parse template library
1. Navigate to the Alarm > Alarming Notification > Parse Template page. This page displays the system-predefined and user-defined parse templates. The template list displays the name, content, and type for each template, as shown in the following figure.
Figure 19 Parse template list
2. The template name is configured when you add the parse template. Click the template name to view detailed information about the parse template, as shown in the following figure.
Figure 20 Parse template details

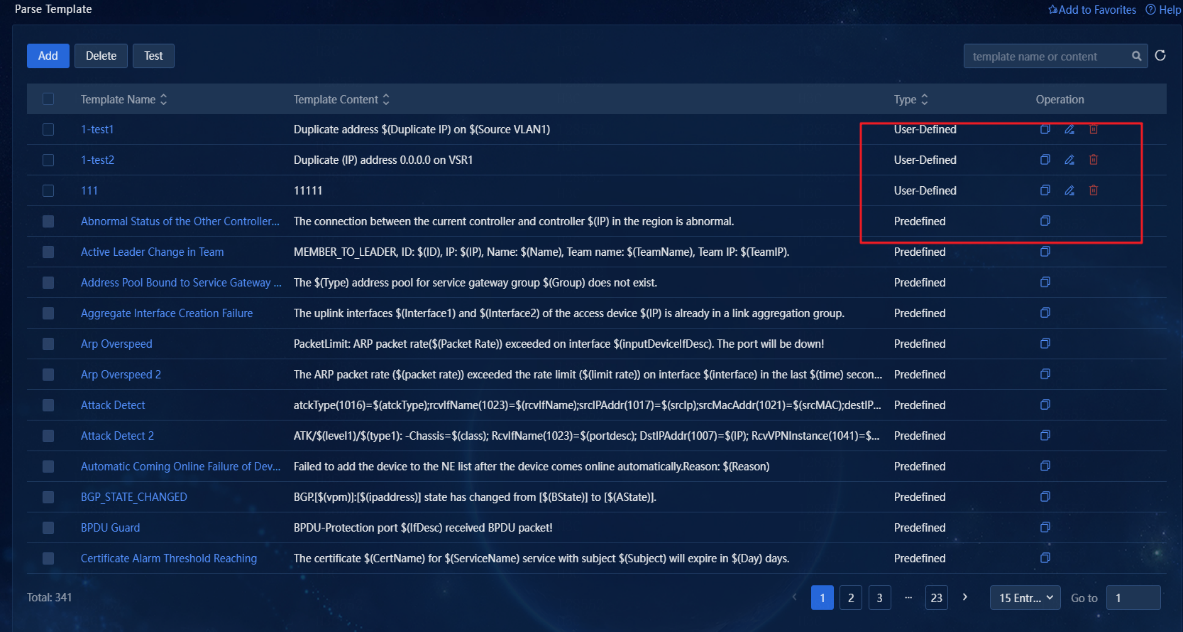
The parse templates are divided into user-defined and predefined types. User-defined templates can be copied, edited, or deleted. Predefined templates can only be copied, as shown in the following figure.
Figure 21 Predefined and user-defined parse templates
3. Click Add to access the Add Template page. You can configure settings for the parse template, including name, whether to enable regular expression, template content, and description, as shown in the following figure.
Figure 22 Adding a parse template
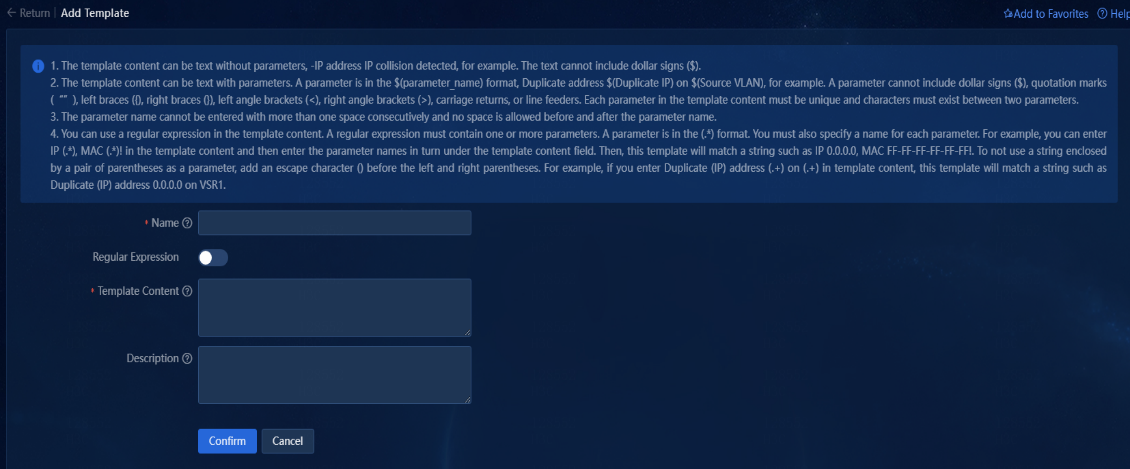
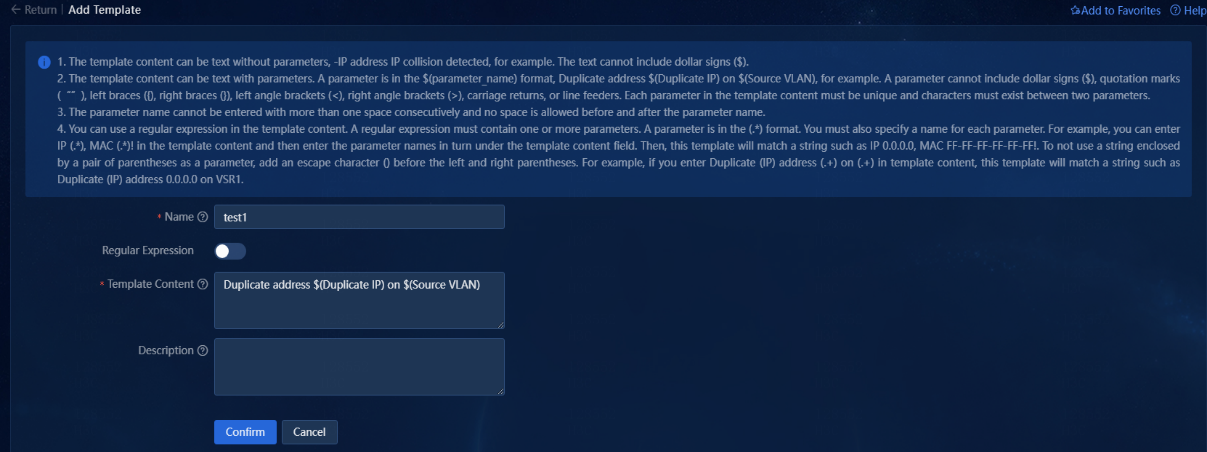
If you turn off the Regular Expression option, the template content supports matching text with parameter information. The parameter format is $(parameter name). The received syslogs compliant with this template can be correctly matched, as shown in the following figure.
Figure 23 Turning off regular expression
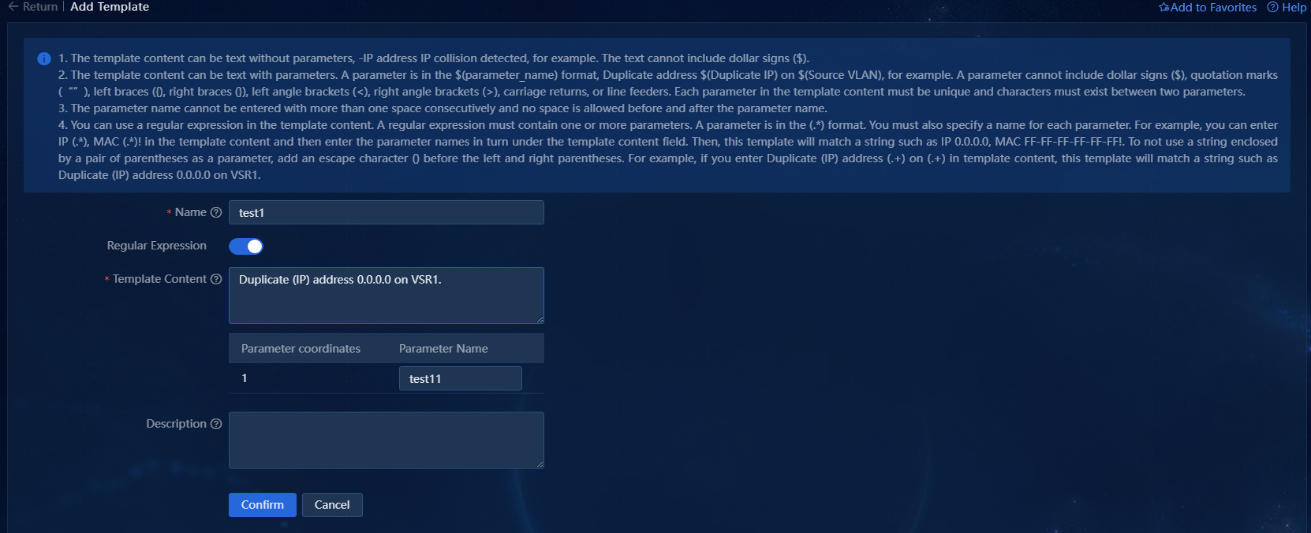
If you turn on the Regular Expression option, you must define one or multiple parameters in the template. You must use parentheses to enclose the parameters in the regular expression, and specify names for the parameters. The received syslogs compliant with this template can be correctly matched, as shown in the following figure.
Figure 24 Turning on regular expression
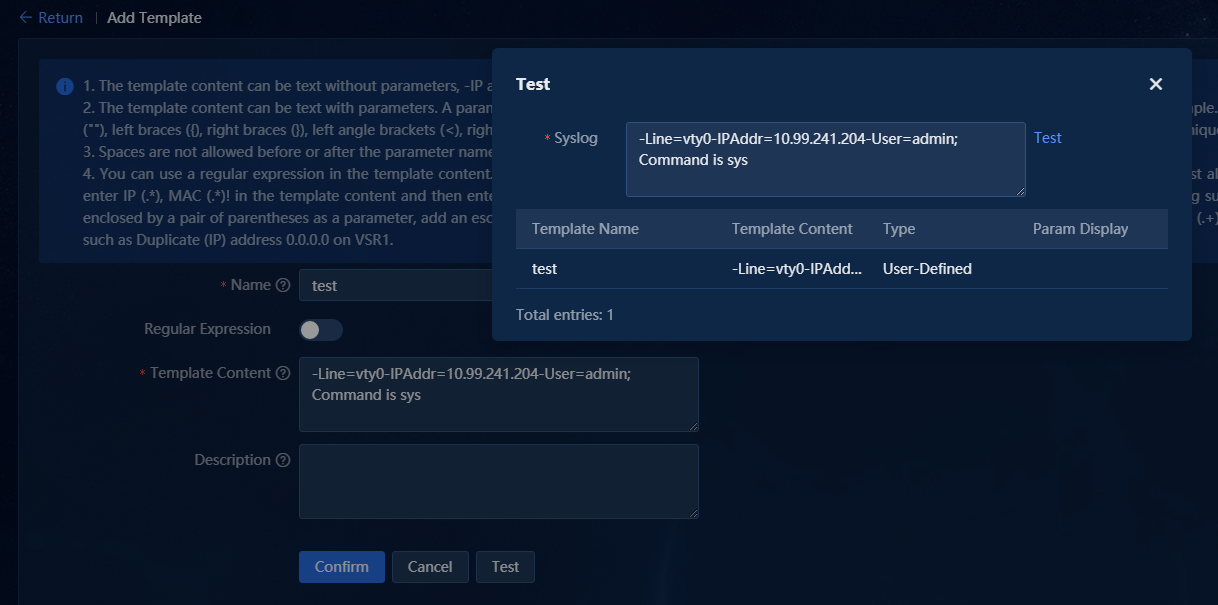
Click Test to copy the syslog description into the test text box, then click Test to verify whether the syslog matches the newly added parse template. The parse template matching the syslog information is displayed in the list. If no matching parse template exists, identify whether the parse template definition is correct.
Figure 25 Testing the newly added parse template
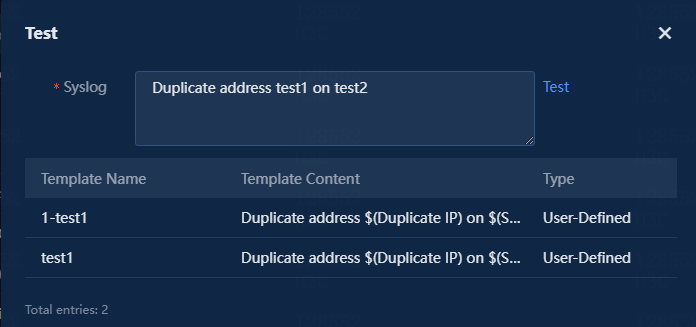
4. Click Test at the top of the list to open the test pop-up window. Enter the syslog information in the Syslog field. Click Test to display the matching parse template in the list. If no matching template exists, identify whether the parse template definition is correct, as shown in the following figure.
Figure 26 Test
5. Click the ![]() icon
in the Operation column for a template to access the page for editing the
template. The page allows you to configure the same parameters as those on the Add
Template page, except that you cannot change the parse template name. To use
the edited parse template for alarm upgrade, you must edit or create an alarm
upgrade rule.
icon
in the Operation column for a template to access the page for editing the
template. The page allows you to configure the same parameters as those on the Add
Template page, except that you cannot change the parse template name. To use
the edited parse template for alarm upgrade, you must edit or create an alarm
upgrade rule.
6. Click the ![]() icon
in the Actions column for a template to access the page for copying the
template. The parameters of the template are automatically populated on this
page. You can edit the parameters as needed.
icon
in the Actions column for a template to access the page for copying the
template. The parameters of the template are automatically populated on this
page. You can edit the parameters as needed.
7. Click the ![]() icon
in the Actions column for a template to delete it. Once deleted, the template
will no longer take effect. To delete multiple parse templates in bulk, select
the templates, and then click Delete, as shown in the following figure. Note
that you cannot delete predefined parse templates or the parse templates that
have been used by alarm upgrade rules.
icon
in the Actions column for a template to delete it. Once deleted, the template
will no longer take effect. To delete multiple parse templates in bulk, select
the templates, and then click Delete, as shown in the following figure. Note
that you cannot delete predefined parse templates or the parse templates that
have been used by alarm upgrade rules.
Figure 27 Deleting parse templates in bulk

Advanced configuration
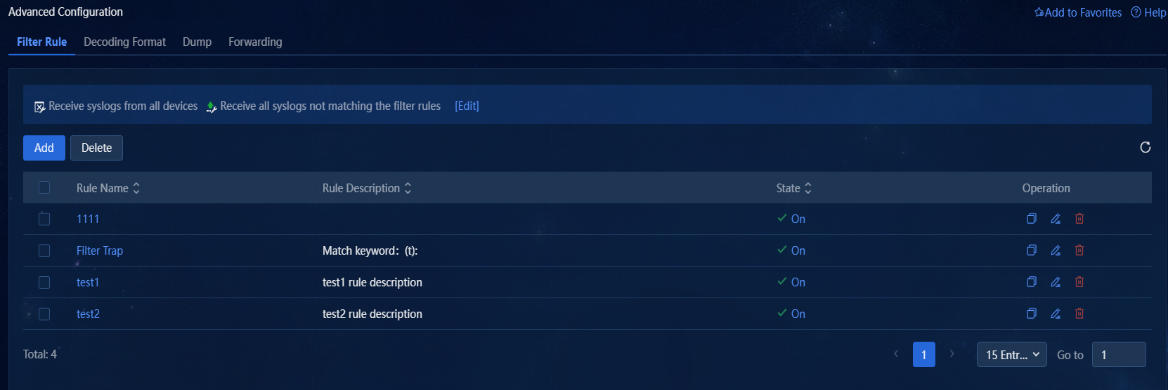
Filter rule
1. Navigate to the Alarm > Alarming Notification > Advanced Configuration > Filter Rule page. This page displays information about all configured filter rules, including name, description, and state.
Figure 28 Filter rule list
2. The filter rule name is configured when the rule is added. Click the rule name to view detailed information about the filter rule.
Figure 29 Filter rule details
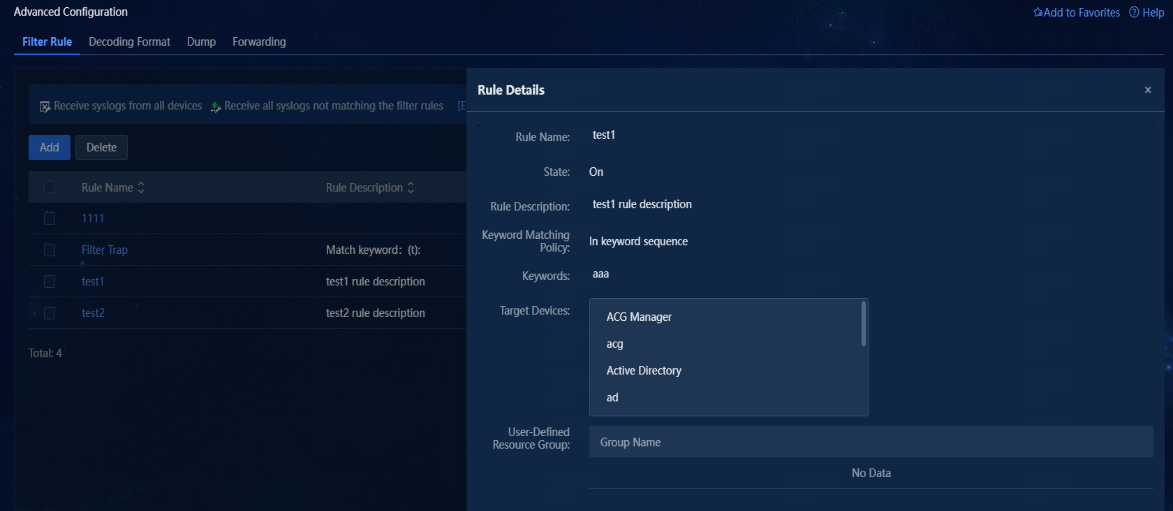
3. Click Add to access the Add Rule page. On this page, you can configure name, state, description, device IP, target devices, user-defined resource group, keyword matching policy, and keywords for the rule.
|
Parameter |
Description |
|
Rule Name |
This field is required. The value is a string of 1 to 32 characters. |
|
State |
If you turn on the rule, the rule is enabled by default. If you turn off the rule, the rule is disabled by default. |
|
Rule Description |
Enter a string of 0 to 64 characters. |
|
Device IP |
Enter an IP address as needed (you are not required to use the IP address of a resource managed by the system), and then click Add to add it to the target devices. |
|
Target Devices |
Select the resources already managed in the system and click Select to select the resources. |
|
User-Defined Resource Group |
Click Select to select a resource group in the system. |
|
Keyword Matching Policy |
You can select In keyword sequence or In any sequence. If you select In keyword sequence, a syslog matches the filter rule only when it matches the specified keywords in sequence. If you select In any sequence, a syslog matches the filter rule as long as it matches the specified keywords. The order of the keywords is not required. |
|
Keywords |
You can enter one or multiple keywords for the keyword matching policy. |
Figure 30 Adding a filter rule

Figure 31 Specifying multiple keywords

4. A filter rule is enabled only when its state is On. You can click the State column to switch between the On and Off states.
5. Click the ![]() icon
in the Actions column for a filter rule to access the page for editing the
rule. The page allows you to configure the same parameters as those on the Add
Rule page, except that you cannot change the rule name.
icon
in the Actions column for a filter rule to access the page for editing the
rule. The page allows you to configure the same parameters as those on the Add
Rule page, except that you cannot change the rule name.
6. Click the ![]() icon
in the Actions column for a filter rule to access the page for copying the
rule. The parameters of the rule are the same as those when the rule is added.
You can edit the parameters as needed.
icon
in the Actions column for a filter rule to access the page for copying the
rule. The parameters of the rule are the same as those when the rule is added.
You can edit the parameters as needed.
7. Click the ![]() icon
in the Actions column for a filter rule to delete it. Once deleted, the rule
will no longer take effect.
icon
in the Actions column for a filter rule to delete it. Once deleted, the rule
will no longer take effect.
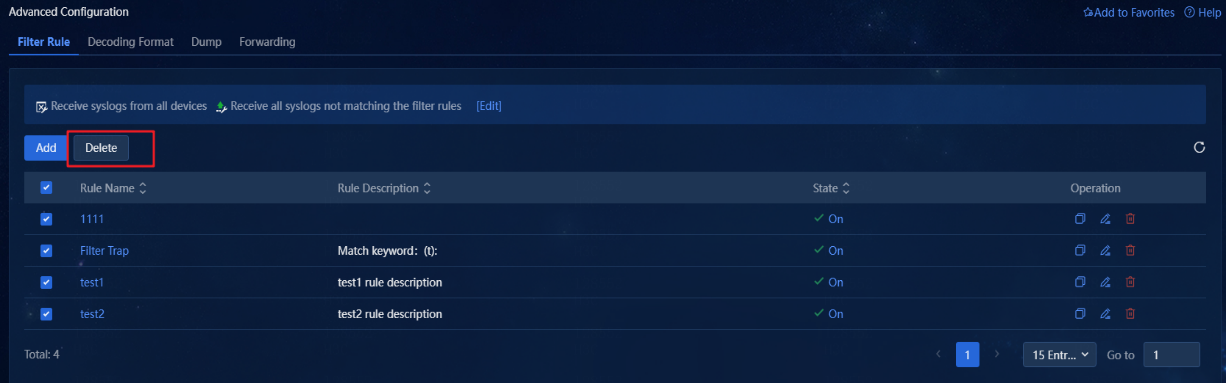
8. To delete multiple filter rules in bulk, select the rules, and then click Delete. Once deleted, the filter rules will no longer take effect.
Figure 32 Deleting filter rules in bulk
9. Click Edit for the filter policy above the list to access the page for editing the filter policy. You can specify the syslog source and matching mode settings, and the rule uses the intersection of these two settings.
|
Parameter |
Description |
|
Syslog Source |
Select Receive syslogs from all devices or Receive syslogs only from devices added to the system. |
|
Matching Mode |
Select Receive all syslogs not matching the filter rules or Receive all syslogs matching the filter rules. |
Figure 33 Filter policy

Decoding format
1. Navigate to the Alarm > Alarming Notification > Advanced Configuration > Decoding Format page. This page displays information about all configured decoding format rules, including resource IP and decoding format, as shown in the following figure.
Figure 34 Decoding format list
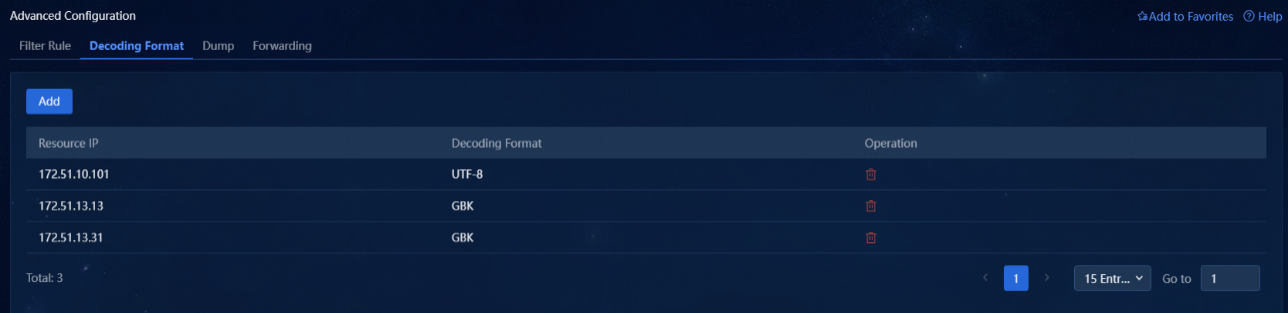
2. Click Add to open the Add Decoding Format window. You can configure the resource IP and decoding format as needed. After configuration, you can decode the syslog information received by the system for that resource.
|
Parameter |
Description |
|
Resource IP |
Specify the IP address of a resource for this rule. |
|
Decoding Format |
Select the GBK or UTF-8 format. |
Figure 35 Adding a decoding format

3. Click the ![]() icon
in the Operation column for a decoding format rule to delete it. Once deleted,
the decoding format will no longer take effect.
icon
in the Operation column for a decoding format rule to delete it. Once deleted,
the decoding format will no longer take effect.
Dump
1. Navigate to the Alarm > Alarming Notification > Advanced Configuration > Dump page. This page allows you to configure the dump status, storage period, and disk status settings.
Figure 36 Dump
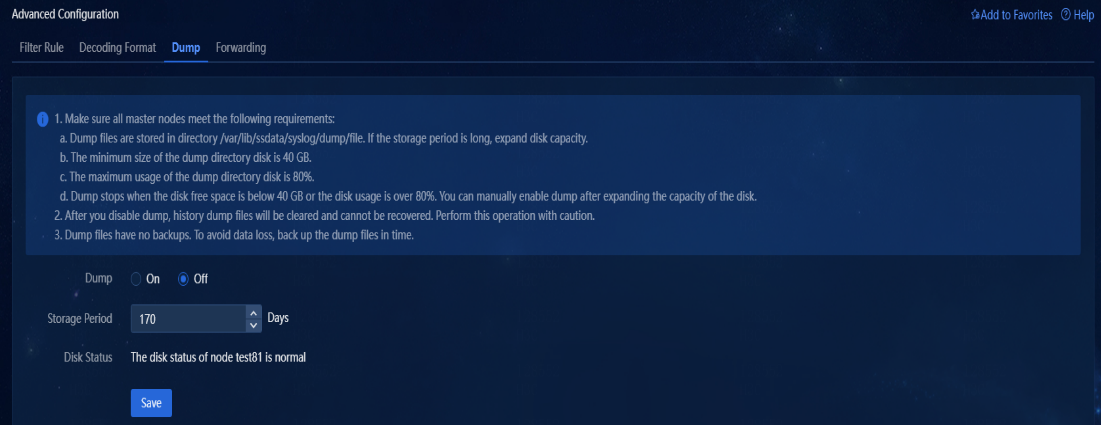
2. The dump status is turned off by default. When you turn it on, the system dumps the previous day's data every morning. You can view the dump records on the Alarm > Alarming Notification > Syslog Browse page.
Figure 37 Dump records
3. The storage period allows you to specify the most recent number of days to retain the dump files. For example, if you set the value to 10, the system retains dump files from the most recent 10 days and deletes other files.
4. The disk status allows you obtain real-time operating status of disks on each node, and detect and fix issues, if any.
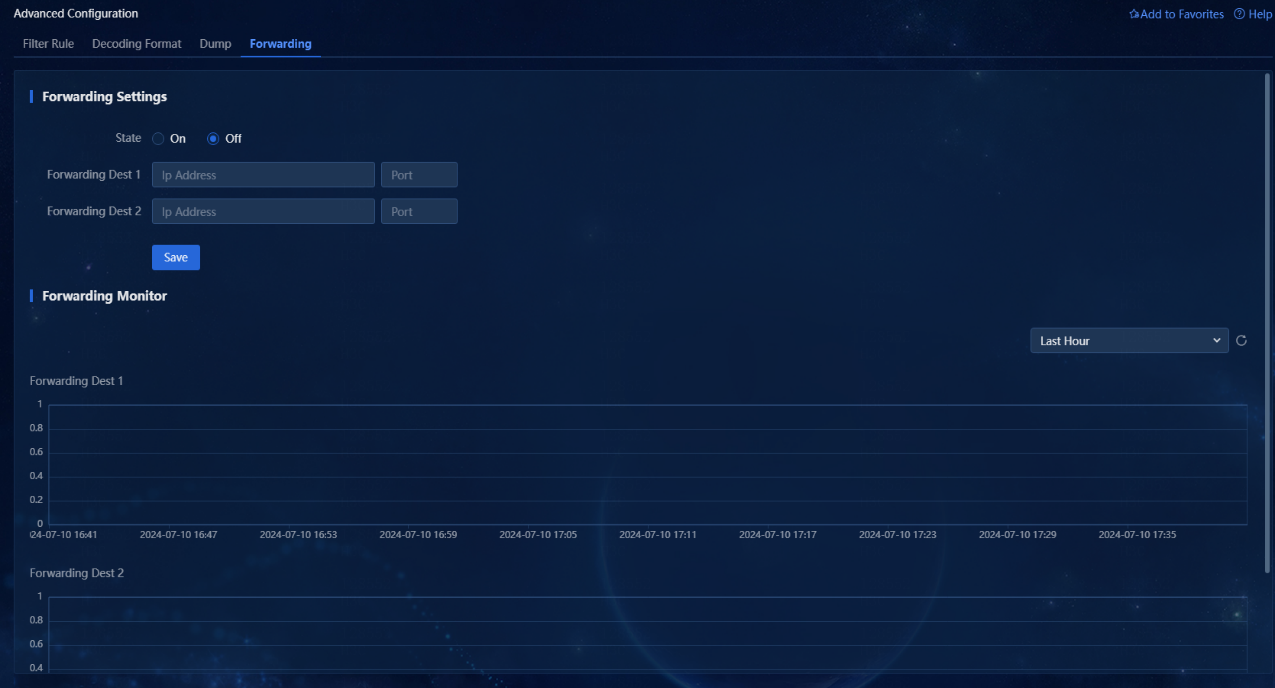
Forwarding
1. Navigate to the Alarm > Alarming Notification > Advanced Configuration > Forwarding page. This page allows you to configure forwarding settings and monitor forwarding records.
2. The forwarding status is turned off by default. You can turn it on as needed.
3. Configure the forwarding destinations as the IP addresses and listening port numbers of receivers.
4. You can configure two forwarding destinations. The forwarding monitor charts will monitor the number of syslogs forwarded to the destination addresses in real time.
|
|
NOTE: The syslog forwarding format is: <+integer+>+time+space+host name+space+%%component name+/+operation result (integer)+/OPERLOG:+operator name+(operator host IP)+[component]+operation description+space+[operation result (description corresponding to the integer)]. |
Figure 38 Forwarding settings