- Table of Contents
-
- H3C Unified Platform Configuration Examples-E71xx-5W101
- 01-Unified Platform Operator Permission Management Configuration Examples
- 02-Unified Platform Dashboard Configuration Examples
- 03-Unified Platform Trap Filter Rule Configuration Examples
- 04-Unified Platform Trap-to-Alarm Rule Configuration Examples
- 05-Unified Platform Alarm Forwarding via SMS Configuration Examples
- 06-Unified Platform Alarm Aggregation Configuration Examples
- 07-Unified Platform Component License Registration and Expansion Configuration Examples
- 08-Unified Platform Alarm Forwarding via Mail Configuration Examples
- 09-Unified Platform Two-Factor Authentication Configuration Examples
- 10-Unified Platform Alarm Rendering Configuration Examples
- 11-Unified Platform Syslog Configuration Examples
- Related Documents
-
| Title | Size | Download |
|---|---|---|
| 10-Unified Platform Alarm Rendering Configuration Examples | 728.30 KB |
Unified Platform Alarm Rendering
Configuration Examples
Document version: 5W100-20250606
Product version: E7101
Copyright © 2025 New H3C Technologies Co., Ltd. All rights reserved.
No part of this manual may be reproduced or transmitted in any form or by any means without prior written consent of New H3C Technologies Co., Ltd.
Except for the trademarks of New H3C Technologies Co., Ltd., any trademarks that may be mentioned in this document are the property of their respective owners.
The information in this document is subject to change without notice.
Alarm automation configuration list
Adding rendering configuration
Viewing rendering configurations
Introduction
The alarm rendering feature enhances and perfects the alarm feature, and allows you to extend and enrich the alarm information of interest.
If you have added alarm automation rules and configured rendering actions, the system can render alarms when it generates alarms that match the rules. A rendering action can add fixed content to alarm information, such as device and interface information, making the alarm descriptions more detailed and issue resolution faster.
Prerequisites
· Log in to Unified Platform with an operator account that has device management and alarm operation permissions. Make sure the devices to be incorporated exist in the system and can communicate with the system.
· Configure SNMP parameters on the devices. For the system to correctly read device information and resolve traps received from the devices, use a correct SNMP parameter template when you incorporate the devices.
Configuration examples
Network configuration
Enterprise A is a large technology company that relies on complex distributed systems and various business components to support its daily operations. Due to its large scale and numerous business lines, enterprise A needs efficient and precise alarms to ensure system stability and high availability.
Use the alarm rendering feature to combine alarm information with detailed information about relevant resources and interfaces. This feature allows operations personnel to quickly locate and resolve system issues.
Figure 1 Schematic diagram for alarm rendering

Analysis
1. Configure basic alarm rendering information:
¡ Select whether to pend information to alarm details.
¡ Use predefined rendering, which is registered and displayed by the network resource installation package (NSM_FCAPS-Res).
¡ Configure custom rendering with fixed values, including: name, label, rendering value, rendering information, and rendering action.
¡ Configure custom rendering with extended values, registered and displayed by the CMDB component.
2. View, modify, and delete alarm rendering configurations.
Software versions used
This configuration example was created and verified on Unified Platform E71xx.
Restrictions and guidelines
· Configure the alarm rendering actions in alarm automation.
· Alarm rendering is not affected by whether the alarm occurrence or duration threshold is reached.
· In the rendering configuration dialog box, the Interface Description and System Description options will be displayed in the Predefined Rendering area only when the network resource installation package (NSM_FCAPS-Res) is installed. The Resource Group option will be displayed in the Predefined Rendering area only when the CMDB component installation package is installed.
Procedures
Alarm automation configuration list
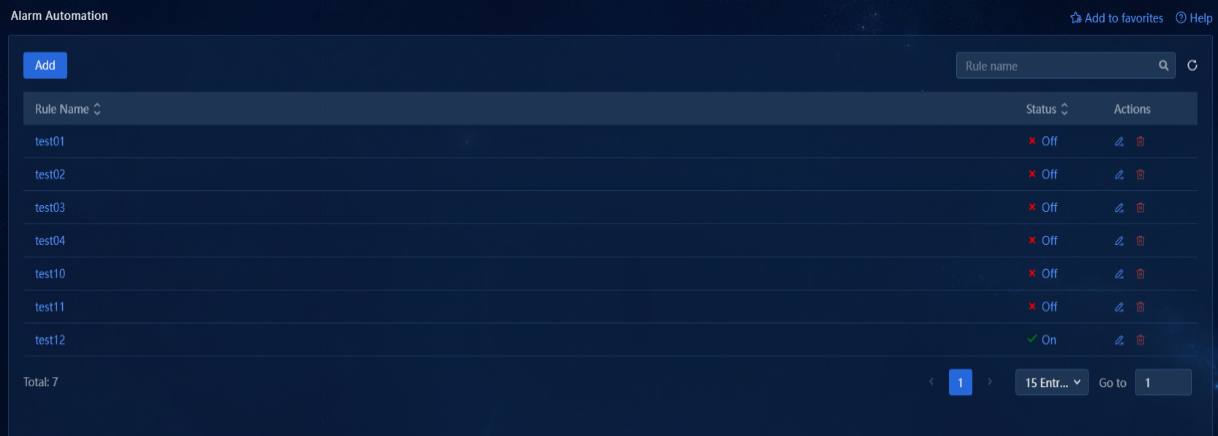
1. Navigate to the Alarm > Alarm Config > Alarm Automation page. This page displays all user-configured automation rules, including rule names, statuses, and action buttons, as shown in the following figure.
Figure 2 Alarm automation rule list
2. You configure the name of an alarm automation rule when adding that rule. Click the name of a rule to view detailed information about that rule. The rendering configuration is displayed as a link in the action settings list, as shown in the following figure.
Figure 3 Alarm automation rule details

3. An alarm automation rule is enabled only when its status is On. You can click the value in the Status column to switch the status between On and Off.
4. To edit an alarm automation rule, click the ![]() icon in the Actions column for that
rule on the alarm automation page. On the page for editing that rule, the
configuration conditions remain the same as those when the rule was added, and
the rule name cannot be edited. To delete an automation rule, click the
icon in the Actions column for that
rule on the alarm automation page. On the page for editing that rule, the
configuration conditions remain the same as those when the rule was added, and
the rule name cannot be edited. To delete an automation rule, click the ![]() icon for that rule. Once deleted, the rule will no longer be
effective.
icon for that rule. Once deleted, the rule will no longer be
effective.
Adding rendering configuration
Perform this task to add alarm automation rules based on user-defined conditions and configure rendering actions in the rules. Click Add on the Alarm Automation page to access the Add Alarm Automation Setting page. On the Add Alarm Automation Setting page, you can set various alarm automation rules as needed and add rendering configurations in the action settings, as shown in the following figure.
Figure 4 Adding alarm automation rules

Configuring basic rendering configuration
The rendering configuration actions include pend to alarm details, predefined rendering, and custom rendering, as shown in the following figure.
Figure 5 Rendering configuration
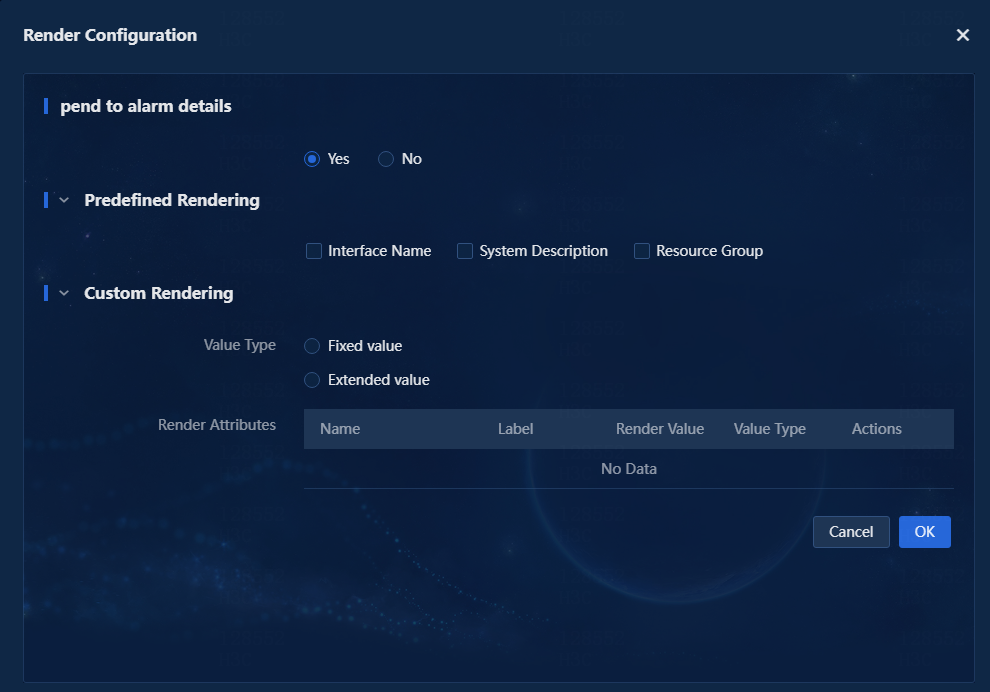
The following information describes how to configure each attribute and its purpose.
Pend to alarm details
You can select whether to add rendering information to the alarm details as extended information.
· If you select Yes in the pend to alarm details area, the rendering information will be added to the alarm information. You can view it in the alarm information on the active alarm list.
Figure 6 Selecting Yes in the pend to alarm details area
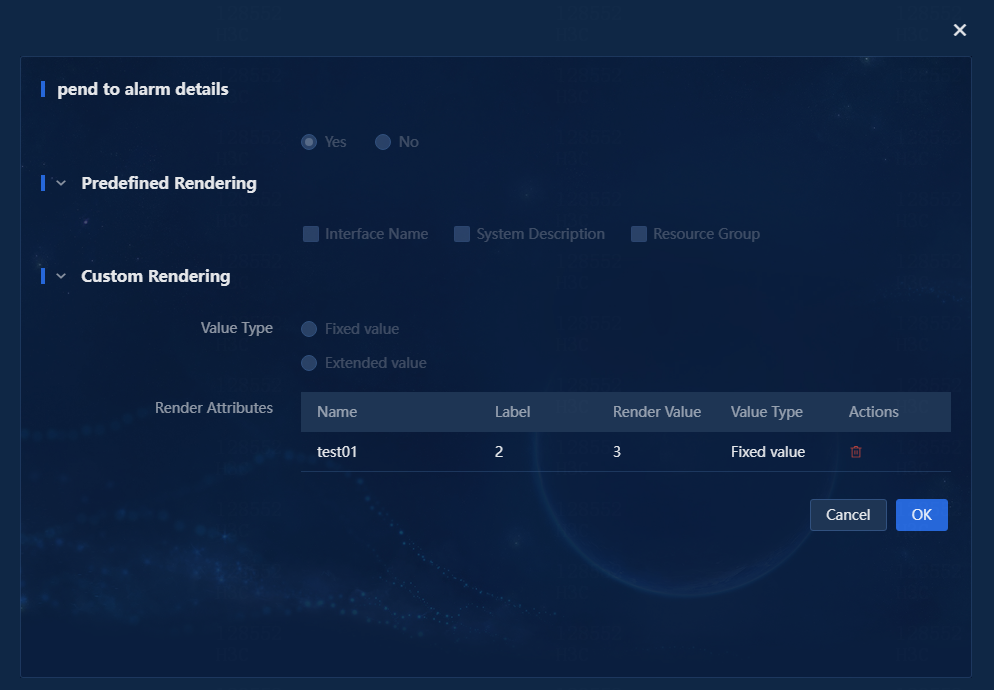
Figure 7 Adding rendering information to the alarm information

· If you select No in the pend to alarm details area, the rendering information will not be pended to the alarm details. The rendering information is displayed only in the extended information.
Figure 8 Selecting No in the pend to alarm details area
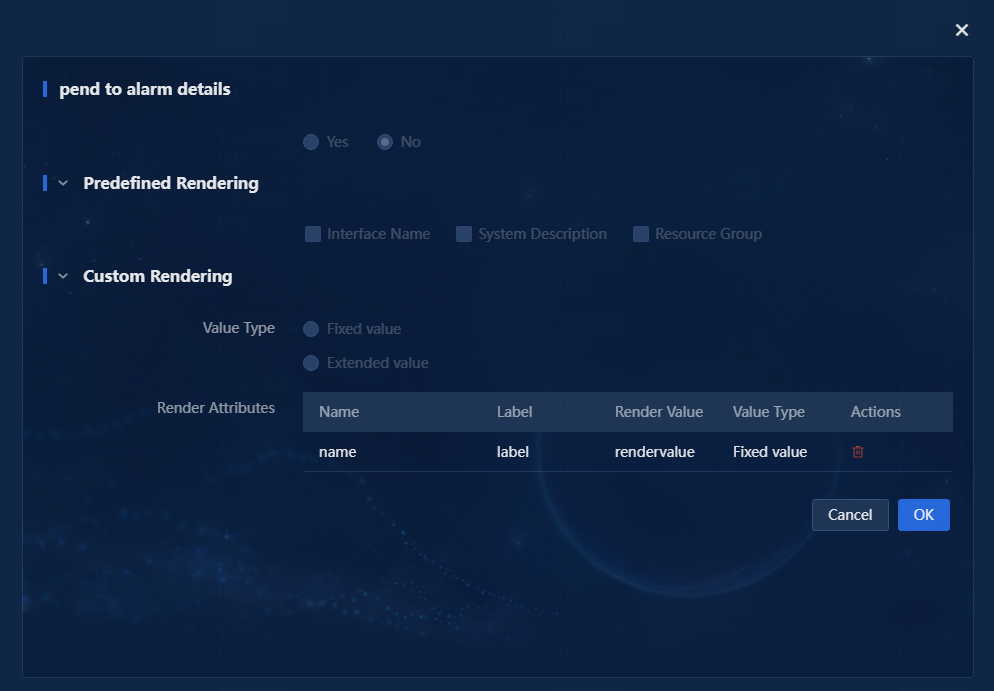
Figure 9 The rendering information is displayed only in the extended information

Predefined rendering
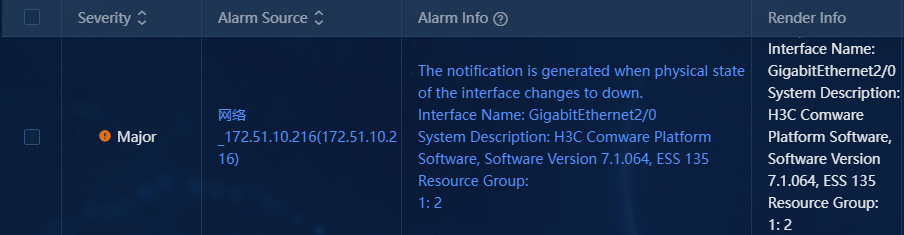
The predefined rendering options are registered by other components. After you install the network resource installation package (NSM_FCAPS-Res), the Interface Name and System Description options will be displayed in the Predefined Rendering area. After you install the CMDB component installation package, the Resource Group option will be displayed in the Predefined Rendering area.
After you configure a rule with predefined rendering, the result after the system generates and renders an alarms is as shown in the following figure.
Figure 10 Predefined rendering
Custom rendering - fixed values
Custom rendering with fixed values allows you to add fixed content to alarms, including name, label, and render value. The rendering information will be displayed in the render attribute list. You can configure multiple fixed values for a rendering action, as shown in the following figure.
Figure 11 Custom rendering - fixed values

After you configure custom rendering with fixed values, the rendering information will be added to the alarms that match the criteria, as shown in the following figure.
Figure 12 Rendering with fixed values

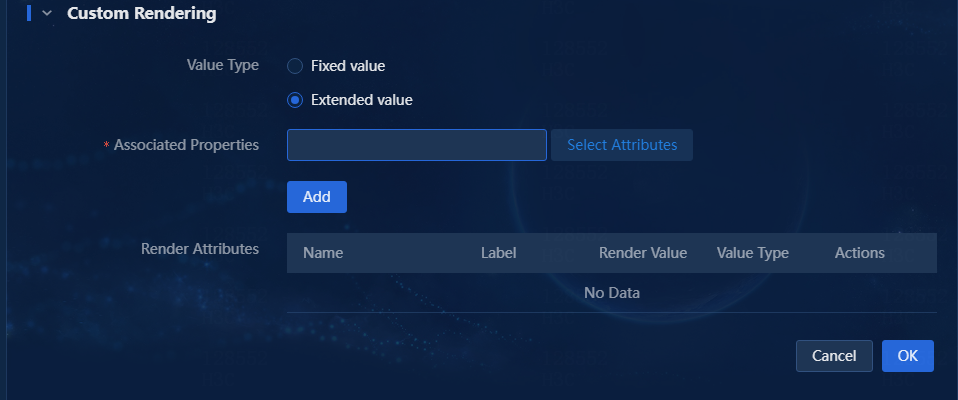
Custom rendering - extended values
1. To use custom rendering with extended values, you must install the CMDB component. If the CMDB component is not installed, the system will prompt that no attributes are available for selection after the Associated Properties field. After you install the CMDB component, the Select Attributes button will appear after the Associated Properties field, as shown in the following figure.
Figure 13 Select Attributes button
2. Click Select Attributes. In the window that opens, select the attributes you want to render. You can select one or multiple attributes from different categories, as shown in the following figure.
Figure 14 Selecting attributes

3. After you select the attributes, click OK. The selected attributes will automatically populate the Associated Properties field. Click Add to add them to the rendering attribute list, as shown in the following figure.
Figure 15 Adding rendering attributes

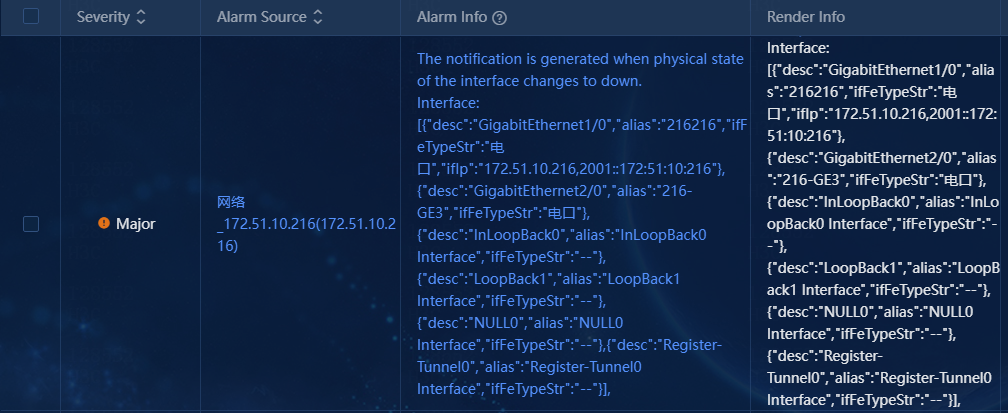
4. After you configure custom rendering with extended values, the rendering information will be added to the alarms that match the criteria, as shown the following figure.
Figure 16 Rendering with extended values
5. After the alarm component sends device and alarm information to CMDB, CMDB receives resource attribute information and returns the resource attribute information. If certain attributes lack values or return content abnormally, the rendering information values will be empty.
Viewing rendering configurations
1. Access the Alarm Automation page, and click the name of the relevant rule to access the alarm automation setting details page. The action parameters for rendering configurations are displayed as a link in the action settings list, as shown in the following figure.
Figure 17 Viewing rendering configurations

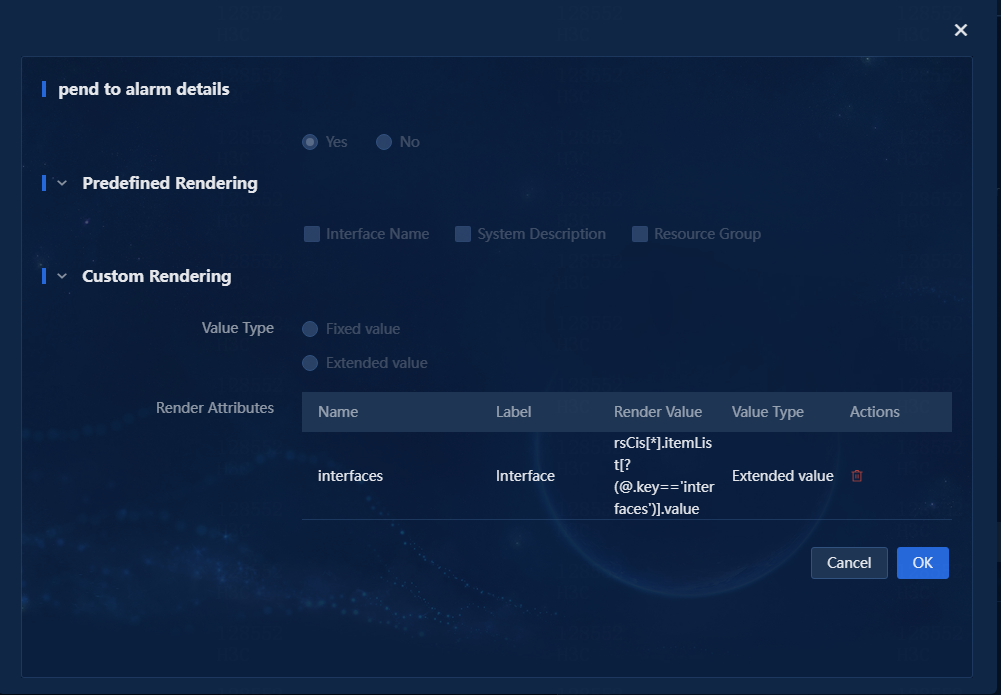
2. Click the link to view the detailed configuration of the action, as shown in the following figure.
Figure 18 Rendering configuration details
Editing the rendering configurations
You cannot directly edit the rendering configurations. To edit the rendering configurations, delete the existing configurations and configure them again.
Deleting the rendering configurations
· To delete an entire alarm automation rule,
simply click the ![]() icon in the Actions column for that
rule in the alarm automation list. The system will delete the rendering
configurations along with the rule.
icon in the Actions column for that
rule in the alarm automation list. The system will delete the rendering
configurations along with the rule.
· To delete the rendering configurations from an
alarm automation rule, click the ![]() icon in the Actions column for that
rule in the list. Then, remove the rendering configurations from the action
settings list.
icon in the Actions column for that
rule in the list. Then, remove the rendering configurations from the action
settings list.