- Table of Contents
-
- H3C Unified Platform Configuration Examples-E71xx-5W101
- 01-Unified Platform Operator Permission Management Configuration Examples
- 02-Unified Platform Dashboard Configuration Examples
- 03-Unified Platform Trap Filter Rule Configuration Examples
- 04-Unified Platform Trap-to-Alarm Rule Configuration Examples
- 05-Unified Platform Alarm Forwarding via SMS Configuration Examples
- 06-Unified Platform Alarm Aggregation Configuration Examples
- 07-Unified Platform Component License Registration and Expansion Configuration Examples
- 08-Unified Platform Alarm Forwarding via Mail Configuration Examples
- 09-Unified Platform Two-Factor Authentication Configuration Examples
- 10-Unified Platform Alarm Rendering Configuration Examples
- 11-Unified Platform Syslog Configuration Examples
- Related Documents
-
| Title | Size | Download |
|---|---|---|
| 01-Unified Platform Operator Permission Management Configuration Examples | 1.32 MB |
Unified Platform User Permission Management
Configuration Examples
Document version: 5W100-20250606
Software version: E7101
Copyright © 2025 New H3C Technologies Co., Ltd. All rights reserved.
No part of this manual may be reproduced or transmitted in any form or by any means without prior written consent of New H3C Technologies Co., Ltd.
Except for the trademarks of New H3C Technologies Co., Ltd., any trademarks that may be mentioned in this document are the property of their respective owners.
The information in this document is subject to change without notice.
Contents
Example: Configuring user permissions
Authorizing a user when adding that user
Bulk authorizing users on the Authorization Wizard page
Adding a user to an authorized user group
Introduction
Users manage and maintain the Unified Platform and its service components. The system controls users' functional and resource permissions by granting them functional and resource authorizations. You can use the following methods to authorize users:
· Authorize a user when you add that user.
· Authorize an existing user.
· Bulk authorize users on the Authorization Wizard page.
· Adding a user to an authorized user group.
Prerequisites
Log in to Unified Platform as a user with authorization management permissions, such as an admin user.
Example: Configuring user permissions
Network configuration
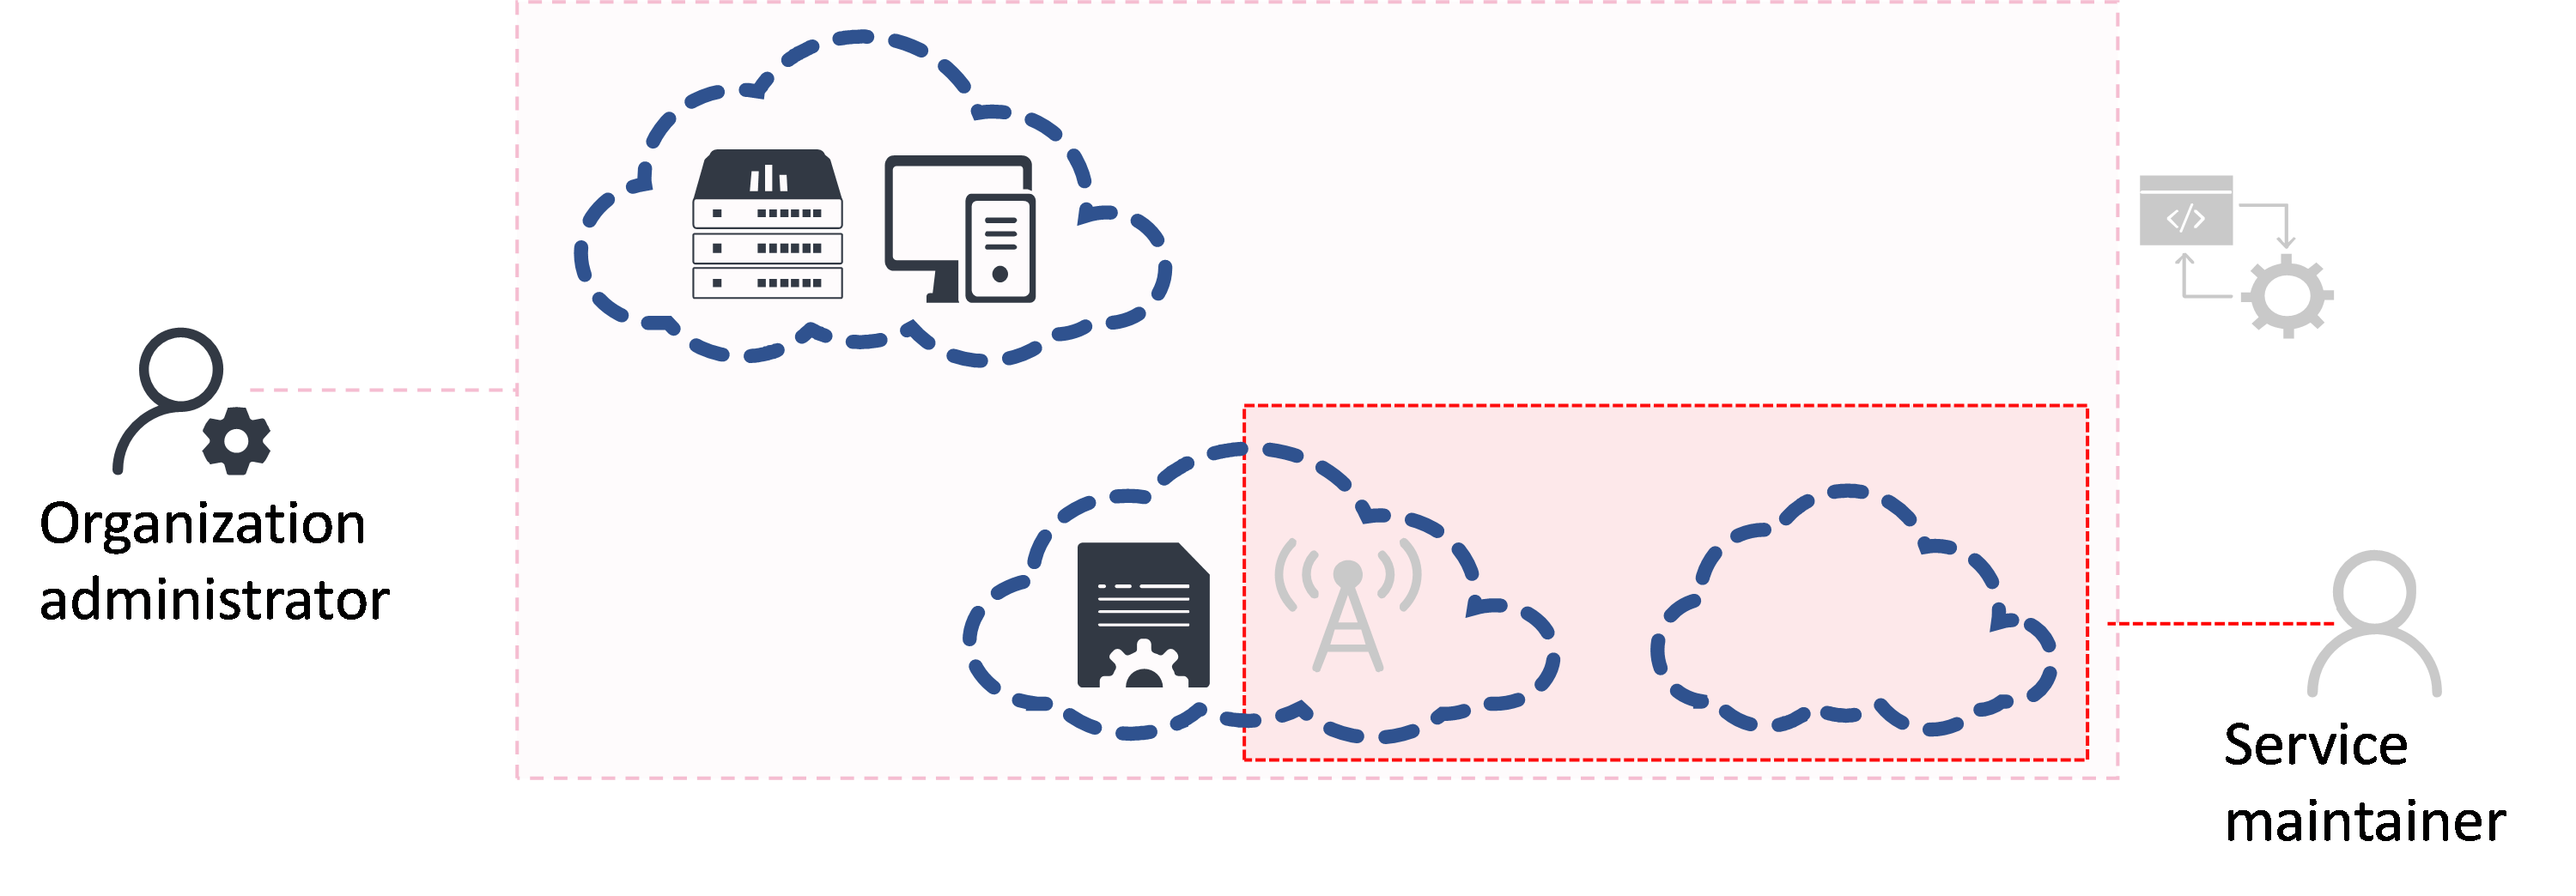
Company A is a company responsible for game development, and has a Headquarters Technology Center and a Sichuan Technology Center. The administrator of the Headquarters Technology Center needs to have full access to all system-level features and resources and manages the organizations within the system. The administrator of Sichuan Technology Center needs to have access to all services features except the DC controller.
To meet the preceding requirements, perform the following configurations:
· Assign the organization administrator role to the administrator of the Headquarters Technology Center, and grant feature and resource permissions to the administrator.
· Assign the service maintenance role to the administrator of Sichuan Technology Center and grant feature and resource permissions to the administrator.
· The administrator of Headquarters Technology Center has been adjusted to another job. Please modify the permissions of the administrator.
Figure 1 Permission assignment
· The headquarters technical center has formed a team. Assign the organization administrator role to members who join this team. Grant roles and permissions to the team.
Figure 2 Users joining a user group

· Additional requirement: Grant batch authorization to multiple users.
Analysis
Table 1 Analysis
|
Requirement |
Analysis |
|
Assign the organization administrator role to the administrator of the Headquarters Technology Center, and grant feature and resource permissions to the administrator. |
1. Create the Headquarters Technology Center organization. 2. Create user A under the Headquarters Technology Center organization. 3. Grant user A the administrator role for the organization. 4. By default, the organization administrator has permissions to all resources. |
|
Assign the service maintenance role to the administrator of Sichuan Technology Center and grant feature and resource permissions to the administrator. |
5. Create the Sichuan Technology Center organization. 6. Create user B under the Sichuan Technology Center organization. 7. Grant user B the services maintenance role. 8. Grant user B the permissions for specified resources. |
|
The administrator of Headquarters Technology Center has been adjusted to another job. Please modify the permissions of the administrator. |
Go to the User Management > User List > Headquarters Technology Center page, click the Configure Permission icon for the target user, and then add or modify permissions. |
|
Assign roles and permissions to the team. |
9. Create a user group. 10. Authorize the user group under the Headquarters Technology Center organization. 11. Add users without permissions to the user group. 12. Users who join the user group inherit the permissions of the user group. |
Software versions used
This configuration example was created and verified on Unified Platform E71xx.
Restrictions and guidelines
¡ Authorized users cannot be assigned to a user group.
¡ You cannot authorize members in a user group by clicking the Configure Permission icon in the Actions column in the user list. In addition, they are invisible in the user list on the authorization wizard page.
¡ To configure authorization in a scenario with an organization, first add a custom organization on the Organization Management page. A scenario with the default organization is not counted as a scenario with an organization.
Procedures
Authorizing a user when adding that user
|
|
NOTE: Roles include those with resources and those without. · Roles with resources include system administrators, tenant administrators, and organization administrators. · Roles without resources include system maintenance personnel, tenant maintenance personnel, service maintenance personnel, service viewers, tenant viewers, and custom roles. |
Authorizing a user with roles with resources
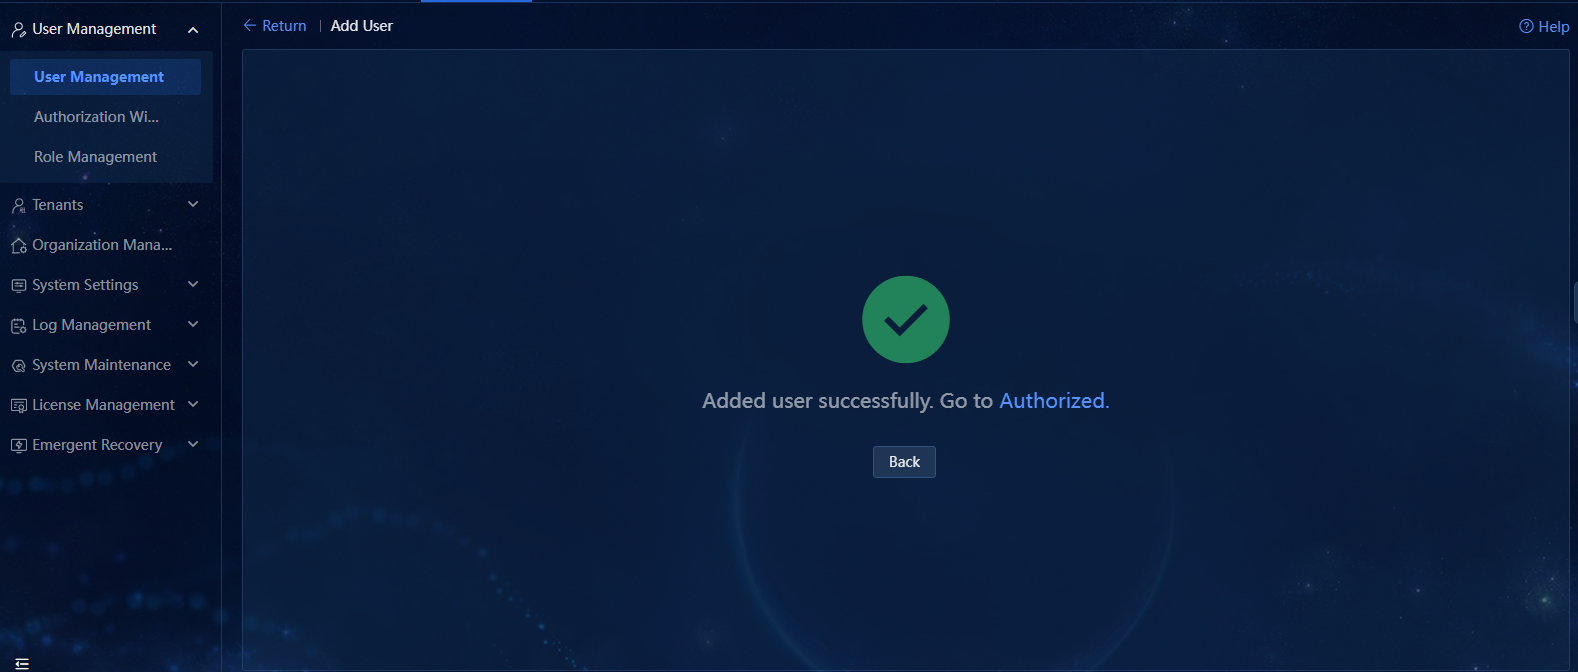
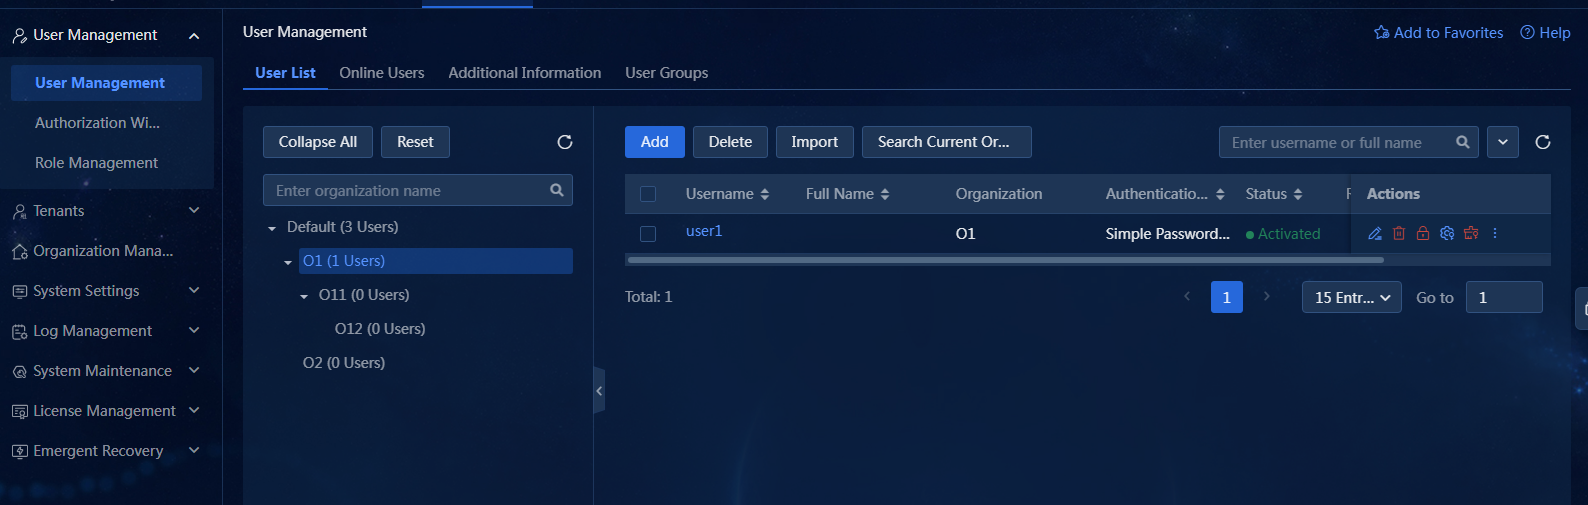
1. Navigate to the System > User Management > User Management > User List page. After you add a user, click Authorized to authorize that user.
Figure 3 Successfully added the user
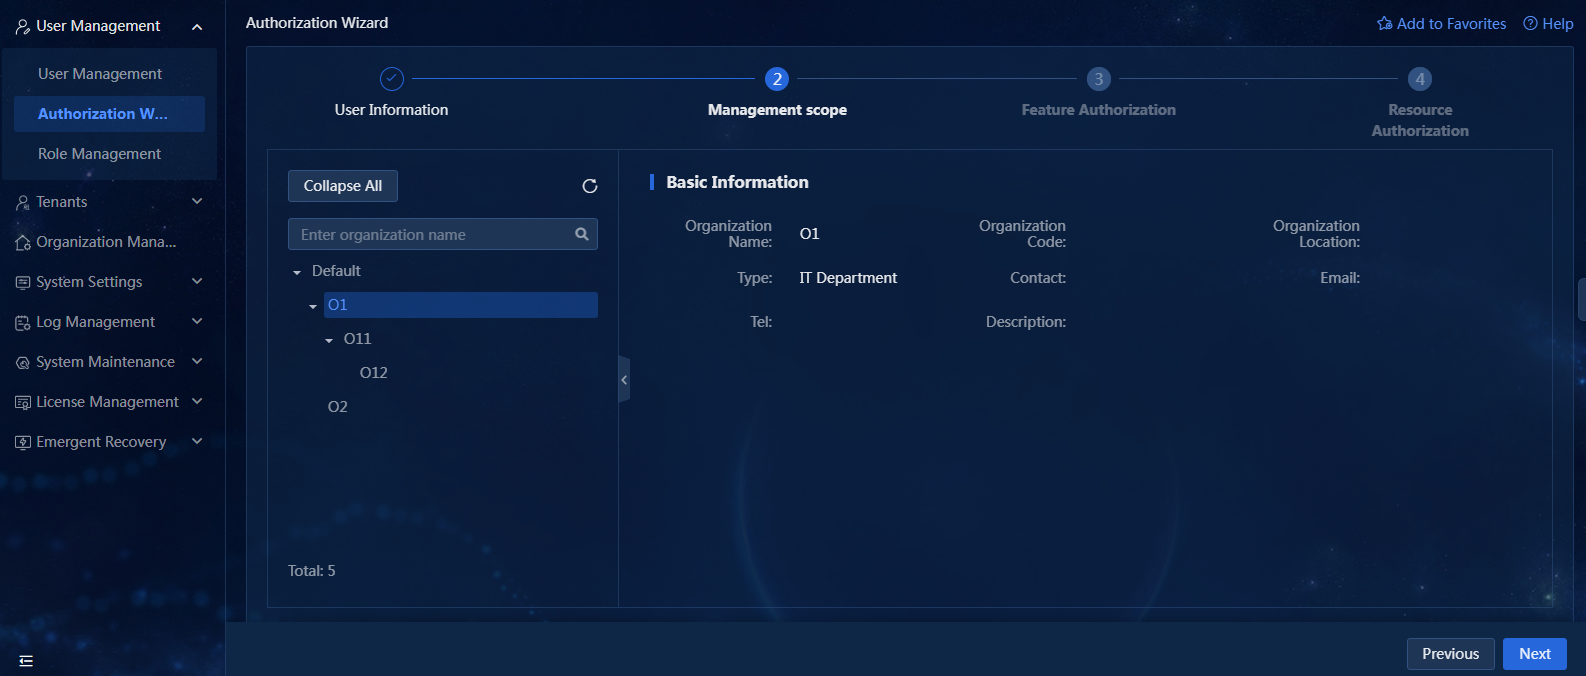
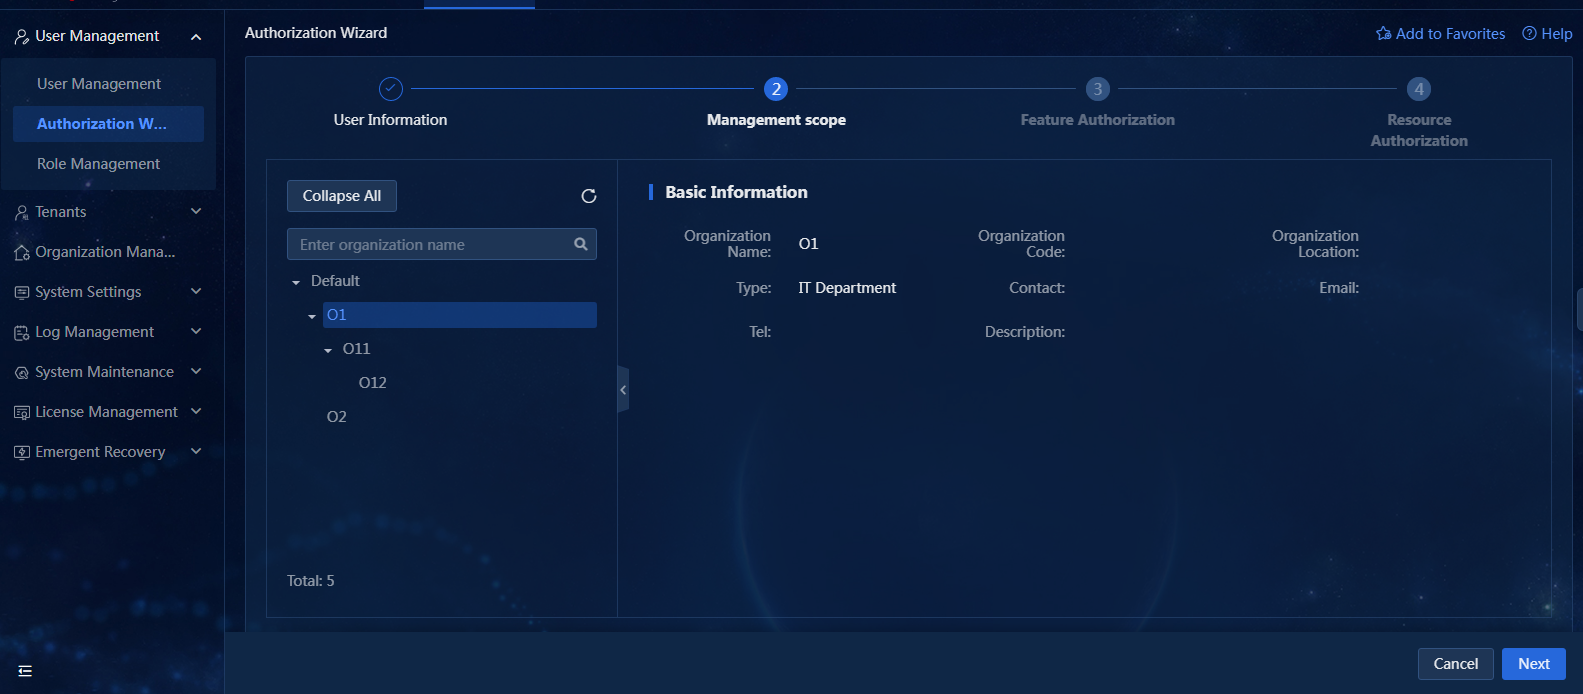
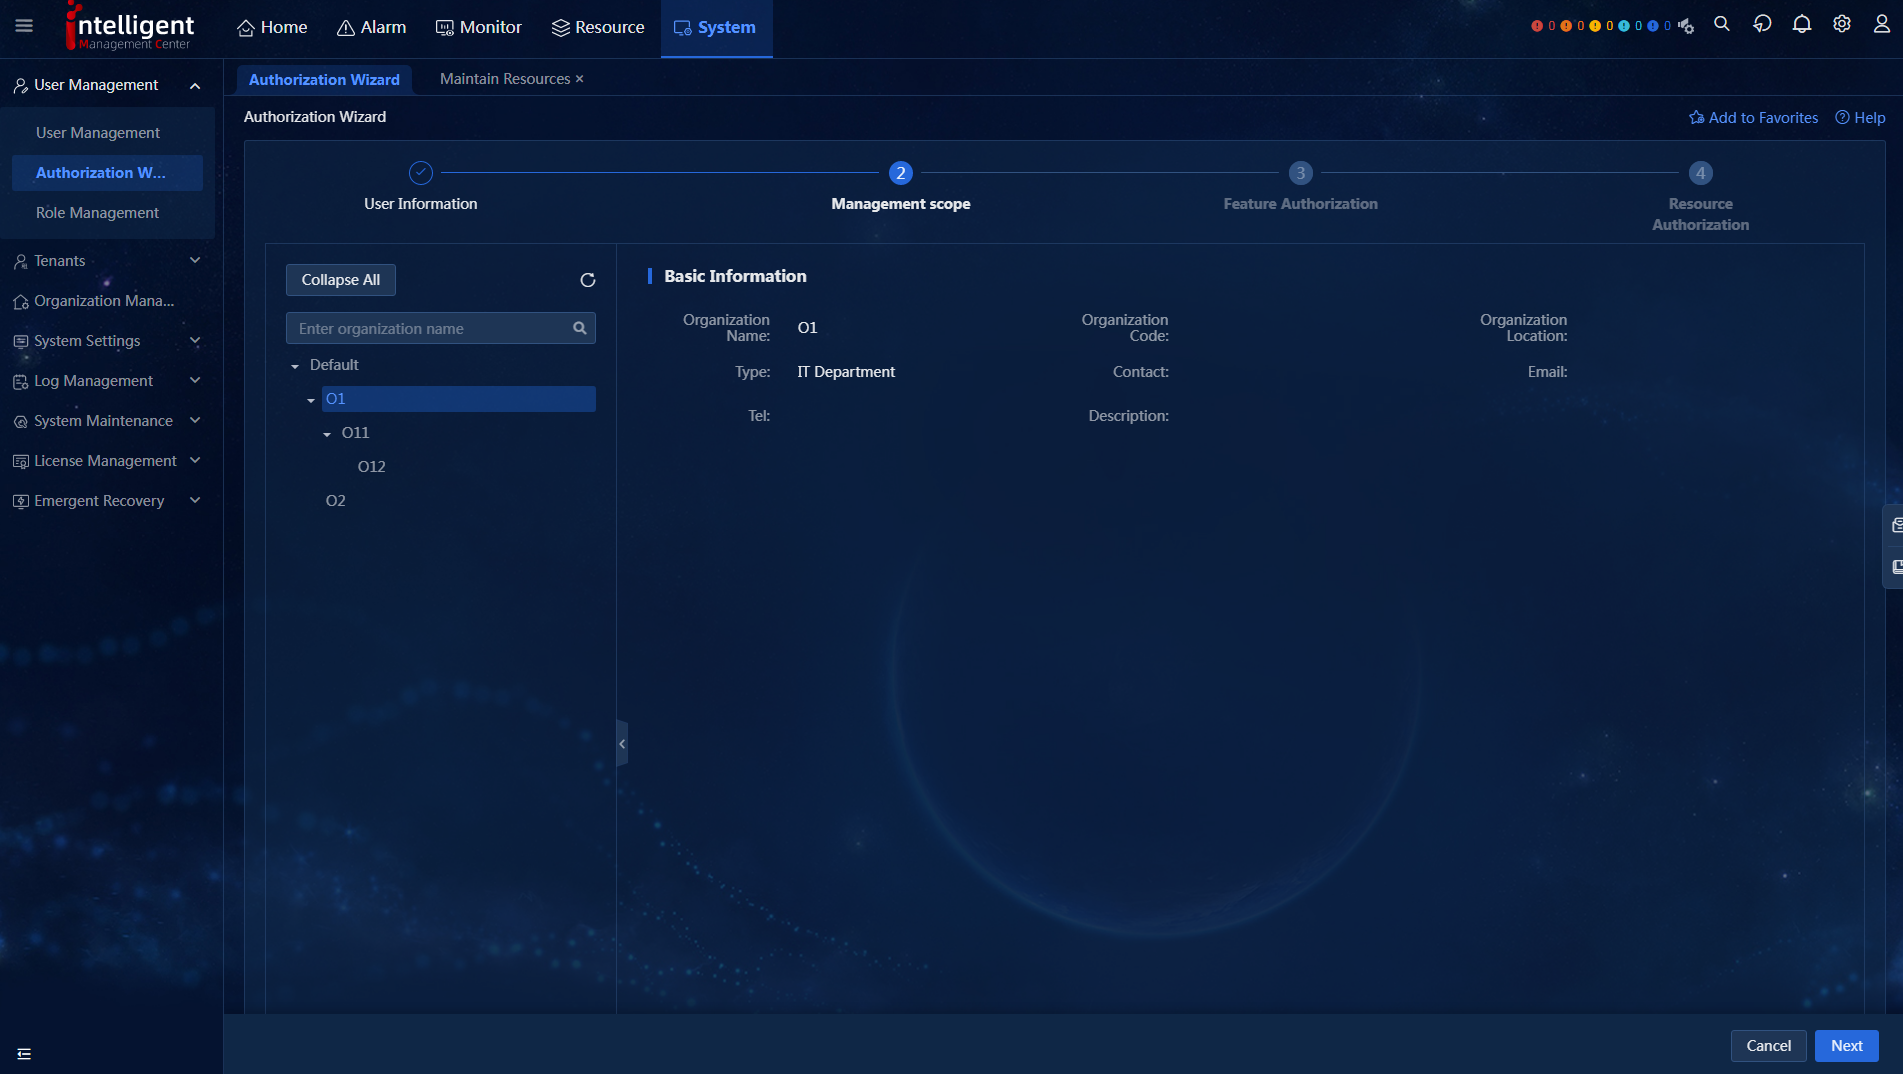
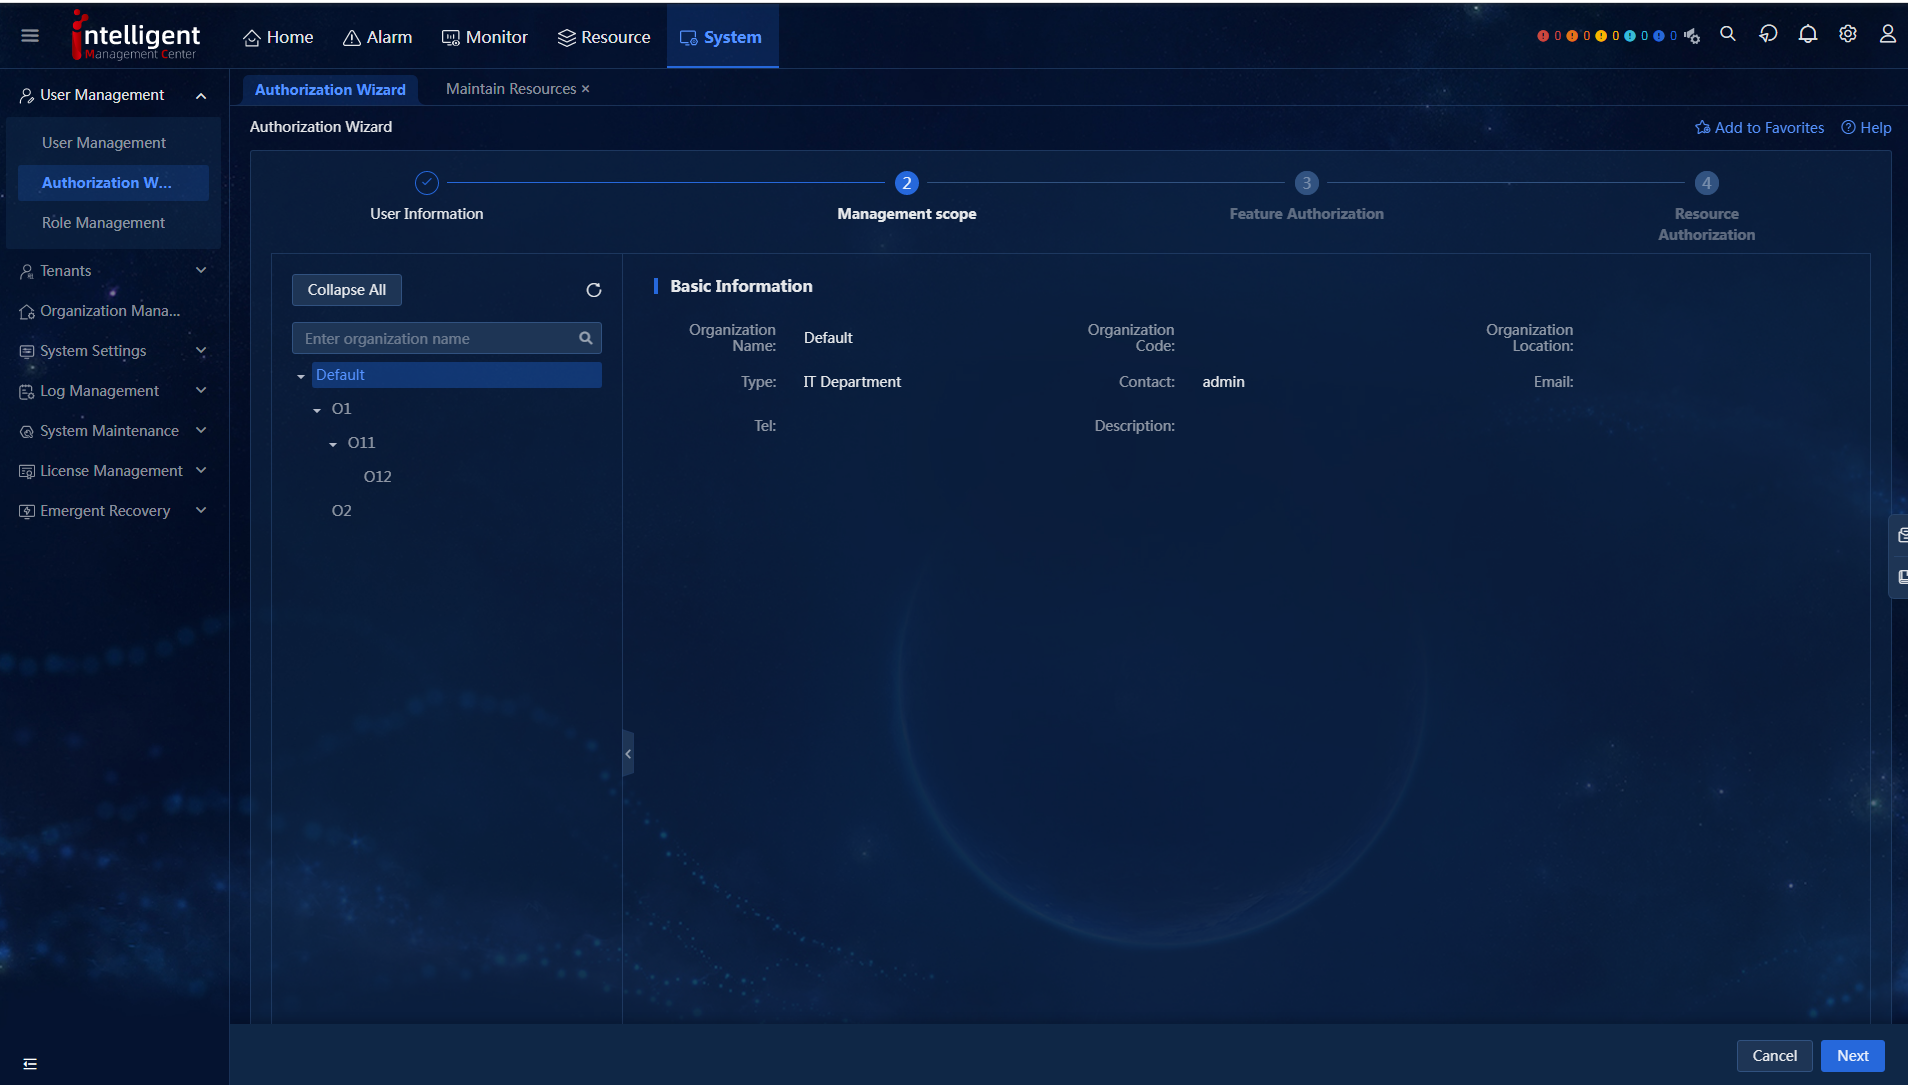
2. Select the management scope, and click Next. In this example, a user-defined organization is selected.
Figure 4 Management scope
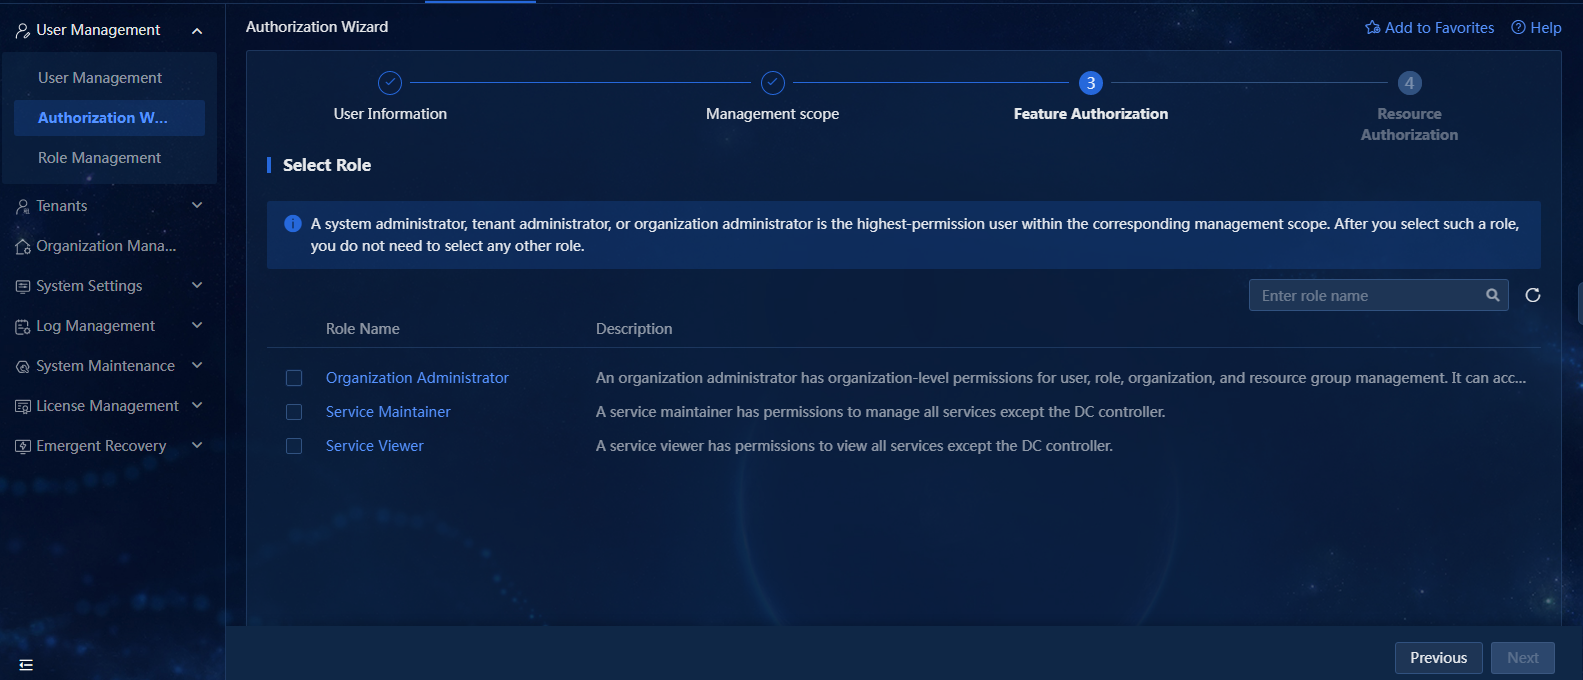
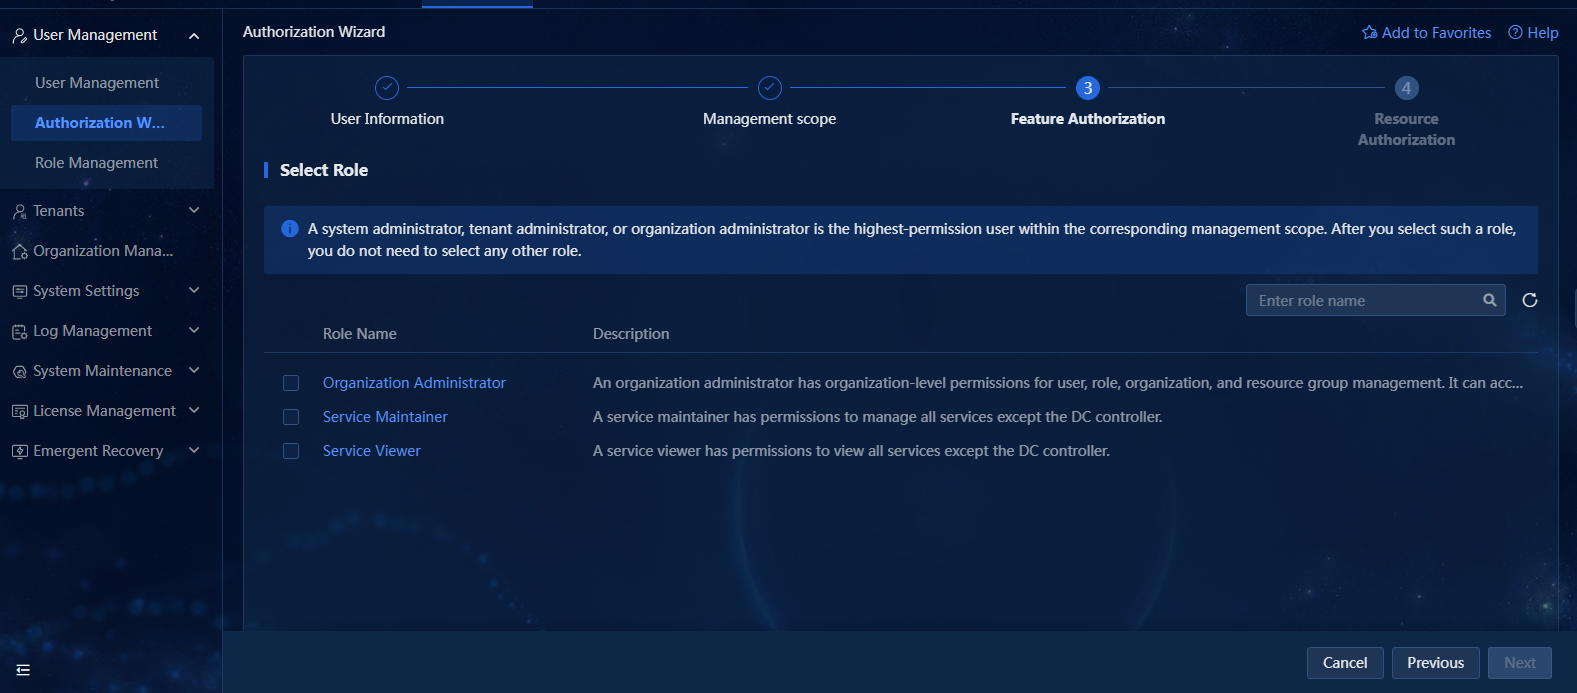
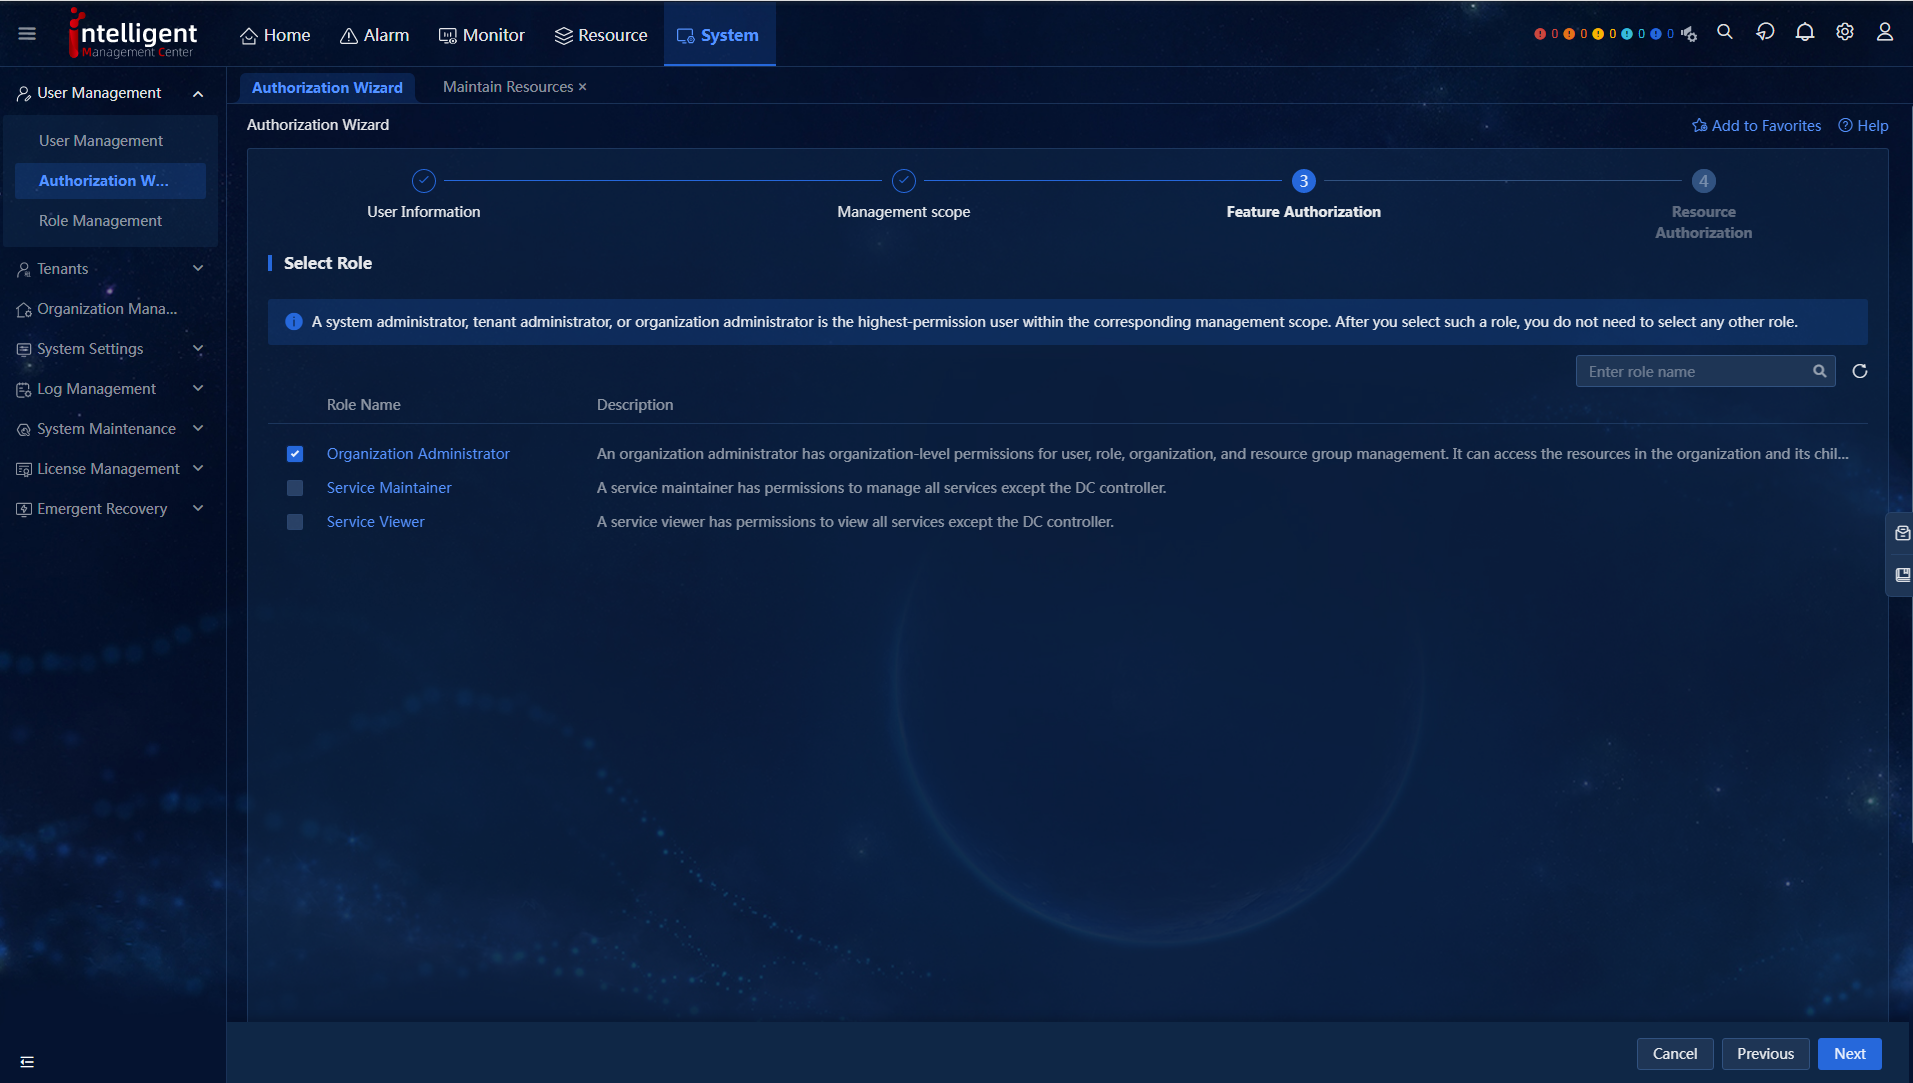
3. Select roles as needed on the Feature Authorization page.
Figure 5 Feature authorization
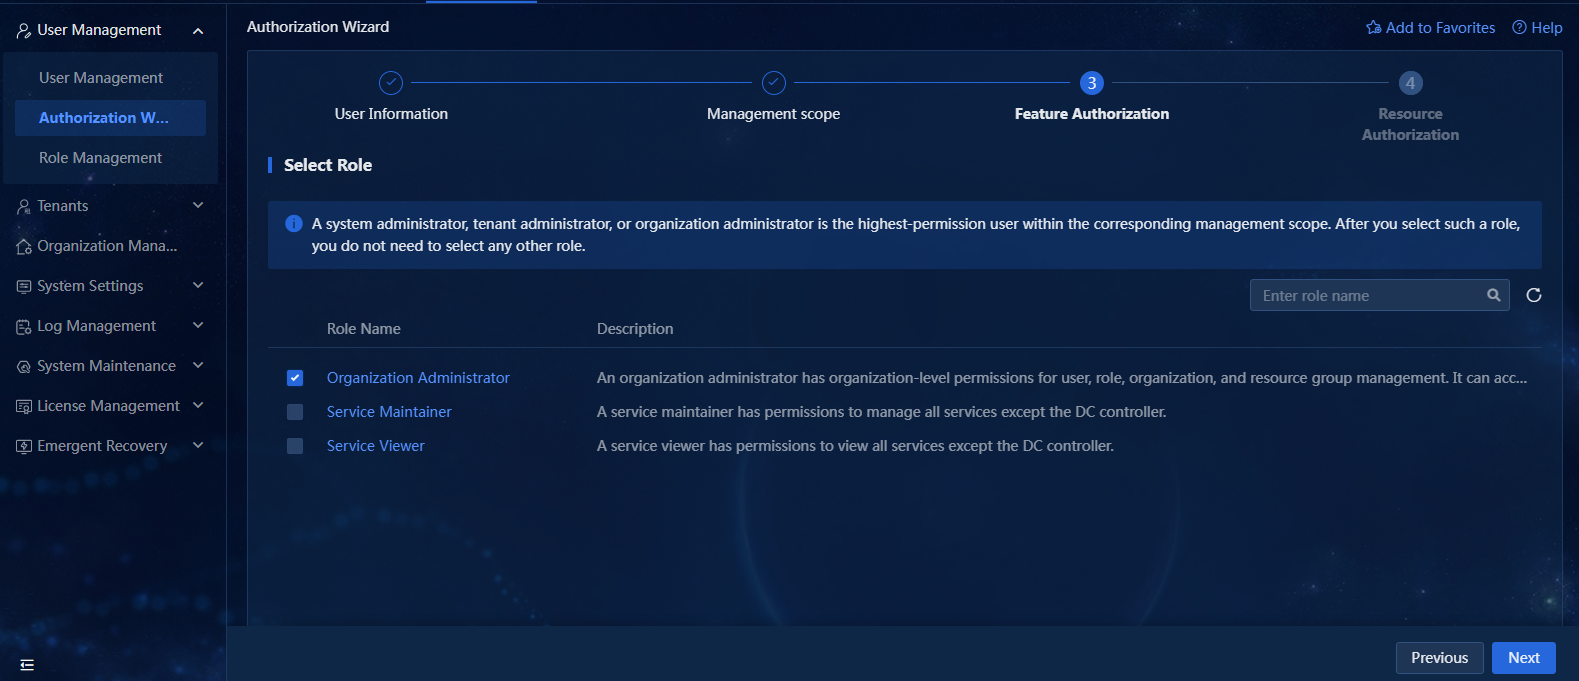
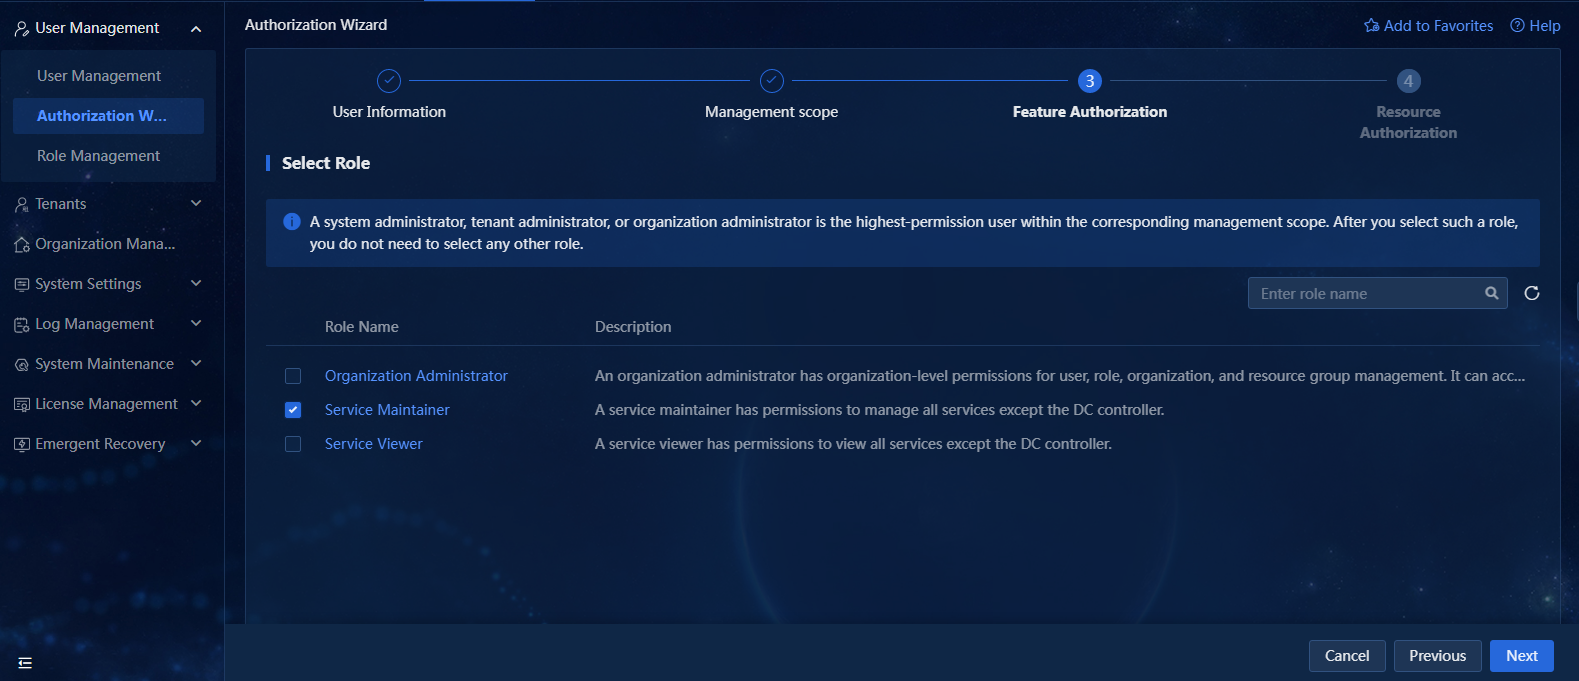
4. Click Next. In this example, Organization Administrator is selected.
Figure 6 Selecting roles
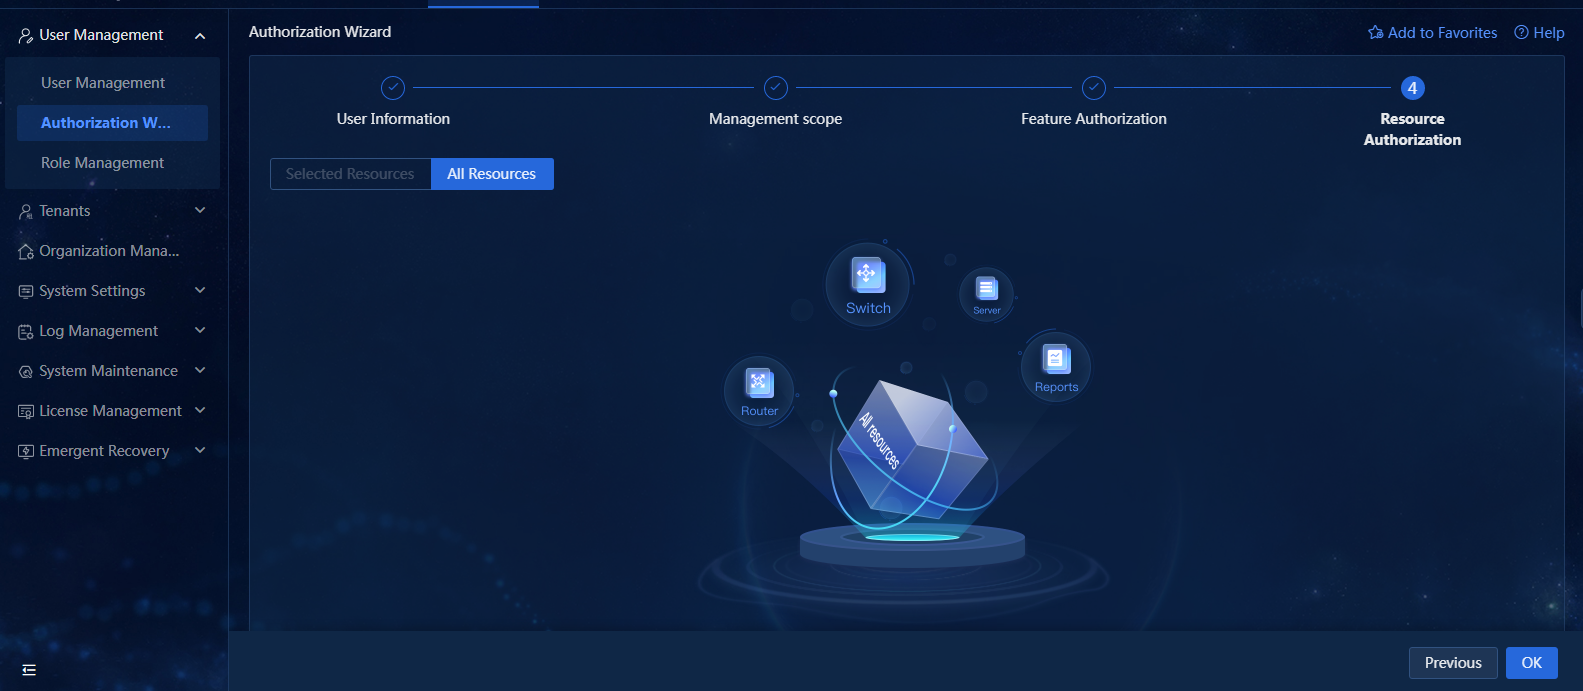
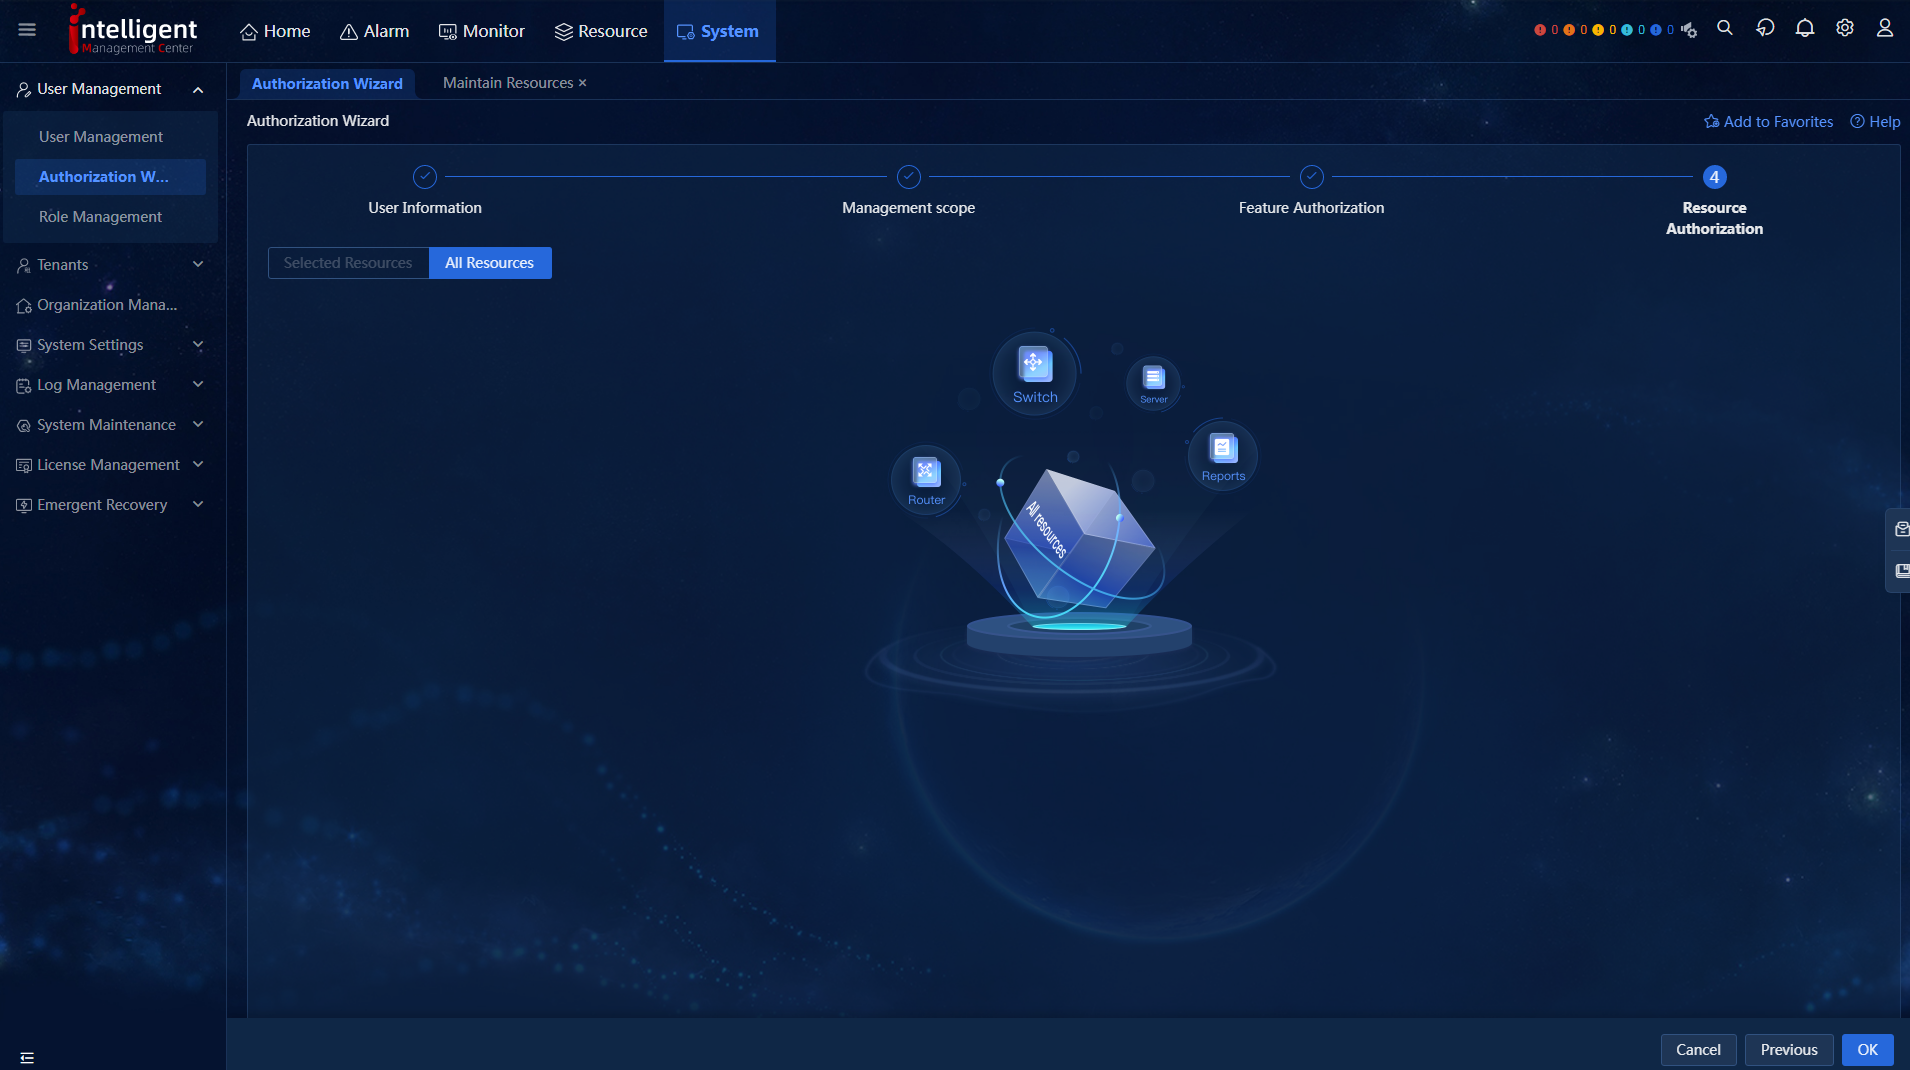
5. You are placed on the Resource Authorization page. Because Organization Administrator is selected, all resources are authorized by default.
Figure 7 Resource authorization
6. Click OK.
Figure 8 Authorization succeeded
Authorizing a user with roles without resources
1. After you add a user, click Authorized to authorize that user.
Figure 9 Successfully added the user

2. Select the management scope, and click Next. In this example, a user-defined organization is selected.
Figure 10 Management scope
3. Select roles as needed on the Feature Authorization page.
Figure 11 Feature authorization
4. Click Next. In this example, Service Maintainer is selected.
Figure 12 Selecting roles
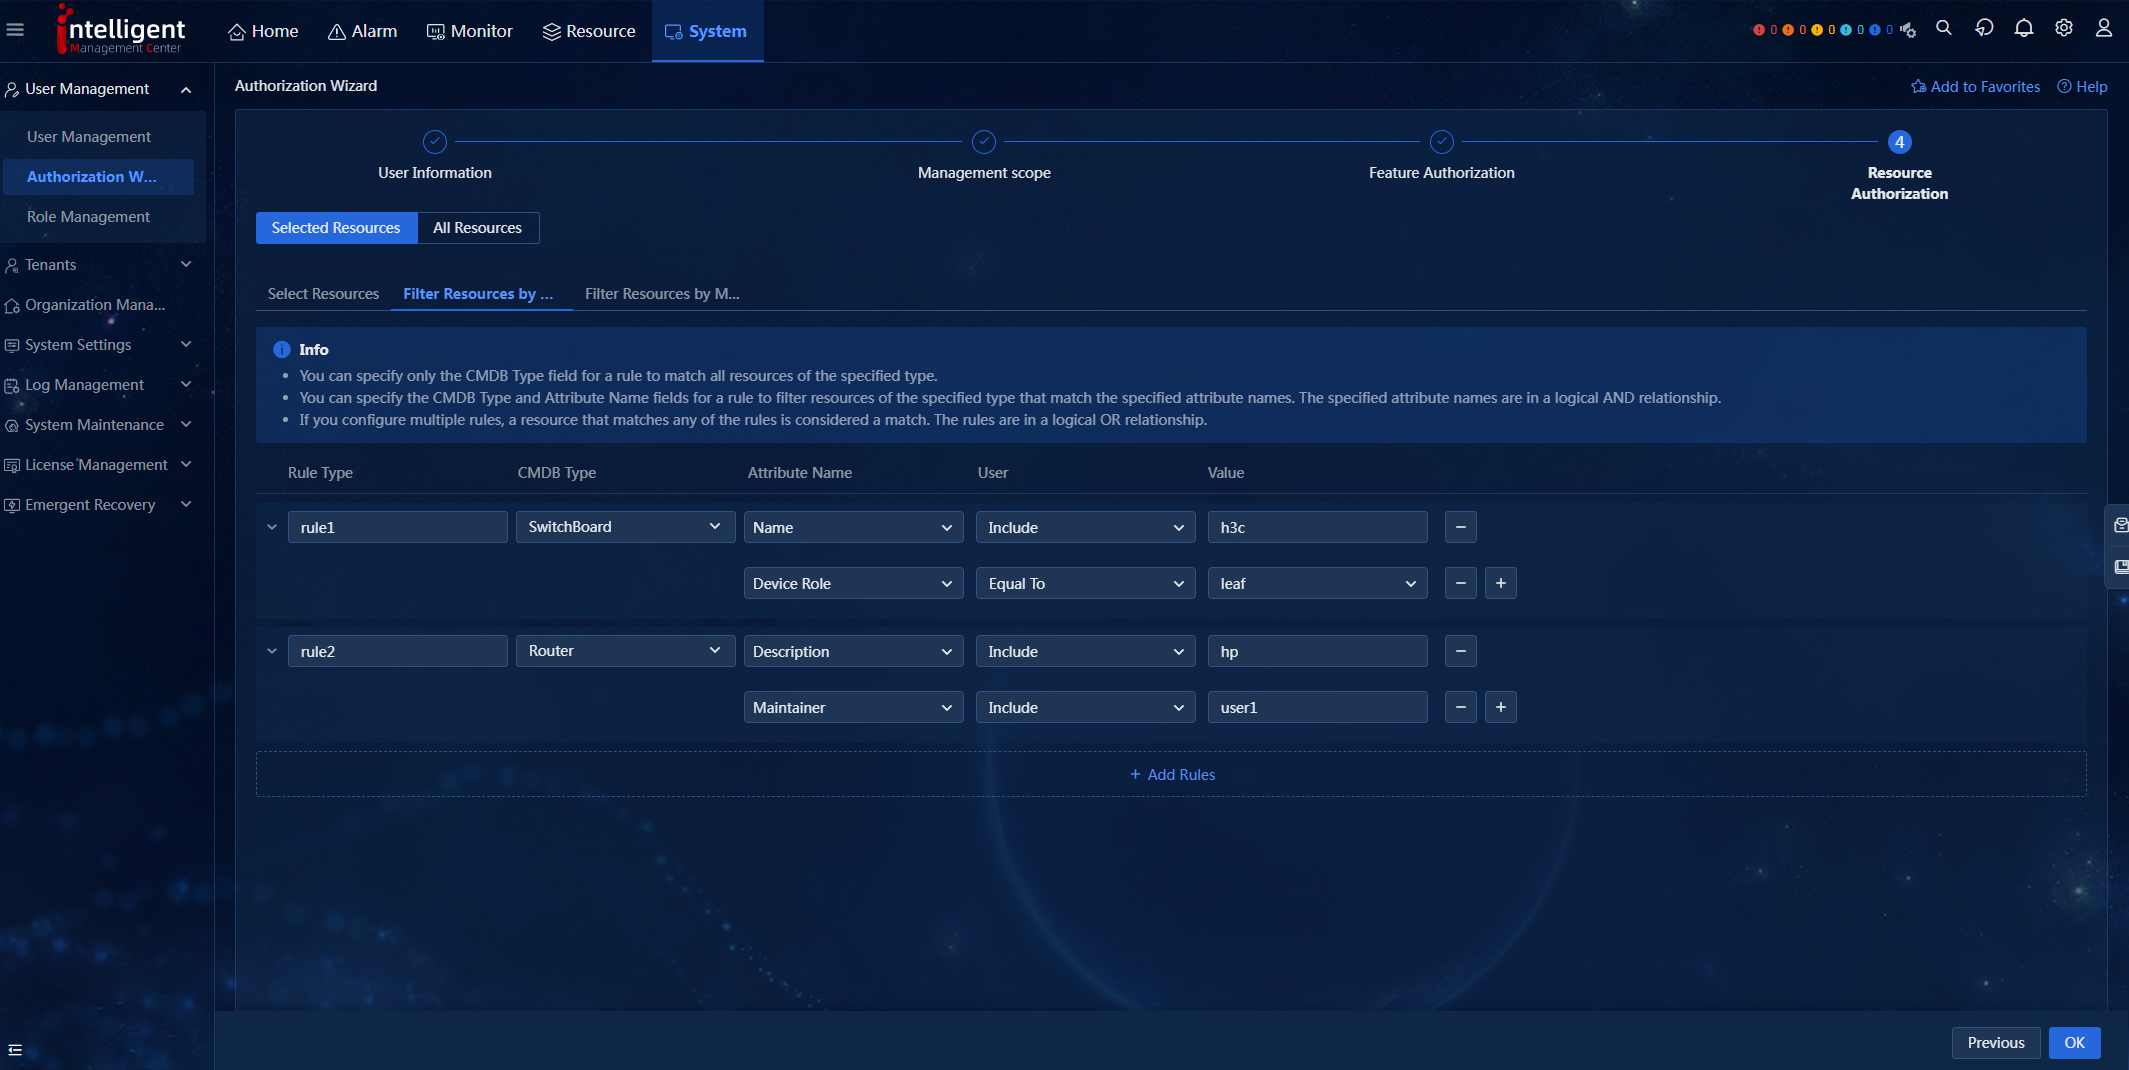
5. You are placed on the Resource Authorization page. Resource authorization offers two methods: specific resource authorization and all-resource authorization. Specific resource authorization: Grant users access to selected resources. All-resource authorization: Grant users access to all resources within their management scope. Specific resource authorization is taken as an example.
Figure 13 Resource authorization
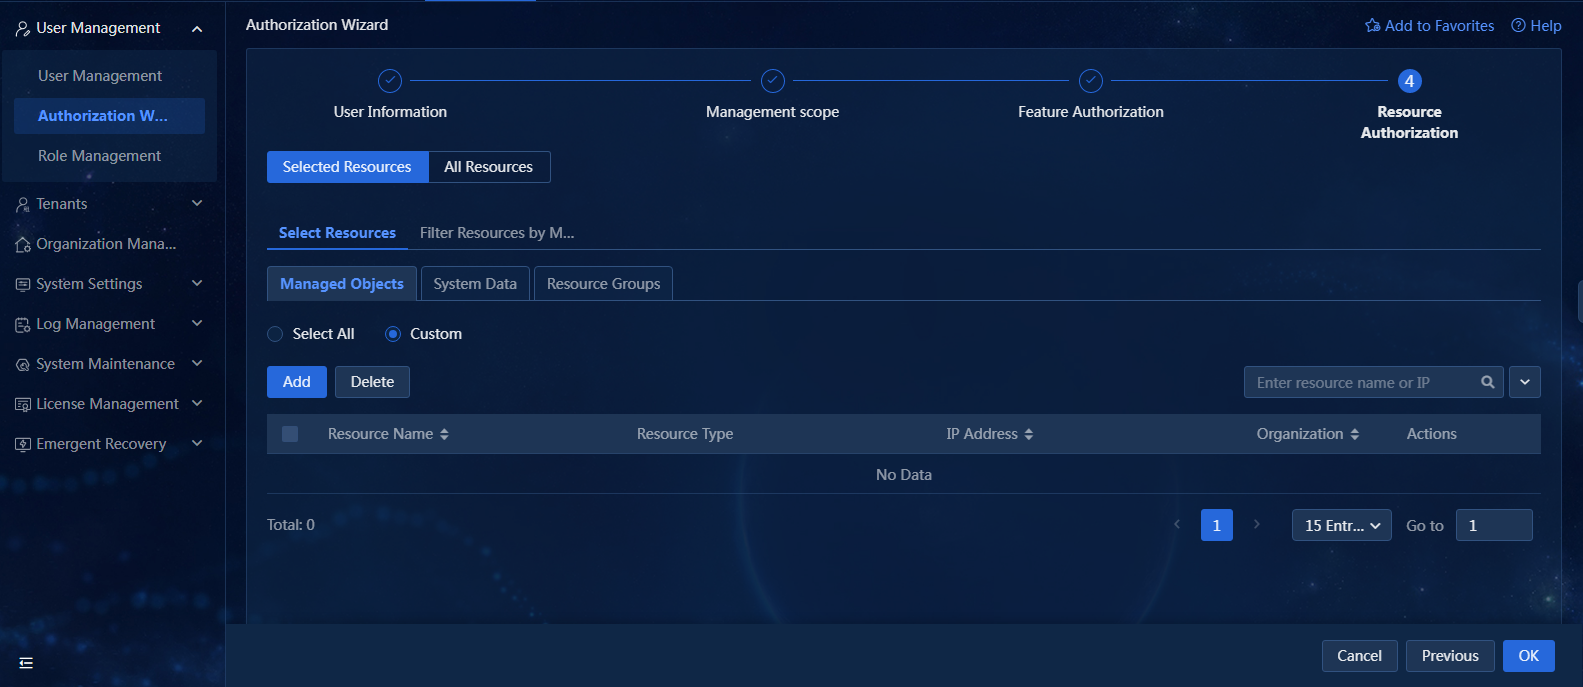
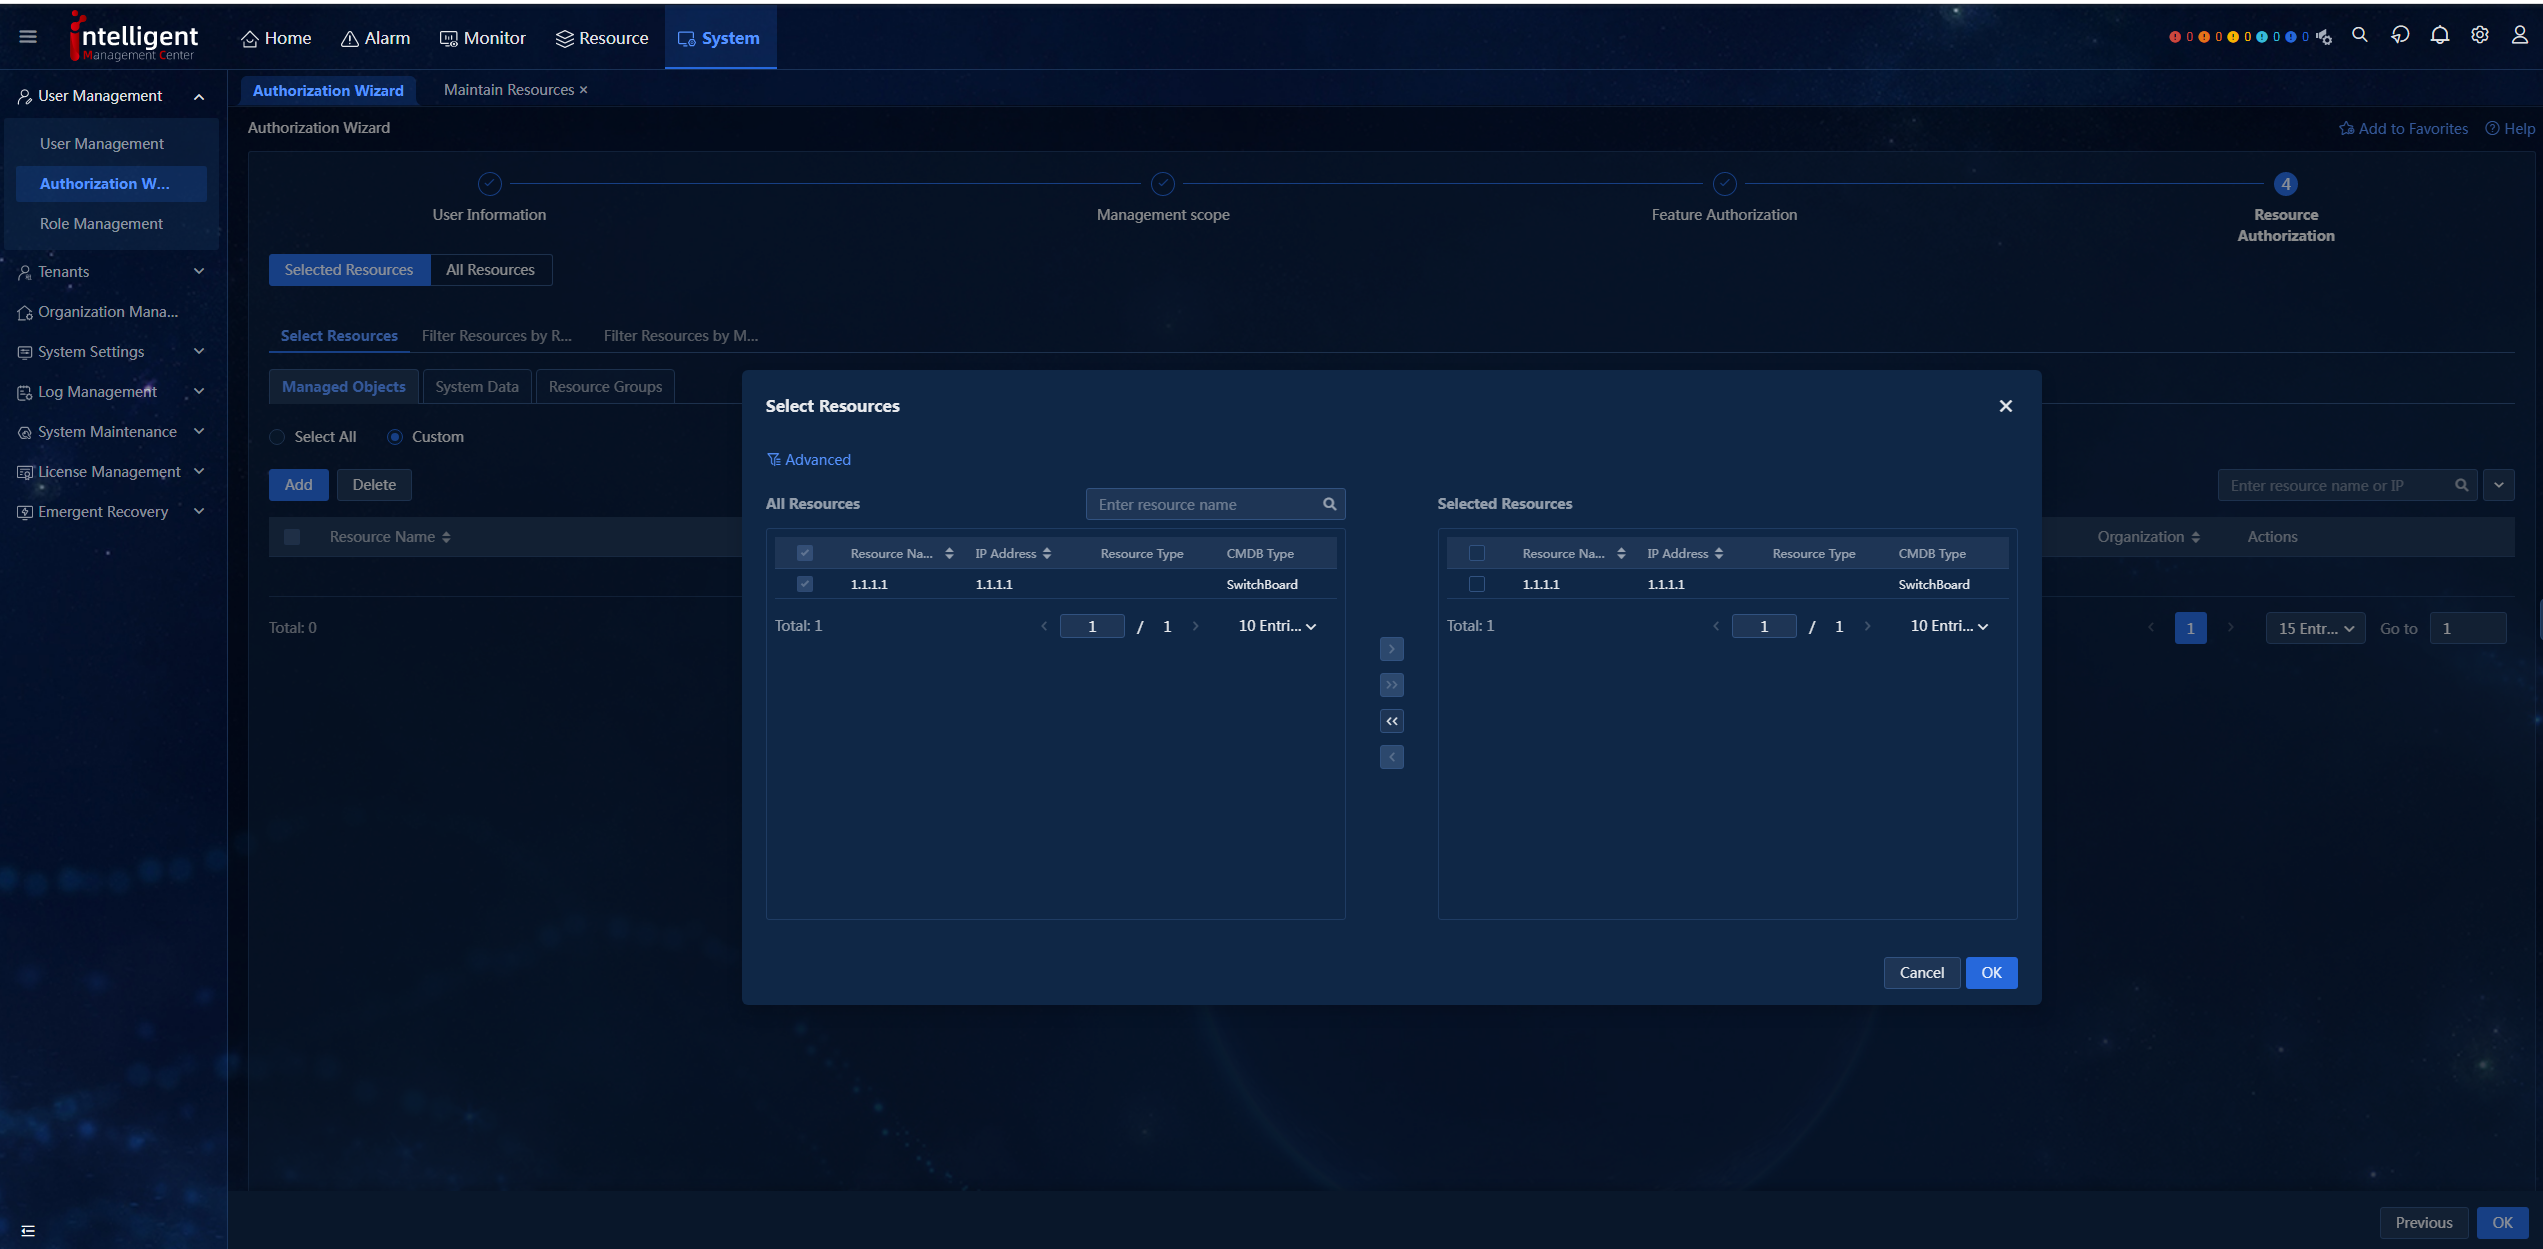
a. Select resources: Resources include managed objects and system data. In this example, managed objects are selected. After you select resources, click OK.
Figure 14 Selecting managed objects
b. Select resource groups: After you select the resource group, click OK.
Figure 15 Selecting resource groups
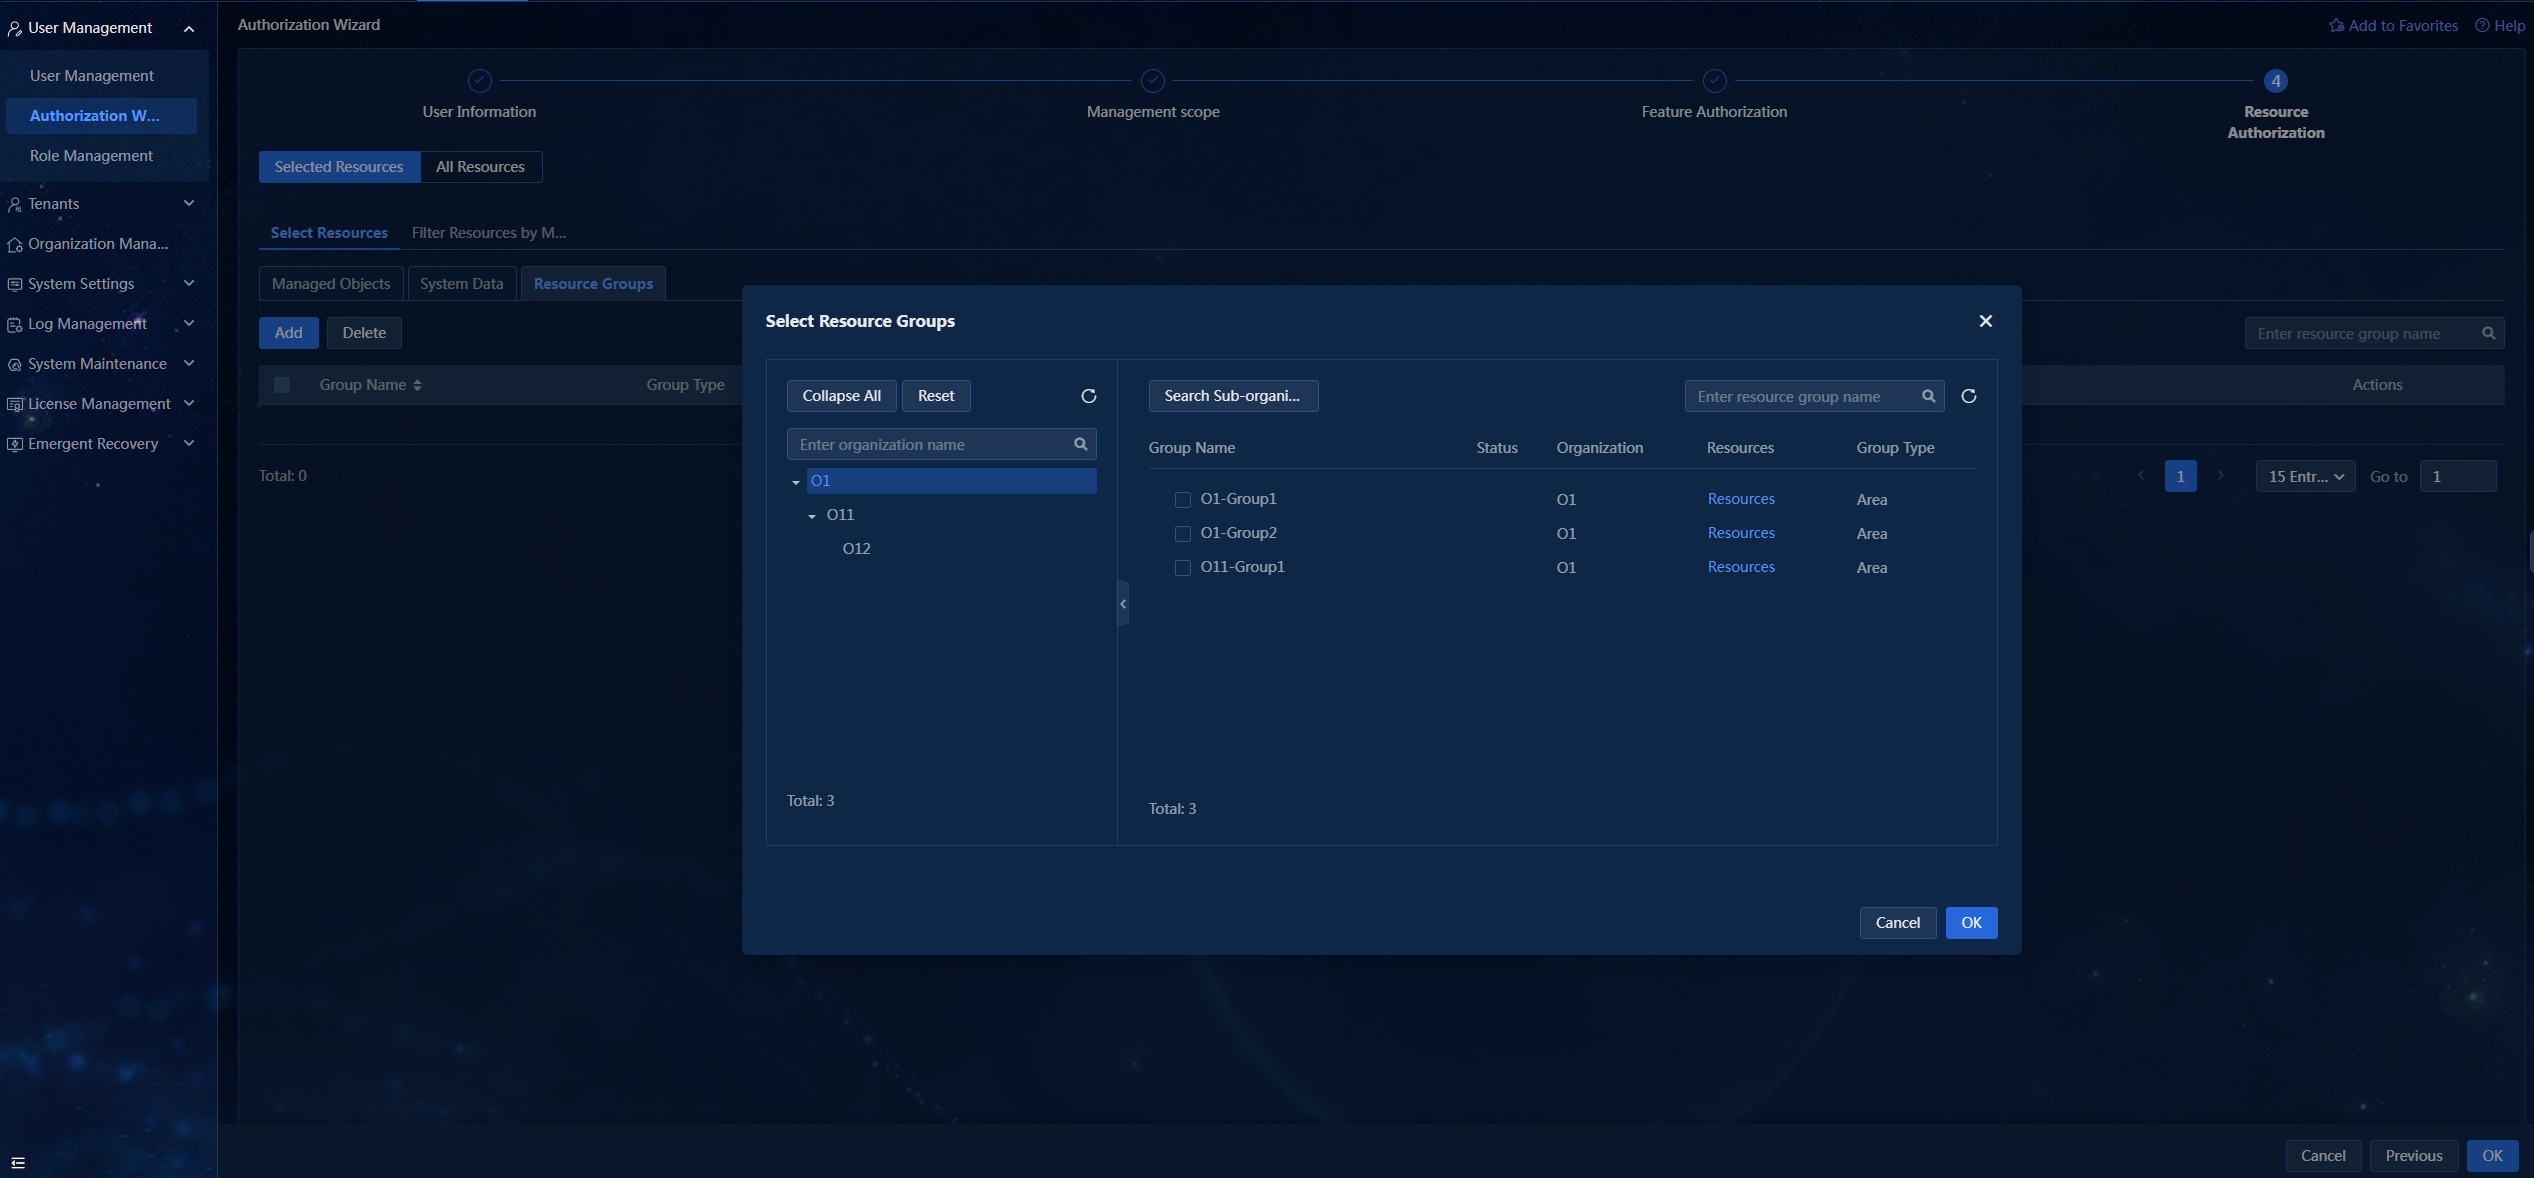
If no resource group has been created, navigate to the System > System Settings > Resource Groups page to create a resource group.
Figure 16 Adding a resource group

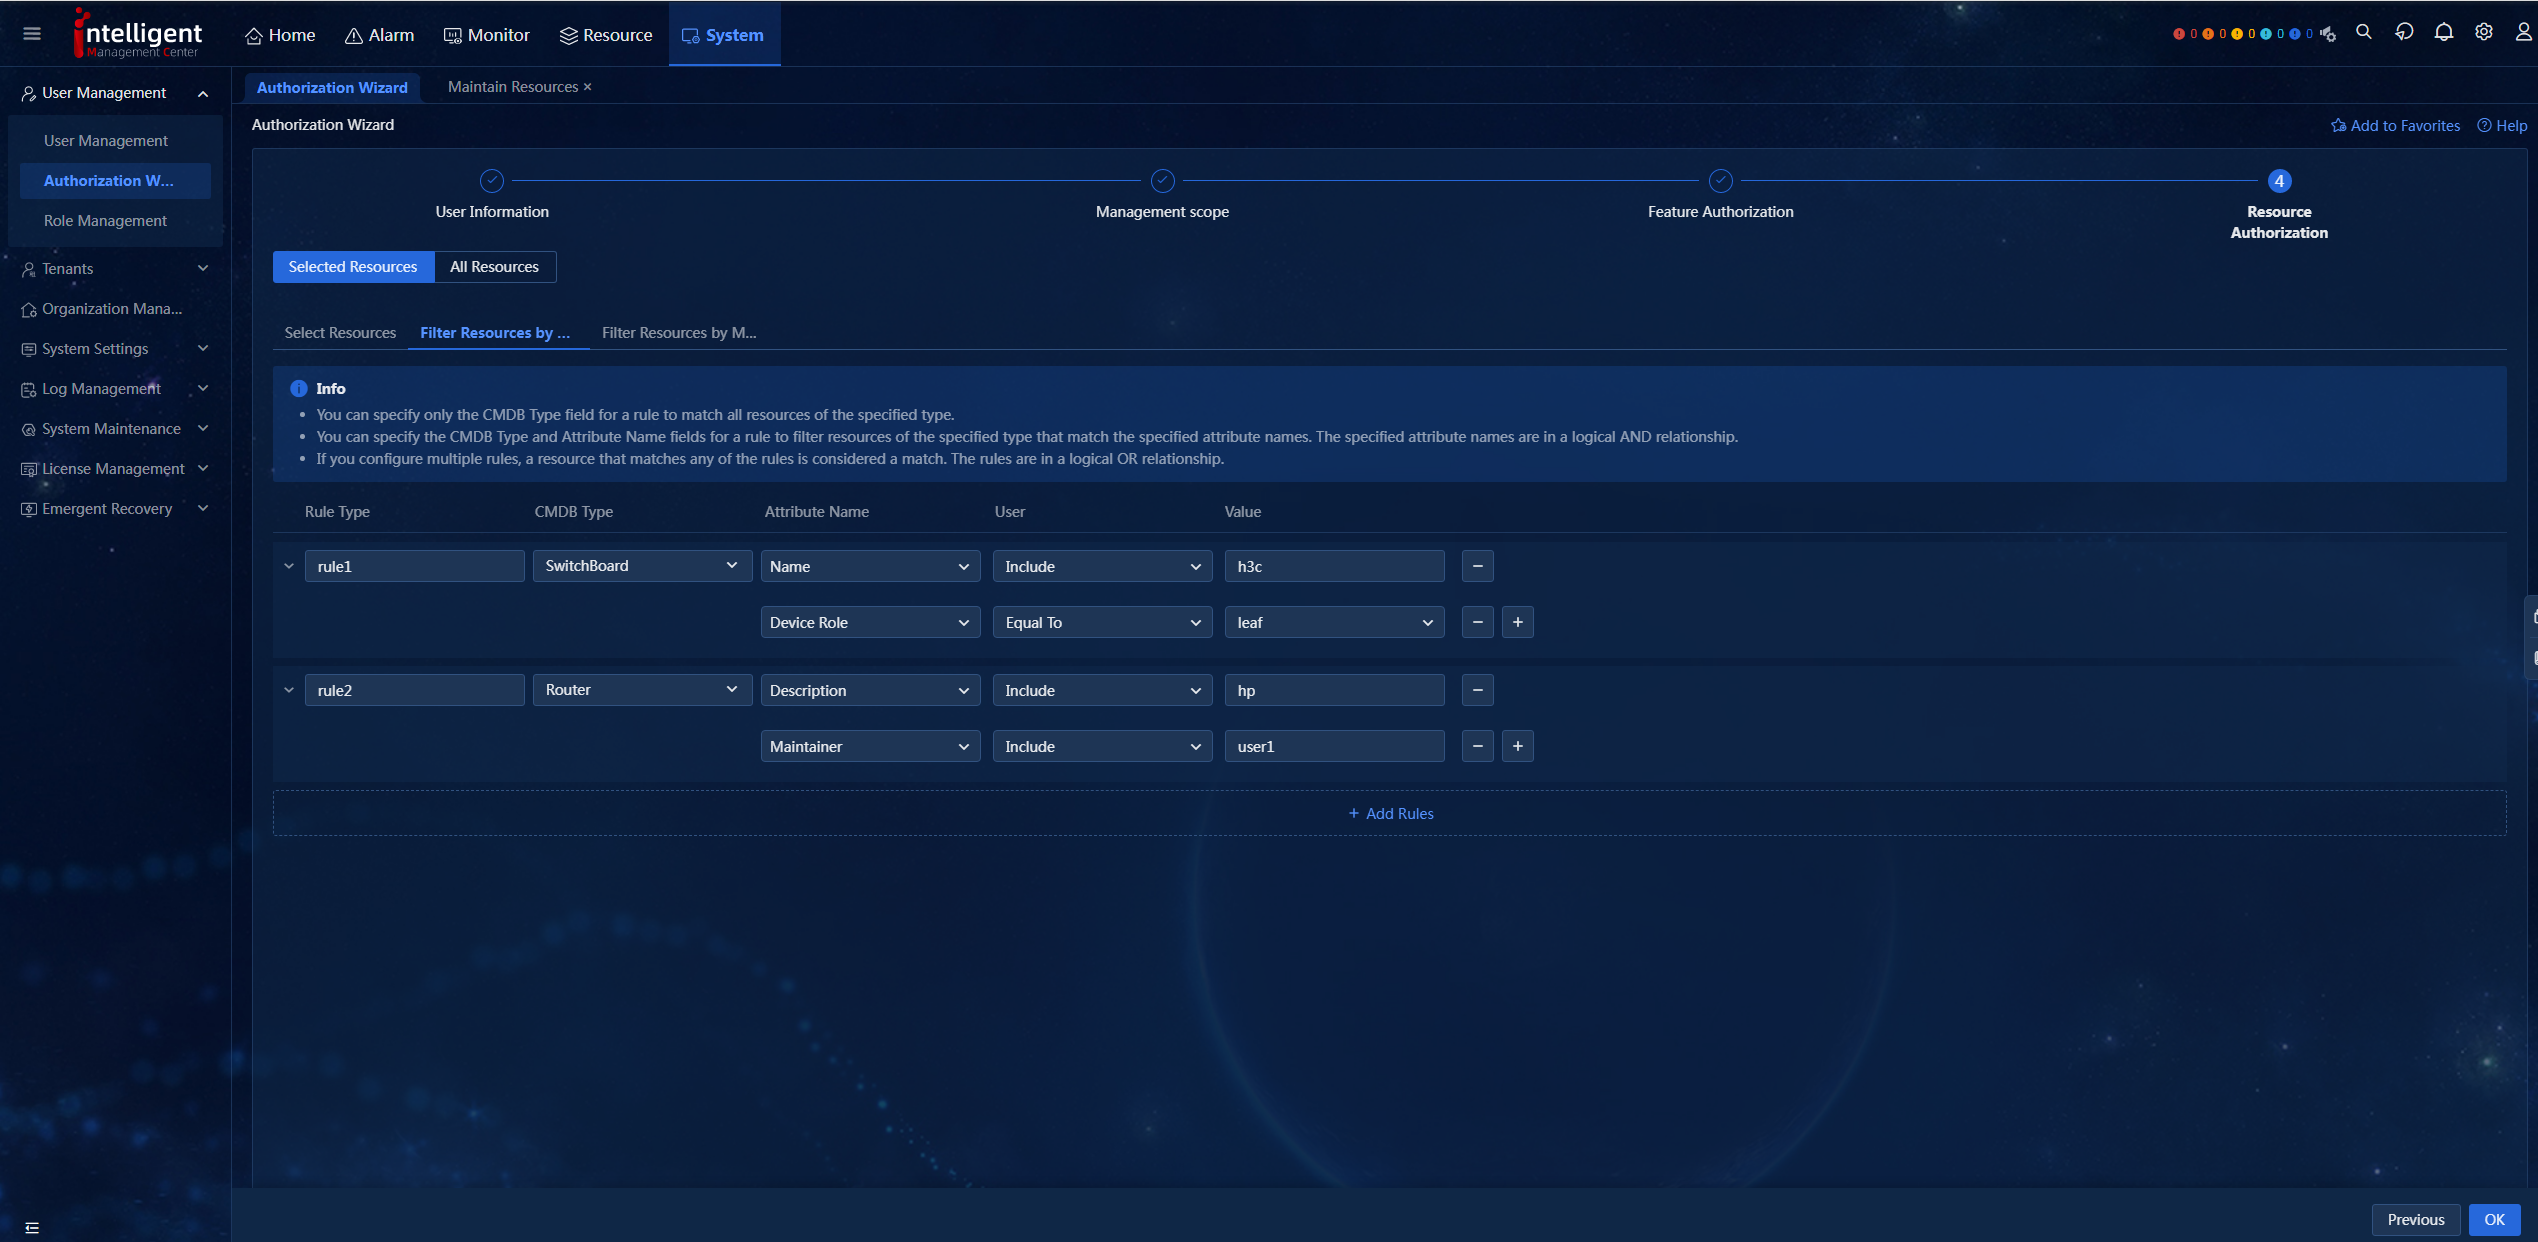
c. Filter resources by rule (available only if the CMDB component is installed): Click the plus sign to add a rule. Enter a rule name, select a CMDB type, and select matching attribute parameters.
Figure 17 Filtering resources by rule
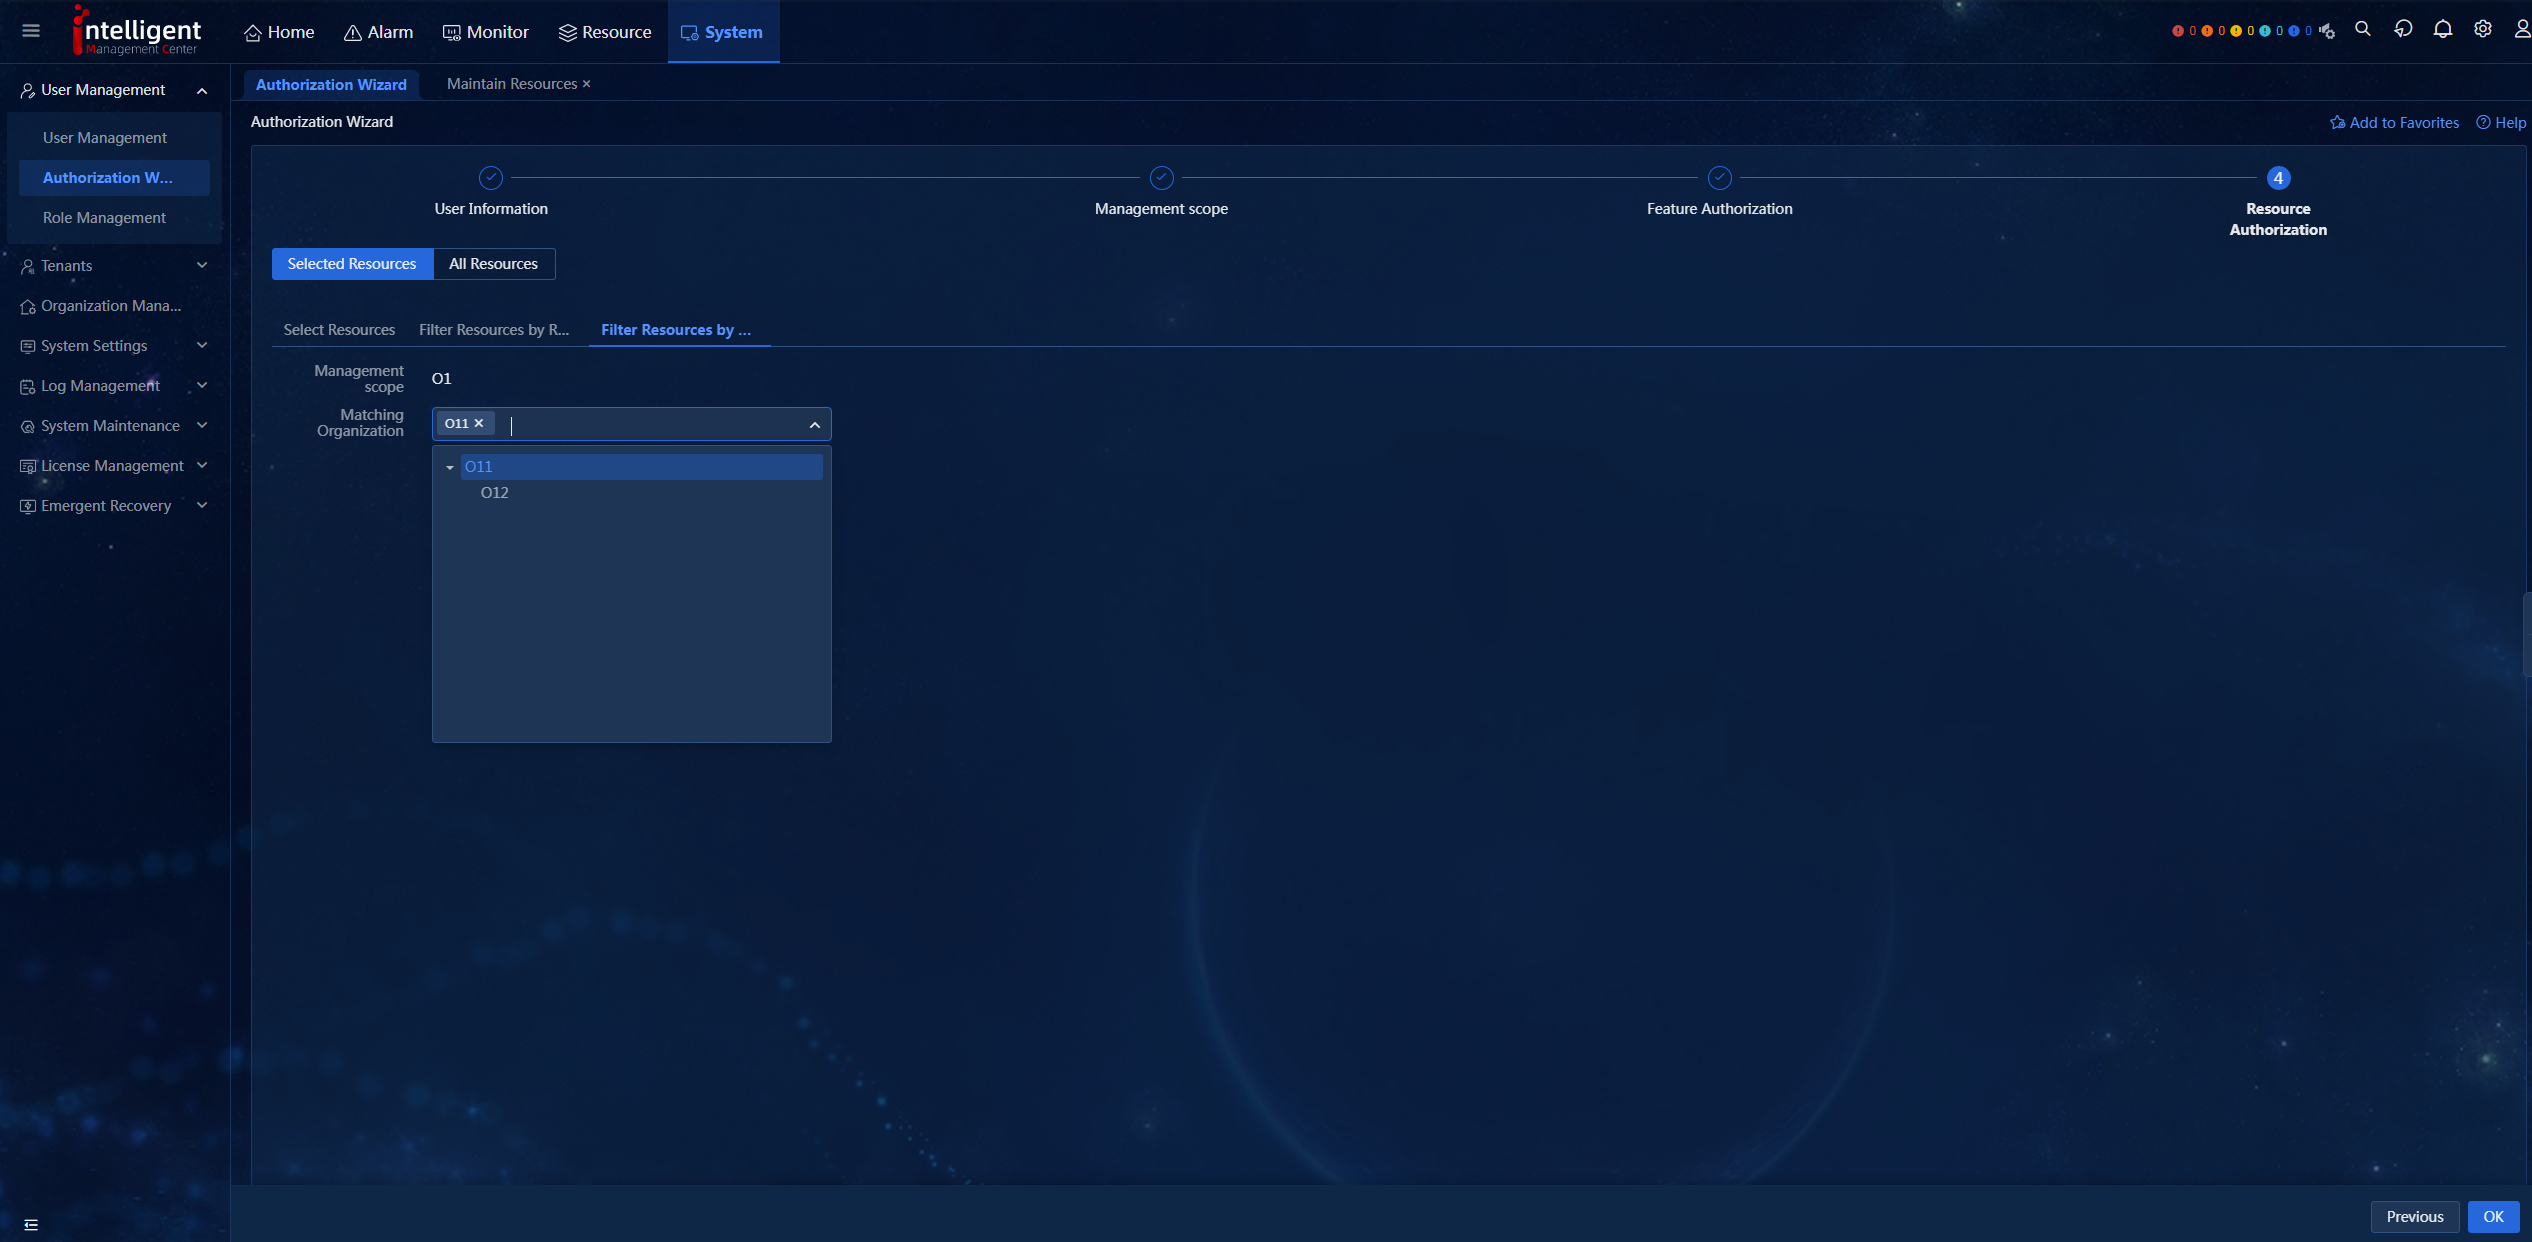
d. Match resources by organization (available only if an organization has child organizations): Select the target organization. The system grants the selected organization, its sub-organizations, and their resource groups to the current user.
Figure 18 Filtering resources by organization
6. Click OK.
Figure 19 Authorization Wizard page
Authorizing an existing user
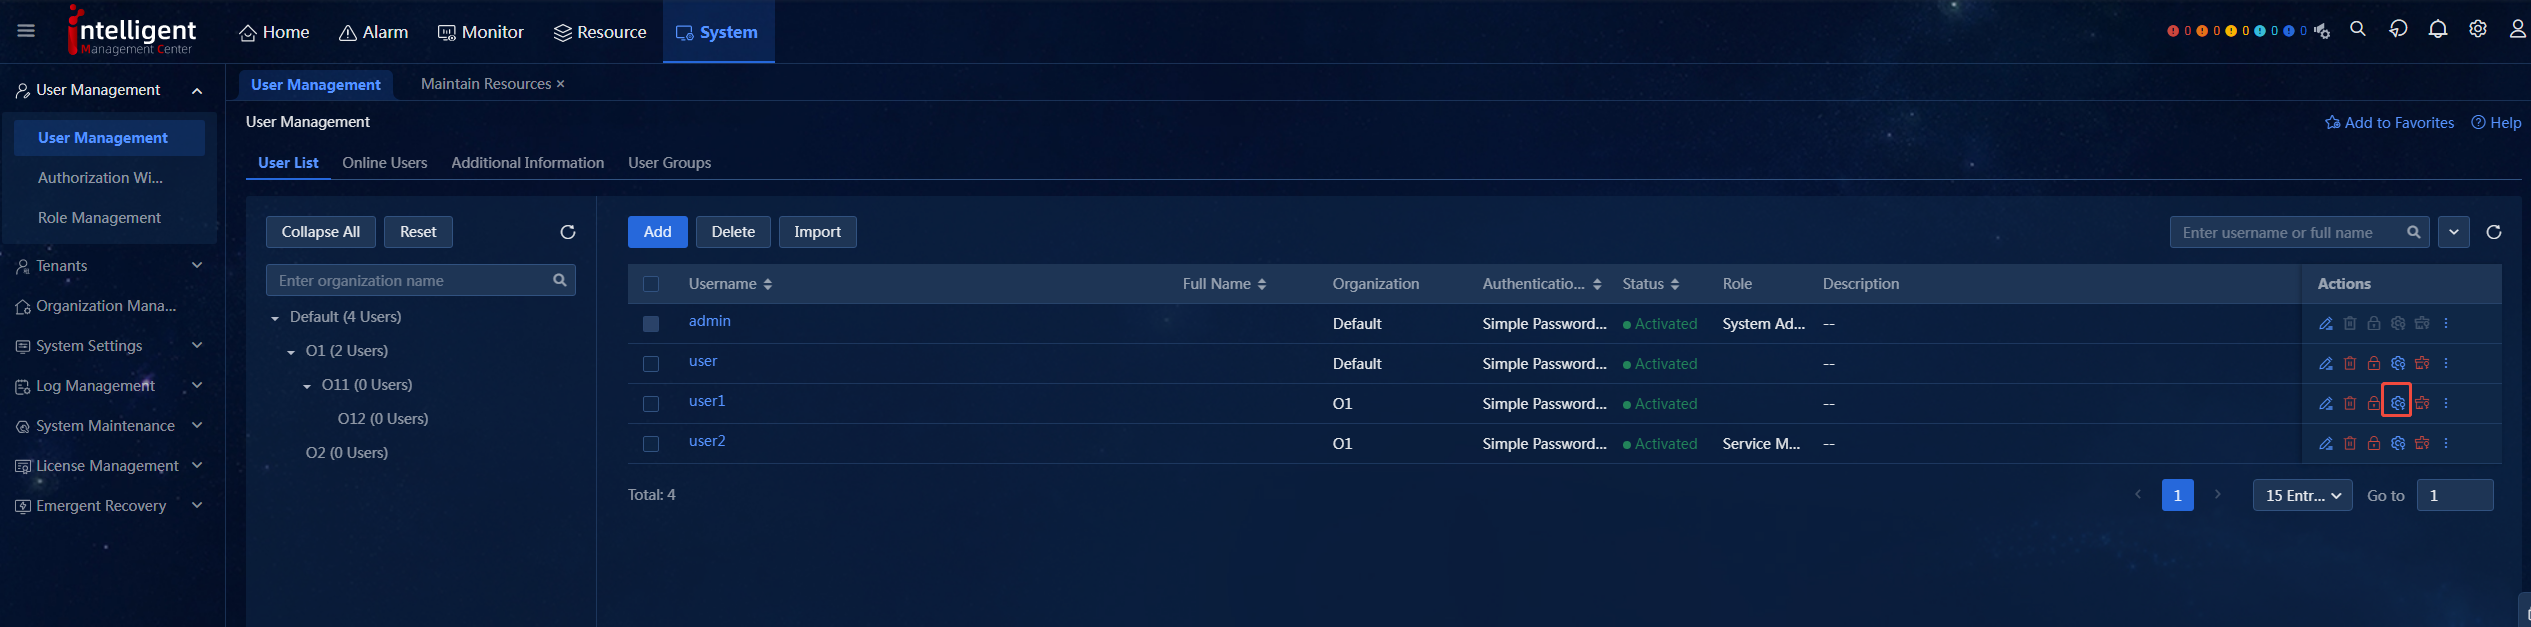
1. Access the User Management page, and click the Configure Permission icon in the Actions column for a user.
Figure 20 Clicking the Configure Permission icon
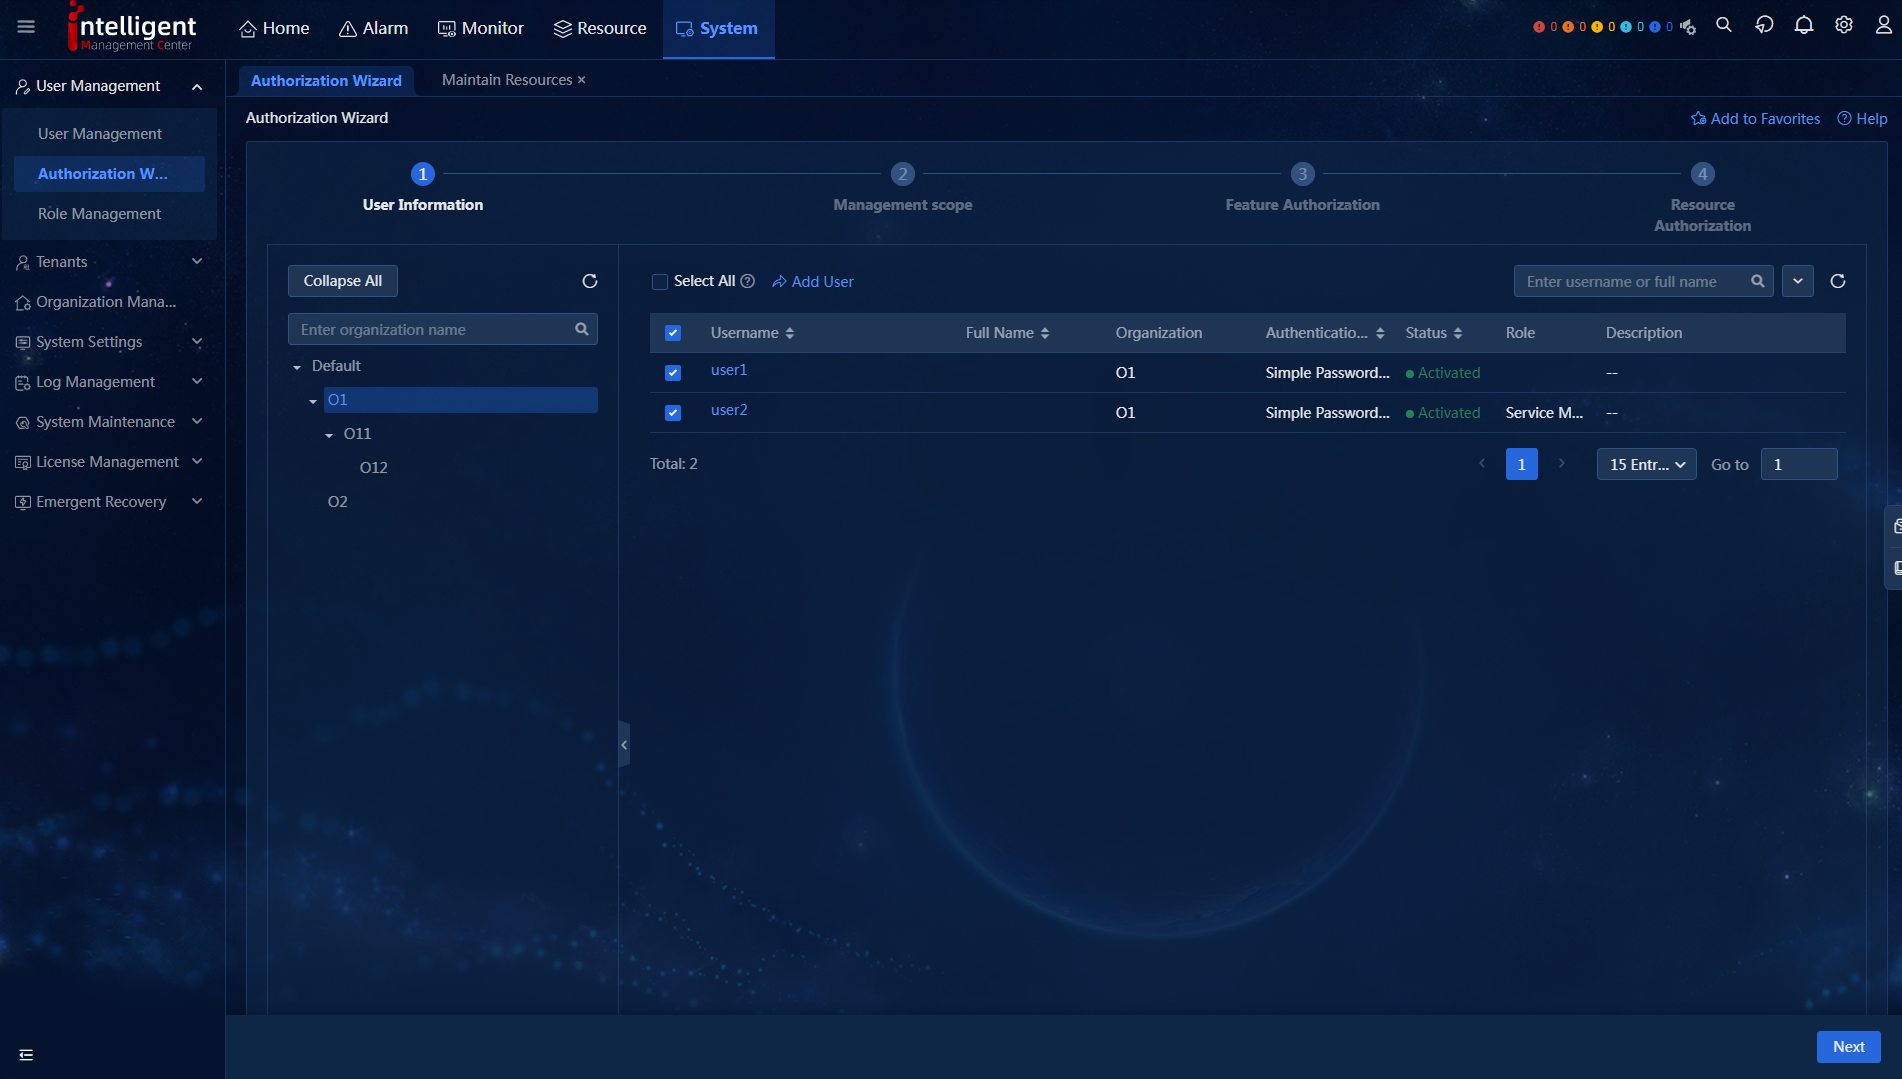
Bulk authorizing users on the Authorization Wizard page
1. Access the User Management > Authorization Wizard page. On this page, you can bulk authorize users in the same organization.
Figure 21 Authorization Wizard page
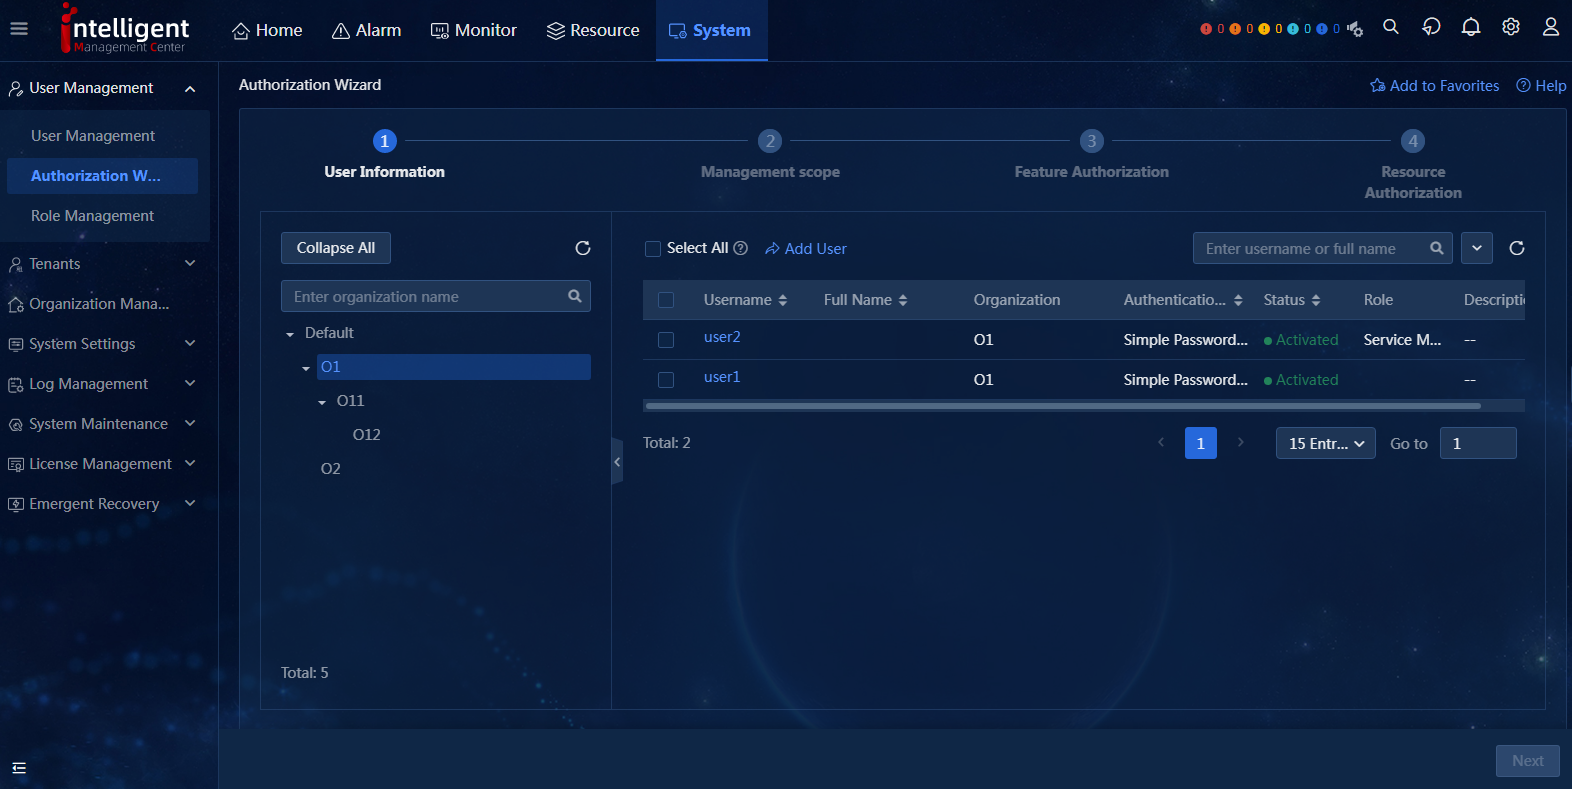
2. Select target users, and then click Next.
Figure 22 Selecting users
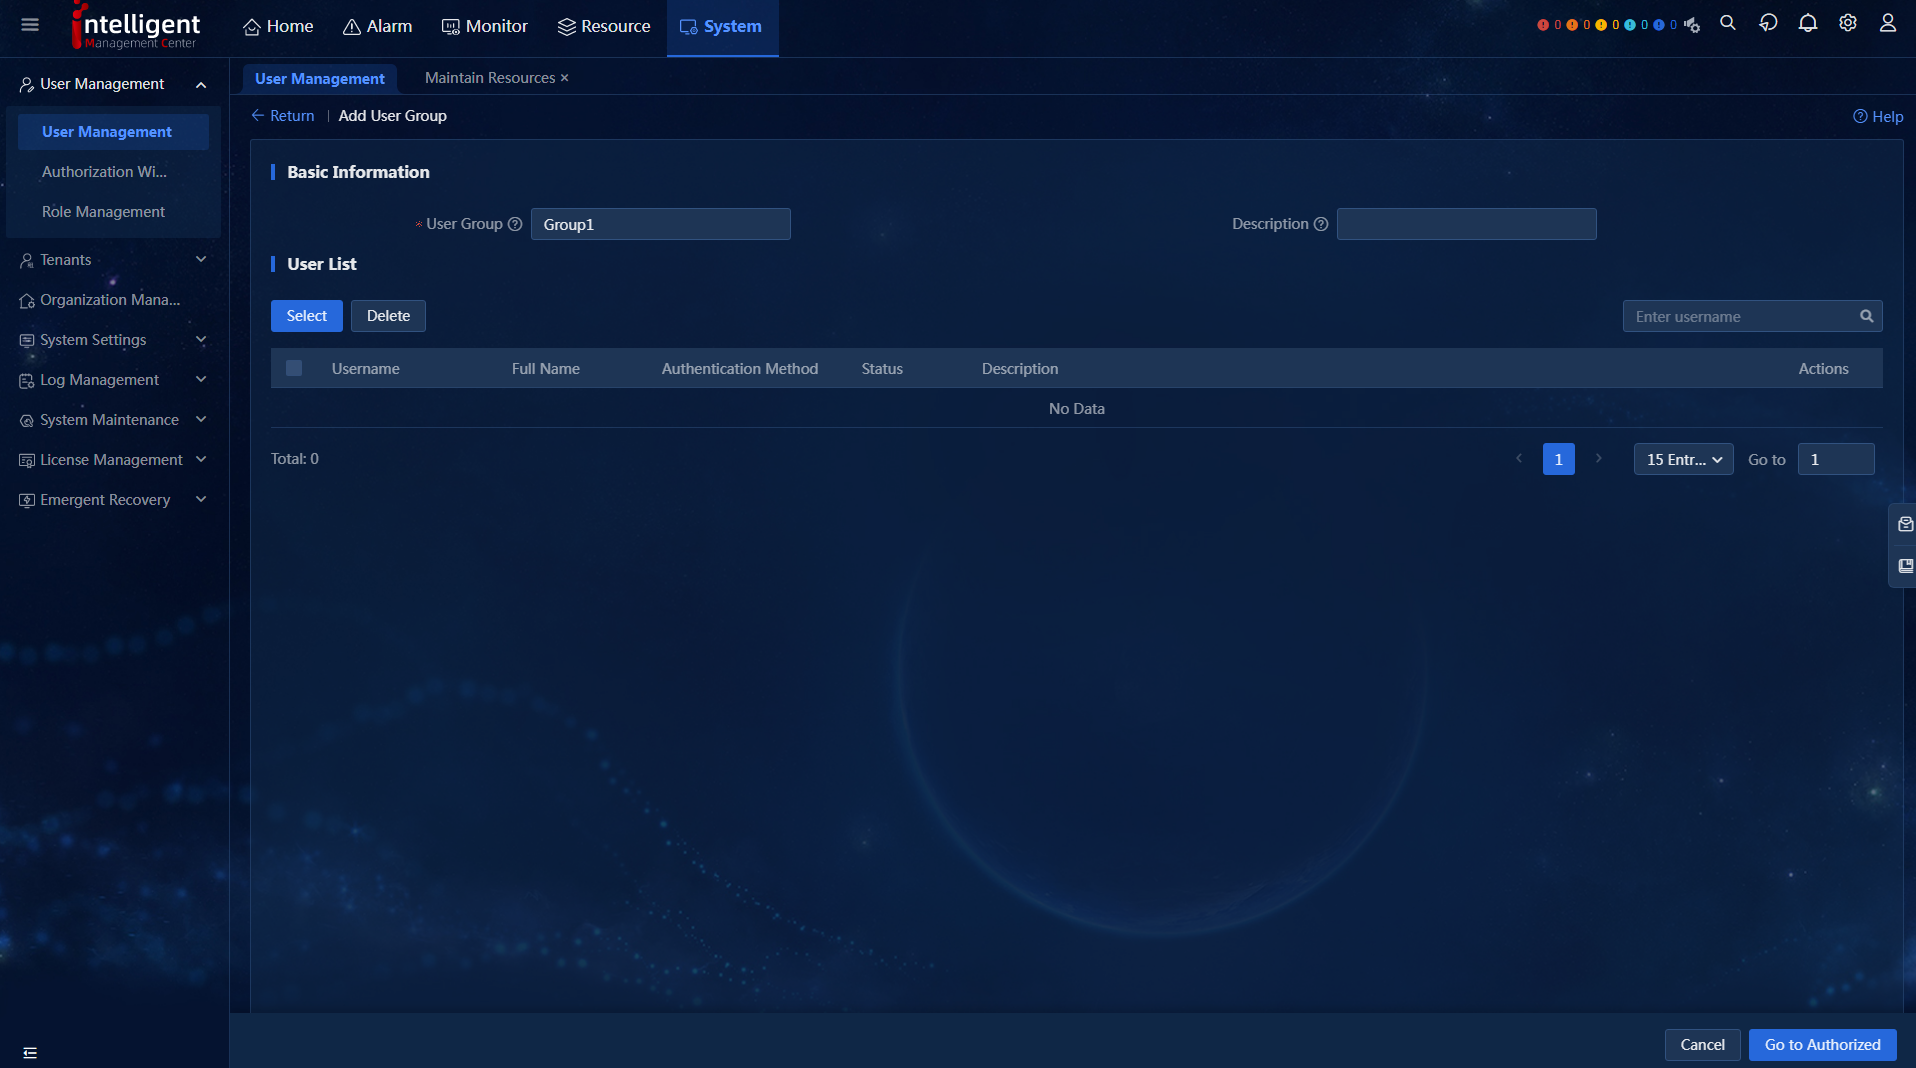
Adding a user to an authorized user group
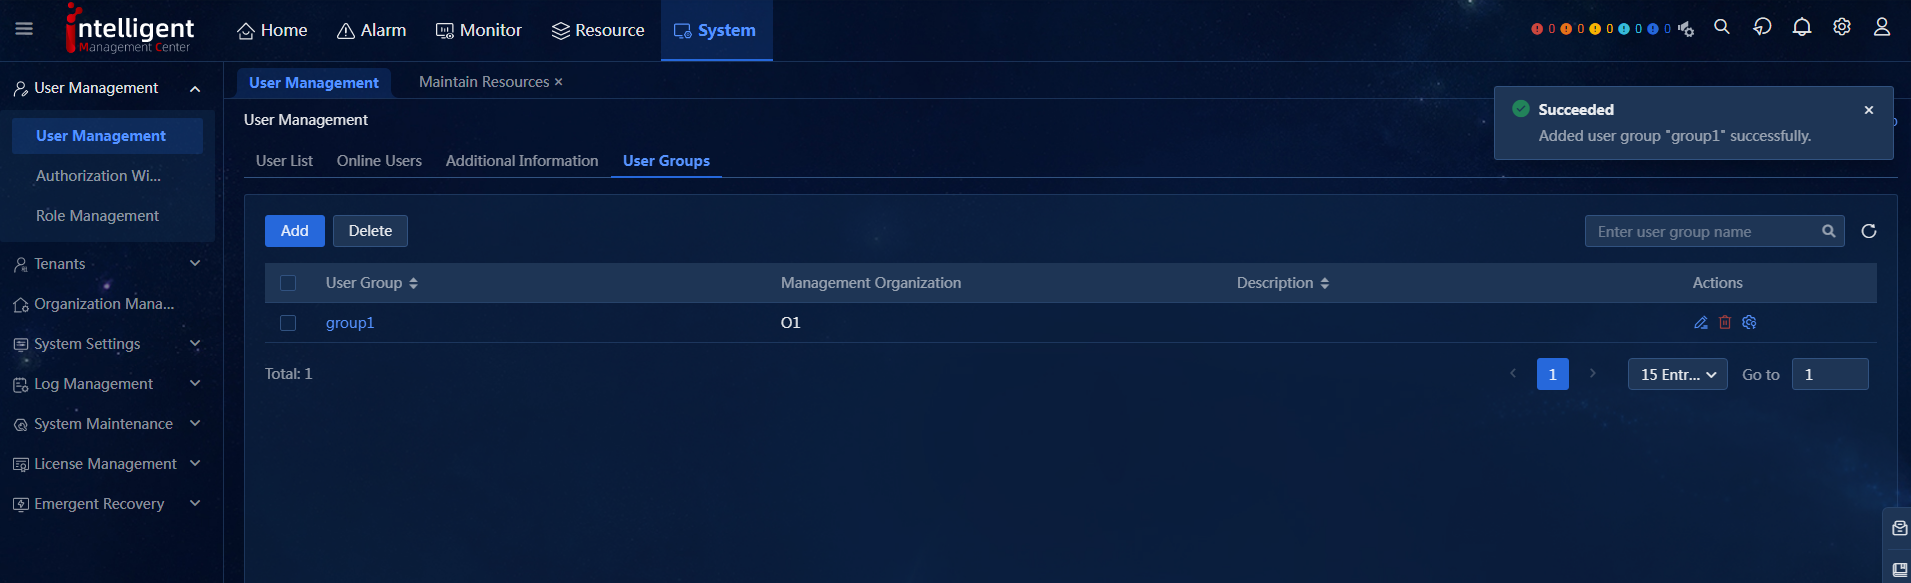
1. Navigate to the System > User Management > User Management > User Groups page. Click Add to access the Add User Group page.
2. Enter a user group name, and then click Go to Authorize.
Figure 23 Adding a user group
3. Select the management scope, and click Next.
Figure 24 Management scope
4. Select roles as needed on the Feature Authorization page.
Figure 25 Feature authorization

5. Click Next. In this example, Organization Administrator is selected.
Figure 26 Selecting roles
6. You are placed on the Resource Authorization page. Because Organization Administrator is selected, all resources are authorized by default.
Figure 27 Resource authorization
7. Click OK.
Figure 28 Authorization succeeded
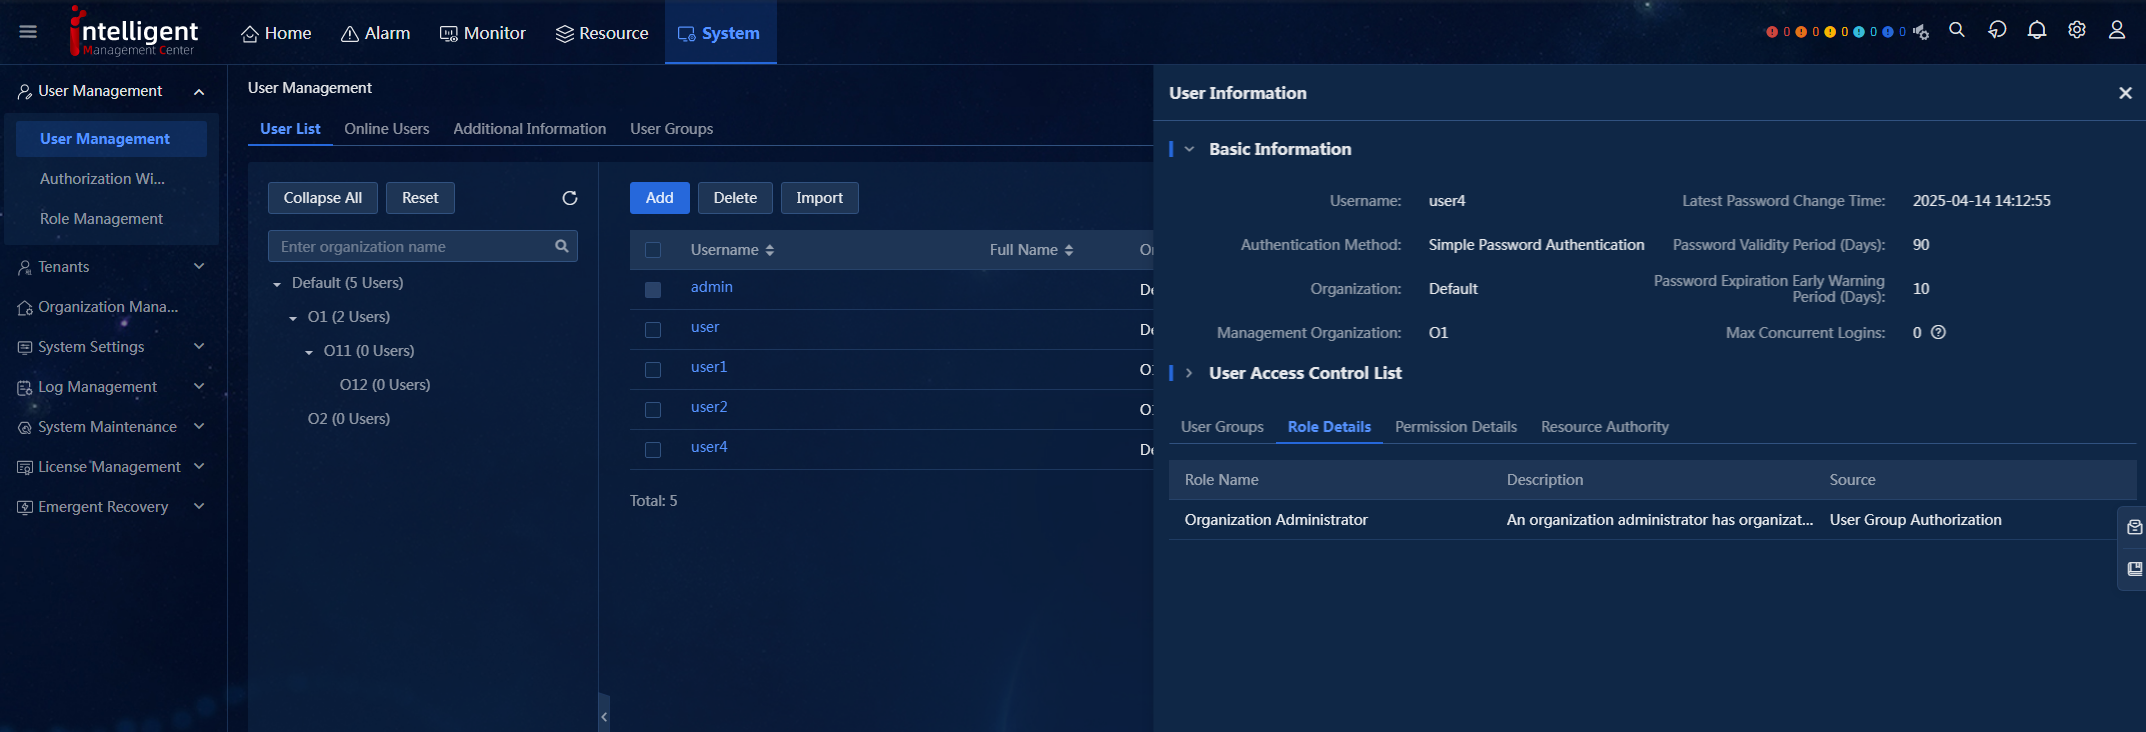
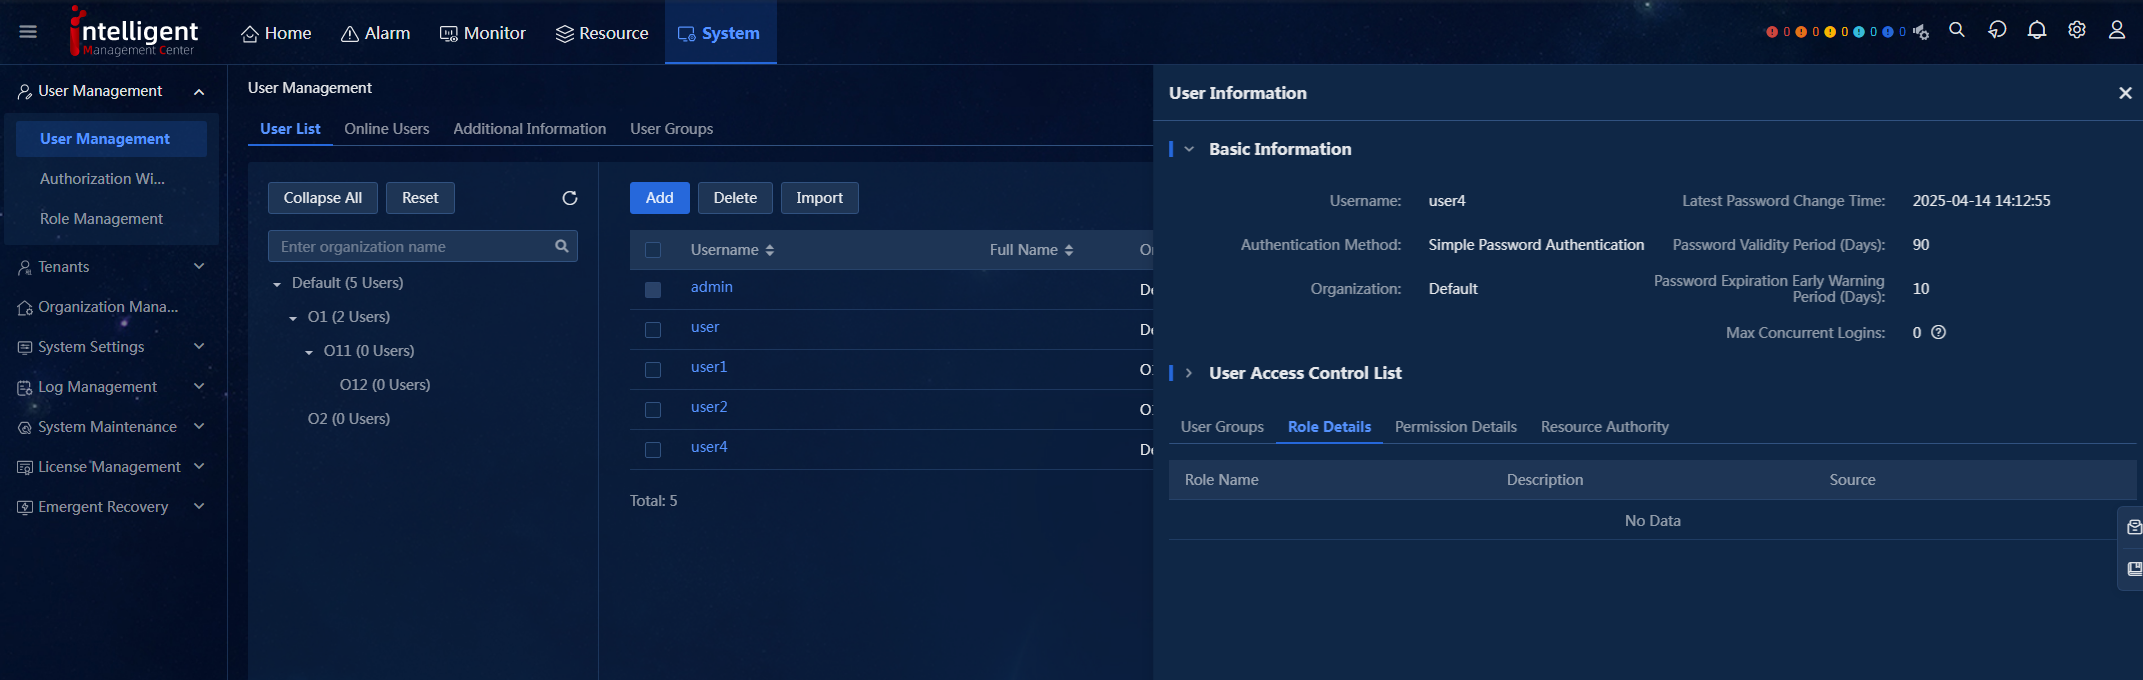
8. On the User Management > User List page, add a user and to not authorize the user. The Role Details tab displays no data for a user that is not authorized. You can click the username to view the user information.
Figure 29 Viewing user information
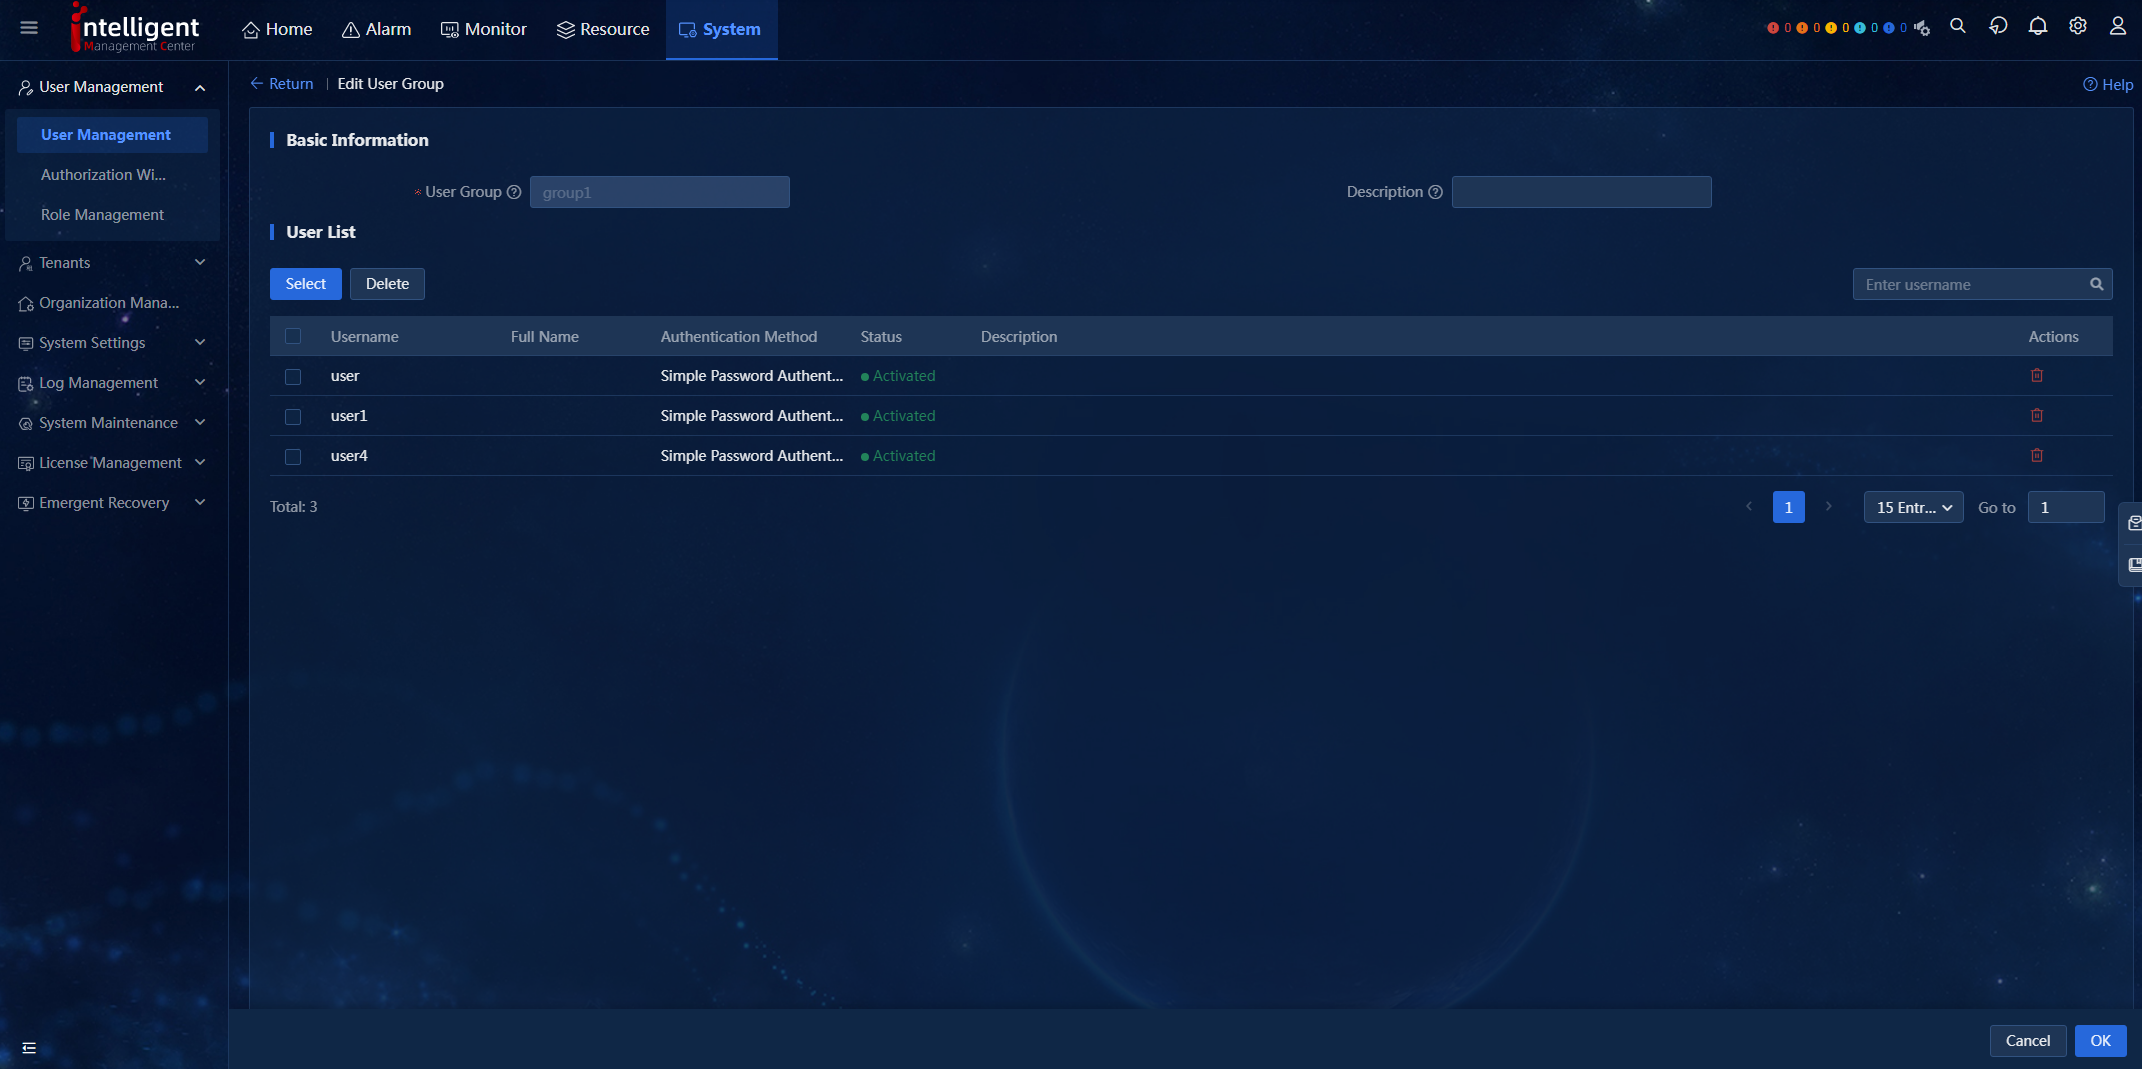
9. On the User Management > User Groups page, click the Edit icon in the Actions column for the user group to access the Edit User Group page.
10. Click Select, and select the added user. Click OK.
Figure 30 Editing a user group
11. Click OK.
12. On the User Management > User List page, click the username to view user information. The user is authorized with the same role as the user group.
Figure 31 Viewing user information