- Table of Contents
-
- 03-Security Configuration Guide
- 00-Preface
- 01-Security zone configuration
- 02-Security policy configuration
- 03-ASPF configuration
- 04-Session management
- 05-Object group configuration
- 06-IP source guard configuration
- 07-AAA configuration
- 08-User identification configuration
- 09-Password control configuration
- 10-Portal configuration
- 11-MAC authentication configuration
- 12-SMS configuration
- 13-802.1X configuration
- 14-Public key management
- 15-PKI configuration
- 16-SSH configuration
- 17-SSL configuration
- 18-Connection limit configuration
- 19-Attack detection and prevention configuration
- 20-Server connection detection configuration
- 21-ARP attack protection configuration
- 22-ND attack defense configuration
- 23-uRPF configuration
- 24-IP-MAC binding configuration
- 25-Keychain configuration
- 26-MAC learning through a Layer 3 device configuration
- 27-APR configuration
- 28-IPoE configuration
- 29-Crypto engine configuration
- 30-Location identification configuration
- 31-Terminal identification configuration
- Related Documents
-
| Title | Size | Download |
|---|---|---|
| 31-Terminal identification configuration | 154.08 KB |
Contents
Configuring terminal identification
How terminal identification works
Terminal identification tasks at a glance
Specifying the operating mode of terminal identification
Configuring an object group for identifying terminal addresses
Enabling terminal identification logging
Configuring the terminal identification allowlist
Approving terminals as legal terminals
Display and maintenance commands for terminal identification
Terminal identification configuration examples
Example: Configuring alarm-mode terminal identification
Example: Configuring allowlist-mode terminal identification
Configuring terminal identification
About terminal identification
Identifying terminals, such as cameras and sensors, is fundamental to establish secure Internet of Things (IoT) connections.
When the terminal traffic passes through a device, the device performs the following tasks:
· Analyzes and extracts the terminal information, such as the vendor, model ,and MAC address information, and displays terminal information on the Web interface.
· Identifies the terminal based on the terminal information.
· Controls identified terminals.
· Generates a log when a terminal is identified for the first time or the terminal information changes.
Operating mode
Terminal identification supports the following operating modes:
· Alarm—In this mode, the system permits traffic of all terminals. When the system identifies a terminal for the first time or detects a terminal information change, it sends a log message to the user. This mode is applicable to scenarios that do not have strict security requirements.
· Allowlist—In this mode, the system permits traffic of only terminals in the allowlist. When the system detects a terminal information change, it sends a log message to the user. This mode is applicable to scenarios that have strict security requirements.
How terminal identification works
Signature library
Terminal identification identifies terminals based on the APR signature library. For information about the APR signature library, see APR in Security Configuration Guide.
Workflow
Terminal identification works as follows:
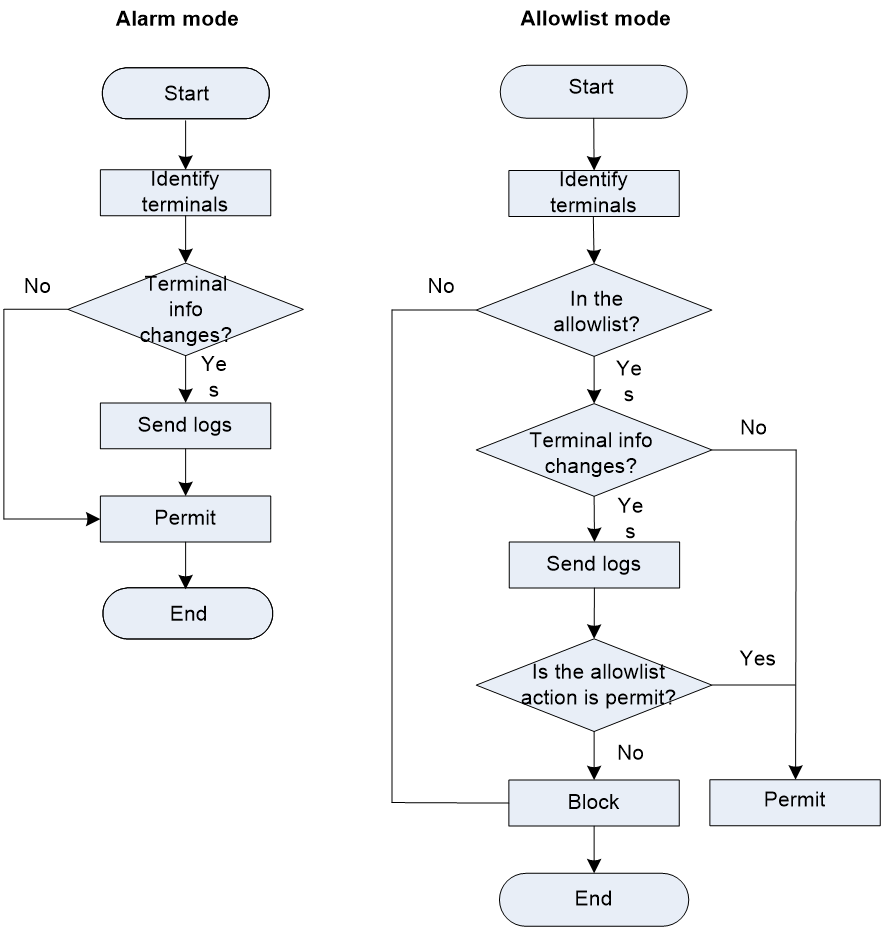
· Alarm mode—As shown in Figure 1, the system identifies each terminal and permits traffic of all terminals. When the system detects a terminal for the first time or detects that the information about an existing terminal changes, the system sends a log message.
· Whitelist mode
a. As shown in Figure 1, the system identifies each terminal and checks whether the IP address of each terminal (including terminals classified as other category) is in the allowlist. An unidentifiable terminal is classified as other category.
b. If the IP address of a terminal is not in the allowlist, the system drops the traffic of the terminal. If the IP address of a terminal is in the allowlist, the system checks whether the terminal information changes. If the terminal information does not change, the system permits the traffic.
c. If the terminal information changes, the system sends a log message and check whether the allowlist action is permit.
d. If the allowlist action is permit, the system permits the traffic. Otherwise, the system drops the traffic.
Figure 1 Terminal identification workflow
Terminal identification tasks at a glance
To configure terminal identification, perform the following tasks:
1. Specifying the operating mode of terminal identification
2. Configuring an object group for identifying terminal addresses
3. Enabling terminal identification logging
4. Configuring the terminal identification allowlist
5. (Optional.) Approving terminals as legal terminals
6. (Optional.) Reidentifying terminals
7. (Optional.) Configuring a terminal group
Specifying the operating mode of terminal identification
1. Enter system view.
system-view
2. Enter terminal identification view.
terminal-identification
3. Specify the operating mode.
work-mode { allowlist | warning }
The default setting is warning.
Configuring an object group for identifying terminal addresses
About this task
This task allows you to identify terminals accurately. By default, the device identifies the packet source IP address as the terminal IP address, which is sometimes inaccurate. If you know terminal IP addresses or manager IP addresses, configure an object group of the corresponding type for accurate terminal address identification. The device supports the following address object groups:
· Terminal address object group—A set of terminal IP addresses. If the packet source or destination IP address matches this group, the source or destination IP address is the terminal IP address.
· Manager address object group—A set of terminal manager IP addresses. If the packet source or destination IP address matches this group, the destination or source IP address is the terminal IP address.
The manager address object group has higher priority over the terminal address object group. If a packet matches a manager address object group, the matching process stops. If a packet does not match a manager address object group, the device continues to match terminal address object groups. If neither the source nor the destination IP address of a packet is in any address object groups, the device identifies the source IP address as the terminal IP address.
Prerequisites
Before configuring an object group for identifying terminal addresses, make sure the specified IPv4 or IPv6 address object group already exists. For more information about IPv4 or IPv6 address object groups, see object group configuration in Security Configuration Guide.
Procedure
1. Enter system view.
system-view
2. Enter terminal identification view.
terminal-identification
3. Configure an object group for identifying terminal addresses. Choose the options to configure as needed:
¡ Configure the terminal address object group.
terminal object-group { ipv4 | ipv6 } object-group-name
By default, no terminal address object group is configured.
¡ Configure the manager address object group.
manage object-group { ipv4 | ipv6 } object-group-name
By default, no manager address object group is configured.
Enabling terminal identification logging
About this task
This feature allows the device to fast output logs to log hosts upon detecting the changes of terminal information, such as the vendor and model changes. For more information about fast log output and log hosts, see configuring fast log output in Network Management and Monitoring Configuration Guide.
Procedure
1. Enter system view.
system-view
2. Enter terminal identification view.
terminal-identification
3. Enable terminal identification logging.
logging enable
By default, terminal identification logging is disabled.
Configuring the terminal identification allowlist
About this task
The device permits the traffic of a terminal if the IP address of the terminal is in the terminal identification allowlist. Otherwise, the device drops the traffic of a terminal. The terminal identification allowlist supports the following actions:
· Permit—Permits the traffic of a terminal all the time.
· Block—Drops the traffic of a terminal all the time only after the terminal information changes.
Restrictions and guidelines
This feature takes effect only in allowlist mode.
Procedure
1. Enter system view.
system-view
2. Enter terminal identification view.
terminal-identification
3. Specify an IPv4 address object group for generating the allowlist.
allowlist object-group ipv4 object-group-name
By default, no IPv4 address object group is specified.
4. Specify an action.
allowlist action { drop | permit }
The default action is permit.
Approving terminals as legal terminals
About this task
If you are sure identified terminals are accurate and trusted, you can perform this task to approve them as legal terminals displays terminal information on the Web interface.
In allowlist mode with the drop action, the system drops traffic of a terminal in the allowlist when the terminal comes online for the first time. To permits the traffic of the terminal, you can approve it as a legal terminal.
Restrictions and guidelines
This feature takes effect only in allowlist mode.
Procedure
1. Enter system view.
system-view
2. Enter terminal identification view.
terminal-identification
3. Approve terminals as legal terminals.
approved { all | ipv4 ipv4-address }
By default, no terminals are approved as legal terminals.
Reidentifying terminals
About this task
If you consider that terminal information is inaccurate, you can perform this task to clear all identified terminal information and reidentifies terminals.
Procedure
1. Enter system view.
system-view
2. Enter terminal identification view.
terminal-identification
3. Reidentify terminals.
reidentify { all | ipv4 ipv4-address }
Configuring a terminal group
About this task
A terminal group is a set of terminals with similar characteristics. A packet belongs to a terminal group if it is from a terminal member of this group.
Procedure
1. Enter system view.
system-view
2. Enter terminal identification view.
terminal-identification
3. Create a terminal group and enter its view.
terminal-group group-name
4. (Optional.) Configure a description for the terminal group.
description text
By default, a terminal group is described as "User-defined terminal group".
5. Add terminals to the terminal group.
include terminal terminal-name
Display and maintenance commands for terminal identification
Execute display commands in any view.
|
Task |
Command |
|
Display information about predefined terminals. |
display terminal-identification terminal predefined |
|
Display information about terminal groups. |
display terminal-identification terminal-group |
Terminal identification configuration examples
Example: Configuring alarm-mode terminal identification
Network configuration
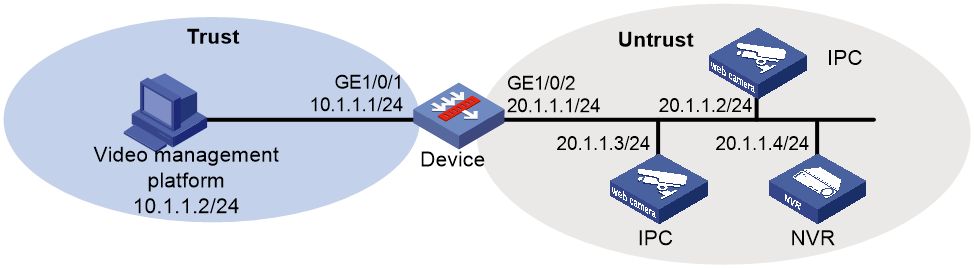
As shown in Figure 2, the device is used to identify and manage terminals to enhance security.
Configure terminal identification on the device to meet the following requirements:
· The device can identify terminal information when a new terminal comes online or information about an existing terminal changes.
· The Web interface of the device can display identified terminal information.

Procedure
1. Assign IP addresses to interfaces:
# Assign an IP address to interface GigabitEthernet 1/0/1.
<Device> system-view
[Device] interface gigabitethernet 1/0/1
[Device-GigabitEthernet1/0/1] ip address 10.1.1.1 255.255.255.0
[Device-GigabitEthernet1/0/1] quit
# Assign IP addresses to other interfaces in the same way. (Details not shown.)
2. Configure address object groups:
# Create an IPv4 address object group named management, and add the video management platform to the object group.
[Device] object-group ip address management
[Device-obj-grp-ip-management] network host address 10.1.1.2
[Device-obj-grp-ip-management] quit
# Create an IPv4 address object group named terminal, and add the terminals to be monitored to the object group.
[Device] object-group ip address terminal
[Device-obj-grp-ip-terminal] network subnet 20.1.1.0 24
[Device-obj-grp-ip-terminal] quit
3. Add interfaces to security zones.
[Device] security-zone name trust
[Device-security-zone-Trust] import interface gigabitethernet 1/0/1
[Device-security-zone-Trust] quit
[Device] security-zone name untrust
[Device-security-zone-Untrust] import interface gigabitethernet 1/0/2
[Device-security-zone-Untrust] quit
4. Configure a security policy:
# Configure a rule named trust-untrust to allow the video management platform to access monitored terminals.
[Device] security-policy ip
[Device-security-policy-ip] rule name trust-untrust
[Device-security-policy-ip-1-trust-untrust] source-zone trust
[Device-security-policy-ip-1-trust-untrust] destination-zone untrust
[Device-security-policy-ip-1-trust-untrust] source-ip management
[Device-security-policy-ip-1-trust-untrust] destination-ip terminal
[Device-security-policy-ip-1-trust-untrust] action pass
[Device-security-policy-ip-1-trust-untrust] quit
# Configure a rule named untrust-trust to allow the monitored terminals to access the video management platform.
[Device-security-policy-ip] rule name untrust-trust
[Device-security-policy-ip-2-untrust-trust] source-zone untrust
[Device-security-policy-ip-2-untrust-trust] destination-zone trust
[Device-security-policy-ip-2-untrust-trust] source-ip terminal
[Device-security-policy-ip-2-untrust-trust] destination-ip management
[Device-security-policy-ip-2-untrust-trust] action pass
[Device-security-policy-ip-2-untrust-trust] quit
[Device-security-policy-ip] quit
5. Configure address object group for identifying terminal addresses.
[Device] terminal identification
[Device-terminal-identification] manage object-group ipv4 management
[Device-terminal-identification] terminal object-group ipv4 terminal
6. Specify the operating mode as alarm, and enable terminal identification logging.
[Device-terminal-identification] work-mode warning
[Device-terminal-identification] logging enable
[Device-terminal-identification] quit
Verifying the configuration
# Verify that you can view the terminal information from the Web interface when a new terminal comes online or information about an existing terminal changes.
To view terminal information, select Monitor > Terminal Info > Terminal Status from the left navigation tree, and click the Terminal heat map tab.
Example: Configuring allowlist-mode terminal identification
Network configuration
As shown in Figure 3, the device is used to identify and manage terminals to enhance security.
Configure terminal identification on the device to meet the following requirements:
· The device can identify a terminal and block its traffic when a terminal comes online for the first time, and the device can displays terminal information on the Web interface.
· The device can approve the blocked terminal as a legal terminal and permits the traffic from the terminal.
· The device can block the traffic from the terminal when the terminal information changes.
Procedure
1. Assign IP addresses to interfaces:
# Assign an IP address to interface GigabitEthernet 1/0/1.
<Device> system-view
[Device] interface gigabitethernet 1/0/1
[Device-GigabitEthernet1/0/1] ip address 10.1.1.1 255.255.255.0
[Device-GigabitEthernet1/0/1] quit
# Assign IP addresses to other interfaces in the same way. (Details not shown.)
2. Configure address object groups:
# Create an IPv4 address object group named management, and add the video management platform to the object group.
[Device] object-group ip address management
[Device-obj-grp-ip-management] network host address 10.1.1.2
[Device-obj-grp-ip-management] quit
# Create an IPv4 address object group named terminal, and add the terminals to be monitored to the object group.
[Device] object-group ip address terminal
[Device-obj-grp-ip-terminal] network subnet 20.1.1.0 24
[Device-obj-grp-ip-terminal] quit
3. Add interfaces to security zones.
[Device] security-zone name trust
[Device-security-zone-Trust] import interface gigabitethernet 1/0/1
[Device-security-zone-Trust] quit
[Device] security-zone name untrust
[Device-security-zone-Untrust] import interface gigabitethernet 1/0/2
[Device-security-zone-Untrust] quit
4. Configure a security policy:
# Configure a rule named trust-untrust to allow the video management platform to access monitored terminals.
[Device] security-policy ip
[Device-security-policy-ip] rule name trust-untrust
[Device-security-policy-ip-1-trust-untrust] source-zone trust
[Device-security-policy-ip-1-trust-untrust] destination-zone untrust
[Device-security-policy-ip-1-trust-untrust] source-ip management
[Device-security-policy-ip-1-trust-untrust] destination-ip terminal
[Device-security-policy-ip-1-trust-untrust] action pass
[Device-security-policy-ip-1-trust-untrust] quit
# Configure a rule named untrust-trust to allow the monitored terminals to access the video management platform.
[Device-security-policy-ip] rule name untrust-trust
[Device-security-policy-ip-2-untrust-trust] source-zone untrust
[Device-security-policy-ip-2-untrust-trust] destination-zone trust
[Device-security-policy-ip-2-untrust-trust] source-ip terminal
[Device-security-policy-ip-2-untrust-trust] destination-ip management
[Device-security-policy-ip-2-untrust-trust] action pass
[Device-security-policy-ip-2-untrust-trust] quit
[Device-security-policy-ip] quit
5. Configure the operating mode as allowlist, specify an address object group, specify the drop action, and enable terminal identification logging.
[Device] terminal identification
[Device-terminal-identification] work-mode allowlist
[Device-terminal-identification] allowlist object-group ipv4 allowlist
[Device-terminal-identification] allowlist action drop
[Device-terminal-identification] logging enable
6. Configure address object group for identifying terminal addresses.
[Device] terminal identification
[Device-terminal-identification] manage object-group ipv4 management
[Device-terminal-identification] terminal object-group ipv4 terminal
7. Approve blocked terminals as legal terminals and permits the traffic from the terminals.
[Device-terminal-identification] approved all
[Device-terminal-identification] quit
Verifying the configuration
# Verify that you can view the terminal information from the Web interface after a terminal comes online for the first time and its traffic is blocked.
To view terminal information, select Monitor > Terminal Info > Terminal Status from the left navigation tree, and click the Terminal heat map tab.
After the terminal is approved as illegal, the system permits the traffic from the terminal. On the Terminal heat map tab, you can view information about the terminal approved.
