- Table of Contents
-
- 03-Security Configuration Guide
- 00-Preface
- 01-Security zone configuration
- 02-Security policy configuration
- 03-ASPF configuration
- 04-Session management
- 05-Object group configuration
- 06-IP source guard configuration
- 07-AAA configuration
- 08-User identification configuration
- 09-Password control configuration
- 10-Portal configuration
- 11-MAC authentication configuration
- 12-SMS configuration
- 13-802.1X configuration
- 14-Public key management
- 15-PKI configuration
- 16-SSH configuration
- 17-SSL configuration
- 18-Connection limit configuration
- 19-Attack detection and prevention configuration
- 20-Server connection detection configuration
- 21-ARP attack protection configuration
- 22-ND attack defense configuration
- 23-uRPF configuration
- 24-IP-MAC binding configuration
- 25-Keychain configuration
- 26-MAC learning through a Layer 3 device configuration
- 27-APR configuration
- 28-IPoE configuration
- 29-Crypto engine configuration
- 30-Location identification configuration
- 31-Terminal identification configuration
- Related Documents
-
| Title | Size | Download |
|---|---|---|
| 08-User identification configuration | 259.14 KB |
Contents
Configuring user identification
Identity-based user access control
Restrictions and guidelines: User identification configuration
User identification tasks at a glance
Enabling the user identification feature
Configuring remote servers and an identity user import policy
Configuring an identity user import policy
Configuring a security management server set
Managing identity user accounts
Enabling automatic identity user account import
Manually importing identity user accounts from remote servers
Manually importing identity user accounts from a .csv file
Manually exporting identity user accounts
Deleting identity user accounts
Managing online identity users
Configuring static identity users
Specifying the username match mode for user identification
Importing online identity users from a remote server
Deleting online identity users
Display and maintenance commands for user identification
User identification configuration examples
Example: Configuring static user identification
Example: Configuring user identification for SSL VPN users
Configuring user identification
About user identification
The user identification feature works with other security features such as blacklist and object policy to control users' network access based on the users' IP addresses or MAC addresses. This feature provides facilitation for network administrators to deploy policies for security features and to collect statistics and analysis for network attack behaviors and traffic flow on a per-user basis. It also enables the network administrators to implement policy control regardless of changes to the user IP or MAC addresses.
Identity-based user access control
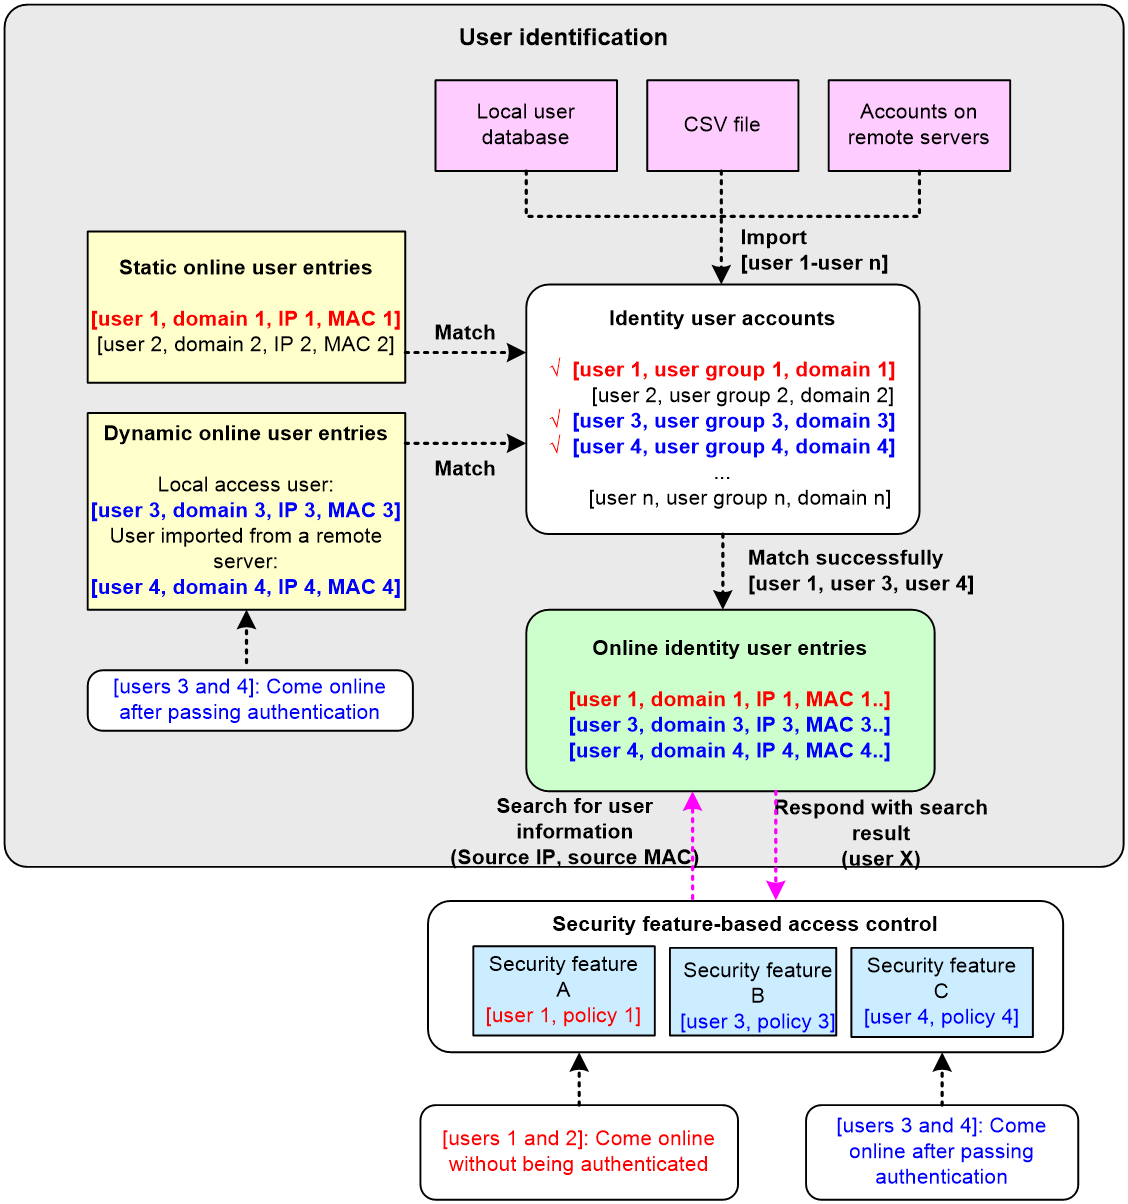
The following shows the process for identity-based user access control:
1. Identity authentication. A network access user passes identity authentication and comes online.
2. User identification. The device obtains the username and IP or MAC address of the online user, and associates the information with the local identity user account and the local identity group. Then, the username-IP or username-MAC mapping for the network access user is created. The administrator can also add static username-IP or username-MAC mappings to permit network access without identity authentication.
3. Identity-based access control. The device identifies the source IP or MAC address of the traffic destined for the network, and resolves the IP or MAC address to the username and user group based on the mapping. The device performs network access control for the user or user group based on other security feature settings such as blacklist and object policy.
Figure 1 Flowchart for identity-based access control
Identity user management
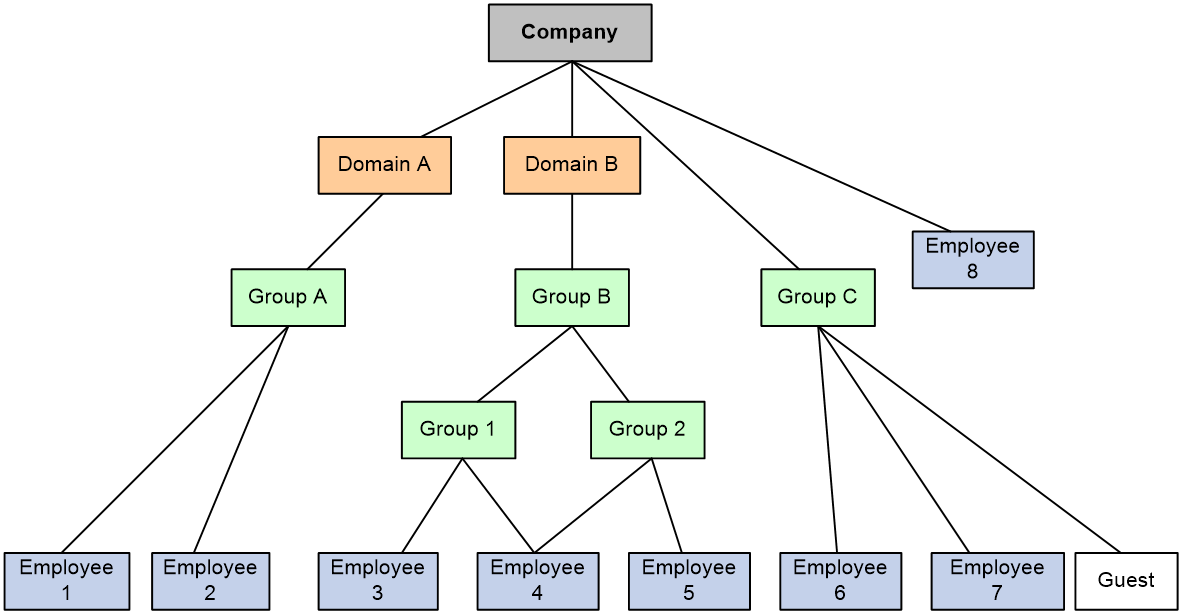
All identity users are organized in a tree structure. Identity user, identity group, and identity domain are management units, and their hierarchy levels are in ascending order.
· An identity user can belong to one or multiple identity groups.
· An identity group can belong to one or multiple higher-layer identity groups.
· An identity user or an identity group can belong to no or one identity domain.
The device uniquely identifies a managed object by the combination of identity domain and username or the combination of identity domain and identity group.
The tree structure facilitates user location and query. As shown in Figure 2, the network administrator creates identity groups and identity users for different departments and employees to implement identity-based network access control.
Figure 2 Identity user management architecture
Identity user accounts
Identity user accounts are used to record identification information of network access users from different sources. The identification information includes the username, user group name, and identity domain name of the users. The user identification module uniformly manages identity users from different sources.
The device supports the following methods to create identity user accounts:
· Learning from the local user database—The user identification module learns network access user information from the local user database and saves the user information as identity user accounts. For more information about network access users, see "Configuring AAA."
· Importing from a .csv file—The network administrator imports user information from a .csv file to the device and the device automatically creates identity user accounts based on the imported information.
· Importing from remote servers—The device initiates user information requests to remote servers, imports network access user information, and then creates identity user accounts based on the imported information. This method enables the network administrator to manage identity user accounts when user information is on the remote servers. Supported remote servers include LDAP servers and H3C IMC RESTful servers.
Online identity users
Online identity users are online network access users (including portal, PPP, IPoE, SSL VPN, 802.1X, and MAC authentication users) that are managed by the user identification module. The device records the username, identity domain name, IP address, and MAC address of online identity users.
Online identity users include dynamic online identity users and static online identity users.
Dynamic online identity users
Dynamic online identity users have the following sources:
· Online network access users that access the network through the device—After a user passes local or remote authentication and comes online, the user identification module searches the user's username and domain name in local identity user accounts. If a matching entry is found, the device creates an online identity user entry for the user.
· Online network access users obtained from remote servers—After the device obtains information about an online user from a remote server, the user identification module searches the user's username and domain name in local identity user accounts. If a matching entry is found, the device creates an online identity user entry for the user. The device can obtain information about all online users of remote servers (including online users on the other devices) for unified management and monitoring.
Supported remote servers include security management servers and H3C IMC RESTful servers.
¡ The device obtains online network access user information pushed by security management servers.
¡ The device actively imports online network access user information from an H3C IMC RESTful server.
The mechanism to generate online identity user entries for portal users is slightly different from other users. The user identification module first examines whether a portal user includes user group information.
· If the portal user includes user group information, the module examines whether the user group is a local identity group.
¡ If the user group is a local identity group, the module examines whether the device already has an online identity user entry that has the same username as the portal user.
- If yes, the module adds the portal user to the local identity group.
- If no, the module generates an online identity user entry for the portal user and adds the user to the local identity group.
¡ If the user group is not a local identity group, the module searches the local identity user accounts for the username and domain name of the portal user. If a matching identity user account is found, the module generates an online identity user entry for the portal user.
· If the portal user does not include user group information, the module searches the local identity user accounts for the username and domain name of the portal user. If a matching identity user account is found, the module generates an online identity user entry for the portal user.
Static online identity users
Static online identity users originate from static identity users configured by the network administrator. Each static identity user contains the mapping between the username and the IP or MAC addresses of the user. After a static identity user is created, the user identification module searches the user's username and domain name in local identity user accounts. If a matching entry is found, the device creates a static online identity user entry for the static identity user. Static online identity users can access the network without identity authentication but their access to the network is controlled by security features. The network administrator can configure static identity users when only few people need to temporarily access the network.
Application of online identity users
Application modules can impose policies of security features on online identity users. When online identity user entries are deleted, the user identification module will instruct the application modules to stop processing services for the users.
Identity groups
Identity users can be added to different groups for batch configuration and hierarchical user management. The groups are called identity groups. The user identification module uniformly manages identity groups from different sources.
Creation of identity groups
The device supports the following methods to create identity groups:
· Learning from the local user database—When a local user group is created, the device instructs the user identification module to create an identity group with the same group name. For more information about local user groups, see "Configuring AAA."
· Importing from a .csv file—The device imports identity user account information from a .csv file and then automatically creates identity groups based on the imported information.
· Importing from remote servers—The device can import identity user account information from an H3C IMC RESTful server or LDAP servers and then create identity groups based on the group information in the accounts. The device can also directly obtain user group information from LDAP servers and then creates identity groups.
Application of identity groups
An identity group is activated when it is used by an application module, and all services based on the identity group will take effect. When the application module stops using the identity group, the identity group is inactive.
Identity roles
An identity role contains access permissions. For application modules to assign access permissions to users or user groups based on identity roles, you can bind the users or user groups to identity roles. Typically, identity roles are used in SSL VPN access services. Separating permissions from users enables simple permission authorization management.
In SSL VPN access services, the device acts as the SSL VPN gateway that controls users' access to network resources based on policy groups. When an SSL VPN user accesses the SSL VPN gateway, the SSL VPN gateway authenticates the user based on the SSL VPN context of the user and assigns a policy group name to the user. The policy group contains accessible Web resources, TCP access service resources, and IP access service resources.
The SSL VPN gateway assigns policy groups to a user by using the following methods in descending order:
1. Role-based policy group assignment—After the user passes authentication, the SSL VPN gateway obtains the identity roles bound to the user from the user identification module. In the SSL VPN context to which the user belongs, the SSL VPN gateway assigns the policy groups associated with the identity roles to the user.
2. AAA-based policy group assignment—After the user passes authentication, the authentication server assigns policy groups to the user.
3. System default policy group—If both role-based policy group assignment and AAA-based policy group assignment are not used, the SSL VPN gateway assigns the default SSL VPN policy group to the user.
vSystem support for features
Non-default vSystems do not support configuring a security management server set (in other words, obtaining online identity user information from security management servers).
For information about the support of non-default vSystems for the commands, see user identification command reference. For information about vSystem, see Virtual Technologies Configuration Guide.
Restrictions and guidelines: User identification configuration
The user identity feature on the device can interact with the following remote servers to learn user information:
· H3C IMC RESTful server—The device imports identity user accounts, identity groups, and online identity users from the H3C IMC RESTful server.
· LDAP servers—The device imports identity user accounts and identity groups from LDAP servers.
· Security management servers—The device obtains online identity users from security management servers.
To use the H3C IMC RESTful server, make sure the server runs IMC PLAT 7.3 (E0605P04) installed with the SSM E0503P04 component or IMC PLAT 7.3(E0605) installed with the EIA E0512 component.
User identification is not applicable to portal users that perform MAC-based quick portal authentication. For more information about MAC-based quick portal authentication, see "Configuring portal authentication."
User identification tasks at a glance
To configure user identification, perform the following tasks:
1. Enabling the user identification feature
2. Configuring remote servers and an identity user import policy
Perform this task if the device needs to import user information from RESTful or LDAP servers.
a. Configure remote server parameters
b. Configuring an identity user import policy
3. Configuring a security management server set
Perform this task if the device needs to obtain user information from security management servers.
4. (Optional.) Managing identity user accounts
¡ Enabling automatic identity user account import
¡ Manually importing identity user accounts from remote servers
¡ Manually importing identity user accounts from a .csv file
¡ Manually exporting identity user accounts
¡ Deleting identity user accounts
5. (Optional.) Managing online identity users
¡ Configuring static identity users
¡ Specifying the username match mode for user identification
¡ Importing online identity users from a remote server
¡ Deleting online identity users
6. (Optional.) Configuring identity roles
7. (Optional.) Deleting identity groups
Enabling the user identification feature
About this task
With the user identification feature, the device learns information about online users (such as PPP, portal, IPoE, SSL VPN, 802.1X, and MAC authentication users) from the user access modules. The device uses the obtained information for user identification and works with other security features for identity-based network access control.
Procedure
1. Enter system view.
system-view
2. Enable the user identification feature.
user-identity enable
By default, the user identification feature is disabled.
Configuring remote servers and an identity user import policy
Configuring a RESTful server
About this task
The RESTful server view defines the related parameter settings for the device to communicate with the RESTful server. The parameters include the login account and the URIs of the RESTful server. After establishing a connection with the RESTful server, the device can import identity user accounts, identity groups, and online identity users from the server.
Restrictions and guidelines
The system can have only one RESTful server.
Procedure
1. Enter system view.
system-view
2. Create a RESTful server and enter its view.
user-identity restful-server server-name
3. Specify the username and password to log in to the RESTful server.
login-name user-name password { cipher | simple } string
By default, no username or password is specified for the device to log in to the RESTful server.
The specified username and password must exist on the RESTful server. Otherwise, the device cannot establish a connection with the RESTful server.
4. Specify a URI for the RESTful server.
uri { get-online-user | get-user-database | get-user-group-database | put-offline-user | put-online-user } uri-string
By default, no URIs are specified for the RESTful server.
The specified URIs must be the same as those on the RESTful server. Otherwise, user information interaction will fail.
You can repeat this command to specify multiple URIs of the RESTful server.
5. Specify an MPLS L3VPN instance for the RESTful server.
vpn-instance vpn-instance-name
By default, the RESTful server belongs to the public network.
6. (Optional.) Configure RESTful server reachability detection:
a. Enable RESTful server reachability detection.
connection-detect enable
By default, RESTful server reachability detection is disabled.
b. Configure parameters for RESTful server reachability detection.
connection-detect { interval interval | maximum max-times }
By default, the reachability detection interval is 5 minutes and the maximum number of probes per detection is 3.
Configuring an LDAP scheme
About this task
An LDAP scheme includes the LDAP server that interacts with the device and the related parameter settings. After establishing a connection with the LDAP server, the device can import identity user accounts and identity groups from the server.
For more information about LDAP attribute maps, see "Configuring AAA."
Restrictions and guidelines
The device cannot import online identity users from the LDAP server.
When importing identity user accounts and identity groups from the LDAP server, the device does not carry parent groups to which the identity users or identity groups belong by default. To configure the device to carry the parent group information, you must configure an LDAP attribute map and specify the LDAP attribute map in the LDAP scheme.
Procedure
1. Enter system view.
system-view
2. Configure an LDAP server.
The LDAP server configuration includes the server IP address, the administrator DN and password for binding with the LDAP server, DN search policy, and user group filter. For more information, see "Configuring AAA."
3. Create an LDAP attribute map and enter LDAP attribute map view.
ldap attribute-map map-name
4. Configure an LDAP attribute mapping entry for the user group attribute.
map ldap-attribute ldap-attribute-name [ prefix prefix-value delimiter delimiter-value ] aaa-attribute user-group
5. Return to system view.
quit
6. Create an LDAP scheme and enter LDAP scheme view.
ldap scheme ldap-scheme-name
7. Specify the LDAP authentication server.
authentication-server server-name
By default, no LDAP authentication server is specified.
8. Specify the LDAP attribute map.
attribute-map map-name
By default, no LDAP attribute map is specified.
After this command is executed, the device imports identity user accounts and identity groups with parent group information. However, the device does not create new identity groups based on the parent group information.
Configuring an identity user import policy
About this task
To import identity user accounts, online identity users, or identity groups from a RESTful server or LDAP servers, you must configure an identity user import policy. In this policy, you can set the parameters for the device to interact with the RESTful server or LDAP servers.
Restrictions and guidelines
The system can have only one identity user import policy. Before you configure a new identity user import policy, you must delete the existing one.
Procedure
1. Enter system view.
system-view
2. Create an identity user import policy and enter its view.
user-identity user-import-policy policy-name
3. Specify a RESTful server.
restful-server server-name
By default, no RESTful server is specified.
You can specify only one RESTful server. Before you specify a new RESTful server, remove the currently specified one.
4. Specify an LDAP scheme.
ldap-scheme ldap-scheme-name
By default, no LDAP schemes are specified.
You can specify a maximum of 16 LDAP schemes.
5. (Optional.) Set the interval for automatic identity user account import.
account-update-interval interval
By default, the interval for automatic identity user account import is 24 hours.
6. Specify the type of user information to be imported from LDAP servers.
import-type { all | group | user }
By default, the device imports both user information and user group information from LDAP servers.
Configuring a security management server set
About this task
The security management server set view defines parameters for the device to communicate with security management servers. The parameters include the IP addresses of the servers, the port number for listening to the servers, and the shared key to secure communication between the device and the servers.
When the device establishes connections with security management servers, it can receive user online and offline notifications that the servers push to the device.
· Based on user online notifications, the device obtains online user information and creates online identity user entries for users that match identity user accounts.
· Based on user offline notifications, the device obtains information about users that have gone offline and deletes the corresponding online identity user entries.
Restrictions and guidelines
The system can have only one security management server set.
To ensure a successful packet parsing, make sure the specified vendor is the actual vendor of the servers in the security management server set.
Procedure
1. Enter system view.
system-view
2. Create a security management server set and enter its view.
user-identity security-manage-server server-set-name
3. Specify IP addresses of security management servers.
ip ip-address&<1-10>
By default, no IP addresses of security management servers are specified.
4. Configure the encryption algorithm and shared key for securing communication with security management servers.
encryption algorithm { 3des | aes128 } key { simple | cipher } string
By default, no encryption algorithm or shared key is configured for securing communication with security management servers.
5. Set the port number for listening to security management servers.
listen-port port-num
By default, the device listens to security management servers on port 8001.
6. (Optional.) Specify the security management server vendor.
vendor { drcom | h3c | hw | srun }
By default, the security management server vendor is not specified.
Managing identity user accounts
Enabling automatic identity user account import
About this task
After this feature is enabled, the device first imports all identity user accounts and online identity user information from the servers specified in the identity user import policy. Then, the device periodically imports identity user accounts from the remote servers at the interval set by using the account-update-interval command.
Restrictions and guidelines
If automatic identity user account import is enabled but user identity is disabled, the device can import only identity user accounts from the remote servers specified in the policy.
If RESTful server reachability detection is enabled for the RESTful server in the specified policy, the device will automatically import online identity user information from that server when the state of that server changes from unreachable to reachable.
Procedure
1. Enter system view.
system-view
2. Enable automatic identity user account import.
user-identity user-account auto-import policy policy-name
By default, automatic identity user account import is disabled.
Manually importing identity user accounts from remote servers
About this task
Perform this task to manually import identity user accounts from remote servers. The device initiates user information requests to the servers, imports network access user account information from the servers, and then creates corresponding identity user accounts. If the device fails to import an account, the device skips the account and continues to import the next account.
Prerequisites
Before you import identity user accounts from remote servers, make sure the following conditions are met:
· An identity user import policy is configured.
· The specified URIs of the RESTful server or the IP addresses of the LDAP servers in the policy must be valid.
Procedure
1. Enter system view.
system-view
2. Import identity user accounts from remote servers.
user-identity user-account import policy policy-name
Manually importing identity user accounts from a .csv file
About this task
Perform this task to manually import identity user accounts from a .csv file. If the device fails to import an account, it stops importing the remaining identity user accounts in the file.
Prerequisites
Before you import identity user accounts from a .csv file, make sure the .csv file is a standard .csv file. To see the format of a standard .csv file, use the user-identity user-account export url command to export a standard template.
Procedure
1. Enter system view.
system-view
2. Import identity user accounts from a .csv file.
user-identity user-account import url url-string [ vpn-instance vpn-instance-name ] [ auto-create-group | override | start-line line-number ] *
Manually exporting identity user accounts
About this task
Perform this task to export identity user accounts on the device to a .csv file. You can directly import identity user accounts in the exported file to other devices. Or, you can edit the exported file and then import identity user accounts in the file back to the device or to other devices.
If you specify the template keyword, the device exports a standard .csv file template. You can use this file template as a reference when you edit .csv files.
Procedure
1. Enter system view.
system-view
2. Export identity user accounts to a .csv file.
user-identity user-account export url url-string [ { domain domain-name | null-domain } [ user user-name ] | template ] [ vpn-instance vpn-instance-name ]
Deleting identity user accounts
About this task
Identity user accounts can be deleted by using the following methods:
· Manual deletion—The administrator uses a command to delete identity user accounts imported from remote servers or .csv files.
· Dynamic deletion—Deletion of network access users in the local user database triggers the deletion of corresponding identity user accounts.
Manually deleting identity user accounts
To manually delete identity user accounts, execute the following command in user view:
reset user-identity user-account { all | { domain domain-name | null-domain } [ name user-name ] }
Managing online identity users
Configuring static identity users
Restrictions and guidelines
A username can be bound with multiple IP addresses, multiple MAC addresses, or multiple IP-MAC address combinations. However, an IP address, MAC address, or IP-MAC address combination cannot be bound with multiple usernames.
Procedure
1. Enter system view.
system-view
2. Configure a static identity user.
user-identity static-user user-name [ domain domain-name ] bind { ipv4 ipv4-address | ipv6 ipv6-address } [ mac mac-address ]
Specifying the username match mode for user identification
About this task
Perform this task to specify the username match mode for user identification. The device creates online identity users only for online users whose usernames can match the usernames in the local identity user accounts.
Restrictions and guidelines
This feature takes effect only on online identity users that access the current device.
Procedure
1. Enter system view.
system-view
2. Specify the username match mode for user identification.
user-identity online-user-name-match { keep-original | with-domain | without-domain }
By default, the username match mode for user identification is keep-original.
Importing online identity users from a remote server
About this task
Perform this task to import online identity user information from a remote server. The device initiates a real-time online user information request to the server and then imports all online user information.
Restrictions and guidelines
The device can import online identity users only from an H3C IMC RESTful server.
For the device to successfully import online identity users from a remote server, make sure the user identification feature is enabled.
Prerequisites
Before you import online identity users from a remote server, make sure the following conditions are met:
· An identity user import policy is configured.
· The specified URIs of the RESTful server in the policy must be valid.
Procedure
1. Enter system view.
system-view
2. Import online identity users.
user-identity online-user import policy policy-name
Deleting online identity users
About this task
Online identity users can be deleted by using the following methods:
· Manual deletion—The administrator uses a command to delete dynamic online identity users imported from remote servers and static online identity users.
· Dynamic deletion—Multiple events trigger the deletion of identity users.
¡ After a network access user goes offline, the access module instructs the user identification module to delete the associated online identity users.
¡ After the device reboots, all dynamic online identity users are deleted.
¡ After the user identification feature is disabled, all dynamic online identity users are deleted.
¡ After a user on a remote server goes offline, the remote server instructs the device to delete the associated online identity user.
Manually deleting dynamic online identity users
To manually delete dynamic online identity users, execute the following command in user view:
reset user-identity dynamic-online-user { all | { domain domain-name | null-domain } [ name user-name ] | { ip ipv4-address | ipv6 ipv6-address }[ mac mac-address ] }
Manually deleting static online identity users
1. Enter system view.
system-view
2. Delete static online identity users.
undo user-identity static-user user-name [ domain domain-name ] [ bind { ipv4 ipv4-address | ipv6 ipv6-address } [ mac mac-address ] ]
Configuring identity roles
About this task
You can bind multiple identity users and groups to one identity role. The identity users and groups can be any identity users and groups learned from the local user database, imported from .csv files, or imported from remote servers.
For configuration simplicity, you can bind an identity group to an identity role. All identity users in the identity group are automatically assigned that identity role.
Restrictions and guidelines
The system automatically assigns the identity role named default to an identity user if the identity user is not bound to any identity role. The identity role named default is system predefined. You cannot configure, edit, or delete that identity role. If you bind an identity user to a non-default identity role, the identity role named default is automatically removed from that identity user.
The system supports a maximum of 63 identity roles.
The user identification module automatically notifies service modules to change the authorization information of online users after you edit or delete the identity roles of the online users.
You can bind a maximum of 256 identity users and groups to an identity role.
Procedure
1. Enter system view.
system-view
2. Create an identity role and enter its view.
user-identity role name role-name
By default, an identity role named default exists.
3. Bind an identity user to the identity role.
user name user-name [ domain domain-name ]
By default, no identity users are bound to an identity role.
4. Bind an identity group to the identity role.
user-group name group-name [ domain domain-name ]
By default, no identity groups are bound to an identity role.
Deleting identity groups
About this task
Identity groups can be deleted by using the following methods:
· Manual deletion—The administrator uses a command to delete identity groups imported from remote servers or .csv files.
· Dynamic deletion—Deletion of user groups in the local user database triggers the deletion of corresponding identity groups.
Manually deleting identity groups
To manually delete identity groups, execute the following command in user view:
reset user-identity user-group { all | { domain domain-name | null-domain } [ name group-name ] }
Display and maintenance commands for user identification
|
|
IMPORTANT: Non-default vSystems do not support some of the display and maintenance commands. For information about vSystem support for these commands, see user identification command reference. |
Execute display commands in any view.
|
Task |
Command |
|
Display information about identity users or identity groups. |
display user-identity { domain domain-name | null-domain } { user [ user-name [ group | role ] ] | user-group [ group-name [ member { group | user } | role ] ] } |
|
Display information about active identity groups. |
display user-identity active-user-group { all | domain domain-name | null-domain } |
|
Display information about all identity users or identity groups. |
display user-identity all { user | user-group } |
|
Display information about online identity users. |
display user-identity online-user { all | { domain domain-name | null-domain } name user-name } |
|
Display RESTful server configuration. |
display user-identity restful-server [ server-name ] |
|
Display configuration information for security management server sets. |
display user-identity security-manage-server [ server-set-name ] |
|
Display identity user import policy information. |
display user-identity user-import-policy [ policy-name ] |
|
Display information about identity roles. |
display user-identity role [ name role-name ] |
User identification configuration examples
Example: Configuring static user identification
Network configuration
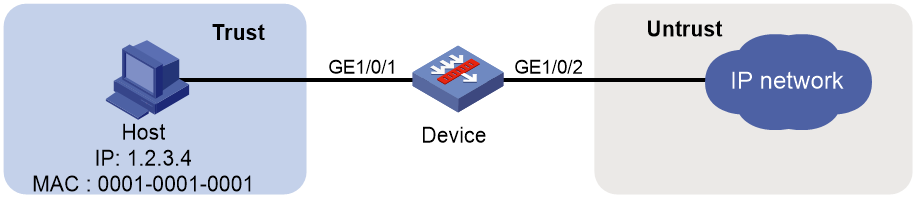
As shown in Figure 3, the administrator permits user usera with IP address 1.2.3.4 and MAC address 0001-0001-0001 to access the network without identity authentication. Configure a security policy for access control, which permits the user to access the network only from 8:00 to 18:00 in working days.
Procedure
1. Assign IP addresses to interfaces:
# Assign an IP address to interface GigabitEthernet 1/0/1.
<Device> system-view
[Device] interface gigabitethernet 1/0/1
[Device-GigabitEthernet1/0/1] ip address 1.2.3.5 255.255.255.0
[Device-GigabitEthernet1/0/1] quit
# Assign IP addresses to other interfaces in the same way. (Details not shown.)
2. Add interfaces to security zones.
[Device] security-zone name trust
[Device-security-zone-Trust] import interface gigabitethernet 1/0/1
[Device-security-zone-Trust] quit
[Device] security-zone name untrust
[Device-security-zone-Untrust] import interface gigabitethernet 1/0/2
[Device-security-zone-Untrust] quit
3. Configure settings for routing. This example configures a static route, and the next hop in the route is 2.2.2.2.
[Device] ip route-static 3.1.1.2 24 2.2.2.2
4. Configure user identification:
# Create a network access user named usera.
[Device] local-user usera class network
[Device-luser-network-usera] quit
# Configure a static identity user named usera with IP address 1.2.3.4 and MAC address 0001-0001-0001.
[Device] user-identity static-user usera bind ipv4 1.2.3.4 mac 0001-0001-0001
# Enable the user identification feature.
[Device] user-identity enable
5. Configure time range and security policy settings:
# Create a time range named work and specify the time range in working days.
[Device] time-range work 08:00 to 18:00 working-day
# Configure a rule named ippolicy1 in the IPv4 security policy to permit user usera to access the IP network only from 8:00 to 18:00 in working days.
[Device] security-policy ip
[Device-security-policy-ip] rule name ippolicy1
[Device-security-policy-ip-1-ippolicy1] source-zone trust
[Device-security-policy-ip-1-ippolicy1] destination-zone untrust
[Device-security-policy-ip-1-ippolicy1] action pass
[Device-security-policy-ip-1-ippolicy1] user usera
[Device-security-policy-ip-1-ippolicy1] time-range work
[Device-security-policy-ip-1-ippolicy1] quit
[Device-security-policy-ip] quit
Verifying the configuration
# Display online identity user information for user usera.
[Device] display user-identity online-user null-domain name usera
User name: usera
IP : 1.2.3.4
MAC : 0001-0001-0001
Type: Static
Total 1 records matched
# Verify that the user can access the network only from 8:00 to 18:00 in working days. (Details not shown.)
Example: Configuring user identification for SSL VPN users
Network configuration
As shown in Figure 4, the device acts as the SSL VPN gateway. It connects the public network users and the enterprise private network. The enterprise private network provides Web server resources for the users through HTTP and port 80.
Configure the device to perform local authentication and authorization for the users and meet the following requirements:
· The device learns identity user accounts from the local user database.
· The device assigns a policy group to the SSL VPN users on a role basis so the users can securely access the Web server through the device.

Prerequisites
The device has obtained CA certificate ca.cer and server certificate server.pfx. If no SSL server policy is applied to the SSL VPN gateway, the device uses the default certificates.
Make sure the user hosts, device, and Web server have routes to reach one another.
Procedure
1. Assign IP addresses to interfaces:
# Assign an IP address to interface GigabitEthernet 1/0/1.
<Device> system-view
[Device] ip http enable
[Device] ip https enable
[Device] interface gigabitethernet 1/0/1
[Device-GigabitEthernet1/0/1] ip address 2.1.1.1 255.255.255.0
[Device-GigabitEthernet1/0/1] quit
# Assign IP addresses to other interfaces in the same way. (Details not shown.)
2. Add interfaces to security zones.
[Device] security-zone name untrust
[Device-security-zone-Untrust] import interface gigabitethernet 1/0/1
[Device-security-zone-Untrust] quit
[Device] security-zone name trust
[Device-security-zone-Trust] import interface gigabitethernet 1/0/2
[Device-security-zone-Trust] quit
3. Configure a security policy to permit the traffic between security zones Untrust and Local so that users can access the SSL VPN gateway:
# Configure a rule named sslvpnlocalout1 to allow the device to send packets to the users.
[Device] security-policy ip
[Device-security-policy-ip] rule name sslvpnlocalout1
[Device-security-policy-ip-1-sslvpnlocalout1] source-zone local
[Device-security-policy-ip-1-sslvpnlocalout1] destination-zone untrust
[Device-security-policy-ip-1-sslvpnlocalout1] source-ip-host 2.1.1.1
[Device-security-policy-ip-1-sslvpnlocalout1] destination-ip-host 4.4.4.1
[Device-security-policy-ip-1-sslvpnlocalout1] destination-ip-host 4.4.4.2
[Device-security-policy-ip-1-sslvpnlocalout1] destination-ip-host 4.4.4.3
[Device-security-policy-ip-1-sslvpnlocalout1] action pass
[Device-security-policy-ip-1-sslvpnlocalout1] quit
# Configure a rule named sslvpnlocalin1 to allow the users to send packets to the device.
[Device-security-policy-ip] rule name sslvpnlocalin1
[Device-security-policy-ip-2-sslvpnlocalin1] source-zone untrust
[Device-security-policy-ip-2-sslvpnlocalin1] destination-zone local
[Device-security-policy-ip-2-sslvpnlocalin1] source-ip-host 4.4.4.1
[Device-security-policy-ip-2-sslvpnlocalin1] source-ip-host 4.4.4.2
[Device-security-policy-ip-2-sslvpnlocalin1] source-ip-host 4.4.4.3
[Device-security-policy-ip-2-sslvpnlocalin1] destination-ip-host 2.1.1.1
[Device-security-policy-ip-2-sslvpnlocalin1] action pass
[Device-security-policy-ip-2-sslvpnlocalin1] quit
# Configure a rule named sslvpnlocalout2 to allow the device to send packets to the Web server.
[Device-security-policy-ip] rule name sslvpnlocalout2
[Device-security-policy-ip-3-sslvpnlocalout2] source-zone local
[Device-security-policy-ip-3-sslvpnlocalout2] destination-zone trust
[Device-security-policy-ip-3-sslvpnlocalout2] source-ip-host 3.3.3.3
[Device-security-policy-ip-3-sslvpnlocalout2] destination-ip-host 20.2.2.2
[Device-security-policy-ip-3-sslvpnlocalout2] action pass
[Device-security-policy-ip-3-sslvpnlocalout2] quit
# Configure a rule named sslvpnlocalin2 to allow the Web server to send packets to the device.
[Device-security-policy-ip] rule name sslvpnlocalin2
[Device-security-policy-ip-4-sslvpnlocalin2] source-zone trust
[Device-security-policy-ip-4-sslvpnlocalin2] destination-zone local
[Device-security-policy-ip-4-sslvpnlocalin2] source-ip-host 20.2.2.2
[Device-security-policy-ip-4-sslvpnlocalin2] destination-ip-host 3.3.3.3
[Device-security-policy-ip-4-sslvpnlocalin2] action pass
[Device-security-policy-ip-4-sslvpnlocalin2] quit
[Device-security-policy-ip] quit
4. Configure a PKI domain and configure the parameters used for certification request.
[Device] pki domain sslvpn
[Device-pki-domain-sslvpn] public-key rsa general name sslvpn
[Device-pki-domain-sslvpn] undo crl check enable
[Device-pki-domain-sslvpn] quit
[Device] pki import domain sslvpn der ca filename ca.cer
[Device] pki import domain sslvpn p12 local filename server.pfx
5. Configure an SSL server policy and specify the PKI domain in the policy.
[Device] ssl server-policy ssl
[Device-ssl-server-policy-ssl] pki-domain sslvpn
[Device-ssl-server-policy-ssl] quit
6. Configure user identification:
# Create network access users usera, userb, and userc and specify the SSL VPN service for the users.
[Device] local-user usera class network
[Device-luser-network-usera] password simple a123456
[Device-luser-network-usera] service-type sslvpn
[Device-luser-network-usera] quit
[Device] local-user userb class network
[Device-luser-network-userb] password simple b123456
[Device-luser-network-userb] service-type sslvpn
[Device-luser-network-userb] quit
[Device] local-user userc class network
[Device-luser-network-userc] password simple c123456
[Device-luser-network-userc] service-type sslvpn
[Device-luser-network-userc] quit
# Create a user group named group1, and add users usera, userb, and userc to the user group as identity members.
[Device] user-group group1
[Device-ugroup-group1] identity-member user usera
[Device-ugroup-group1] identity-member user userb
[Device-ugroup-group1] identity-member user userc
[Device-ugroup-group1] quit
# Create identity role r1.
[Device] user-identity role name r1
# Bind identity group group1 to the identity role.
[Device-identity-role-r1] user-group name group1
[Device-identity-role-r1] quit
# Enable the user identification feature.
[Device] user-identity enable
7. Configure SSL VPN gateway settings for the users to access the SSL VPN gateway:
# Configure the IP address of SSL VPN gateway gw as 2.1.1.1 and the port number as 2000.
[Device] sslvpn gateway gw
[Device-sslvpn-gateway-gw] ip address 2.1.1.1 port 2000
# Enable the SSL VPN gateway.
[Device-sslvpn-gateway-gw] service enable
[Device-sslvpn-gateway-gw] quit
8. Configure SSL VPN context settings to provide SSL VPN Web access service for the users:
# Configure SSL VPN context ctx1 to use SSL VPN gateway gw.
[Device] sslvpn context ctx1
[Device-sslvpn-context-ctx1] url-item urlitem
[Device-sslvpn-context-ctx1-url-item-urlitem] url http://20.2.2.2
[Device-sslvpn-context-ctx1-url-item-urlitem] quit
[Device-sslvpn-context-ctx1] url-list urllist
[Device-sslvpn-context-ctx1-url-list-urllist] heading web
[Device-sslvpn-context-ctx1-url-list-urllist] resources url-item urlitem
[Device-sslvpn-context-ctx1-url-list-urllist] quit
[Device-sslvpn-context-ctx1] policy-group p1
[Device-sslvpn-context-ctx1-policy-group-p1] resources url-list urllist
[Device-sslvpn-context-ctx1-policy-group-p1] quit
# Configure the SSL VPN context to assign policy group p1 to users based on role r1.
[Device-sslvpn-context-ctx1] role r1
[Device-sslvpn-context-ctx1-role-r1] resources policy-group p1
[Device-sslvpn-context-ctx1-role-r1] web-access enable
[Device-sslvpn-context-ctx1-role-r1] quit
[Device-sslvpn-context-ctx1] service enable
[Device-sslvpn-context-ctx1] quit
Verifying the configuration
# Display information about identity roles.
[Device] display user-identity role
--------------------------------------------------------------------------
Role name: default
This role is assigned to all identity users that do not obtain an administer-defined role.
--------------------------------------------------------------------------
Role name: r1
User group name Domain name
group1 N/A
Total 2 records matched.
# On the host of each SSL VPN user, enter https://1.1.1.2:2000/ in the browser address bar. On the login page, enter the correct username and password to log in to the SSL VPN gateway. Verify that the users can access remote Web server resources assigned to them based on their role.
