- Table of Contents
-
- H3C G3G5 Servers Storage Controller User Guide-6W108
- 00-Preface
- 01-Storage controller overview
- 02-Storage controller features
- 03-Configuring an embedded RSTe RAID controller
- 04-Configuring an NVMe VROC module
- 05-Configuring a P430 storage controller
- 06-Configuring a 1000 storage controller
- 07-Configuring a 9361 94xx L460 P5408 H5408 storage controller
- 08-Configuring an H460, P460, P240 or P4408 storage controller
- 09-Configuring a 9300 storage controller
- 10-Configuring a 9311 storage controller
- 11-Configuring an LSI 9400 or 9500 series storage controller
- 12-Configuring a RAID-MARVELL-SANTACRUZ-LP-2i storage controller
- 13-Appendix A Troubleshooting storage controllers
- 14-Appendix B RAID arrays and fault tolerance
- Related Documents
-
| Title | Size | Download |
|---|---|---|
| 11-Configuring an LSI 9400 or 9500 series storage controller | 1.92 MB |
Configuring LSI 9400 and 9500 series storage controllers
|
|
NOTE: The BIOS screens might vary by the BIOS version. The screenshots in this chapter are for illustration only. |
About the LSI 9400 and 9500 series storage controllers
The LSI 9400 and 9500 series storage controllers support 12-Gbps data channels. For detailed storage controller information, access http://www.h3c.com/en/home/qr/default.htm?id=66.
The LSI 9400 and 9500 series storage controllers contain the following models:
· HBA-LSI-9400-16i
· HBA-LSI-9500-8i
· HBA-LSI-9500-16i
The storage controller does not support configuring RAID arrays.
Configuring controller settings in UEFI mode
This section describes how to configure the storage controller in UEFI mode. For more information about how to enter the BIOS and set the boot mode to UEFI, see the BIOS user guide for the server.
Controller configuration tasks at a glance
To configure controller settings in UEFI mode, perform the following tasks:
· Refreshing configuration information
· (Optional.) Viewing basic controller information
· (Optional.) Viewing drive information
· (Optional.) Locating drives
· (Optional.) Configuring boot options for the legacy mode
Refreshing configuration information
1. Access the BIOS setup screen. During server POST, press Delete, Esc, or F2 as prompted to open the BIOS setup screen as shown in Figure 1.
For some devices, the Front screen opens. You must select Device Management to enter the BIOS setup screen.
For how to navigate screens and modify settings, see the operation instructions at the lower right corner.

2. On the screen as shown in Figure 2, select Advanced > Storage controller, and press Enter. In this example, storage controller HBA 9400-8i is selected.

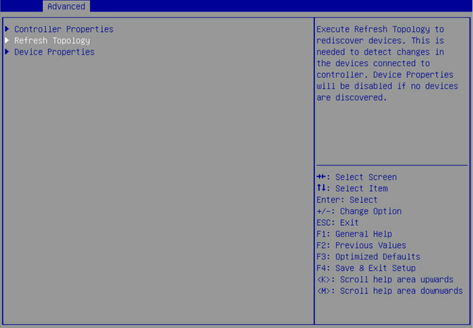
3. On the storage controller configuration screen as shown in Figure 3, select Refresh Topology and then press Enter.
Figure 3 Storage controller configuration screen

4. On the confirmation screen as shown in Figure 4, select OK and then press Enter.
Figure 4 Confirming the operation

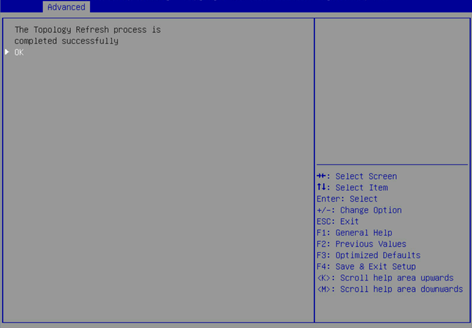
5. On the screen as shown in Figure 5, select OK and then press Enter to return to the configuration screen.
Figure 5 Configuration completed
Viewing basic controller information
1. Refresh configuration information. For more information, see "Refreshing configuration information."
2. On the storage controller configuration screen as shown in Figure 6, select Controller Properties and then press Enter.
Figure 6 Storage controller configuration screen
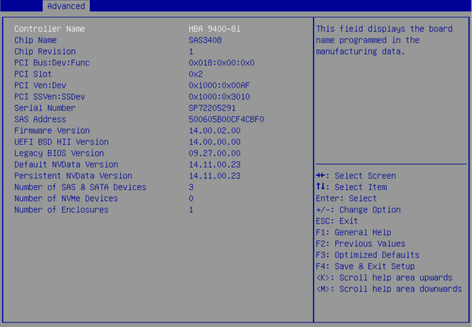
3. On the screen as shown in Figure 7, you can view basic information about the storage controller.
Figure 7 Basic controller information
Viewing drive information
1. Refresh configuration information. For more information, see "Refreshing configuration information."
2. On the screen as shown in Figure 8, select Device Properties and then press Enter.
Figure 8 Controller configuration screen

3. On the storage controller configuration screen as shown in Figure 9, press Enter.
Figure 9 Selecting the enclosure

4. On the screen as shown in Figure 10, select the target drive such as <Slot 36>SAS-HDD-HGST HUC101818CS4200 and then press Enter.
Figure 10 Selecting the target drive

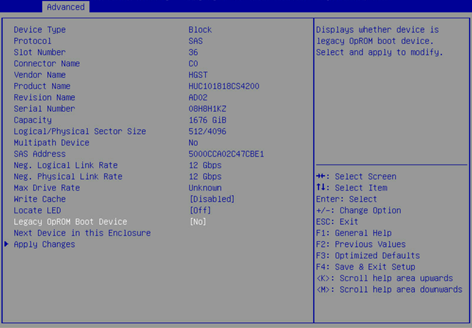
5. On the drive configuration screen as shown in Figure 11, you can view information about the drive.
Figure 11 Drive properties screen
Locating drives
1. On the drive properties screen as shown in Figure 12, select Locate LED and press Enter.
2. In the dialog box that opens, select On to turn on the drive LED.
Figure 12 Drive properties screen

3. Select Apply Changes, and press Enter.
Configuring boot options for the legacy mode
The storage controller does not provide legacy mode configuration screens. You can perform this task to configure boot options for the legacy mode in the UEFI BIOS. This enables users to install an OS in legacy mode.
To configure boot options for the legacy mode:
1. On the drive properties screen as shown in Figure 13, select Legacy OpROM Boot Device and then press Enter.
2. In the dialog box that opens, select Yes for the system to start from a drive in legacy mode.
Figure 13 Drive properties screen

3. Select Apply Changes, and press Enter.
Configuring controller settings in legacy mode
The storage controllers support the legacy mode but do not provide configuration screens in legacy mode.
Downloading and installing StorCLI
This section introduces the download and installation steps of the OS command line tool. You can use the OS command line tool to manage storage controllers during normal server operation without restarting the server.
Downloading StorCLI
1. Access https://www.h3c.com/cn/BizPortal/DownLoadAccessory/DownLoadAccessoryFilt.aspx.
2. Download the installation package and release notes for the corresponding storage controller firmware as instructed.
3. Decompress the installation package to obtain the StorCLI tool package for different operating systems.
Installing StorCLI
See the release notes to install StorCLI for the corresponding operating system.
Commonly-used commands in StorCLI
This section describes the usage and examples of commonly used commands in StorCLI. You can use StorCLI commands to manage storage controllers during normal server operation without restarting the server.
|
|
NOTE: Commands related to the specified path in this tool do not support spaces and special characters. |
Viewing the storage controller configuration
Perform this task to view storage controller information, including storage controller name, firmware version, drive slot, capacity, vendor, serial number, interface type, and interface speed.
Syntax
./storcli64 /ccontroller_id show
Parameters
controller_id: Specifies the controller ID. To view information about all storage controllers, specify the controller ID as all.
Examples
# View storage controller configuration.
[root@localhost storcli]# ./storcli64 /c0 show
CLI Version = 007.1207.0000.0000 Sep 25, 2019
Operating system = Linux 4.18.0-193.el8.x86_64
Controller = 0
Status = Success
Description = None
Product Name = HBA 9400-16i
Serial Number = SPB2726571
SAS Address = 500605b01193f2e0
PCI Address = 00:41:00:00
System Time = 03/21/2020 00:05:20
FW Package Build = 00.00.00.00
FW Version = 17.00.00.00
BIOS Version = 09.33.00.00_17.00.00.00
NVDATA Version = 17.01.00.25
PSOC Version = 06000001
Driver Name = mpt3sas
Driver Version = 32.100.00.00
Bus Number = 65
Device Number = 0
Function Number = 0
Vendor Id = 0x1000
Device Id = 0xAC
SubVendor Id = 0x1000
SubDevice Id = 0x3000
Board Name = HBA 9400-16i
Board Assembly = 03-50008-15011
Board Tracer Number = SPB2726571
Physical Drives = 7
PD LIST :
=======
----------------------------------------------------------------------------
EID:Slt DID State DG Size Intf Med SED PI SeSz Model Sp
----------------------------------------------------------------------------
7:0 0 JBOD - 10.913 TB SATA HDD N N 512B ST12000NM001G-2MV103 U
7:1 1 JBOD - 7.277 TB SATA HDD N N 512B HGST HUS728T8TALE6L4 U
7:2 2 JBOD - 7.277 TB SATA HDD N N 512B HGST HUS728T8TALE6L4 U
7:3 3 JBOD - 7.277 TB SATA HDD N N 512B HGST HUS728T8TALE6L4 U
7:4 4 JBOD - 12.732 TB SATA HDD N N 512B ST14000NM0018-2H4101 U
7:5 5 JBOD - 7.277 TB SATA HDD N N 512B HGST HUS728T8TALE6L4 U
7:12 6 JBOD - 1.746 TB SATA SSD N N 512B INTEL SSDSC2KB019T8 U
----------------------------------------------------------------------------
EID-Enclosure Device ID|Slt-Slot No.|DID-Device ID|DG-DriveGroup
UGood-Unconfigured Good|UBad-Unconfigured Bad|Intf-Interface
Med-Media Type|SED-Self Encryptive Drive|PI-Protection Info
SeSz-Sector Size|Sp-Spun|U-Up|D-Down|T-Transition
Requested Boot Drive = Not Set
Upgrading the firmware of a storage controller
Perform this task to upgrade the firmware of a storage controller.
Syntax
./storcli64 /ccontroller_id download file=x.bin
./storcli64 /ccontroller_id download bios file=x.rom
Parameters
controller_id: Specifies the controller ID.
x.bin: Specifies the name of the storage controller firmware.
x.rom: Specifies the BIOS driver of the storage controller.
Examples
# Upgrade a storage controller.
[root@localhost storcli]# ./storcli64 /c0 download file=9500_8i_ Mixed_Profile_H3C.bin
'Downloading image.Please wait...
CLI Version = 007.2507.0000.0000 Feb 07, 2023
Operating system = Linux 5.14.0-70.22.1.el9_0.x86_64
Controller = 0
Status = Success
Description = Firmware Flash Successful
# Upgrade the firmware version of a storage controller.
[root@localhost storcli]# ./storcli64 /c0 download bios
file=IT_HBA_X64_BIOS_PKG_E6.rom
'Downloading image.Please wait...
CLI Version = 007.2507.0000.0000 Feb 07, 2023
Operating system = Linux 5.14.0-70.22.1.el9_0.x86_64
Controller = 0
Status = Success
Description = Bios Flash Successful
Managing drive UID LEDs
Perform this task to turn on or turn off the UID LED of a drive.
Syntax
./storcli64 /ccontroller_id /eenclosure_id /sslot_id operation locate
Parameters
controller_id: Specifies the controller ID.
enclosure_id: Specifies the enclosure ID. To manage the UID LEDs for drives in all enclosures, specify the enclosure ID as all.
slot_id: Specifies the ID of the physical drive slot. To manage the UID LEDs for all drives in the specified enclosure, specify the slot ID as all.
operation: Specifies the action to take.
· start: Turn on the UID LED.
· stop: Turn off the UID LED.
Examples
# Turn on the UID LED.
[root@localhost storcli]# ./storcli64 /c0/e7/s0 start locate
CLI Version = 007.1207.0000.0000 Sep 25, 2019
Operating system = Linux 4.18.0-193.el8.x86_64
Controller = 0
Status = Success
Description = Start Drive Locate Succeeded
# Turn off the UID LED.
[root@localhost storcli]# ./storcli64 /c0/e7/s0 stop locate
CLI Version = 007.1207.0000.0000 Sep 25, 2019
Operating system = Linux 4.18.0-193.el8.x86_64
Controller = 0
Status = Success
Description = Stop Drive Locate Succeeded
Upgrading the drive firmware
Perform this task to upgrade the drive firmware.
Syntax
./storcli64 /ccontroller_id /eenclosure_id/sslot_id download src=FW_name
Parameters
controller_id: Specifies the controller ID.
enclosure_id: Specifies the enclosure ID.
slot_id: Specifies the ID of the physical drive slot.
FW_name: Specifies the firmware name.
Examples
# Upgrade the drive firmware.
[root@localhost storcli]# ./storcli64 /c0/e7/s0 download src=Evans_SATA_5xxe_STD_OEM_SDnD_SN04.lod
Starting microcode update.please wait...
CLI Version = 007.1207.0000.0000 Sep 25, 2019
Operating system = Linux 4.18.0-193.el8.x86_64
Controller = 0
Status = Success
Description = None
Troubleshooting
For detailed information about collecting storage controller fault information, diagnosing and locating faults, and troubleshooting servers, see H3C Servers Troubleshooting Guide.
Compatibility
For information about storage controller and server compatibility, access http://www.h3c.com/en/home/qr/default.htm?id=66.
Downloading and installing drivers
Access the H3C official website to download the storage controller drivers. For more information about installing drivers, see the release notes for the driver program.
