- Table of Contents
- Related Documents
-
| Title | Size | Download |
|---|---|---|
| 06-EVPN L3VPN over SRv6 configuration | 246.27 KB |
Configuring EVPN L3VPN over SRv6
Restrictions: Hardware compatibility with EVPN L3VPN over SRv6
EVPN L3VPN over SRv6 tasks at a glance
Applying a locator to a BGP VPN instance
Configuring SRv6-encapsulated EVPN route advertisement
Configuring PEs to exchange BGP EVPN routes
Configuring next hop-based dynamic End.DX4 or End.DX6 SID allocation for BGP routes
Configuring BGP EVPN route settings
Restrictions and guidelines for BGP EVPN route configuration
Configuring BGP route reflection
Configuring attributes of BGP EVPN routes
Configuring the route recursion mode
Specifying a source address for the outer IPv6 header of SRv6-encapsulated EVPN L3VPN packets
Display and maintenance commands for EVPN L3VPN over SRv6
Displaying and maintaining the running status of EVPN L3VPN over SRv6
EVPN L3VPN over SRv6 configuration examples
Example: Configuring IPv4 EVPN L3VPN over SRv6 in SRv6-BE mode
Configuring EVPN L3VPN over SRv6
About EVPN L3VPN over SRv6
EVPN L3VPN over SRv6 uses SRv6 tunnels to carry EVPN L3VPN services. This technology establishes SRv6 tunnels among geographically dispersed customer sites over the IPv6 backbone network and transparently forwards EVPN L3VPN customer traffic through the tunnels. For more information about EVPN L3VPN configuration, see EVPN Configuration Guide.
Basic principle
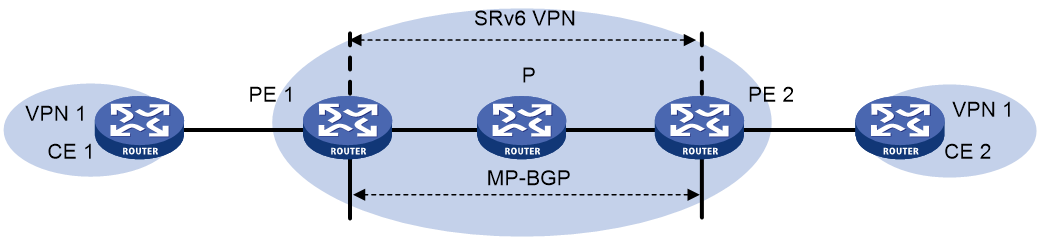
Figure 1 shows a typical EVPN L3VPN over SRv6 network.
· PE 1 and PE 2 use MP-BGP to advertise EVPN IP advertisement routes to each other over the IPv6 backbone network. The EVPN IP advertisement routes contain IPv4 or IPv6 VPN routing information and SID information.
· The PEs have a single-hop SRv6 tunnel between them and they use the SRv6 tunnel to forward EVPN L3VPN traffic across sites.
· The devices in the IPv6 backbone network forward the SRv6-encapsulated EVPN L3VPN traffic through the optimal path calculated by IGP.
EVPN L3VPN over SRv6 connects geographically dispersed sites that belong to the same VPN over the IPv6 backbone network.
Route advertisement
The route advertisement process of IPv4 EVPN L3VPN over SRv6 is similar to that of IPv6 EVPN L3VPN over SRv6. This section uses IPv4 EVPN L3VPN over SRv6 to illustrate the process.
As shown in Figure 1, local routes of CE 1 are advertised to CE 2 by using the following process:
1. CE 1 uses static routing, RIP, OSPF, IS-IS, EBGP, or IBGP to advertise routes of the local site to PE 1.
2. PE 1 stores the routes advertised by CE 1 to the routing table of VPN 1. Then, PE 1 converts the routes to BGP EVPN IP advertisement routes and advertises the IP advertisement routes to PE 2 by using MP-BGP. The IP advertisement routes carry RD, RT, and SID attributes (the SID attribute is used as the private network label).
¡ If next hop-based dynamic SID allocation is not used, all private network routes of the VPN instance are allocated the same End.DT4 or End.DT46 SID.
¡ If next hop-based dynamic SID allocation is used, private network routes with the same next hop are allocated the same End.DX4 SID in the VPN instance.
3. PE 2 adds the IP advertisement routes to the routing table of VPN 1, converts the IP advertisement routes to IPv4 routes, and advertises the IPv4 routes to CE 2.
4. By adding the received IPv4 routes to the routing table, CE 2 learns the private network routes of CE 1.
Packet forwarding
EVPN L3VPN over SRv6 supports the following route recursion modes:
· SRv6-BE mode.
· SRv6-TE mode.
· SRv6-TE and SRv6-BE hybrid mode.
The packet forwarding process differs by the route recursion mode in use.
SRv6-BE mode
This mode is also called SID-based forwarding mode. In this mode, a PE forwards an SRv6 packet by searching the IPv6 routing table based on the SRv6 SID encapsulated in the packet.
The packet forwarding process of IPv4 EVPN L3VPN over SRv6 is similar to that of IPv6 EVPN L3VPN over SRv6. This section uses IPv4 EVPN L3VPN over SRv6 to illustrate the process.
As shown in Figure 1, CE 2 forwards an IPv4 packet to CE 1 as follows:
1. CE 2 sends the IPv4 packet to PE 2.
2. PE 2 receives the packet on an interface associated with VPN 1. PE 2 searches for a route that matches the destination IPv4 address of the packet in the routing table of VPN 1. The corresponding End.DT4, End.DT46, or End.DX4 SID is found. Then, PE 2 encapsulates an outer IPv6 header for the packet. The End.DT4, End.DT46, or End.DX4 SID is encapsulated in the outer IPv6 header as the destination address.
3. PE 2 searches the IPv6 routing table based on the End.DT4, End.DT46, or End.DX4 SID for the optimal IGP route and forwards the packet to P through the route.
4. P searches the IPv6 routing table based on the End.DT4, End.DT46, or End.DX4 SID for the optimal IGP route and forwards the packet to PE 1 through the route.
5. When PE 1 receives the packet, it processes the packet as follows:
¡ If the packet header contains an End.DT4 or End.DT46 SID, PE 1 searches the local SID forwarding table for the SID and removes the outer IPv6 header. Then, PE 1 matches the packet to VPN 1 based on the SID, searches the routing table of VPN 1 for the optimal route and forwards the packet to CE 1.
¡ If the packet header contains an End.DX4 SID, PE 1 searches the local SID forwarding table for the SID and removes the outer IPv6 header. Then, PE 1 forwards the packet to CE 1 according to the next hop and output interface bound to the SID.
SRv6-TE mode
This mode is also called SRv6 TE policy-based forwarding mode. In this mode, when a PE forwards a customer packet, it first searches for a matching SRv6 TE policy based on the packet attributes. Then, the PE adds an SRH to the packet. The SRH includes the destination SRv6 SID and the SID list of the SRv6 TE policy. Finally, the PE forwards the encapsulated packet based on the SRv6 TE policy.
The following modes are available to steer traffic to an SRv6 TE policy:
· Color—The device searches for an SRv6 TE policy that has the same color and endpoint address as the color and nexthop address of a BGP EVPN route. If a matching SRv6 TE policy exists, the device recurses the BGP EVPN route to that SRv6 TE policy. When the device receives packets that match the BGP EVPN route, it forwards the packets through the SRv6 TE policy.
· Tunnel policy—The device searches the tunnel policies for a matching SRv6 TE policy based on the next hop of a matching route. Configure a preferred tunnel or load sharing tunnel policy that uses the SRv6 TE policy. In this way, the SRv6 TE policy will be used as the public tunnel to forward private network packets.
For more information about tunnel policies, see MPLS Configuration Guide. For more information about SRv6 TE policies, see "Configuring SRv6 TE policies."
SRv6-TE and SRv6-BE hybrid mode
In this mode, the PE preferentially uses the SRv6-TE mode to forward a packet. If no SRv6 TE policy is available for the packet, the PE forwards the packet in SRv6-BE mode.
EVPN L3VPN over SRv6 FRR
EVPN L3VPN over SRv6 Fast Reroute (FRR) is applicable to a dualhomed scenario, as shown in Figure 2. By using static BFD to detect the primary link, FRR enables a PE to use the backup link when the primary link fails. The PE then selects a new optimal route, and uses the new optimal route to forward traffic.
EVPN L3VPN over SRv6 uses EVPN route backup for an EVPN route.
Figure 2 Network diagram of EVPN route backup for an EVPN route
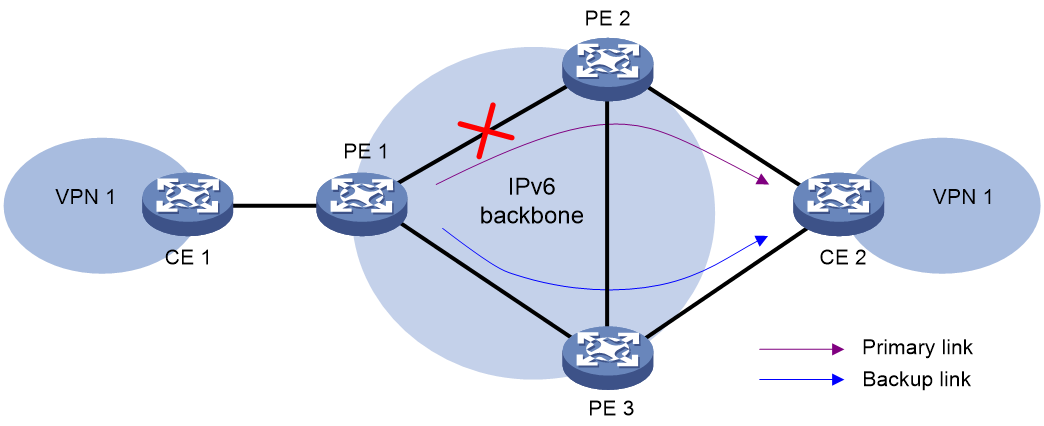
As shown in Figure 2, configure FRR on the ingress node PE 1, and specify the backup next hop for VPN 1 as PE 3. When PE 1 receives an EVPN route to CE 2 from both PE 2 and PE 3, it uses the route from PE 2 as the primary link, and the route from PE 3 as the backup link.
Configure static BFD for public tunnels on PE 1 to detect the connectivity of the public tunnel from PE 1 to PE 2. When the tunnel PE 1—PE 2 operates correctly, traffic from CE 1 to CE 2 goes through the path CE 1—PE 1—PE 2—CE 2. When the tunnel fails, the traffic goes through the path CE 1—PE 1—PE 3—CE 2.
In this scenario, PE 1 is responsible for primary link detection and traffic switchover.
For more information about static BFD, see BFD configuration in High Availability Configuration Guide.
Restrictions: Hardware compatibility with EVPN L3VPN over SRv6
|
Hardware |
EVPN L3VPN over SRv6 compatibility |
|
MSR810, MSR810-W, MSR810-W-DB, MSR810-LM, MSR810-W-LM, MSR810-10-PoE, MSR810-LM-HK, MSR810-W-LM-HK, MSR810-LM-CNDE-SJK, MSR810-CNDE-SJK |
Yes |
|
MSR810-LMS, MSR810-LUS |
No |
|
MSR810-LMS-EA, MSR810-LME |
Yes |
|
MSR1004S-5G |
Yes |
|
MSR2600-6-X1, MSR2600-10-X1, MSR2600-15-X1 |
Yes |
|
MSR 2630 |
No |
|
MSR3600-28, MSR3600-51 |
No |
|
MSR3600-28-SI, MSR3600-51-SI |
No |
|
MSR3600-28-X1, MSR3600-28-X1-DP, MSR3600-51-X1, MSR3600-51-X1-DP |
No |
|
MSR3610-I-DP, MSR3610-IE-DP, MSR3610-IE-ES, MSR3610-IE-EAD, MSR-EAD-AK770, MSR3610-I-IG, MSR3610-IE-IG |
Yes |
|
MSR3610-X1, MSR3610-X1-DP, MSR3610-X1-DC, MSR3610-X1-DP-DC, MSR3620-X1, MSR3640-X1 |
Yes |
|
MSR3610, MSR3620, MSR3620-DP, MSR3640, MSR3660 |
Yes |
|
MSR3610-G, MSR3620-G |
Yes |
|
MSR3640-X1-HI |
No |
|
Hardware |
EVPN L3VPN over SRv6 compatibility |
|
MSR810-W-WiNet, MSR810-LM-WiNet |
Yes |
|
MSR830-4LM-WiNet |
Yes |
|
MSR830-5BEI-WiNet, MSR830-6EI-WiNet, MSR830-10BEI-WiNet |
Yes |
|
MSR830-6BHI-WiNet, MSR830-10BHI-WiNet |
Yes |
|
MSR2600-6-WiNet, MSR2600-10-X1-WiNet |
Yes |
|
MSR2630-WiNet |
No |
|
MSR3600-28-WiNet |
No |
|
MSR3610-X1-WiNet |
Yes |
|
MSR3610-WiNet, MSR3620-10-WiNet, MSR3620-DP-WiNet, MSR3620-WiNet, MSR3660-WiNet |
Yes |
|
Hardware |
EVPN L3VPN over SRv6 compatibility |
|
MSR2630-XS |
Yes |
|
MSR3600-28-XS |
No |
|
MSR3610-XS |
Yes |
|
MSR3620-XS |
Yes |
|
MSR3610-I-XS |
Yes |
|
MSR3610-IE-XS |
Yes |
|
MSR3620-X1-XS |
Yes |
|
MSR3640-XS |
Yes |
|
MSR3660-XS |
Yes |
|
Hardware |
EVPN L3VPN over SRv6 compatibility |
|
MSR810-LM-GL |
Yes |
|
MSR810-W-LM-GL |
Yes |
|
MSR830-6EI-GL |
Yes |
|
MSR830-10EI-GL |
Yes |
|
MSR830-6HI-GL |
Yes |
|
MSR830-10HI-GL |
Yes |
|
MSR1004S-5G-GL |
Yes |
|
MSR2600-6-X1-GL |
Yes |
|
MSR3600-28-SI-GL |
No |
EVPN L3VPN over SRv6 tasks at a glance
To configure EVPN L3VPN over SRv6, perform the following tasks:
1. Configuring a VPN instance and associating interfaces connected to CEs with the VPN instance
Perform this task on PEs. For more information, see MPLS L3VPN in MPLS Configuration Guide.
2. Configuring route exchange between a PE and a CE
Configure an IPv4 routing protocol (static routing, RIP, OSPF, IS-IS, EBGP, or IBGP) or an IPv6 routing protocol (IPv6 static routing, RIPng, OSPFv3, IPv6 IS-IS, EBGP, or IBGP) to exchange routes between a PE and a CE
On the CE, configure an IPv4 or IPv6 routing protocol to advertise routes of the local site to the PE. On the PE, associate the routing protocol with the VPN instance. For more information about routing protocol configurations, see Layer 3—IP Routing Configuration Guide.
3. Configuring route exchange between PEs
Perform this task to manually configure an End.DT4, End.DT6, End.DT46, End.DX4, or End.DX6 SID.
b. Applying a locator to a BGP VPN instance
BGP can advertise SRv6 SIDs through BGP routes only after you apply a locator to BGP.
c. Configuring SRv6-encapsulated EVPN route advertisement
Perform this task to advertise VPN routes as EVPN routes to a peer or peer group in the EVPN L3VPN over SRv6 network.
d. Configuring PEs to exchange BGP EVPN routes
e. (Optional.) Configuring next hop-based dynamic End.DX4 or End.DX6 SID allocation for BGP routes
This feature enables a PE to dynamically allocate End.DX4 or End.DX6 SIDs to BGP private network routes based on the route next hops.
f. (Optional.) Configuring BGP EVPN route settings
4. Configuring the route recursion mode
5. Specifying a source address for the outer IPv6 header of SRv6-encapsulated EVPN L3VPN packets
This feature specifies the source address of the outer IPv6 header for SRv6 packets forwarded between two private network sites over the backbone network.
Configuring an SRv6 SID
1. Enter system view.
system-view
2. Enable SRv6 and enter SRv6 view.
segment-routing ipv6
3. Configure a locator and enter SRv6 locator view.
locator locator-name [ ipv6-prefix ipv6-address prefix-length [ args args-length | static static-length ] * ]
4. Configure an opcode. Perform one of the following tasks:
¡ Configure an End.DT4 SID.
opcode opcode end-dt4 vpn-instance vpn-instance-name evpn
The specified VPN instance must exist. An End.DT4 SID cannot be configured in different VPN instances.
¡ Configure an End.DT6 SID.
opcode opcode end-dt6 vpn-instance vpn-instance-name evpn
The specified VPN instance must exist. An End.DT6 SID cannot be configured in different VPN instances.
¡ Configure an End.DT46 SID.
opcode opcode end-dt46 vpn-instance vpn-instance-name evpn
The specified VPN instance must exist. An End.DT46 SID cannot be configured in different VPN instances.
¡ Configure an End.DX4 SID.
opcode opcode end-dx4 interface interface-type interface-number nexthop nexthop-ipv4-address vpn-instance vpn-instance-name evpn
The specified VPN instance must exist. An End.DX4 SID cannot be configured with different output interfaces or next hops.
¡ Configure an End.DX6 SID.
opcode opcode end-dx6 interface interface-type interface-number nexthop nexthop-ipv6-address vpn-instance vpn-instance-name evpn
The specified VPN instance must exist. An End.DX6 SID cannot be configured with different output interfaces or next hops.
Applying a locator to a BGP VPN instance
About this task
Use this feature in BGP-VPN IPv4 or IPv6 unicast address family view of a VPN instance to apply for SRv6 SIDs for the private network routes of the VPN instance.
Use this feature if the device will use End.DT4, End.DT6, End.DT46, End.DX4, or End.DX6 SIDs to deliver EVPN traffic across sites.
Restrictions and guidelines
The VPN instance of the specified locator must be the same as the VPN instance of the private network. To specify a VPN instance for a locator, use the opcode end-dt4, opcode end-dt6, opcode end-dt46, opcode end-dx4, or opcode end-dx6 command in SRv6 locator view.
Prerequisites
Before you perform this task, you must create the specified locator.
Procedure
1. Enter system view.
system-view
2. Enter BGP instance view.
bgp as-number [ instance instance-name ]
3. Enter BGP-VPN instance view.
ip vpn-instance vpn-instance-name
4. Enter BGP-VPN IPv4 unicast address family view or BGP-VPN IPv6 unicast address family view.
¡ Enter BGP-VPN IPv4 unicast address family view.
address-family ipv4 [ unicast ]
¡ Enter BGP-VPN IPv6 unicast address family view.
address-family ipv6 [ unicast ]
5. Apply a locator to the BGP VPN instance.
segment-routing ipv6 locator locator-name evpn [ auto-sid-disable ]
By default, no locator is applied to a BGP VPN instance.
Configuring SRv6-encapsulated EVPN route advertisement
About this task
Perform this task to ensure that a PE can advertise VPN routes as EVPN routes to a peer or peer group in an EVPN L3VPN over SRv6 network.
Restrictions and guidelines
Perform this task on the edge nodes of the EVPN L3VPN network and RRs.
Procedure
1. Enter system view.
system-view
2. Enter BGP instance view.
bgp as-number [ instance instance-name ]
3. Enter BGP EVPN address family view.
address-family l2vpn evpn
4. Enable SRv6 encapsulation for the EVPN IP prefix advertisement routes advertised to a peer or peer group.
peer { group-name | ipv6-address [ prefix-length ] } advertise encap-type srv6
By default, IP prefix advertisement routes use VXLAN encapsulation.
Configuring PEs to exchange BGP EVPN routes
Restrictions and guidelines
To ensure optimal route selection and SRv6 tunnel traffic forwarding, make sure a pair of PEs are not both IPv4 and IPv6 peers to each other.
Procedure
1. Enter system view.
system-view
2. Enter BGP instance view.
bgp as-number [ instance instance-name ]
3. Configure an IPv6 peer or peer group.
peer { group-name | ipv6-address [ prefix-length ] } as-number as-number
4. Specify the source interface of TCP connections to a peer or peer group.
peer { group-name | ipv6-address [ prefix-length ] } connect-interface interface-type interface-number
By default, BGP uses the IPv6 address of the output interface in the optimal route to the BGP peer or peer group as the source address of TCP connections to the peer or peer group.
5. Enter BGP EVPN address family view.
address-family l2vpn evpn
6. Enable BGP to exchange EVPN routes with an IPv6 peer or peer group.
peer { group-name | ipv6-address [ prefix-length ] } enable
By default, BGP cannot exchange EVPN routes with an IPv6 peer or peer group.
Configuring next hop-based dynamic End.DX4 or End.DX6 SID allocation for BGP routes
About this task
Perform this task to forward an SRv6 decapsulated VPN packet to the next hop without looking up the routing table of the VPN instance.
If you assign an End.DT4 SID, End.DT6 SID, or End.DT46 SID to a BGP VPN instance, all BGP private network routes of the instance are allocated that SID. When a PE removes the SRv6 encapsulation from a received packet, it looks up the routing table of the VPN instance based on the SID for an optimal route. Then, the PE forwards the packet to a CE. To forward the packet to the next hop without looking up the routing table of the VPN instance, perform this task.
This task dynamically allocates End.DX4 or End.DX6 SIDs to all next hops of the BGP private network routes in a VPN instance based on the next hop addresses. When forwarding a packet, the PE searches for the output interface and next hop based on the End.DX4 or End.DX6 SID of the packet. Then, the PE directly forwards the packet out of the output interface to the next hop.
Restrictions and guidelines
Before you perform this task in BGP-VPN IPv4 or IPv6 unicast address family view, execute the segment-routing ipv6 locator command in the same view to apply a locator to the view. This ensures successful dynamic End.DX4 or End.DX6 SID allocation.
This feature does not allocate End.DX4 or End.DX6 SIDs to direct routes.
Procedure
1. Enter system view.
system-view
2. Enter BGP instance view.
bgp as-number [ instance instance-name ]
3. Enter BGP-VPN instance view.
ip vpn-instance vpn-instance-name
4. Enter BGP-VPN IPv4 unicast address family view or BGP-VPN IPv6 unicast address family view.
¡ Enter BGP-VPN IPv4 unicast address family view.
address-family ipv4 [ unicast ]
¡ Enter BGP-VPN IPv6 unicast address family view.
address-family ipv6 [ unicast ]
5. Automatically allocate End.DX4 or End.DX6 SIDs to all next hops of BGP private network routes.
segment-routing ipv6 apply-sid all-nexthop evpn
By default, VPN instance-based SID allocation is used for private network routes.
Configuring BGP EVPN route settings
Restrictions and guidelines for BGP EVPN route configuration
For more information about the commands in this section, see BGP commands in Layer 3—IP Routing Command Reference.
Configuring BGP route reflection
1. Enter system view.
system-view
2. Enter BGP instance view.
bgp as-number [ instance instance-name ]
3. Enter BGP EVPN address family view.
address-family l2vpn evpn
4. Configure the device as an RR and specify a peer or peer group as its client.
peer { group-name | ipv6-address [ prefix-length ] } reflect-client
By default, no RR or client is configured.
5. (Optional.) Enable BGP EVPN route reflection between clients.
reflect between-clients
By default, BGP EVPN route reflection between clients is enabled.
6. (Optional.) Configure the cluster ID of the RR.
reflector cluster-id { cluster-id | ip-address }
By default, an RR uses its own router ID as the cluster ID.
7. (Optional.) Create a reflection policy for the RR to filter reflected BGP EVPN routes.
rr-filter ext-comm-list-number
By default, an RR does not filter reflected BGP EVPN routes.
Configuring attributes of BGP EVPN routes
1. Enter system view.
system-view
2. Enter BGP instance view.
bgp as-number [ instance instance-name ]
3. Enter BGP EVPN address family view.
address-family l2vpn evpn
4. Set the local router as the next hop for routes advertised to a peer or peer group.
peer { group-name | ipv6-address [ prefix-length ] } next-hop-local
By default, BGP sets the local router as the next hop for all routes advertised to a peer or peer group.
5. Permit the local AS number to appear in routes from a peer or peer group and set the number of appearances.
peer { group-name | ipv6-address [ prefix-length ] } allow-as-loop [ number ]
By default, the local AS number is not allowed in routes from peers.
6. Advertise the COMMUNITY attribute to a peer or peer group.
peer { group-name | ipv6-address [ prefix-length ] } advertise-community
By default, the device does not advertise the COMMUNITY attribute to peers or peer groups.
Filtering BGP EVPN routes
1. Enter system view.
system-view
2. Enter BGP instance view.
bgp as-number [ instance instance-name ]
3. Enter BGP EVPN address family view.
address-family l2vpn evpn
4. Filter routes advertised to a peer or peer group.
filter-policy mac-acl-number export
By default, routes advertised to peers or peer groups are not filtered.
5. Filter routes received from a peer or peer group.
filter-policy mac-acl-number import
By default, routes received from peers or peer groups are not filtered.
6. Apply a routing policy to routes received from or advertised to a peer or peer group.
peer { group-name | ipv6-address [ prefix-length ] } route-policy route-policy-name { export | import }
By default, no routing policies are applied to routes received from or advertised to peers or peer groups.
7. Enable route target filtering for BGP EVPN routes.
policy vpn-target
By default, route target filtering is enabled for BGP EVPN routes.
Configuring the route recursion mode
About this task
After a PE receives a customer packet destined for an SRv6 SID, it forwards the packet according to the route recursion mode.
· SRv6-BE mode—This mode is also called SID-based forwarding mode. In this mode, the PE first encapsulates the End.DT4, End.DT6, or End.DT46 SID into the packet. Then, the PE searches the IPv6 routing table based on the SID encapsulated in the packet to forward the packet.
· SRv6-TE mode—This mode is also called SRv6 TE policy-based forwarding mode. In this mode, the PE first searches for a matching SRv6 TE policy based on the packet attributes. Then, the PE adds an SRH to the packet. The SRH includes the End.DT4, End.DT6, or End.DT46 SID and the SID list of the SRv6 TE policy. Finally, the PE forwards the encapsulated packet through the SRv6 TE policy. For more information, see "Configuring SRv6 TE policies."
· SRv6-TE and SRv6-BE hybrid mode—In this mode, the PE preferentially uses the SRv6-TE mode to forward the packet. If no SRv6 TE policy is available for the packet, the PE forwards the packet in SRv6-BE mode.
Procedure
1. Enter system view.
system-view
2. Enter BGP instance view.
bgp as-number [ instance instance-name ]
3. Enter BGP-VPN instance view.
ip vpn-instance vpn-instance-name
4. Enter BGP-VPN IPv4 unicast address family view or BGP-VPN IPv6 unicast address family view.
¡ Enter BGP-VPN IPv4 unicast address family view.
address-family ipv4 [ unicast ]
¡ Enter BGP-VPN IPv6 unicast address family view.
address-family ipv6 [ unicast ]
5. Configure the route recursion mode.
segment-routing ipv6 { best-effort | traffic-engineer | traffic-engineer best-effort } evpn
By default, a PE searches the IPv6 routing table based on the next hop of a matching route to forward traffic.
Specifying a source address for the outer IPv6 header of SRv6-encapsulated EVPN L3VPN packets
Restrictions and guidelines
To ensure correct VPN traffic forwarding in an EVPN L3VPN over SRv6 network, you must specify a source address for the outer IPv6 header of SRv6-encapsulated EVPN L3VPN packets.
You cannot specify a loopback address, link-local address, multicast address, or unspecified address as the source IPv6 address. You must specify an IPv6 address of the local device as the source IPv6 address, and make sure the IPv6 address has been advertised by a routing protocol. As a best practice, specify a loopback interface address of the local device as the source IPv6 address.
Procedure
1. Enter system view.
system-view
2. Enter SRv6 view.
segment-routing ipv6
3. Specify a source address for the outer IPv6 header of SRv6-encapsulated EVPN L3VPN packets.
encapsulation source-address ipv6-address [ ip-ttl ttl-value ]
By default, no source address is specified for the outer IPv6 header of SRv6-encapsulated EVPN L3VPN packets.
Display and maintenance commands for EVPN L3VPN over SRv6
Resetting BGP sessions
For BGP setting changes to take effect, you must reset or soft-reset BGP sessions. Soft-resetting BGP sessions updates BGP routing information without tearing down the BGP sessions. Resetting BGP sessions updates BGP routing information by tearing down and re-establishing the BGP sessions. Soft-reset requires that both the local router and the peer support ROUTE-REFRESH messages.
Execute the commands in this section in user view. For more information about the commands, see BGP in Layer 3—IP Routing Command Reference.
|
Task |
Command |
|
Soft-reset BGP sessions of the BGP VPNv4 address family. |
refresh bgp [ instance instance-name ] ipv6-address [ prefix-length ] { export | import } vpnv4 |
|
Reset BGP sessions of the BGP VPNv4 address family. |
reset bgp [ instance instance-name ] ipv6-address [ prefix-length ] vpnv4 |
Displaying and maintaining the running status of EVPN L3VPN over SRv6
Execute display commands in any view.
|
Task |
Command |
|
Display BGP EVPN route information. |
display bgp [ instance instance-name ] l2vpn evpn [ peer ipv4-address { advertised-routes | received-routes } [ statistics ] | route-distinguisher route-distinguisher [ route-type ip-prefix ] [ evpn-route route-length [ advertise-info ] ] | route-type { auto-discovery | es | imet | ip-prefix | mac-ip } | statistics ] |
EVPN L3VPN over SRv6 configuration examples
Example: Configuring IPv4 EVPN L3VPN over SRv6 in SRv6-BE mode
Network configuration
As shown in Figure 3, the backbone network is an IPv6 network, and VPN 1 is an IPv4 network. Deploy EVPN L3VPN over SRv6 in SRv6-BE mode between PE 1 and PE 2 and use an SRv6 tunnel to transmit EVPN traffic between the PEs.
· Configure EBGP to exchange VPN routing information between the CEs and PEs.
· Configure IPv6 IS-IS on the PEs in the same AS to realize IPv6 network connectivity.
· Configure MP-IBGP to exchange EVPN routing information between the PEs.
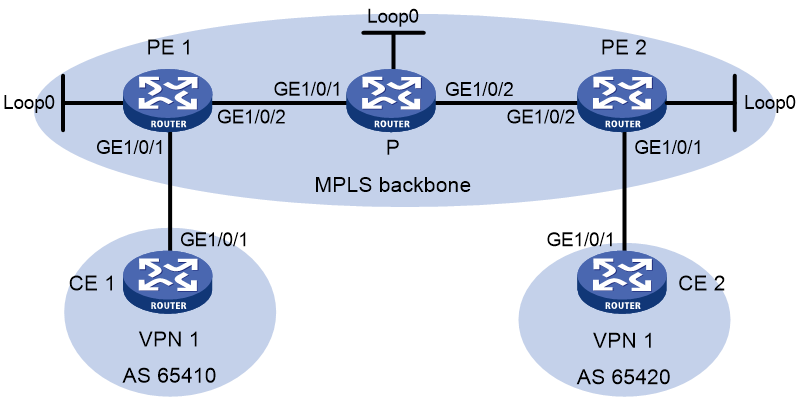
Table 1 Interface and IP address assignment
|
Device |
Interface |
IP address |
Device |
Interface |
IP address |
|
CE 1 |
GE1/0/1 |
10.1.1.2/24 |
PE 2 |
Loop0 |
3::3/128 |
|
PE 1 |
Loop0 |
1::1/128 |
|
GE1/0/1 |
10.2.1.1/24 |
|
|
GE1/0/1 |
10.1.1.1/24 |
|
GE1/0/2 |
2002::1/96 |
|
|
GE1/0/2 |
2001::1/96 |
CE 2 |
GE1/0/1 |
10.2.1.2/24 |
|
P |
Loop0 |
2::2/128 |
|
|
|
|
|
GE1/0/1 |
2001::2/96 |
|
|
|
|
|
GE1/0/2 |
2002::2/96 |
|
|
|
Procedure
1. Configure IPv6 IS-IS on the PEs and device P for network connectivity between the devices:
# Configure PE 1.
<PE1> system-view
[PE1] isis 1
[PE1-isis-1] is-level level-1
[PE1-isis-1] cost-style wide
[PE1-isis-1] network-entity 10.1111.1111.1111.00
[PE1-isis-1] address-family ipv6 unicast
[PE1-isis-1-ipv6] quit
[PE1-isis-1] quit
[PE1] interface loopback 0
[PE1-LoopBack0] ipv6 address 1::1 128
[PE1-LoopBack0] isis ipv6 enable 1
[PE1-LoopBack0] quit
[PE1] interface gigabitethernet 1/0/2
[PE1-GigabitEthernet1/0/2] ipv6 address 2001::1 96
[PE1-GigabitEthernet1/0/2] isis ipv6 enable
[PE1-GigabitEthernet1/0/2] quit
# Configure P.
<P> system-view
[P] isis
[P-isis-1] is-level level-1
[P-isis-1] cost-style wide
[P-isis-1] network-entity 10.2222.2222.2222.00
[P-isis-1] address-family ipv6 unicast
[P-isis-1-ipv6] quit
[P-isis-1] quit
[P] interface loopback 0
[P-LoopBack0] ipv6 address 2::2 128
[P-LoopBack0] isis ipv6 enable
[P-LoopBack0] quit
[P] interface gigabitethernet 1/0/1
[P-GigabitEthernet1/0/1] ipv6 address 2001::2 96
[P-GigabitEthernet1/0/1] isis ipv6 enable
[P-GigabitEthernet1/0/1] quit
[P] interface gigabitethernet 1/0/2
[P-GigabitEthernet1/0/2] ipv6 address 2002::2 96
[P-GigabitEthernet1/0/2] isis ipv6 enable
[P-GigabitEthernet1/0/2] quit
# Configure PE 2.
<PE2> system-view
[PE2] isis
[PE2-isis-1] is-level level-1
[PE2-isis-1] cost-style wide
[PE2-isis-1] network-entity 10.3333.3333.3333.00
[PE2-isis-1] address-family ipv6 unicast
[PE2-isis-1-ipv6] quit
[PE2-isis-1] quit
[PE2] interface loopback 0
[PE2-LoopBack0] ipv6 address 3::3 128
[PE2-LoopBack0] isis ipv6 enable
[PE2-LoopBack0] quit
[PE2] interface gigabitethernet 1/0/2
[PE2-GigabitEthernet1/0/2] ipv6 address 2002::1 96
[PE2-GigabitEthernet1/0/2] isis ipv6 enable
[PE2-GigabitEthernet1/0/2] quit
# Verify that PE 1, P, and PE 2 have established IPv6 IS-IS neighbor relationships and the neighbor state is up.
[PE1] display isis peer
[P] display isis peer
[PE2] display isis peer
# Verify that PE 1 and PE 2 each learn a route destined for the loopback interface of each other.
[PE1] display isis route ipv6
[PE2] display isis route ipv6
2. Configure VPN instance settings on PE 1 and PE 2 and verify that each CE can access its local PE:
# Configure PE 1.
[PE1] ip vpn-instance vpn1
[PE1-vpn-instance-vpn1] route-distinguisher 100:1
[PE1-vpn-instance-vpn1] vpn-target 111:1
[PE1-vpn-instance-vpn1] quit
[PE1] interface gigabitethernet 1/0/1
[PE1-GigabitEthernet1/0/1] ip binding vpn-instance vpn1
[PE1-GigabitEthernet1/0/1] ip address 10.1.1.1 24
[PE1-GigabitEthernet1/0/1] quit
# Configure PE 2.
[PE2] ip vpn-instance vpn1
[PE2-vpn-instance-vpn1] route-distinguisher 100:1
[PE2-vpn-instance-vpn1] vpn-target 111:1
[PE2-vpn-instance-vpn1] quit
[PE2] interface gigabitethernet 1/0/1
[PE2-GigabitEthernet1/0/1] ip binding vpn-instance vpn1
[PE2-GigabitEthernet1/0/1] ip address 10.2.1.1 24
[PE2-GigabitEthernet1/0/1] quit
# Configure IP addresses for the interfaces on the CEs, as shown in Figure 3. (Details not shown.)
# Display VPN instance settings on each PE. This step uses PE 1 as an example.
[PE1] display ip vpn-instance
Total VPN-Instances configured : 1
Total IPv4 VPN-Instances configured : 1
Total IPv6 VPN-Instances configured : 1
VPN-Instance Name RD Address family Create time
vpn1 100:1 IPv4/IPv6 2019/08/12 13:59:39
# Verify that each PE can ping its local CE. This step uses PE 1 and CE 1 as an example.
[PE1] ping -vpn-instance vpn1 10.1.1.2
Ping 10.1.1.2 (10.1.1.2): 56 data bytes, press CTRL+C to break
56 bytes from 10.1.1.2: icmp_seq=0 ttl=255 time=2.000 ms
56 bytes from 10.1.1.2: icmp_seq=1 ttl=255 time=0.000 ms
56 bytes from 10.1.1.2: icmp_seq=2 ttl=255 time=1.000 ms
56 bytes from 10.1.1.2: icmp_seq=3 ttl=255 time=0.000 ms
56 bytes from 10.1.1.2: icmp_seq=4 ttl=255 time=0.000 ms
--- Ping statistics for 10.1.1.2 in VPN instance vpn1 ---
5 packet(s) transmitted, 5 packet(s) received, 0.0% packet loss
round-trip min/avg/max/std-dev = 0.000/0.600/2.000/0.800 ms
3. Set up an EBGP peer relationship between each PE and its local CE and distribute VPN routes to EBGP:
# Configure CE 1.
<CE1> system-view
[CE1] bgp 65410
[CE1-bgp-default] peer 10.1.1.1 as-number 100
[CE1-bgp-default] address-family ipv4 unicast
[CE1-bgp-default-ipv4] peer 10.1.1.1 enable
[CE1-bgp-default-ipv4] import-route direct
[CE1-bgp-default-ipv4] quit
[CE1-bgp-default] quit
# Configure CE 2 in the same way as CE 1 is configured. (Details not shown.)
# Configure PE 1.
[PE1] bgp 100
[PE1-bgp-default] router-id 1.1.1.1
[PE1-bgp-default] ip vpn-instance vpn1
[PE1-bgp-default-vpn1] peer 10.1.1.2 as-number 65410
[PE1-bgp-default-vpn1] address-family ipv4 unicast
[PE1-bgp-default-ipv4-vpn1] peer 10.1.1.2 enable
[PE1-bgp-default-ipv4-vpn1] quit
[PE1-bgp-default-vpn1] quit
# Configure PE 2 in the same way PE 1 is configured. (Details not shown.)
# Verify that the PEs have established BGP peer relationships with their local CEs and the peers are in established state.
[PE1] display bgp peer ipv4 vpn-instance
[PE2] display bgp peer ipv4 vpn-instance
4. Set up an MP-IBGP peer relationship between PE 1 and PE 2:
# Configure PE 1.
[PE1] bgp 100
[PE1-bgp-default] peer 3::3 as-number 100
[PE1-bgp-default] peer 3::3 connect-interface loopback 0
[PE1-bgp-default] address-family l2vpn evpn
[PE1-bgp-default-evpn] peer 3::3 enable
[PE1-bgp-default-evpn] quit
[PE1-bgp-default] quit
# Configure PE 2.
[PE2] bgp 100
[PE2-bgp-default] peer 1::1 as-number 100
[PE2-bgp-default] peer 1::1 connect-interface loopback 0
[PE2-bgp-default] address-family l2vpn evpn
[PE2-bgp-default-evpn] peer 1::1 enable
[PE2-bgp-default-evpn] quit
[PE2-bgp-default] quit
# Verify that the PEs have established a BGP peer relationship and the peers are in established state.
[PE1] display bgp peer l2vpn evpn
[PE2] display bgp peer l2vpn evpn
5. Specify a source address for the outer IPv6 header of SRv6-encapsulated IPv4 EVPN L3VPN packets on PE 1 and PE 2:
# Configure PE 1.
[PE1] segment-routing ipv6
[PE1-segment-routing-ipv6] encapsulation source-address 1::1
# Configure PE 2.
[PE2] segment-routing ipv6
[PE2-segment-routing-ipv6] encapsulation source-address 3::3
6. Configure the destination address (End.DT4 SID) of the outer IPv6 header for SRv6-encapsulated IPv4 EVPN L3VPN packets:
# Configure PE 1.
[PE1-segment-routing-ipv6] locator aaa ipv6-prefix 1:2::1:0 96 static 8
[PE1-segment-routing-ipv6-locator-aaa] quit
[PE1-segment-routing-ipv6] quit
[PE1] isis 1
[PE1-isis-1] address-family ipv6 unicast
[PE1-isis-1-ipv6] segment-routing ipv6 locator aaa
[PE1-isis-1-ipv6] quit
[PE1-isis-1] quit
# Configure PE 2.
[PE2-segment-routing-ipv6] locator bbb ipv6-prefix 6:5::1:0 96 static 8
[PE2-segment-routing-ipv6-locator-bbb] quit
[PE2-segment-routing-ipv6] quit
[PE2] isis 1
[PE2-isis-1] address-family ipv6 unicast
[PE2-isis-1-ipv6] segment-routing ipv6 locator bbb
[PE2-isis-1-ipv6] quit
[PE2-isis-1] quit
# Verify that the PEs have distributed the End.DT4 SIDs to the routing table and generated SRv6 routes. This step uses PE 1 as an example.
[PE1] display ipv6 routing-table protocol srv6
Summary count : 1
SRv6 Routing table status : <Active>
Summary count : 1
Destination: 1:2::101/128 Protocol : SRv6
NextHop : ::1 Preference: 4
Interface : InLoop0 Cost : 0
SRv6 Routing table status : <Inactive>
Summary count : 0
7. Add End.DT4 SIDs to private network routes on PE 1 and PE 2:
# Configure PE 1.
[PE1] bgp 100
[PE1-bgp-default] ip vpn-instance vpn1
[PE1-bgp-default-vpn1] address-family ipv4 unicast
[PE1-bgp-default-ipv4-vpn1] segment-routing ipv6 locator aaa evpn
[PE1-bgp-default-ipv4-vpn1] quit
[PE1-bgp-default-vpn1] quit
[PE1-bgp-default] quit
# Configure PE 2.
[PE2] bgp 100
[PE2-bgp-default] ip vpn-instance vpn1
[PE2-bgp-default-vpn1] address-family ipv4 unicast
[PE2-bgp-default-ipv4-vpn1] segment-routing ipv6 locator bbb evpn
[PE2-bgp-default-ipv4-vpn1] quit
[PE2-bgp-default-vpn1] quit
[PE2-bgp-default] quit
8. Enable IPv6 peers on the PEs to exchange End.DT4 SIDs and enable SRv6-BE mode:
# Configure PE 1.
[PE1] bgp 100
[PE1-bgp-default] address-family l2vpn evpn
[PE1-bgp-default-evpn] peer 3::3 advertise encap-type srv6
[PE1-bgp-default-evpn] quit
[PE1-bgp-default] ip vpn-instance vpn1
[PE1-bgp-default-vpn1] address-family ipv4 unicast
[PE1-bgp-default-ipv4-vpn1] segment-routing ipv6 best-effort evpn
[PE1-bgp-default-ipv4-vpn1] quit
[PE1-bgp-default-vpn1] quit
[PE1-bgp-default] quit
# Configure PE 2.
[PE2] bgp 100
[PE2-bgp-default] address-family l2vpn evpn
[PE2-bgp-default-evpn] peer 1::1 advertise encap-type srv6
[PE2-bgp-default-evpn] quit
[PE2-bgp-default] ip vpn-instance vpn1
[PE2-bgp-default-vpn1] address-family ipv4 unicast
[PE2-bgp-default-ipv4-vpn1] segment-routing ipv6 best-effort evpn
[PE2-bgp-default-ipv4-vpn1] quit
[PE2-bgp-default-vpn1] quit
[PE2-bgp-default] quit
# Display BGP EVPN routing information on each PE and verify that the routes advertised by the PEs have the SID attribute. This step uses PE 1 as an example.
[PE1] display bgp l2vpn evpn [5][0][24][10.2.1.0]/80
BGP local router ID: 1.1.1.1
Local AS number: 100
Route distinguisher: 100:1(vpn1)
Total number of routes: 1
Paths: 1 available, 1 best
BGP routing table information of [5][0][24][10.2.1.0]/80:
From : 3::3 (3.3.3.3)
Rely nexthop : FE80::2A96:34FF:FE9D:216
Original nexthop: 3::3
Out interface : GigabitEthernet1/0/2
Route age : 00h14m23s
OutLabel : NULL
Ext-Community : <RT: 111:1>
RxPathID : 0x0
TxPathID : 0x0
PrefixSID : End.DT4 SID <6:5::101>
AS-path : 65420
Origin : incomplete
Attribute value : MED 0, localpref 100, pref-val 0
State : valid, internal, best
IP precedence : N/A
QoS local ID : N/A
Traffic index : N/A
EVPN route type : IP prefix advertisement route
ESI : 0000.0000.0000.0000.0000
Ethernet tag ID : 0
IP prefix : 10.2.1.0/24
Gateway address : 0.0.0.0
MPLS label : 16777215
Tunnel policy : NULL
Rely tunnel IDs : N/A
Verifying the configuration
# Display IPv4 routing table information on the PEs and verify that each PE has a route destined for the remote CE and the next hop of the route is the End.DT4 SID of the route. This step uses PE 1 as an example.
[PE1] display ip routing-table vpn-instance vpn1
Destinations : 11 Routes : 11
Destination/Mask Proto Pre Cost NextHop Interface
0.0.0.0/32 Direct 0 0 127.0.0.1 InLoop0
10.1.1.0/24 Direct 0 0 10.1.1.1 GE1/0/1
10.1.1.0/32 Direct 0 0 10.1.1.1 GE1/0/1
10.1.1.1/32 Direct 0 0 127.0.0.1 InLoop0
10.1.1.255/32 Direct 0 0 10.1.1.1 GE1/0/1
10.2.1.0/24 BGP 255 0 6:5::101 GE1/0/2
127.0.0.0/8 Direct 0 0 127.0.0.1 InLoop0
127.0.0.0/32 Direct 0 0 127.0.0.1 InLoop0
127.0.0.1/32 Direct 0 0 127.0.0.1 InLoop0
127.255.255.255/32 Direct 0 0 127.0.0.1 InLoop0
255.255.255.255/32 Direct 0 0 127.0.0.1 InLoop0
# Verify that CE 1 and CE 2 can ping each other. (Details not shown.)
