- Table of Contents
-
- 12-Security Configuration Guide
- 00-Preface
- 01-Security zone configuration
- 02-AAA configuration
- 03-802.1X configuration
- 04-MAC authentication configuration
- 05-Portal configuration
- 06-Port security configuration
- 07-User profile configuration
- 08-Password control configuration
- 09-Keychain configuration
- 10-Public key management
- 11-PKI configuration
- 12-IPsec configuration
- 13-Group domain VPN configuration
- 14-SSH configuration
- 15-SSL configuration
- 16-SSL VPN configuration
- 17-ASPF configuration
- 18-APR configuration
- 19-mGRE configuration
- 20-Session management
- 21-Connection limit configuration
- 22-Object group configuration
- 23-Object policy configuration
- 24-Security policy configuration
- 25-Attack detection and prevention configuration
- 26-IP source guard configuration
- 27-ARP attack protection configuration
- 28-ND attack defense configuration
- 29-uRPF configuration
- 30-Crypto engine configuration
- 31-FIPS configuration
- 32-Application account auditing configuration
- Related Documents
-
| Title | Size | Download |
|---|---|---|
| 24-Security policy configuration | 238.63 KB |
Contents
Restrictions: Hardware compatibility with security policy
Restrictions and guidelines: Security policy configuration
Configuration procedure diagram
Prerequisites for security policies
Security policy tasks at a glance
Switching object policies to security policies
About switching object policies to security policies
Restrictions and guidelines for switching object policies to security policies
Prerequisites for switching object policies to security policies
Manually switching object policies to security policies
Enabling the security policy feature
Configuring IPv4 security policy rules
Creating a security policy rule
Configuring filtering criteria for a security policy rule
Specifying the action for a security policy rule
Specifying a time range for a security policy rule
Applying a DPI application profile to a security policy rule
Setting the session aging time for a security policy rule
Associating a security policy rule with a track entry
Enabling logging for matched packets
Enabling statistics collection for matched packets
Configuring IPv6 security policy rules
Creating a security policy rule
Configuring filtering criteria for a security policy rule
Specifying the action for a security policy rule
Specifying a time range for a security policy rule
Applying a DPI application profile to a security policy rule
Setting the session aging time for a security policy rule
Associating a security policy rule with a track entry
Enabling logging for matched packets
Enabling statistics collection for matched packets
Activating rule matching acceleration
Disabling a security policy rule
Renaming a security policy rule
Configuring security policy rule groups
Creating a security policy rule group
Specifying a security policy rule group for a security policy rule
Moving a security policy rule group
Renaming a security policy rule group
Display and maintenance commands for object policies
Configuring security policies
About security policies
A security policy defines a set of rules for forwarding control and Deep Packet Inspection (DPI). It matches packets against the rules and takes the action stated in the rules on the matched packets.
Benefits
Security policies can provide the same functions as packet filtering and object policies, and support precise network management based on application, protocol, and user. By working with DPI, it can also provide security protection services such as antivirus and intrusion protection.
For more information about packet filtering, see ACL and QoS Configuration Guide. For more information about object policies, see "Configuring object policies."
Security policy rules
A security policy contains one or multiple rules. Each security policy rule is a permit or deny, or DPI statement for identifying traffic based on criteria.
Rule numbering
Each rule is uniquely identified by a name and an ID. When you create a rule, the rule name must be manually configured, and the rule ID can be manually configured or automatically assigned by the system.
Rule match criteria
The rule match criteria include the following types: source security zone, destination security zone, source IP address and source MAC address, destination IP address, application and application group, VPN instance, and service.
You can specify multiple criteria for each type, except VPN instance. For example, you can configure multiple source security zones for a rule.
Rule and session management
When a security policy is configured, the device generates session entries for permitted packets to record packet information.
You can set session aging times for protocol states, application layer protocols, or rules. The aging time configured for a rule takes precedence over the aging time configured for a protocol state or an application layer protocol. For more information about session management, see "Managing sessions."
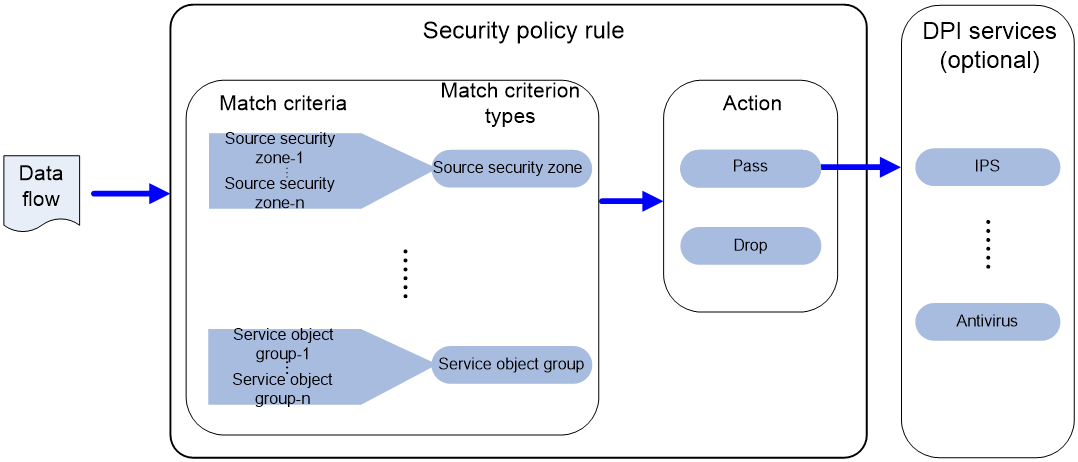
Security policy mechanism
As shown in Figure 1, a security policy operates as follows:
1. After receiving a packet, the device matches the packet against the configured security policy rules.
A security policy rule includes various match criterion types. A packet is considered matched if it matches all the criterion types in the rule. Each criterion type includes one or more criteria, and a packet matches a criterion type if it matches any criterion of the type. Source MAC address criteria and source IP address criteria belong to the same criterion type.
¡ If no match is found, the device discards the packet.
¡ If a match is found and the rule action is drop, the device discards the packet.
¡ If a match is found and the rule action is pass, the device goes to the next step.
2. If a DPI application profile is configured for the matched rule, the device uses the specified profile to perform DPI on the packet. If no DPI application profile is specified, the device allows the packet to pass.
Figure 1 Security policy mechanism
Rule matching acceleration
This feature accelerates security policy rule matching to enhance connection establishment and packet forwarding performance, especially for a device using multiple rules to match packets from multiple users.
Security policy rule grouping
Security policy rule grouping allows users to enable, disable, delete, and move security policy rules in batches. A security policy rule in a security policy rule group takes effect only when both the rule and the group are enabled.
Restrictions: Hardware compatibility with security policy
|
Hardware |
Security policy compatibility |
|
MSR810, MSR810-W, MSR810-W-DB, MSR810-LM, MSR810-W-LM, MSR810-10-PoE, MSR810-LM-HK, MSR810-W-LM-HK, MSR810-LM-CNDE-SJK, MSR810-CNDE-SJK |
Yes |
|
MSR810-LMS, MSR810-LUS |
No |
|
MSR810-LMS-EA, MSR810-LME |
Yes |
|
MSR1004S-5G |
Yes |
|
MSR2600-6-X1, MSR2600-10-X1, MSR2600-15-X1 |
Yes |
|
MSR 2630 |
Yes |
|
MSR3600-28, MSR3600-51 |
Yes |
|
MSR3600-28-SI, MSR3600-51-SI |
No |
|
MSR3600-28-X1, MSR3600-28-X1-DP, MSR3600-51-X1, MSR3600-51-X1-DP |
Yes |
|
MSR3610-I-DP, MSR3610-IE-DP, MSR3610-IE-ES, MSR3610-IE-EAD, MSR-EAD-AK770, MSR3610-I-IG, MSR3610-IE-IG |
Yes |
|
MSR3610-X1, MSR3610-X1-DP, MSR3610-X1-DC, MSR3610-X1-DP-DC, MSR3620-X1, MSR3640-X1 |
Yes |
|
MSR3610, MSR3620, MSR3620-DP, MSR3640, MSR3660 |
Yes |
|
MSR3610-G, MSR3620-G |
Yes |
|
MSR3640-X1-HI |
Yes |
|
Hardware |
Security policy compatibility |
|
MSR810-W-WiNet, MSR810-LM-WiNet |
Yes |
|
MSR830-4LM-WiNet |
Yes |
|
MSR830-5BEI-WiNet, MSR830-6EI-WiNet, MSR830-10BEI-WiNet |
Yes |
|
MSR830-6BHI-WiNet, MSR830-10BHI-WiNet |
Yes |
|
MSR2600-6-WiNet, MSR2600-10-X1-WiNet |
Yes |
|
MSR2630-WiNet |
Yes |
|
MSR3600-28-WiNet |
Yes |
|
MSR3610-X1-WiNet |
Yes |
|
MSR3610-WiNet, MSR3620-10-WiNet, MSR3620-DP-WiNet, MSR3620-WiNet, MSR3660-WiNet |
Yes |
|
Hardware |
Security policy compatibility |
|
MSR2630-XS |
Yes |
|
MSR3600-28-XS |
Yes |
|
MSR3610-XS |
Yes |
|
MSR3620-XS |
Yes |
|
MSR3610-I-XS |
Yes |
|
MSR3610-IE-XS |
Yes |
|
MSR3620-X1-XS |
Yes |
|
MSR3640-XS |
Yes |
|
MSR3660-XS |
Yes |
|
Hardware |
Security policy compatibility |
|
MSR810-LM-GL |
Yes |
|
MSR810-W-LM-GL |
Yes |
|
MSR830-6EI-GL |
Yes |
|
MSR830-10EI-GL |
Yes |
|
MSR830-6HI-GL |
Yes |
|
MSR830-10HI-GL |
Yes |
|
MSR1004S-5G-GL |
Yes |
|
MSR2600-6-X1-GL |
Yes |
|
MSR3600-28-SI-GL |
No |
vSystem support for features
Non-default vSystems do not support the following features:
· Apply a DPI application profile to a security policy rule.
· Associate a security policy rule with a track entry.
· Rename a security policy rule.
For information about the support of non-default vSystems for the commands, see security policy command reference. For information about vSystem, see Virtual Technologies Configuration Guide.
Restrictions and guidelines: Security policy configuration
When you configure security policies, follow these restrictions and guidelines:
· If the security policy feature is enabled, object policy settings lose effect the first time you enter security policy view. Make sure object policy settings have been switched to security policy settings before you enter security policy view.
· Packet filtering, if configured, is performed only on packets that do not match any security policy rule. As a best practice, make sure security policies have stricter filtering criteria than packet filtering, so the unmatched packets can still be filtered by packet filtering.
· Follow the depth-first order during rule creation to create rules with stricter match criteria first because the system matches packets against rules in the order the rules were created.
· Security policy rules specified with an IP address object group that uses a user or user group cannot match packets. To filter packets by user or user group, configure security policy rules specified with user or user group criteria.
Configuration procedure diagram
Figure 2 shows how to configure a security policy.
Figure 2 Security policy configuration procedure

Prerequisites for security policies
Before you configure security policies, perform the following tasks:
· Configure a time range. See time range configuration in ACL and QoS Configuration Guide.
· Configure IP address object groups and service object groups. See "Configuring object groups."
· Configure applications and application groups. See "Configuring APR."
· Configure security zones. See "Configuring security zones.".
· Configure DPI. See DPI Configuration Guide.
Security policy tasks at a glance
To configure object policies, perform the following tasks:
1. (Optional.) Switching object policies to security policies
2. Enabling the security policy feature
3. Configuring IPv4 security policy rules
a. Creating a security policy rule
b. Configuring filtering criteria for a security policy rule
c. Specifying the action for a security policy rule
d. (Optional.) Specifying a time range for a security policy rule
e. (Optional.) Applying a DPI application profile to a security policy rule
f. (Optional.) Setting the session aging time for a security policy rule
g. (Optional.) Associating a security policy rule with a track entry
h. (Optional.) Enabling logging for matched packets
i. (Optional.) Enabling statistics collection for matched packets
4. Configuring IPv6 security policy rules
a. Creating a security policy rule
b. Configuring filtering criteria for a security policy rule
c. Specifying the action for a security policy rule
d. (Optional.) Specifying a time range for a security policy rule
e. (Optional.) Applying a DPI application profile to a security policy rule
f. (Optional.) Setting the session aging time for a security policy rule
g. (Optional.) Associating a security policy rule with a track entry
h. (Optional.) Enabling logging for matched packets
i. (Optional.) Enabling statistics collection for matched packets
5. (Optional.) Manage security policies
a. Changing the rule match order
b. Activating rule matching acceleration
c. Disabling a security policy rule
d. Renaming a security policy rule
6. (Optional.) Configuring security policy rule groups
a. Creating a security policy rule group
b. Specifying a security policy rule group for a security policy rule
c. Moving a security policy rule group
d. Renaming a security policy rule group
Switching object policies to security policies
About switching object policies to security policies
After upgrading a device from a security policy-incapable version to a version that supports security policies, you can perform this task to fast switch object policies to security policies. Object policy settings lose effect after the switching.
The device performs object policy switching as follows:
1. Saves the specified configuration file as a new file with the specified name.
2. Switches object policy rules in the new file in the order that the rules are displayed on the device (the rule match order).
3. Deletes object policy settings and their relations with security zone pairs in the new file.
4. Sets the new file as the main next-startup configuration file.
The security policy settings take effect after the device reboots.
Restrictions and guidelines for switching object policies to security policies
When you switch object policies to security policies, follow these restrictions and guidelines:
· Enable the security policy feature before you execute the manual switching command.
· Security policy rules switched from object policy rules that are not applied to any security zone pairs are in inactive state and do not take effect.
· Do not configure any security policy settings before switching.
· To downgrade the software to a version that does not support security policies, first set the configuration file used before the switching as the main next-startup configuration file.
· Make sure the working directory is on a fixed storage medium in the device, for example, the flash memory, instead of a removable storage medium, such as a hard disk.
Prerequisites for switching object policies to security policies
Before configuring a security policy, complete the following tasks:
· Change the object policy rule match order to make sure the rules are created in the depth-first order.
· Make sure no object policy is applied to zone pairs that use security zone any as the source or destination security zone.
· Make sure configuration file encryption is disabled.
· Before you perform manual switching, make sure the current software version supports security policies. For more information about software upgrading, see Fundamentals Configuration Guide.
Manually switching object policies to security policies
1. Enter system view.
system-view
2. Switch object policy settings in the specified configuration file to security policy settings.
security-policy switch-from object-policy object-filename security-filename
Enabling the security policy feature
Restrictions and guidelines
Security policy settings take effect only when the security policy feature is enabled.
After the device starts up, the device automatically executes the security-policy disable command to disable the security policy feature if object policy settings exist in the configuration file. If object policy settings do not exist in the configuration file, the device enables the security policy feature.
Security policies and object policies cannot take effect at the same time on a device. If security policy is enabled, object policies lose effect at the first time security policy view is entered. If you are to manually configure security policies item by item based on object policy settings, keep the security policy feature disabled until you finish the configuration.
After a configuration rollback from security policies to object policies, disable the security feature for the object policies to take effect.
Procedure
1. Enter system view.
system-view
2. Enable the security policy feature.
undo security-policy disable
By default, the security policy feature is enabled.
Configuring IPv4 security policy rules
Creating a security policy rule
About this task
By default, no rules exist in a security policy, and the device allows only packets exchanged between the Management security zone and the Local security zone to pass. For the device to process packets correctly, configure policy rules for each security policy.
If a configured feature, such as dynamic routing, tunneling, and VPN, requires exchanges with the device, configure security policy rules for the Local security zone to communicate with the specific zones.
Procedure
1. Enter system view.
system-view
2. Enter IPv4 security policy view.
security-policy ip
3. (Optional.) Configure a description for the policy.
description text
By default, a security policy does not have a description.
4. Create a security policy rule.
rule { rule-id | [ rule-id ] name rule-name }
5. (Optional.) Configure a description for the rule.
description text
By default, a security policy rule does not have a description.
Configuring filtering criteria for a security policy rule
Restrictions and guidelines
A rule matches all packets if no criteria are specified for the rule.
If a specified object group has no objects, the rule cannot match any packets.
Packets exchanged between the Management and Local security zones are allowed to pass by default and can only match local-to-management or management-to-local security policy rules. To discard packets between the Management and Local security zones, configure local-to-management and management-to-local rules and specify the rule actions as drop.
Procedure
1. Enter system view.
system-view
2. Enter IPv4 security policy view.
security-policy ip
3. Enter security policy rule view.
rule { rule-id | [ rule-id ] name rule-name }
4. Configure source filtering criteria:
¡ Specify a source security zone as a filtering criterion.
source-zone source-zone-name
By default, no source security zone is specified as a filtering criterion.
¡ Specify a source IPv4 address object group as a filtering criterion.
source-ip object-group-name
By default, no source IPv4 address object group is specified as a filtering criterion.
¡ Specify a source IPv4 host address as a filtering criterion.
source-ip-host ip-address
By default, no source IPv4 host address is specified as a filtering criterion.
¡ Specify a source IPv4 subnet as a filtering criterion.
source-ip-subnet ip-address { mask-length | mask }
By default, no source IPv4 subnet is specified as a filtering criterion.
¡ Specify a source IPv4 address range as a filtering criterion.
source-ip-range ip-address1 ip-address2
By default, no source IPv4 address range is specified as a filtering criterion.
¡ Specify a source MAC address object group as a filtering criterion.
source-mac object-group-name
By default, no source MAC address object group is specified as a filtering criterion.
5. Configure destination filtering criteria:
¡ Specify a destination security zone as a filtering criterion.
destination-zone destination-zone-name
By default, no destination security zone is specified as a filtering criterion.
¡ Specify a destination IPv4 address object group as a filtering criterion.
destination-ip object-group-name
By default, no destination IPv4 address object group is specified as a filtering criterion.
¡ Specify a destination IPv4 host address as a filtering criterion.
destination-ip-host ip-address
By default, no destination IPv4 host address is specified as a filtering criterion.
¡ Specify a destination IPv4 subnet as a filtering criterion.
destination-ip-subnet ip-address { mask-length | mask }
By default, no destination IPv4 subnet is specified as a filtering criterion.
¡ Specify a destination IPv4 address range as a filtering criterion.
destination-ip-range ip-address1 ip-address2
By default, no destination IPv4 address range is specified as a filtering criterion.
6. Specify a service object group as a filtering criterion.
service { object-group-name | any }
By default, no service object group is specified as a filtering criterion.
7. Specify a service port as a filtering criterion.
service-port protocol [ { destination { { eq | lt | gt } port | range port1 port2 } | source { { eq | lt | gt } port | range port1 port2 } } * | icmp-type icmp-code | icmpv6-type icmpv6-code ]
By default, no service port is specified as a filtering criterion.
8. Configure application filtering criteria:
¡ Specify an application as a filtering criterion.
application application-name
By default, no application is specified as a filtering criterion.
For the application filtering criteria to be identified, you must permit the dependent applications to pass through.
¡ Specify an application group as a filtering criterion.
app-group app-group-name
By default, no application group is specified as a filtering criterion.
9. Configure the rule to take effect on received packets of the specified VPN instance.
vrf vrf-name
By default, a security policy rule takes effect on received packets of the public network.
Specifying the action for a security policy rule
1. Enter system view.
system-view
2. Enter IPv4 security policy view.
security-policy ip
3. Enter security policy rule view.
rule { rule-id | [ rule-id ] name rule-name }
4. Specify the action for the security policy rule.
action { drop | pass }
By default, the action for a security policy rule is drop.
Specifying a time range for a security policy rule
1. Enter system view.
system-view
2. Enter IPv4 security policy view.
security-policy ip
3. Enter security policy rule view.
rule { rule-id | [ rule-id ] name rule-name }
4. Specify a time range during which the security policy rule is in effect.
time-range time-range-name
By default, a security policy rule is in effect at any time.
Applying a DPI application profile to a security policy rule
About this task
This feature enables the device to perform DPI on packets matching the specified rule. For more information about DPI, see DPI Configuration Guide.
Restrictions and guidelines
This feature takes effect only when the rule action is pass.
Procedure
1. Enter system view.
system-view
2. Enter IPv4 security policy view.
security-policy ip
3. Enter security policy rule view.
rule { rule-id | [ rule-id ] name rule-name }
4. Specify the rule action as pass.
action pass
By default, the action for a security policy rule is drop.
5. Apply a DPI application profile to the rule.
profile app-profile-name
By default, no DPI application profile is applied to a rule.
Setting the session aging time for a security policy rule
About this task
Perform this task to specify the aging time for stable sessions and persistent sessions. The configuration takes effect only on sessions established afterwards.
The configured aging time for persistent sessions is effective only on TCP sessions in ESTABLISHED state.
The priorities of the session aging times configured by using the session persistent aging-time, session aging-time, and session persistent acl commands are in descending order.
Procedure
1. Enter system view.
system-view
2. Enter IPv4 security policy view.
security-policy ip
3. Enter security policy rule view.
rule { rule-id | [ rule-id ] name rule-name }
4. Set the session aging time.
session aging-time time-value
By default, the session aging time is not configured.
5. Set the aging time for persistent sessions.
session persistent aging-time time-value
By default, the aging time for persistent sessions is not configured.
Associating a security policy rule with a track entry
About this task
Perform this task to enable the collaboration between the track module and a security policy rule. The collaboration operates as follows:
· If a rule is associated with the Negative state of a track entry, the device:
¡ Sets the rule state to Active if the track entry is in Negative state.
¡ Sets the rule state to Inactive if the track entry is in Positive state.
· If a rule is associated with the Positive state of a track entry, the device:
¡ Sets the rule state to Active if the track entry is in Positive state.
¡ Sets the rule state to Inactive if the track entry is in Negative state.
Procedure
1. Enter system view.
system-view
2. Enter IPv4 security policy view.
security-policy ip
3. Enter security policy rule view.
rule { rule-id | [ rule-id ] name rule-name }
4. Associate the rule with a track entry.
track { negative | positive } track-entry-number
By default, no track entry is associated with a rule.
Enabling logging for matched packets
About this task
This feature enables the device to log matching packets and send the log to the information center for processing. The log destinations and output rules are determined by the information center settings. For more information about the information center, see Network Management and Monitoring Configuration Guide.
Procedure
1. Enter system view.
system-view
2. Enter IPv4 security policy view.
security-policy ip
3. Enter security policy rule view.
rule { rule-id | [ rule-id ] name rule-name }
4. Enable logging for matched packets.
logging enable
By default, logging for matched packets is disabled.
Enabling statistics collection for matched packets
About this task
Perform this task to enable the device to collect statistics about matched packets. The collected statistics can be viewed by executing the display security-policy statistics command.
If an enabling period is specified, the system disables the statistics collection feature and removes the configuration at period expiration. If no enabling period is specified, you must execute the undo command to disable the statistics collection feature.
Restrictions and guidelines
When inter-VLAN bridge forwarding is configured, this feature collects statistics only about packets discarded by security policies and DPI. Statistics about permitted packets are not collected. For more information about inter-VLAN bridge forwarding, see Layer 2 forwarding in Layer 2—LAN Switching Configuration Guide.
Procedure
1. Enter system view.
system-view
2. Enter IPv4 security policy view.
security-policy ip
3. Enter security policy rule view.
rule { rule-id | [ rule-id ] name rule-name }
4. Enable statistics collection for matched packets.
counting enable [ period value ]
By default, the device does not collect statistics about matched packets.
Configuring IPv6 security policy rules
Creating a security policy rule
About this task
By default, no rules exist in a security policy, and the device allows only packets exchanged between the Management security zone and the Local security zone to pass. For the device to process packets correctly, configure policy rules for each security policy.
If a configured feature, such as dynamic routing, tunneling, and VPN, requires exchanges with the device, configure security policy rules for the Local security zone to communicate with the specific zones.
Procedure
1. Enter system view.
system-view
2. Enter IPv6 security policy view.
security-policy ipv6
3. (Optional.) Configure a description for the policy.
description text
By default, a security policy does not have a description.
4. Create a security policy rule.
rule { rule-id | [ rule-id ] name rule-name }
5. (Optional.) Configure a description for the rule.
description text
By default, a security policy rule does not have a description.
Configuring filtering criteria for a security policy rule
Restrictions and guidelines
A rule matches all packets if no criteria are specified for the rule.
If a specified object group has no objects, the rule cannot match any packets.
Packets exchanged between the Management and Local security zones are allowed to pass by default and can only match local-to-management or management-to-local security policy rules. To discard packets between the Management and Local security zones, configure local-to-management and management-to-local rules and specify the rule actions as drop.
Procedure
1. Enter system view.
system-view
2. Enter IPv6 security policy view.
security-policy ipv6
3. Enter security policy rule view.
rule { rule-id | [ rule-id ] name rule-name }
4. Configure source filtering criteria:
¡ Specify a source security zone as a filtering criterion.
source-zone source-zone-name
By default, no source security zone is specified as a filtering criterion.
¡ Specify a source IPv6 address object group as a filtering criterion.
source-ip object-group-name
By default, no source IPv6 address object group is specified as a filtering criterion.
¡ Specify a source IPv6 host address as a filtering criterion.
source-ip-host ipv6-address
By default, no source IPv6 host address is specified as a filtering criterion.
¡ Specify a source IPv6 subnet as a filtering criterion.
source-ip-subnet ipv6-address prefix-length
By default, no source IPv6 subnet is specified as a filtering criterion.
¡ Specify a source IPv6 address range as a filtering criterion.
source-ip-range ipv6-address1 ipv6-address2
By default, no source IPv6 address range is specified as a filtering criterion.
5. Configure destination filtering criteria:
¡ Specify a destination security zone as a filtering criterion.
destination-zone destination-zone-name
By default, no destination security zone is specified as a filtering criterion.
¡ Specify a destination IPv6 address object group as a filtering criterion.
destination-ip object-group-name
By default, no destination IPv6 address object group is specified as a filtering criterion.
¡ Specify a destination IPv6 host address as a filtering criterion.
destination-ip-host ipv6-address
By default, no destination IPv6 host address is specified as a filtering criterion.
¡ Specify a destination IPv6 subnet as a filtering criterion.
destination-ip-subnet ipv6-address prefix-length
By default, no destination IPv6 subnet is specified as a filtering criterion.
¡ Specify a destination IPv6 address range as a filtering criterion.
destination-ip-range ipv6-address1 ipv6-address2
By default, no destination IPv6 address range is specified as a filtering criterion.
6. Specify a service object group as a filtering criterion.
service { object-group-name | any }
By default, no service object group is specified as a filtering criterion.
7. Specify a service port as a filtering criterion.
service-port protocol [ { destination { { eq | lt | gt } port | range port1 port2 } | source { { eq | lt | gt } port | range port1 port2 } } * | icmpv6-type icmpv6-code ]
By default, no service port is specified as a filtering criterion.
8. Configure application filtering criteria:
¡ Specify an application as a filtering criterion.
application application-name
By default, no application is specified as a filtering criterion.
For the application filtering criteria to be identified, you must permit the dependent applications to pass through.
¡ Specify an application group as a filtering criterion.
app-group app-group-name
By default, no application group is specified as a filtering criterion.
9. Configure the rule to take effect on received packets of the specified VPN instance.
vrf vrf-name
By default, a security policy rule takes effect on received packets of the public network.
Specifying the action for a security policy rule
1. Enter system view.
system-view
2. Enter IPv6 security policy view.
security-policy ipv6
3. Enter security policy rule view.
rule { rule-id | [ rule-id ] name rule-name }
4. Specify the action for the security policy rule.
action { drop | pass }
By default, the action for a security policy rule is drop.
Specifying a time range for a security policy rule
1. Enter system view.
system-view
2. Enter IPv6 security policy view.
security-policy ipv6
3. Enter security policy rule view.
rule { rule-id | [ rule-id ] name rule-name }
4. Specify a time range during which the security policy rule is in effect.
time-range time-range-name
By default, a security policy rule is in effect at any time.
Applying a DPI application profile to a security policy rule
About this task
This feature enables the device to perform DPI on packets matching the specified rule. For more information about DPI, see DPI Configuration Guide.
Restrictions and guidelines
This feature takes effect only when the rule action is pass.
Procedure
1. Enter system view.
system-view
2. Enter IPv6 security policy view.
security-policy ipv6
3. Enter security policy rule view.
rule { rule-id | [ rule-id ] name rule-name }
4. Specify the rule action as pass.
action pass
By default, the action for a security policy rule is drop.
5. Apply a DPI application profile to the rule.
profile app-profile-name
By default, no DPI application profile is applied to a rule.
Setting the session aging time for a security policy rule
About this task
Perform this task to specify the aging time for stable sessions and persistent sessions. The configuration takes effect only on sessions established afterwards.
The configured aging time for persistent sessions is effective only on TCP sessions in ESTABLISHED state.
The priorities of the session aging times configured by using the session persistent aging-time, session aging-time, and session persistent acl commands are in descending order.
Procedure
1. Enter system view.
system-view
2. Enter IPv6 security policy view.
security-policy ipv6
3. Enter security policy rule view.
rule { rule-id | [ rule-id ] name rule-name }
4. Set the session aging time.
session aging-time time-value
By default, the session aging time is not configured.
5. Set the aging time for persistent sessions.
session persistent aging-time time-value
By default, the aging time for persistent sessions is not configured.
Associating a security policy rule with a track entry
About this task
Perform this task to enable the collaboration between the track module and a security policy rule. The collaboration operates as follows:
· If a rule is associated with the Negative state of a track entry, the device:
¡ Sets the rule state to Active if the track entry is in Negative state.
¡ Sets the rule state to Inactive if the track entry is in Positive state.
· If a rule is associated with the Positive state of a track entry, the device:
¡ Sets the rule state to Active if the track entry is in Positive state.
¡ Sets the rule state to Inactive if the track entry is in Negative state.
Procedure
1. Enter system view.
system-view
2. Enter IPv6 security policy view.
security-policy ipv6
3. Enter security policy rule view.
rule { rule-id | [ rule-id ] name rule-name }
4. Associate the rule with a track entry.
track { negative | positive } track-entry-number
By default, no track entry is associated with a rule.
Enabling logging for matched packets
About this task
This feature enables the device to log matching packets and send the log to the information center for processing. The log destinations and output rules are determined by the information center settings. For more information about the information center, see Network Management and Monitoring Configuration Guide.
Procedure
1. Enter system view.
system-view
2. Enter IPv6 security policy view.
security-policy ipv6
3. Enter security policy rule view.
rule { rule-id | [ rule-id ] name rule-name }
4. Enable logging for matched packets.
logging enable
By default, logging for matched packets is disabled.
Enabling statistics collection for matched packets
About this task
Perform this task to enable the device to collect statistics about matched packets. The collected statistics can be viewed by executing the display security-policy statistics command.
If an enabling period is specified, the system disables the statistics collection feature and removes the configuration at period expiration. If no enabling period is specified, you must execute the undo command to disable the statistics collection feature.
Restrictions and guidelines
When inter-VLAN bridge forwarding is configured, this feature collects statistics only about packets discarded by security policies and DPI. Statistics about permitted packets are not collected. For more information about inter-VLAN bridge forwarding, see Layer 2 forwarding in Layer 2—LAN Switching Configuration Guide.
Procedure
1. Enter system view.
system-view
2. Enter IPv6 security policy view.
security-policy ipv6
3. Enter security policy rule view.
rule { rule-id | [ rule-id ] name rule-name }
4. Enable statistics collection for matched packets.
counting enable [ period value ]
By default, the device does not collect statistics about matched packets.
Changing the rule match order
About this task
The device matches packets against security policy rules in the order the rules were created. You can change the rule match order by changing the position of a security policy rule in the rule list.
Procedure
1. Enter system view.
system-view
2. Enter IPv4 or IPv6 security policy view.
security-policy { ip | ipv6 }
3. Move a security policy rule.
¡ Move a security policy rule by rule ID.
move rule rule-id before insert-rule-id
¡ Move a security policy rule by rule name.
move rule name rule-name1 { { after | before } name rule-name2 | bottom | down | top | up }
Activating rule matching acceleration
About this task
Rule matching acceleration does not take effect on newly added, modified, and moved rules unless the feature is activated for the rules. By default, the system automatically activates rule matching acceleration for such rules at specific intervals. The interval is 2 seconds if 100 or fewer rules exist and 20 seconds if over 100 rules exist.
To activate rule matching acceleration immediately after a rule change, you can perform this task.
Restrictions and guidelines
If no rule change is detected, the system does not perform an activation operation.
Insufficient memory can cause rule matching acceleration failures. Unaccelerated rules do not take effect, and rules that have been accelerated are not affected.
Procedure
1. Enter system view.
system-view
2. Enter IPv4 or IPv6 security policy view.
security-policy { ip | ipv6 }
3. Activate rule matching acceleration.
accelerate enhanced enable
Disabling a security policy rule
1. Enter system view.
system-view
2. Enter IPv4 or IPv6 security policy view.
security-policy { ip | ipv6 }
3. Enter security policy rule view.
rule { rule-id | [ rule-id ] name rule-name }
4. Disable the security policy rule.
disable
By default, a security policy rule is enabled.
Renaming a security policy rule
1. Enter system view.
system-view
2. Enter IPv4 or IPv6 security policy view.
security-policy { ip | ipv6 }
3. Rename a security policy rule.
rule rename old-name new-name
Configuring security policy rule groups
Creating a security policy rule group
About this task
Perform this task to create a security policy rule group and add security policy rules to the group.
Restrictions and guidelines
To add a list of security policy rules, make sure the end rule is listed behind the start rule and the specified rules do not belong to any other security policy rule group.
A security policy rule group can contain only IPv4 rules or IPv6 rules.
Procedure
1. Enter system view.
system-view
2. Enter IPv4 or IPv6 security policy view.
security-policy { ip | ipv6 }
3. Create a security policy rule group and add security policy rules to the group.
group name group-name [ from rule-name1 to rule-name2 ] [ description description-text ] [ disable | enable ]
Specifying a security policy rule group for a security policy rule
1. Enter system view.
system-view
2. Enter IPv4 or IPv6 security policy view.
security-policy { ip | ipv6 }
3. Enter security policy rule view.
rule { rule-id | [ rule-id ] name rule-name }
4. Specify a security policy rule group for the security policy rule.
parent-group group-name
Moving a security policy rule group
About this task
Perform this task to move a security policy rule group to change the match order of security policy rules.
Restrictions and guidelines
If you specify a target security policy rule that belongs to a security policy rule group, follow these restrictions and guidelines:
· If the target rule is neither the start nor end rule of the group, you cannot move a security policy rule group to the place before or after the rule.
· If the target rule is the start rule of the group, you can only move a security policy rule group to the place before the rule.
· If the target rule is the end rule of the group, you can only move a security policy rule group to the place after the rule.
You can move a security policy rule group before or after a security policy rule or group of the same type (IPv4 or IPv6).
Procedure
1. Enter system view.
system-view
2. Enter IPv4 or IPv6 security policy view.
security-policy { ip | ipv6 }
3. Move a security policy rule group.
group move group-name1 { after | before } { group group-name2 | rule rule-name }
Renaming a security policy rule group
1. Enter system view.
system-view
2. Enter IPv4 or IPv6 security policy view.
security-policy { ip | ipv6 }
3. Rename a security policy rule group.
group rename old-name new-name
Display and maintenance commands for object policies
Execute display commands in any view and reset commands in user view.
|
Task |
Command |
|
Display security policy configuration. |
display security-policy { ip | ipv6 } |
|
Display security policy statistics. |
display security-policy statistics { ip | ipv6 } [ rule rule-name ] |
|
Display the security policy switching result. |
display security-policy switch-result |
|
Clear security policy statistics. |
reset security-policy statistics [ ip | ipv6 ] [ rule rule-name ] |
