- Table of Contents
-
- 03-Security Configuration Guide
- 00-Preface
- 01-Security zone configuration
- 02-Security policy configuration
- 03-Object group configuration
- 04-Object policy configuration
- 05-AAA configuration
- 06-IPoE configuration
- 07-Portal configuration
- 08-User identification configuration
- 09-Password control configuration
- 10-Public key management
- 11-PKI configuration
- 12-SSH configuration
- 13-SSL configuration
- 14-ASPF configuration
- 15-APR configuration
- 16-Session management
- 17-Connection limit configuration
- 18-Attack detection and prevention configuration
- 19-DDoS protection configuration
- 20-uRPF configuration
- 21-ARP attack protection configuration
- 22-ND attack defense configuration
- 23-IP-MAC binding configuration
- 24-Keychain configuration
- 25-Crypto engine configuration
- 26-SMS configuration
- 27-Terminal identification configuration
- 28-Flow manager configuration
- 29-Location identification configuration
- 30-Server connection detection configuration
- 31-Trusted access control configuration
- Related Documents
-
| Title | Size | Download |
|---|---|---|
| 02-Security policy configuration | 399.16 KB |
Contents
Restrictions and guidelines: Security policy configuration
Configuration procedure diagram
Prerequisites for security policies
Security policy tasks at a glance
Switching packet filtering to security policy settings
Switching packet filtering to security policy settings before security policies are configured
Switching packet filtering to security policy settings after security policies are configured
Switching object policies to security policies
About switching object policies to security policies
Restrictions and guidelines for switching object policies to security policies
Prerequisites for switching object policies to security policies
Manually switching object policies to security policies
Enabling the security policy feature
Configuring IPv4 security policy rules
Creating a security policy rule
Configuring filtering criteria for a security policy rule
Specifying the action for a security policy rule
Specifying a time range for a security policy rule
Applying a DPI application profile to a security policy rule
Setting the session aging time for a security policy rule
Associating a security policy rule with a track entry
Enabling logging for matched packets
Enabling statistics collection for matched packets
Configuring IPv6 security policy rules
Creating a security policy rule
Configuring filtering criteria for a security policy rule
Specifying the action for a security policy rule
Specifying a time range for a security policy rule
Applying a DPI application profile to a security policy rule
Setting the session aging time for a security policy rule
Associating a security policy rule with a track entry
Enabling logging for matched packets
Enabling statistics collection for matched packets
Activating rule matching acceleration
Disabling a security policy rule
Renaming a security policy rule
Configuring security policy rule groups
Creating a security policy rule group
Specifying a security policy rule group for a security policy rule
Moving a security policy rule group
Renaming a security policy rule group
Setting the time for fast output of security policy settings as logs
Display and maintenance commands for object policies
Security policy configuration examples
Example: Configuring an IPv4 security policy
Example: Configuring domain name-based security policy
Example: Configuring a security policy based on fuzzy domain name matching
Example: Configuring location-based security policy
Example: Configuring user-based security policy
Example: Switching object policies to security policies
Example: Configuring a security policy for OSPF communication
Configuring security policies
About security policies
A security policy defines a set of rules for forwarding control and Deep Packet Inspection (DPI). It matches packets against the rules and takes the action stated in the rules on the matched packets.
Benefits
Security policies can provide the same functions as packet filtering and object policies, and support precise network management based on application, protocol, and user. By working with DPI, it can also provide security protection services such as antivirus and intrusion protection.
For more information about packet filtering, see ACL and QoS Configuration Guide. For more information about object policies, see "Configuring object policies."
Security policy rules
A security policy contains one or multiple rules. Each security policy rule is a permit or deny, or DPI statement for identifying traffic based on criteria.
Rule numbering
Each rule is uniquely identified by a name and an ID. When you create a rule, the rule name must be manually configured, and the rule ID can be manually configured or automatically assigned by the system.
Rule match criteria
The rule match criteria include the following types: source security zone, destination security zone, source IP address and source MAC address, destination IP address, user and user group, application and application group, terminal, terminal group, location and location group, URL category, VPN instance, and service.
You can specify multiple criteria for each type, except VPN instance. For example, you can configure multiple source security zones for a rule.
Rule and session management
When a security policy is configured, the device generates session entries for permitted packets to record packet information.
You can set session aging times for protocol states, application layer protocols, or rules. The aging time configured for a rule takes precedence over the aging time configured for a protocol state or an application layer protocol. For more information about session management, see "Managing sessions."
Security policy mechanism
As shown in Figure 1, a security policy operates as follows:
1. After receiving a packet, the device matches the packet against the configured security policy rules.
A security policy rule includes various match criterion types. A packet is considered matched if it matches all the criterion types in the rule. Each criterion type includes one or more criteria, and a packet matches a criterion type if it matches any criterion of the type. Source MAC address criteria and source IP address criteria belong to the same criterion type.
¡ If no match is found, the device discards the packet.
¡ If a match is found and the rule action is drop, the device discards the packet.
¡ If a match is found and the rule action is pass, the device goes to the next step.
2. If a DPI application profile is configured for the matched rule, the device uses the specified profile to perform DPI on the packet. If no DPI application profile is specified, the device allows the packet to pass.
Figure 1 Security policy mechanism

Rule matching acceleration
This feature accelerates security policy rule matching to enhance connection establishment and packet forwarding performance, especially for a device using multiple rules to match packets from multiple users.
Security policy rule grouping
Security policy rule grouping allows users to enable, disable, delete, and move security policy rules in batches. A security policy rule in a security policy rule group takes effect only when both the rule and the group are enabled.
vSystem support for features
Non-default vSystems do not support the following features:
· Disable the security policy feature.
· Associate a security policy rule with a track entry.
· Set the time for fast output of security policy settings as logs.
For information about the support of non-default vSystems for the commands, see security policy command reference. For information about vSystem, see Virtual Technologies Configuration Guide.
Application scenarios
Local device access
In a local access scenario, you must configure security policy rules for the following operations to be performed successfully:
· Local device access through a non-management local port, including ping, telnet, Web access, and FTP operations.
· Protocol packet exchange triggered by any other devices (such as packet exchanges of Dynamic Routing Protocol or VPN tunneling).
For example, as shown in Figure 2, for a PC (10.1.1.10) in the Trust security zone to access the Web interface of the local device (10.1.1.1) through HTTPS, you must configure a security policy rule as described in Table 1.
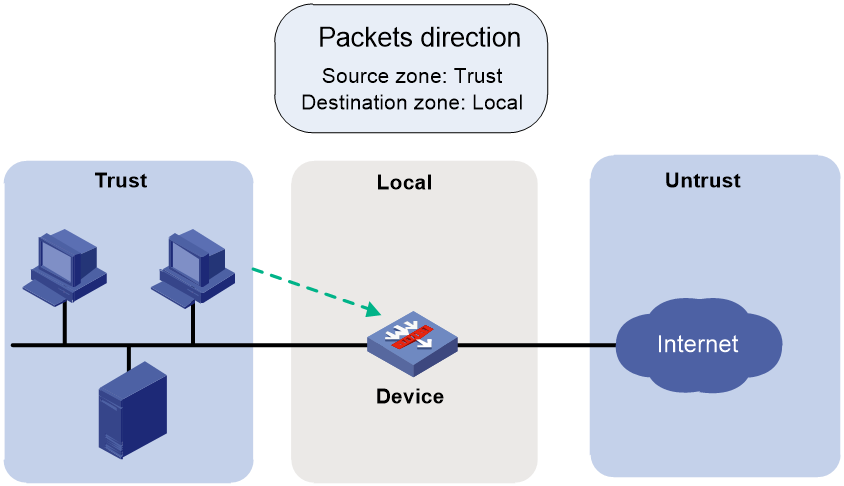
Table 1 Security policy rule configuration
|
Rule name |
Source security zone |
Destination security zone |
Source IP address |
Destination IP address |
Service |
Action |
|
httpslocalin |
Trust |
Local |
10.1.1.10 |
10.1.1.1 |
https |
pass |
For more information about permitting protocol packets, see "Common local services."
Remote device access
In a remote access scenario, you must configure security policy rules for the following operations to be performed successfully:
· Remote device access through a non-management local port, including ping, telnet, Web access, and FTP operations.
· Protocol packet exchange triggered by the local device (such as packet exchanges of Dynamic Routing Protocol or VPN tunneling).
For example, as shown in Figure 3, for the local device (10.1.1.1) to access the FTP service provided by the FTP server (10.1.1.20) in the Trust security zone, you must configure a security policy rule as described in Table 2.
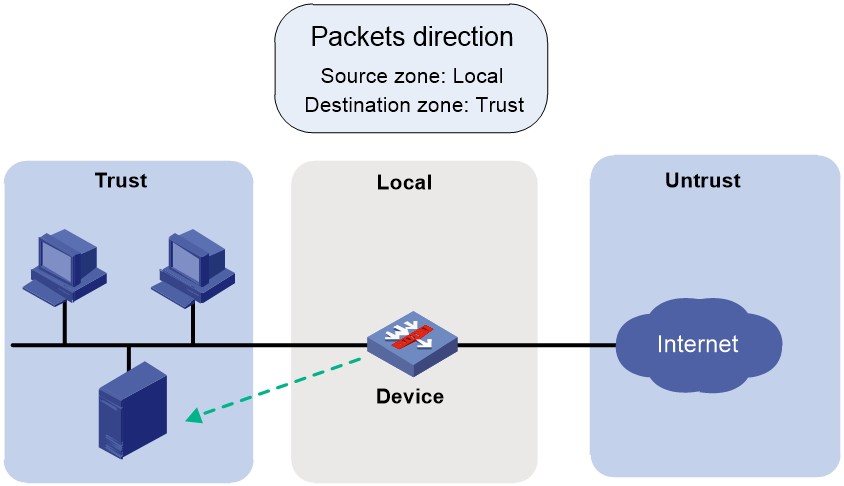
Table 2 Configuration of local device accessing other devices
|
Rule name |
Source security zone |
Destination security zone |
Source IP address |
Destination IP address |
Service |
Action |
|
ftplocalout |
Local |
Trust |
10.1.1.1 |
10.1.1.20 |
ftp |
pass |
Direct traffic forwarding
For the local device to forward traffic that is either sent from or destined to the local device, you must configure security policy rules to permit traffic from the corresponding security zones.
For example, as shown in Figure 4, for a PC (10.1.1.10) in the Trust zone to visit a website in the Untrust zone through HTTP, you must configure a security policy rule as shown in Table 3.
Figure 4 Direct traffic forwarding

Table 3 Direct traffic forwarding
|
Rule name |
Source security zone |
Destination security zone |
Source IP address |
Service |
Action |
|
trust-untrust |
Trust |
Untrust |
10.1.1.10 |
http |
pass |
Configuration principles
As a best practice to achieve the optimal performance, follow these principles when you configure security policy rules:
· Configure matching criteria as strict as possible.
· Follow the depth-first order during rule creation to create rules with stricter match criteria first because the system matches packets against rules in the order the rules were created.
· For packets from and to the same security zone, configure two rules to control packet exchanges between interfaces instead of using one rule that allows traffic between any interfaces in the zone to pass.
· Place security policy rules using the Local security zone as a matching criteria in front of all the other rules to ensure that local service packets can be correctly processed.
Common local services
You must configure security policy rules to permit local service traffic from or to specific security zones. Table 4 lists the common local services that require security policy permission. Support for the common local services varies by device.
Table 4 Common local services that require security policy permission
|
Service |
Required security policy configuration |
|
OSPF/IS-IS/RIP/BGP |
Configure rules for the service traffic from or to the local zone. |
|
IPsec/SSL/L2TP/MPLS/GRE |
Configure rules for the service traffic from or to the local zone. |
|
DNS/DHCP/FTP (client) |
Configure rules only for the service traffic from the local zone. |
|
DNS/DHCP/FTP (server) |
Configure rules only for the service traffic to the local zone. |
|
SSH/Telnet/Ping/Tracet (locally triggered) |
Configure rules only for the service traffic from the local zone. |
|
SSH/Telnet/SNMP/HTTP/HTTPS (local access) |
Configure rules only for the service traffic to the local zone. |
|
BFD |
Configure rules only for the service traffic from or to the local zone. |
|
LB |
Configure rules only for the service traffic from or to the local zone. |
Restrictions and guidelines: Security policy configuration
As a best practice, do not configure packet filtering, object policies, and security policies at the same time. If you do so, some policies might fail to take effect, causing service interruption.
Before configuring security policies, verify if the device is configured with packet filtering or object policies. As a best practice, switch packet filtering and object policies to security policies because security policies take precedence over packet filtering and object policies lose effect the first time you enter security policy view. For more information, see "Switching packet filtering to security policy settings" and "Switching object policies to security policies."
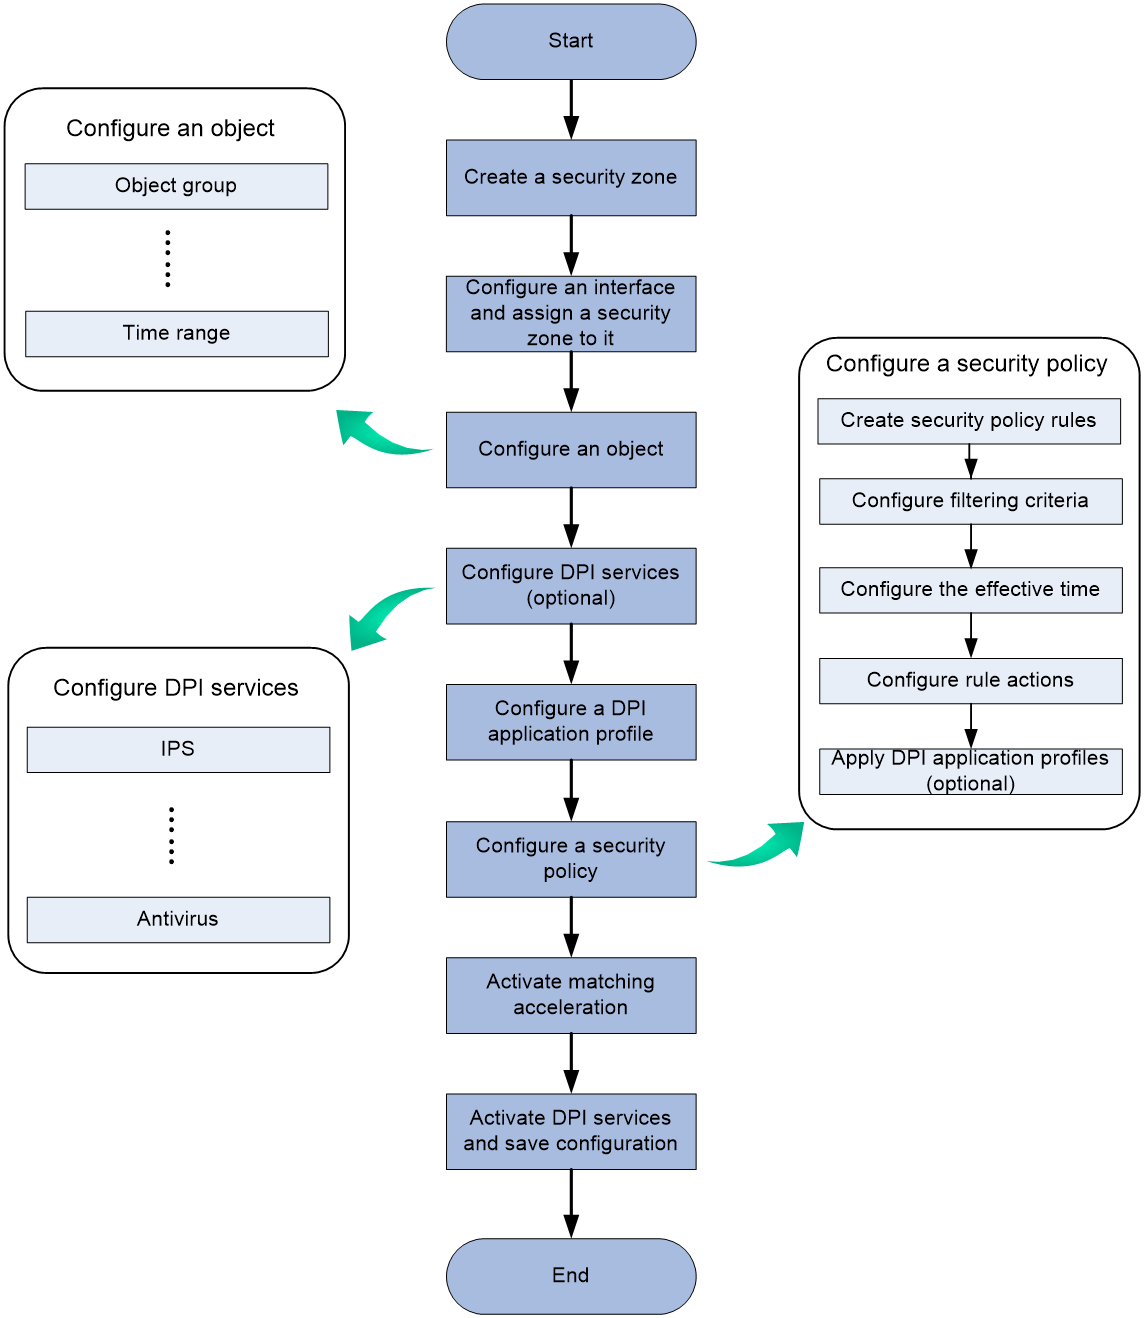
Configuration procedure diagram
Figure 5 shows how to configure a security policy.
Figure 5 Security policy configuration procedure
Prerequisites for security policies
Before you configure security policies, perform the following tasks:
· Configure a time range. See time range configuration in ACL and QoS Configuration Guide.
· Configure IP address object groups and service object groups. See "Configuring object groups."
· Configure applications and application groups. See "Configuring APR."
· Configure terminals and terminal groups. See "Identifying terminals."
· Configure user and user groups. See "Configuring user identification."
· Configure location and location groups. See "Configuring location identification."
· Configure URL categories. See DPI Configuration Guide.
· Configure security zones. See "Configuring security zones."
· Configure DPI. See DPI Configuration Guide.
Security policy tasks at a glance
To configure object policies, perform the following tasks:
1. (Optional.) Switching packet filtering to security policy settings
2. (Optional.) Switching object policies to security policies
3. Enabling the security policy feature
4. Configuring IPv4 security policy rules
a. Creating a security policy rule
b. Configuring filtering criteria for a security policy rule
c. Specifying the action for a security policy rule
d. (Optional.) Specifying a time range for a security policy rule
e. (Optional.) Applying a DPI application profile to a security policy rule
f. (Optional.) Setting the session aging time for a security policy rule
g. (Optional.) Associating a security policy rule with a track entry
h. (Optional.) Enabling logging for matched packets
i. (Optional.) Enabling statistics collection for matched packets
5. Configuring IPv6 security policy rules
a. Creating a security policy rule
b. Configuring filtering criteria for a security policy rule
c. Specifying the action for a security policy rule
d. (Optional.) Specifying a time range for a security policy rule
e. (Optional.) Applying a DPI application profile to a security policy rule
f. (Optional.) Setting the session aging time for a security policy rule
g. (Optional.) Associating a security policy rule with a track entry
h. (Optional.) Enabling logging for matched packets
i. (Optional.) Enabling statistics collection for matched packets
6. (Optional.) Manage security policies
a. Changing the rule match order
b. Activating rule matching acceleration
c. Disabling a security policy rule
d. Renaming a security policy rule
7. (Optional.) Configuring security policy rule groups
a. Creating a security policy rule group
b. Specifying a security policy rule group for a security policy rule
c. Moving a security policy rule group
d. Renaming a security policy rule group
8. (Optional.) Setting the time for fast output of security policy settings as logs
Switching packet filtering to security policy settings
When security policies are configured, packet filtering is performed only on packets that do not match any security policy rule. As a best practice to avoid interruption of services permitted by packet filtering, do not configure packet filtering and security policies at the same time.
If packet filtering is configured, switch packet filtering to security policy settings as a best practice before enabling the security policy feature.
Switching packet filtering to security policy settings before security policies are configured
1. Execute the security-policy disable command to disable the security policy feature.
2. Enter security policy view, configure filtering criteria and actions for security policy rules based on the packet filtering configuration.
3. Execute the undo security-policy disable command to enable the security policy feature.
4. (Optional.) Delete the packet filtering configuration from the device.
Switching packet filtering to security policy settings after security policies are configured
You can perform this task from the Web interface (recommended) or CLI.
To perform this task from the CLI:
1. Access the CLI of the device. As a best practice, access the device through the Console port or interface of the Management security zone in case the connection is terminated by packet filtering.
2. Enter security policy view, and configure filtering criteria and actions for security policy rules based on the packet filtering configuration.
|
|
CAUTION: After using the rule [ rule-id ] name rule-name command to create the first security policy rule, configure the filtering criteria and actions based on packet filtering as soon as possible to shorten service interruption. With no filtering criteria or action specified, the rule matches and drops all packets. You can configure other security policy settings when the service is not busy as a best practice. |
3. (Optional.) Delete the packet filtering configuration from the device.
Switching object policies to security policies
About switching object policies to security policies
To avoid service interruption, switch object policies to security policies before configuring security policies for the first time because object policies lose effect once security policies are configured.
After the switching, the device deletes object policy settings and their relations with security zone pairs, and security policy rules switched from object policy rules that are not applied to any security zone pairs are in inactive state and do not take effect.
Restrictions and guidelines for switching object policies to security policies
When you switch object policies to security policies, follow these restrictions and guidelines:
· Perform the undo security-policy disable command to enable the security policy feature before you execute the manual switching command, and then save the configuration.
· Do not configure any security policy settings before switching.
· Use this feature only after you upgrade the device from a security policy-incapable version to a version that supports security policy.
· Make sure the working directory is on a fixed storage medium in the device, for example, the flash memory, instead of a removable storage medium, such as a hard disk.
Prerequisites for switching object policies to security policies
Before configuring a security policy, complete the following tasks:
· Change the object policy rule match order to make sure the rules are created in the depth-first order.
· Make sure no object policy is applied to zone pairs that use security zone any as the source or destination security zone.
· Make sure configuration file encryption is disabled.
Manually switching object policies to security policies
1. Enter system view.
system-view
2. Switch object policy settings in the specified configuration file to security policy settings.
security-policy switch-from object-policy object-filename security-filename
Enabling the security policy feature
Restrictions and guidelines
Security policy settings take effect only when the security policy feature is enabled.
After the device starts up, the device automatically executes the security-policy disable command to disable the security policy feature if object policy settings exist in the configuration file. If object policy settings do not exist in the configuration file, the device enables the security policy feature.
Security policies and object policies cannot take effect at the same time on a device. If security policy is enabled, object policies lose effect at the first time security policy view is entered. If you are to manually configure security policies item by item based on object policy settings, keep the security policy feature disabled until you finish the configuration.
After a configuration rollback from security policies to object policies, disable the security feature for the object policies to take effect.
Procedure
1. Enter system view.
system-view
2. Enable the security policy feature.
undo security-policy disable
By default, the security policy feature is enabled.
|
|
CAUTION: The security-policy disable command disables the security policy feature and might cause traffic interruption. |
Configuring IPv4 security policy rules
Creating a security policy rule
About this task
By default, no rules exist in a security policy, and the device allows only packets exchanged between the Management security zone and the Local security zone to pass. For the device to process packets correctly, configure policy rules for each security policy.
If a configured feature, such as dynamic routing, tunneling, and VPN, requires exchanges with the device, configure security policy rules for the Local security zone to communicate with the specific zones.
Procedure
1. Enter system view.
system-view
2. Enter IPv4 security policy view.
security-policy ip
|
|
CAUTION: If the security policy feature is enabled, object policy settings lose effect the first time you enter security policy view. Make sure object policy settings have been switched to security policy settings before you enter security policy view. |
3. (Optional.) Configure a description for the policy.
description text
By default, a security policy does not have a description.
4. Create a security policy rule.
rule { rule-id | [ rule-id ] name rule-name }
5. (Optional.) Configure a description for the rule.
description text
By default, a security policy rule does not have a description.
Configuring filtering criteria for a security policy rule
Restrictions and guidelines
A rule matches all packets if no criteria are specified for the rule. If no action is set for the rule, the device drops the matched packets by default.
If a specified object group has no objects, the rule cannot match any packets.
Packets exchanged between the Management and Local security zones are allowed to pass by default and can only match local-to-management or management-to-local security policy rules. To discard packets between the Management and Local security zones, configure local-to-management and management-to-local rules and specify the rule actions as drop.
Security policy rules specified with an IP address object group that uses a user or user group cannot match packets. To filter packets by user or user group, configure security policy rules specified with user or user group criteria.
Procedure
1. Enter system view.
system-view
2. Enter IPv4 security policy view.
security-policy ip
3. Enter security policy rule view.
rule { rule-id | [ rule-id ] name rule-name }
4. Configure source filtering criteria:
¡ Specify a source security zone as a filtering criterion.
source-zone source-zone-name
By default, no source security zone is specified as a filtering criterion.
¡ Specify a source IPv4 address object group as a filtering criterion.
source-ip object-group-name
By default, no source IPv4 address object group is specified as a filtering criterion.
¡ Specify a source IPv4 host address as a filtering criterion.
source-ip-host ip-address
By default, no source IPv4 host address is specified as a filtering criterion.
¡ Specify a source IPv4 subnet as a filtering criterion.
source-ip-subnet ip-address { mask-length | mask }
By default, no source IPv4 subnet is specified as a filtering criterion.
¡ Specify a source IPv4 address range as a filtering criterion.
source-ip-range ip-address1 ip-address2
By default, no source IPv4 address range is specified as a filtering criterion.
¡ Specify a source MAC address object group as a filtering criterion.
source-mac object-group-name
By default, no source MAC address object group is specified as a filtering criterion.
¡ Specify a source location as a filtering criterion.
source-location location-name
By default, no source location is specified as a filtering criterion.
¡ Specify a source location group as a filtering criterion.
source-location-group location-group-name
By default, no source location group is specified as a filtering criterion.
5. Configure destination filtering criteria:
¡ Specify a destination security zone as a filtering criterion.
destination-zone destination-zone-name
By default, no destination security zone is specified as a filtering criterion.
¡ Specify a destination IPv4 address object group as a filtering criterion.
destination-ip object-group-name
By default, no destination IPv4 address object group is specified as a filtering criterion.
¡ Specify a destination IPv4 host address as a filtering criterion.
destination-ip-host ip-address
By default, no destination IPv4 host address is specified as a filtering criterion.
¡ Specify a destination IPv4 subnet as a filtering criterion.
destination-ip-subnet ip-address { mask-length | mask }
By default, no destination IPv4 subnet is specified as a filtering criterion.
¡ Specify a destination IPv4 address range as a filtering criterion.
destination-ip-range ip-address1 ip-address2
By default, no destination IPv4 address range is specified as a filtering criterion.
¡ Specify a destination location as a filtering criterion.
destination-location location-name
By default, no destination location is specified as a filtering criterion.
¡ Specify a destination location group as a filtering criterion.
destination-location-group location-group-name
By default, no destination location group is specified as a filtering criterion.
6. Specify a service object group as a filtering criterion.
service { object-group-name | any }
By default, no service object group is specified as a filtering criterion.
7. Specify a service port as a filtering criterion.
service-port protocol [ { destination { { eq | lt | gt } port | range port1 port2 } | source { { eq | lt | gt } port | range port1 port2 } } * | icmp-type icmp-code | icmpv6-type icmpv6-code ]
By default, no service port is specified as a filtering criterion.
8. Configure application filtering criteria:
¡ Specify an application as a filtering criterion.
application application-name
By default, no application is specified as a filtering criterion.
For the application filtering criteria to be identified, you must permit the dependent applications to pass through.
¡ Specify an application group as a filtering criterion.
app-group app-group-name
By default, no application group is specified as a filtering criterion.
9. Configure terminal filtering criterion:
¡ Specify a terminal as a filtering criterion.
terminal terminal-name
By default, no terminal is specified as a filtering criterion.
For the terminal filtering criteria to be identified, you must permit packets of protocols on which the terminals depend to pass through.
¡ Specify a terminal group as a filtering criterion.
terminal-group terminal-group-name
By default, no terminal group is specified as a filtering criterion.
10. Configure user filtering criterion:
¡ Specify a user as a filtering criterion.
user username [ domain domain-name ]
By default, no user is specified as a filtering criterion.
¡ Specify a user group as a filtering criterion.
user-group user-group-name [ domain domain-name ]
By default, no user group is specified as a filtering criterion.
11. Specify a URL category as a filtering criterion.
url-category url-category-name
By default, no URL category is specified as a filtering criterion.
12. Configure the rule to take effect on received packets of the specified VPN instance.
vrf vrf-name
By default, a security policy rule takes effect on received packets of the public network.
Specifying the action for a security policy rule
1. Enter system view.
system-view
2. Enter IPv4 security policy view.
security-policy ip
3. Enter security policy rule view.
rule { rule-id | [ rule-id ] name rule-name }
4. Specify the action for the security policy rule.
action { drop | pass }
By default, the action for a security policy rule is drop.
Specifying a time range for a security policy rule
1. Enter system view.
system-view
2. Enter IPv4 security policy view.
security-policy ip
3. Enter security policy rule view.
rule { rule-id | [ rule-id ] name rule-name }
4. Specify a time range during which the security policy rule is in effect.
time-range time-range-name
By default, a security policy rule is in effect at any time.
Applying a DPI application profile to a security policy rule
About this task
This feature enables the device to perform DPI on packets matching the specified rule. For more information about DPI, see DPI Configuration Guide.
Restrictions and guidelines
This feature takes effect only when the rule action is pass.
Procedure
1. Enter system view.
system-view
2. Enter IPv4 security policy view.
security-policy ip
3. Enter security policy rule view.
rule { rule-id | [ rule-id ] name rule-name }
4. Specify the rule action as pass.
action pass
By default, the action for a security policy rule is drop.
5. Apply a DPI application profile to the rule.
profile app-profile-name
By default, no DPI application profile is applied to a rule.
Setting the session aging time for a security policy rule
About this task
Perform this task to specify the aging time for stable sessions and persistent sessions. The configuration takes effect only on sessions established afterwards.
The configured aging time for persistent sessions is effective only on TCP sessions in ESTABLISHED state.
The priorities of the session aging times configured by using the session persistent aging-time, session aging-time, and session persistent acl commands are in descending order.
Procedure
1. Enter system view.
system-view
2. Enter IPv4 security policy view.
security-policy ip
3. Enter security policy rule view.
rule { rule-id | [ rule-id ] name rule-name }
4. Set the session aging time.
session aging-time time-value
By default, the session aging time is not configured.
5. Set the aging time for persistent sessions.
session persistent aging-time time-value
By default, the aging time for persistent sessions is not configured.
|
|
CAUTION: Setting too long an aging time might cause persistent sessions to increase rapidly and therefore cause the CPU usage to be high. |
Associating a security policy rule with a track entry
About this task
Perform this task to enable the collaboration between the track module and a security policy rule. The collaboration operates as follows:
· If a rule is associated with the Negative state of a track entry, the device:
¡ Sets the rule state to Active if the track entry is in Negative state.
¡ Sets the rule state to Inactive if the track entry is in Positive state.
· If a rule is associated with the Positive state of a track entry, the device:
¡ Sets the rule state to Active if the track entry is in Positive state.
¡ Sets the rule state to Inactive if the track entry is in Negative state.
For more information about track entries, see Network Management and Monitoring Configuration Guide.
Procedure
1. Enter system view.
system-view
2. Enter IPv4 security policy view.
security-policy ip
3. Enter security policy rule view.
rule { rule-id | [ rule-id ] name rule-name }
4. Associate the rule with a track entry.
track { negative | positive } track-entry-number
By default, no track entry is associated with a rule.
Enabling logging for matched packets
About this task
This feature enables the device to log matching packets and send the log to the information center or fast output the log for processing. The log destinations and output rules are determined by the information center and fast log output settings. For more information about the information center and fast log output, see Network Management and Monitoring Configuration Guide.
Procedure
1. Enter system view.
system-view
2. Enter IPv4 security policy view.
security-policy ip
3. Enter security policy rule view.
rule { rule-id | [ rule-id ] name rule-name }
4. Enable logging for matched packets.
logging enable
By default, logging for matched packets is disabled.
Enabling statistics collection for matched packets
About this task
Perform this task to enable the device to collect statistics about matched packets. The collected statistics can be viewed by executing the display security-policy statistics command.
If an enabling period is specified, the system disables the statistics collection feature and removes the configuration at period expiration. If no enabling period is specified, you must execute the undo command to disable the statistics collection feature.
Restrictions and guidelines
When inter-VLAN bridge forwarding is configured, this feature collects statistics only about packets discarded by security policies and DPI. Statistics about permitted packets are not collected. For more information about inter-VLAN bridge forwarding, see Layer 2 forwarding in Layer 2—LAN Switching Configuration Guide.
Procedure
1. Enter system view.
system-view
2. Enter IPv4 security policy view.
security-policy ip
3. Enter security policy rule view.
rule { rule-id | [ rule-id ] name rule-name }
4. Enable statistics collection for matched packets.
counting enable [ period value ]
By default, the device does not collect statistics about matched packets.
Configuring IPv6 security policy rules
Creating a security policy rule
About this task
By default, no rules exist in a security policy, and the device allows only packets exchanged between the Management security zone and the Local security zone to pass. For the device to process packets correctly, configure policy rules for each security policy.
If a configured feature, such as dynamic routing, tunneling, and VPN, requires exchanges with the device, configure security policy rules for the Local security zone to communicate with the specific zones.
Procedure
1. Enter system view.
system-view
2. Enter IPv6 security policy view.
security-policy ipv6
|
|
CAUTION: If the security policy feature is enabled, object policy settings lose effect the first time you enter security policy view. Make sure object policy settings have been switched to security policy settings before you enter security policy view. |
3. (Optional.) Configure a description for the policy.
description text
By default, a security policy does not have a description.
4. Create a security policy rule.
rule { rule-id | [ rule-id ] name rule-name }
5. (Optional.) Configure a description for the rule.
description text
By default, a security policy rule does not have a description.
Configuring filtering criteria for a security policy rule
Restrictions and guidelines
A rule matches all packets if no criteria are specified for the rule. If no action is set for the rule, the device drops the matched packets by default.
If a specified object group has no objects, the rule cannot match any packets.
Packets exchanged between the Management and Local security zones are allowed to pass by default and can only match local-to-management or management-to-local security policy rules. To discard packets between the Management and Local security zones, configure local-to-management and management-to-local rules and specify the rule actions as drop.
Security policy rules specified with an IP address object group that uses a user or user group cannot match packets. To filter packets by user or user group, configure security policy rules specified with user or user group criteria.
Procedure
1. Enter system view.
system-view
2. Enter IPv6 security policy view.
security-policy ipv6
3. Enter security policy rule view.
rule { rule-id | [ rule-id ] name rule-name }
4. Configure source filtering criteria:
¡ Specify a source security zone as a filtering criterion.
source-zone source-zone-name
By default, no source security zone is specified as a filtering criterion.
¡ Specify a source IPv6 address object group as a filtering criterion.
source-ip object-group-name
By default, no source IPv6 address object group is specified as a filtering criterion.
¡ Specify a source IPv6 host address as a filtering criterion.
source-ip-host ipv6-address
By default, no source IPv6 host address is specified as a filtering criterion.
¡ Specify a source IPv6 subnet as a filtering criterion.
source-ip-subnet ipv6-address prefix-length
By default, no source IPv6 subnet is specified as a filtering criterion.
¡ Specify a source IPv6 address range as a filtering criterion.
source-ip-range ipv6-address1 ipv6-address2
By default, no source IPv6 address range is specified as a filtering criterion.
5. Configure destination filtering criteria:
¡ Specify a destination security zone as a filtering criterion.
destination-zone destination-zone-name
By default, no destination security zone is specified as a filtering criterion.
¡ Specify a destination IPv6 address object group as a filtering criterion.
destination-ip object-group-name
By default, no destination IPv6 address object group is specified as a filtering criterion.
¡ Specify a destination IPv6 host address as a filtering criterion.
destination-ip-host ipv6-address
By default, no destination IPv6 host address is specified as a filtering criterion.
¡ Specify a destination IPv6 subnet as a filtering criterion.
destination-ip-subnet ipv6-address prefix-length
By default, no destination IPv6 subnet is specified as a filtering criterion.
¡ Specify a destination IPv6 address range as a filtering criterion.
destination-ip-range ipv6-address1 ipv6-address2
By default, no destination IPv6 address range is specified as a filtering criterion.
6. Specify a service object group as a filtering criterion.
service { object-group-name | any }
By default, no service object group is specified as a filtering criterion.
7. Specify a service port as a filtering criterion.
service-port protocol [ { destination { { eq | lt | gt } port | range port1 port2 } | source { { eq | lt | gt } port | range port1 port2 } } * | icmpv6-type icmpv6-code ]
By default, no service port is specified as a filtering criterion.
8. Configure application filtering criteria:
¡ Specify an application as a filtering criterion.
application application-name
By default, no application is specified as a filtering criterion.
For the application filtering criteria to be identified, you must permit the dependent applications to pass through.
¡ Specify an application group as a filtering criterion.
app-group app-group-name
By default, no application group is specified as a filtering criterion.
9. Configure terminal filtering criterion:
¡ Specify a terminal as a filtering criterion.
terminal terminal-name
By default, no terminal is specified as a filtering criterion.
For the terminal filtering criteria to be identified, you must permit packets of protocols on which the terminals depend to pass through.
¡ Specify a terminal group as a filtering criterion.
terminal-group terminal-group-name
By default, no terminal group is specified as a filtering criterion.
10. Configure user filtering criterion:
¡ Specify a user as a filtering criterion.
user username [ domain domain-name ]
By default, no user is specified as a filtering criterion.
¡ Specify a user group as a filtering criterion.
user-group user-group-name [ domain domain-name ]
By default, no user group is specified as a filtering criterion.
11. Specify a URL category as a filtering criterion.
url-category url-category-name
By default, no URL category is specified as a filtering criterion.
12. Configure the rule to take effect on received packets of the specified VPN instance.
vrf vrf-name
By default, a security policy rule takes effect on received packets of the public network.
Specifying the action for a security policy rule
1. Enter system view.
system-view
2. Enter IPv6 security policy view.
security-policy ipv6
3. Enter security policy rule view.
rule { rule-id | [ rule-id ] name rule-name }
4. Specify the action for the security policy rule.
action { drop | pass }
By default, the action for a security policy rule is drop.
Specifying a time range for a security policy rule
1. Enter system view.
system-view
2. Enter IPv6 security policy view.
security-policy ipv6
3. Enter security policy rule view.
rule { rule-id | [ rule-id ] name rule-name }
4. Specify a time range during which the security policy rule is in effect.
time-range time-range-name
By default, a security policy rule is in effect at any time.
Applying a DPI application profile to a security policy rule
About this task
This feature enables the device to perform DPI on packets matching the specified rule. For more information about DPI, see DPI Configuration Guide.
Restrictions and guidelines
This feature takes effect only when the rule action is pass.
Procedure
1. Enter system view.
system-view
2. Enter IPv6 security policy view.
security-policy ipv6
3. Enter security policy rule view.
rule { rule-id | [ rule-id ] name rule-name }
4. Specify the rule action as pass.
action pass
By default, the action for a security policy rule is drop.
5. Apply a DPI application profile to the rule.
profile app-profile-name
By default, no DPI application profile is applied to a rule.
Setting the session aging time for a security policy rule
About this task
Perform this task to specify the aging time for stable sessions and persistent sessions. The configuration takes effect only on sessions established afterwards.
The configured aging time for persistent sessions is effective only on TCP sessions in ESTABLISHED state.
The priorities of the session aging times configured by using the session persistent aging-time, session aging-time, and session persistent acl commands are in descending order.
Procedure
1. Enter system view.
system-view
2. Enter IPv6 security policy view.
security-policy ipv6
3. Enter security policy rule view.
rule { rule-id | [ rule-id ] name rule-name }
4. Set the session aging time.
session aging-time time-value
By default, the session aging time is not configured.
5. Set the aging time for persistent sessions.
session persistent aging-time time-value
By default, the aging time for persistent sessions is not configured.
|
|
CAUTION: Setting too long an aging time might cause persistent sessions to increase rapidly and therefore cause the CPU usage to be high. |
Associating a security policy rule with a track entry
About this task
Perform this task to enable the collaboration between the track module and a security policy rule. The collaboration operates as follows:
· If a rule is associated with the Negative state of a track entry, the device:
¡ Sets the rule state to Active if the track entry is in Negative state.
¡ Sets the rule state to Inactive if the track entry is in Positive state.
· If a rule is associated with the Positive state of a track entry, the device:
¡ Sets the rule state to Active if the track entry is in Positive state.
¡ Sets the rule state to Inactive if the track entry is in Negative state.
For more information about track entries, see Network Management and Monitoring Configuration Guide.
Procedure
1. Enter system view.
system-view
2. Enter IPv6 security policy view.
security-policy ipv6
3. Enter security policy rule view.
rule { rule-id | [ rule-id ] name rule-name }
4. Associate the rule with a track entry.
track { negative | positive } track-entry-number
By default, no track entry is associated with a rule.
Enabling logging for matched packets
About this task
This feature enables the device to log matching packets and send the log to the information center or fast output the log for processing. The log destinations and output rules are determined by the information center and fast log output settings. For more information about the information center and fast log output, see Network Management and Monitoring Configuration Guide.
Procedure
1. Enter system view.
system-view
2. Enter IPv6 security policy view.
security-policy ipv6
3. Enter security policy rule view.
rule { rule-id | [ rule-id ] name rule-name }
4. Enable logging for matched packets.
logging enable
By default, logging for matched packets is disabled.
Enabling statistics collection for matched packets
About this task
Perform this task to enable the device to collect statistics about matched packets. The collected statistics can be viewed by executing the display security-policy statistics command.
If an enabling period is specified, the system disables the statistics collection feature and removes the configuration at period expiration. If no enabling period is specified, you must execute the undo command to disable the statistics collection feature.
Restrictions and guidelines
When inter-VLAN bridge forwarding is configured, this feature collects statistics only about packets discarded by security policies and DPI. Statistics about permitted packets are not collected. For more information about inter-VLAN bridge forwarding, see Layer 2 forwarding in Layer 2—LAN Switching Configuration Guide.
Procedure
1. Enter system view.
system-view
2. Enter IPv6 security policy view.
security-policy ipv6
3. Enter security policy rule view.
rule { rule-id | [ rule-id ] name rule-name }
4. Enable statistics collection for matched packets.
counting enable [ period value ]
By default, the device does not collect statistics about matched packets.
Changing the rule match order
About this task
The device matches packets against security policy rules in the order the rules were created. You can change the rule match order by changing the position of a security policy rule in the rule list.
Procedure
1. Enter system view.
system-view
2. Enter IPv4 or IPv6 security policy view.
security-policy { ip | ipv6 }
3. Move a security policy rule.
¡ Move a security policy rule by rule ID.
move rule rule-id1 { { after | before } rule-id2 | bottom | down | top | up }
¡ Move a security policy rule by rule name.
move rule name rule-name1 { { after | before } name rule-name2 | bottom | down | top | up }
Activating rule matching acceleration
About this task
Rule matching acceleration does not take effect on newly added, modified, and moved rules unless the feature is activated for the rules. By default, the system automatically activates rule matching acceleration for such rules at dynamically calculated intervals.
To activate rule matching acceleration immediately after a rule change, you can perform this task.
Restrictions and guidelines
If no rule change is detected, the system does not perform an activation operation.
Insufficient memory can cause rule matching acceleration failures. Unaccelerated rules do not take effect, and rules that have been accelerated are not affected.
Procedure
1. Enter system view.
system-view
2. Enter IPv4 or IPv6 security policy view.
security-policy { ip | ipv6 }
3. Activate rule matching acceleration.
accelerate enhanced enable
Disabling a security policy rule
1. Enter system view.
system-view
2. Enter IPv4 or IPv6 security policy view.
security-policy { ip | ipv6 }
3. Enter security policy rule view.
rule { rule-id | [ rule-id ] name rule-name }
4. Disable the security policy rule.
disable
By default, a security policy rule is enabled.
Renaming a security policy rule
1. Enter system view.
system-view
2. Enter IPv4 or IPv6 security policy view.
security-policy { ip | ipv6 }
3. Rename a security policy rule.
rule rename old-name new-name
Configuring security policy rule groups
Creating a security policy rule group
About this task
Perform this task to create a security policy rule group and add security policy rules to the group.
Restrictions and guidelines
To add a list of security policy rules, make sure the end rule is listed behind the start rule and the specified rules do not belong to any other security policy rule group.
A security policy rule group can contain only IPv4 rules or IPv6 rules.
Procedure
1. Enter system view.
system-view
2. Enter IPv4 or IPv6 security policy view.
security-policy { ip | ipv6 }
3. Create a security policy rule group and add security policy rules to the group.
group name group-name [ from rule-name1 to rule-name2 ] [ description description-text ] [ disable | enable ]
Specifying a security policy rule group for a security policy rule
1. Enter system view.
system-view
2. Enter IPv4 or IPv6 security policy view.
security-policy { ip | ipv6 }
3. Enter security policy rule view.
rule { rule-id | [ rule-id ] name rule-name }
4. Specify a security policy rule group for the security policy rule.
parent-group group-name
Moving a security policy rule group
About this task
Perform this task to move a security policy rule group to change the match order of security policy rules.
Restrictions and guidelines
If you specify a target security policy rule that belongs to a security policy rule group, follow these restrictions and guidelines:
· If the target rule is neither the start nor end rule of the group, you cannot move a security policy rule group to the place before or after the rule.
· If the target rule is the start rule of the group, you can only move a security policy rule group to the place before the rule.
· If the target rule is the end rule of the group, you can only move a security policy rule group to the place after the rule.
You can move a security policy rule group before or after a security policy rule or group of the same type (IPv4 or IPv6).
Procedure
1. Enter system view.
system-view
2. Enter IPv4 or IPv6 security policy view.
security-policy { ip | ipv6 }
3. Move a security policy rule group.
group move group-name1 { after | before } { group group-name2 | rule rule-name }
Renaming a security policy rule group
1. Enter system view.
system-view
2. Enter IPv4 or IPv6 security policy view.
security-policy { ip | ipv6 }
3. Rename a security policy rule group.
group rename old-name new-name
Setting the time for fast output of security policy settings as logs
About this task
After the customlog format security-policy sgcc command is executed, the device fast outputs settings of enabled security policies as logs in SGCC format every day at the specified time. For more information about fast log output, see Network Management and Monitoring Configuration Guide.
Procedure
1. Enter system view.
system-view
2. Set the time at which the device fast outputs security policy settings as logs every day.
security-policy config-logging send-time time
By default, the device fast outputs security policy settings as logs every day at 0 o'clock.
Display and maintenance commands for object policies
|
|
IMPORTANT: Non-default vSystems do not support some of the display and maintenance commands. For information about vSystem support for these commands, see security policy command reference. |
Execute display commands in any view and reset commands in user view.
|
Task |
Command |
|
Display security policy configuration. |
display security-policy { ip | ipv6 } [ rule name rule-name ] |
|
Display security policy statistics. |
display security-policy statistics { ip | ipv6 } [ rule rule-name ] |
|
Display the security policy switching result. |
display security-policy switch-result |
|
Clear security policy statistics. |
reset security-policy statistics [ ip | ipv6 ] [ rule rule-name ] |
Security policy configuration examples
Example: Configuring an IPv4 security policy
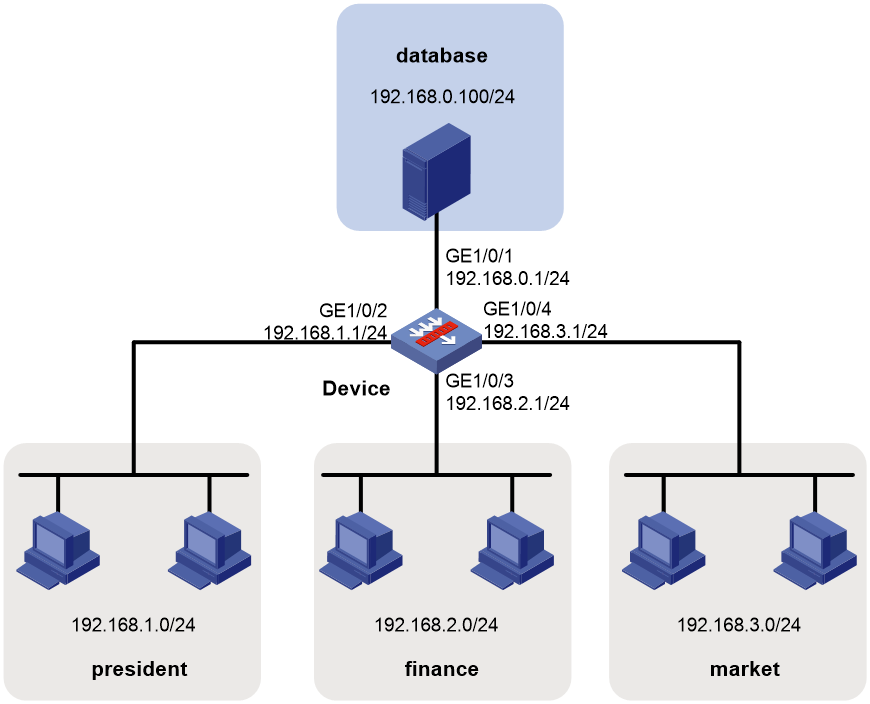
Network configuration
Configure security policy to achieve the following goals:
· The president office can access the financial database server through HTTP at any time.
· The financial office can access the financial database server through HTTP from 8:00 to 18:00 on weekdays.
· The marketing office cannot access the financial database server through HTTP at any time.
Figure 6 Network diagram
Procedure
1. Assign IP addresses to interfaces.
# Assign an IP address to interface GigabitEthernet 1/0/1.
<Device> system-view
[Device] interface gigabitethernet 1/0/1
[Device-GigabitEthernet1/0/1] ip address 192.168.0.1 255.255.255.0
[Device-GigabitEthernet1/0/1] quit
# Assign IP addresses to other interfaces in the same way. (Details not shown.)
2. Add interfaces to security zones.
[Device] security-zone name database
[Device-security-zone-database] import interface gigabitethernet 1/0/1
[Device-security-zone-database] quit
[Device] security-zone name president
[Device-security-zone-president] import interface gigabitethernet 1/0/2
[Device-security-zone-president] quit
[Device] security-zone name finance
[Device-security-zone-finance] import interface gigabitethernet 1/0/3
[Device-security-zone-finance] quit
[Device] security-zone name market
[Device-security-zone-market] import interface gigabitethernet 1/0/4
[Device-security-zone-market] quit
3. Create a time range named work to cover 8:00 to 18:00 on weekdays.
[Device] time-range work 08:00 to 18:00 working-day
4. Configure a security policy:
# Configure a rule named president-database to allow the president office to access the financial database server through HTTP at any time.
[Device] security-policy ip
[Device-security-policy-ip] rule name president-database
[Device-security-policy-ip-0-president-database] source-zone president
[Device-security-policy-ip-0-president-database] destination-zone database
[Device-security-policy-ip-0-president-database] source-ip-subnet 192.168.1.0 24
[Device-security-policy-ip-0-president-database] destination-ip-subnet 192.168.0.0 24
[Device-security-policy-ip-0-president-database] service http
[Device-security-policy-ip-0-president-database] action pass
[Device-security-policy-ip-0-president-database] quit
# Configure a rule named finance-database to allow the financial office to access the financial database server through HTTP from 8:00 to 18:00 on weekdays.
[Device-security-policy-ip] rule name finance-database
[Device-security-policy-ip-1-finance-database] source-zone finance
[Device-security-policy-ip-1-finance-database] destination-zone database
[Device-security-policy-ip-1-finance-database] source-ip-subnet 192.168.2.0 24
[Device-security-policy-ip-1-finance-database] destination-ip-subnet 192.168.0.0 24
[Device-security-policy-ip-1-finance-database] service-port tcp destination eq 80
[Device-security-policy-ip-1-finance-database] action pass
[Device-security-policy-ip-1-finance-database] time-range work
[Device-security-policy-ip-1-finance-database] quit
# Configure a named market-database to prohibit the marketing office from accessing the financial database server through HTTP at any time.
[Device-security-policy-ip] rule name market-database
[Device-security-policy-ip-2-market-database] source-zone market
[Device-security-policy-ip-2-market-database] destination-zone database
[Device-security-policy-ip-2-market-database] source-ip-subnet 192.168.3.0 24
[Device-security-policy-ip-2-market-database] destination-ip-subnet 192.168.0.0 24
[Device-security-policy-ip-2-market-database] service http
[Device-security-policy-ip-2-market-database] action drop
[Device-security-policy-ip-2-market-database] quit
5. Activate rule matching acceleration.
[Device-security-policy-ip] accelerate enhanced enable
[Device-security-policy-ip] quit
Verifying the configuration
# Use a PC in each office to access the Web service of the financial database server through the browser. (Details not shown.)
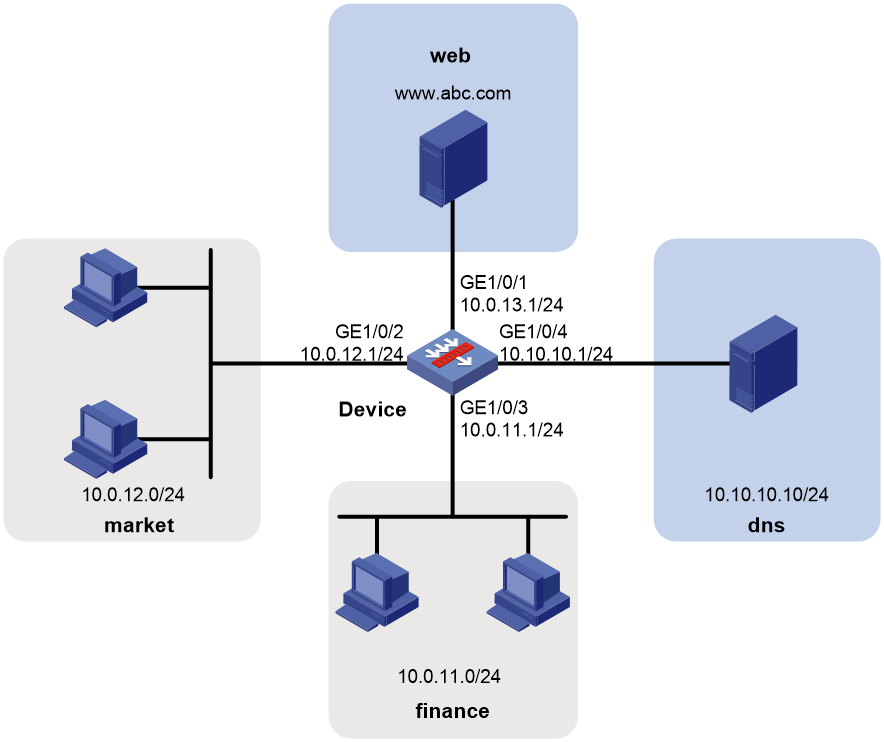
Example: Configuring domain name-based security policy
Network configuration
As shown in Figure 7, a Web server with domain name www.abc.com is deployed to process financial affairs. The domain name has been registered on the DNS server.
Configure security policy to achieve the following goals:
· The financial office can access the financial Web server through HTTP.
· The marketing office cannot access the financial Web server through HTTP at any time.
Procedure
1. Assign IP addresses to interfaces.
# Assign an IP address to interface GigabitEthernet 1/0/1.
<Device> system-view
[Device] interface gigabitethernet 1/0/1
[Device-GigabitEthernet1/0/1] ip address 10.0.13.1 255.255.255.0
[Device-GigabitEthernet1/0/1] quit
# Assign IP addresses to other interfaces in the same way. (Details not shown.)
2. Add interfaces to security zones.
[Device] security-zone name web
[Device-security-zone-web] import interface gigabitethernet 1/0/1
[Device-security-zone-web] quit
[Device] security-zone name market
[Device-security-zone-market] import interface gigabitethernet 1/0/2
[Device-security-zone-market] quit
[Device] security-zone name finance
[Device-security-zone-finance] import interface gigabitethernet 1/0/3
[Device-security-zone-finance] quit
[Device] security-zone name dns
[Device-security-zone-dns] import interface gigabitethernet 1/0/4
[Device-security-zone-dns] quit
3. Create an IPv4 address object group named web. Configure an IPv4 address object with host name www.abc.com for the group.
[Device] object-group ip address web
[Device-obj-grp-ip-web] network host name www.abc.com
[Device-obj-grp-ip-web] quit
4. Specify the IP address of the DNS server as 10.10.10.10.
[Device] dns server 10.10.10.10
5. Configure a security policy:
# Configure a rule named dnslocalout to allow the device to send packets to the DNS server.
[Device] security-policy ip
[Device-security-policy-ip] rule name dnslocalout
[Device-security-policy-ip-0-dnslocalout] source-zone local
[Device-security-policy-ip-0-dnslocalout] destination-zone dns
[Device-security-policy-ip-0-dnslocalout] destination-ip-host 10.10.10.10
[Device-security-policy-ip-0-dnslocalout] action pass
[Device-security-policy-ip-0-dnslocalout] quit
# Configure a rule named host-dns to allow the financial department and marketing department to access the DNS server.
[Device-security-policy-ip] rule name host-dns
[Device-security-policy-ip-1-host-dns] source-zone finance
[Device-security-policy-ip-1-host-dns] source-zone market
[Device-security-policy-ip-1-host-dns] destination-zone dns
[Device-security-policy-ip-1-host-dns] source-ip-subnet 10.0.11.0 24
[Device-security-policy-ip-1-host-dns] source-ip-subnet 10.0.12.0 24
[Device-security-policy-ip-1-host-dns] destination-ip-host 10.10.10.10
[Device-security-policy-ip-1-host-dns] service dns-udp
[Device-security-policy-ip-1-host-dns] action pass
[Device-security-policy-ip-1-host-dns] quit
# Configue a rule named finance-web to allow the financial department to access the financial Web server through HTTP.
[Device-security-policy-ip] rule name finance-web
[Device-security-policy-ip-2-finance-web] source-zone finance
[Device-security-policy-ip-2-finance-web] destination-zone web
[Device-security-policy-ip-2-finance-web] source-ip-subnet 10.0.11.0 24
[Device-security-policy-ip-2-finance-web] destination-ip web
[Device-security-policy-ip-2-finance-web] service http
[Device-security-policy-ip-2-finance-web] action pass
[Device-security-policy-ip-2-finance-web] quit
# Configure a rule named market-web to forbid the marketing department from accessing the financial Web server through HTTP.
[Device-security-policy-ip] rule name market-web
[Device-security-policy-ip-3-market-web] source-zone market
[Device-security-policy-ip-3-market-web] destination-zone web
[Device-security-policy-ip-3-market-web] source-ip-subnet 10.0.12.0 24
[Device-security-policy-ip-3-market-web] destination-ip web
[Device-security-policy-ip-3-market-web] service http
[Device-security-policy-ip-3-market-web] action drop
[Device-security-policy-ip-3-market-web] quit
6. Activate rule matching acceleration.
[Device-security-policy-ip] accelerate enhanced enable
[Device-security-policy-ip] quit
Verifying the configuration
# Use a PC in each office to access the Web service of the financial server. (Details not shown.)
Example: Configuring a security policy based on fuzzy domain name matching
Network configuration
As shown in Figure 8, Web servers with domain names www.abc.com, finance.abc.com, and bbs.abc.com are deployed. The domain names have been registered on the DNS server.
Configure security policy to achieve the following goals:
· The financial office can access all Web servers through HTTP based on fuzzy domain name matching.
· The marketing office can access the bbs.abc.com server through HTTP based on exact domain matching.

Procedure
1. Specify the address of the DNS server for intranet hosts as the IP address of the device.
2. Assign IP addresses to interfaces:
# Assign an IP address to interface GigabitEthernet 1/0/1.
<Device> system-view
[Device] interface gigabitethernet 1/0/1
[Device-GigabitEthernet1/0/1] ip address 10.0.13.1 255.255.255.0
[Device-GigabitEthernet1/0/1] quit
# Assign IP addresses to other interfaces in the same way. (Details not shown.)
3. Add interfaces to security zones.
[Device] security-zone name web
[Device-security-zone-web] import interface gigabitethernet 1/0/1
[Device-security-zone-web] quit
[Device] security-zone name market
[Device-security-zone-market] import interface gigabitethernet 1/0/2
[Device-security-zone-market] quit
[Device] security-zone name finance
[Device-security-zone-finance] import interface gigabitethernet 1/0/3
[Device-security-zone-finance] quit
[Device] security-zone name dns
[Device-security-zone-dns] import interface gigabitethernet 1/0/4
[Device-security-zone-dns] quit
4. Create object groups:
# Create an IPv4 address object group named web. Configure an IPv4 address object with host name *.abc.com for the group. The host name can match all domain names that contain the .abc.com string.
[Device] object-group ip address web
[Device-obj-grp-ip-web] network host name *.abc.com
[Device-obj-grp-ip-web] quit
# Create an IPv4 address object group named bbs. Configure an IPv4 address object with host name bbs.abc.com for the group.
[Device] object-group ip address bbs
[Device-obj-grp-ip-bbs] network host name bbs.abc.com
[Device-obj-grp-ip-bbs] quit
5. Configure DNS settings:
# Enable DNS proxy.
[Device] dns proxy enable
# Specify the IP address of the DNS server as 10.10.10.10.
[Device] dns server 10.10.10.10
6. Configure security policies:
# Configure a rule named local-dns to allow the device to send packets to the DNS server.
[Device] security-policy ip
[Device-security-policy-ip] rule name local-dns
[Device-security-policy-ip-0-local-dns] source-zone local
[Device-security-policy-ip-0-local-dns] destination-zone dns
[Device-security-policy-ip-0-local-dns] destination-ip-host 10.10.10.10
[Device-security-policy-ip-0-local-dns] service dns-udp
[Device-security-policy-ip-0-local-dns] service dns-tcp
[Device-security-policy-ip-0-local-dns] action pass
[Device-security-policy-ip-0-local-dns] quit
# Configure a rule named host-localdns to allow the financial department and marketing department to access DNS proxy.
[Device-security-policy-ip] rule name host-localdns
[Device-security-policy-ip-1-host-localdns] source-zone finance
[Device-security-policy-ip-1-host-localdns] source-zone market
[Device-security-policy-ip-1-host-localdns] destination-zone local
[Device-security-policy-ip-1-host-localdns] source-ip-subnet 10.0.11.0 24
[Device-security-policy-ip-1-host-localdns] source-ip-subnet 10.0.12.0 24
[Device-security-policy-ip-1-host-localdns] service dns-udp
[Device-security-policy-ip-1-host-localdns] service dns-tcp
[Device-security-policy-ip-1-host-localdns] action pass
[Device-security-policy-ip-1-host-dns] quit
# Configure a rule named finance-web to allow the financial department to access all Web servers through HTTP.
[Device-security-policy-ip] rule name finance-web
[Device-security-policy-ip-2-finance-web] source-zone finance
[Device-security-policy-ip-2-finance-web] destination-zone web
[Device-security-policy-ip-2-finance-web] source-ip-subnet 10.0.11.0 24
[Device-security-policy-ip-2-finance-web] destination-ip web
[Device-security-policy-ip-2-finance-web] service http
[Device-security-policy-ip-2-finance-web] action pass
[Device-security-policy-ip-2-finance-web] quit
# Configure a rule named market-web to allow the marketing department to access the bbs.abc.com server through HTTP.
[Device-security-policy-ip] rule name market-web
[Device-security-policy-ip-3-market-web] source-zone market
[Device-security-policy-ip-3-market-web] destination-zone web
[Device-security-policy-ip-3-market-web] source-ip-subnet 10.0.12.0 24
[Device-security-policy-ip-3-market-web] destination-ip bbs
[Device-security-policy-ip-3-market-web] service http
[Device-security-policy-ip-3-market-web] action pass
[Device-security-policy-ip-3-market-web] quit
7. Activate rule matching acceleration.
[Device-security-policy-ip] accelerate enhanced enable
[Device-security-policy-ip] quit
Verifying the configuration
# Use a PC in the financial office to access all Web servers and a PC in the marketing office to access the bbs.abc.com server. (Details not shown.)
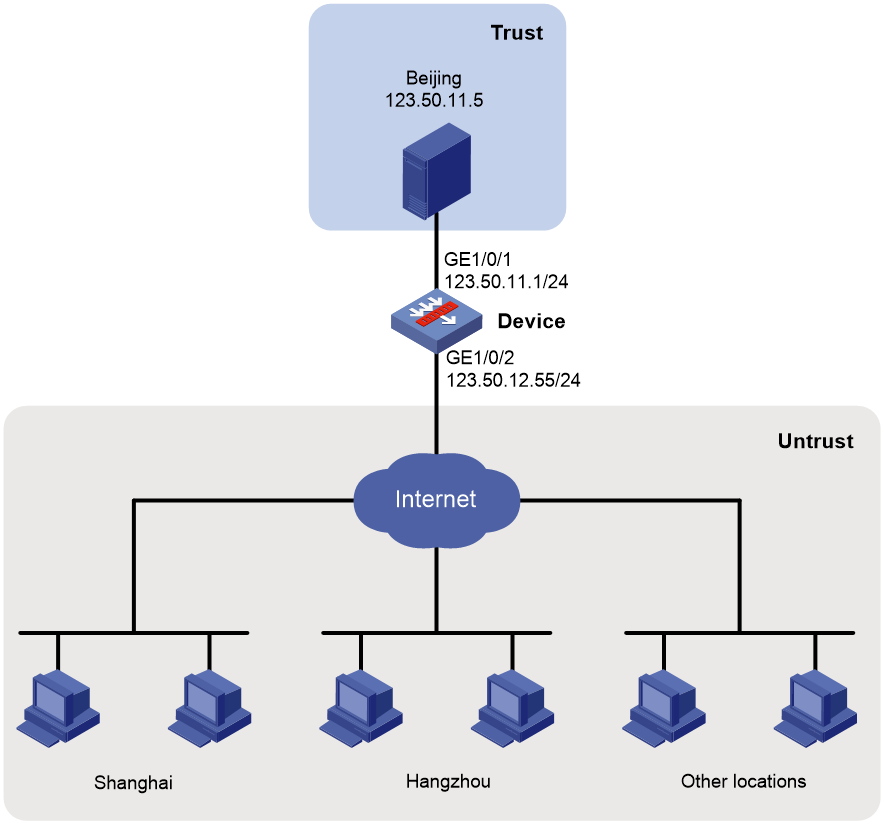
Example: Configuring location-based security policy
Network configuration
As shown in Figure 9, a server is deployed in the headquarters in Beijing.
Configure a security policy to allow only employees in the branches in Shanghai and Hangzhou to access the server.
Procedure
1. Assign IP addresses to interfaces:
# Assign an IP address to interface GigabitEthernet 1/0/1.
<Device> system-view
[Device] interface gigabitethernet 1/0/1
[Device-GigabitEthernet1/0/1] ip address 123.50.11.1 255.255.255.0
[Device-GigabitEthernet1/0/1] quit
# Assign IP addresses to other interfaces in the same way. (Details not shown.)
2. Configure settings for routing.
This example configures static routes, and the next hop in the routes is 123.50.12.254.
[Device] ip route-static 0.0.0.0 0 123.50.12.254
3. Add interfaces to security zones.
[Device] security-zone name trust
[Device-security-zone-trust] import interface gigabitethernet 1/0/1
[Device-security-zone-trust] quit
[Device] security-zone name untrust
[Device-security-zone-untrust] import interface gigabitethernet 1/0/2
[Device-security-zone-untrust] quit
4. Configure a security policy:
# Configure a rule named untrust-trust to allow employees in the branches in Shanghai and Hangzhou to access the server.
[Device-security-policy-ip] rule name untrust-trust
[Device-security-policy-ip-0-untrust-trust] source-zone untrust
[Device-security-policy-ip-0-untrust-trust] destination-zone trust
[Device-security-policy-ip-0-untrust-trust] source-location shanghai
[Device-security-policy-ip-0-untrust-trust] source-location hangzhou
[Device-security-policy-ip-0-untrust-trust] destination-ip-host 123.50.11.5
[Device-security-policy-ip-0-untrust-trust] action pass
[Device-security-policy-ip-0-untrust-trust] quit
# Activate rule matching acceleration.
[Device-security-policy-ip] accelerate enhanced enable
[Device-security-policy-ip] quit
Verifying the configuration
# Verify that only employees in the branches in Shanghai and Hangzhou can access the server. (Details not shown.)
Example: Configuring user-based security policy
See "Configuring user identification."
Example: Switching object policies to security policies
Network configuration
Object policies are already configured to achieve the following goals:
· The president office can access the financial database server through HTTP at any time.
· The financial office can access the financial database server through HTTP during working hours.
· The marketing office cannot access the financial database server through HTTP at any time.
The device software needs to be upgraded to a version that supports security policy. Switch object policy settings to security policy settings after software upgrade to achieve the same goals and ensure correct network operation.
Figure 10 Network diagram

Procedure
1. Make sure you have completed the tasks in "Prerequisites for switching object policies to security policies."
2. Switch object policy settings to security policy settings.
# Enter system view.
<Device> system-view
# Switch object policy settings in configuration file startup.cfg to security policy settings.
[Device] security-policy switch-from object-policy startup.cfg startup_secp.cfg
Configuration switching begins...
Object policies in the specified configuration file have been switched to securi
ty policies.
This command will reboot the device. Continue? [Y/N]:y
[Device]
System is starting...
Press Ctrl+D to access BASIC-BOOTWARE MENU...
Press Ctrl+T to start heavy memory test
Verifying the configuration
# Use a PC in each office to access the Web service of the financial database server through the browser. (Details not shown.)
# Verify that the security policy settings are consistent with the object policy settings. The following shows the sample settings.
· Object policy settings:
#
object-group ip address database
0 network subnet 192.168.0.0 255.255.255.0
#
object-group ip address finance
0 network subnet 192.168.2.0 255.255.255.0
#
object-group ip address market
0 network subnet 192.168.3.0 255.255.255.0
#
object-group ip address president
0 network subnet 192.168.1.0 255.255.255.0
#
object-group service web
0 service tcp destination eq 80
#
object-policy ip finance-database
rule 0 pass source-ip finance destination-ip database service web time-range work
#
object-policy ip market-database
rule 0 drop source-ip market destination-ip database service web
#
object-policy ip president-database
rule 0 pass source-ip president destination-ip database service web
#
security-zone name Local
#
security-zone name Trust
#
security-zone name DMZ
#
security-zone name Untrust
#
security-zone name database
import interface GigabitEthernet1/0/1
#
security-zone name finance
import interface GigabitEthernet1/0/3
#
security-zone name market
import interface GigabitEthernet1/0/4
#
security-zone name president
import interface GigabitEthernet1/0/2
#
zone-pair security source finance destination database
object-policy apply ip finance-database
#
zone-pair security source market destination database
object-policy apply ip market-database
#
zone-pair security source president destination database
object-policy apply ip president-database
#
· Security policy settings:
#
object-group ip address database
0 network subnet 192.168.0.0 255.255.255.0
#
object-group ip address finance
0 network subnet 192.168.2.0 255.255.255.0
#
object-group ip address market
0 network subnet 192.168.3.0 255.255.255.0
#
object-group ip address president
0 network subnet 192.168.1.0 255.255.255.0
#
object-group service web
0 service tcp destination eq 80
#
security-zone name Local
#
security-zone name Trust
#
security-zone name DMZ
#
security-zone name Untrust
#
security-zone name database
import interface GigabitEthernet1/0/1
#
security-zone name finance
import interface GigabitEthernet1/0/3
#
security-zone name market
import interface GigabitEthernet1/0/4
#
security-zone name president
import interface GigabitEthernet1/0/2
#
zone-pair security source finance destination database
#
zone-pair security source market destination database
#
zone-pair security source president destination database
#
security-policy ip
rule 0 name finance-database-0
action pass
time-range work
source-zone finance
destination-zone database
source-ip finance
destination-ip database
service web
rule 1 name market-database-1
source-zone market
destination-zone database
source-ip market
destination-ip database
service web
rule 2 name president-database-2
action pass
source-zone president
destination-zone database
source-ip president
destination-ip database
service web
#
Example: Configuring a security policy for OSPF communication
Network configuration
As shown in Figure 11, OSPF is configured and the network is divided into three areas. Device A and Device B act as ABRs to exchange traffic between areas.
Configure the IPv4 security policy to make sure each router can learn the routes to all network segments in the AS.

Configuring Device A
1. Assign IP addresses to interfaces.
# Assign an IP address to interface GigabitEthernet 1/0/1.
<Device> system-view
[Device] interface gigabitethernet 1/0/1
[Device-GigabitEthernet1/0/1] ip address 1.1.1.1 255.255.255.0
[Device-GigabitEthernet1/0/1] quit
# Assign IP addresses to other interfaces in the same way. (Details not shown.)
2. Add interfaces to security zones.
[DeviceA] security-zone name untrust
[DeviceA-security-zone-Untrust] import interface gigabitethernet 1/0/1
[DeviceA-security-zone-Untrust] quit
[DeviceA] security-zone name trust
[DeviceA-security-zone-Trust] import interface gigabitethernet 1/0/2
[DeviceA-security-zone-Trust] quit
3. Configure a security policy:
a. Configure rules to permit traffic between the Untrust and Local security zones, so the devices can establish OSPF neighbor relations:
# Configure a rule named ospflocalin to permit the packets from security zone Untrust to security zone Local.
[DeviceA] security-policy ip
[DeviceA-security-policy-ip] rule name ospflocalin
[DeviceA-security-policy-ip-0-ospflocalin] source-zone untrust
[DeviceA-security-policy-ip-0-ospflocalin] destination-zone local
[DeviceA-security-policy-ip-0-ospflocalin] service ospf
[DeviceA-security-policy-ip-0-ospflocalin] action pass
[DeviceA-security-policy-ip-0-ospflocalin] quit
# Configure a rule named ospflocalout to permit the packets from security zone Local to security zone Untrust.
[DeviceA-security-policy-ip] rule name ospflocalout
[DeviceA-security-policy-ip-1-ospflocalout] source-zone local
[DeviceA-security-policy-ip-1-ospflocalout] destination-zone untrust
[DeviceA-security-policy-ip-1-ospflocalout] service ospf
[DeviceA-security-policy-ip-1-ospflocalout] action pass
[DeviceA-security-policy-ip-1-ospflocalout] quit
b. Configure rules to permit traffic between the Untrust and Trust security zones, so devices in area 1 can communicate with devices in area 2.
# Configure a rule named trust-untrust to permit the packets from security zone Trust to security zone Untrust.
[DeviceA-security-policy-ip] rule name trust-untrust
[DeviceA-security-policy-ip-2-trust-untrust] source-zone trust
[DeviceA-security-policy-ip-2-trust-untrust] destination-zone untrust
[DeviceA-security-policy-ip-2-trust-untrust] source-ip-subnet 2.2.2.0 24
[DeviceA-security-policy-ip-2-trust-untrust] destination-ip-subnet 3.3.3.0 24
[DeviceA-security-policy-ip-2-trust-untrust] action pass
[DeviceA-security-policy-ip-2-trust-untrust] quit
# Configure a rule named untrust-trust to permit the packets from security zone Untrust to security zone Trust.
[DeviceA-security-policy-ip] rule name untrust-trust
[DeviceA-security-policy-ip-3-untrust-trust] source-zone untrust
[DeviceA-security-policy-ip-3-untrust-trust] destination-zone trust
[DeviceA-security-policy-ip-3-untrust-trust] source-ip-subnet 3.3.3.0 24
[DeviceA-security-policy-ip-3-untrust-trust] destination-ip-subnet 2.2.2.0 24
[DeviceA-security-policy-ip-3-untrust-trust] action pass
[DeviceA-security-policy-ip-3-untrust-trust] quit
[DeviceA-security-policy-ip] quit
4. Configure basic OSPF functions.
[DeviceA] router id 2.2.2.1
[DeviceA] ospf
[DeviceA-ospf-1] area 0
[DeviceA-ospf-1-area-0.0.0.0] network 1.1.1.0 0.0.0.255
[DeviceA-ospf-1-area-0.0.0.0] quit
[DeviceA-ospf-1] area 1
[DeviceA-ospf-1-area-0.0.0.1] network 2.2.2.0 0.0.0.255
[DeviceA-ospf-1-area-0.0.0.1] quit
[DeviceA-ospf-1] quit
Configuring Device B
1. Assign IP addresses to interfaces.
<Device> system-view
[Device] interface gigabitethernet 1/0/1
[Device-GigabitEthernet1/0/1] ip address 1.1.1.2 255.255.255.0
[Device-GigabitEthernet1/0/1] quit
[Device] interface gigabitethernet 1/0/2
[Device-GigabitEthernet1/0/2] ip address 3.3.3.1 255.255.255.0
[Device-GigabitEthernet1/0/2] quit
2. Add interfaces to security zones.
[DeviceB] security-zone name untrust
[DeviceB-security-zone-Untrust] import interface gigabitethernet 1/0/1
[DeviceB-security-zone-Untrust] quit
[DeviceB] security-zone name trust
[DeviceB-security-zone-Trust] import interface gigabitethernet 1/0/2
[DeviceB-security-zone-Trust] quit
3. Configure a security policy:
a. Configure rules to permit traffic between the Untrust and Local security zones, so the device can establish OSPF neighbor relations:
# Configure a rule named ospflocalin to permit the packets from security zone Untrust to security zone Local.
[DeviceB] security-policy ip
[DeviceB-security-policy-ip] rule name ospflocalin
[DeviceB-security-policy-ip-0-ospflocalin] source-zone untrust
[DeviceB-security-policy-ip-0-ospflocalin] destination-zone local
[DeviceB-security-policy-ip-0-ospflocalin] service ospf
[DeviceB-security-policy-ip-0-ospflocalin] action pass
[DeviceB-security-policy-ip-0-ospflocalin] quit
# Configure a rule named ospflocalout to permit the packets from security zone Local to security zone Untrust.
[DeviceB-security-policy-ip] rule name ospflocalout
[DeviceB-security-policy-ip-1-ospflocalout] source-zone local
[DeviceB-security-policy-ip-1-ospflocalout] destination-zone untrust
[DeviceB-security-policy-ip-1-ospflocalout] service ospf
[DeviceB-security-policy-ip-1-ospflocalout] action pass
[DeviceB-security-policy-ip-1-ospflocalout] quit
b. Configure rules to permit traffic between the Trust and Untrust security zones, so devices in area 1 can communicate with devices in area 2:
# Configure a rule named trust-untrust to permit the packets from security zone Trust to security zone Untrust.
[DeviceB-security-policy-ip] rule name trust-untrust
[DeviceB-security-policy-ip-2-trust-untrust] source-zone trust
[DeviceB-security-policy-ip-2-trust-untrust] destination-zone untrust
[DeviceB-security-policy-ip-2-trust-untrust] source-ip-subnet 3.3.3.0 24
[DeviceB-security-policy-ip-2-trust-untrust] destination-ip-subnet 2.2.2.0 24
[DeviceB-security-policy-ip-2-trust-untrust] action pass
[DeviceB-security-policy-ip-2-trust-untrust] quit
# Configure a rule named untrust-trust to permit the packets from security zone Untrust to security zone Trust.
[DeviceB-security-policy-ip] rule name untrust-trust
[DeviceB-security-policy-ip-3-untrust-trust] source-zone untrust
[DeviceB-security-policy-ip-3-untrust-trust] destination-zone trust
[DeviceB-security-policy-ip-3-untrust-trust] source-ip-subnet 2.2.2.0 24
[DeviceB-security-policy-ip-3-untrust-trust] destination-ip-subnet 3.3.3.0 24
[DeviceB-security-policy-ip-3-untrust-trust] action pass
[DeviceB-security-policy-ip-3-untrust-trust] quit
[DeviceB-security-policy-ip] quit
4. Configure basic OSPF functions.
[DeviceB] router id 3.3.3.1
[DeviceB] ospf
[DeviceB-ospf-1] area 0
[DeviceB-ospf-1-area-0.0.0.0] network 1.1.1.0 0.0.0.255
[DeviceB-ospf-1-area-0.0.0.0] quit
[DeviceB-ospf-1] area 2
[DeviceB-ospf-1-area-0.0.0.2] network 3.3.3.0 0.0.0.255
[DeviceB-ospf-1-area-0.0.0.2] quit
[DeviceB-ospf-1] quit
Verifying the configuration
# View detailed information about OSPF neighbors on Device A.
[DeviceA] display ospf peer verbose
OSPF Process 1 with Router ID 2.2.2.1
Neighbors
Area 0.0.0.0 interface 1.1.1.1(GigabitEthernet1/0/1)'s neighbors
Router ID: 3.3.3.1 Address: 1.1.1.2 GR State: Normal
State: Full Mode: Nbr is master Priority: 1
DR: 1.1.1.1 BDR: 1.1.1.2 MTU: 0
Options is 0x42 (-|O|-|-|-|-|E|-)
Dead timer due in 32 sec
Neighbor is up for 00:07:08
Authentication Sequence: [ 0 ]
Neighbor state change count: 5
BFD status: Disabled
# View OSPF routing information on Device A.
[DeviceA] display ospf routing
OSPF Process 1 with Router ID 2.2.2.1
Routing Table
Routing for network
Destination Cost Type NextHop AdvRouter Area
3.3.3.0/24 2 Inter 1.1.1.2 3.3.3.1 0.0.0.0
2.2.2.0/24 1 Stub 0.0.0.0 2.2.2.1 0.0.0.1
1.1.1.0/24 1 Transit 0.0.0.0 2.2.2.1 0.0.0.0
Total nets: 3
Intra area: 2 Inter area: 1 ASE: 0 NSSA: 0
# Verify that PCs in area 1 can ping PCs in area 2. (Details not shown.)
