- Table of Contents
- Related Documents
-
| Title | Size | Download |
|---|---|---|
| 03-WLAN Security Configuration | 259.32 KB |
Enabling an authentication method
Configuring the GTK rekey method
Configuring management frame protection
Displaying and maintaining WLAN security
WLAN security configuration examples
PSK authentication configuration example
MAC and PSK authentication configuration example
802.1X authentication configuration example
Dynamic WEP encryption-802.1X authentication configuration example
Supported combinations for ciphers
Overview
The wireless security incorporated in 802.11 is inadequate for protecting networks that contain sensitive information. They do a fairly good job defending against the general public, but not against good hackers. As a result, there is a need to implement advanced security mechanisms beyond the capabilities of 802.11.
Authentication modes
To secure wireless links, the wireless clients must be authenticated before accessing the AP. Only wireless clients passing the authentication can be associated with the AP. 802.11 links define two authentication mechanisms: open system authentication and shared key authentication.
· Open system authentication
Open system authentication is the default authentication algorithm. This is the simplest of the available authentication algorithms. Essentially it is a null authentication algorithm. Any client that requests authentication with this algorithm can become authenticated. Open system authentication is not required to be successful because an AP may decline to authenticate the client. Open system authentication involves a two-step authentication process. In the first step, the wireless client sends a request for authentication. In the second step, the AP determines if the wireless client passes the authentication and returns the result to the client.
Figure 1 Open system authentication process

· Shared key authentication
The following figure shows a shared key authentication process. The two parties have the same shared key configured.
a. The client sends an authentication request to the AP.
b. The AP randomly generates a challenge and sends it to the client.
c. The client uses the shared key to encrypt the challenge and sends it to the AP.
d. The AP uses the shared key to de-encrypt the challenge and compares the result with that received from the client. If they are identical, the client passes the authentication. If not, the authentication fails.
Figure 2 Shared key authentication process
WLAN data security
Compared with wired networks, WLAN networks are more susceptible to attacks because all WLAN devices share the same medium and thus every device can receive data from any other sending device. Plain-text data is transmitted over the WLAN if there is no security service.
To secure data transmission, 802.11 protocols provide some encryption methods to ensure that devices without the right key cannot read encrypted data.
1. WEP encryption
Wired Equivalent Privacy (WEP) was developed to protect data exchanged among authorized users in a wireless LAN from casual eavesdropping. WEP uses RC4 encryption (a stream encryption method) for confidentiality. WEP encryption falls into static and dynamic encryption according to how a WEP key is generated.
¡ Static WEP encryption
With static WEP encryption, all clients using the same SSID must use the same encryption key. If the encryption key is deciphered or lost, all data that attackers receive is encrypted. In addition, periodical manual key update brings great management workload.
¡ Dynamic WEP encryption
Dynamic WEP encryption is a great improvement over static WEP encryption. With dynamic WEP encryption, WEP keys are negotiated between client and server through the 802.1X protocol so that each client is assigned a different WEP key, which can be updated periodically to further improve unicast frame transmission security.
Although WEP encryption increases the difficulty of network interception and session hijacking, it still has weaknesses due to limitations of RC4 encryption algorithm and static key configuration.
2. TKIP encryption
Temporal key integrity Protocol (TKIP) and WEP both use the RC4 algorithm, but TKIP has several advantages over WEP, and provides more secure protection for WLAN as follows:
¡ First, TKIP provides longer IVs to enhance encryption security. Compared with WEP encryption, TKIP encryption uses 128-bit RC4 encryption algorithm, and increases the length of IVs from 24 bits to 48 bits.
¡ Second, TKIP allows for dynamic key negotiation to avoid static key configuration. TKIP replaces a single static key with a base key generated by an authentication server. TKIP dynamic keys cannot be easily deciphered.
¡ Third, TKIP offers MIC and countermeasures. If a packet fails the MIC, the data may be tampered, and the system may be attacked. If two packets fail the MIC in a certain period, the AP automatically takes countermeasures. It will not provide services in a certain period to prevent attacks.
3. AES-CCMP encryption
CTR with CCMP is based on the CCM of the AES encryption algorithm. CCM combines CTR for confidentiality and CBC-MAC for authentication and integrity. CCM protects the integrity of both the MAC Protocol Data Unit (MPDU) Data field and selected portions of the IEEE 802.11 MPDU header. The AES block algorithm in CCMP uses a 128-bit key and a 128-bit block size. Similarly, CCMP contains a dynamic key negotiation and management method, so that each wireless client can dynamically negotiate a key suite, which can be updated periodically to further enhance the security of the CCMP encryption mechanism. During the encryption process, CCMP uses a 48-bit packet number (PN) to ensure that each encrypted packet uses a different PN, improving the security to a certain extent.
Client access authentication
1. PSK authentication
To implement pre-shared key (PSK) authentication, the client and the authenticator must have the same shared key configured. Otherwise, the client cannot pass the PSK authentication.
2. 802.1X authentication
As a port-based access control protocol, 802.1X authenticates and controls accessing devices at the port level. A device that is connected to an 802.1X-enabled port of a WLAN access control device can access the resources on the WLAN only after passing authentication.
3. MAC address authentication
MAC address authentication does not require any client software. The MAC address of a client is compared against a predefined list of allowed MAC addresses. If a match is found, the client can pass the authentication and access the WLAN. If no match is found, the authentication fails and access is denied. The entire process does not require the user to enter a username or password. This type of authentication is suited to small networks (such as families and small offices) with fixed clients.
MAC address authentication can be done locally or through a RADIUS server.
¡ Local MAC address authentication—A list of usernames and passwords (the MAC addresses of allowed clients) is created on the wireless access device and the clients are authenticated by the wireless access device. Only clients whose MAC addresses are included in the list can pass the authentication and access the WLAN.
¡ MAC address authentication through RADIUS server—The wireless access device serves as the RADIUS client and sends the MAC address of each requesting client to the RADIUS server. If the client passes the authentication on the RADIUS server, the client can access the WLAN within the authorization assigned by the RADIUS server. In this authentication mode, if different domains are defined, authentication information of different SSIDs are sent to different RADIUS servers based on their domains.
For more information about access authentication, see Security Configuration Guide.
Management frame protection
The management frame protection service protects a set of robust management frames, such as de-authentication, disassociation, and some robust action frames. Management frame protection uses the PTK to encrypt unicast management frames and provides secrecy, integrity, and replay protection. It uses the Broadcast Integrity Protocol (BIP) to provide integrity and replay protection for broadcast and multicast management frames.
The security association (SA) query mechanism is used to enhance security if the AP and client negotiate to use management frame protection. SA queries include active SA queries and passive SA queries.
· Active SA query
As shown in Figure 3, active SA query uses the following process:
a. The client sends an association or reassociation request to the AP.
b. Upon receiving the request, the AP sends a response to inform the client that the request is denied and the client can associate at a later time. The response contains the association comeback time.
c. The AP sends an SA query request to verify the status of the client:
- If the AP receives an SA query response within the timeout time, it considers the client online.
- If the AP does not receive an SA query response within the timeout time, it sends another SA query request. If the AP receives an SA query response within the retransmission time, it considers the client online. The AP does not respond to any association or reassociation requests from the client until the association comeback time times out.
- If the AP does not receive an SA query response within the retransmission time, it considers the client offline and allows the client to reassociate.
Figure 3 Active SA query process
· Passive SA query
As shown in Figure 4, passive SA query uses the following process:
a. The client triggers the SA query process upon receiving an unencrypted disassociation or deauthentication frame.
b. The client sends an SA query request to the AP.
c. The AP sends an SA query response to the client:
- If the client receives the response, the client determines that the AP is online and does not process the disassociation or deauthentication frame.
- If the client does not receive a response, the client determines that the AP is offline and disassociates with the AP.
Figure 4 Passive SA query process
Protocols and standards
· IEEE Standard for Information technology—Telecommunications and information exchange between systems— Local and metropolitan area networks— Specific requirements -2004
· WI-FI Protected Access—Enhanced Security Implementation Based On IEEE P802.11i Standard-Aug 2004
· Information technology—Telecommunications and information exchange between systems—Local and metropolitan area networks—Specific requirements—802.11, 1999
· IEEE Standard for Local and metropolitan area networks "Port-Based Network Access Control" 802.1X™- 2004
· 802.11i IEEE Standard for Information technology—Telecommunications and information exchange between systems—Local and metropolitan area networks—Specific requirements
Configuring WLAN security
Configuration task list
To configure WLAN security in a service template, map the service template to a radio policy, and add radios to the radio policy. The SSID name, advertisement setting (beaconing), and encryption settings are configured in the service template. You can configure an SSID to support any combination of WPA, RSN, and Pre-RSN clients
|
Task |
Remarks |
|
Required |
|
|
Optional |
|
|
Optional |
|
|
Required |
|
|
Required |
|
|
Required |
|
|
Optional |
|
|
Optional |
Enabling an authentication method
You can enable open system or shared key authentication or both.
To enable an authentication method:
|
Step |
Command |
Remarks |
|
1. Enter system view. |
system-view |
N/A |
|
2. Enter WLAN service template view. |
wlan service-template service-template-number crypto |
N/A |
|
3. Enable the authentication method. |
authentication-method { open-system | shared-key } |
Optional. By default, open system authentication is adopted. · The shared-key authentication can be adopted only when WEP encryption is used, and you must configure the authentication-method shared-key command. · For RSN and WPA, the authentication method must be open system authentication. |
Configuring the PTK lifetime
A pairwise transient key (PTK) is generated through a four-way handshake, during which, the pairwise master key (PMK), an AP random value (ANonce), a site random value (SNonce), the AP’s MAC address and the client’s MAC address are used.
To configure the PTK lifetime:
|
Step |
Command |
Remarks |
|
1. Enter system view. |
system-view |
N/A |
|
2. Enter WLAN service template view. |
wlan service-template service-template-number crypto |
N/A |
|
3. Configure the PTK lifetime. |
ptk-lifetime time |
Optional. By default, the PTK lifetime is 43200 seconds. |
Configuring the GTK rekey method
A fat AP generates a group temporal key (GTK) and sends the GTK to a client during the authentication process between an AP and the client through group key handshake or the 4-way handshake. The client uses the GTK to decrypt broadcast and multicast packets. The Robust Security Network (RSN) negotiates the GTK through the 4-way handshake or group key handshake, and Wi-Fi Protected Access (WPA) negotiates the GTK only through group key handshake.
Two GTK rekey methods can be configured:
· Time-based GTK rekey—After the specified interval elapses, GTK rekey occurs.
· Packet-based GTK rekey—After the specified number of packets is sent, GTK rekey occurs.
By default, time-based GTK rekey is adopted, and the rekey interval is 86400 seconds.
Configuring a new GTK rekey method overwrites the previous one. For example, if time-based GTK rekey is configured after packet-based GTK rekey is configured, time-based GTK rekey takes effect.
You can also configure the device to start GTK rekey when a client goes offline.
Configuring GTK rekey based on time
|
Step |
Command |
Remarks |
|
1. Enter system view. |
system-view |
N/A |
|
2. Enter WLAN service template view. |
wlan service-template service-template-number crypto |
N/A |
|
3. Enable GTK rekey. |
gtk-rekey enable |
By default, GTK rekey is enabled. |
|
4. Configure the GTK rekey interval. |
gtk-rekey method time-based [ time ] |
By default, the interval is 86400 seconds. |
|
5. Configure the device to start GTK rekey when a client goes offline. |
gtk-rekey client-offline enable |
Optional. By default, the device does not start GTK rekey when a client goes offline. This command takes effect only when you execute the gtk-rekey enable command. |
Configuring GTK rekey based on packet
|
Step |
Command |
Remarks |
|
1. Enter system view. |
system-view |
N/A |
|
2. Enter WLAN service template view. |
wlan service-template service-template-number crypto |
N/A |
|
3. Enable GTK rekey. |
gtk-rekey enable |
By default, GTK rekey is enabled. |
|
4. Configure GTK rekey based on packet. |
gtk-rekey method packet-based [ packet ] |
The default packet number is 10000000. |
|
5. Configure the device to start GTK rekey when a client goes offline. |
gtk-rekey client-offline enable |
Optional. By default, the device does not start GTK rekey when a client goes offline. This command takes effect only when you execute the gtk-rekey enable command. |
Configuring security IE
WPA ensures greater protection than WEP. WPA operates in either WPA-PSK (or Personal) mode or WPA-802.1X (or Enterprise) mode. In Personal mode, a pre-shared key or pass-phrase is used for authentication. In Enterprise mode, 802.1X and RADIUS servers and the EAP are used for authentication.
Configuring WPA security IE
|
Step |
Command |
Remarks |
|
1. Enter system view. |
system-view |
N/A |
|
2. Enter WLAN service template view. |
wlan service-template service-template-number crypto |
N/A |
|
3. Enable the WPA-IE in the beacon and probe responses. |
security-ie wpa |
By default, WPA-IE is disabled. |
Configuring RSN security IE
An RSN is a security network that only allows the creation of robust security network associations (RSNAs). An RSN can be identified by the indication in the RSN Information Element (IE) of beacon frames. It provides greater protection than WEP and WPA.
|
Step |
Command |
Remarks |
|
1. Enter system view. |
system-view |
N/A |
|
2. Enter WLAN service template view. |
wlan service-template service-template-number crypto |
N/A |
|
3. Enable the RSN-IE in the beacon and probe responses. |
security-ie rsn |
By default, RSN-IE is disabled. |
Configuring cipher suite
A cipher suite is used for data encapsulation and de-encapsulation. It uses the following encryption methods:
· WEP40/WEP104/WEP128
· TKIP
· AES-CCMP
Configuring WEP cipher suite
1. Configure static WEP encryption:
The WEP encryption mechanism requires that the authenticator and clients on a WLAN have the same key configured. WEP adopts the RC4 algorithm (a stream encryption algorithm), supporting WEP40, WEP104 and WEP128 keys.
You can use WEP with either open system or shared key authentication mode:
¡ In open system authentication mode, the WEP key is used for encryption only and not for authentication. A client can access the network without having the same key as the authenticator. However, if the receiver has a different key from the sender, it discards the packets received from the sender.
¡ In shared key authentication mode, the WEP key is used for both encryption and authentication. If the key of a client is different from that of the authenticator, the client cannot pass the authentication and the access of the client is denied.
To configure static WEP encryption:
|
Step |
Command |
Remarks |
|
1. Enter system view. |
system-view |
N/A |
|
2. Enter WLAN service template view. |
wlan service-template service-template-number crypto |
N/A |
|
3. Enable the WEP cipher suite. |
cipher-suite { wep40 | wep104 | wep128 } |
By default, no cipher suite is selected. |
|
4. Configure the WEP default key. |
wep default-key { 1 | 2 | 3 | 4 } { wep40 | wep104 | wep128 } { pass-phrase | raw-key } [ cipher | simple ] key |
By default, the WEP default key index number is 1. |
|
5. Apply the WEP key. |
wep key-id { 1 | 2 | 3 | 4 } |
Optional. By default, WEP key 1 is applied. |
2. Configure dynamic WEP encryption:
|
Step |
Command |
Remarks |
|
1. Enter system view. |
system-view |
N/A |
|
2. Enter WLAN service template view. |
wlan service-template service-template-number crypto |
N/A |
|
3. Enable dynamic WEP encryption. |
wep mode dynamic |
By default, static WEP encryption is adopted. Dynamic WEP encryption must be used together with 802.1X authentication. |
|
4. Enable the WEP cipher suite. |
cipher-suite { wep40 | wep104 | wep128 } |
Optional. With dynamic WEP encryption configured, the device automatically uses the WEP 104 cipher suite. To change the encryption method, use the cipher-suite command. |
|
5. Configure the WEP default key. |
wep default-key { 1 | 2 | 3 | 4 } { wep40 | wep104 | wep128 } { pass-phrase | raw-key } [ cipher | simple ] key |
Optional. By default, no WEP default key is configured. If the WEP default key is configured, the WEP default key is used to encrypt multicast frames. If not, the device randomly generates a multicast WEP key. |
|
6. Apply the WEP key. |
wep key-id { 1 | 2 | 3 } |
Optional. By default, WEP key 1 is applied. For dynamic WEP encryption, the WEP key ID cannot be configured as 4. |
Configuring TKIP cipher suite
Message integrity check (MIC) is used to prevent attackers from data modification. It ensures data security by using the Michael algorithm. When a fault occurs to the MIC, the device will consider that the data has been modified and the system is being attacked. Upon detecting the attack, TKIP will suspend within the countermeasure interval. No TKIP associations can be established within the interval.
To configure TKIP cipher suite:
|
Step |
Command |
Remarks |
|
1. Enter system view. |
system-view |
N/A |
|
2. Enter WLAN service template view. |
wlan service-template service-template-number crypto |
N/A |
|
3. Enable the TKIP cipher suite. |
cipher-suite tkip |
By default, no cipher suite is selected. |
|
4. Configure the TKIP countermeasure interval. |
tkip-cm-time time |
Optional. The default countermeasure interval is 0 seconds. No countermeasures are taken. |
Configuring AES-CCMP cipher suite
|
Step |
Command |
Remarks |
|
1. Enter system view. |
system-view |
N/A |
|
2. Enter WLAN service template view. |
wlan service-template service-template-number crypto |
N/A |
|
3. Enable the CCMP cipher suite. |
cipher-suite ccmp |
By default, no cipher suite is selected. |
Configuring port security
The authentication type configuration includes the following options:
· PSK
· 802.1X
· MAC
· PSK and MAC
This document describes only common port security modes. For more information about other port security modes, see Security Configuration Guide.
Before configuring port security, create the wireless port and enable port security.
Configuring PSK authentication
|
Step |
Command |
Remarks |
|
1. Enter system view. |
system-view |
N/A |
|
2. Enter WLAN-BSS interface view. |
interface wlan-bss interface-number |
N/A |
|
3. Enable 802.11 key negotiation. |
port-security tx-key-type 11key |
By default, 802.11 key negotiation is not enabled. |
|
4. Configure the pre-shared key. |
port-security preshared-key { pass-phrase | raw-key } [ cipher | simple ] key |
By default, no pre-shared key is configured. |
|
5. Enable the PSK port security mode. |
port-security port-mode psk |
N/A |
Configuring 802.1X authentication
|
Step |
Command |
|
1. Enter system view. |
system-view |
|
2. Enter WLAN-BSS interface view. |
interface wlan-bss interface-number |
|
3. Enable the 802.1X port security mode. |
port-security port-mode { userlogin-secure | userlogin-secure-ext } |
Configuring MAC address authentication
802.11i does not support MAC address authentication.
To configure MAC address authentication:
|
Step |
Command |
|
1. Enter system view. |
system-view |
|
2. Enter WLAN-BSS interface view. |
interface wlan-bss interface-number |
|
3. Enable MAC port security mode. |
port-security port-mode mac-authentication |
Configuring PSK and MAC address authentication
For more information about port security configuration commands, see Security Configuration Guide.
To configure PSK and MAC address authentication:
|
Step |
Command |
Remarks |
|
1. Enter system view. |
system-view |
N/A |
|
2. Enter WLAN-BSS interface view. |
interface wlan-bss interface-number |
N/A |
|
3. Enable 802.11 key negotiation. |
port-security tx-key-type 11key |
By default, 802.11 key negotiation is not enabled. |
|
4. Enable the PSK and MAC port security mode. |
port-security port-mode mac-and-psk |
N/A |
|
5. Configure the pre-shared key. |
port-security preshared-key { pass-phrase | raw-key } key |
The key is a string of 8 to 63 characters, or a 64-digit hex number. |
Setting the KDF
KDFs are used to generate PTKs and GTKs. KDFs include HMAC-SHA1 and HMAC-SHA256 algorithms. This feature is only available when the authentication mode is PSK or 802.1X.
To set the KDF:
|
Step |
Command |
Remarks |
|
1. Enter system view. |
system-view |
N/A |
|
2. Enter WLAN service template view. |
wlan service-template service-template-name crypto |
The existing service template cannot be modified. |
|
3. Set the KDF. |
key-derivation { sha1 | sha1-and-sha256 | sha256 } |
Optional. By default, the HMAC-SHA1 algorithm is set. |
Configuring management frame protection
Management frame protection takes effect only for a network that uses the PSK or 802.1X authentication mode, and is configured with the CCMP cipher suite and RSN security information element.
If management frame protection is disabled, network access is available for all clients, but management frame protection is not performed. If management frame protection is enabled, the network access and management frame protection availability varies by management frame protection mode.
· Optional mode—Network access is available for all clients, but management frame protection is performed only for clients that support management frame protection.
· Mandatory mode—Network access and management frame protection are available only for clients that support management frame protection.
To configure management frame protection:
|
Step |
Command |
Remarks |
|
1. Enter system view. |
system-view |
N/A |
|
2. Enter WLAN service template view. |
wlan service-template service-template-name crypto |
The existing service template cannot be modified. |
|
3. Enable management frame protection. |
pmf { mandatory | optional } |
By default, management frame protection is disabled. If the mandatory mode is set, the KDF HMAC-SHA256 is used. |
|
4. Set the interval for sending SA query requests. |
pmf saquery timeout value |
Optional. By default, the interval for sending SA query requests is 200 milliseconds. |
|
5. Set the maximum transmission attempts for SA query requests. |
pmf saquery retry value |
Optional. By default, the maximum retransmission attempt number is 4 for SA query requests. |
|
6. Set the association comeback time. |
pmf association-comeback value |
Optional. By default, the association comeback time is 1 second. |
Displaying and maintaining WLAN security
For more information about related display commands, see Security Command Reference.
|
Task |
Command |
Remarks |
|
Display WLAN service template information. |
display wlan service-template [ service-template-number ] [ | { begin | exclude | include } regular-expression ] |
Available in any view. |
|
Display client information. |
display wlan client { interface wlan-radio [ radio-number ] | mac-address mac-address | service-template service-template-number } [ verbose ] [ | { begin | exclude | include } regular-expression ] |
Available in any view. |
|
Display MAC address authentication information. |
display mac-authentication [ interface interface-list ] [ | { begin | exclude | include } regular-expression ] |
Available in any view. |
|
Display the MAC address information of port security. |
display port-security mac-address security [ interface interface-type interface-number ] [ vlan vlan-id ] [ count ] [ | { begin | exclude | include } regular-expression ] |
Available in any view. |
|
Display the PSK user information of port security. |
display port-security preshared-key user [ interface interface-type interface-number ] [ | { begin | exclude | include } regular-expression ] |
Available in any view. |
|
Display the configuration information, running state and statistics of port security. |
display port-security [ interface interface-list ] [ | { begin | exclude | include } regular-expression ] |
Available in any view. |
|
Display 802.1X session information or statistics. |
display dot1x [ sessions | statistics ] [ interface interface-list ] [ | { begin | exclude | include } regular-expression ] |
Available in any view. |
WLAN security configuration examples
PSK authentication configuration example
Network requirements
As shown in Figure 5, perform PSK authentication with key 12345678 on the client.
Configuration procedure
# Enable port security.
<Sysname> system-view
[Sysname] port-security enable
# Configure the authentication mode as PSK, the pre-shared key as 12345678, and the key negotiation mode as 802.11 on the WLAN-BSS interface.
[Sysname] interface wlan-bss 1
[Sysname-WLAN-BSS1] port-security port-mode psk
[Sysname-WLAN-BSS1] port-security preshared-key pass-phrase simple 12345678
[Sysname-WLAN-BSS1] port-security tx-key-type 11key
[Sysname-WLAN-BSS1] quit
# Create crypto-type service template 1, configure its SSID as psktest, set the open system authentication mode, and enable the service template.
[Sysname] wlan service-template 1 crypto
[Sysname-wlan-st-1] ssid psktest
[Sysname-wlan-st-1] security-ie rsn
[Sysname-wlan-st-1] cipher-suite ccmp
[Sysname-wlan-st-1] authentication-method open-system
[Sysname-wlan-st-1] service-template enable
# Bind interface WLAN-BSS 1 to service template 1 on interface WLAN-radio 1/0/1.
[Sysname] interface wlan-radio1/0/1
[Sysname-WLAN-Radio1/0/1] radio-type dot11ac
[Sysname-WLAN-Radio1/0/1] service-template 1 interface wlan-bss 1
Verifying the configuration
· After the client has the same PSK configured, it can associate with the AP and access the WLAN.
· You can use the display wlan client verbose command and display port-security preshared-key user command to view the online clients.
MAC and PSK authentication configuration example
Network requirements
As shown in Figure 6, perform MAC and PSK authentication on the client.
Configuration procedure
1. Configure the fat AP:
# Enable port security.
<Sysname> system-view
[Sysname] port-security enable
# Configure the configuration modes as MAC and PSK, the pre-shared key as 12345678, and the key negotiation mode as 802.11 on the WLAN-BSS interface.
[Sysname] interface wlan-bss 1
[Sysname-WLAN-BSS1] port-security port-mode mac-and-psk
[Sysname-WLAN-BSS1] port-security preshared-key pass-phrase simple 12345678
[Sysname-WLAN-BSS1] port-security tx-key-type 11key
[Sysname-WLAN-BSS1] quit
# Create service template 1 of crypto type and configure its SSID as mactest.
[Sysname] wlan service-template 1 crypto
[Sysname-wlan-st-1] ssid mactest
# Set the RSN security IE and CCMP cipher suite.
[Sysname-wlan-st-1] security-ie rsn
[Sysname-wlan-st-1] cipher-suite ccmp
# Set the open system authentication mode and enable the service template.
[Sysname-wlan-st-1] authentication-method open-system
[Sysname-wlan-st-1] service-template enable
# Create a RADIUS scheme rad, and specify the extended RADIUS server type.
[Sysname] radius scheme rad
[Sysname-radius-rad] server-type extended
# Configure the IP addresses of the primary authentication server and accounting server as 10.18.1.88.
[Sysname-radius-rad] primary authentication 10.18.1.88
[Sysname-radius-rad] primary accounting 10.18.1.88
# Configure the shared key for RADIUS authentication/accounting packets as 12345678.
[Sysname-radius-rad] key authentication 12345678
[Sysname-radius-rad] key accounting 12345678
[Sysname-radius-rad] user-name-format without-domain
[Sysname-radius-rad] quit
# Configure AAA domain cams by referencing RADIUS scheme rad.
[Sysname] domain cams
[Sysname-isp-cams] authentication lan-access radius-scheme rad
[Sysname-isp-cams] authorization lan-access radius-scheme rad
[Sysname-isp-cams] accounting lan-access radius-scheme rad
[Sysname-isp-cams] quit
# Configure the MAC address authentication domain as cams.
[Sysname] mac-authentication domain cams
# Configure MAC address authentication user name format, using MAC addresses without hyphen as username and password (consistent with the format on the server).
[Sysname] mac-authentication user-name-format mac-address without-hyphen
# On interface WLAN-radio 1/0/1, bind interface WLAN-BSS 1 to service template 1.
[Sysname] interface wlan-radio1/0/1
[Sysname-WLAN-Radio1/0/1] radio-type dot11ac
[Sysname-WLAN-Radio1/0/1] service-template 1 interface wlan-bss 1
2. Configure the RADIUS server.
For more information about how to configure the RADIUS server, see related IMC guides.
Verifying the configuration
· After the client passes the MAC address authentication, the client can associate with the AP and access the WLAN.
· You can use the display wlan client verbose command, the display connection command, and the display mac-authentication command to view the online clients.
802.1X authentication configuration example
Network requirements
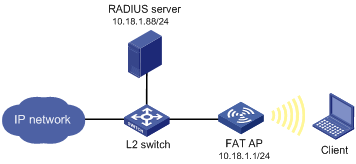
As shown in Figure 7, configure the FAT AP to perform 802.1X authentication on the client.
Configuration procedure
1. Configure the fat AP:
# Enable port security.
<Sysname> system-view
[Sysname] port-security enable
# Configure the 802.1X authentication mode as EAP.
[Sysname] dot1x authentication-method eap
# Create a RADIUS scheme rad, and specify the extended RADIUS server type.
[Sysname] radius scheme rad
[Sysname-radius-rad] server-type extended
# Configure the IP addresses of the primary authentication server and accounting server as 10.18.1.88.
[Sysname-radius-rad] primary authentication 10.18.1.88
[Sysname-radius-rad] primary accounting 10.18.1.88
# Configure the shared key for RADIUS authentication/accounting packets as 12345678.
[Sysname-radius-rad] key authentication 12345678
[Sysname-radius-rad] key accounting 12345678
[Sysname-radius-rad] user-name-format without-domain
[Sysname-radius-radius1] quit
# Configure AAA domain cams by referencing RADIUS scheme rad.
[Sysname] domain cams
[Sysname-isp-cams] authentication lan-access radius-scheme rad
[Sysname-isp-cams] authorization lan-access radius-scheme rad
[Sysname-isp-cams] accounting lan-access radius-scheme rad
[Sysname-isp-cams] quit
# Configure the AAA domain cams as the default ISP domain.
[Sysname] domain default enable cams
# Configure the port security mode as userlogin-secure-ext, and enable 802.11 key negotiation on the interface WLAN-BSS 1.
[Sysname] interface wlan-bss 1
[Sysname-WLAN-BSS1] port-security port-mode userlogin-secure-ext
[Sysname-WLAN-BSS1] port-security tx-key-type 11key
# Disable the multicast trigger function and the online user handshake function.
[Sysname-WLAN-BSS1] undo dot1x multicast-trigger
[Sysname-WLAN-BSS1] undo dot1x handshake
[Sysname-WLAN-BSS1] quit
# Create crypto-type service template 1, configure its SSID as dot1x, and configure the tkip and ccmp cipher suite.
[Sysname] wlan service-template 1 crypto
[Sysname-wlan-st-1] ssid dot1x
# Set the open system authentication mode.
[Sysname-wlan-st-1] authentication-method open-system
# Set the RSN security IE and CCMP cipher suite.
[Sysname-wlan-st-1] cipher-suite ccmp
[Sysname-wlan-st-1] security-ie rsn
# Enable the service template.
[Sysname-wlan-st-1] service-template enable
[Sysname-wlan-st-1] quit
# On interface WLAN-radio 1/0/1, bind service template 1 to interface WLAN-BSS 1.
[Sysname] interface wlan-radio1/0/1
[Sysname-WLAN-Radio1/0/1] radio-type dot11ac
[Sysname-WLAN-Radio1/0/1] service-template 1 interface wlan-bss 1
2. Configure the RADIUS server.
For more information about how to configure the RADIUS server, see related IMC guides.
Verifying the configuration.
· The client can pass 802.1X authentication and access the WLAN.
· You can use the display wlan client verbose command, display connection command and display dot1x command to view the online clients.
Dynamic WEP encryption-802.1X authentication configuration example
Network requirements
As shown in Figure 8, perform dynamic WEP encryption.
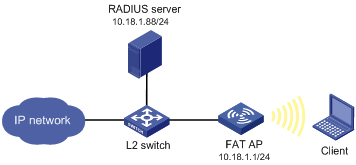
Configuration procedure
1. Configure the AP:
# Enable port security.
<Sysname> system-view
[Sysname] port-security enable
# Configure the 802.1X authentication mode as EAP.
[Sysname] dot1x authentication-method eap
# Create a RADIUS scheme rad, and specify the extended RADIUS server type.
[Sysname] radius scheme rad
[Sysname-radius-rad] server-type extended
# Configure the IP addresses of the primary authentication and accounting servers as 10.18.1.88.
[Sysname-radius-rad] primary authentication 10.18.1.88
[Sysname-radius-rad] primary accounting 10.18.1.88
# Configure the shared key for RADIUS authentication/accounting as 12345678.
[Sysname-radius-rad] key authentication 12345678
[Sysname-radius-rad] key accounting 12345678
[Sysname-radius-rad] user-name-format without-domain
[Sysname-radius-rad] quit
# Configure AAA domain bbb by referencing RADIUS scheme rad.
[Sysname] domain bbb
[Sysname-isp-bbb] authentication lan-access radius-scheme rad
[Sysname-isp-bbb] authorization lan-access radius-scheme rad
[Sysname-isp-bbb] accounting lan-access radius-scheme rad
[Sysname-isp-bbb] quit
[Sysname] domain default enable bbb
# Configure the WLAN-BSS interface and configure the port security mode as userlogin-secure-ext.
[Sysname] interface wlan-bss 1
[Sysname-WLAN-BSS1] port-security port-mode userlogin-secure-ext
# Disable the multicast trigger function and the online user handshake function.
[Sysname-WLAN-BSS1] undo dot1x multicast-trigger
[Sysname-WLAN-BSS1] undo dot1x handshake
[Sysname-WLAN-BSS1] quit
# Create crypto-type service template 1, configure its SSID as dot1x, and configure dynamic WEP encryption.
[Sysname] wlan service-template 1 crypto
[Sysname-wlan-st-1] authentication-method open-system
[Sysname-wlan-st-1] ssid dot1x
[Sysname-wlan-st-1] wep mode dynamic
[Sysname-wlan-st-1] service-template enable
[Sysname-wlan-st-1] quit
# Bind the WLAN-BSS interface to service template 1.
[Sysname] interface wlan-radio1/0/1
[Sysname-WLAN-Radio1/0/1] radio-type dot11ac
[Sysname-WLAN-Radio1/0/1] service-template 1 interface wlan-bss 1
2. Configure the RADIUS server.
For more information about how to configure the RADIUS server, see related IMC guides.
3. Configure the wireless card:
a. Double click the ![]() icon at the bottom right corner of your desktop.
icon at the bottom right corner of your desktop.
The Wireless Network Connection Status window appears.
b. Click the Properties button in the General tab.
The Wireless Network Connection Properties window appears.
c. In the Wireless Networks tab, select the wireless network with the SSID dot1x, and then select Automatically use my Windows logon name and password (and domain if any). See Figure 9.
Figure 9 Configuring the wireless card
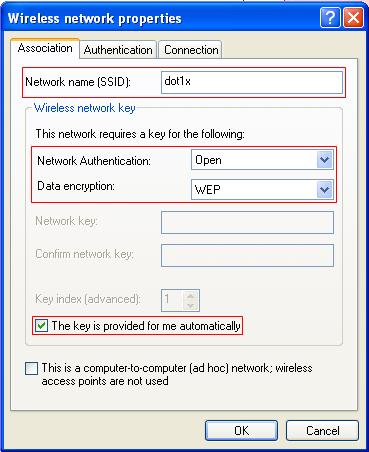
Verifying the configuration
· After you enter username user and password dot1x in the popup dialog box, the client can associate with the AP and access the WLAN.
· You can use the display wlan client verbose command, the display connection command, and the display dot1x command to view online client information.
Supported combinations for ciphers
This section introduces the combinations that can be used during the cipher suite configuration.
RSN
For RSN, the WLAN-WSEC module supports only CCMP and TKIP ciphers as the pair wise ciphers and WEP cipher suites are only used as group cipher suites. Below are the cipher suite combinations that WLAN-WSEC supports for RSN. (WEP40, WEP104 and WEP128 are mutually exclusive).
|
Unicast cipher |
Broadcast cipher |
Authentication method |
Security Type |
|
CCMP |
WEP40 |
PSK |
RSN |
|
CCMP |
WEP104 |
PSK |
RSN |
|
CCMP |
WEP128 |
PSK |
RSN |
|
CCMP |
TKIP |
PSK |
RSN |
|
CCMP |
CCMP |
PSK |
RSN |
|
TKIP |
WEP40 |
PSK |
RSN |
|
TKIP |
WEP104 |
PSK |
RSN |
|
TKIP |
WEP128 |
PSK |
RSN |
|
TKIP |
TKIP |
PSK |
RSN |
|
CCMP |
WEP40 |
802.1X |
RSN |
|
CCMP |
WEP104 |
802.1X |
RSN |
|
CCMP |
WEP128 |
802.1X |
RSN |
|
CCMP |
TKIP |
802.1X |
RSN |
|
CCMP |
CCMP |
802.1X |
RSN |
|
TKIP |
WEP40 |
802.1X |
RSN |
|
TKIP |
WEP104 |
802.1X |
RSN |
|
TKIP |
WEP128 |
802.1X |
RSN |
|
TKIP |
TKIP |
802.1X |
RSN |
WPA
For WPA, the WLAN-WSEC module supports the CCMP and TKIP ciphers as the pair wise ciphers and WEP cipher suites are only used as group cipher suites. Below are the cipher suite combinations that WLAN-WSEC supports for WPA (WEP40, WEP104 and WEP128 are mutually exclusive).
|
Unicast cipher |
Broadcast cipher |
Authentication method |
Security Type |
|
CCMP |
WEP40 |
PSK |
WPA |
|
CCMP |
WEP104 |
PSK |
WPA |
|
CCMP |
WEP128 |
PSK |
WPA |
|
CCMP |
TKIP |
PSK |
WPA |
|
CCMP |
CCMP |
PSK |
WPA |
|
TKIP |
WEP40 |
PSK |
WPA |
|
TKIP |
WEP104 |
PSK |
WPA |
|
TKIP |
WEP128 |
PSK |
WPA |
|
TKIP |
TKIP |
PSK |
WPA |
|
CCMP |
WEP40 |
802.1X |
WPA |
|
CCMP |
WEP104 |
802.1X |
WPA |
|
CCMP |
WEP128 |
802.1X |
WPA |
|
CCMP |
TKIP |
802.1X |
WPA |
|
CCMP |
CCMP |
802.1X |
WPA |
|
TKIP |
WEP40 |
802.1X |
WPA |
|
TKIP |
WEP104 |
802.1X |
WPA |
|
TKIP |
WEP128 |
802.1X |
WPA |
|
TKIP |
TKIP |
802.1X |
WPA |
Pre-RSN
For Pre-RSN stations, the WLAN-WSEC module supports only WEP cipher suites. (WEP40, WEP104 and WEP128 are mutually exclusive).
|
Unicast cipher |
Broadcast cipher |
Authentication method |
Security Type |
|
WEP40 |
WEP40 |
Open system |
no Sec Type |
|
WEP104 |
WEP104 |
Open system |
no Sec Type |
|
WEP128 |
WEP128 |
Open system |
no Sec Type |
|
WEP40 |
WEP40 |
Shared key |
no Sec Type |
|
WEP104 |
WEP104 |
Shared key |
no Sec Type |
|
WEP128 |
WEP128 |
Shared key |
no Sec Type |