- Table of Contents
-
- 04-Layer 3 Configuration Guide
- 00-Preface
- 01-ARP Configuration
- 02-IP Addressing Configuration
- 03-DHCP Configuration
- 04-DHCPv6 Configuration
- 05-DNS Configuration
- 06-IPv6 DNS Configuration
- 07-NAT Configuration
- 08-Adjacency Table Configuration
- 09-Flow Classification Configuration
- 10-IPv6 Basics Configuration
- 11-IP Performance Optimization Configuration
- 12-IP Routing Basics
- 13-Static Routing Configuration
- 14-IPv6 Static Routing Configuration
- 15-GRE Configuration
- 16-RIP Configuration
- 17-RIPng Configuration
- 18-Policy-Based Routing Configuration
- Related Documents
-
| Title | Size | Download |
|---|---|---|
| 04-DHCPv6 Configuration | 426.85 KB |
DHCPv6 address/prefix assignment
Rapid assignment involving two messages
Assignment involving four messages
DHCPv6 server configuration task list
Configuring IPv6 prefix assignment
Configuring IPv6 address assignment
Configuring non-temporary IPv6 address assignment
Configuring temporary IPv6 address assignment
Configuring network parameter assignment
Configuring parameters in a DHCPv6 address pool
Configuring a DHCPv6 option group for parameter assignment
Enabling the DHCPv6 server on an interface
Configuring IPv6 prefix assignment for stateless address autoconfiguration
Displaying and maintaining the DHCPv6 server
DHCPv6 server configuration examples
IPv6 prefix and configuration parameters assignment configuration example
IPv6 address and configuration parameters assignment configuration example
Static IPv6 address and prefix assignment configuration example
Dynamic IPv6 address and prefix assignment configuration example
Configuring the DHCPv6 relay agent
Displaying and maintaining the DHCPv6 relay agent
DHCPv6 relay agent configuration example
DHCPv6 client configuration task list
Configuring address acquisition
Configuring prefix acquisition
Displaying and maintaining the DHCPv6 client
DHCPv6 client configuration examples
IPv6 prefix acquisition configuration example
IPv6 address acquisition configuration example
Configuring a DHCPv6 snooping trusted port
Setting the maximum number of DHCPv6 snooping entries
Displaying and maintaining DHCPv6 snooping
DHCPv6 snooping configuration example
DHCPv6 overview
Support for this feature depends on the device model. For more information, see About the H3C Access Controllers Configuration Guides.
Basic concepts
Multicast addresses used by DHCPv6
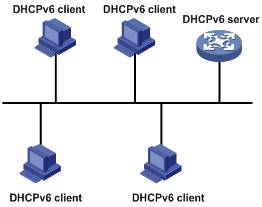
DHCPv6 uses the multicast address FF05::1:3 to identify all DHCPv6 servers on the site-local scope, and uses the multicast address FF02::1:2 to identify all DHCPv6 servers and relay agents on the link-local scope.
DUID
A DHCP unique identifier (DUID) uniquely identifies a DHCPv6 device (DHCPv6 client, server, or relay agent). A DHCPv6 device adds its DUID in a sent packet.
The DUID includes many types. The device supports only the DUID based on link-layer address (DUID-LL) defined in RFC 3315.
Figure 1 shows the DUID-LL format, where:
· DUID type—The device supports the DUID type of DUID-LL with the value of 0x0003.
· Hardware type—The device supports the hardware type of Ethernet with the value of 0x0001.
· Link layer address—Takes the value of the bridge MAC address of the device.
IA
Identified by an IAID, an Identity Association (IA) provides a construct for managing the obtained addresses, prefixes, and other configuration parameters assigned from a server to a client. A client can have more than one IA assigned to it (for example, one for each of its interfaces) to manage the addresses, prefixes, and other configuration parameters obtained by the interfaces.
IAID
An IAID uniquely identifies an IA. It is chosen by the client and must be unique among the IAIDs on the client.
Binding
The DHCPv6 server uses bindings to record the configuration information assigned to DHCPv6 clients, including the IPv6 address/prefix, client DUID, IAID, valid lifetime, preferred lifetime, and lease expiration time.
PD
The DHCPv6 server creates a Prefix Delegation (PD) for each assigned prefix to record the IPv6 prefix, client DUID, IAID, valid lifetime, preferred lifetime, and lease expiration time.
DHCPv6 address/prefix assignment
A process of DHCPv6 address/prefix assignment involves two or four messages.
Rapid assignment involving two messages
As shown in Figure 2, the rapid assignment involving two messages operates as follows:
1. The DHCPv6 client sends out a Solicit message that contains a Rapid Commit option, requesting that rapid assignment of address/prefix and other configuration parameters should be preferred.
2. If the DHCPv6 server supports rapid assignment, it responds with a Reply message containing the assigned IPv6 address/prefix and other configuration parameters. If the DHCPv6 server does not support rapid assignment, Assignment involving four messages is implemented.
Figure 2 Rapid assignment involving two messages
Assignment involving four messages
Figure 3 shows the process of IPv6 address/prefix assignment involving four messages.
Figure 3 Assignment involving four messages
The assignment involving four messages operates as follows:
1. The DHCPv6 client sends out a Solicit message, requesting an IPv6 address/prefix and other configuration parameters.
2. If the Solicit message does not contain a Rapid Commit option, or if the DHCPv6 server does not support rapid assignment even though the Solicit message contains a Rapid Commit option, the DHCPv6 server responds with an Advertise message, informing the DHCPv6 client of the assignable address/prefix and other configuration parameters.
3. The DHCPv6 client might receive multiple Advertise messages offered by different DHCPv6 servers. It then selects an offer according to the receiving sequence and server priority, and sends a Request message to the selected server for the confirmation of assignment.
4. The DHCPv6 server sends a Reply message to the client, confirming that the address/prefix and other configuration parameters are assigned to the client.
Address/prefix lease renewal
The IPv6 address/prefix assigned by the DHCPv6 server has a lease time, which depends on the valid lifetime. When the valid lifetime of the IPv6 address/prefix expires, the DHCPv6 client cannot use the IPv6 address/prefix any longer. To continue using the IPv6 address/prefix, the DHCPv6 client has to renew the lease time.
As shown in Figure 4, at T1, the DHCPv6 client sends a Renew message to the DHCPv6 server. The recommended value of T1 is half the preferred lifetime. Then the DHCPv6 server responds with a Reply message, informing the client about whether or not the lease is renewed.
Figure 4 Using the Renew message for address/prefix lease renewal
As shown in Figure 5, if the DHCPv6 client receives no response from the DHCPv6 server after sending out a Renew message at T1, it multicasts a Rebind message to all DHCPv6 servers at T2 (that is, when 80% of the preferred lifetime expires). Then the DHCPv6 server responds with a Reply message, informing the client about whether or not the lease is renewed.
If the DHCPv6 client receives no response from the DHCPv6 servers, the client stops using the address/prefix when the valid lifetime expires.
Figure 5 Using the Rebind message for address/prefix lease renewal

For more information about the valid lifetime and the preferred lifetime, see "Configuring IPv6 basics."
Protocols and standards
· RFC 3736, Stateless Dynamic Host Configuration Protocol (DHCP) Service for IPv6
· RFC 3315, Dynamic Host Configuration Protocol for IPv6 (DHCPv6)
· RFC 2462, IPv6 Stateless Address Autoconfiguration
· RFC 3633, IPv6 Prefix Options for Dynamic Host Configuration Protocol (DHCP) version 6
Configuring the DHCPv6 server
Overview
A DHCPv6 server can assign IPv6 addresses or IPv6 prefixes to DHCPv6 clients.
IPv6 address assignment
As shown in Figure 6, the DHCPv6 server assigns IPv6 addresses, domain name, DNS server addresses, and other configuration parameters to DHCPv6 clients.
The IPv6 addresses assigned to the clients fall into the following types:
· Temporary IPv6 addresses—Internally used and frequently changed without lease renewal.
· Non-temporary IPv6 addresses—Normally used by DHCP clients.
Figure 6 IPv6 address assignment
IPv6 prefix assignment
As shown in Figure 7, the DHCPv6 server assigns an IPv6 prefix to the DHCPv6 client. The client advertises the prefix information in an RA message so that hosts on the subnet can automatically configure their IPv6 addresses by using the prefix.
Figure 7 IPv6 prefix assignment
DHCPv6 address pool
The DHCP server selects IPv6 addresses, IPv6 prefixes, DNS server addresses, and other parameters from an address pool and assigns them to the DHCP clients.
Address allocation mechanisms
DHCPv6 supports the following address allocation mechanisms:
· Static address allocation—To implement static address allocation for a client, create a DHCPv6 address pool, and manually bind the DUID and IAID of the client to an IPv6 address in the DHCPv6 address pool. When the client requests an IPv6 address, the DHCPv6 server assigns the IPv6 address in the static binding to the client.
· Dynamic address allocation—To implement dynamic address allocation for clients, create a DHCPv6 address pool, specify a subnet for the pool, and divide the subnet into temporary and non-temporary IPv6 address ranges. Upon receiving a DHCP request, the DHCPv6 server selects an IPv6 address from the temporary or non-temporary IPv6 address range based on the address type specified in the client request.
Prefix allocation mechanisms
DHCPv6 supports the following prefix allocation mechanisms:
· Static prefix allocation—To implement static prefix allocation for a client, create a DHCPv6 address pool, and manually bind the DUID and IAID of the client to an IPv6 prefix in the DHCPv6 address pool. When the client requests an IPv6 prefix, the DHCPv6 server assigns the IPv6 prefix in the static binding to the client.
· Dynamic prefix allocation—To implement dynamic prefix allocation for clients, create a DHCPv6 address pool and a prefix pool, specify a subnet for the address pool, and apply the prefix pool to the address pool. Upon receiving a DHCP request, the DHCPv6 server dynamically selects an IPv6 prefix from the prefix pool in the address pool.
Address/prefix selection
The DHCPv6 server observes the following principles to select an IPv6 address or prefix for a client:
1. If there is an address pool where an IPv6 address or prefix is statically bound to the DUID or IAID of the client, the DHCPv6 server selects this address pool and assigns the statically bound IPv6 address or prefix and other configuration parameters to the client.
2. If the receiving interface has an address pool, the DHCP server selects an IPv6 address or prefix and other configuration parameters from this address pool.
3. If there is no static address pool and the receiving interface has no address pool, the DHCPv6 server selects an address pool in the following way:
¡ If the client and the server reside on the same subnet, the DHCP server matches the IPv6 address of the receiving interface against the subnets of all address pools, and selects the address pool with the longest-matching subnet.
¡ If the client and the server reside on different subnets (a DHCPv6 relay agent is in-between), the DHCPv6 server matches the IPv6 address of the DHCPv6 relay agent interface closest to the client against the subnets of all address pools, and selects the address pool with the longest-matching subnet.
Configuration prerequisites
Before you configure the DHCPv6 server, enable IPv6 by using the ipv6 command. For more information about the ipv6 command, see Layer 3—IP Services Command Reference.
DHCPv6 server configuration task list
|
Task |
Remarks |
|
Required. |
|
|
Perform one of the tasks as you need. |
|
|
Required. |
|
|
Configuring IPv6 prefix assignment for stateless address autoconfiguration |
Optional. |
Enabling the DHCPv6 server
|
Step |
Command |
Remarks |
|
1. Enter system view. |
system-view |
N/A |
|
2. Enable the DHCPv6 server function. |
ipv6 dhcp server enable |
Disabled by default. |
Configuring IPv6 prefix assignment
Use one of the following methods to configure IPv6 prefix assignment:
· Configure a static IPv6 prefix binding in an address pool—If you bind a DUID and an IAID to an IPv6 prefix, the DUID and IAID in a request must match those in the binding before the DHCPv6 server can assign the IPv6 prefix to the DHCPv6 client. If you only bind a DUID to an IPv6 prefix, the DUID in the request must match the DUID in the binding before the DHCPv6 server can assign the IPv6 prefix to the DHCPv6 client.
· Apply a prefix pool to an address pool—The DHCPv6 server dynamically assigns an IPv6 prefix from the address pool to a DHCPv6 client.
Configuration guidelines
· To configure multiple static IPv6 prefix bindings, use the static-bind prefix command multiple times.
· An IPv6 prefix can be bound to only one DHCPv6 client. You cannot use the static-bind prefix command to modify the DUID, IAID, preferred lifetime, and valid lifetime of an existing static IPv6 prefix binding. To do so, you must remove the static IPv6 prefix binding first.
· Only one prefix pool can be applied to an address pool.
· An non-existing prefix pool can be applied to an address pool, but no prefix can be assigned from the prefix pool until the prefix pool is created.
· You cannot use the prefix-pool command to modify an applied prefix pool, and its preferred lifetime and valid lifetime. To do so, you must remove the application of the prefix pool first.
Configuration procedure
To configure IPv6 prefix assignment:
|
Step |
Command |
Remarks |
|
1. Enter system view. |
system-view |
N/A |
|
2. Create a prefix pool. |
ipv6 dhcp prefix-pool prefix-pool-number prefix { prefix/prefix-len | prefix-number } assign-len assign-len |
This step is required for dynamic prefix assignment. By default, no prefix pool is configured. A non-existing IPv6 prefix can be specified, but the prefix pool takes effect only after the IPv6 prefix is created. For information about IPv6 prefix configuration, see "Configuring IPv6 basics." |
|
3. Create a DHCPv6 address pool and enter its view. |
ipv6 dhcp pool pool-number |
By default, no DHCPv6 address pool is configured. |
|
4. Specify an IPv6 subnet for dynamic address assignment. |
network { network-address/prefix-length | prefix prefix-number [ sub-prefix/sub-prefix-length ] } [ preferred-lifetime preferred-lifetime valid-lifetime valid-lifetime ] |
This step is optional if you want to apply an address pool to the DHCPv6 server when enabling the DHCPv6 server on the interface. By default, no IPv6 subnet is configured for dynamic address assignment. |
|
5. Configure static or dynamic prefix assignment. |
· Configure a static prefix binding: · Apply the prefix pool to the address pool: |
Use at least one command. By default, no static or dynamic prefix assignment is configured for an address pool. |
Configuring IPv6 address assignment
Use one of the following methods to configure IPv6 address assignment:
· Configure a static IPv6 address binding in an address pool
If you bind a DUID and an IAID to an IPv6 address, the DUID and IAID in a request must match those in the binding before the DHCPv6 server can assign the IPv6 address to the requesting DHCPv6 client. If you only bind a DUID to an IPv6 address, the DUID in a request must match the DUID in the binding before the DHCPv6 server can assign the IPv6 address to the requesting client.
· Specify a subnet and address ranges in an address pool
¡ Non-temporary address assignment—The server selects addresses from the non-temporary address range specified by the address range command. If no non-temporary address range is specified, the server selects addresses on the subnet specified by the network command.
¡ Temporary address assignment—The server selects addresses from the temporary address range specified by the temporary address range command. If no temporary address range is specified in the address pool, the DHCPv6 server cannot assign temporary addresses to clients.
Configuring non-temporary IPv6 address assignment
Follow these guidelines when you configure non-temporary IPv6 address assignment:
· To configure multiple static IPv6 address bindings, use the static-bind address command multiple times.
· An IPv6 address can be bound to only one DHCPv6 client. You cannot use the static-bind address command to modify the DUID, IAID, preferred lifetime and valid lifetime of a static IPv6 address binding. To do so, you must remove the static binding first.
· You cannot use the network command to configure the same subnet in different address pools.
· In the same address pool, the temporary address range and address range cannot overlap.
To configure non-temporary IPv6 address assignment:
|
Step |
Command |
Description |
|
1. Enter system view. |
system-view |
N/A |
|
2. Create a DHCPv6 address pool and enter its view. |
ipv6 dhcp pool pool-number |
By default, no DHCPv6 address pool exists. |
|
3. Create a static binding. |
static-bind address ipv6-address/addr-prefix-length duid duid [ iaid iaid ] [ preferred-lifetime preferred-lifetime valid-lifetime valid-lifetime ] |
Use at least one step. By default, no static binding or dynamic address allocation is configured. |
|
4. Configure dynamic address allocation. |
· Specify an IPv6 subnet for dynamic
assignment: · Specify a non-temporary IPv6 address
range (optional): |
Configuring temporary IPv6 address assignment
|
Step |
Command |
Description |
|
1. Enter system view. |
system-view |
N/A |
|
2. Create a DHCPv6 address pool and enter its view. |
ipv6 dhcp pool pool-number |
By default, no DHCPv6 address pool exists. |
|
3. Specify an IPv6 subnet for dynamic assignment. |
network { network-address/prefix-length | prefix prefix-number [ sub-prefix/sub-prefix-length ] } [ preferred-lifetime preferred-lifetime valid-lifetime valid-lifetime ] |
By default, no IPv6 subnet is configured for dynamic address assignment. |
|
4. Specify a temporary IPv6 address range. |
temporary address range start-ipv6-address end-ipv6-address [ preferred-lifetime preferred-lifetime valid-lifetime valid-lifetime ] |
By default, no temporary address range is specified. In the same address pool, the temporary address range and address range cannot overlap. |
Configuring network parameter assignment
In addition to IPv6 prefixes and IPv6 addresses, you can configure other configuration parameters in a DHCPv6 address pool, such as DNS server address, client domain name, SIP server address and domain name, self-defined options, and AFTR address.
Use one of the following methods to configure network parameter assignment:
· Configure configuration parameters in the DHCPv6 address pool.
· Create a DHCPv6 option group, configure configuration parameters in the group, and apply the option group to the DHCPv6 address pool.
Configuration parameters in the address pool take precedence over these in the DHCPv6 option group.
You can configure up to eight DNS server addresses, one domain name suffix, eight SIP server addresses, and eight SIP server domain names in an address pool or a DHCPv6 option group.
Configuring parameters in a DHCPv6 address pool
|
Step |
Command |
Remarks |
|
1. Enter system view. |
system-view |
N/A |
|
2. Create a DHCPv6 address pool and enter its view. |
ipv6 dhcp pool pool-number |
By default, no DHCPv6 address pool exists. |
|
3. Specify an IPv6 subnet for dynamic assignment. |
network { network-address/prefix-length | prefix prefix-number [ sub-prefix/sub-prefix-length ] } [ preferred-lifetime preferred-lifetime valid-lifetime valid-lifetime ] |
This step is optional if you apply an address pool when enabling the DHCPv6 server on the interface. By default, no IPv6 subnet is specified for dynamic address assignment. |
|
4. Specify a DNS server address. |
dns-server ipv6-address |
Optional. By default, no DNS server address is specified. |
|
5. Specify a domain name suffix. |
domain-name domain-name |
Optional. By default, no domain name suffix is specified. |
|
6. Specify the IPv6 address or domain name of a SIP server. |
sip-server { address ipv6-address | domain-name domain-name } |
Optional. By default, no SIP server address or domain name is specified. |
|
7. Specify the AFTR address. |
ds-lite address ipv6-address |
Optional. By default, no AFTR address is specified. |
|
8. Specify the self-defined DHCPv6 option. |
option code hex hex-string |
Optional. By default, no self-defined DHCPv6 option is configured. |
Configuring a DHCPv6 option group for parameter assignment
A DHCPv6 option group can be static or dynamic.
· A static DHCPv6 option group is manually created by the ipv6 dhcp option-group command.
· A dynamic DHCPv6 option group is dynamically created when the DHCPv6 client obtains an IP address, prefix, and configuration parameters from the server. For information about dynamic DHCPv6 option group configuration, see "Configuring the DHCPv6 client."
To configure a DHCPv6 option group for parameter assignment:
|
Step |
Command |
Remarks |
|
1. Enter system view. |
system-view |
N/A |
|
2. Create a static DHCPv6 option group and enter its view. |
ipv6 dhcp option-group option-group-number |
By default, no static DHCPv6 option group exists. |
|
3. Configure a DNS server address. |
dns-server ipv6-address |
Optional. By default, no DNS server address is configured. |
|
4. Configure a domain name suffix. |
domain-name domain-name |
Optional. By default, no domain name suffix is configured. |
|
5. Configure the IPv6 address or domain name of a SIP server. |
sip-server { address ipv6-address | domain-name domain-name } |
Optional. By default, no SIP server address or domain name is specified. |
|
6. Specify the AFTR address. |
ds-lite address ipv6-address |
Optional. By default, no AFTR address is specified. |
|
7. Specify the self-defined DHCPv6 option. |
option code hex hex-string |
Optional. By default, no self-defined DHCPv6 option is configured. |
|
8. Exit to system view. |
quit |
N/A |
|
9. Create a DHCPv6 address pool and enter its view. |
ipv6 dhcp pool pool-number |
By default, no DHCPv6 address pool exists. |
|
10. Specify an IPv6 subnet for dynamic assignment. |
network { network-address/prefix-length | prefix prefix-number [ sub-prefix/sub-prefix-length ] } [ preferred-lifetime preferred-lifetime valid-lifetime valid-lifetime ] |
This step is optional if you apply an address pool when enabling the DHCPv6 server on the interface. By default, no IPv6 subnet is configured for dynamic address assignment. |
|
11. Apply the option group to the address pool. |
option-group option-group-number |
By default, no option group is applied to the address pool. |
Enabling the DHCPv6 server on an interface
Follow these guidelines when you enable the DHCPv6 server on an interface:
· An interface cannot serve as a DHCPv6 server and DHCPv6 relay agent at the same time.
· Do not enable DHCPv6 server and DHCPv6 client on the same interface.
· Only one address pool can be applied to an interface.
· A non-existing address pool can be applied to an interface, but the server cannot assign any prefix, address, or other configuration information from the address pool until the address pool is created.
· When implementing static address/prefix allocation, the DHCPv6 server searches all address pools instead of the address pool applied to the interface.
· If you use the ipv6 dhcp server command multiple times, the most recent configuration takes effect.
To enable the DHCPv6 server on an interface:
|
Step |
Command |
Remarks |
|
1. Enter system view. |
system-view |
N/A |
|
2. Enter interface view. |
interface interface-type interface-number |
N/A |
|
3. Enable the DHCPv6 server on the interface. |
ipv6 dhcp server [ allow-hint | apply pool pool-number | preference preference-value | rapid-commit ] * |
Disabled by default. |
Configuring IPv6 prefix assignment for stateless address autoconfiguration
Perform this task to configure the DHCPv6 server to assign IPv6 prefixes to DHCPv6 clients for stateless address autoconfiguration. When receiving an RS message from a client, the DHCPv6 server sends back an IPv6 prefix in an RA message to the client for stateless address autoconfiguration.
To configure IPv6 prefix assignment for stateless address autoconfiguration:
|
Step |
Command |
Remarks |
|
1. Enter system view. |
system-view |
N/A |
|
2. Enter interface view. |
interface interface-type interface-number |
N/A |
|
3. Configure the DHCPv6 server to assign IPv6 prefixes to clients for stateless address autoconfiguration. |
ipv6 nd ra separate-delegation dhcp-pool prefix-pool-number |
Disabled by default. |
Displaying and maintaining the DHCPv6 server
|
Task |
Command |
Remarks |
|
Display the DUID of the local device. |
display ipv6 dhcp duid [ | { begin | exclude | include } regular-expression ] |
Available in any view. |
|
Display information about DHCPv6 option groups. |
display ipv6 dhcp option-group [ option-group-number ] [ | { begin | exclude | include } regular-expression ] |
Available in user view. |
|
Display DHCPv6 address pool information. |
display ipv6 dhcp pool [ pool-number ] [ | { begin | exclude | include } regular-expression ] |
Available in any view. |
|
Display prefix pool information. |
display ipv6 dhcp prefix-pool [ prefix-pool-number ] ] [ | { begin | exclude | include } regular-expression ] |
Available in any view. |
|
Display DHCPv6 server information on an interface. |
display ipv6 dhcp server [ interface interface-type interface-number ] [ | { begin | exclude | include } regular-expression ] |
Available in any view. |
|
Display information about IPv6 address conflicts. |
display ipv6 dhcp server conflict [ address ipv6-address | pool pool-number ] ] [ | { begin | exclude | include } regular-expression ] |
Available in any view. |
|
Display information about expired IPv6 addresses. |
display ipv6 dhcp server expired [ address ipv6-address | pool pool-number ] ] [ | { begin | exclude | include } regular-expression ] |
Available in any view. |
|
Display information about IPv6 address bindings. |
display ipv6 dhcp server ip-in-use [ address ipv6-address | pool pool-number ] ] [ | { begin | exclude | include } regular-expression ] |
Available in any view. |
|
Display information about IPv6 prefix bindings. |
display ipv6 dhcp server pd-in-use [ pool pool-number | prefix prefix/prefix-len | prefix-pool prefix-pool-number ] ] [ | { begin | exclude | include } regular-expression ] |
Available in any view. |
|
Display packet statistics on the DHCPv6 server. |
display ipv6 dhcp server statistics [ | { begin | exclude | include } regular-expression ] |
Available in any view. |
|
Clear information about IPv6 address conflicts. |
reset ipv6 dhcp server conflict [ address ipv6-address | pool pool-number ] ] |
Available in user view. |
|
Clear binding information about lease-expired IPv6 addresses. |
reset ipv6 dhcp server expired [ address ipv6-address | pool pool-number ] ] |
Available in user view. |
|
Clear information about IPv6 address bindings. |
reset ipv6 dhcp server ip-in-use [ address ipv6-address | pool pool-number ] ] |
Available in user view. |
|
Clear information about IPv6 prefix bindings. |
reset ipv6 dhcp server pd-in-use [ pool pool-number | prefix prefix/prefix-len | prefix-pool prefix-pool-number ] ] |
Available in user view. |
|
Clear packets statistics on the DHCPv6 server. |
reset ipv6 dhcp server statistics |
Available in user view. |
DHCPv6 server configuration examples
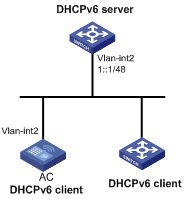
IPv6 prefix and configuration parameters assignment configuration example
Network requirements
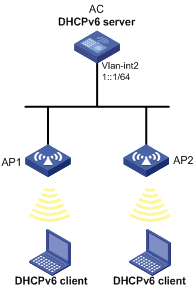
As shown in Figure 8, AC serves as a DHCPv6 server, and assigns the IPv6 prefix, DNS server address, domain name suffix, SIP server address, and SIP server domain name to the DHCPv6 clients. The IPv6 address of AC is 1::1/64.
AC assigns prefix 2001:0410:0201::/48 to the client whose DUID is 00030001CA0006A40000, and assigns prefixes ranging from 2001:0410::/48 to 2001:0410:FFFF::/48 (excluding 2001:0410:0201::/48) to other clients. The DNS server address is 2::2:3. The domain name suffix is aaa.com. The SIP server address is 2:2::4, and the domain name of the SIP server is bbb.com.
Configuration considerations
To configure the DHCPv6 server:
· Enable IPv6 and DHCPv6 server.
· Create a prefix pool containing prefix 2001:0410::/32 with the length of the assigned prefix being 48, so that the server assigns clients the prefixes ranging from 2001:0410::/48 to 2001:0410:FFFF::/48.
· Create an address pool. Configure a static prefix in the address pool and have the prefix pool referenced by the address pool. Configure other configuration parameters.
· Enable the DHCPv6 server on the interface that connects to the clients and apply the address pool to the interface.
Configuration procedure
# Configure basic functions of the AC. For more information, see WLAN Configuration Guide. (Details not shown.)
# Enable IPv6 and DHCPv6 server.
<AC> system-view
[AC] ipv6
[AC] ipv6 dhcp server enable
# Configure the IPv6 address of VLAN-interface 2.
[AC] interface vlan-interface 2
[AC-Vlan-interface2] ipv6 address 1::1/64
[AC-Vlan-interface2] quit
# Create and configure prefix pool 1.
[AC] ipv6 dhcp prefix-pool 1 prefix 2001:0410::/32 assign-len 48
# Create address pool 1.
[AC] ipv6 dhcp pool 1
# Apply prefix pool 1 to address pool 1, and set the preferred lifetime to one day, the valid lifetime to three days.
[AC-dhcp6-pool-1] prefix-pool 1 preferred-lifetime 86400 valid-lifetime 259200
# In address pool 1, bind prefix 2001:0410:0201::/48 to DUID 00030001CA0006A40000. Set the preferred lifetime to one day and the valid lifetime to three days.
[AC-dhcp6-pool-1] static-bind prefix 2001:0410:0201::/48 duid 00030001CA0006A40000 preferred-lifetime 86400 valid-lifetime 259200
# Specify the DNS server address as 2:2::3.
[AC-dhcp6-pool-1] dns-server 2:2::3
# Specify the domain name suffix as aaa.com.
[AC-dhcp6-pool-1] domain-name aaa.com
# specify the SIP server address as 2:2::4, and the domain name of the SIP server as bbb.com.
[AC-dhcp6-pool-1] sip-server address 2:2::4
[AC-dhcp6-pool-1] sip-server domain-name bbb.com
[AC-dhcp6-pool-1] quit
# Enable the DHCPv6 server on interface VLAN-interface 2, apply address pool 1 to the interface, enable desired address/prefix assignment and rapid address/prefix assignment, and set the precedence to the highest.
[AC] interface Vlan-interface 2
[AC-Vlan-interface2] ipv6 dhcp server apply pool 1 allow-hint preference 255 rapid-commit
Verifying the configuration
# Display DHCPv6 server configuration information on VLAN-interface 2.
[AC-Vlan-interface2] display ipv6 dhcp server interface Vlan-interface 2
Using pool: 1
Preference value: 255
Allow-hint: Enabled
Rapid-commit: Enabled
# Display information about DHCPv6 address pool 1.
[AC-Vlan-interface2] display ipv6 dhcp pool 1
Pool: 1
Static bindings:
Prefix: 2001:410:201::/48
DUID: 00030001CA0006A40000
IAID: 0xA1A1A1A1
Preferred lifetime 86400 sec, valid lifetime 2592000 sec
Prefix pool: 1
Preferred lifetime 86400 sec, valid lifetime 2592000 sec
DNS server addresses:
2:2::3
Domain names:
aaa.com
SIP server addresses:
2:2::4
SIP server domain names:
bbb.com
# Display information about prefix pool 1.
[AC-Vlan-interface2] display ipv6 dhcp prefix-pool 1
Prefix: 2001:410::/32
Assigned length: 48
Total prefix number: 65536
Available: 65535
In-use: 0
Static: 1
# After the client whose DUID is 00030001CA0006A40000 obtains an IPv6 prefix, display binding information on the DHCPv6 server.
[AC-Vlan-interface2] display ipv6 dhcp server pd-in-use
Total number: 1
Prefix Type Pool Expiration time
2001:410:201::/48 Static(C) 1 Jul 10 2011 19:45:01
# After the other client obtains an IPv6 prefix, display binding information on the DHCPv6 server.
[AC-Vlan-interface2] display ipv6 dhcp server pd-in-use
Total number: 2
Prefix Type Pool Expiration time
2001:410:201::/48 Static(C) 1 Jul 10 2011 19:45:01
2001:410::/48 Auto(C) 1 Jul 10 2011 20:44:05
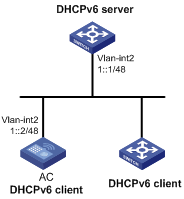
IPv6 address and configuration parameters assignment configuration example
Network requirements
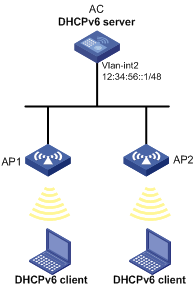
As shown in Figure 9, AC at 1::1/64 serves as a DHCPv6 server, and assigns IPv6 addresses, DNS server address, domain name suffix, SIP server address, and SIP server domain name to DHCPv6 clients.
AC assigns address 12:34:56::A/48 to the client with the DUID 00030001CA0006A40000, and assigns addresses from the subnet 12:34:56::/48 (excluding 12:34:56::A/48) to other clients.
The DNS server address is 2:2::3. The domain name suffix aaa.com. The SIP server address is 2:2::4, and the domain name of the SIP server is bbb.com.
Configuration considerations
To configure the DHCPv6 server:
· Enable IPv6 and DHCPv6 server.
· Create a static DHCPv6 option group and configure configuration parameters in the group.
· Create and configure an address pool.
Create a static binding so that the server can assign the specific address to the specified client. Specify a subnet 12:34:56::/48 for dynamic assignment. Apply the DHCPv6 option group to the address pool.
· Enable the DHCPv6 server on the interface that connects to the clients.
Configuration procedure
# Configure basic functions of the AC. For more information, see WLAN Configuration Guide. (Details not shown.)
# Enable IPv6 and the DHCPv6 server.
<AC> system-view
[AC] ipv6
[AC] ipv6 dhcp server enable
# Configure the IPv6 address of VLAN-interface 2.
[AC] interface vlan-interface 2
[AC-Vlan-interface2] ipv6 address 12:34:56::1/48
[AC-Vlan-interface2] quit
# Create a static DHCPv6 option group 1.
[AC] ipv6 dhcp option-group 1
# Specify the DNS server address as 2:2::3.
[AC-dhcp6-option-group1] dns-server 2:2::3
# Specify the domain name suffix as aaa.com.
[AC-dhcp6-option-group1] domain-name aaa.com
# Specify the SIP server address as 2:2::4, and the domain name of the SIP server as bbb.com.
[AC-dhcp6-option-group1] sip-server address 2:2::4
[AC-dhcp6-option-group1] sip-server domain-name bbb.com
[AC-dhcp6-option-group1] quit
# Create address pool 1.
[AC] ipv6 dhcp pool 1
# In address pool 1, bind IPv6 address 12:34:56::A/48 to DUID 00010006498D43220001. Set the preferred lifetime to one day and valid lifetime to three days.
[AC-dhcp6-pool-1] static-bind address 12:34:56::A/48 duid 00010006498d43220001 preferred-lifetime 86400 valid-lifetime 259200
# Specify a subnet 12:34:56::/48, and set the preferred lifetime to 1 day and valid lifetime to three days.
[AC-dhcp6-pool-1] network 12:34:56::/48 preferred-lifetime 86400 valid-lifetime 259200
# Apply option group 1 to address pool 1.
[AC-dhcp6-pool-1] option-group 1
[AC-dhcp6-pool-1] quit
# Enable the DHCPv6 server on interface VLAN-interface 2, apply address pool 1 to the interface, enable the desired address/prefix assignment and rapid address/prefix assignment, and set the precedence to the highest.
[AC] interface Vlan-interface 2
[AC-Vlan-interface2] ipv6 dhcp server apply pool 1 allow-hint preference 255 rapid-commit
[AC-Vlan-interface2] quit
Verifying the configuration
# Display DHCPv6 server configuration on VLAN-interface 2.
[AC] display ipv6 dhcp server interface Vlan-interface 2
Using pool: 1
Preference value: 255
Allow-hint: Enabled
Rapid-commit: Enabled
# Display information about DHCPv6 option group 1.
[AC] display ipv6 dhcp option-group 1
DHCPv6 option group: 1
Type: Static
DNS server addresses:
2:2::3
Domain names:
aaa.com
SIP server addresses:
2:2::4
SIP server domain names:
bbb.com
# Display information about DHCPv6 address pool 1.
[AC] display ipv6 dhcp pool 1
Pool: 1
Network: 12:34:56::/48
Preferred lifetime 86400 sec, valid lifetime 259200 sec
Static bindings:
Address: 12:34:56::A/48
DUID: 00010006498D43220001
IAID: Not configured
Preferred lifetime 86400 sec, valid lifetime 259200 sec
Option group: 1
# After the client whose DUID is 00010006498D43220001 obtains an IPv6 address, display binding information on the DHCPv6 server.
[AC] display ipv6 dhcp server ip-in-use address 12:34:56::a
Pool: 1
Client: FE80::1EBD:B9FF:FEE3:BD84
Type: Static(C)
DUID: 00010006498D43220001
IAID: 0x1
Address: 12:34:56::A
Preferred lifetime 86400 sec, valid lifetime 259200 sec
Will expire at Apr 29 2011 15:43:35 (259064 seconds left)
# After the other client obtains an IPv6 address, display binding information on the DHCPv6 server.
[AC] display ipv6 dhcp server ip-in-use
Total number: 2
Address Type Pool Expiration time
12:34:56::A Static(C) 1 Apr 29 2011 15:43:35
12:34:56::4 Auto(C) 1 Apr 29 2011 15:47:53
Static IPv6 address and prefix assignment configuration example
Network requirements
As shown in Figure 10, AC at 12:34:56::1/48 serves as a DHCPv6 server, and assigns IPv6 prefixes and addresses, DNS server address, domain name suffix, SIP server address, and SIP server domain name to DHCPv6 clients.
AC assigns prefix in the range of 12:34::/48 to 12:34:FFFF::/48 and addresses in the subnet 12:34:56::/48 to clients.
The DNS server address is 2:2::3. The domain name suffix is aaa.com. The SIP server address is 2:2::4, and the domain name of the SIP server is bbb.com.
Network considerations
To configure the DHCPv6 server:
· Enable IPv6 and DHCPv6 server.
· Create a static IPv6 prefix.
· Create a static DHCPv6 option group, and configure parameters in the group.
· Specify the static prefix to create a prefix pool.
· Create an address pool.
Apply the prefix pool to the address pool so that the DHCPv6 server can dynamically select a prefix from the prefix pool and assign it to a client. Apply the static prefix to the network subnet so that the server can assign an IP address to the client. To achieve network parameters assignment, apply the DHCPv6 option group to the address pool.
· Enable the DHCPv6 server on the interface that connects to the clients.

Configuration procedure
# Configure basic functions of the AC. For more information, see WLAN Configuration Guide. (Details not shown.)
# Enable IPv6 and DHCPv6 server on AC.
<AC> system-view
[AC] ipv6
[AC] ipv6 dhcp server enable
# Configure the IPv6 address of interface VLAN-interface 2.
[AC] interface Vlan-interface 2
[AC-Vlan-interface2] ipv6 address 12:34:56::1/48
[AC-Vlan-interface2] quit
# Create static IPv6 prefix 12:34::/32 with prefix ID 1.
[AC] ipv6 prefix 1 12:34::/32
# Create a static DHCPv6 option group 1.
[AC] ipv6 dhcp option-group 1
# Specify the DNS server address as 2:2::3.
[AC-dhcp6-option-group1] dns-server 2:2::3
# Specify the domain name suffix as aaa.com.
[AC-dhcp6-option-group1] domain-name aaa.com
# Specify the SIP server address as 2:2::4, and the domain name of the SIP server as bbb.com.
[AC-dhcp6-option-group1] sip-server address 2:2::4
[AC-dhcp6-option-group1] sip-server domain-name bbb.com
[AC-dhcp6-option-group1] quit
# Create prefix pool 1 that contains the prefix with the ID 1 and specify the length of prefixes to be assigned as 48. Prefix pool 1 can assign prefixes in the range of 12:34::/48 to 12:34:FFFF::/48.
[AC] ipv6 dhcp prefix-pool 1 prefix 1 assign-len 48
# Create address pool 1.
[AC] ipv6 dhcp pool 1
# Specify a static prefix with prefix ID 1 so that addresses in the subnet 12:34:56::/48 are assignable. Set the preferred lifetime to one day, and valid lifetime to three days.
[AC-dhcp6-pool-1] network prefix 1 0:0:56::/48 preferred-lifetime 86400 valid-lifetime 259200
# Apply prefix pool 1 to address pool 1, and set the preferred lifetime to one day and the valid lifetime to three days.
[AC-dhcp6-pool-1] prefix-pool 1 preferred-lifetime 86400 valid-lifetime 259200
# Apply DHCPv6 option group 1 to address pool 1.
[AC-dhcp6-pool-1] option-group 1
[AC-dhcp6-pool-1] quit
# Enable the DHCPv6 server on interface VLAN-interface 2, apply address pool 1 to the interface, enable the desired address/prefix assignment and rapid address/prefix assignment, and set the precedence to the highest.
[AC] interface Vlan-interface 2
[AC-Vlan-interface2] ipv6 dhcp server apply pool 1 allow-hint preference 255 rapid-commit
[AC-Vlan-interface2] quit
Verifying the configuration
# Display DHCPv6 server configuration information on VLAN-interface 2.
[AC] display ipv6 dhcp server interface Vlan-interface 2
Using pool: 1
Preference value: 255
Allow-hint: Enabled
Rapid-commit: Enabled
# Display information about DHCPv6 address pool 1.
[AC] display ipv6 dhcp pool 1
Pool: 1
Network: 12:34:56::/48
Preferred lifetime 86400 sec, valid lifetime 259200 sec
Prefix pool: 1
Preferred lifetime 86400 sec, valid lifetime 259200 sec
Option group: 1
# Display information about DHCPv6 option group 1.
[AC] display ipv6 dhcp option-group 1
DHCPv6 option group: 1
Type: Static
DNS server addresses:
2:2::3
Domain names:
aaa.com
SIP server addresses:
2:2::4
SIP server domain names:
bbb.com
# After a client obtains an IPv6 prefix, display IPv6 prefix binding information.
[AC] display ipv6 dhcp server pd-in-use
Total number: 1
Prefix Type Pool Expiration time
12:34::/48 Auto(C) 1 Apr 29 2011 17:07:38
# After a client obtains an IPv6 address, display IPv6 address binding information.
[AC] display ipv6 dhcp server ip-in-use
Total number: 1
Address Type Pool Expiration time
12:34:56::A Auto(C) 1 Apr 29 2011 17:06:58
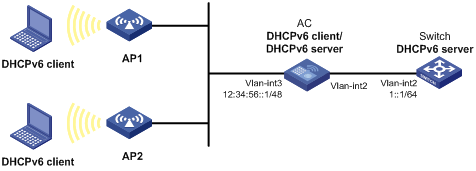
Dynamic IPv6 address and prefix assignment configuration example
Network requirements
As shown in Figure 11, Switch serves as a DHCPv6 server, and assigns an IPv6 prefix, DNS server address, domain name suffix, SIP server address, and SIP server domain name to the DHCPv6 client, AC. The DNS server address is 2:2::3. The domain name suffix is aaa.com. The SIP server address is 2:2::4, and the domain name of the SIP server is bbb.com.
With the configuration obtained from Switch, AC serves as a DHCPv6 server and assigns IP prefixes in the range of 12:34::/48 to 12:34:FFFF::/48 and addresses in the subnet 12:34:56::/48 to DHCPv6 clients.
Configuration considerations
· To configure Switch:
a. Enable IPv6.
b. Enable the DHCPv6 server.
c. Create a prefix pool.
d. Create an address pool, and specify a prefix pool so that Switch can assign a prefix to AC.
e. Enable the DHCPv6 server on VLAN-interface 2 that connects to AC.
· To configure AC that serves as the DHCPv6 client:
a. Enable IPv6.
b. Configure interface VLAN-interface 2 to use DHCPv6 for IPv6 prefix acquisition, and specify the prefix ID as 1 and option group ID as 1.
· To configure AC that serves as the DHCPv6 server:
a. Enable the DHCPv6 server.
b. Specify the dynamic prefix to create a prefix pool.
c. Create an address pool.
Apply the prefix pool to the address pool so that the DHCPv6 server can dynamically select a prefix from the prefix pool and assign it to a client. Apply the dynamic prefix to the network subnet so that the server can assign an IP address to the client. To achieve network parameters assignment, specify the dynamically crated DHCPv6 option group for the address pool.
d. Enable the DHCPv6 server on the interface VLAN-interface 3 that connects to the clients.
Configuration procedure
1. Configure Switch:
# Enable IPv6.
<Switch> system-view
[Switch] ipv6
# Enable the DHCPv6 server.
[Switch] ipv6 dhcp server enable
# Configure the IPv6 address of interface VLAN-interface 2.
[Switch] interface Vlan-interface 2
[Switch-Vlan-interface2] ipv6 address 1::1/64
[Switch-Vlan-interface2] quit
# Create prefix pool 1.
[Switch] ipv6 dhcp prefix-pool 1 prefix 12:34::/32 assign-len 32
# Apply prefix pool 1 to address pool 1, and set the preferred lifetime to one day and the valid lifetime to three days.
[Switch] ipv6 dhcp pool 1
[Switch-dhcp6-pool-1] prefix-pool 1 preferred-lifetime 86400 valid-lifetime 259200
# Specify the DNS server address as 2:2::3.
[Switch-dhcp6-pool-1] dns-server 2:2::3
# Specify the domain name suffix as aaa.com.
[Switch-dhcp6-pool-1] domain-name aaa.com
# Specify the SIP server address as 2:2::4, and the domain name of the SIP server as bbb.com.
[Switch-dhcp6-pool-1] sip-server address 2:2::4
[Switch-dhcp6-pool-1] sip-server domain-name bbb.com
[Switch-dhcp6-pool-1] quit
# Enable the DHCPv6 server on interface VLAN-interface 2, apply address pool 1 to the interface, enable the desired address/prefix assignment and rapid address/prefix assignment, and set the precedence to the highest.
[Switch] interface Vlan-interface 2
[Switch-Vlan-interface2] ipv6 dhcp server apply pool 1 allow-hint preference 255 rapid-commit
[Switch-Vlan-interface2] quit
2. Configure AC as the DHCPv6 client:
# Enable IPv6.
<AC> system-view
[AC] ipv6
# Configure interface VLAN-interface 2 to use DHCPv6 for IPv6 prefix acquisition, and specify the prefix ID as 1 and option group ID as 1.
[AC] interface Vlan-interface 2
[AC-Vlan-interface2] ipv6 dhcp client pd 1 rapid-commit option-group 1
[AC-Vlan-interface2] quit
3. Configure AC as the DHCPv6 server:
# Enable the DHCPv6 server.
[AC] ipv6 dhcp server enable
# Configure an IPv6 address for interface VLAN-interface 3.
[AC] interface Vlan-interface 3
[AC-Vlan-interface3] ipv6 address 12:34:56::1/48
[AC-Vlan-interface3] quit
# Create a prefix pool and specify the prefix ID 1.
[AC] ipv6 dhcp prefix-pool 1 prefix 1 assign-len 48
# Create address pool 1, specify the prefix ID 1, and set the preferred lifetime to one day, and valid lifetime to three days.
[AC] ipv6 dhcp pool 1
[AC-dhcp6-pool-1] network prefix 1 0:0:56::/48 preferred-lifetime 86400 valid-lifetime 259200
# Apply prefix pool 1 to address pool 1, and set the preferred lifetime to one day and the valid lifetime to three days.
[AC-dhcp6-pool-1] prefix-pool 1 preferred-lifetime 86400 valid-lifetime 259200
# Apply option group 1 to the address pool.
[AC-dhcp6-pool-1] option-group 1
[AC-dhcp6-pool-1] quit
# Enable the DHCPv6 server on interface VLAN-interface 3, apply address pool 1 to the interface, enable the desired address/prefix assignment and rapid address/prefix assignment, and set the precedence to the highest.
[AC] interface Vlan-interface 3
[AC-Vlan-interface3] ipv6 dhcp server apply pool 1 allow-hint preference 255 rapid-commit
[AC-Vlan-interface3] quit
Verifying the configuration
# Display DHCPv6 server configuration on VLAN-interface 2 of Switch. Similar output is displayed if you display the DHCPv6 configuration on VLAN-interface 2 of AC.
<Switch> display ipv6 dhcp server interface Vlan-interface 2
Using pool: 1
Preference value: 255
Allow-hint: Enabled
Rapid-commit: Enabled
# After AC obtains an IPv6 prefix and network configurations, display IPv6 prefix information.
<AC> display ipv6 prefix 1
Number: 1
Type : Dynamic
Prefix: 12:34::/32
Preferred lifetime 86400 sec, valid lifetime 259200 sec
# Display information about DHCPv6 option group 1 on AC.
<AC> display ipv6 dhcp option-group 1
DHCPv6 option group: 1
Type: Dynamic
DNS server addresses:
2:2::3
Domain names:
aaa.com
SIP server addresses:
2:2::4
SIP server domain names:
bbb.com
# Display information about DHCPv6 address pool 1 on AC.
<AC> display ipv6 dhcp pool 1
Pool: 1
Network: 12:34:56::/48
Preferred lifetime 86400 sec, valid lifetime 259200 sec
Prefix pool: 1
Preferred lifetime 86400 sec, valid lifetime 259200 sec
Option group: 1
# After DHCP client obtains an IPv6 prefix, display IPv6 prefix binding information on AC.
<AC> display ipv6 dhcp server pd-in-use
Total number: 1
Prefix Type Pool Expiration time
12:34::/48 Auto(C) 1 Apr 29 2011 17:07:38
# After DHCP client obtains an IPv6 address, display IPv6 address binding information on AC.
<AC> display ipv6 dhcp server ip-in-use
Total number: 1
Address Type Pool Expiration time
12:34:56::3 Auto(C) 1 Apr 29 2011 17:06:58
Configuring the DHCPv6 relay agent
Overview
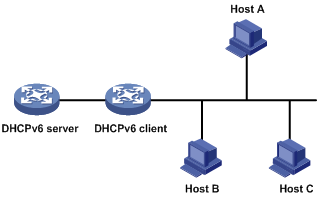
A DHCPv6 client usually uses a multicast address to contact the DHCPv6 server on the local link to obtain an IPv6 address and other configuration parameters. As shown in Figure 12, if the DHCPv6 server resides on another subnet, the DHCPv6 client can contact the server through a DHCPv6 relay agent, so you do not need to deploy a DHCPv6 server on each subnet.
Figure 12 Typical DHCPv6 relay agent application
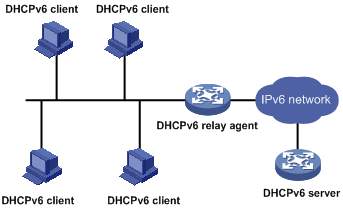
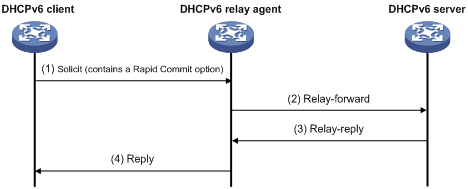
Figure 13 shows how the DHCPv6 client obtains an IPv6 address and other network configuration parameters from the DHCPv6 server through the DHCPv6 relay agent, using the process of rapid assignment involving two messages as an example.
1. The DHCPv6 client sends a Solicit message containing the Rapid Commit option to the multicast address FF02::1:2 of all the DHCPv6 servers and relay agents.
2. After receiving the Solicit message, the DHCPv6 relay agent encapsulates the message into the Relay Message option of a Relay-forward message, and sends the message to the DHCPv6 server.
3. After obtaining the Solicit message from the Relay-forward message, the DHCPv6 server selects an IPv6 address and other required parameters, and adds them to the reply that is encapsulated within the Relay Message option of a Relay-reply message. The DHCPv6 server then sends the Relay-reply message to the DHCPv6 relay agent.
4. The DHCPv6 relay agent obtains the reply from the Relay-reply message and sends the reply to the DHCPv6 client.
Then the DHCPv6 client uses the IPv6 address and other configuration parameters assigned by the DHCPv6 server to perform network configuration.
Figure 13 Operating process of a DHCPv6 relay agent
Configuration prerequisites
Before you configure the DHCPv6 relay agent, enable IPv6 by using the ipv6 command in system view.
Configuration guidelines
· You can specify up to eight DHCPv6 servers for an interface. After receiving requests from DHCPv6 clients, the DHCPv6 relay agent forwards the requests to all the specified DHCPv6 servers.
· If the DHCPv6 server address is a link-local address or link-scoped multicast address on the local link, you must specify an outgoing interface by using the interface keyword in the ipv6 dhcp relay server-address command. Otherwise, DHCPv6 packets might fail to be forwarded to the DHCPv6 server.
· After you remove all the specified DHCPv6 servers from an interface with the undo ipv6 dhcp relay server-address command, DHCPv6 relay agent is disabled on the interface.
· An interface cannot serve as a DHCPv6 relay agent and DHCPv6 server at the same time.
· Do not enable the DHCPv6 relay agent and DHCPv6 client on the same interface.
Configuration procedure
To configure the DHCPv6 relay agent:
|
Step |
Command |
Remarks |
|
1. Enter system view. |
system-view |
N/A |
|
2. Enter interface view. |
interface interface-type interface-number |
N/A |
|
3. Enable DHCPv6 relay agent on the interface and specify a DHCPv6 server. |
ipv6 dhcp relay server-address ipv6-address [ interface interface-type interface-number ] |
By default, DHCPv6 relay agent is disabled and no DHCPv6 server is specified on the interface. |
Displaying and maintaining the DHCPv6 relay agent
|
Task |
Command |
Remarks |
|
Display the DUID of the local device. |
display ipv6 dhcp duid [ | { begin | exclude | include } regular-expression ] |
Available in any view. |
|
Display DHCPv6 server addresses specified on the DHCPv6 relay agent. |
display ipv6 dhcp relay server-address { all | interface interface-type interface-number } [ | { begin | exclude | include } regular-expression ] |
Available in any view. |
|
Display packet statistics on the DHCPv6 relay agent. |
display ipv6 dhcp relay statistics [ | { begin | exclude | include } regular-expression ] |
Available in any view. |
|
Clear packets statistics on the DHCPv6 relay agent. |
reset ipv6 dhcp relay statistics |
Available in user view. |
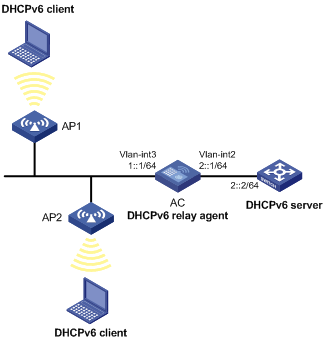
DHCPv6 relay agent configuration example
Network requirements
As shown in Figure 14, DHCPv6 clients reside in network 1::/64, and the IPv6 address of the DHCPv6 server is 2::2/64. The DHCPv6 client and server must communicate through a DHCPv6 relay agent (AC).
AC acts as the gateway of network 1::/64. It sends RA messages to notify the hosts to obtain IPv6 addresses and other configuration parameters through DHCPv6. For more information about RA messages, see "Configuring IPv6 basics."
Configuration procedure
1. Configure AC as a DHCPv6 relay agent:
# Configure basic functions of the AC. For more information, see WLAN Configuration Guide. (Details not shown.)
# Enable IPv6.
<AC> system-view
[AC] ipv6
# Configure the IPv6 addresses of VLAN-interface 2 and VLAN-interface 3.
[AC] interface vlan-interface 2
[AC-Vlan-interface2] ipv6 address 2::1 64
[AC-Vlan-interface2] quit
[AC] interface vlan-interface 2
[AC-Vlan-interface2] ipv6 address 1::1 64
# Enable DHCPv6 relay agent and specify the DHCPv6 server address on interface VLAN-interface 3.
[AC-Vlan-interface3] ipv6 dhcp relay server-address 2::2
2. Configure AC as a gateway:
# Enable AC to send RA messages and turn on the M and O flags.
[AC-Vlan-interface3] undo ipv6 nd ra halt
[AC-Vlan-interface3] ipv6 nd autoconfig managed-address-flag
[AC-Vlan-interface3] ipv6 nd autoconfig other-flag
Verifying the configuration
# Display DHCPv6 server address information on AC.
[AC-Vlan-interface3] display ipv6 dhcp relay server-address all
Interface: Vlan3
Server address(es) Output Interface
2::2
# Display packet statistics on the DHCPv6 relay agent.
[AC-Vlan-interface3] display ipv6 dhcp relay statistics
Packets dropped : 0
Error : 0
Excess of rate limit : 0
Packets received : 14
SOLICIT : 0
REQUEST : 0
CONFIRM : 0
RENEW : 0
REBIND : 0
RELEASE : 0
DECLINE : 0
INFORMATION-REQUEST : 7
RELAY-FORWARD : 0
RELAY-REPLY : 7
Packets sent : 14
ADVERTISE : 0
RECONFIGURE : 0
REPLY : 7
RELAY-FORWARD : 7
RELAY-REPLY : 0
Configuring the DHCPv6 client
A DHCPv6 client can use DHCPv6 to complete the following:
· Obtain an IPv6 address and configuration parameters, and create a DHCPv6 option group for the parameters.
· Obtain an IPv6 prefix and configuration parameters, and create a DHCPv6 option group for the parameters.
Configuration guidelines
· To make the DHCPv6 client successfully obtain IPv6 address, IPv6 prefix, and configuration parameters through DHCPv6, make sure the DHCPv6 server is available.
· Use the ipv6 command to enable IPv6 on the DHCPv6 client. For more information about the command, see "Configuring IPv6 basics."
· Do not enable the DHCPv6 client and DHCPv6 server, or the DHCPv6 client and DHCPv6 relay agent on the same interface.
DHCPv6 client configuration task list
|
Task |
Remarks |
|
Use either method. |
|
Configuring address acquisition
|
Step |
Command |
Remarks |
|
1. Enter system view. |
system-view |
N/A |
|
2. Enter interface view. |
interface interface-type interface-number |
N/A |
|
3. Configure the interface to use DHCPv6 for IP address acquisition. |
ipv6 address dhcp-alloc [ option-group group-number | rapid-commit ] * |
By default, An interface does not use DHCPv6 for IP address acquisition. |
Configuring prefix acquisition
|
Step |
Command |
Remarks |
|
1. Enter system view. |
system-view |
N/A |
|
2. Enter interface view. |
interface interface-type interface-number |
N/A |
|
3. Configure the interface to use DHCPv6 for IPv6 prefix acquisition. |
ipv6 dhcp client pd prefix-number [ option-group group-number | rapid-commit ] * |
By default, the interface does not use DHCPv6 for IPv6 prefix acquisition. |
Displaying and maintaining the DHCPv6 client
|
Task |
Command |
Remarks |
|
Display DHCPv6 client information. |
display ipv6 dhcp client [ interface interface-type interface-number ] [ | { begin | exclude | include } regular-expression ] |
Available in any view. |
|
Display DHCPv6 client statistics. |
display ipv6 dhcp client statistics [ interface interface-type interface-number ] [ | { begin | exclude | include } regular-expression ] |
Available in any view. |
|
Display the DUID of the local device. |
display ipv6 dhcp duid [ | { begin | exclude | include } regular-expression ] |
Available in any view. |
|
Clear DHCPv6 client statistics. |
reset ipv6 dhcp client statistics [ interface interface-type interface-number ] |
Available in user view. |
DHCPv6 client configuration examples
IPv6 prefix acquisition configuration example
Network requirements
The DHCPv6 client AC uses DHCPv6 to obtain an IPv6 prefix, the DNS server address, domain name suffix, SIP server address, and domain name of the SIP server.
Configure AC to create an IPv6 prefix based on the obtained prefix and create a DHCPv6 option group for the obtained configuration parameters.
Figure 15 Network diagram
Configuration procedure
Before you make the following configuration, configure the DHCPv6 server. For information about DHCPv6 server, see "Configuring the DHCPv6 server."
# Enable IPv6.
<AC> system-view
[AC] ipv6
# Configure the IPv6 address of VLAN-interface 2.
[AC] interface vlan-interface 2
[AC-Vlan-interface2] ipv6 address 1::2/48
# Configure VLAN-interface 2 to use DHCPv6 to obtain an IPv6 prefix and configuration parameters, and enable rapid prefix assignment. With the obtained prefix and parameters, the client automatically creates a DHCPv6 option group.
[AC-Vlan-interface2] ipv6 dhcp client pd 1 rapid-commit option-group 1
[AC-Vlan-interface2] quit
Verifying the configuration
# Display DHCPv6 client information. The output shows that AC has obtained an IPv6 prefix and configuration parameters.
[AC] display ipv6 dhcp client
Vlan-interface2:
Type: Stateful client requested for prefix
State: OPEN
IAID: 0xf0019
Preferred server:
Reachable via address: FE80::200:5EFF:FE0A:2303
DUID: 00030001000fe20a0a00
Prefix: 12:34::/32
Preferred lifetime 90 sec, valid lifetime 90 sec
T1 45 sec, T2 72 sec
Will expire at Jul 18 2011 10:04:03
DNS server addresses:
2000::FF
Domain names:
example.com
SIP server addresses:
2:2::4
SIP server domain names:
bbb.com
# Display Ipv6 prefix information.
[AC] display ipv6 prefix 1
Number: 1
Type : Dynamic
Prefix: 12:34::/32
Preferred lifetime 90 sec, valid lifetime 90 sec
# Display information about dynamic DHCPv6 option group 1.
[AC] display ipv6 dhcp option-group 1
DHCPv6 option group: 1
DNS server addresses:
2000::FF
Domain names:
example.com
SIP server addresses:
2:2::4
SIP server domain names:
bbb.com
IPv6 address acquisition configuration example
Network requirements
The DHCPv6 client AC uses DHCPv6 to obtain an IPv6 address, the DNS server address, domain name suffix, SIP server address, and domain name of the SIP server.
Configure AC to create a DHCPv6 option group for the obtained configuration parameters.
Figure 16 Network diagram
Configuration procedure
Before you make the following configuration, configure the DHCPv6 server. For information about DHCPv6 server, see "Configuring the DHCPv6 server."
# Enable IPv6.
<AC> system-view
[AC] ipv6
# Configure VLAN-interface 2 to use DHCPv6 to obtain an IPv6 prefix and configuration parameters, and enable rapid address assignment. With the obtained address and parameters, the client automatically creates a DHCPv6 option group.
[AC] interface vlan-interface 2
[AC-Vlan-interface2] ipv6 address dhcp-alloc rapid-commit option-group 1
[AC-Vlan-interface2] quit
Verifying the configuration
# Display DHCPv6 client information. The output shows that AC has obtained an IPv6 address and configuration parameters.
[AC] display ipv6 dhcp client
Vlan-interface2:
Type: Stateful address client
State: OPEN
IAID: 0xf0019
Preferred server:
Reachable via address: FE80::200:5EFF:FE0A:2303
DUID: 00030001000fe20a0a00
Address: 1:2::2
Preferred lifetime 60 sec, valid lifetime 60 sec
T1 30 sec, T2 48 sec
Will expire at Jul 18 2011 10:06:57
DNS server addresses:
2000::FF
Domain names:
example.com
SIP server addresses:
2:2::4
SIP server domain names:
bbb.com
# Display information about dynamic DHCPv6 option group 1.
[AC] display ipv6 dhcp option-group 1
DHCPv6 option group: 1
Type: Dynamic
DNS server addresses:
2000::FF
Domain names:
example.com
SIP server addresses:
2:2::4
SIP server domain names:
bbb.com
# Display IPv6 address information.
[AC] display ipv6 interface brief
*down: administratively down
(s): spoofing
Interface Physical Protocol IPv6 Address
Vlan-interface2 up up 1:2::2
Configuring DHCPv6 snooping
DHCPv6 snooping works between the DHCPv6 client and server or between the DHCPv6 client and relay agent. It cannot work between the DHCP server and DHCP relay agent.
You can configure only Layer 2 Ethernet interfaces or Layer 2 aggregate interfaces as DHCPv6 snooping trusted ports. For more information about aggregate interfaces, see Layer 2 Configuration Guide.
Overview
DHCPv6 snooping is security feature with the following functions:
· Guaranteeing that DHCPv6 clients obtain IPv6 addresses from authorized DHCPv6 servers
· Recording IP-to-MAC mappings of DHCPv6 clients
Guaranteeing that DHCPv6 clients obtain IPv6 addresses from authorized DHCPv6 servers
If DHCPv6 clients obtain invalid IPv6 addresses and network configuration parameters from an unauthorized DHCPv6 server, they are unable to communicate with other network devices. With DHCPv6 snooping, the ports of a device can be configured as trusted or untrusted to make sure the clients obtain IPv6 addresses only from authorized DHCPv6 servers:
· Trusted—A trusted port forwards DHCPv6 messages normally.
· Untrusted—An untrusted port discards reply messages from any DHCPv6 server.
Figure 17 Trusted and untrusted ports
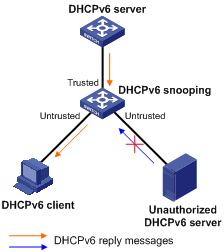
A DHCPv6 snooping device's port that is connected to an authorized DHCPv6 server, DHCPv6 relay agent, or another DHCPv6 snooping device should be configured as a trusted port to forward reply messages from the authorized DHCPv6 server. Other ports are configured as untrusted so that they do not forward reply messages from unauthorized DHCPv6 servers. This makes sure that the DHCPv6 client can obtain an IPv6 address from the authorized DHCPv6 server only.
As shown in Figure 17, configure the port that connects to the DHCPv6 server as a trusted port, and other ports as untrusted.
Recording IP-to-MAC mappings of DHCPv6 clients
DHCPv6 snooping reads DHCPv6 messages to create and update DHCPv6 snooping entries, including MAC addresses of clients, IPv6 addresses obtained by the clients, ports that connect to DHCPv6 clients, and VLANs to which the ports belong. You can use the display ipv6 dhcp snooping user-binding command to view the IPv6 address obtained by each client, so you can manage and monitor the clients' IPv6 addresses.
Enabling DHCPv6 snooping
To allow clients to obtain IPv6 addresses from an authorized DHCPv6 server, enable DHCPv6 snooping globally and configure trusted and untrusted ports properly. To record DHCPv6 snooping entries for a VLAN, enable DHCPv6 snooping for the VLAN.
To enable DHCPv6 snooping:
|
Step |
Command |
Remarks |
|
1. Enter system view. |
system-view |
N/A |
|
2. Enable DHCPv6 snooping globally. |
ipv6 dhcp snooping enable |
Disabled by default. |
|
3. Enter VLAN view. |
vlan vlan-id |
N/A |
|
4. Enable DHCPv6 snooping for the VLAN. |
ipv6 dhcp snooping vlan enable |
Optional. Disabled by default. |
Configuring a DHCPv6 snooping trusted port
After enabling DHCPv6 snooping globally, you can specify trusted and untrusted ports for a VLAN as needed. A DHCPv6 snooping trusted port normally forwards DHCPv6 packets. A DHCPv6 snooping untrusted port discards any DHCPv6 reply message received from a DHCPv6 server. Upon receiving a DHCPv6 request from a client in the VLAN, the DHCPv6 snooping device forwards the packet through trusted ports rather than any untrusted port in the VLAN, reducing network traffic.
Follow these guidelines when you configure a DHCPv6 snooping trusted port:
· You must specify a port connected to an authorized DHCPv6 server as trusted to make sure DHCPv6 clients can obtain valid IPv6 addresses. The trusted port and the ports connected to the DHCPv6 clients must be in the same VLAN.
· If a Layer 2 Ethernet interface is added to an aggregation group, the DHCPv6 snooping configuration of the interface does not take effect until the interface quits from the aggregation group.
To configure a DHCPv6 snooping trusted port:
|
Step |
Command |
Remarks |
|
1. Enter system view. |
system-view |
N/A |
|
2. Enter interface view. |
interface interface-type interface-number |
N/A |
|
3. Configure the port as trusted. |
ipv6 dhcp snooping trust |
By default, all ports of the device with DHCPv6 snooping globally enabled are untrusted. |
Setting the maximum number of DHCPv6 snooping entries
Perform this optional task to prevent an interface from learning too many DHCPv6 snooping entries and to save system resources.
To set the maximum number of DHCPv6 snooping entries:
|
Step |
Command |
Remarks |
|
1. Enter system view. |
system-view |
N/A |
|
2. Enter interface view. |
interface interface-type interface-number |
N/A |
|
3. Set the maximum number of DHCPv6 snooping entries that the interface can learn. |
ipv6 dhcp snooping max-learning-num number |
Optional. By default, the number of DHCPv6 snooping entries learned by an interface is not limited. |
Displaying and maintaining DHCPv6 snooping
|
Task |
Command |
Remarks |
|
Display DHCPv6 snooping trusted ports. |
display ipv6 dhcp snooping trust [ | { begin | exclude | include } regular-expression ] |
Available in any view. |
|
Display DHCPv6 snooping entries. |
display ipv6 dhcp snooping user-binding { ipv6-address | dynamic } [ | { begin | exclude | include } regular-expression ] |
Available in any view. |
|
Clear DHCPv6 snooping entries. |
reset ipv6 dhcp snooping user-binding { ipv6-address | dynamic } |
Available in user view. |
DHCPv6 snooping configuration example
ACs have either 10 GE or GE interfaces. Table 1 identifies the Ethernet interfaces (GigabitEthernet 1/0/1, in this example) on different types of ACs.
If the AC is an AC module installed on a switch, make sure the internal Ethernet interface that connects the switch to the AC module has correct settings, including in particular VLAN settings.
Table 1 AC Ethernet interfaces
|
Hardware |
AC Ethernet interfaces |
|
AC modules (installed in a switch) |
|
|
LSQM1WCMD0 LSRM1WCM3A1 LSUM3WCMD0 LSUM1WCME0 |
The internal Ethernet interface that connects the AC module to the switch. |
|
Wireless switches |
|
|
WX3024E WX3010E |
The internal Ethernet interface that connects the AC engine to the switching engine. |
|
ACs |
|
|
WX6103 |
The internal Ethernet interface that connects the MPU to the switching module. |
|
WX5002V2 WX5004 WX3510E WX3540E WX5510E |
Any Ethernet interface on the AC. |
|
WX2540E WAC360 WAC361 |
Any LAN or WAN interfaces on the AC. |
|
WX5540E |
The internal Ethernet interface that connects the AC engine to the switching engine. |
Network requirements
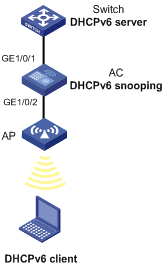
As shown in Figure 18, AC is connected to a DHCPv6 server (Switch) through GigabitEthernet 1/0/1, and is connected to DHCPv6 clients through GigabitEthernet 1/0/2. These two interfaces belong to VLAN 2. Configure AC to do the following:
· Forwarding DHCPv6 reply messages received only on GigabitEthernet 1/0/1.
· Recording the IP-to-MAC mappings for DHCPv6 clients.
Configuration procedure
# Configure basic functions of the AC. For more information, see WLAN Configuration Guide. (Details not shown.)
# Enable DHCPv6 snooping globally.
<AC> system-view
[AC] ipv6 dhcp snooping enable
# Add GigabitEthernet 1/0/1 and GigabitEthernet 1/0/2 to VLAN 2.
[AC] vlan 2
[AC-vlan2] port gigabitethernet1/0/1 gigabitethernet1/0/2
# Enable DHCPv6 snooping for VLAN 2.
[AC-vlan2] ipv6 dhcp snooping vlan enable
[AC] quit
# Configure GigabitEthernet 1/0/1 as a DHCPv6 snooping trusted port.
[AC] interface gigabitethernet1/0/1
[AC-GigabitEthernet1/0/1] ipv6 dhcp snooping trust
Verifying the configuration
After completing the configuration, connect GigabitEthernet 1/0/2 to a DHCPv6 client and GigabitEthernet 1/0/1 to a DHCPv6 server (Switch). The DHCPv6 client obtains an IPv6 address from Switch, but cannot obtain any IPv6 address from the unauthorized DHCPv6 server. You can use the display ipv6 dhcp snooping user-binding command to view the DHCPv6 snooping entries on AC.