- Table of Contents
-
- H3C Fixed Port Campus Switches Configuration Examples-B70D022-6W100
- 01-Login Management Configuration Examples
- 02-RBAC Configuration Examples
- 03-Software Upgrade Examples
- 04-ISSU Configuration Examples
- 05-Software Patching Examples
- 06-Ethernet Link Aggregation Configuration Examples
- 07-Port Isolation Configuration Examples
- 08-Spanning Tree Configuration Examples
- 09-VLAN Configuration Examples
- 10-VLAN Tagging Configuration Examples
- 11-DHCP Snooping Configuration Examples
- 12-Cross-Subnet Dynamic IP Address Allocation Configuration Examples
- 13-IPv6 over IPv4 Manual Tunneling with OSPFv3 Configuration Examples
- 14-ISATAP Tunnel and 6to4 Tunnel Configuration Examples
- 15-GRE Tunnel Configuration Examples
- 16-GRE with OSPF Configuration Examples
- 17-OSPF Configuration Examples
- 18-IS-IS Configuration Examples
- 19-BGP Configuration Examples
- 20-Policy-Based Routing Configuration Examples
- 21-OSPFv3 Configuration Examples
- 22-IPv6 IS-IS Configuration Examples
- 23-Routing Policy Configuration Examples
- 24-IGMP Snooping Configuration Examples
- 25-IGMP Configuration Examples
- 26-BIDIR-PIM Configuration Examples
- 27-Multicast VPN Configuration Examples
- 28-MLD Snooping Configuration Examples
- 29-IPv6 Multicast VLAN Configuration Examples
- 30-Basic MPLS Configuration Examples
- 31-MPLS L3VPN Configuration Examples
- 32-ACL Configuration Examples
- 33-Control Plane-Based QoS Policy Configuration Examples
- 34-Traffic Policing Configuration Examples
- 35-GTS and Rate Limiting Configuration Examples
- 36-Priority Mapping and Queue Scheduling Configuration Examples
- 37-Traffic Filtering Configuration Examples
- 38-AAA Configuration Examples
- 39-Port Security Configuration Examples
- 40-Portal Configuration Examples
- 41-SSH Configuration Examples
- 42-IP Source Guard Configuration Examples
- 43-Ethernet OAM Configuration Examples
- 44-CFD Configuration Examples
- 45-DLDP Configuration Examples
- 46-VRRP Configuration Examples
- 47-BFD Configuration Examples
- 48-NTP Configuration Examples
- 49-SNMP Configuration Examples
- 50-NQA Configuration Examples
- 51-Mirroring Configuration Examples
- 52-sFlow Configuration Examples
- 53-OpenFlow Configuration Examples
- 54-MAC Address Table Configuration Examples
- 55-Static Multicast MAC Address Entry Configuration Examples
- 56-IP Unnumbered Configuration Examples
- 57-MVRP Configuration Examples
- 58-MCE Configuration Examples
- 59-Congestion Avoidance and Queue Scheduling Configuration Examples
- 60-Attack Protection Configuration Examples
- 61-Smart Link Configuration Examples
- 62-RRPP Configuration Examples
- 63-BGP Route Selection Configuration Examples
- 64-IS-IS Route Summarization Configuration Examples
- 65-IRF Configuration Examples
- 66-MPLS TE Configuration Examples
- 67-VXLAN Configuration Examples
- 68-VCF Fabric Configuration Examples
- Related Documents
-
| Title | Size | Download |
|---|---|---|
| 01-Login Management Configuration Examples | 271.39 KB |
Example: Configuring console login
Applicable hardware and software versions
Example: Configuring user-role based Telnet login
Applicable hardware and software versions
Example: Configuring login user command authorization and accounting
Applicable hardware and software versions
Configuring the HWTACACS server
Example: Configuring Telnet login
Applicable hardware and software versions
Example: Telnetting from the device to another device
Applicable hardware and software versions
Introduction
This document provides login configuration examples. It also provides examples for implementing user access control by using command authorization and command accounting.
Prerequisites
The configuration examples in this document were created and verified in a lab environment, and all the devices were started with the factory default configuration. When you are working on a live network, make sure you understand the potential impact of every command on your network.
This document assumes that you have basic knowledge of login management.
Example: Configuring console login
Network configuration
Configure console login so users must pass local authentication to log in to the device through the console port.
Analysis
The port properties for the terminal emulation program must match the console port's default settings.
By default, a local user is assigned the user role network-operator and is not assigned any service type. To enable the user to log in through the console port, you must assign the terminal service type to the user. To enable the user to manage the device, you must assign the network-admin user role to the user.
Applicable hardware and software versions
The following matrix shows the hardware and software versions to which this configuration example is applicable:
|
Hardware |
Software version |
|
S6520XE-HI switch series |
Supported in Release 11xx |
|
S5560X-EI switch series |
Supported in Release 111x |
|
S5500V2-EI switch series |
Supported in Release 111x |
|
MS4520V2-30F switch |
Supported in Release 111x |
|
S5560S-EI switch series S5560S-SI switch series |
Supported in Release 612x |
|
S5130S-HI switch series S5130S-EI switch series S5130S-SI switch series S5130S-LI switch series |
Supported in Release 612x |
|
S5120V2-SI switch series S5120V2-LI switch series |
Supported in Release 612x |
|
S3100V3-EI switch series S3100V3-SI switch series |
Supported in Release 612x |
|
S5110V2 switch series |
Supported in Release 612x |
|
S5110V2-SI switch series |
Supported in Release 612x |
|
S5000V3-EI switch series |
Supported in Release 612x |
|
S5000E-X switch series |
Supported in Release 612x |
|
WAS6000 switch series |
Supported in Release 612x |
|
E128C switch E152C switch E500C switch series E500D switch series |
Supported in Release 612x |
|
MS4520V2 switch series (except the MS4520V2-30F switch) |
Supported in Release 612x |
|
MS4320V2 switch series MS4300V2 switch series MS4320 switch series MS4200 switch series |
Supported in Release 612x |
|
WS5850-WiNet switch series |
Supported in Release 612x |
|
WS5820-WiNet switch series WS5810-WiNet switch series |
Supported in Release 612x |
Restrictions and guidelines
For successful console port login, follow these restrictions and guidelines:
· Identify the console port carefully to make sure you are connecting to the correct port.
· Prepare a console terminal, for example, a PC. Make sure the console terminal has a terminal emulation program, such as HyperTerminal or PuTTY. For information about how to use terminal emulation programs, see the programs' user guides.
Procedures
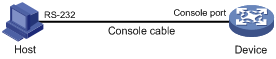
1. Turn off the PC if the PC is on.
2. Connect the DB-9 female connector of the console cable to the serial port of the PC.
3. Identify the console port of the device carefully and connect the RJ-45 connector of the console cable to the console port.
|
|
IMPORTANT: The serial ports on PCs do not support hot swapping. To connect a PC to an operating switch, first connect the PC end. To disconnect a PC from an operating device, first disconnect the device end. |
Figure 1 Connecting a configuration terminal to the console port
4. Turn on the PC.
5. On the PC, launch the terminal emulation program, and create a connection that uses the serial port connected to the device. Set the port properties so the port properties match the following console port default settings:
¡ Bits per second—9600 bps.
¡ Flow control—None.
¡ Parity—None.
¡ Stop bits—1.
¡ Data bits—8.
6. Power on the device and press Enter as prompted.
The user view prompt appears. You can enter commands to configure or manage the device. To get help, enter ?.
7. Configure AUX line 0:
# Enter AUX line view.
<Sysname> system-view
System View: return to User View with Ctrl+Z.
[Sysname] line aux 0
# Enable scheme authentication to use AAA to authenticate the console login user.
[Sysname-line-aux0] authentication-mode scheme
[Sysname-line-aux0] quit
# Create the local user admin.
[Sysname] local-user admin class manage
New local user added.
# Set the password to 123 (plain text) for the local user.
[Sysname-luser-manage-admin] password simple 123
# Assign the terminal service type and the network-admin user role to the user. Reclaim the default user role.
[Sysname-luser-manage-admin] service-type terminal
[Sysname-luser-manage-admin] authorization-attribute user-role network-admin
[Sysname-luser-manage-admin] undo authorization-attribute user-role network-operator
[Sysname-luser-manage-admin] quit
Verifying the configuration
Log in to the device through the console port again, and press Enter and enter the username admin and password 123 as prompted.
******************************************************************************
* Copyright (c) 2004-2018 New H3C Technologies Co., Ltd. All rights reserved.*
* Without the owner's prior written consent, *
* no decompiling or reverse-engineering shall be allowed. *
******************************************************************************
Line aux0 is available.
Press ENTER to get started.
login: admin
Password:
Configuration files
#
line aux 0
authentication-mode scheme
user-role network-admin
#
local-user admin class manage
password hash $h$6$RgG+mm4RKXICN1tY$ld6pV+qB2a/BBFXVnqocFJjYgx/EKCYod9tHmGRP8AA
1qnbeRcB6Bd4jW+cteG9aY2Gc+J8JqLHsWwvtnLyEAw==
service-type terminal
authorization-attribute user-role network-admin
#
Example: Configuring user-role based Telnet login
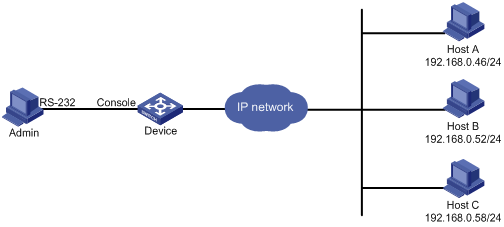
Network configuration
As shown in Figure 2, users need to log in to the device remotely to manage the device.
· Configure Telnet login to enable users to Telnet to the device.
· Configure Telnet user authentication so a Telnet user must provide the correct username and password at login.
· Configure access control so only Telnet users at 192.168.0.46/24 and 192.168.0.52/24 can Telnet to the device.
· Configure two local users.
¡ One local user can manage the device.
¡ One local user can use only the read commands of features.
Analysis
Telnet service is disabled by default. To enable Telnet login, you must enable Telnet service.
To control Telnet login, configure an ACL to permit access only from the specified IP addresses.
By default, a local user is assigned the user role network-operator. To restrict a local user to read commands, you must create a user role that can access only read commands.
Applicable hardware and software versions
The following matrix shows the hardware and software versions to which this configuration example is applicable:
|
Hardware |
Software version |
|
S6520XE-HI switch series |
Supported in Release 11xx |
|
S5560X-EI switch series |
Supported in Release 111x |
|
S5500V2-EI switch series |
Supported in Release 111x |
|
MS4520V2-30F switch |
Supported in Release 111x |
|
S5560S-EI switch series S5560S-SI switch series |
Supported in Release 612x |
|
S5130S-HI switch series S5130S-EI switch series S5130S-SI switch series S5130S-LI switch series |
Supported in Release 612x |
|
S5120V2-SI switch series S5120V2-LI switch series |
Supported in Release 612x |
|
S3100V3-EI switch series S3100V3-SI switch series |
Supported in Release 612x |
|
S5110V2 switch series |
Supported in Release 612x |
|
S5110V2-SI switch series |
Supported in Release 612x |
|
S5000V3-EI switch series |
Supported in Release 612x |
|
S5000E-X switch series |
Supported in Release 612x |
|
WAS6000 switch series |
Supported in Release 612x |
|
E128C switch E152C switch E500C switch series E500D switch series |
Supported in Release 612x |
|
MS4520V2 switch series (except the MS4520V2-30F switch) |
Supported in Release 612x |
|
MS4320V2 switch series MS4300V2 switch series MS4320 switch series MS4200 switch series |
Supported in Release 612x |
|
WS5850-WiNet switch series |
Supported in Release 612x |
|
WS5820-WiNet switch series WS5810-WiNet switch series |
Supported in Release 612x |
Procedures
# Log in to the device through the console port. (Details not shown.)
# Enable Telnet service.
<Sysname> system-view
[Sysname] telnet server enable
# Enable scheme authentication to use AAA to authenticate the Telnet login user.
[Sysname] line vty 0 63
[Sysname-line-vty0-63] authentication-mode scheme
[Sysname-line-vty0-63] quit
# Create the local user userA. Set the password to 123 (plain text).
[Sysname] local-user userA class manage
New local user added.
[Sysname-luser-manage-userA] password simple 123
# Assign the Telnet service type and the network-admin user role to the user. Reclaim the default user role.
[Sysname-luser-manage-userA] authorization-attribute user-role network-admin
[Sysname-luser-manage-userA] service-type telnet
[Sysname-luser-manage-userA] undo authorization-attribute user-role network-operator
[Sysname-luser-manage-userA] quit
# Create user role roleB. Add rule 1 to permit the user role to access read commands of all features.
[Sysname] role name roleB
[Sysname-role-roleB] rule 1 permit read feature
[Sysname-role-roleB] quit
# Create the local user userB. Set the password to 123 (plain text).
[Sysname] local-user userB class manage
New local user added.
[Sysname-luser-manage-userB] password simple 123
# Assign the Telnet service type and the roleB user role to the user. Reclaim the default user role.
[Sysname-luser-manage-userB] authorization-attribute user-role roleB
[Sysname-luser-manage-userB] service-type telnet
[Sysname-luser-manage-userB] undo authorization-attribute user-role network-operator
[Sysname-luser-manage-userB] quit
# Create ACL 2000 and add rules to permit only access from 192.168.0.46 and 192.168.0.52.
[Sysname] acl basic 2000
[Sysname-acl-basic-2000] rule 1 permit source 192.168.0.46 0
[Sysname-acl-basic-2000] rule 2 permit source 192.168.0.52 0
[Sysname-acl-basic-2000] rule 3 deny source any
[Sysname-acl-basic-2000] quit
# Apply the ACL to filter Telnet logins.
[Sysname] telnet server acl 2000
Verifying the configuration
1. Telnet to the device from Host A, and enter the username userA and password 123 as prompted.
2. Display the commands available in user view.
The commands for device configuration and management are included in the list.
******************************************************************************
* Copyright (c) 2004-2018 New H3C Technologies Co., Ltd. All rights reserved.*
* Without the owner's prior written consent, *
* no decompiling or reverse-engineering shall be allowed. *
******************************************************************************
login: userA
Password:
<Sysname> ?
User view commands:
archive Archive configuration
arp Address Resolution Protocol (ARP) module
backup Backup operation
boot-loader Software image file management
bootrom Update/read/backup/restore bootrom
cd Change current directory
cfd Connectivity Fault Detection (CFD) module
clock Specify the system clock
copy Copy a file
create Create a file
debugging Enable system debugging functions
delete Delete a file
diagnostic-logfile Diagnostic log file configuration
dir Display files and directories on the storage media
display Display current system information
erase Alias for 'delete'
exception Exception information configuration
exit Alias for 'quit'
fdisk Partition a storage medium
fixdisk Check and repair a storage medium
format Format a storage medium
free Release a connection
ftp Open an FTP connection
---- More ----
3. Telnet to the device from Host B, and enter the username userB and password 123 as prompted.
4. Display the commands available in user view.
Only read commands are displayed.
******************************************************************************
* Copyright (c) 2004-2018 New H3C Technologies Co., Ltd. All rights reserved.*
* Without the owner's prior written consent, *
* no decompiling or reverse-engineering shall be allowed. *
******************************************************************************
login: userB
Password:
<Sysname> ?
User view commands:
dir Display files and directories on the storage media
display Display current system information
erase Alias for 'delete'
exit Alias for 'quit'
md5sum Compute the hash digest of a file using the MD5 algorithm
more Display the contents of a file
no Alias for 'undo'
pwd Display current working directory
quit Exit from current command view
sha256sum Compute the hash digest of a file using the SHA256 algorithm
show Alias for 'display'
system-view Enter the System View
write Alias for 'save'
<Sysname>
5. Telnet to the device from Host C.
Your access request is rejected.
Configuration files
#
telnet server enable
telnet server acl 2000
#
acl basic 2000
rule 1 permit source 192.168.0.46 0
rule 2 permit source 192.168.0.52 0
rule 3 deny
#
line vty 0 63
authentication-mode scheme
user-role network-operator
#
local-user userA class manage
password hash $h$6$I2Sg4Llj1qVUWQZ3$JA6KkU3zfVVRg48MM92X6cVpdiqR2JF887PKi3GQMwn
XXXcsWBuz7GIeJZeeNFMmMBaV7DPkKblnb0sGT2axvg==
service-type telnet
authorization-attribute user-role network-admin
local-user userB class manage
password hash $h$6$q+c3OcSxrPpDpsDf$BWkgfOyxBLyR5zyYgF/+VvN/1ofy81zoHDlFf80OjDl
a6/EiSJbSBl33PeazilSkWSYcttkg5v5bGecB7oYwAw==
service-type telnet
authorization-attribute user-role roleB
#
role name roleB
rule 1 permit read feature
#
Example: Configuring login user command authorization and accounting
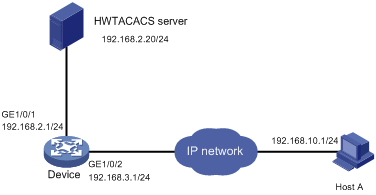
Network configuration
As shown in Figure 3, Host A needs to log in to the device to manage the device.
For device security purposes, configure the device to perform the following tasks:
· Allow Host A to Telnet in after authentication.
· Use the HWTACACS server to control the commands that the user can execute.
· Send commands executed by users to the HWTACACS server to monitor and control user operations on the device.
Analysis
To implement command authorization and accounting, you must perform the following tasks:
· Enable scheme authentication and configure a HWTACACS scheme on the device.
· Configure an account on the HWTACACS server for the Telnet user and assign commands for the user to use.
Applicable hardware and software versions
The following matrix shows the hardware and software versions to which this configuration example is applicable:
|
Hardware |
Software version |
|
S6520XE-HI switch series |
Supported in Release 11xx |
|
S5560X-EI switch series |
Supported in Release 111x |
|
S5500V2-EI switch series |
Supported in Release 111x |
|
MS4520V2-30F switch |
Supported in Release 111x |
|
S5560S-EI switch series S5560S-SI switch series |
Supported in Release 612x |
|
S5130S-HI switch series S5130S-EI switch series S5130S-SI switch series S5130S-LI switch series |
Supported in Release 612x |
|
S5120V2-SI switch series S5120V2-LI switch series |
Supported in Release 612x |
|
S3100V3-EI switch series S3100V3-SI switch series |
Supported in Release 612x |
|
S5110V2 switch series |
Supported in Release 612x |
|
S5110V2-SI switch series |
Supported in Release 612x |
|
S5000V3-EI switch series |
Supported in Release 612x |
|
S5000E-X switch series |
Supported in Release 612x |
|
WAS6000 switch series |
Supported in Release 612x |
|
E128C switch E152C switch E500C switch series E500D switch series |
Supported in Release 612x |
|
MS4520V2 switch series (except the MS4520V2-30F switch) |
Supported in Release 612x |
|
MS4320V2 switch series MS4300V2 switch series MS4320 switch series MS4200 switch series |
Supported in Release 612x |
|
WS5850-WiNet switch series |
Supported in Release 612x |
|
WS5820-WiNet switch series WS5810-WiNet switch series |
Supported in Release 612x |
Restrictions and guidelines
The command authorization function takes effect immediately after you execute the command authorization command. Before executing this command, you must complete the following tasks:
· Configure a user account on the HWTACACS server and specify the commands for the user to use.
· Configure the required HWTACACS scheme on the device.
Procedures
Configuring the HWTACACS server
In this example, the HWTACACS server runs on IMC PLAT 7.1 (E0302) and IMC EIA 7.1 (E0301).
1. Add a device area:
a. Log in to IMC.
b. Click the User tab.
c. From the navigation tree, select Device User Policy > Authorization Conditions > Device Areas.
d. Click Add.
e. Set the area name to system and click OK.
Figure 4 Adding a device area

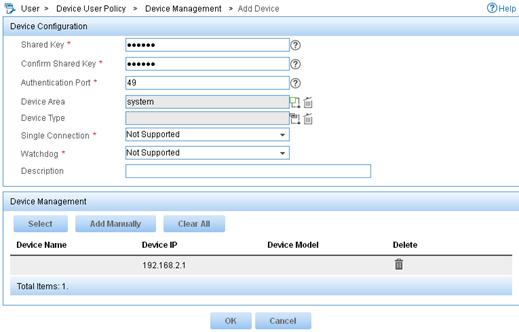
2. Add a device:
a. From the navigation tree, select Device User Policy > Device Management.
b. Click Add.
c. Enter expert for both Shared Key and Confirm Shared Key.
d. Set the authentication port to 49.
e. Select the device area system.
f. Select Not Supported for Single Connection to disable establishing multiple sessions over a single TCP connection.
g. Select Not Supported for Watchdog to disable the device from sending watchdog packets while the user is online.
h. In the Device Management area, click Add Manually.
i. Enter the IP address 192.168.2.1 and click OK.
j. Click OK.
Figure 5 Adding a device
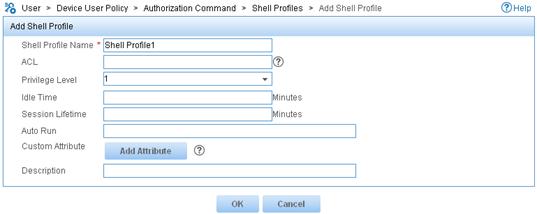
3. Add a shell profile:
a. From the navigation tree, select Device User Policy > Authorization Command > Shell Profiles.
b. Click Add.
c. Enter the profile name Shell Profile1.
d. Select the privilege Level 1.
e. Click OK.
Figure 6 Adding a shell profile
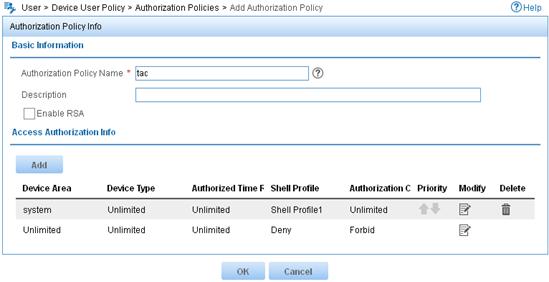
4. Add an authorization policy:
a. From the navigation tree, select Device User Policy > Authorization Policies.
b. Click Add.
c. Enter the policy name tac.
d. In the Access Authorization Info area, click Add to configure access authorization information.
e. Select system for Device Area, Unlimited for Device Type and Authorized Time Range.
f. Select the shell profile Shell Profile1.
g. Select Unlimited for Authorization Command Set and click OK.
h. Click OK.
Figure 7 Configuring access authorization information
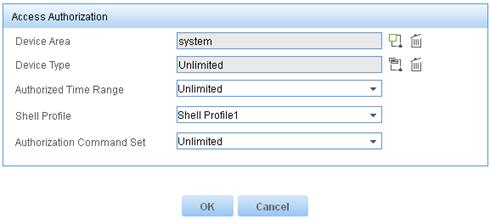
Figure 8 Adding an authorization policy
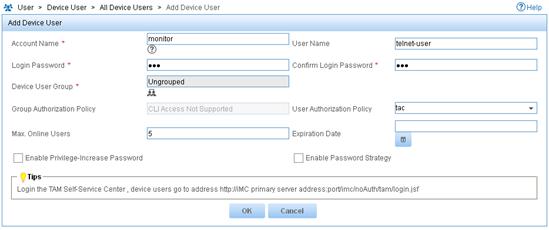
5. Add a device user:
a. From the navigation tree, select Device User > All Device Users.
b. Click Add.
c. Enter the account name monitor and username telnet-user.
d. Enter the login password 123 and confirm the password.
e. Select the user authorization policy tac.
f. Enter 5 for Max. Online Users to limit the number of online users that use the account.
g. Click OK.
Figure 9 Adding a device user
Configuring the device
# Assign IP addresses to relevant interfaces. Make sure the device and the HWTACACS server can reach each other, and the device and Host A can reach each other. (Details not shown.)
# Enable Telnet service.
<Sysname> system-view
[Sysname] telnet server enable
# Create the HWTACACS scheme tac.
[Sysname] hwtacacs scheme tac
# Configure the scheme to use the HWTACACS server at 192.168.2.20:49 for authentication, authorization, and accounting.
[Sysname-hwtacacs-tac] primary authentication 192.168.2.20 49
[Sysname-hwtacacs-tac] primary authorization 192.168.2.20 49
[Sysname-hwtacacs-tac] primary accounting 192.168.2.20 49
# Set the shared keys to expert.
[Sysname-hwtacacs-tac] key authentication simple expert
[Sysname-hwtacacs-tac] key authorization simple expert
[Sysname-hwtacacs-tac] key accounting simple expert
# Remove domain names from usernames sent to the HWTACACS server.
[Sysname-hwtacacs-tac] user-name-format without-domain
[Sysname-hwtacacs-tac] quit
# Configure the system-predefined domain system.
[Sysname] domain system
# Use the HWTACACS scheme tac for login user authentication, authorization, and accounting. Use local authentication, authorization, and accounting as the backup method.
[Sysname-isp-system] authentication login hwtacacs-scheme tac local
[Sysname-isp-system] authorization login hwtacacs-scheme tac local
[Sysname-isp-system] accounting login hwtacacs-scheme tac local
# Use the HWTACACS scheme tac for command authorization and accounting. Use local authorization as the backup command authorization method.
[Sysname-isp-system] authorization command hwtacacs-scheme tac local
[Sysname-isp-system] accounting command hwtacacs-scheme tac
[Sysname-isp-system] quit
# Create the local user monitor. Set the password to 123 (plain text).
[Sysname] local-user monitor class manage
New local user added.
[Sysname-luser-manage-monitor] password simple 123
# Assign the Telnet service type and the level-1 user role to the user. Reclaim the default user role.
[Sysname-luser-manage-monitor] service-type telnet
[Sysname-luser-manage-monitor] authorization-attribute user-role level-1
[Sysname-luser-manage-monitor] undo authorization-attribute user-role network-operator
[Sysname-luser-manage-monitor] quit
# Enable scheme authentication to use AAA to authenticate the Telnet login user.
[Sysname] line vty 0 63
[Sysname-line-vty0-63] authentication-mode scheme
# Enable command authorization and command accounting.
[Sysname-line-vty0-63] command authorization
[Sysname-line-vty0-63] command accounting
[Sysname-line-vty0-63] quit
Verifying the configuration
1. Verify the command authorization feature:
# Telnet to the device, and enter the username monitor and password 123.
C:\Documents and Settings\Administrator> telnet 192.168.2.1
******************************************************************************
* Copyright (c) 2004-2018 New H3C Technologies Co., Ltd. All rights reserved.*
* Without the owner's prior written consent, *
* no decompiling or reverse-engineering shall be allowed. *
******************************************************************************
login:monitor
Password:
<Sysname>
# Display commands available in user view and system view. Only commands permitted by the level-1 user role are displayed.
<Sysname> ?
User view commands:
display Display current system information
erase Alias for 'delete'
exit Alias for 'quit'
mtrace Configure the multicast traceroute
no Alias for 'undo'
ping Ping function
quit Exit from current command view
show Alias for 'display'
ssh2 Establish an Stelnet connection to an Stelnet server
super Switch to a user role
system-view Enter the System View
telnet Establish a telnet connection
tracert Tracert function
write Alias for 'save'
<Sysname> system-view
System View: return to User View with Ctrl+Z.
[Sysname] ?
System view commands:
access-list Alias for 'acl'
display Display current system information
end Alias for 'return'
erase Alias for 'delete'
exit Alias for 'quit'
hostname Alias for 'sysname'
logging Alias for 'info-center'
mtrace Configure the multicast traceroute
no Alias for 'undo'
ping Ping function
quit Exit from current command view
return Exit to User View
show Alias for 'display'
tracert Tracert function
write Alias for 'save'
|
|
NOTE: The mtrace command is not available on the S6520XE-HI switch series. |
2. Verify the command accounting feature:
a. Log in to IMC.
b. Click the User tab.
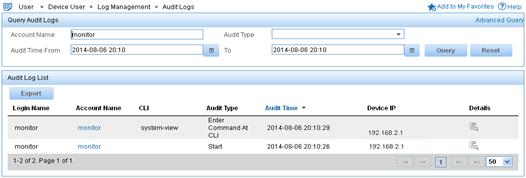
c. From the navigation tree, select Device User > Log Management > Audit Logs.
d. In the Query Audit Logs area, enter the account name monitor, select the audit time range, and click Query.
A log for user monitor shows that the user executed the system-view command.
Figure 10 Querying audit logs
e. Click the Details icon ![]() for
the log of the Start audit type.
for
the log of the Start audit type.
Figure 11 Displaying details about the log of the Start audit type

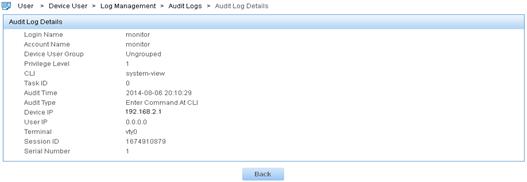
f. Click the Details icon ![]() for
the log of the Enter Command At
CLI audit type.
for
the log of the Enter Command At
CLI audit type.
Figure 12 Displaying details about the log of the Enter Command At CLI audit type
Configuration files
#
telnet server enable
#
hwtacacs scheme tac
primary authentication 192.168.2.20
primary authorization 192.168.2.20
primary accounting 192.168.2.20
key authentication cipher $c$3$Fl1Mn3wBsh+vH6otPvoz+AdE7VaNS3c0Pw==
key authorization cipher $c$3$2x6XI5xU7UGX6VqWFXNp2n3FG07uTNjiQw==
key accounting cipher $c$3$2oKsuCOAZX1+3ibvTPxnJ1YvJ1MHqv73Lw==
user-name-format without-domain
#
domain system
authentication login hwtacacs-scheme tac local
authorization login hwtacacs-scheme tac local
accounting login hwtacacs-scheme tac local
authorization command hwtacacs-scheme tac local
accounting command hwtacacs-scheme tac
#
local-user monitor class manage
password hash $h$6$5BqWnAJTpBbU5NbY$PbdgF+43eE5WMvj2iHPySfd5nGqj5AhDCDOXTiUMJvR
FFVsZaF8EW1tgpsQPRSq7SDKaGqwHTy9nsabAoGNaYg==
service-type telnet
authorization-attribute user-role level-1
#
line vty 0 63
authentication-mode scheme
user-role network-operator
idle-timeout 0 0
command authorization
command accounting
#
Example: Configuring Telnet login
Network configuration
As shown in Figure 13, users need to log in to the device remotely to manage the device.
· Configure Telnet login to enable users to Telnet to the device.
· Configure Telnet user authentication so a Telnet user must provide the correct username and password at login.
· Configure the device to send up to 20 lines to the configuration terminal at a time.
· Set the command history buffer size to 100.
· Set the maximum number of concurrent Telnet users to 10.
· Set the session idle timeout to 20 minutes.
Analysis
Telnet service is disabled by default. To enable Telnet login, you must enable Telnet service.
By default, a local user is assigned the user role network-operator. To allow the user to use all commands on the device, assign the user role network-admin to the user.
Applicable hardware and software versions
The following matrix shows the hardware and software versions to which this configuration example is applicable:
|
Hardware |
Software version |
|
S6520XE-HI switch series |
Supported in Release 11xx |
|
S5560X-EI switch series |
Supported in Release 111x |
|
S5500V2-EI switch series |
Supported in Release 111x |
|
MS4520V2-30F switch |
Supported in Release 111x |
|
S5560S-EI switch series S5560S-SI switch series |
Supported in Release 612x |
|
S5130S-HI switch series S5130S-EI switch series S5130S-SI switch series S5130S-LI switch series |
Supported in Release 612x |
|
S5120V2-SI switch series S5120V2-LI switch series |
Supported in Release 612x |
|
S3100V3-EI switch series S3100V3-SI switch series |
Supported in Release 612x |
|
S5110V2 switch series |
Supported in Release 612x |
|
S5110V2-SI switch series |
Supported in Release 612x |
|
S5000V3-EI switch series |
Supported in Release 612x |
|
S5000E-X switch series |
Supported in Release 612x |
|
WAS6000 switch series |
Supported in Release 612x |
|
E128C switch E152C switch E500C switch series E500D switch series |
Supported in Release 612x |
|
MS4520V2 switch series (except the MS4520V2-30F switch) |
Supported in Release 612x |
|
MS4320V2 switch series MS4300V2 switch series MS4320 switch series MS4200 switch series |
Supported in Release 612x |
|
WS5850-WiNet switch series |
Supported in Release 612x |
|
WS5820-WiNet switch series WS5810-WiNet switch series |
Supported in Release 612x |
Procedures
# Log in to the device through the console port. (Details not shown.)
# Change the device name and enable Telnet service.
<Sysname> system-view
[Sysname] sysname Device
[Device] telnet server enable
# Assign IP addresses to interfaces.
[Device] vlan 2
[Device-vlan2] port gigabitethernet 1/0/1
[Device-vlan2] quit
[Device] interface vlan-interface 2
[Device-Vlan-interface2] ip address 192.168.3.1 24
[Device-Vlan-interface2] quit
# Enable scheme authentication to use AAA to authenticate the Telnet login user.
[Device] line vty 0 63
[Device-line-vty0-63] authentication-mode scheme
# Configure common VTY line settings.
[Device-line-vty0-63] screen-length 20
[Device-line-vty0-63] history-command max-size 100
[Device-line-vty0-63] idle-timeout 20
[Device-line-vty0-63] quit
# Set the maximum number of concurrent Telnet users to 10.
[Device] aaa session-limit telnet 10
# Create the local user test. Set the password to test (plain text).
[Device] local-user test class manage
New local user added.
[Device-luser-manage-test] password simple test
# Assign the Telnet service type and the network-admin user role to the user. Reclaim the default user role.
[Device-luser-manage-test] service-type telnet
[Device-luser-manage-test] authorization-attribute user-role network-admin
[Device-luser-manage-test] undo authorization-attribute user-role network-operator
[Device-luser-manage-test] quit
Verifying the configuration
1. Telnet to the device from Host A, and enter the username test and password test.
If the number of online Telnet users is less than 20, you are logged in to the system.
******************************************************************************
* Copyright (c) 2004-2018 New H3C Technologies Co., Ltd. All rights reserved.*
* Without the owner's prior written consent, *
* no decompiling or reverse-engineering shall be allowed. *
******************************************************************************
login: test
Password:
<Device>
If the number of concurrent Telnet users has reached the maximum number, an error message is displayed.
C:\Users\zhangsan>telnet 192.168.3.1
Trying 192.168.3.1 ...
Press CTRL+K to abort
Connected to 192.168.3.1 ...
Failed to connect to the remote host!
2. After login, do not perform any operations within 20 minutes.
You are logged out.
******************************************************************************
* Copyright (c) 2004-2018 New H3C Technologies Co., Ltd. All rights reserved.*
* Without the owner's prior written consent, *
* no decompiling or reverse-engineering shall be allowed. *
******************************************************************************
login:
Configuration files
|
|
IMPORTANT: The port link-mode bridge command is available only on the following switches: · S6520XE-HI switch series. · S5560X-EI switch series. · S5500V2-EI switch series. · MS4520V2-30F switch. |
#
sysname Device
#
telnet server enable
#
interface Vlan-interface2
ip address 192.168.3.1 255.255.255.0
#
interface GigabitEthernet1/0/1
port link-mode bridge
port access vlan 2
#
line vty 0 63
authentication-mode scheme
user-role network-operator
idle-timeout 20 0
screen-length 20
history-command max-size 100
#
aaa session-limit telnet 10
#
local-user test class manage
password hash $h$6$/Xa6qIOrThQEVqbK$C00MPM5UaYoigaOfflWhpTskb/uB80yZ9O06tpztnDe
vrFEHqkvxfkSb4hUadHuknPSnjLNQByztfr30cP/Hlg==
service-type telnet
authorization-attribute user-role network-admin
#
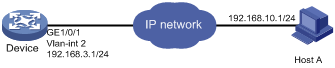
Example: Telnetting from the device to another device
Network configuration
As shown in Figure 14, the user connected to Device A needs to Telnet to Device B to manage Device B.
· Configure Telnet login to enable users to Telnet to Device A and Device B.
· Configure Telnet user authentication on Device A so a Telnet user must provide the correct username and password to log in to Device A.
· Configure access control so only Telnet users at 192.168.10.1/24 can Telnet to Device A and only Device A can Telnet to Device B.
· Configure the devices to send up to 20 lines to the configuration terminal at a time.
· Set the command history buffer size to 100.
· Set the session idle timeout to 20 minutes.

Analysis
Telnet service is disabled by default. To enable Telnet login, you must enable Telnet service.
By default, a local user is assigned the default user role network-operator. To allow the user to use all commands on the device, assign the user role network-admin to the user.
To control Telnet login, configure an ACL on each device to permit access only from the specified IP address.
Applicable hardware and software versions
The following matrix shows the hardware and software versions to which this configuration example is applicable:
|
Hardware |
Software version |
|
S6520XE-HI switch series |
Supported in Release 11xx |
|
S5560X-EI switch series |
Supported in Release 111x |
|
S5500V2-EI switch series |
Supported in Release 111x |
|
MS4520V2-30F switch |
Supported in Release 111x |
|
S5560S-EI switch series S5560S-SI switch series |
Supported in Release 612x |
|
S5130S-HI switch series S5130S-EI switch series S5130S-SI switch series S5130S-LI switch series |
Supported in Release 612x |
|
S5120V2-SI switch series S5120V2-LI switch series |
Supported in Release 612x |
|
S3100V3-EI switch series S3100V3-SI switch series |
Supported in Release 612x |
|
S5110V2 switch series |
Supported in Release 612x |
|
S5110V2-SI switch series |
Supported in Release 612x |
|
S5000V3-EI switch series |
Supported in Release 612x |
|
S5000E-X switch series |
Supported in Release 612x |
|
WAS6000 switch series |
Supported in Release 612x |
|
E128C switch E152C switch E500C switch series E500D switch series |
Supported in Release 612x |
|
MS4520V2 switch series (except the MS4520V2-30F switch) |
Supported in Release 612x |
|
MS4320V2 switch series MS4300V2 switch series MS4320 switch series MS4200 switch series |
Supported in Release 612x |
|
WS5850-WiNet switch series |
Supported in Release 612x |
|
WS5820-WiNet switch series WS5810-WiNet switch series |
Supported in Release 612x |
Procedures
Configuring Device A
# Log in to Device A through the console port. (Details not shown.)
# Change the device name and enable Telnet service.
<Sysname> system-view
[Sysname] sysname DeviceA
[DeviceA] telnet server enable
# Assign IP addresses to interfaces.
[DeviceA] vlan 3
[DeviceA-vlan3] port gigabitethernet 1/0/1
[DeviceA-vlan3] quit
[DeviceA] interface vlan-interface 3
[DeviceA-Vlan-interface3] ip address 192.168.3.2 24
[DeviceA-Vlan-interface3] quit
[DeviceA] vlan 2
[DeviceA-vlan2] port gigabitethernet 1/0/2
[DeviceA-vlan3] quit
[DeviceA] interface vlan-interface 2
[DeviceA-Vlan-interface2] ip address 192.168.10.2 24
[DeviceA-Vlan-interface2] quit
# Enable scheme authentication to use AAA to authenticate the Telnet login user.
[DeviceA] line vty 0 63
[DeviceA-line-vty0-63] authentication-mode scheme
# Configure common VTY line settings.
[DeviceA-line-vty0-63] screen-length 20
[DeviceA-line-vty0-63] history-command max-size 100
[DeviceA-line-vty0-63] idle-timeout 20
[DeviceA-line-vty0-63] protocol inbound telnet
[DeviceA-line-vty0-63] quit
# Create the local user test. Set the password to test (plain text).
[DeviceA] local-user test class manage
New local user added.
[DeviceA-luser-manage-test] password simple test
# Assign the Telnet service type and the network-admin user role to the user. Reclaim the default user role.
[DeviceA-luser-manage-test] service-type telnet
[DeviceA-luser-manage-test] authorization-attribute user-role network-admin
[DeviceA-luser-manage-test] undo authorization-attribute user-role network-operator
[DeviceA-luser-manage-test] quit
# Create ACL 2000 and add rules to permit only access from 192.168.10.1.
[DeviceA] acl basic 2000
[DeviceA-acl-basic-2000] rule 1 permit source 192.168.10.1 0
[DeviceA-acl-basic-2000] rule 2 deny source any
[DeviceA-acl-basic-2000] quit
# Apply the ACL to filter Telnet logins.
[DeviceA] telnet server acl 2000
Configuring Device B
# Log in to Device B through the console port. (Details not shown.)
# Change the device name and enable Telnet service.
<Sysname> system-view
[Sysname] sysname DeviceB
[DeviceB] telnet server enable
# Assign IP addresses to interfaces.
[DeviceB] vlan 3
[DeviceB-vlan3] port gigabitethernet 1/0/1
[DeviceB-vlan3] quit
[DeviceB] interface vlan-interface 3
[DeviceB-Vlan-interface3] ip address 192.168.3.1 24
[DeviceB-Vlan-interface3] quit
# Disable authentication for the Telnet login user.
[DeviceB] line vty 0 63
[DeviceB-line-vty0-63] authentication-mode none
# Configure common VTY line settings.
[DeviceB-line-vty0-63] screen-length 20
[DeviceB-line-vty0-63] history-command max-size 100
[DeviceB-line-vty0-63] idle-timeout 20
[DeviceB-line-vty0-63] protocol inbound telnet
[DeviceB-line-vty0-63] quit
# Create ACL 2000 and add rules to permit only access from 192.168.3.2.
[DeviceB] acl basic 2000
[DeviceB-acl-basic-2000] rule 1 permit source 192.168.3.2 0
[DeviceB-acl-basic-2000] rule 2 deny source any
[DeviceB-acl-basic-2000] quit
# Apply the ACL to filter Telnet logins.
[DeviceB] telnet server acl 2000
Verifying the configuration
1. Telnet to Device A from Host A and enter the username test and password test.
You are logged in to the system.
******************************************************************************
* Copyright (c) 2004-2018 New H3C Technologies Co., Ltd. All rights reserved.*
* Without the owner's prior written consent, *
* no decompiling or reverse-engineering shall be allowed. *
******************************************************************************
login: test
Password:
<DeviceA>
If you use another host to Telnet to Device A, your access request is rejected.
C:\Users\zhangsan>telnet 192.168.10.2
Trying 192.168.10.2 ...
Press CTRL+K to abort
Connected to 192.168.10.2 ...
Failed to connect to the remote host!
2. After login, do not perform any operations in 20 minutes.
You are logged out.
******************************************************************************
* Copyright (c) 2004-2018 New H3C Technologies Co., Ltd. All rights reserved.*
* Without the owner's prior written consent, *
* no decompiling or reverse-engineering shall be allowed. *
******************************************************************************
login:
3. Telnet from Device A to Device B.
You are logged in to the system.
<DeviceA> telnet 192.168.3.1
Trying 192.168.3.1 ...
Press CTRL+K to abort
Connected to 192.168.3.1 ...
******************************************************************************
* Copyright (c) 2004-2018 New H3C Technologies Co., Ltd. All rights reserved.*
* Without the owner's prior written consent, *
* no decompiling or reverse-engineering shall be allowed. *
******************************************************************************
<DeviceB>
If you use another host or device to Telnet to Device B, your access request is rejected.
[Telnet error. Number: 10061 Description: Connect method failed. No connection could be made because the target machine actively refused it. This usually results from trying to connect to a service that is inactive on the foreign host
- i.e. one with no server application running.]
4. After login, do not perform any operations within 20 minutes.
You are logged out.
Configuration files
|
|
IMPORTANT: The port link-mode bridge command is available only on the following switches: · S6520XE-HI switch series. · S5560X-EI switch series. · S5500V2-EI switch series. · MS4520V2-30F switch. |
· Device A:
#
sysname DeviceA
#
telnet server enable
telnet server acl 2000
#
interface Vlan-interface2
ip address 192.168.10.2 255.255.255.0
#
interface Vlan-interface3
ip address 192.168.3.2 255.255.255.0
#
interface GigabitEthernet1/0/1
port link-mode bridge
port access vlan 3
#
interface GigabitEthernet1/0/2
port link-mode bridge
port access vlan 2
#
line vty 0 63
authentication-mode scheme
user-role network-operator
protocol inbound telnet
idle-timeout 20 0
screen-length 20
history-command max-size 100
#
acl basic 2000
rule 1 permit source 192.168.10.1 0
rule 2 deny source any
#
local-user test class manage
password hash $h$6$V5dw8qzFDLAOmDzx$upf9K29n110G6OGdSXI0t69IoE5eot/Qh9Iuv/hptq6
2vxUq3867QbUBzmc6/hHwIfVQcDC8gVWpGvDQWXQTSQ==
service-type telnet
authorization-attribute user-role network-admin
#
· Device B:
#
sysname DeviceB
#
telnet server enable
telnet server acl 2000
#
interface Vlan-interface3
ip address 192.168.3.1 255.255.255.0
#
interface GigabitEthernet1/0/1
port link-mode bridge
port access vlan 3
#
line vty 0 63
authentication-mode none
user-role network-operator
protocol inbound telnet
idle-timeout 20 0
screen-length 20
history-command max-size 100
#
acl basic 2000
rule 1 permit source 192.168.3.2 0
rule 2 deny source any
#