- Table of Contents
-
- H3C S9500 Operation Manual-Release1648[v1.24]-08 System Volume
- 00-1Cover
- 01-Command Line Interface Configuration
- 02-Login and User Interface Configuration
- 03-FTP and TFTP Configuration
- 04-HA Configuration
- 05-NQA Configuration
- 06-NetStream Configuration
- 07-NTP Configuration
- 08-RMON Configuration
- 09-SNMP Configuration
- 10-Packet Statistics Accounting Configuration
- 11-Device Management Configuration
- 12-Configuration File Management Configuration
- 13-File System Management Configuration
- 14-Cluster Management Configuration
- 15-System Maintenance and Debugging Configuration
- 16-Information Center Configuration
- 17-PoE Configuration
- 18-Clock Module Configuration
- 19-ACSEI Server Configuration
- 20-OAP Module Configuration
- Related Documents
-
| Title | Size | Download |
|---|---|---|
| 09-SNMP Configuration | 103.97 KB |
Table of Contents
1.1.2 SNMP Versions and Supported MIB
1.2.2 Setting the System Information
1.2.3 Enabling SNMP Agent to Send Traps
1.2.4 Setting the Destination Address of Trap
1.2.5 Setting Lifetime of Trap Message
1.2.6 Setting the Engine ID of a Local Device
1.2.8 Setting the Source Address of Trap
1.2.9 Adding a User to an SNMP Group
1.2.10 Creating/Updating View Information
1.2.11 Setting the Size of the SNMP Packet Sent/Received by an Agent
1.2.13 Extending the Standard linkUp/linkDown Traps
1.3 Displaying and Debugging SNMP
1.4 SNMP Configuration Examples
1.4.1 Common SNMP Configuration Example
1.4.2 Configuration Example for Private Network Support
Chapter 1 SNMP Configuration
When configuring SNMP, go to these sections for information you are interested in:
l Displaying and Debugging SNMP
1.1 SNMP Overview
1.1.1 Introduction to SNMP
By far, Simple Network Management Protocol (SNMP) has gained the most extensive application in the computer networks. SNMP has been put into use and widely accepted as an industry standard in practice. It is used for ensuring the transmission of the management information between any two nodes. In this way, network administrators can easily search and modify the information on any node on the network. In the meantime, they can locate faults promptly and implement the fault diagnosis, capacity planning and report generating. SNMP adopts the polling mechanism and provides the most basic function set. It is most applicable to the small-sized, fast-speed and low-cost environment. It only requires the unverified transport layer protocol UDP; and is thus widely supported by many other products.
In terms of structure, SNMP can be divided into two parts, namely, Network Management Station and Agent. Network Management Station is the workstation for running the client program. At present, the commonly used NM platforms include Sun NetManager and IBM NetView. Agent is the server software operated on network devices. Network Management Station can send GetRequest, GetNextRequest and SetRequest messages to the Agent. Upon receiving the requests from the Network Management Station, Agent will perform Read or Write operation according to the message types, generate and return the Response message to Network Management Station. On the other hand, Agent will send Trap message on its own initiative to the Network Management Station to report the events whenever the device encounters any abnormalities such as restart.
1.1.2 SNMP Versions and Supported MIB
To uniquely identify the management variables of a device in SNMP messages, SNMP adopts the hierarchical naming scheme to identify the managed objects. It is like a tree. A tree node represents a managed object, as shown in the figure below. Thus the object can be identified with the unique path starting from the root.
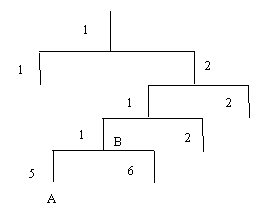
Figure 1-1 Architecture of the MIB tree
The MIB (Management Information Base) is used to describe the hierarchical architecture of the tree and it is the set defined by the standard variables of the monitored network device. In the above figure, the managed object B can be uniquely specified by a string of numbers {1.2.1.1}. The number string is the Object Identifier of the managed object.
The current SNMP Agent of switch supports SNMP V1, V2C and V3. The MIBs supported are listed in the following table.
Table 1-1 MIBs supported by the switch
|
MIB attribute |
MIB content |
References |
|
Public MIB |
MIB II based on TCP/IP network device |
RFC1213 |
|
BRIDGE MIB |
RFC1493 |
|
|
RFC2675 |
||
|
RIP MIB |
RFC1724 |
|
|
RMON MIB |
RFC2819 |
|
|
Ethernet MIB |
RFC2665 |
|
|
OSPF MIB |
RFC1253 |
|
|
IF MIB |
RFC1573 |
|
|
Private MIB |
DHCP MIB |
— |
|
QACL MIB |
— |
|
|
ADBM MIB |
— |
|
|
RSTP MIB |
— |
|
|
VLAN MIB |
— |
|
|
Device management |
— |
|
|
Interface management |
— |
1.2 Configuring SNMP
The following sections describe the SNMP configuration tasks.
l Setting the System Information
l Enabling SNMP Agent to Send Trap
l Setting the Destination Address of Trap
l Setting Lifetime of Trap Message
l Setting the Engine ID of a Local Device
l Setting the Source Address of Trap
l Adding a User to an SNMP Group
l Creating/Updating View Information
l Setting the Size of the SNMP Packet Sent/Received by an Agent
l Extending the Standard linkUp/linkDown Traps
1.2.1 Setting Community Names
l SNMP V1 and SNMPV2C adopt the community name authentication scheme. SNMP Community is named with a character string, which is called community name. SNMP community name defines the relationship between SNMP manager and SNMP agent. The community name functions like a password, that is, it controls the access of the SNMP manager to the SNMP agent. You can choose to specify one or more community name-related features: Define MIB views of all the accessible MIB subsets.
l Define the read-only or read-write access mode of the community name to the MIB. The community with read-only authority can only query the device information, whereas the community with read-write authority can also configure the device.
Perform the following configuration in system view:
|
To do… |
Use the command… |
|
Set the community name and the access authority |
snmp-agent community { read | write } community-name [ [ mib-view-view-name ] [ acl acl-list ] ] |
|
Remove the community name and the access authority |
undo snmp-agent community community-name |
1.2.2 Setting the System Information
System information includes the ID and the contact method of the administrator, the location of the switch and the version of the SNMP.
The ID and the contact method of the administrator is a character string describing the contact information used for the system maintenance. Through this information, the device maintenance staffs can obtain the manufacturer information of the device so as to contact the manufacturer in case the device is in trouble. You can use the following command to set the contact information.
The location information of the switch is a management variable of the system group in MIB, which represents the location of the managed device.
Perform the following configuration in system view:
|
To do… |
Use the command… |
|
Set the system information |
snmp-agent sys-info { contact sysContact | location sysLocation | version { { v1 | v2c | v3 }* | all } } |
|
Restore the default information |
undo snmp-agent sys-info { { contact | location }* | version { { v1 | v2c | v3 }* | all } } |
By default, the contact information for system maintenance is "Hangzhou H3C Technologies Co., Ltd.", the physical location information is " Hangzhou, China", and the version is SNMPv1, SNMPv2c, and SNMPv3.
1.2.3 Enabling SNMP Agent to Send Traps
The managed device transmits traps without request to the Network Management Station to report some critical and urgent events (such as restart).
You can use the following commands to enable or disable the managed device to send trap messages.
Perform the following configuration in corresponding views.
By default, the current port or VLAN interface sends trap messages.
1.2.4 Setting the Destination Address of Trap
You can use the following commands to set or delete the destination address of the trap.
Perform the following configuration in system view.
|
To do… |
Use the command… |
|
Set the destination address of trap |
snmp-agent target-host trap address udp-domain host-addr [ udp-port udp-port-number ] params securityname securityname [ v1 | v2c | v3 [ authentication | privacy ] ] |
|
Delete the destination address of trap |
undo snmp-agent target-host host-addr securityname securityname |
1.2.5 Setting Lifetime of Trap Message
You can use the following command to set lifetime of Trap message. Trap message that exists longer than the set lifetime will be dropped.
Perform the following configuration in system view.
|
To do… |
Use the command… |
|
Set lifetime of Trap message |
snmp-agent trap life seconds |
|
Restore lifetime of Trap message |
undo snmp-agent trap life |
By default, the lifetime of Trap message is 120 seconds.
1.2.6 Setting the Engine ID of a Local Device
You can use the following commands to set the engine ID of a local device.
Perform the following configuration in system view.
|
To do… |
Use the command… |
|
Set the engine ID of the device |
snmp-agent local-engineid engineid |
|
Restore the default engine ID of the device. |
undo snmp-agent local-engineid |
The engine ID of the device can be IP address, MAC address or self-defined text. It defaults to the enterprise number + the device information.
1.2.7 Setting an SNMP Group
You can use the following commands to set or delete an SNMP group.
Perform the following configuration in system view.
|
To do… |
Use the command… |
|
Set an SNMP group |
snmp-agent group { v1 | v2c } group-name [ read-view read-view ] [ write-view write-view ] [ notify-view notify-view ] [ acl acl-list ] snmp-agent group v3 group-name [ authentication | privacy ] [ read-view read-view ] [ write-view write-view ] [notify-view notify-view ] [ acl acl-list ] |
|
Delete an SNMP group |
undo snmp-agent group { v1 | v2c } group-name undo snmp-agent group v3 group-name [ authentication | privacy ] |
1.2.8 Setting the Source Address of Trap
You can use the following commands to set or remove the source address of the trap.
Perform the following configuration in system view.
|
To do… |
Use the command… |
|
Set the Source Address of Trap |
snmp-agent trap source interface-type interface-number |
|
Remove the source address of trap |
undo snmp-agent trap source |
1.2.9 Adding a User to an SNMP Group
You can use the following commands to add or delete a user to/from an SNMP group.
Perform the following configuration in system view.
|
To do… |
Use the command… |
|
Add a user to an SNMP group |
snmp-agent usm-user { v1 | v2c } username groupname [ acl acl-list ] snmp-agent usm-user v3 username groupname [ authentication-mode { md5 | sha } authpassstring [ privacy-mode { des56 privpassstring } ] ] [ acl acl-list ] |
|
Delete a user from an SNMP group |
undo snmp-agent usm-user { v1 | v2c } username groupname undo snmp-agent usm-user v3 username groupname { local | engineid engine-id } |
You must first configure the SNMP engine ID before configuring the remote user for an agent, because the engine ID is required during the authentication. If you forget to configure the engine ID before adding a user, the operation of adding this user will fail.
For SNMPv1 and v2c, this operation is adding a new community name, while for SNMPv3, this operation is adding a user for an SNMP group.
1.2.10 Creating/Updating View Information
Perform the following configuration in system view.
|
To do… |
Use the command… |
|
Create/Update view information |
snmp-agent mib-view { included | excluded } view-name oid-tree |
|
Delete a view |
undo snmp-agent mib-view view-name |
1.2.11 Setting the Size of the SNMP Packet Sent/Received by an Agent
You can use the following commands to set the size of SNMP packet sent/received by an agent.
Perform the following configuration in system view.
|
To do… |
Use the command… |
|
Set the size of the SNMP packet sent/received by an agent |
snmp-agent packet max-size byte-count |
|
Restore the default size of the SNMP packet sent/received by an agent |
undo snmp-agent packet max-size |
The agent can receive/send the SNMP packets of the sizes ranging from 484 to 17940, measured in bytes. By default, the size of an SNMP packet is 2000 bytes.
1.2.12 Disabling SNMP Agent
To disable SNMP Agent, perform the following configuration in system view.
|
To do… |
Use the command… |
|
Disable SNMP agent |
undo snmp-agent |
If users disable SNMP Agent, it will be enabled whatever snmp-agent command is configured thereafter.
1.2.13 Extending the Standard linkUp/linkDown Traps
Follow these steps to extend the stand linkup/down traps:
|
To do… |
Use the command… |
Remarks |
|
Extend the standard linkUp/linkDown traps |
snmp-agent trap ifmib link extended |
Available in system view |
|
Disable the extension of the standard linkUp/linkDown traps |
undo snmp-agent trap ifmib link extended |
Available in system view |
After this command is configured, an extended linkUp/linkDown trap is the standard linkUp/linkDown trap defined in RFC appended with the interface description and interface type information.
![]() Caution:
Caution:
Not all NMSs can process the extended trap messages correctly. By default, the device sends traps whose format is consistent with that defined in the standard IF-MIB. This command is available only when the NMS used supports the extended trap.
1.3 Displaying and Debugging SNMP
|
To do… |
Use the command… |
Remarks |
|
Display the statistics information about SNMP packets |
display snmp-agent statistics |
Available in any view |
|
Display the engine ID of the active device |
display snmp-agent local-engineid |
Available in any view |
|
Display the group name, the security mode, the states for all types of views, and the storage mode of each group of the switch. |
display snmp-agent group [ group-name ] |
Available in any view |
|
Display SNMP user information in the group user table |
display snmp-agent usm-user [ engineid engineid | group groupname | username username ]* |
Available in any view |
|
Display the current community name |
display snmp-agent community [ read | write ] |
Available in any view |
|
Display the current MIB view |
display snmp-agent mib-view [ exclude | include | { viewname mib-view } ] |
Available in any view |
|
Display the contact character strings, location character strings, and the SNMP version of the system |
display snmp-agent sys-info [ contact | location | version ]* |
Available in any view |
1.4 SNMP Configuration Examples
1.4.1 Common SNMP Configuration Example
I. Network requirements
Network Management Station and the switch are connected through the Ethernet. The IP address of Network Management Station is 129.102.149.23 and that of the VLAN interface on the switch is 129.102.0.1. Perform the following configurations on the switch: setting the community name and access authority, administrator ID, contact and switch location, and enabling the switch to send trap packets.
II. Network diagram

Figure 1-2 Network diagram for SNMP configuration
III. Configuration procedure
# Enter the system view.
<H3C> system-view
# Set the community name, group and user.
[H3C] snmp-agent sys-info version all
[H3C] snmp-agent community read public
[H3C] snmp-agent mib include internet 1.3.6.1
[H3C] snmp-agent group v3 managev3group write internet
[H3C] snmp-agent usm v3 managev3user managev3group
# Set VLAN-interface 2 as the interface for network management. Add port GigabitEthernet 2/1/3 to VLAN 2. This port will be used for network management. Set the IP address of VLAN-interface 2 as 129.102.0.1.
[H3C] vlan 2
[H3C-vlan2] port gigabitethernet 2/1/3
[H3C-vlan2] interface vlan 2
[H3C-Vlan-interface2] ip address 129.102.0.1 255.255.0.0
# Enable SNMP agent to send the trap to network management station whose IP address is 129.102.149.23. The SNMP community is public.
[H3C] snmp-agent trap enable standard authentication
[H3C] snmp-agent trap enable standard coldstart
[H3C] snmp-agent trap enable standard linkup
[H3C] snmp-agent trap enable standard linkdown
[H3C] snmp-agent target-host trap address udp-domain 129.102.149.23 udp-port 5000 params securityname public
# Configure network management system
The PC on which the network management resides requires for login configuration. As for Mib-Browser, the login configuration is as follows: SNMPv1/v2c logs in using the default community name public, and the SNMPv3 logs in using managev3user.
The switch supports iManager Quidview NMS. Users can query and configure the switch through the network management system. For details, see the manuals for the network management products.
1.4.2 Configuration Example for Private Network Support
I. Network requirements
l As shown in Figure 1-3, the VLAN to which PC belongs is in a private network. You manage the switches S9500A and S9500B using the network management software Quidview on PC;
l S9500A acts as a host. On S9500A, configure a static route to PC in the public network, and configure the static routes to the loopback interface and other devices to be managed in the private network;
l On S9500B, configure the routes to PC and the loopback interface on S9500A through a routing protocol or configure the static routes to them;
l It is required to implement: PC can manage S9500A and S9500B through SNMP in the private network.
II. Network diagram

Figure 1-3 Network diagram for SNMP private network support
III. Configuration procedure
1) Configure S9500A
# Configure the loopback interface and a VLAN interface.
<S9500A> system-view
[S9500A] interface loopback 0
[S9500A-LoopBack0] ip address 1.1.1.1 32
[S9500A-LoopBack0] quit
[S9500A] vlan 10
[S9500A-vlan10] port Ethernet 3/1/2
[S9500A-vlan10] interface vlan-interface 10
[S9500A-Vlan-interface10] ip address 10.0.0.1 24
[S9500A-Vlan-interface10] quit
# Create a VPN instance, create a VLAN and bind it with the private network.
[S9500A] ip vpn-instance vpna
[S9500A-vpn-vpna] route-distinguisher 100:1
[S9500A-vpn-vpna] vpn-target 100:1 both
[S9500A-vpn-vpna] quit
[S9500A] vlan 172
[S9500A-vlan172] port Ethernet 3/1/1
[S9500A-vlan172] interface vlan-interface 172
[S9500A-Vlan-interface172] ip binding vpn-instance vpna
[S9500A-Vlan-interface172] ip address 172.16.0.1 24
[S9500A-Vlan-interface172] quit
# Configure static routes.
[S9500A] ip route-static 172.16.0.2 255.255.255.255 vpn-instance vpna 172.16.0.2 preference 1
[S9500A] ip route-static vpn-instance vpna 1.1.1.1 255.255.255.255 10.0.0.2 public preference 1
[S9500A] ip route-static vpn-instance vpna 2.2.2.2 255.255.255.255 10.0.0.2 public preference 1
# Configure SNMP, and set the trap source address.
[S9500A] snmp-agent
[S9500A] snmp-agent local-engineid 800007DB000FE21E44486877
[S9500A] snmp-agent community write private
[S9500A] snmp-agent community read public
[S9500A] snmp-agent sys-info version all
[S9500A] snmp-agent target-host trap address udp-domain 172.16.0.2 params securityname public
[S9500A] snmp-agent trap enable ldp
[S9500A] snmp-agent trap enable configuration
[S9500A] snmp-agent trap enable system
[S9500A] snmp-agent trap enable standard
[S9500A] snmp-agent trap enable lsp
[S9500A] snmp-agent trap enable vrrp
[S9500A] snmp-agent trap enable ospf
[S9500A] snmp-agent trap enable bgp
[S9500A] snmp-agent trap enable flash
[S9500A] snmp-agent trap source LoopBack0
2) Configure S9500B
# Configure the loopback interface and a VLAN interface.
<S9500B> system-view
[S9500B] interface loopback 0
[S9500B-LoopBack0] ip address 2.2.2.2 32
[S9500B-LoopBack0] quit
[S9500B] vlan 10
[S9500B-vlan10] port Ethernet 2/1/1
[S9500B-vlan10] interface vlan-interface 10
[S9500B-Vlan-interface10] ip address 10.0.0.2 24
[S9500B-Vlan-interface10] quit
# Configure the static routes to S9500A and PC.
[S9500B] ip route-static 172.16.0.2 255.255.255.255 10.0.0.1 preference 1
[S9500B] ip route-static 1.1.1.1 255.255.255.255 10.0.0.1 preference 1
# Configure SNMP, and set the trap source address.
[S9500B] snmp-agent
[S9500B] snmp-agent local-engineid 800007DB000FE21E44486877
[S9500B] snmp-agent community write private
[S9500B] snmp-agent community read public
[S9500B] snmp-agent sys-info version all
[S9500B] snmp-agent target-host trap address udp-domain 172.16.0.2 params securityname public
[S9500B] snmp-agent trap enable ldp
[S9500B] snmp-agent trap enable configuration
[S9500B] snmp-agent trap enable system
[S9500B] snmp-agent trap enable standard
[S9500B] snmp-agent trap enable lsp
[S9500B] snmp-agent trap enable vrrp
[S9500B] snmp-agent trap enable ospf
[S9500B] snmp-agent trap enable bgp
[S9500B] snmp-agent trap enable flash
[S9500B] snmp-agent trap source LoopBack0
